Search the Community
Showing results for tags 'filter'.
-
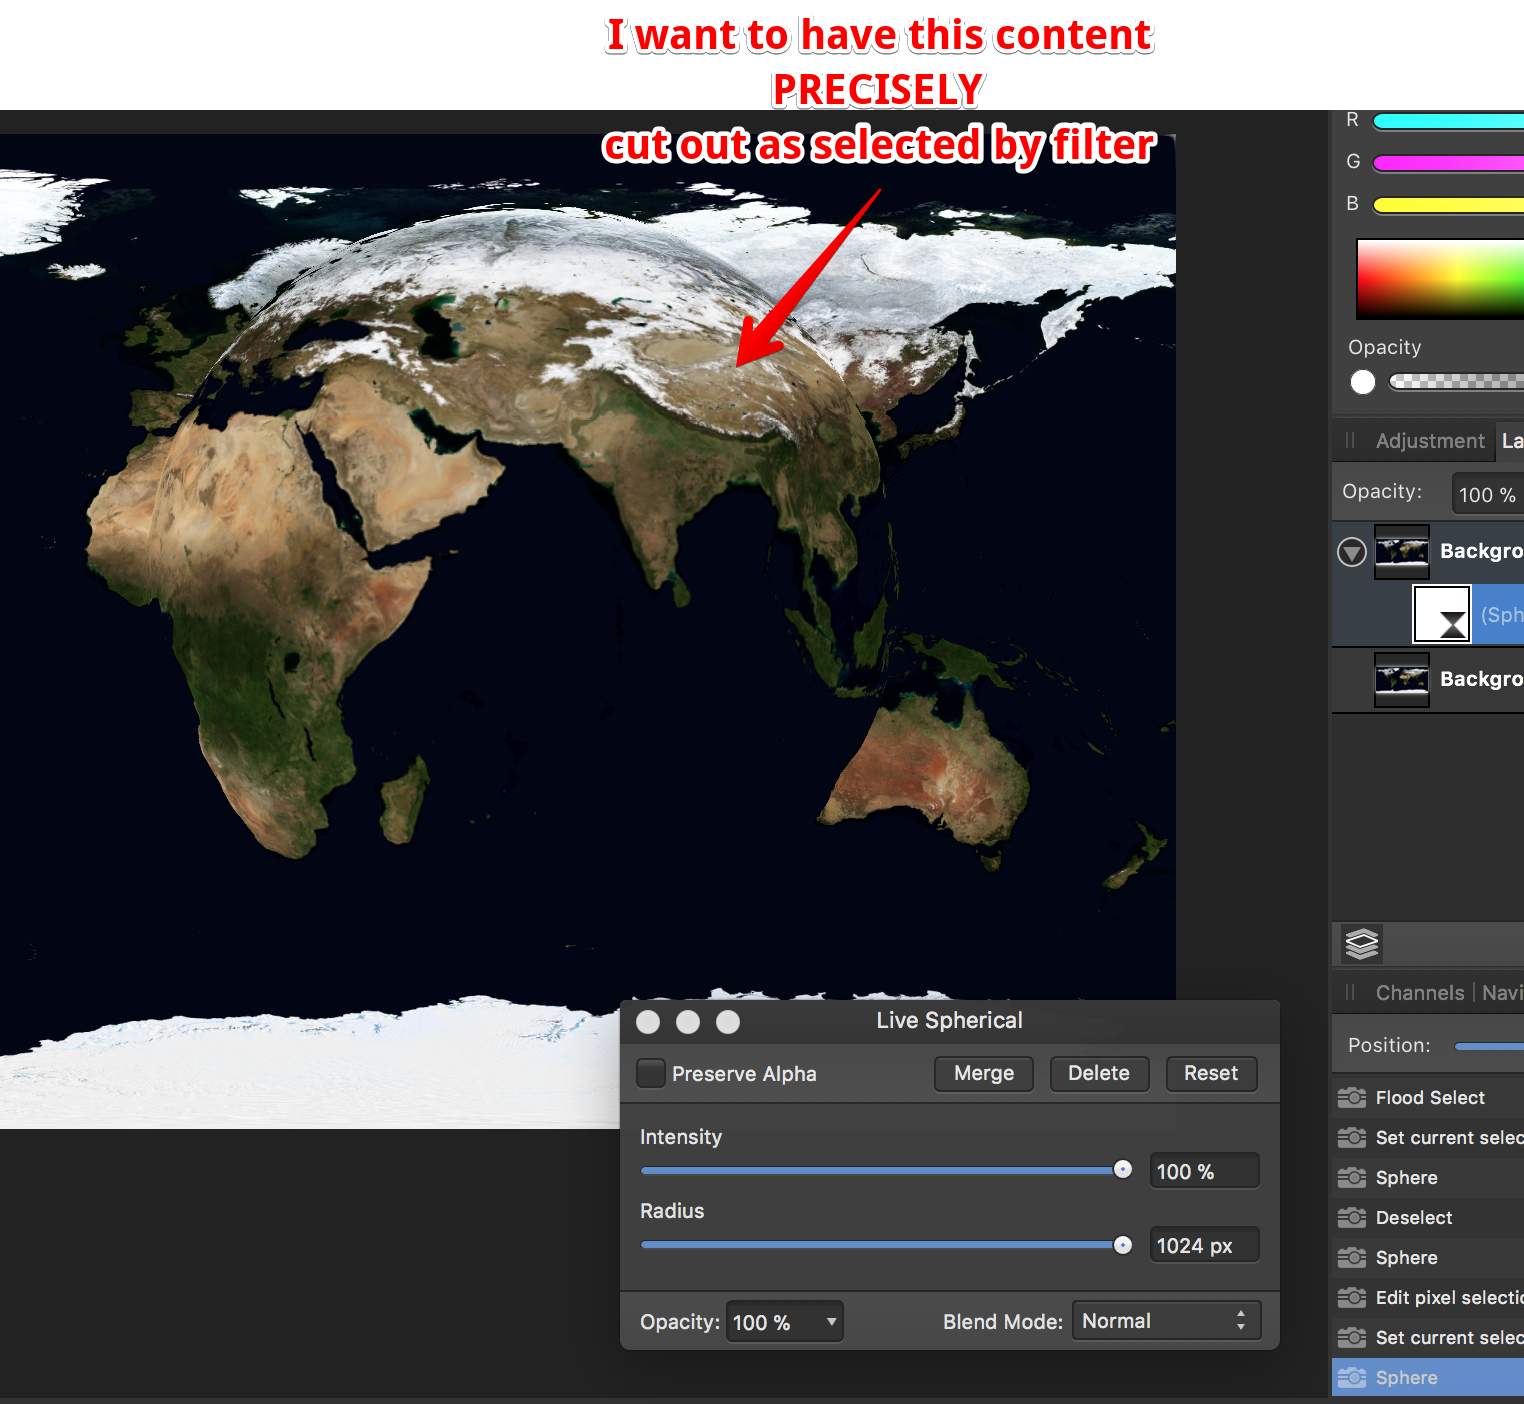
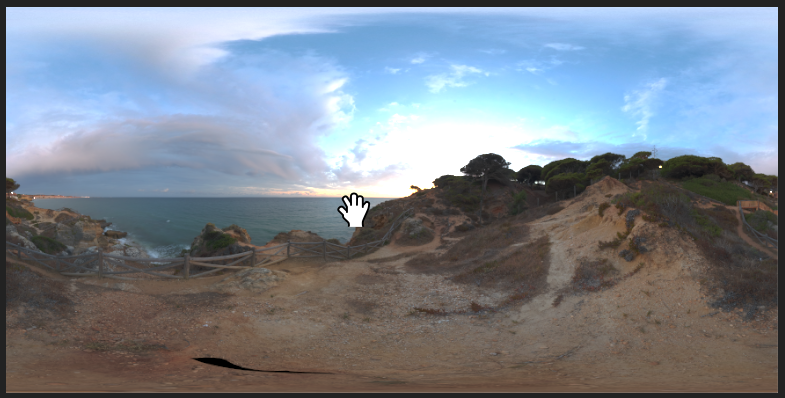
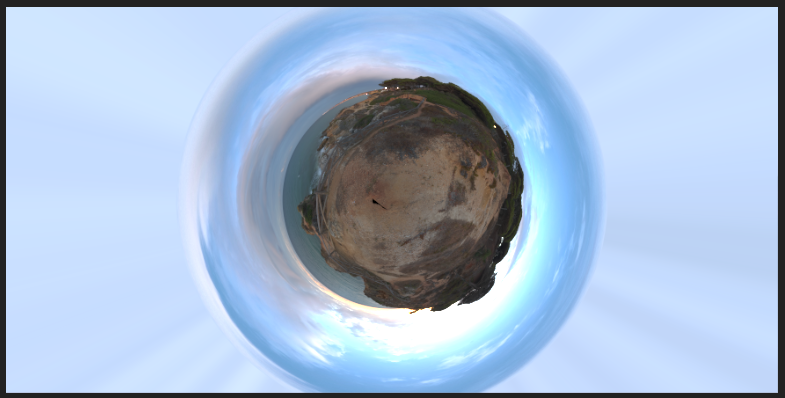
 How do I cut out precisely (!!!) the range I selected with the distortion filter "Sphere" - no matter live or destructive. I tried everything, giving up... FYC: if I make a circle selection first, I never get the range spherized I want to... Why is this filter limited to 1024 pixels??? Thanks for all reply in advance
-
Here's a set of traditional lens filters turned into a swatch. Includes solid colours and gradients. Hex values for colours taken from here: https://www.dpreview.com/forums/post/26765086 Installation: Click on Swatches (in tab next to Colour panel) Click on little box with lines in top right corner. Click Import Palette, then Application Palette, then find the file you have downloaded. Typical usage: Add new pixel layer (Layer/New Layer) Click on Swatches (in tab next to Colour panel) Click on drop-down and select Traditional Filters Click on desired colour filter (hover over colours to see the name) If you clicked on a gradient, click on Gradient tool in left hand toolbar and drag over image to paint in gradient. Reduce layer Opacity (often to fairly low) Optionally set Blend Mode (typically to Overlay) To limit the extent of the filter, add a mask to the pixel layer (Layer/New Mask Layer) and paint out unwanted area with black. To save file size with solid colours, you can use the Lens Filter adjustment Layer/New Adjustment Layer/Lenst Filter Adjustment. Click on Filter Colour, then top drop-down to get Swatches then second drop-down to select Traditional Filters. Click on chosen colour and adjust with Optical Density slider. To save file size with gradients, instead of using pixel layer: Select rectangle in left hand tool bar and drag to cover whole image. Grab corners and adust as needed. In top context bar, click on Fill, then Swatches, then drop-down to select Traditional Filters, then the gradient you want. Hit Esc on keyboard to dismiss drop-down. Click on Gradient tool in left hand tool menu, then click-drag to draw on image. Adjust with layer Opacity (often fairly low). Optionally set Blend Mode (typically to Overlay). Traditional Filters.afpalette
-
Dear Friends, I haven't used Affinity for a couple of months and I cannot find any more the 4-5 ready made filters from normal to sharp and sharper pictures. I have looked for it everywhere but cannot find the way any longer. sorry I am new in this program and still training. thank you! Enjoy Affinity! Mauj
-
 Another question comes to mind as I try to find a way to emulate as closely as possible in Photo the workflow I'm used to in PS: PS remembers most user settings, and it seems that Photo does not. For example, if I call up the High Pass filter in PS, it remembers the Radius value I used last time. Photo always seem to go back to its default value (zero pixel), thus making the user adjust the slider or type in the value again every time... Would there be a way to set Photo so that it remembers such things, or is that a feature to request? Many thanks in advance.
 -
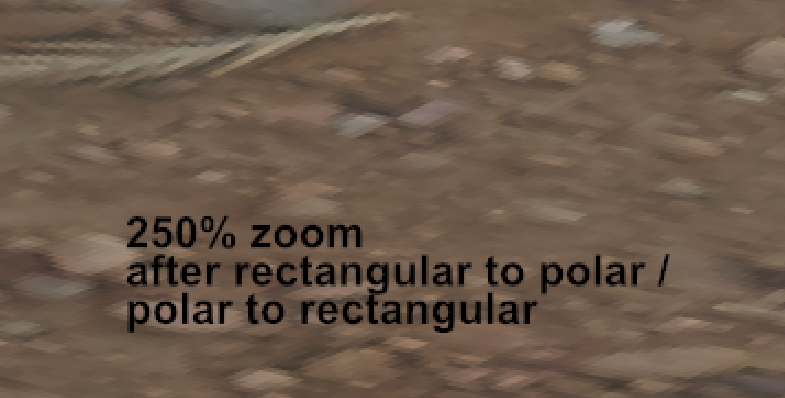
 Hello, First of all I have to say thank you for doing an alternative to photoshop (and illustrator) it is more than welcome! I am doing some 14k hdri panorama editing at the moment and found some things which unfortunately work not as well as in photoshop yet. Maybe there is a way to fix them!? The process: To get rid of the tripod in the picture it is necessary to do some clone stamping. So what you do is flipping the image vertically and then use the rectangular to polar filter to unstretch the floor. after clone stamping you use the polar to rectangular filter and flip the image vertically another time. The Problems: - after using the polar to rectangular filter the top of the image does a weird stretching (photoshop doesn't do that) what I do to avoid this is just making a mask and only paint in the edited (clone stamped) parts. Unfortunately the second problem is bigger: - after using the polar to rectangular filter the image is unsharp and has a weird jpeg like artifact pattern. First Problem (Stretching in the top of the image) Second Problem (Unsharp Artifacts) It looks similar to the artifacts in the following post: https://forum.affinity.serif.com/index.php?/topic/16741-rectangular-to-polar-good-results/ Thanks!
-
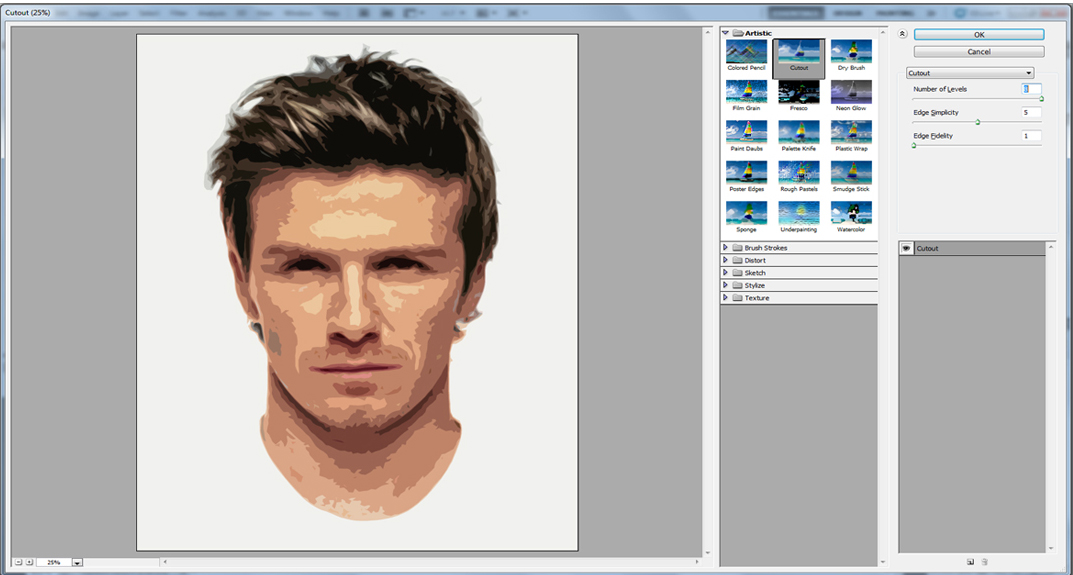
 I want to convert to mac and need a program such as yours. At present I use PS10. I need a filter simular or equal to the one in PS ie: Filter---> Artistic ----> Cutout This filter makes a photo look as if one has cutout pieces of paper to make a photo using a reduced pallat of color. Is this achieavable in Affinity photo ---- Regards, drawde simular to attached jpeg.
-
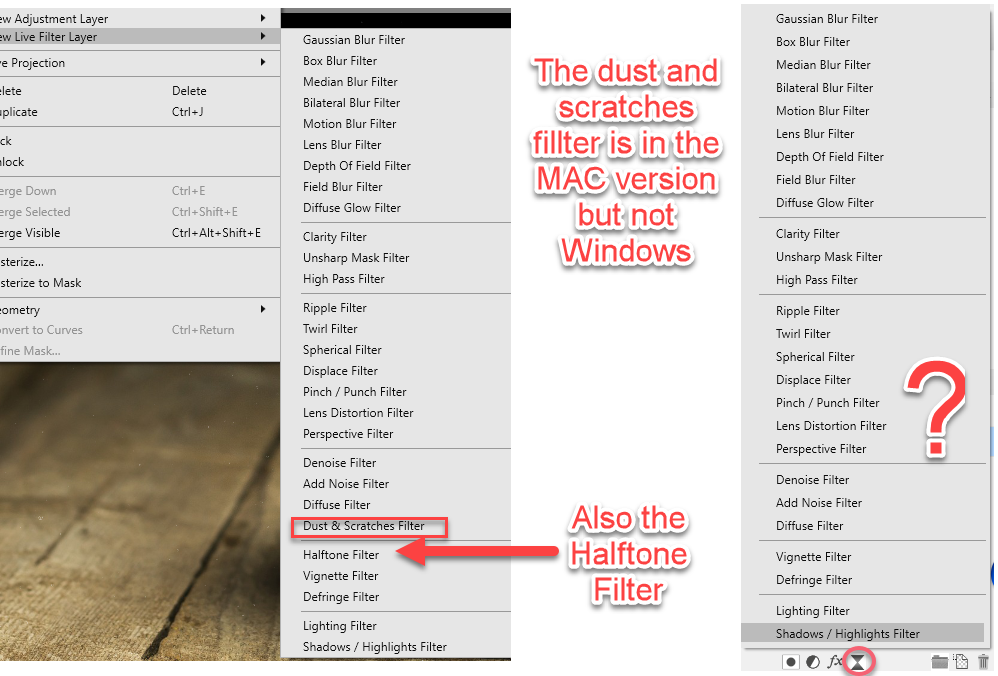
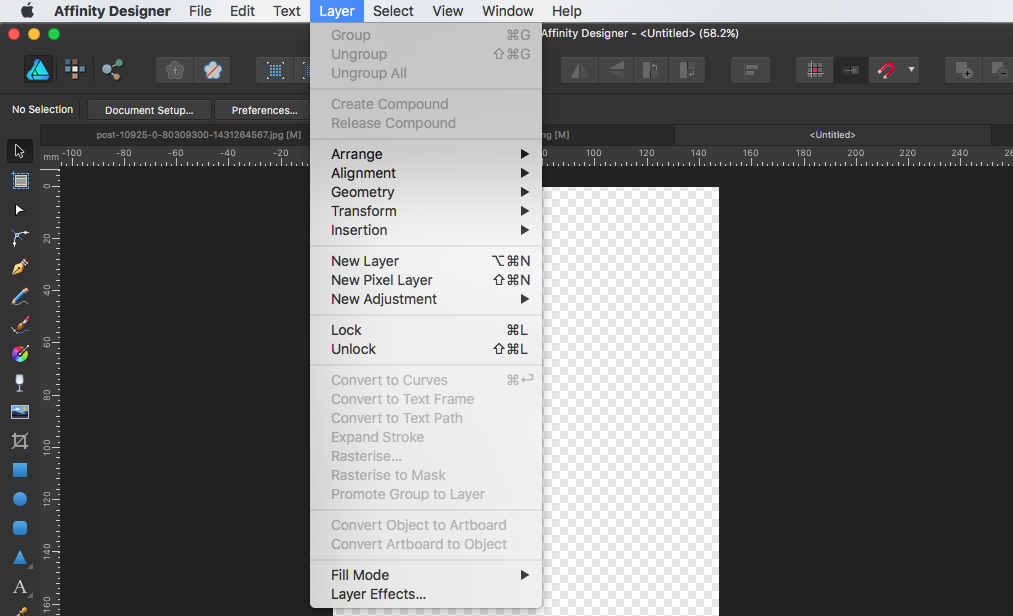
If you choose a filter via the menu Filters / New Live filter layer you get a complete list of live filters. If you use the drop down below the Layers module the list is missing 2 items Confirmations?
-
Hello, Just got Affinity Photo for iPad. Great app, thank you very much. I was wondering if there was any plans to create a Wave distortion filter, like Adobe Photoshop has. You can see an example of the Photoshop Wave filter in action right here: https://youtu.be/1CcdLwCRuQ0 You can create really cool glitch effects with this Photoshop filter. As a creator of glitch art I would love to see this added to Affinity Photo. I also think it would bring a lot of new users to Affinity Photo. Thank you.
-
 I was trying to follow a Photoshop tutorial on creating clouds and found that, in Affinity, Perlin Noise should do this for me. I created an empty file 800 by 800 px, RGB/8bit and set the foreground/background to black/white. I then duplicated it to create an editable layer. I then selected Filter>Noise>Perlin noise. No matter what I did to the parameters there was no effect on my image. It remained white. I did click on Apply! I have also tried to do the same with a 50% grey image, to no avail. What should I be doing?
 -
 So when are the live filter grid lines going away?
 -
 Hi all, I just want to apply a color filter to an image with Affinity Photo to get something like this: : I´ve watched this video but I don´t know neither how to change the color of the filter nor this is the right approach to do it: Many thanks in advanced! Pedro
 -
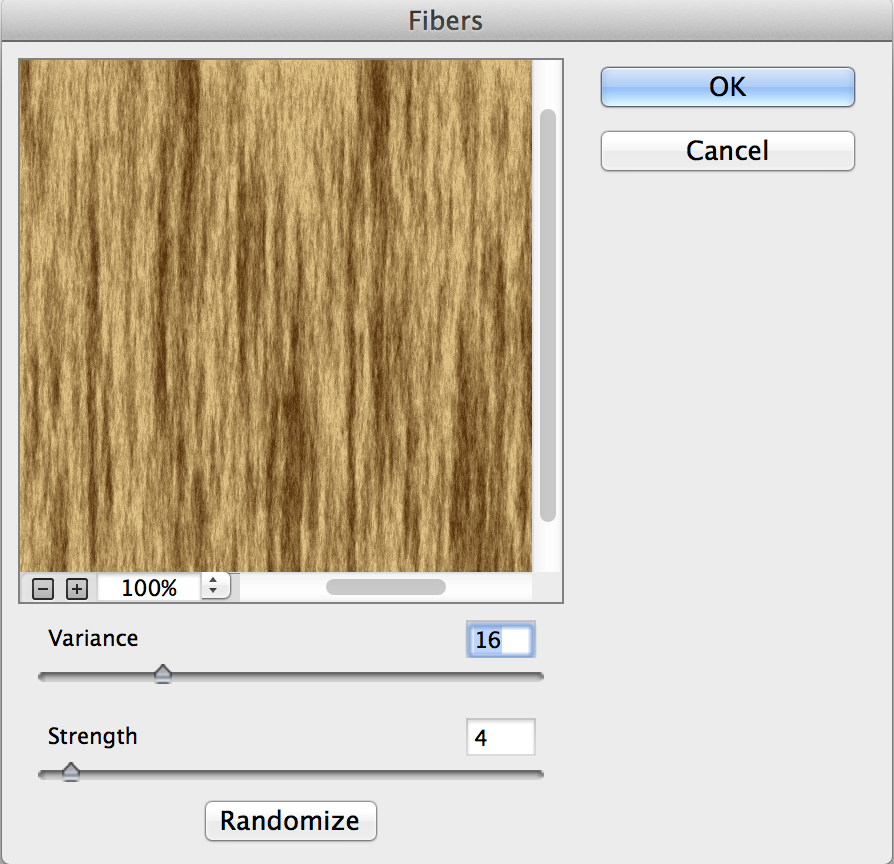
I used the fiber filter in photoshop to make wood grain. The basic setup is setup colors, use the cloud (perloin) filter, then add a fiber filter to get the wood grain effect. Is there a work around in Affinity? Thanks Jeff
-
Hi everyone! I have a question about using displacement tool and screen mode for blending a new layer with an underlaying layer. It is possible to make fake graffiti art's on walls with these two tools. Using these tools to make a fake tattoo on a skin. There are many video's for photoshop about making fake tattoo's. But it is different to Affinity. I was wondering if someone knows the answers for making fake tattoo's. My second question is about using screen mode. It automatically makes my text white. Is it possible to change that to black or an other color? Thanks in advance! Joran
-
I think a filter thats works like viveza from google would be very helpfull in Affinity Photo. j3rry
-
 Hi, I just started using the program but throughout several video tutorials I have come to notice that I don't have the "New Live Filter" option on my Layer menu. Any ideas on why isn't it showing? And how can I get it to show? I'm currently running version 1.5.4 Thank you!
- 1 reply
-
- 1
-

-
- New Live Filter
- not showing
- (and 5 more)
-
Sometimes the historgram in the "Levels" panel does not show up (area remains empty/black). After closing the panel and re-opening it the histogram is available again. This behaviour occours sometimes, but is not reliable reproducable. Known bug?
-
 Hi folks, maybe someone can help me with this one: when applying some (live) filters on a high-res picture certain parameters are selected. After rescaling the picture e.g. to a small web format the parameters of theses filters are preserved and the picture is fully recalculated - what inevitably results in completly inappropriate parameters for the new pic dimension. Is there a way to tell AP to recalculate the parameters according to the new picture resolution? Would be nice to have a checkbox that will optionally enable recalculation parameters when resizing. BTW: Trying to overcome this issue I was pressing the right mousebutton on the depth of field filter and it offered "rasterize" in the pop-up. Well, of course that did not work but I was wondering why the "rasterize" option was not greyed out like other commands in the popup? Cheers, Timo
 -
I'm still fairly new to Affinity but I have looked through every menu and have been unable to find it. Please forgive me if this is already built in. Otherwise: Please add the ability to create fake lens flairs (similar to Photoshops: filter-render-lens flair). I'm sure this feature has been requested before but hopefully it can be implemented soon. I know that generally in photography, lens flair is looked down upon and is usually not desired. In fact a lot of photographers probably use Affinity to remove lens flair but of course Affinity is used by more than just photographers. I work in the architectural visualization field and the main objective of my job is creating renderings that look as realistic as possible. Part of that realism is being able to make the rendered image look like it was shot with a camera which means adding depth of field and lens flairs where appropriate. I'm sure there are others in need of this feature. It would be awesome if this could be built right into Affinity and we could have a selection of lens flairs and be able to control their brightness and location in a non destructive way. Good job on the program. Keep up the good work.
-
Summary: Would really love to see a cutout filter for affinity, just like the one in photoshop. See image below. Usage: Quite frequently I am asked to take a photographic image and blend it into a more graphic image, one that has a very limited color palette where shades of color are defined by 2d shapes. Using the cutout filter, I can take that photo and give it that more graphic look, and then paint on top of the result to get the final image way faster than painting the entire image in a 2D graphic style from scratch. Thanks. - Neil
-
 Version: 1.5.0.37 Platform: Windows 10 Pro 64bit I found that when the program loads a Photoshop filter, it didn't fill this parameter: FilterRecord::platformData::hwnd, but Photoshop does. Is there a reason or it's just a bug?
 -
 I'm trying Affinity Photo's (v1.4.2) Haze Removal filter on an Olympus E-M1 raw file (.ORF). The filter seems to have no effect (zero) at all, even though I realize I need to Develop the raw file before I can access the Haze tool. The raw file is recognized by Affinity Photo and opens just fine. But the Haze Removal tool doesn't shows no visible difference. (Note that Photoshop CC and its Dehaze effect works well and works directly on the raw file... no "development" required.) Maybe there's something simple I'm missing, even though I watched the video about this tool a few times and tried to research it's use here in the forum. Thanks for any advice you can give.
 -
 In my example I've got a selection as a separate channel. Then I add a Live Filter on an image. After that I realize that I just want to 'activated' this filter only for my selection, and load it from the channel. Unfortunately, I cannot see a way how to apply this selection to my current filter. How can that been done, without re-adding the Live Filter and set all the details there again? Right-click on a filter and 'Refine Mask' seems to create only new selections/masks. -- Steffen
 -
 Could someone please tell me if Affinity Photo has a Polarizer Filter? I would like to filter out the non-polarised light from my photos. many thanks, Allie
 -
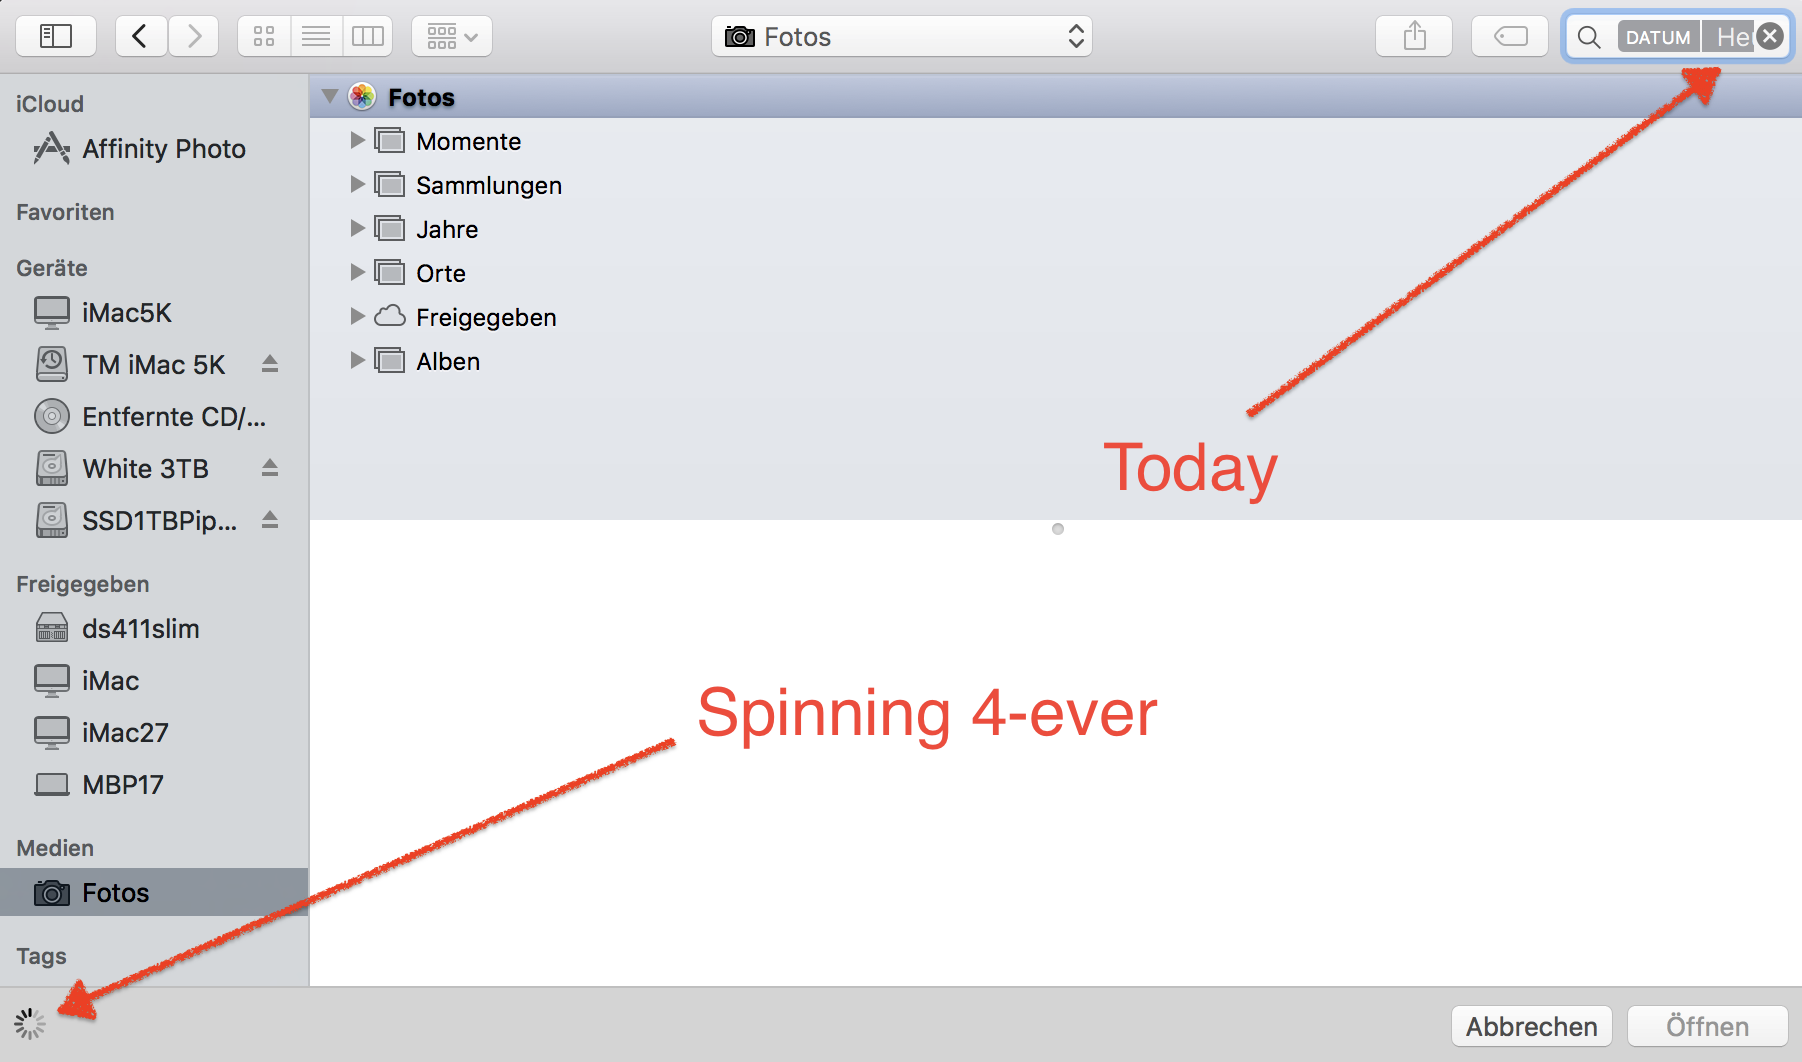
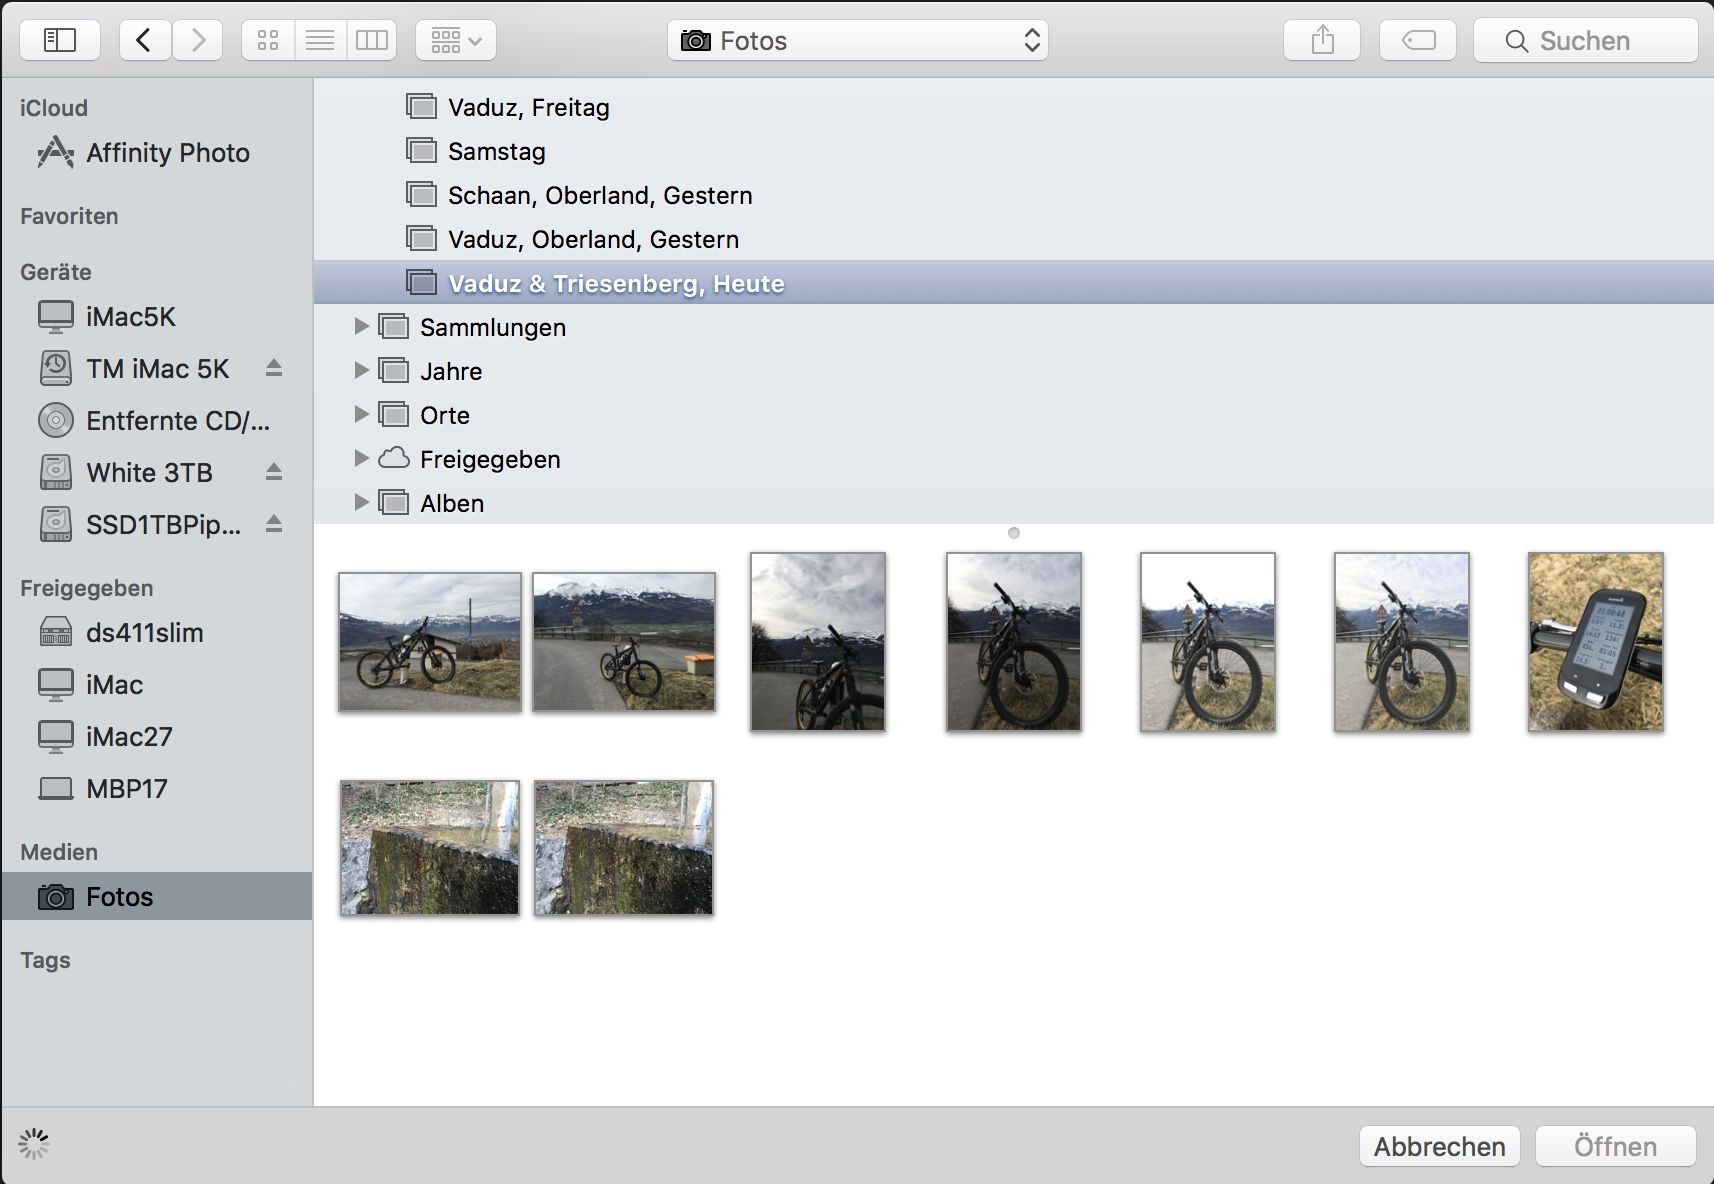
Hi Community May be this is the wrong forum section to post. Because it's somehow not really a bug, I post it here. Please forgive me if it's the wrong Forum section. 1. Start AP 2. File -> Open -> Media 3. I may only select "Photos" there, I think this is normal. Now for the problem: If I use a "Filter" like "Today" (in the screen shot it's applied as "Heute" in the Spotlight field), even after 7 minutes or so, no photos are listet. With the filter, the "Please wait" indicator is spinning forever: But it should show (manually selection): # of Photos in Library: 27'461 Off topic: And yes, I know, Photos is not worth talking about it. But Apple has unfortunately discontinued iPhoto and Aperture :( And I have yet not found another piece of Software, able to read out the DB of iPhoto and Aperture and adapt it into it's own one, handling everything folder based (including renaming a folder automatically if you rename event or album etc. the piece of Software should offer). Suggestions welcome. Best regards, Roland
-
Hi all, i'm Gabriele and i'm new of this software. I've start to use and try to find a way to get the best of my photo. I've a first question. When i had use CS6 i used often the oil painting filter to give a "Van Gogh" sensation to my photo. There's something for Affinity? Thanks a lot for your answer :)