Search the Community
Showing results for tags 'fill opacity'.
Found 6 results
-
 Hey folks, I've noticed a problem in Affinity Photo 2, affecting both iPad and desktop versions, where changing a layer's fill opacity via the FX options from 100 % to anything between 100 and 0 % doesn't hide the layers contents as expected. Instead, the contents remain visible 100 % at all times. This seems similar to a previously mentioned, but seemingly solved issue with the 3D effect in Affinity Designer, indicating a possible consistent rendering issue with layer effects and fill opacity settings. To reproduce the Bevel / Emboss visibility issue, follow these steps: Open Affinity Photo 2 on either an iPad or desktop and create a new layer. On this layer, draw anything using any colour of your choice. Apply the Bevel / Emboss effect to the drawn layer. Reduce the layer's fill opacity to 0%. Expected Outcome: The layer contents should become invisible, leaving only the Bevel / Emboss effect visible. Actual Outcome: Despite reducing fill opacity to 0%, both the layer contents and the Bevel / Emboss effect remain visible, suggesting that the expected change in visibility does not occur. I'm looking for insights or workarounds from anyone who has encountered this. Any feedback or suggestions would be appreciated. Cheers Dennis
 -
 Hi guys, if you are using Adobe Photoshop or used it before, you must have seen the FILL option often right. It's located below Opacity in Layer Panel. So some of you might be wondering about the difference between Opacity & Fill Opacity because if you look at it, both Opacity & Fill Opacity do the same thing, controlling the transparency of a layer. But then, why bother to create the same feature, there must be a difference right. So in this video, I will explain the difference between Opacity & Fill Opacity, and where Fill Opacity is located in Affinity Photo. I hope you enjoy this video, thank you!
- 12 replies
-
- 5
-

-

-

-
- fill opacity
- opacity
- (and 4 more)
-
Hi, i assume a bug: when you use a vector shape, fill it with white, add a black outside outline (layer effects) reduce the fill opacity The fill gets darker and finally black (not expected). Expected is fill gets transparent, but stays white. Instead, it gets the color of the outline. When reaching 0% opacity, fill gets transparent (expected), but the outline is extended to the inside (wrong). Spotted by my son in 1.8.5 and 1.9.0.932 Example file shows two linked vector shapes, one using stroke behaving correctly, one with outline mis-behaving. Linked so opacity affects both, and you can see the issue. outline opacity issue.afphoto
-
 Hi everyone, probably a newbie question, but I just want to get it right before sending out my document for printing. I have created a document with multiple elements that have a 90% fill opacity (see screenshot attached) and overlay eachother: The colors I used are "normal" ones, so neither spot or overprint colors. When I export the file as a PDF (CMYK colors) everything looks as intended, so the opacity is still there. What will happen during printing? Will the opacity be visible on the printed document as well? Or will it be removed before printing, so in my example above it would be orange with 100% print opacity and the overlay effect would be lost? Thanks!
-
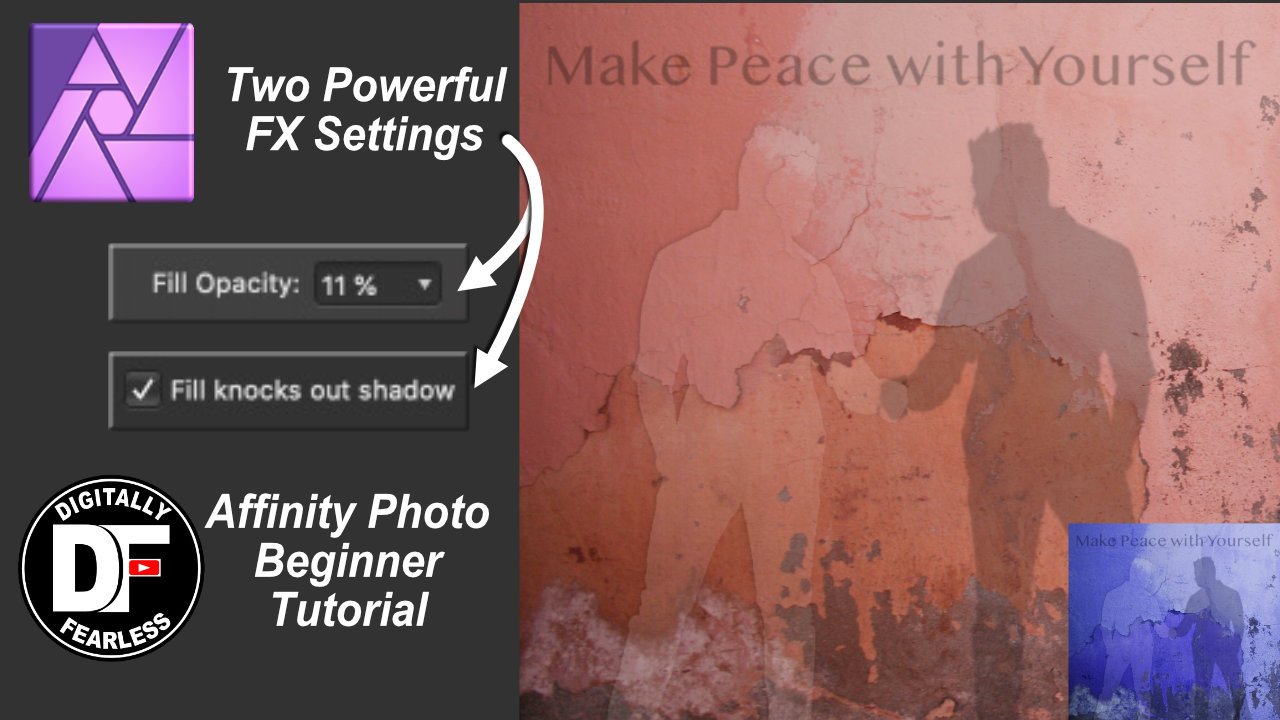
 FX knock out shadow and fill opacity in Affinity Photo My latest Digitally Fearless Affinity Photo beginner tutorial. How to use the FX knock out shadow and fill opacity menu, not to be confused with the layer opacity. Interesting text effects can also be achieved using this method.
-
 In Photoshop the Fill Opacity has particular effects in the 'Special 8' blend modes as well as its use in 'Effects'. I can see it working in Effects, but not as PS-style Fill Opacity. Am I missing something?