Search the Community
Showing results for tags 'dpi'.
-
 Hi, so when I resize my pictures to 300dpi and then save the picture and then export it as a jpeg, when I upload them to a photo printing site, they are only uploading at 99dpi!!!!!! what am I doing wrong here ???? please help, I am so frustrated!!!
 -
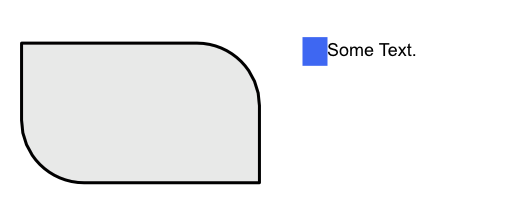
 Windows 10 Home 1809, Publisher 1.7.0.257. When I change the document DPI, some things change but others don't. Consider the attached document. The first image shows the document at 300DPI. The second image shows the same document at 144DPI. The visible size of the corners of the rectangle increase - the absolute sizes in the context bar have also increased - and so has the visible width of the paragraph decoration - but the sizes in the Paragraph panel are as before. However, the thickness of the rectangle stroke is the same, as is the size of the text and also the height of the text decoration. Why do some things change and some others don't? Is this expected behaviour? DPI-change.afpub
-
 I have a png with a transparent background that I’ve imported into Designer on my iPad Pro. Original dpi was 150. I need to upload it to an online vendor that only accepts 300 dpi files. (I know.) Changing the dpi in Designer only seems to work if I uncheck Embed Metadata in the Export screen — but when I do that and save as png, the resulting image has a white background. If I leave the setting checked, the background is transparent but the dpi remains listed as 150. Is it possible to change the dpi of the saved png to 300, but retain the transparency? edit: I’ve discovered that I can make this work if I first create a 300 dpi document and then use Place Image to add my image. I can then turn off embed metadata and retain transparency. Still not sure why I can’t start with an existing png, though.
 -
 I have two displays...my main one is 1440p and the secondary is 1080p. When launching Publisher, images and text will render pixelated/lower resolution on the main 1440p monitor. This can be rectified by bringing publisher into the second 1080p monitor, where images and text render properly, and then bringing it back to the main monitor. Images and text will then render correctly at 1440p. The problem arises again when I use Ctrl+Shift+W to toggle preview mode on or off. Images and text pixelate again, and I need to repeat the above to fix it. I assume this will have something to do with the new adjustments in the latest update concerning multiple-dpi monitors. I am using Version 1.7.0.157. This Issue did not occur with Version 1.7.0.145 and earlier. Two images are attached to show the difference in rendering. Take note that the interface stays sharp throughout.
-
 If I change the DPI of the documente, the text alignment and the text size of the master pages also change only in the child pages.
-
 Like many people, I've struggled with PPI/DPI and how they affect print quality. The discussions I've seen here are usually actually about PPI and include the advice, "You don't need to worry about DPI unless you're talking about printing," and then they don't mention printing again. But printing is exactly what I'm interested in. I think I have a grasp of the fact that AP says DPI when it means PPI, and that I don't need to worry about what DPI AP says my image has until I'm ready to print. But when I am ready to print, I don't see anyplace to specify what DPI I'd like in my print. It's not in the Canon printer driver and I don't see it in AP's print dialogue. When I was using Adobe, I saved every image I worked with at 300 (DPI? PPI?) and then when I printed I didn't even think about it. But all the discussions here (and the video tutorial Understanding DPI) make me feel really sure that I have absolutely no idea what DPI I'm printing at. (My prints look good, but I'd still like to be clear about this; maybe they could be better.) So how does one properly print at 300 DPI?
 -
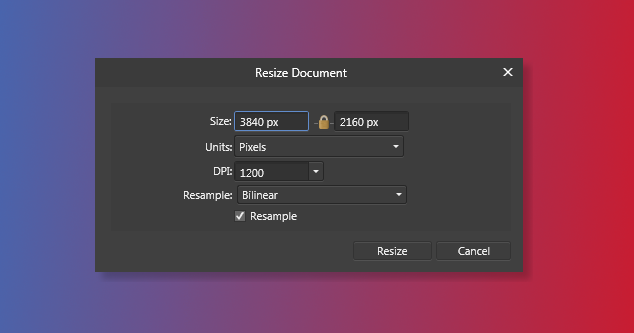
 I have read the previous discussions on this topic, and none have resolved this issue for me (and from what I have read, for a lot of other users as well). I am going to try to state this as simply, clearly, and specifically as I can. I am using Windows 10. If I right-click on my target jpeg image, and select properties, it shows a Horizontal and Vertical resolution of 72 dpi. I open the image in AP, and select Document - Resize document. In the pop-up box, I uncheck Resample and change the DPI to 300, and click Resize. I can then either Save or Export (doesn't matter which) the file. Now the problem. If I check the properties of Saved/Exported file it still shows 72 dpi. I need to send the file to the end user, as well as upload the file to a processor for printing an enlargement. Both will reply the file is unacceptable because the resolution is too low. Not surprising since the properties still show 72 dpi. In comparison to Light Room, when I change the resolution in that program the Saved/Exported file properties show 300 dpi. Bottom line - how do I end up with a file from AP whose properties show 300 dpi?
 -
 Maybe I am not understanding something, but one thing that is driving me nuts, is, that I seem to be unable to export smaller images (lets say for web and with a size around 200 or 300 px) in a crisp way when text is included. My results are terrible. I get that you can't fill a pixel with two colors but i can't shake off the feeling, that there is something very tricky going on with the rendering machine/ anti-aliasing setting of Affinity when it comes to exporting text and I just wish that it would do a better job there (sorry, I otherwise really love the apps). Anyway to temper with the anti-aliasing? I have Questions like why is a screenshot of 400px picture viewed in half the size (50%) crisper that a 200 px export (no resizing and lanczos3 setting)? Why can a browser show small fonts crisp and why can i not even come close to that when exporting? Latest example: 236x236px web-image, viewed in 100% in AfP looks ok I guess, too small to tell, hahah (due to my screen-resolution?). Now i see the same picture in 100% in the browser and it appears double the size and extremely blurry. Wtf am I missing? To the good people out there : Has anyone of you a best-practice for me, when creating/exporting smaller stuff for web? Can someone help with advice? Thank you very much, Hannah
-
 I'm building a replacement website for my 7-year-old outdated site and need to edit my photos for this new platform. 1. For a photography site that retains large files for automatically sending to the print lab and as the file can be printed at varying sizes (on paper, canvas, etc.), should I save a file at it's original size but at a 300DPI? As these are photos taken over many years with different types of cameras, some images may be 72DPI, others higher, also many are from film cameras. 2. If all need to be saved as 300DPI for optimal printing, then what is the best way to save the file without resizing the original file? (I'm new to AP.) (My site displays optimised file sizes for website speed, so don't need duplicated files.) Many thanks
 -
 I have been watching a bunch of video tutorials and ended up with more questions than what any of them answered. Basically they told me the how to use but not enough info. In almost all the videos, they made it seem like this was mostly for web designers. I only work in print, can I not use this if I work at 300dpi? I have NO use for any IOS anything. If I delete all the assets that came with the program, can I later get them back if I ever find a need for them? If assets are available every time I open the program, if I had a lot will it slow down the program? Will it be using more CPU resources? I often have several graphics programs open and the web browser, so I have run my computer out of working memory before and am concerned about the impact of assets being there every time. Thanks Sig
 -
 I’m finding that when I change an AP document’s DPI and pixel size downwards before exporting the final image to the size and DPI that I want, said exported final image always comes out still retaining the working documents original higher DPI. The new pixel dimensions are honoured but not the new DPI.
 -
Can someone tell me how to change the DPI of an image? Can not find it in the Workbook. Thanks!
-
I’m an illustrator. I’ve started drawing my work in Clip Studio Paint on my iPad, and CSP works best producing art at 600dpi. I was hoping to be able to use Affinity Photo on my iPad to resize these 600dpi greyscale .tiffs produced in CSP into bitmap .tiff files (1200dpi, black and white values only). Is there a way to do this? On my 2015 iPad Pro, it seems like the max dpi for an image file in Affinity Photo is 400dpi. Is that correct? Is there a way to change this? Even though 1200dpi is a very high resolution, my illustrations are not very complex. Thank you.
-
 I have a few questions regarding images placed in an Affinity Designer file and the eventual resolution/file size: Is it best for eventual PDF file size to pre-crop images before placing them in my document? ie. does the PDF file still contain image data that falls beyond the edges of pages or masks? Does the AD crop tool achieve the above the same as pre-cropping would? How do I 'uncrop' an image? There doesn't seem to be an option for removing any crop I've applied to an image (beyond stretching the handles back out and trying to line up with the original image edges). I've noticed placing an image in my document and exporting to 'PDF for Export' without any alterations to the placed image results in a large file size (the original image DPI is maintained). However applying the crop tool (even a tiny amount) suddenly results in the image taking the DPI of the document (and bringing the file size right down). Is this intentional? Shaun
 -
 Hi I've tried to search for this on the forum and internet, also in the help files in affinity photo, so if this has been asked before, I'm sorry. and please send me a link to the answer. I tried to ask via twitter but they havent answered me. I need to know if and how I can scan/open a new file, with more then 400 dpi. I need to send something in to a publisher and they require the pictures to be scanned in at least 1200 dpi. I've looked but I can't figure it out. if anyone can help me I'd be very grateful, even if the answer is that it's not possible. Thank you
 -
OS-X desktop version Suggestion for improvement: When using the "Document/Resize Document" menu-item, if 'Resample' checkbox is not selected, the only resizing allowed is by dpi. (and it's limited to 400dpi using the slider). It would be much more useful, when not resampling, to be able to specify the size desired while having the dpi calculated automatically. Also, changing the size to input into the size box is cumbersome: Unable to select the digits with the mouse, the cursor must be positioned just right, then must delete the digits with the keyboard, before typing in the new size.
- 3 replies
-
- 1
-

-
- document size
- dpi
- (and 1 more)
-
 If the project document dpi is set to 300 then a tiff is exported using File > Export > Tiff the exported document has a dpi of 72. This is totally wrong. The exported document should absolutely inherit the main project dpi. I am amazed that Affinity Photo, an otherwise very smart program, does this wrong. The workarounds are clumsy and dumb. Please fix this most irksome design flaw immediately.
 -
I just found out that a full UI project I delivered was done using the wrong dpi. Thus the text objects on the exported SVGs have fractions of points (10.49999142pt instead of 14pt). There are some important topics here. 1) Changing DPI settings make little sense for Web and other UI projects since these are screen based. The obvious choice would be to use the current screen dpi; 2) The default value for all Windows machines is 96 dpi. 72 dpi is just for Macs; 3) I believe there is no simple way of changing the default values for new documents, so it's something to remember every time a new project is started. I suggest verifying the screen DPI and use it for web projects, or at least show us how to change the default values if possible.
-
 It's disappointing that the bug in Document>Resize Document appears to be unresolved, i.e. whatever the imported metadata has, 72, 96 etc. is what the output DPI is. (I use the work round to resize the DPI (typically 300) with "Resample" unchecked; then resize to the size of photo I want, with Resize> "Resample" checked. I then export to jpg ,via un-checking More>embed Metadata). But this is a known bug from day 1. Is it not scheduled to be fixed in 1.6?
 -
Hi I need to be able to change the dpi/print size of an image. The pixel size is fine, it's just that if you import a 4000x3000 pixel image into QuarkXPress and that file is in 72 dpi the print size will be 141 x 106 cm and Quark will only allow you to scale it down to 10% which will still be too large to fit on the page. Maybe you can already do this, but I can't seem to find any way of doing it. So for now I am "stuck with" CC 2014. Best regards Geir Rosset Publisher Oslo Norway
-
 Hi! Please Add Decimal Places for Rotation, Shear and dpi resolution (number shown in top-left when Move tool is selected) It can be useful and in many cases and make program more precise;)
 -
 When I open a photo for which I'd like to resize the dpi in Affinity Photo, I go to Resize Document and I see the default dpi is 72. When I change the dpi to 150, the pixels adjust accordingly. However, when I export that photo, reimport to Affinity Photo, and go back to Resize Document, it shows dpi as 72 again. Why does it not show 150? Any insight would be greatly appreciated as I want to ensure these are best quality for printing. Thanks!
 -
 Is there any way to choose the DPI used for rasterization in AD? I am working on a large, multi-artboard document and want to rasterize some vector art to reduce the file size of the PDF I'll eventually export. But I still want the document's viewers to be able to zoom in and inspect the art at a reasonably crisp resolution. Changing the DPI of the document doesn't seem to work, as it doesn't rescale my artboards. How can I fix this? Thanks!
 -
 Hi everybody, when creating a vector object in a document the dimensions of this object change when pasting it into a document with a different DPI setting (as far as I can see DPI shouldn't affect the physical dimensions). To reproduce, create a square 1cm x 1cm in a document set to 72DPI, copy and paste into a document at 300 DPI and the square will be much smaller than 1cm x 1cm. Cheers, -hubob
 -
 There is a discussion on PPI vs DPI in the Questions and Feedback section. After discussion and consideration, I'd like to make an official feature request. In the User Interface section of the Preferences in both Designer and Photo, I request that you include a checkbox to change the default DPI setting of documents to PPI. I understand a portion of your staff believe DPI is an appropriate choice, so it could be set to DPI by default, and every one who feels strongly that it should read PPI could have a customization option to change their user experience within the software. I feel that's a good compromise, considering everyone who understands what the field is for would understand that it would typically make no difference to anyone's workflow, and it would appease each party that has a preference to one acronym or the other. Thank you for your consideration, I appreciate your time.
19_30_35.jpg.40a6d95390785a7a6c7df72a7ab73133.jpg)
19_31_37.jpg.231ca59a00e5b180ca0111e28e120c7a.jpg)