Search the Community
Showing results for tags 'develop'.
-
 Developing raw files in Affinity Photo isn’t too shabby. But it’s a pain to select and load raw files each time. Would appreciate a browser mode where I as a user could browse through a folder of RAW files, develop them, save and apply master presets containing ALL of the settings, and batch converting files. This is currently painful as it has to be done manually per file.
 -
 Hi everyone, I'd like to bring back a bug report that has been totally ignored since 2021, which I think is urgent and deserves to be discussed. Below you can find two very old threads talking about it. to summarize: the white balance tool is not working properly for non-raw files both in the develop persona and in the photo persona (through the adjustment layers). -what the tool should do: colour pick a pixel and equalize the RGB values to convert the colour of the pixel to a neutral grey (RGB values equal to each other) then apply the same RGB shift to the whole image. -what the tool really does: in develop persona with a raw file it works properly, when used on tiff, png, jpg (etc.) it does not work. What we observed: -the sliders in the develop persona with a raw file open are called "temperature" and "tint" and both of them are properly moved automatically when using the white balance tool, in this case it works properly; -however in the photo persona (white balance adjustment layer) they are called "white balance" and "tint", and only the "white balance" slider move when colour picking the image, we don't see why they should be called and behave differently since it is the same tool that already works properly for raw files in the develop persona. A possible way to fix the bug: -just apply the same rule applied for raw files (in the develop persona) also to non-raw files (both in the develop persona and photo persona adjustment layers). kind regards: Riccardo
 -
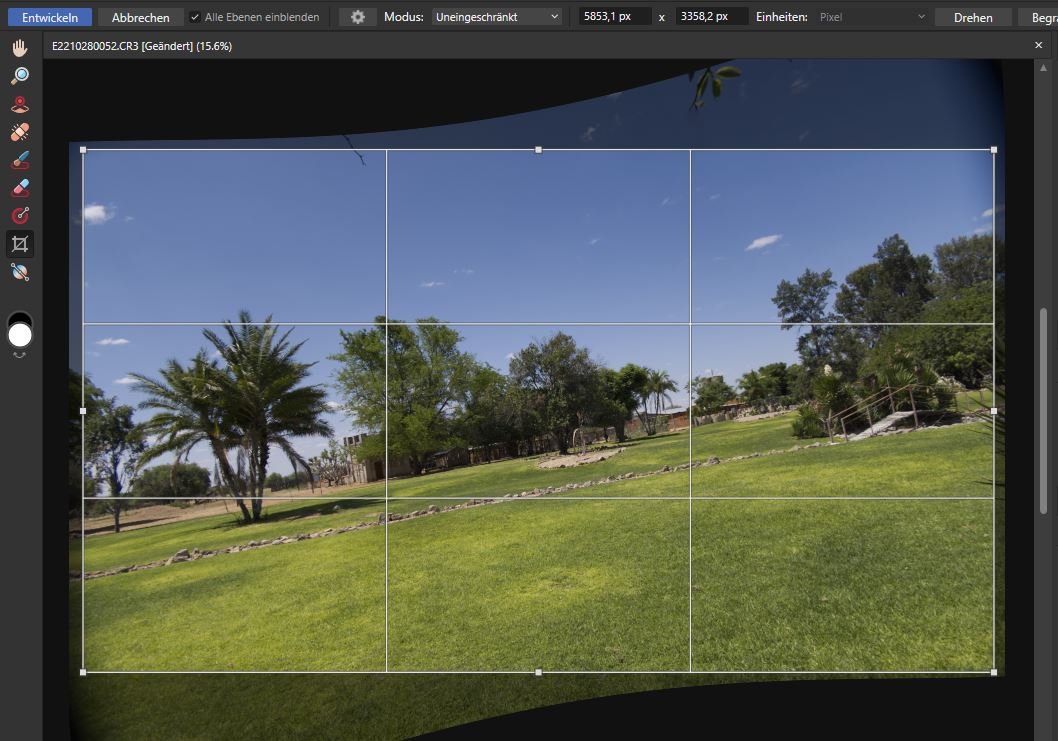
 Expected behaviour: You apply your changes to the image and if you are satisfied, press "Develop" and you get exactly this result you saw before. Actual behaviour: The result after developing may vary, most prominently when using rotated crops. How to reproduce: Open a raw file with lens correction applied. (In this case it is a wide angle view.) I carefully cropped an image to a rotated crop section, avoiding any white corners (which is hard enough in AP having to take care of this manually). After developing, the top left and bottom right corner were white, so image data was missing in the corners. Switched back to develop persona - no white corners (as previously). (Note that I use the "linked file" option of AP 2.0) Developed again - white corners were there. My guess what happens is: The camera and its raw files use a heavy (automated) lens correction. I could go easily to 95% scale and still not see everything the sensor captured. So when rotating the image, there's quite a bit of head room to use without extending beyond the actual sensor data. See the third screenshot showing this . It seems as if the actual development process later only works on the data after the lens correction, so it works on already cropped sensor data, thus the white areas after the additional application of the rotation by the crop tool. (Note that the image used below is just for demonstration, I originally encountered this effect on a different RAW file of the same camera.) AP 2.0.0 on Windows
-
 Hello everyone. I have a question about what I'm doing wrong. I develop RAW files and I already have photos in Develop Persona that I am happy with, then when I press "Develop" my image looks completely different - it is much brighter. Do you have any idea what to do or maybe there is a tutorial about it? Thank you in advance Jurand Do
-
I only just noticed that when making a mask using the develope persona and check snap to edges, it doesn’t work anymore. Is this a know problem on the Mac?
-
 I've been encountering a recurring issue with RAW development, but the issue happens inconsistently and seemingly at random. After loading a RAW file, I make some of the color and lighting adjustments I want to make to the file. But then I click "develop" and the edits are not preserved, leaving me with a developed image without any of the RAW edits I made. I use the same process for developing images every time, but the results have been inconsistent. Perhaps I'm experiencing a PEBCAK problem, but I'm not sure what exactly I would be doing wrong that causes inconsistent development results.
 -
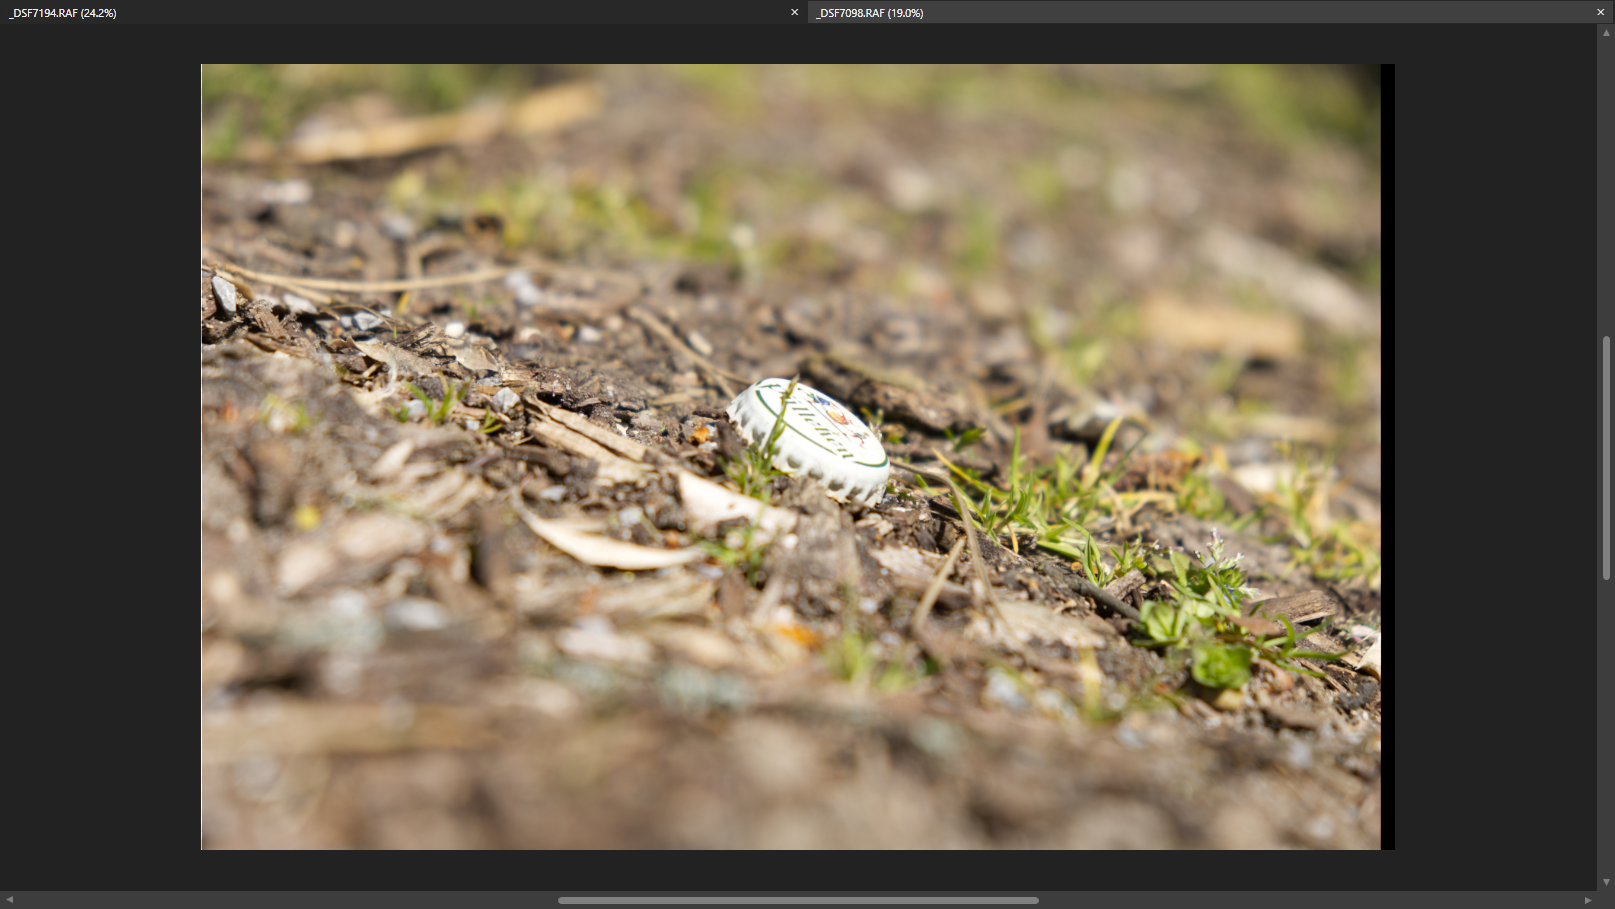
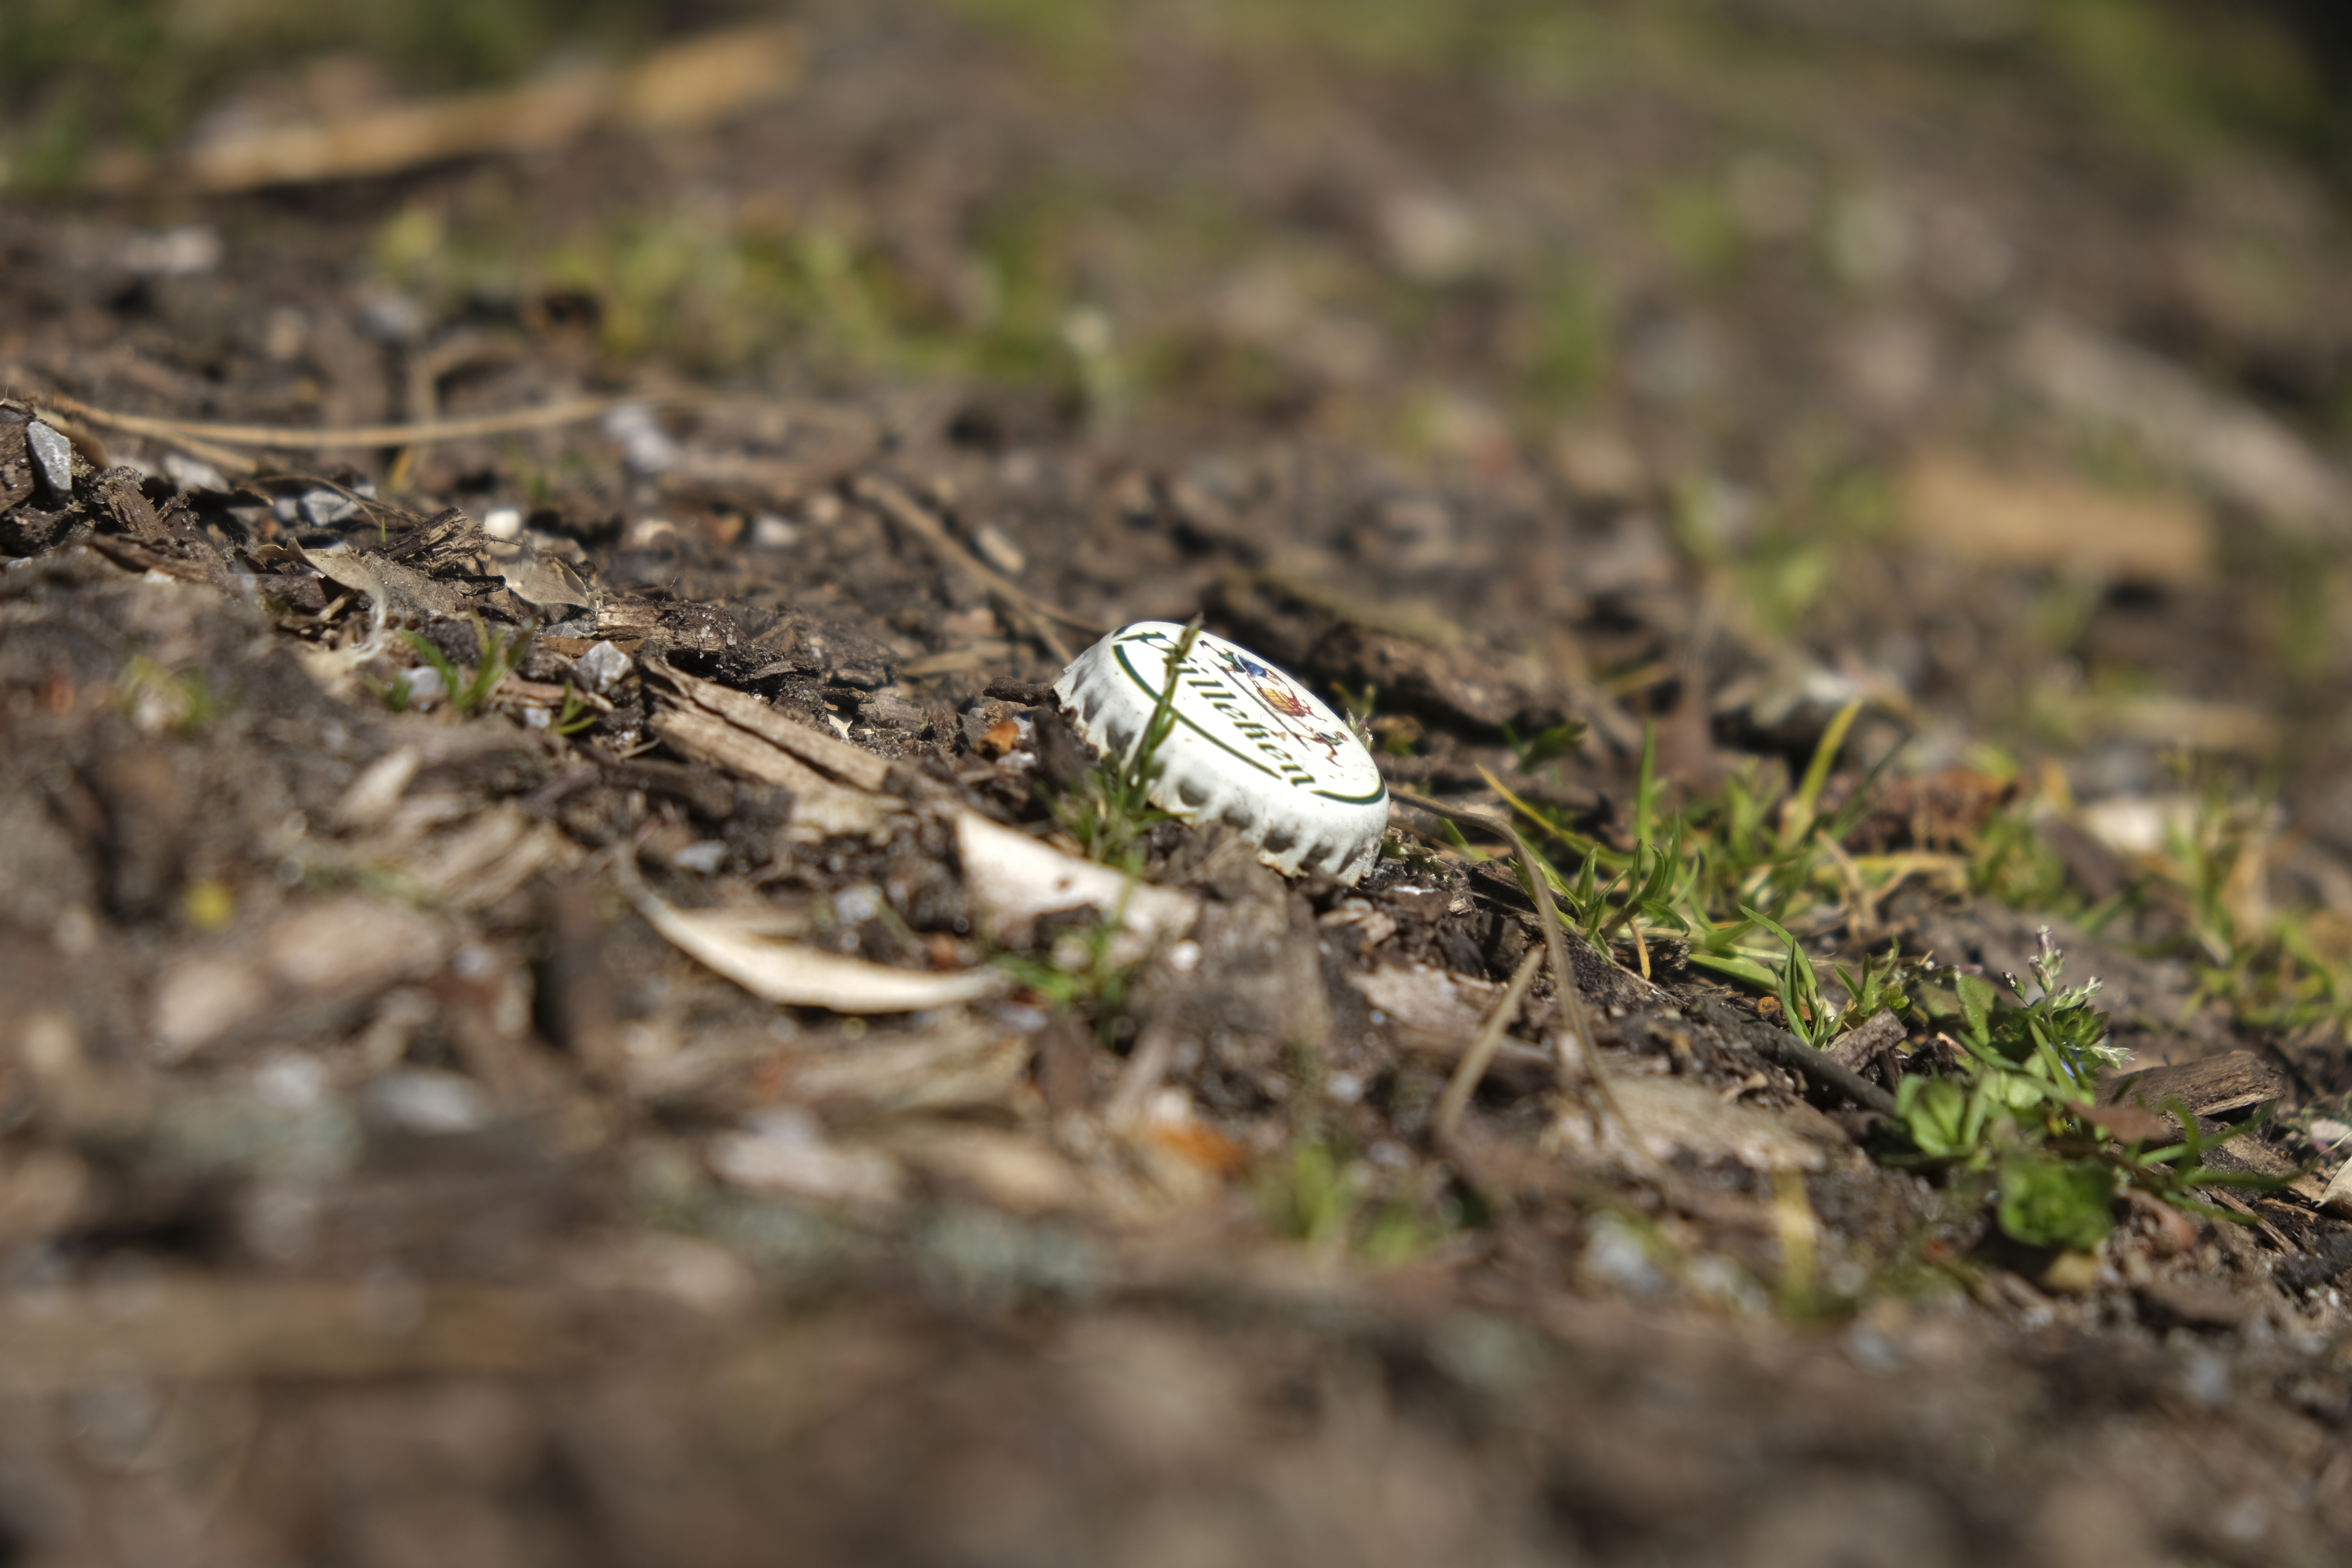
 Hi! When I import a RAF-File into Affinity Photo, one of three things will happen: 1. huge parts of the image get cut of (the top third and the bottom third) [in this example, the original image is 6246 x 4170 px and it is cropped to 6276 x 1004 px] 2. a black line appears on the right of the image (which shows up on the developed photo as well) [I can cut it of by cropping, but it is annoying after all] 3. everything works as intended 😃 It seems to be related to the focal length and the lens I used For the first example I used a Fujifilm X-S10 Camera with a Fujinon XC50-230mmF4.5-6.7 OIS II lens set to 230mm; for the second example I used a Fujifilm X-S10 Camera with a Fujinon XF18-55mmF2.8-4 R LM OIS lens set to 55mm. My Version is 1.9.2.1035 on windows 10 I attached the original files for you to try to reproduce the issue. Best Regards, Pepe _DSF7098.RAF _DSF7194.RAF
-
 Hello, Let's say I have a JPEG that someone gave me and I don't like the white balance. I open it in Photo and go to the Develop persona where I can adjust the white balance, which is great. And so, I make my adjustments, and Save. Now that my work is done, I try to close the file using Ctrl-W (PC), but then a pop-up warns me that I must "Commit or cancel" before I can exit. The same warning appears if I click on, say, the Photo Persona, or even try to shut down the program entirely using Alt-F4... Then, since I understand the meaning of "Commit", and because I indeed intend to "commit" to the changes I just made, let's just say I hit Return, which is the way one normally "commits" in Photoshop, when there is any committing to be done. Except that, in Photo, ,othing seems to happen, and when I try to close the persistent JPEG, I'm still being asked to "Commit or cancel"... So where is the darn "Commit" button? :o) Sorry, please read "complete" instead of "commit" above, it's "complete" that is being used in this particular case, although I think I have indeed seen "commit" in some other place.
 -
 I recently sent a JPG file to a friend of mine and he opened the file in Photoshop. The JPG was exported from AP v2.0.4 (Mac Ventura). When he opened the file in Photoshop, it automatically opened the file in Adobe Camera RAW instead of opening it normally, as if the file I sent him was a RAW file instead of a JPG. I tried it myself on another computer I own that has Photoshop installed and got the same result. It launches Adobe Camera RAW, with a lot of crazy slider settings in the Basic Tab. The original file was a RAW DNG file from my Canon DSLR. I processed the original RAW DNG file in AP v2.0.4 (Develop Persona) and I chose to import it into the Photo Persona with the RAW file (linked or embedded, I forget which). I wanted to retain the ability to go back and forth between AP and the Develop Persona so I could make adjustments in the Develop Persona. That all worked fine, as designed. When I exported the file from AP to JPG, I suspect AP must have written something in the metadata so the JPG looks like a RAW file, which is what caused Photoshop to launch Camera Raw. To me, JPG is an industry standard file format and should not look or open as a RAW file in any program (even AP). The original AfPhoto file format is a different matter, since you want to retain that active link to the original raw file (if linked). Is this a bug? If intended, should it be changed? I suspect so. I don't want my JPG files sent to others opening as RAW files. I exported the file from AP to JPG twice, and will attach both files. One has sRGB embedded and the other is Adobe RGB.
-
 Hi, in this Affinity Photo Tutorial I will introduce you to the RAW engine, the so-called Develop Persona. I would like to encourage you to shoot in RAW format, which is even possible with the iPhone. With overlays you can then create layers and masks and thus limit the processing to certain areas. Have fun Ciao Jack
 -
I attach a file. Each time I try to touch the WB controls in the Develop persona (with the image layer selected), Photo 2.0.3 crashes. System: iMac Pro running macOS 13.2 (22D49) 202301_M1A1717-1600.afphoto
-
 For me one of the key missing features to help me replace Lightroom would be a filmstrip feature. Basically, I would want to select an bunch of photos, load them into the Develop persona to give me a side-by-side comparison of the Photo's that I have edited. Ideally, it would allow for adding ratings to photos so I can filter them by quality. And it would also be nice to add labels to photos to indicate whether or not they were fully developed or marked to be developed/ discarded. This would then also allow me to copy paste all (or a selection of) the Develop parameters and paste them to a selected photos as an easy means to batch process them (with immediate visual feedback on the result).
- 5 replies
-
- 1
-

-
- affinity photo 2
- film strip
- (and 8 more)
-
 The last thing I do in the raw-conversion part of development (i.e. in Adobe Camera Raw or in AP's Develop module) is capture sharpening. My experience has been that the precise amount of capture sharpening within modest limits isn't critical to the final result. So I just eyeball the result, starting from some slider-values (my own pre-sets in ACR) that have worked in the past. But I'm a bit puzzled by AP's use of a percentage in the Radius slider of Detail Refinement. If this is a USM routine, I'd expect the value in "radius" to be the number of pixels surrounding detected edges where contrast will be increased (by the "amount"). What does a percentage radius measure? Percent of what? (Or am I wrong to assume that this is a USM routine? Is it, instead, some form of de-convolution?) Thank you.
 -
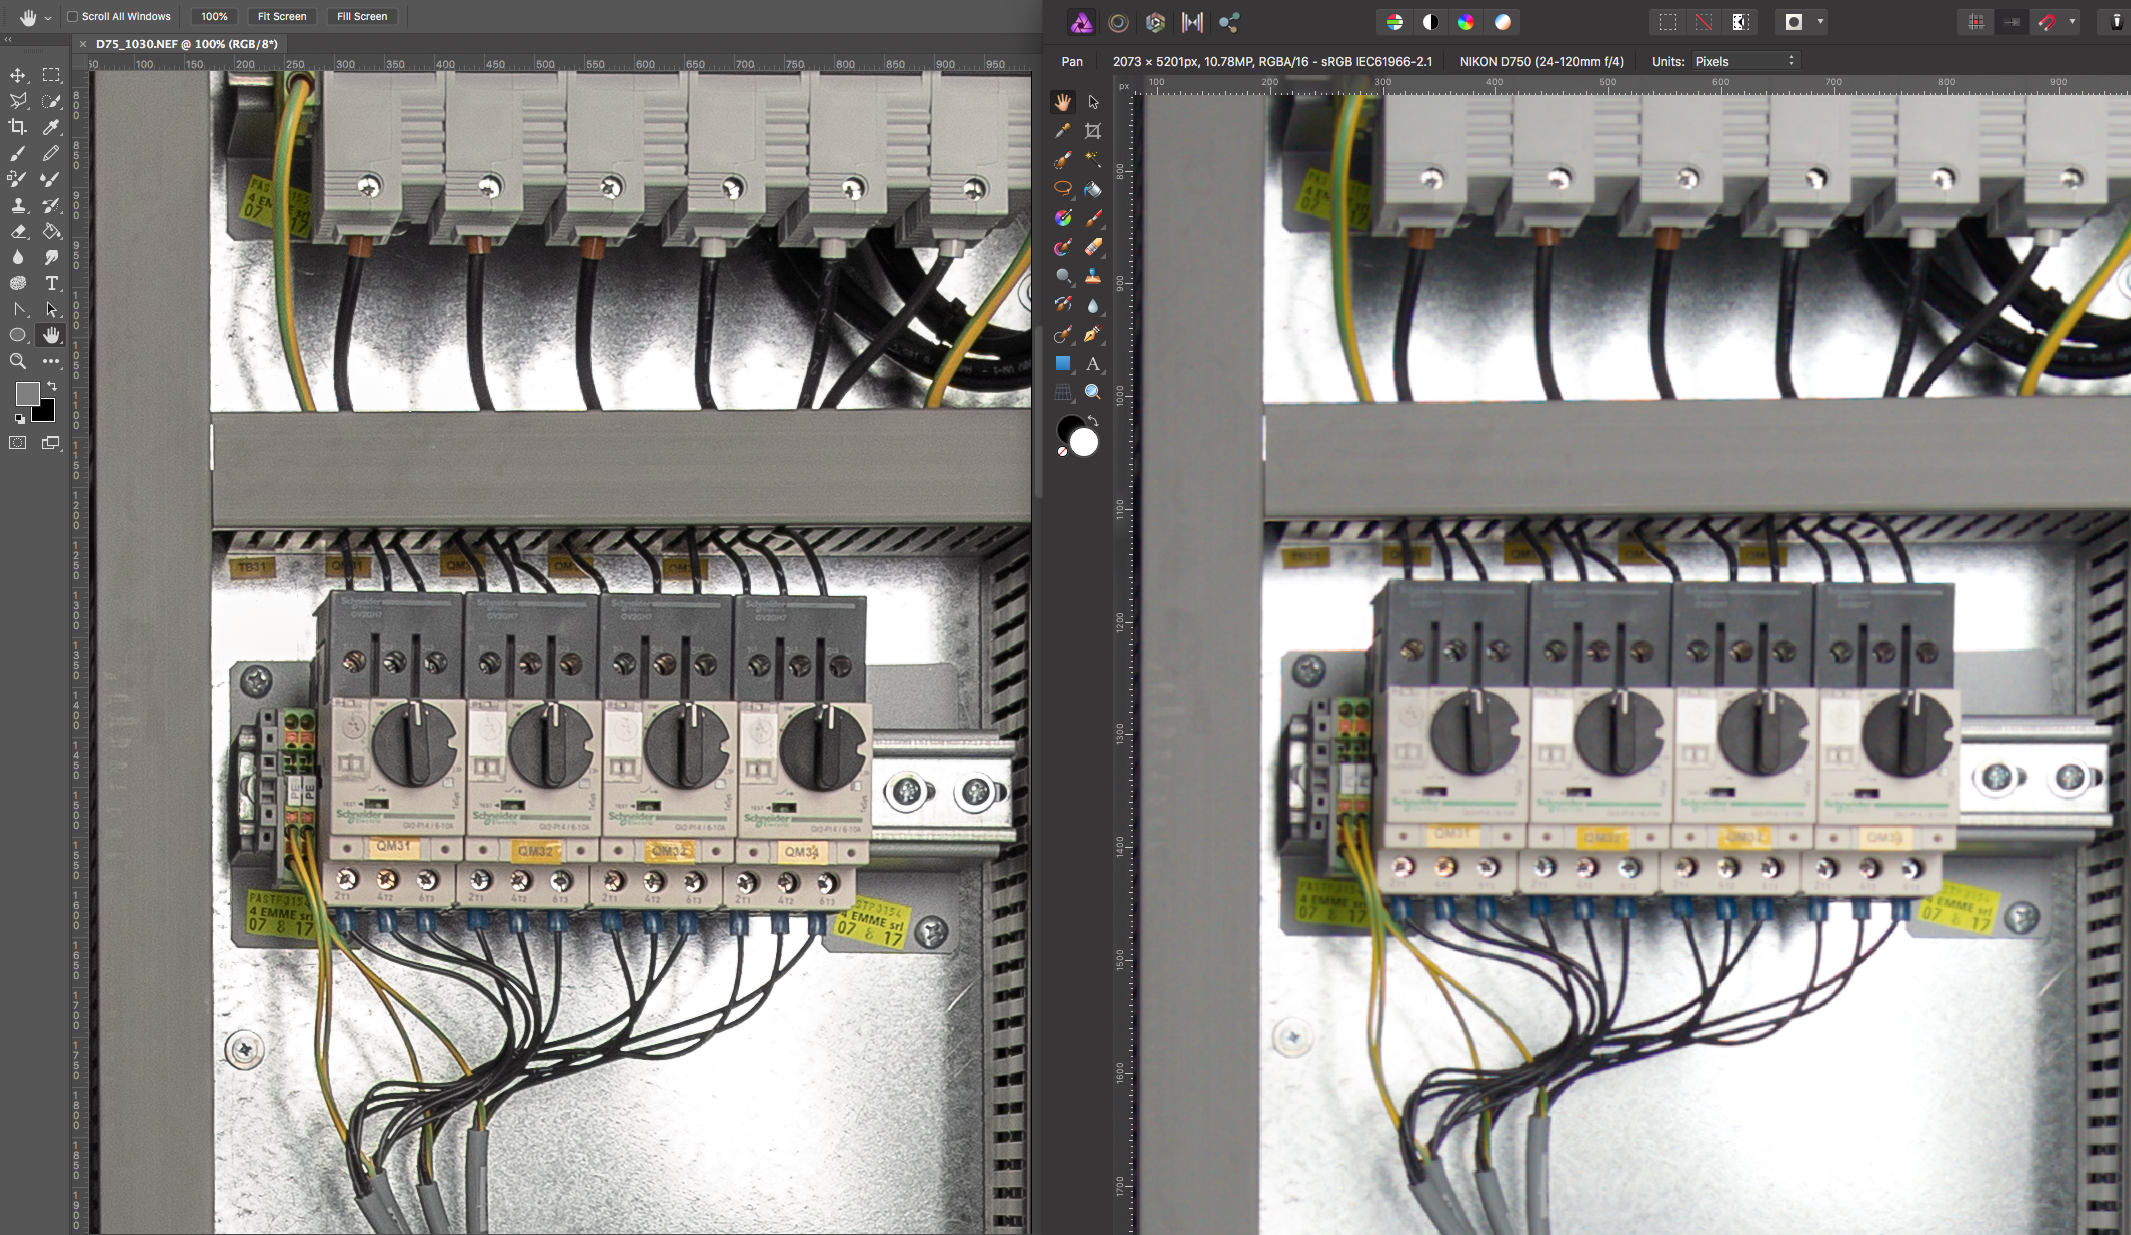
 Personally, I have been having a hard time accepting AP as a replacement for PS. There is a performance issue and quality issue. I have attached a side-by-side example of a NEF image taken with my D750, both zoomed too 100% . The image were processed similarly, or as best I could. You can PS did a much better job, especially in regards to sharpeness. Has anyone else done this comparison? If so, what were your results?
-
 I like what was done in the Develop Persona in Affinity Photo. I use Affinity Photo in the last step of my processing. Today I had plenty of time to really test the output I could get from binging my RAW files into Affinity Photo after my first two steps of culling and adding IPTC and keyword data. So, instead of developing the RAW file in my regular editing software and sending a tiff to Affinity Photo I took the RAW file directly to Affinity Photo. What I found throughout the day was I was getting as good or much better final product with Affinity Photo, the result file size for the .afphoto was much smaller because it held the linked RAW file instead of a tiff file, and it had read and loaded the key words from the Xmp sidecar. I think if had a way to create presets that would let me populate several of the Metadata fields I could simply paste in the keywords for a photo and go straight to Affinity Photo from my culling of photos. I intend to keep working like this until I hit a snag that I didn’t encounter today. What I would like to see is: A way to click and have a larger area for the metadata fields so it would be easier to type in the data and paste in keywords. Something like an option button on the Metadata Panel. The current area and print is too small to work with for a long period. Anything to make entering that data would be good. Not having this now is not a problem that would prevent me from going from culling, to meta data entry in another app and all development. In short, the changes in the Develop Persona are going to give me a better or equal final product, save file storage space because of smaller afphoto sizes, and save me from having to maintain multiple RAW converters. Nice job by the folks who worked on this rewrite in any capacity. Thanks. Peace Marvin
 -
 When I open a RAW file in Develop (Affinity Photo) one of the first things I adjust are the Detail Refinements, the sharpening tool. When I then click Develop at the top left, all my adjustments are saved except for the Details Refinements... Any changes made to e.g. exposure or color are developed, just not the sharpening. I'm new to Affinity so maybe I'm doing something wrong, but it seems odd anyway. Any suggestions?
 -
 When developing CR3 (Canon R, Windows 10) the original photo (cr3) looses vibrance. It is as if a slight layer of haze is added to the photo. Adding vibrance to the developped photo makes it better but colour is better pre-developping. Examples in annexe, The developped photo (afphoto) had every possible adjustment box unticked. I am probably doing something (probably dumb) wrong, but what??? Pieter _59_0053.CR3 _59_0053.afphoto
 -
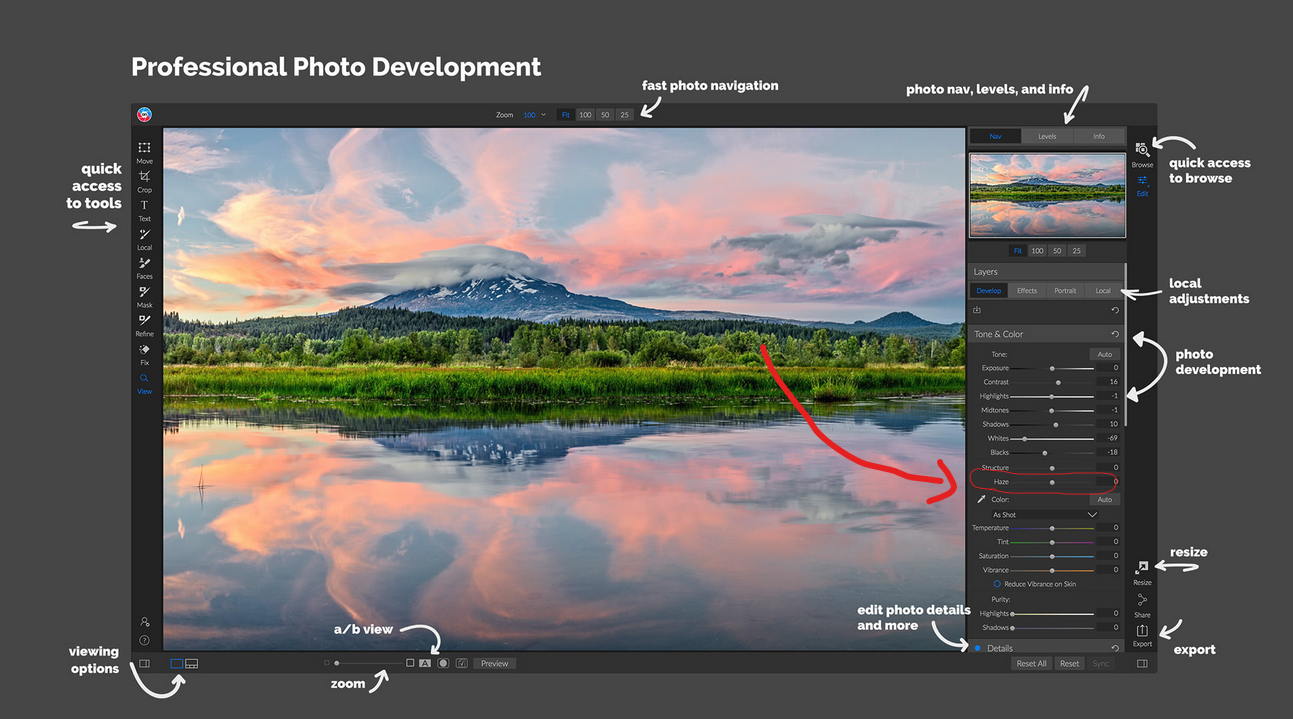
In Adobe Lightroom, it has a "dehaze" slider in the area for developing raw photos. I was wondering if this could be a good addition to the develop persona. Kind regards Tom.
-
I recently installed Affinity Photo on a new laptop (I7 11th gen, 16 gB RAM, NVIDIA). The software frequently crashes on, for instance, batch running macro (72dpi to 300 dpi), develop personal detail refinement etc. This frequent crashing never occurred on my old I3, but then again these hard jobs weren't possible on this system. I probably have conflicting software, but where???? Pieter
-
 I don't have time to search entire forums or the interwebs to see if someone else has ever suggested this feedback before. So I offer my apologies if my suggestions have already been covered. 1) Please can you provide a feedback function WITHIN the application it self. It's incredibly frustrating to have to use out dated methods of signing up to god-awful web-forums which just leads to nonconstructive replies of un-thought out opinions and arguments. It also allows you to correctly link feedback (and abuse) to the software license of the user and even categorise the feedback so you can easily see which areas are causing most concern to the user base. 2) Please can you fix the mouse icon when painting in masks in the develop mode. The standard OS mouse icon does not feel accurate to paint with. Also a nice to improve if possible: Painting often feels sluggish to see the red tint forming. If there is a way to make this feel more responsive without upgrading an existing 32GB RAM I7 processor machine, that would be lovely please. 3) Cropping in Develop mode is missing an "ok" or "finished" button. It's frustrating to be sitting back with my tablet, controlling everything then having reach over to the keyboard which I moved to one side, just to hit <enter>. I don't want to map the enter key to my tablet device as it's never used for anything else! if you simply put a button in the UI it will mean I can just move the mouse there and click! perhaps I've missed a trick that does what I want, but then that would mean it's not obvious and intuitive to the user. 4) Please update the flash function for uploading files on this forum. Who runs flash in 2017? Browsers auto block flash from running by default because it's nasty. 5) More of a question then a suggestion, but is there a way to rename the overlays in the Overlays tab in Develop mode? I have 3 gradient overlays, all with the same name! that's very confusing to simple minds like myself. 6) Although I generally hope you spend more time fine tuning what you have already developed, instead of just rushing out new features, it would be nice if there was an in-application function for browsing image files, with a nice big preview of the image and EXIF data, which you can then double click to open it in the develop mode. I don't think anyone wants all this "importing" and cataloguing rubbish which is very slow. But browsing files within Affinity with a UI that suits photographers that windows/macOS don't offer, would be a great win. Thanks for your time.
 -
Within the Develop Persona, there are particularly little keyboard shortcuts that can be configured. While most of the action occurs within the studio panels, the toolbar items are the ones that need to be mapped to keyboard shortcuts the most. Nevertheless, there are no options for me to assign show highlight clipping (O in Camera Raw), blackpoint clipping (U in Camera Raw) or clipped tones, Single view, Split view or Mirror view, neither for Sync before/ after or swap. I am also missing a toggle to toggle between the original, non-modified version of the image and the developed image, because once I synced before/ after, I cannot go back to the non-modified image.
-
 Hello. I've noticed a weird thing. I've increased sharpness in Develop Persona (Detail Refinement) in my photo. When I click "Develop" to go to the Photo Persona, it loses a lot of sharpness. I've increased the sharpness more (but not that much more) so it's easier for you to see the difference. Why is this happening?
 -
 I'm not sure if this issue has been previously addressed, but I am using the trial version of Affinity Photo to see if I should purchase it during y'all's Black Friday Sale. None of the other personas in Affinity Photo seem to be working. I see no visual changes to my image when entering the Liquify, Develop, or Tone Mapping Personas. Not really sure how this could be the case, but I'm not willing to buy the product during y'all's discounted sale if entire sections of the software are not working properly for me to test them. Also, if I purchase just Affinity Designer and Affinity Publisher, will the Studio Link feature still work between those respective applications, or do I have to own all three in order for Studio Link to work? Thank you in advance for any clarity you can bring to the situation. All the best!
 -
Hi When I drag only a little bit the brush in Develop Persona, it results in some random brush strokes. In the atteched screen I've pointed the place where I've clicked the mouse (starting point of the brush, blue dot) and the direction I've dragged in only a little bit. The problem is that the brush started dragging in the other place. The orange colour on the screen is the marked place that shouldn't be there.
-

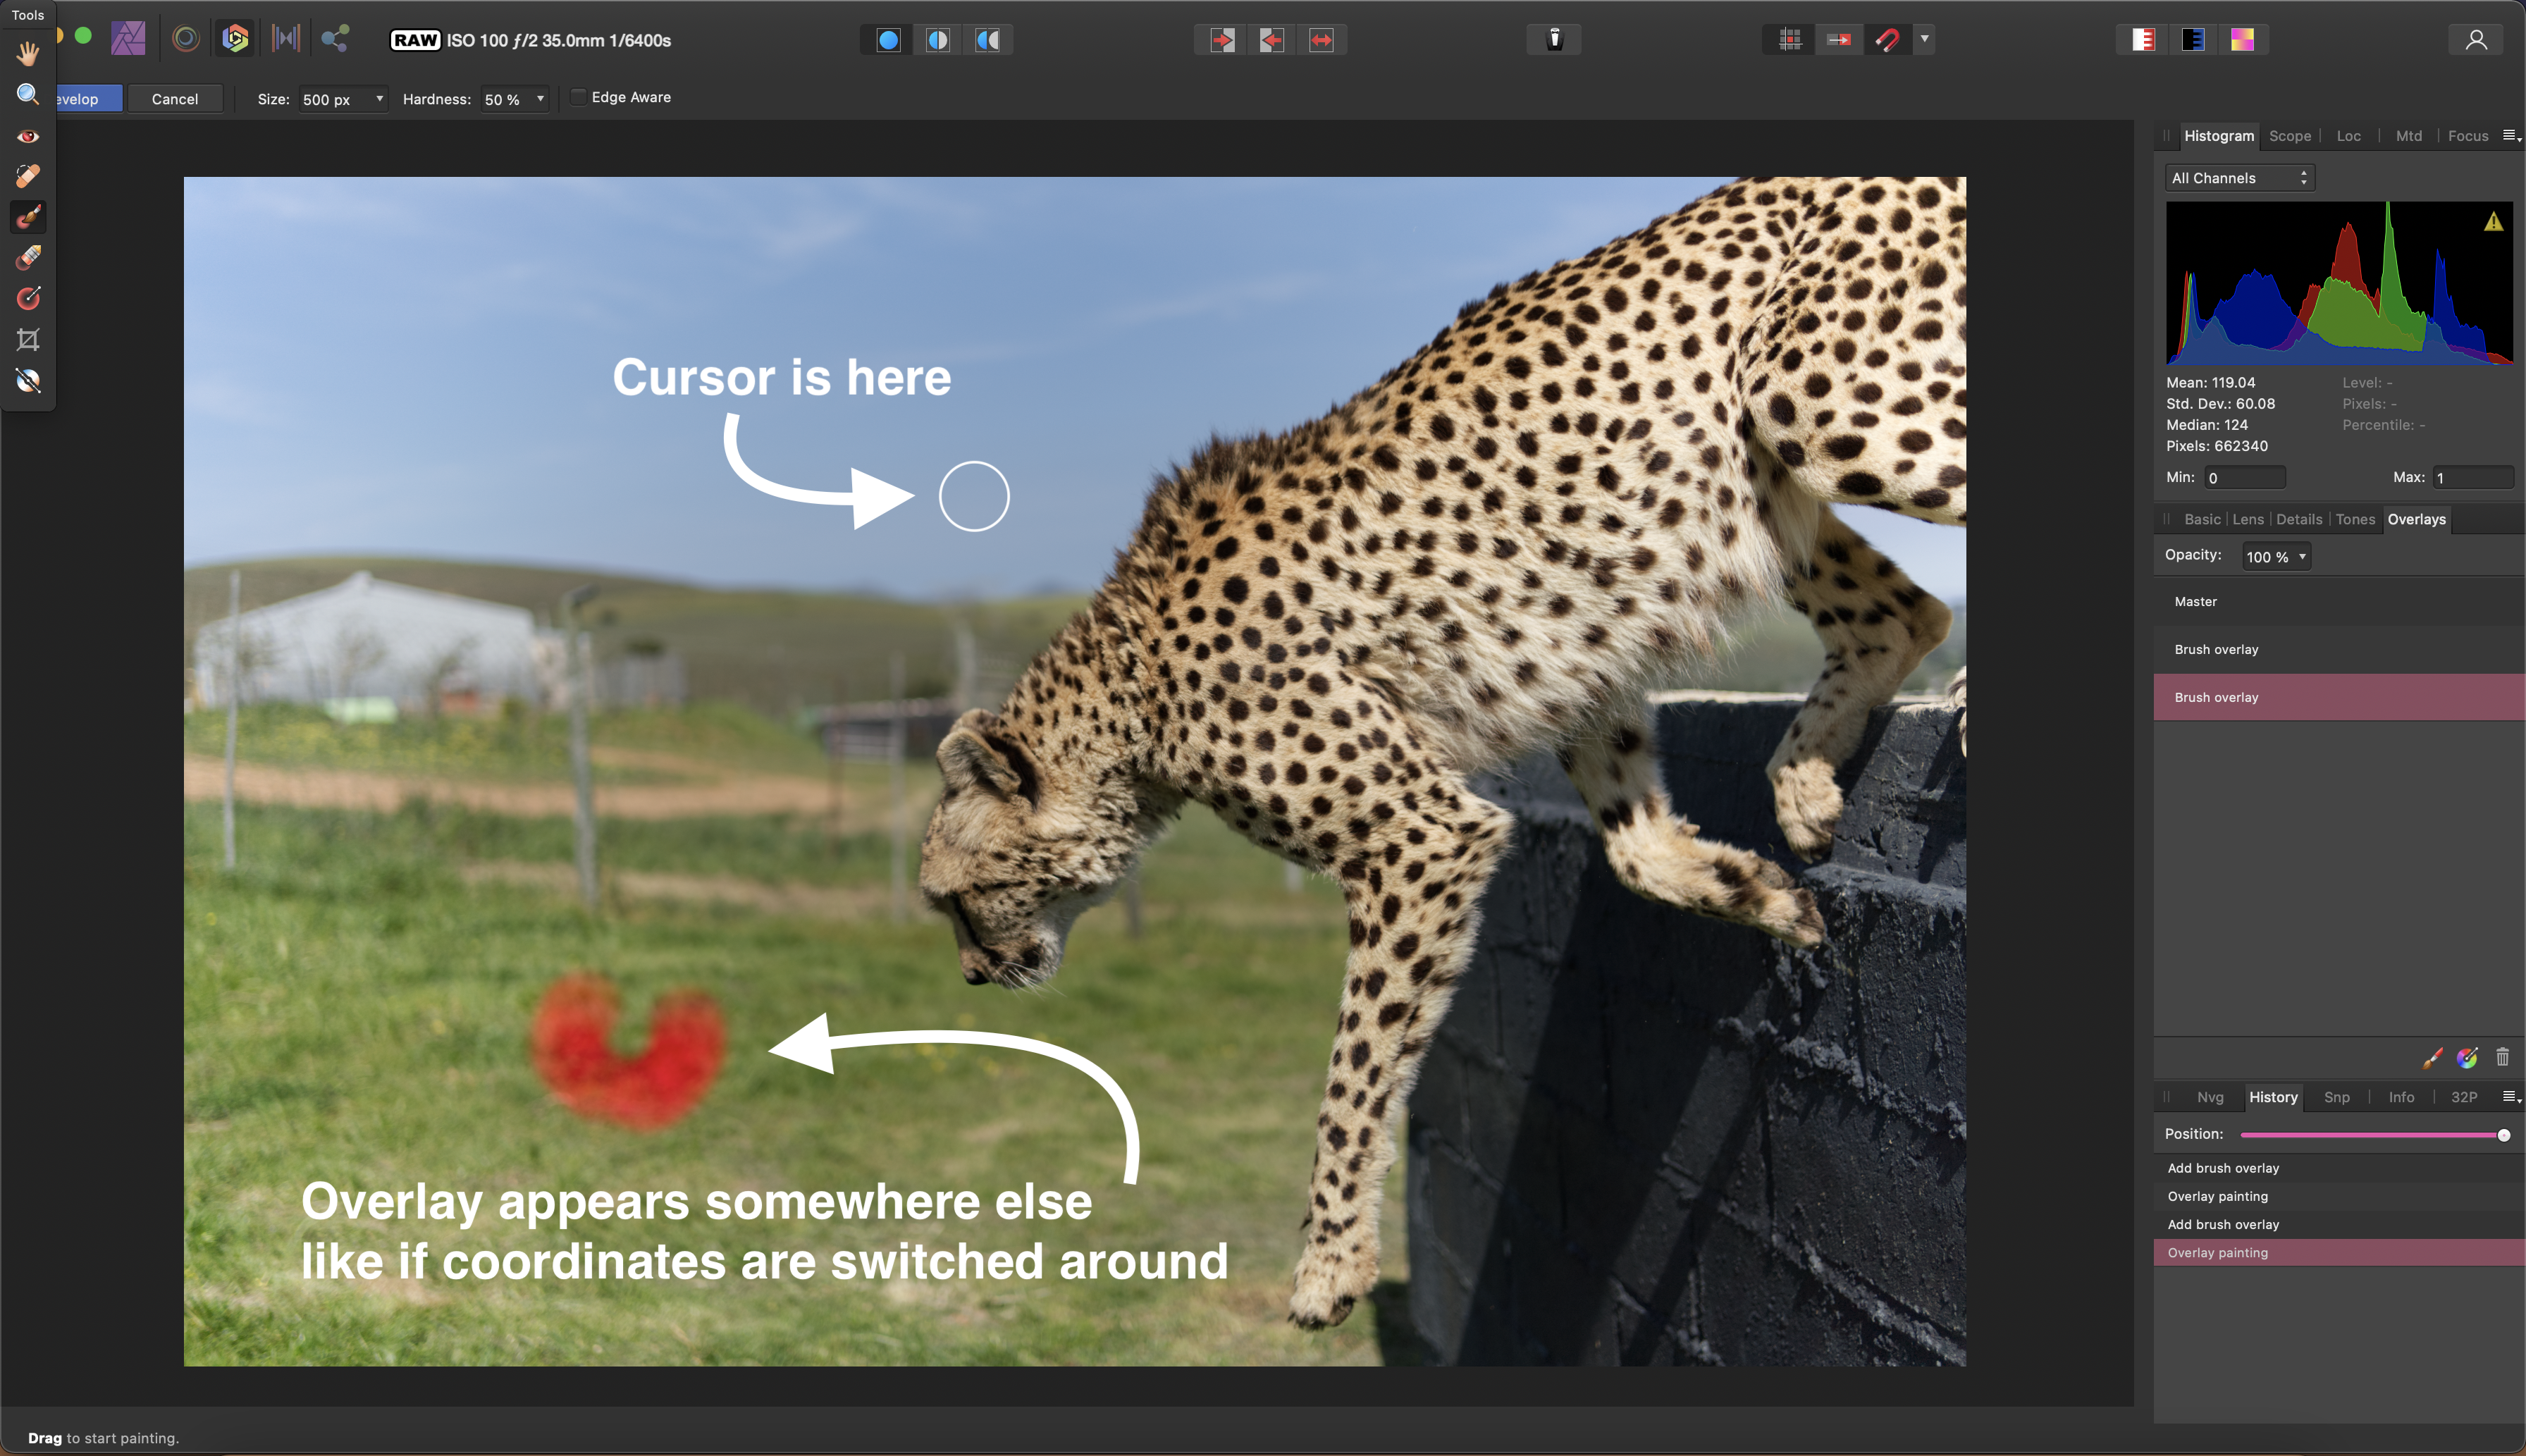
Overlay Develop Tool paints other area than where the cursor is.
Guest posted a topic in V1 Bugs found on macOS
Hi! I am using Affinity Photo on macOS Big Sur 11.6 hardware acceleration (in Preferences > Performance) is ON When developing big RAW images, typically after applying Basic / Lens / Details effects, when painting an overlay using either the trackpad or an external mouse, the coordinates seem to be turned around and the overlay gets drawn in a totally different place than where the curor is actually drawing them on screen. (See Screenshot1).