Search the Community
Showing results for tags 'destructive'.
Found 11 results
-
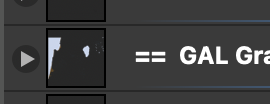
 (Working in aPub v1 since my group is still there.) There has been much discussion about this on the forum but I have yet to find some explanation for the symbols below on the top layer in aPub. lt must have to do with this question. I have placed many objects within a bounding box on the top layer. Great! But if I want to change the area of the bounding box the object remain "destroyed," i.e., the effect of the original bounding box remain (objects remain clipped as they were before). I realize that they are still there and have found that the only way to see the original unclipped object is to create a new top layer and move all of the object into that new top layer. Thus it appears that the original clipping is preserved in this original top layer. I see the symbols (attached snap) in this original top layer. These no doubt are related to the above. However, I have yet to find some aPub video that explains these layer symbols. Does one exist? BTW, by "symbol" I simply mean those which appear in the snap below (click to see full snap. NOTE that the == is part of my panel name. My question is about the symbols to the left of the ==. Nothing to do with creating "symbols" in aPub.
-
 EDIT: * The format i was editing is TIFF16 with LZW compression. Is not a DNG or RAW. While editing a photo, everything is fine but they stop appearing when I zoom in and out, move or apply a brush to areas of the image. However, they remain recognisable by affinity for automatic tracing and adjustments, they are simply not displayed on the screen. When the document is exported, the destruction is still there. If I convert to .psd and open in Phtoshop it comes out fine. i5 12th with 16 GB RAM and Intel Xe 98 CE using graphics accelerator. Latest DHC drivers. Windows 11. When you export, the data gargabe still there. But if you export from PSD and later in photoshop you export to PNG the file it's fine This is a representantion of what happend during the edit, just zooming and panning creates the issue.
-
Having been using Affinity Photo for nearly a year now I wonder why the same complaint is prevalent. There are so many comments of 'AP is great but' the but referring to the fact that RAW development is destructive. At first it didn't bother me but now I find there are more and more times I would like to go back and tweak my initial raw development but I have to return to the RAW file and start from scratch. I used to hate PS's sidecar file but now realise it's benefit. How hard would it be to implement non-destructive RAW adjustment? This would make it easy to copy the RAW adjustments from one edit and paste in to many files speeding up workflow. From comments I have seen there are many people who will not use AP purely because of this 'issue'. I am looking at another program that has a far better 'RAW' development tool but sadly lacks on the photo editing side as, among other things, it does not support layers. IMHO AP comes second to PS but only because RAW development is destructive, fix that and AP would be number 1.
-
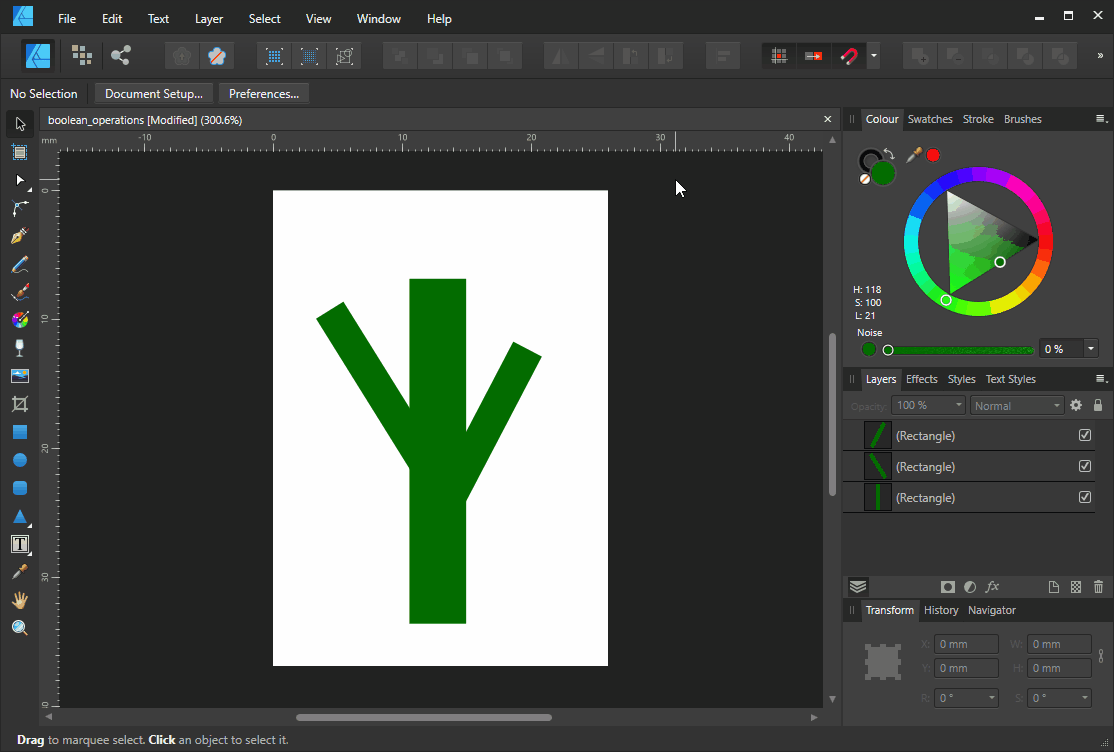
I discovered by chance that errors occur in "destructive" and "non-destructive" Boolean operations. Here is an example of "non-destructive" Boolean operations: boolean_operations.afdesign
- 1 reply
-
- 1
-

-
- boolean
- destructive
- (and 4 more)
-
Today I tried every way to edit a 360 picture in the equirecangular live projection it works fine BUT it is all destructive! SO for this work I have to go back to Photoshop I already abandoned for good (at least I thought), this is very sad because I love the Serif programs - especially Affinity Photo. Please do something in that regard otherwise keep up the good work greetings Schwabihabi
-
- 1
-
-
- 360
- non destructive
- (and 3 more)
-
 Read a review that auto adjustments in Affinity are destructive. If true, please provide more info. I currently use Lightroom and all adjustments are non destructive. Thanks.
 -
 Hello Everyone ! Would ask for more Non-Destructive capabilities to be added to Affinity Photo. There are great initiative taken with certain tools using a blank pixel layer but i believe more needs to be implemented and documented. i'm first thinking about : The Tone Mapping Persona: this is a great place for making our work better but it's only works in a destructive way (maybe i don't how to do it) but it would be great if a tone map can be added to a mask or a blank pixel layer then we can chose from there to map only a certain area/object etc of our photo/picture/ Development Persona: Great place to spend time working on better picture but also everything there is destructive, here i propose that one applied, our development to appears on sub or top layers similar to filter or mask or whatever dev's may find then from there we can mask this or that or simply make it possible continue where we left it in case we click the development persona again. Same thing should be applied to Liquify persona too. in fact, more Non-Destructive is okay and will be well received. if anyone knows how to do deep Non-Destructive works and/or know where to find tutos that talks about, please share ! Blessings !
-
- 1
-
-
- non destructive
- destructive
- (and 5 more)
-
 Is it possible to destructively apply a later mask so the export only has the lines visible on screen? Here is why: I've been playing around with topographical maps, a laser cutter and wood veneers. Starting with USGS vector data I've separated the 10' topo lines for the area around my house. I've laser cut these lines on wood veneers and glued them up to build a 3D map of my neighborhood. Its pretty cool, but I want to etch the rivers/lakes and roads too. My design has ~30 layer groups for each of the topo lines and a layer group with the water and roads. I want to generate 30 layers for each of the of the layers to be etched. To do this I want to mask the water and roads layer with a pair of the topo layers. Visually I can do this by creating a mask of the two topo layers and applying it to the water and roads group. However, this in only on the screen. When this is exported lots of other lines come through. I've done a few layers with the Intersect, and Divide commands, but it doesn't work with a multi curve group. IFNY-sort-redueced.afdesign
 -
 Hi all, first of all, apologies, I'm sure I've seen this covered before, but multiple searches have come up with nothing, so let's make a new one!.. I want to make simple hue, (or whatever) adjustments to a selected layer, without it appearing on a new layer above the selected layer and subsequently affecting the whole image. I understand the value of the live and non destructive adjustments, and, of course, wouldn't be without them, but sometimes I just want to hack the colour of a blob on a layer without having to go through all the hassle of dragging my adjustment layer onto my target layer and then applying the change. Sometime I just want to press CMD+U and drag a slider! Is there any way to do this as quickly and simply as some other non-mentionable apps might do it? If memory serves correct, I think there was a setting somewhere, but even that sounds like I might have to turn it on and off each time I didn't care about non destructive stuff. Thanks for listening Wayne
 -
 Hi, I was wondering if there is only non-destructive cropping in affinity photo or is the a way to crop destructively? Edit 1: Hmm i suppose that would be "Document > Flatten" to achieve this?! Edit 2: I guess that was only half the trick am I right presuming it is actually first Flatten and then Clip Canvas? Kinda strange way of getting there but seams to have done the trick for me on a picture. Cheers
 -
 So far I am impressed with the Affinity Photo Beta Great replacement for Nikon Capture NX-2 and Aperture. Very intuitive on first look. So I am thinking about work flow and preservation of RAW files, edited files, layers etc. Can someone provide a brief outline to illuminate a workflow for Afinity Pro? A suggested Workflow using LR as a Digital Asset Manager?