Search the Community
Showing results for tags 'custom brush'.
-
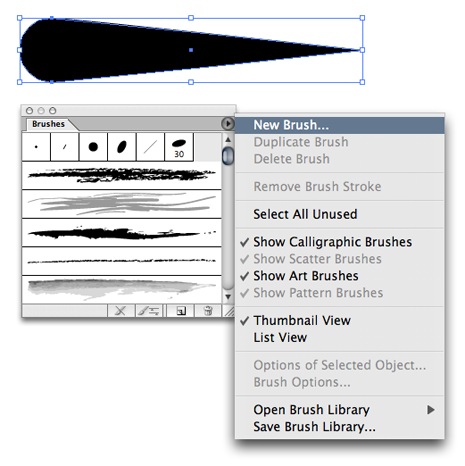
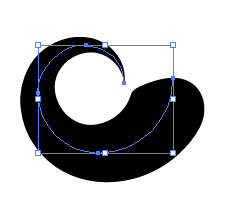
I'm brand new to Affinity Design and I'm having teething problems trying to do certain things I'm used to doing in Adobe Illustrator. For example the custom brush, or a brush that is thin in a point at one end only and responds to pen pressure. Also I used to be able to draw this out neatly with a line from the pen tool and then drag the brush from the menu of brushes to instantly change the pen line to this stroke effect. What's the best way to customise this type of brush? (The pictures come from this custom brush tutorial suitable for Adobe Illustrator http://www.bittbox.com/illustrator/illustrator-how-to-make-custom-swooshes-swirls-and-curls ) Another question while on topic, I already have some brush files suitable for illustrator but wont open in Affinity, is there anyway they can work or be converted to work? Thanks
- 9 replies
-
- custom brush
- brush
-
(and 3 more)
Tagged with:
-
I'm new to Affinity Designer and was trying to make a custom brush that can loop seemlessly for circles, but when I import the brush it creates a glitch when moving it at certain angles. As far as I can tell it's purely visual as it clears when zooming out, but I'm concerned it might cause issues later on if its something I messed up when making the brush. I created a new textured intensity brush with the following image and didnt change any of the settings. It doesn't occur with any other brush though so it might be something I missed about how brushes work. I've also tried changing the stroke width and head/tail offset. Any help is appreciated and I can provide more info if needed. BrushArtifact.mp4
-
I created a custom brush using New Brush from Selection. It's fine if i paint on a regular pixel layer but if I use it on a mask, it paints as a block with the shape inside, almost like it's been inverted. Steps I used to create the brush: Create a new pixel layer Create an outline with the freehand lasso Fill selection with black Brush Panel > New Brush from Selection (both with an active selection and without) Edited brush dynamics (also tried without editing) AP: 1.9.3 Mac:
-
Hey, 1. I want to make a brush of three different images, lets say smileys (one happy, one very happy and one sad). The images do exist. Now when i paint with the brush the appearing smiley should be random how do i do it? 2. Now i want a more complex brush a brush of garden gnomes but this time i want them to differ in thei features randomly. So i have three mouths, 2 beardstyles and 5 hats they should not differ in any other way. Can i get a brush maybe with the subbrush menu that paints a garden gnome with a random combination of these features? All that without me having to create a picture of a gnome for every possible combination first. Do you know whether it is possible in a different program ? Kindest regards and a big thx for your explanations.
-
- brush
- customized
- (and 8 more)
-
Hello all.. I'm trying to figure something out but for the life of me, I can't seem to find the answer.. I'm following this tutorial on creating a custom brush for Designer (re-creating a beard hair brush I made for myself years ago in PS) How to create and import brush in Affinity Designer - YouTube The problem I'm running into is that I need to be able to adjust the dynamics of this brush (like the size and scattering etc) for it to be effective, so I have to create it as a pixel persona brush seeing as I don't have these options in the vector brush dialog box.. But apparently once I have defined the brush using the selection/image like in the video, I have no ability to change the color of this brush when painting with it, which for my particular purpose is pretty useless unless I want to add a color overlay to every layer I use it on.. So..... How do you create a a custom pixel brush that you can paint with any chosen color, like the default brushes or the ones I've purchased through the website?
-
Hi all, Is there a way to create a brush with your signature? I used to have this a long time ago on PS, where I could use it when I opened a PDF file and just "stamp" it with my brush for my signature... Saves a lot of time printing documents, signing them and scanning them to send out.....easier to just open the PDF and "sign" it digitally... Thoughts? Is there a good tutorial for AP doing brushes like this? Thank you in advance, cayenne
-
In this video, We are going to show you, how to create and import custom brush in Affinity Designer. You have to create some shape as well as you want, After creating your shape, Select all layer and export in PNG format as 'Selection without Background' and then import PNG image in brush menu as 'New Textured Image Brush'. I think this video tutorial will help you create a new custom brush in Affinity Designer. Thanks for Watching.
-
- create custom brush
- image brush
- (and 3 more)
-
I made this video to show a friend how to make a watermark by creating a custom brush. When added as a layer, click once to act like a "Stamp" Only drawback is, once saved as a PNG, you cant change the color of your text, BUT, layer "Effects" work on the layer including, resizing, rotation, etc. How to Make a Custom Brush / Watermark https://youtu.be/9QBCKDGk8X0
-
- Custom Brush
- Watermark
-
(and 1 more)
Tagged with:
-
In this tutorial I'm gonna show you how to draw a simple paper clip in Affinity designer. In the first step we will draw the single paper clip as a curve and will use the actions break curve and join curve. With the pen tool we will extend the curve so that it looks like a real paper clip. In the second step (8:18) we will link two paper clips together. Therefor we will use the function expand stroke and the operations devide and add. In the third step we will use a rectangle as a clipping mask to create the drawing for the closed paper clip brush (12:38). At 16:12 I'll show you how to export the paper clip drawings as transparent png files. Creating different brushes in AD and AP will been shown at 18:05. https://youtu.be/Iaq7lmSsVoA
-
- curve actions
- break curve
-
(and 6 more)
Tagged with:


