Search the Community
Showing results for tags 'curves'.
-
 Hi, I'm trying to join these two separate curves into one complete curve. Sometime the 'Join curves' -option joins these nodes, sometime I have to close Designer and open it again, for it to do something with this option, most of the times nothing happens. Sometimes it just joins random nodes (or it seems that way), regardles of which nodes have been chosen. Am I doing something wrong, or is there some bug or something else worth knowing? I've read most likely all there is related to this kind of issue, but have not found a solution. Any ideas?
 -
In Affinity Photo, it would be nice to have numerical input for Curves control points, allowing more precise values.
-
 Hi, I was just surfing youtube yesterday and I came across a video by Sean Tucker: At 7:50, Sean uses hue saturation and lumance sliders to edit inividual colours in his image. I was wondering if you can do this in affinity photo. I am interested in buying it soon so any answer will help me in making my decision. Thanks, Jayvin.
 -
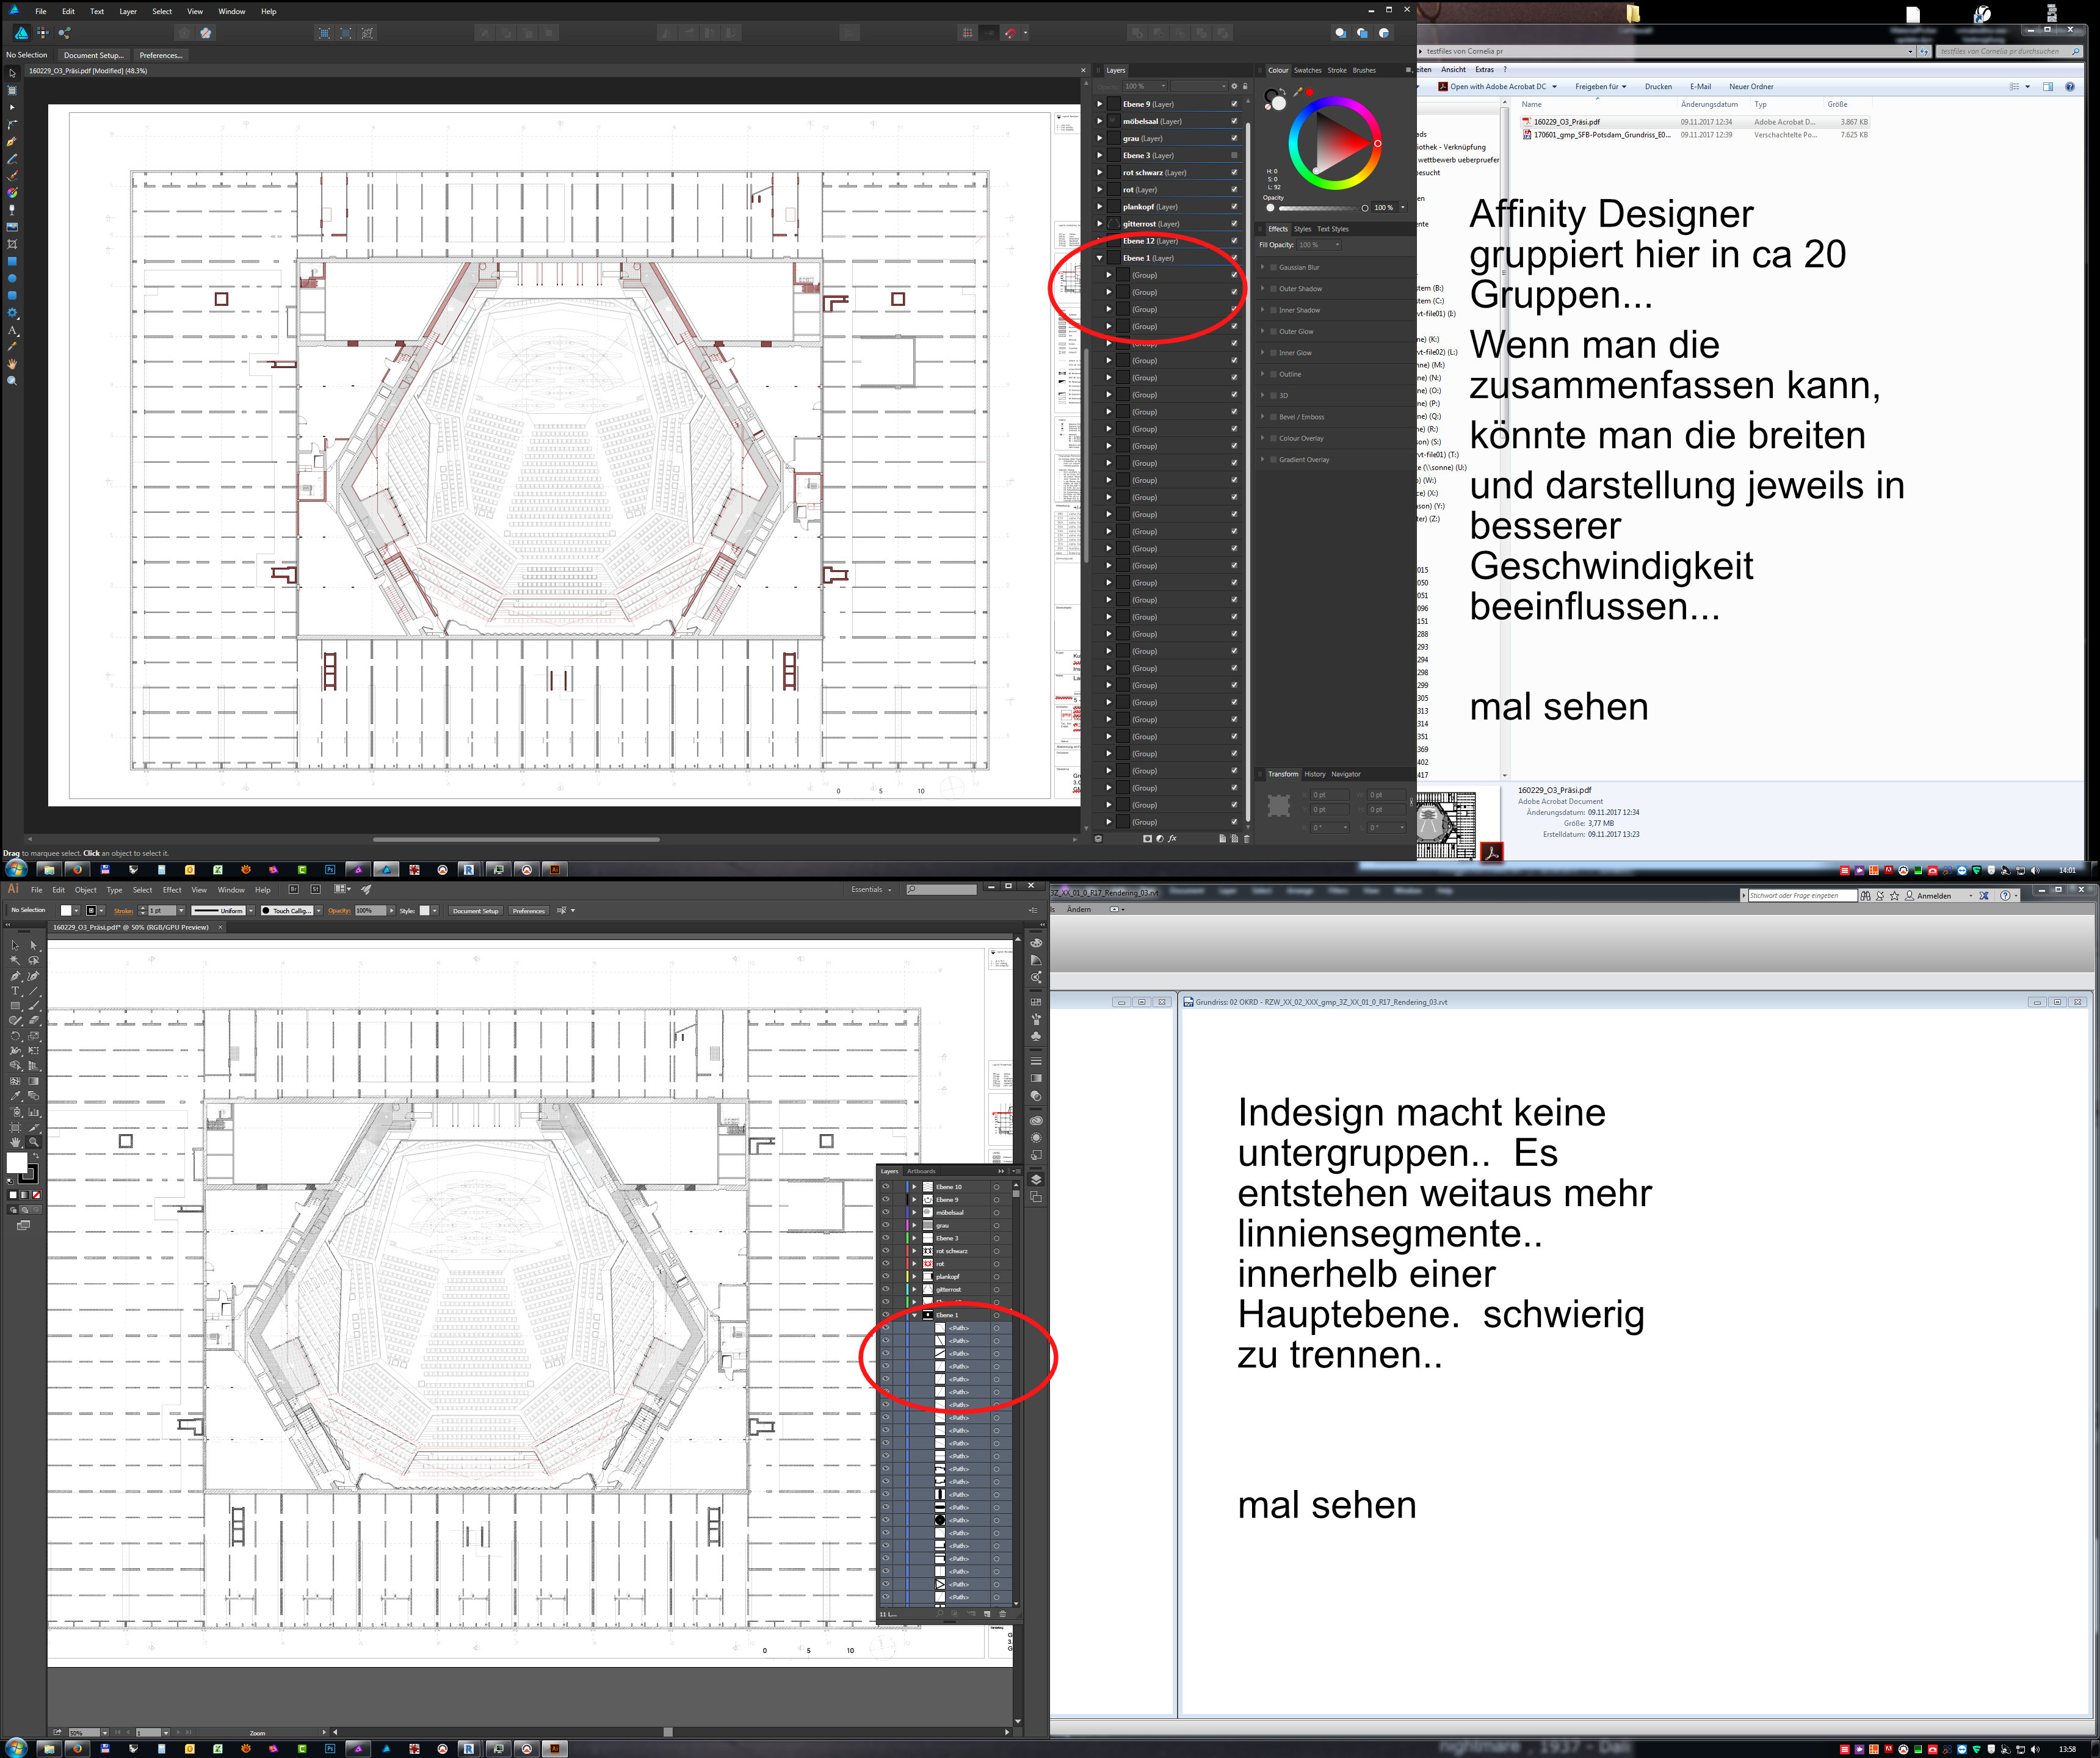
 Hi everyone, here´s a Questin comming from our PR appartment. We are Architects, and our Company produces Plans and views of Architectural Projects using CAD software, that will be printed as PDF files.. now, when importing them, Illustrator, as well as Affinity Designer seperate lines ore layer with for example dotted lines or to exploded separated lines.. so you get hundredts of seperated single shapes, that before belonged to for example ony on Autocad line, that was just told to be dotted... and.. using Designer or Illustrator kills the possibilty to change their look afterwords. nevertheless, Designer seems to organise the seperated shapes a little bit further into Groups, and my question now is, can i just select the segments inside of such a group and combine them into one single easier editable curvesegment ? is there a way `?
-

clipping path / Curves in JPGs [AG, AF, AP]
Oval posted a topic in Older Feedback & Suggestion Posts
Apps like PhotoLine, PS, InDesign, GraphicConverter, … handle this. A must. And the Curves in PSDs? Ignored? Not on the Common Feature Requests INDEX yet? It is not a problem to program. Give us hope, please. -
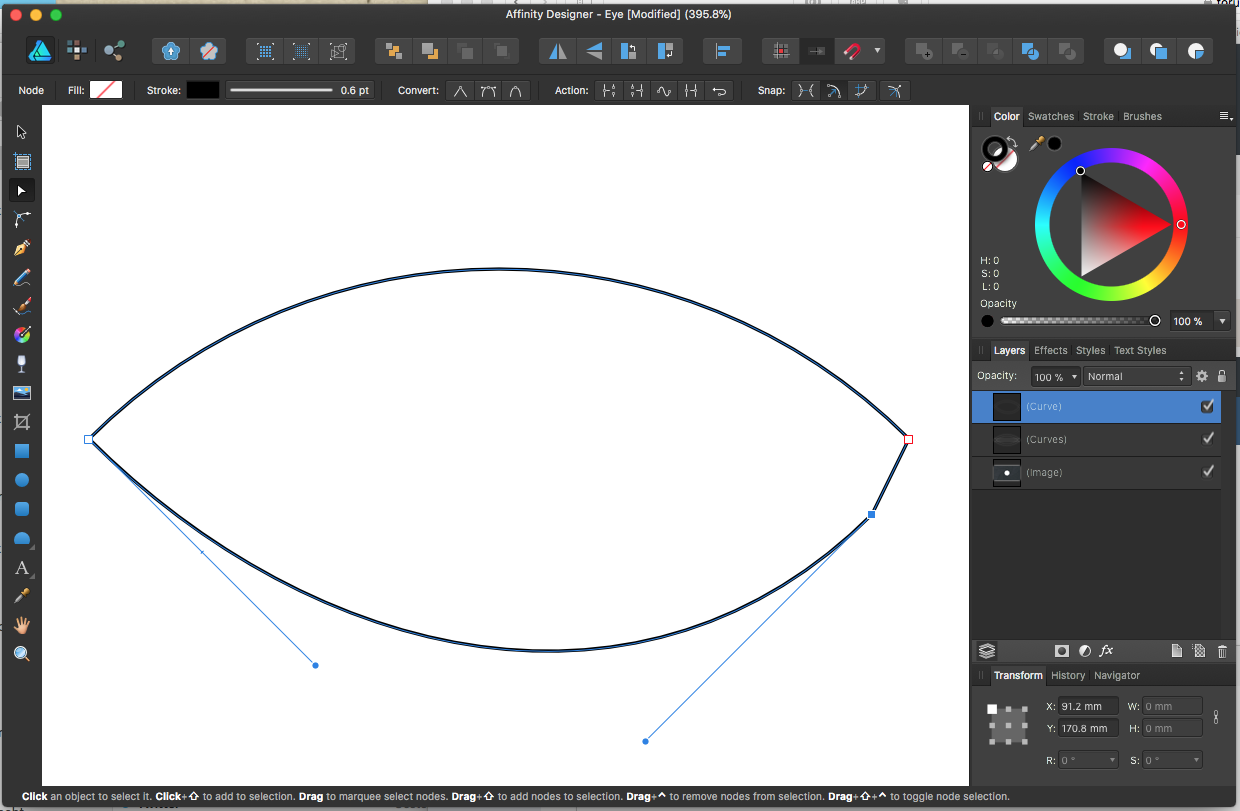
 I am trying to create an eye shape. I did this by closing and joining two quarter circle curves: But now the right side of the shape still consists of two nodes on top of each other (see below, I dragged on of them away so you can see both of them ). How can I join those two nodes, so that my eye shape consits only of two nodes and not three? If I just delete that node, the lower curve is not symmetric anymore and I can't figure out to get the symmetry back. If I can't join them, what is a better way to create an eye shape?
-
 When converting a many layered doc to pdf for print, we need to convert all text to curves. Select All + Convert to Curves works, unless some layers are locked. Is there a way to determine if there are any "Text" layers in a document? Thanks.
 -
I added a preset in the 'curves adjustments' layer in a image and want to reuse these settings in another image; I can't find a way to reload these settings? Can anybody tell me if this is possible ??? BTW: I'm using the beta6 version now and it seems to be working ok (for me... that is) thanks IA
-
 Hi all, Just a small tutorial: To convert a curve to it's outlines, do the following: 1. Klick on the curve. 2. Set the thickness you desire. 3. In Menu LAYER klick on Expand Stroke. Done.
 -
On an JPEG picture a Curves layer was added. With this layer marked as active the gradient tool was opened and a linear gradient drawn. When the gradient color at the dark end should be adjusted to black, the hsl color wheel (and this is valid for other color adjust variant, too) dialog disappears whenever one tries to change anything. The color remains not altered. This is repeatable. The same operation in 1.5.2 works as expected.
-
No further tweaks of “Expand Stroke” or will we get the same quality like in other apps in the next beta?
-
Hello Affinity team! I've had some problems with merging curves layers and in the result I asked this wonderful community for help. At first I thought I must be missing some tools and someone here will guide me to the light, but seems like it's the software that misses pretty important tool. Please, get familiar with the thread I started: https://forum.affinity.serif.com/index.php?/topic/46069-designer-simplifying-closing-single-curve/& Issues: - dividing curves when hitting "Add" - no easy solution to merging curve that overlaps itself 2 ideas emerged: - breaking curves in innocuous places and then hitting add, - creating rectangles in divided areas and then removing some of the nodes. It's something and working for now, but it's pretty time consuming, and for someone facing deadlines on the daily basis can be a deal breaker. Suggestion: - getting "Add" tool to merge singe curve that overlaps itself, - or creating another tool that will do so.
-
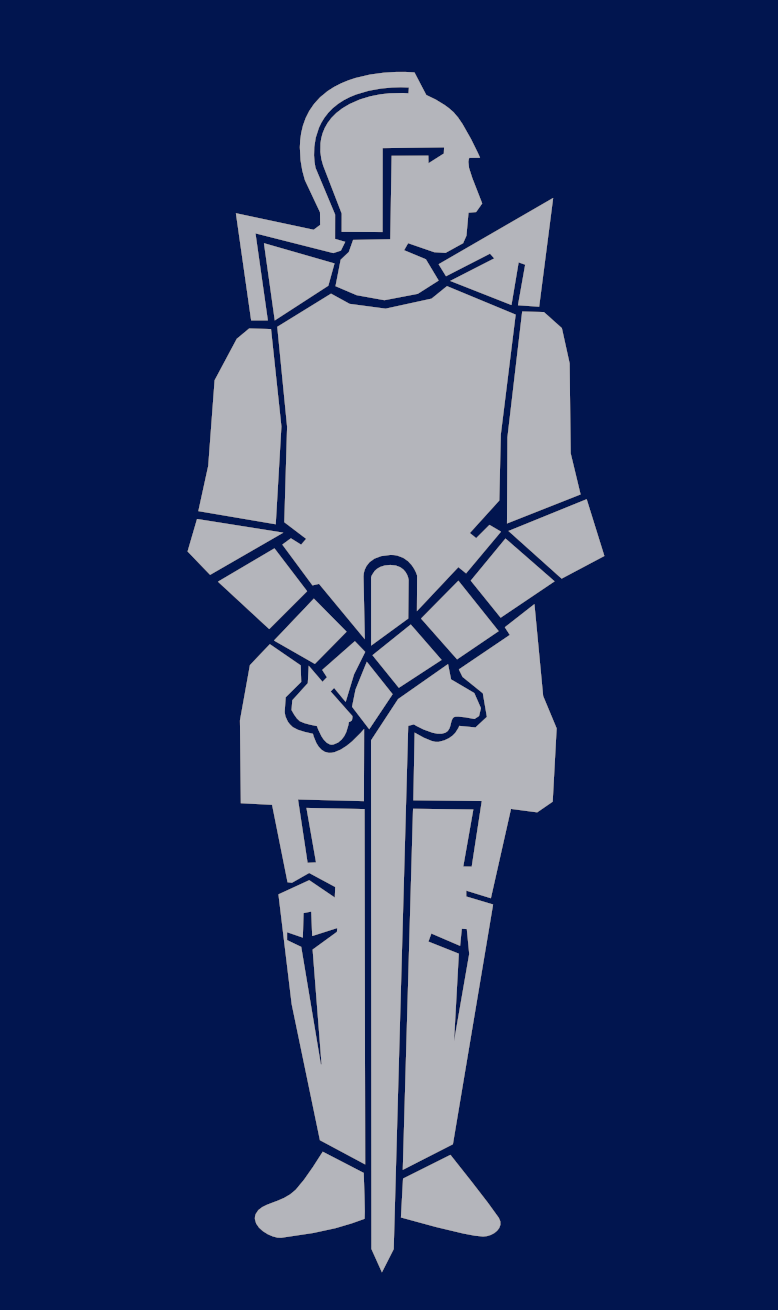
 Hi Guys Once again another newbie, but I hope you have some brain energy to spare! My current predicament is, even after reading the AD guide, that I'm unable to find a way to equally space rhomboids within my design. My design essentially is a suite of Amor with varying rhomboids to make up the armour, Im looking for a way to make sure that all the pieces have equal distances between them. I have tried the transform tool but this is really restricted to nodes within each curve to a X and Y coordinates which would require a lot of pythagoras! I was thinking is there any way to set equal distance between the lines which the nodes create?
-
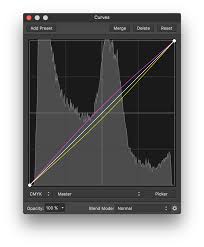
 Hi there, first of all, congratullations for the app. Do you have plans to implement in curves, the option to see the image in background, of the histogram for every color chanel (I dont know i writing it right in english, see the attached image). I think that is imprescindible for a profesional retouching photo soft. Thanks.
-
Hi there, first of all, congratullations for the app. Do you have plans to implement in curves, the option to see the image in background, of the histogram for every color chanel (I dont know i writing it right in english, see the attached image). I think that is imprescindible for a profesional retouching photo app. Thanks.
-
Telegram (on iPhone at least) has a pretty nice curves adjustment feature in their photo sharing dialog you do not add points onto the curve but give the curve a gentle push to either side this gives more subtle results and feels just right on a touch surface maybe this is something that could be added to the iPad as well to even better use the touch input method cheers
-
 Odd thing just happened (AD 1.5.1.43 Win7)... Drew a curve Made a clone Flipped it horizontally Aligned the start nodes Attempted to join them And the whole lot vanishes! I've erased the rest of the drawing leaving just the two curves, and this behaviour happens repeatedly. File attached - try selecting the top centre nodes where the curves touch and joining. If I tamper with the file in almost any way (such ad adding a new object to the canvas) then the curves join correctly. What is going on? Have just loaded the file into 1.5.0.36 Retail and the behaviour is different... here the curves remain, but do not join. The Vanishing.afdesign
 -
 Hi! At first – sorry for my english. Second – my problem. I want to join curves, but I don’t know how
-
 Good day! Having played around with Affinity Designer the whole afternoon creating curves and shapes, I would like to share some thougths. - It often happens to me that I add a node accidentally, because it just takes a single click. I would prefer a double click instead of a single click for adding a node, which is something I do far less often than trying to select a curve or a node or dragging the path. - When deleting a node, the curve is distorted significantly. It would be great if you could apply an algorithm that tries to adjust the neighboring nodes such that the shape is preserved as much as possible without the deleted node. (I know that this is not possible exactly mathematically, but when adding a node and then deleting it again, I would expect to get back almost the same curve.) I often simplify curves by deleting nodes, for example when drawing with the pencil tool and the curve is a bit shaky and has too many nodes. But deleting the superfluous nodes does not produce a smoother curve, rather it ends up more like a series of nearly straight lines. Or I try to place a new node along the curve in a better location and then delete its neighbour (effectively moving a node along the path). As it is now, this always requires me to restore the path to its previous shape. - In the help I read this: "The curve will automatically reshape because of the deleted node, but you can retain the curve's original geometry by pressing Alt+Delete key instead." This does not work on my Version (1.5.3 on Windows, Swiss German Keyboard Layout). Alt+Delete does not do anything. In my opinion, the current behaviour (automatically reshape) is not useful. Make a shape preserving node deletion the default. Then Alt-Delete could be used for something else, for example to create a straight-line segment. - While talking about keyboard shortcuts: There are some keyboard short cuts that do not work for me. I have a Swiss German Layout. For example, the [ and ] keys do not work. On my Keyboard, I need to type them with the AltGr key, which is the same as Alt+Ctl. This gets confused with Keyboard shortcuts like Ctl+Alt+[ which I cannot press at all. When trying to redefinine a function to [ and ] in the shortcut editor, it is recognized as AltGr-ü and AltGr-¨, which is insofar correct as it is the typed key combination, but it does not work. Keys defined this way show no reaction. (Letters and numbers do work, though) - The "Smooth curve" function sometimes produces unpleasant results. For example, I draw a circle and convert it to a path. This gives me a perfectly smooth path with 4 nodes. After clicking "Smooth curve" I get a path with 12 nodes. While I admit that it is still smooth, it goes as against my experience that the smoothest paths I create are usually those with the fewest nodes. Also, when drawing a line with the pencil tool which seems a bit shaky, "Smooth curve" will just add more nodes! - A "Simplify curve" function might be more useful. Successively reducing the node count while trying to keep the overall shape as much as possible. Either apply it on the whole curve or a selection of adjacent nodes. - When designing free form curves, a good strategy is to place the majority of nodes so that their handles extend vertically or horizontally. (This trick I learned from typographers https://theagsc.com/blog/tutorials/so-whats-the-big-deal-with-horizontal-vertical-bezier-handles-anyway/ ) It would be great if there was a way to restrict the handles to these directions. In the help I learned that by pressing Shift, the directions are constrained to multiples of 45°, but it seems this only works when laying out the curve with the pen tool. When editing it with the Node tool, pressing shift just fixes the handle direction (which is also useful). Nevertheless, I really like the program! Best regards, Andreas
 -
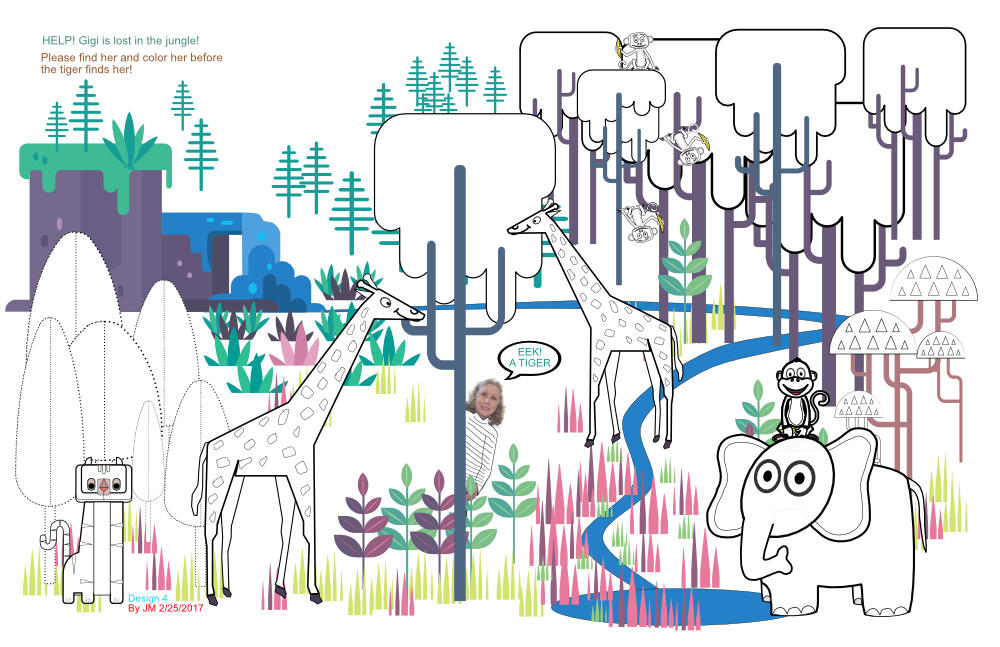
Thought Enrique (Frankentoons) might like to see a use I have made of his eBook resources - thanks again, Enrique! Here is the post where he announced it... https://forum.affinity.serif.com/index.php?/topic/34700-free-ebook-for-designer-by-frankentoon/?hl=frankentoon For fun, I create coloring pages for family members using Affinity Designer and Photo. Each coloring page is Tabloid size as I have found it fits high-chair tray-tops nicely and provides error-room for straying crayons. :lol: I make a colored copy for a visual sample, and a minimally colored one for the kids to use their crayons. Each set I do takes several days to create. Below is one set I did a few months ago using Frankentoon eBook resources and additional *animals (this one has no shadows/shading as it was busy enough for kids). The kids responded they really liked having their own "Gigi" in the forest. Color Sample: To be colored version: * Disclaimer: since it is not for resale or publication, I use Google images as a guide for animals/people/subjects. I pen-tool and modify each and every one to fit my concept and I don't claim complete originality.
- 2 replies
-
- 2
-

-
- Pen tool
- AFdesigner
- (and 1 more)
-
 Hi, I am new to Affinity Designer (a week) and need some guidance. I have a simple problem that I cannot seem to get past. I'm trying to reduce the weight of a font and cannot seem to do it. I am using the PilGi font and would like to reduce the weight. - Thus far I have been converting to curves and adjusting it manually but am not 100% happy with my work. I am struggling with keeping the lines smooth. - I have also tried to create/edit text style as it seems to have that option, but it is greyed out. I would like to just dictated the weight of that font. Please help, this is driving me bonkers! Thanks ahead of time!
 -
Attached is a simple tones bar that can be used in AP for: Assessing luminosity of parts of an image. Constraining curves adjustments to specific tones. Variable luminosity-based selection and edit. Details on origin and use are included in a pdf. mono-tones.zip
- 1 reply
-
- 4
-
-
- luminosity
- curves
- (and 1 more)
-
It's nice that Affinity Photo has got such good support of the 32 floating point mode but it is somehow unfinished. There are particularly two things that I desperately miss: 1. The ability to show the 32 bit float color values in the info panel. How should we work accurately with 32 bit float values if they are displayed nowhere? All that I can see are the conventional RGB values from 0 - 255 but these are meaningless in 32 bit float. 32 bit float per definition contains color values below 0 (actually a bad thing) or above 1 (actually a good thing). 2. Please make the curves dialogue zoomable so we can also edit values that exceed the white point of 1. The values beyond the white point are in fact one of the main advantages of 32 bit float.
-
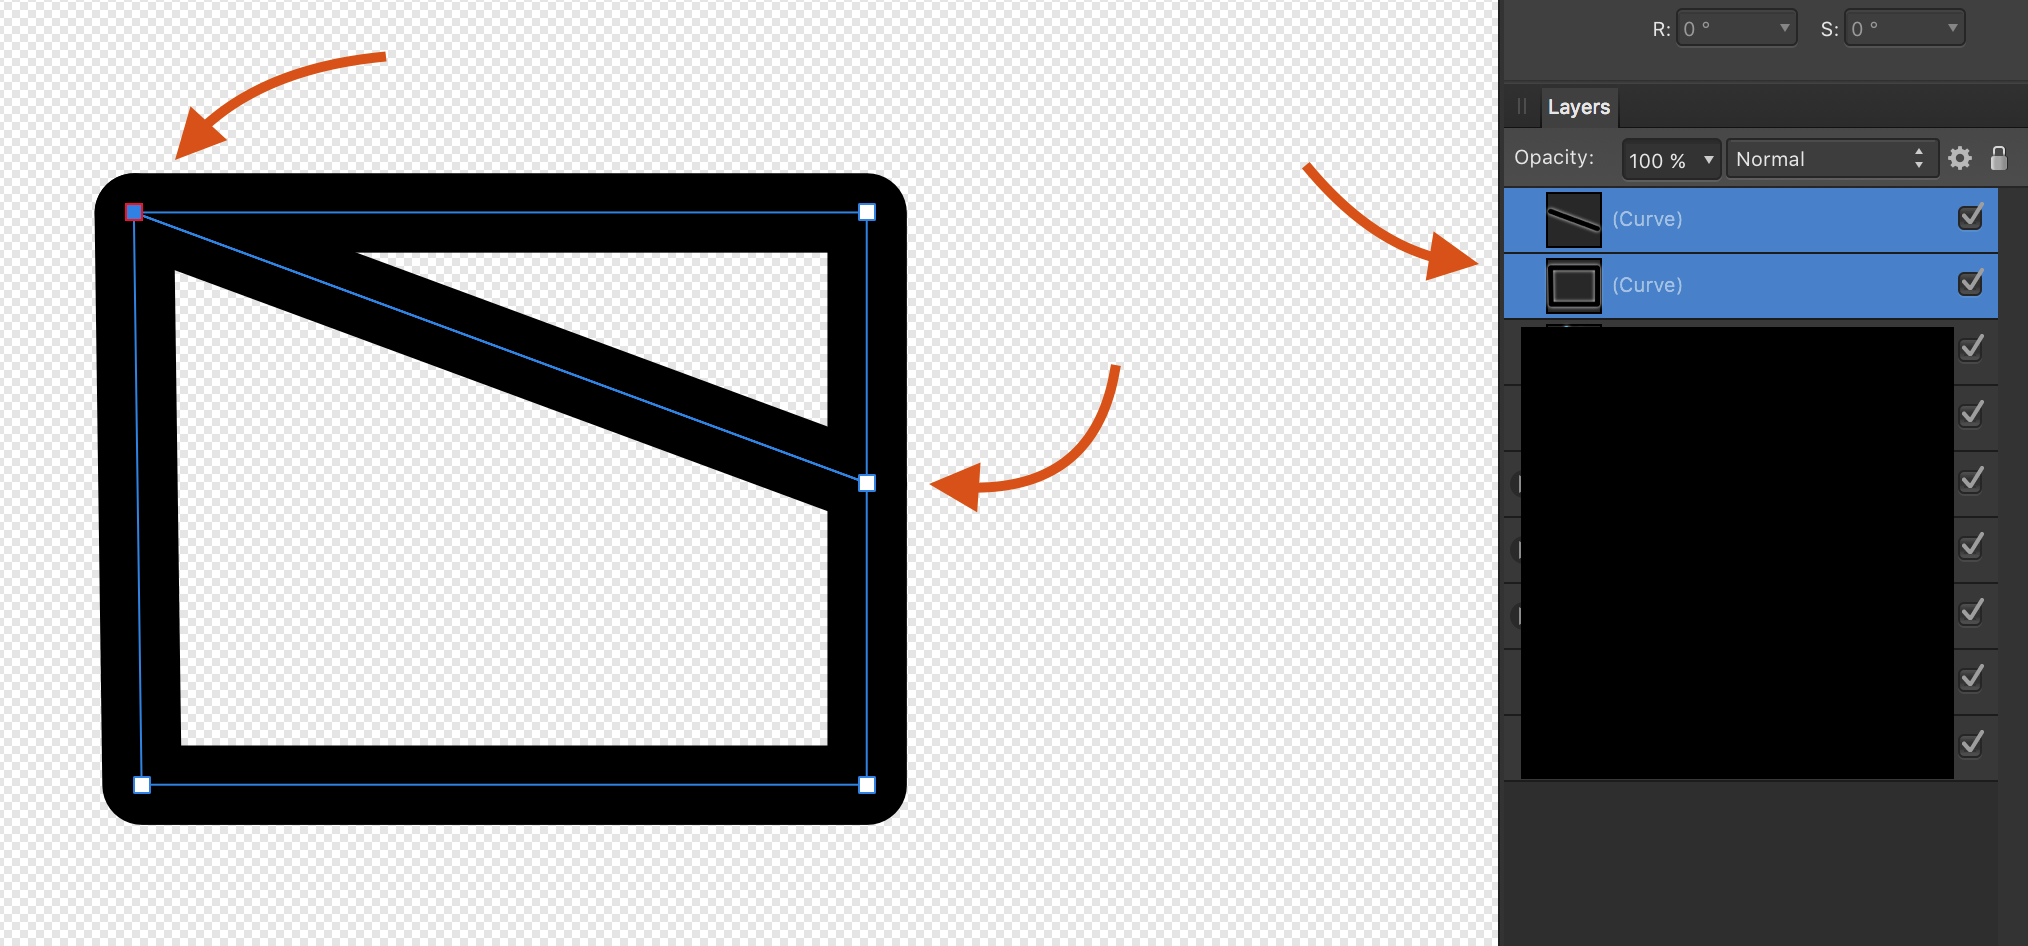
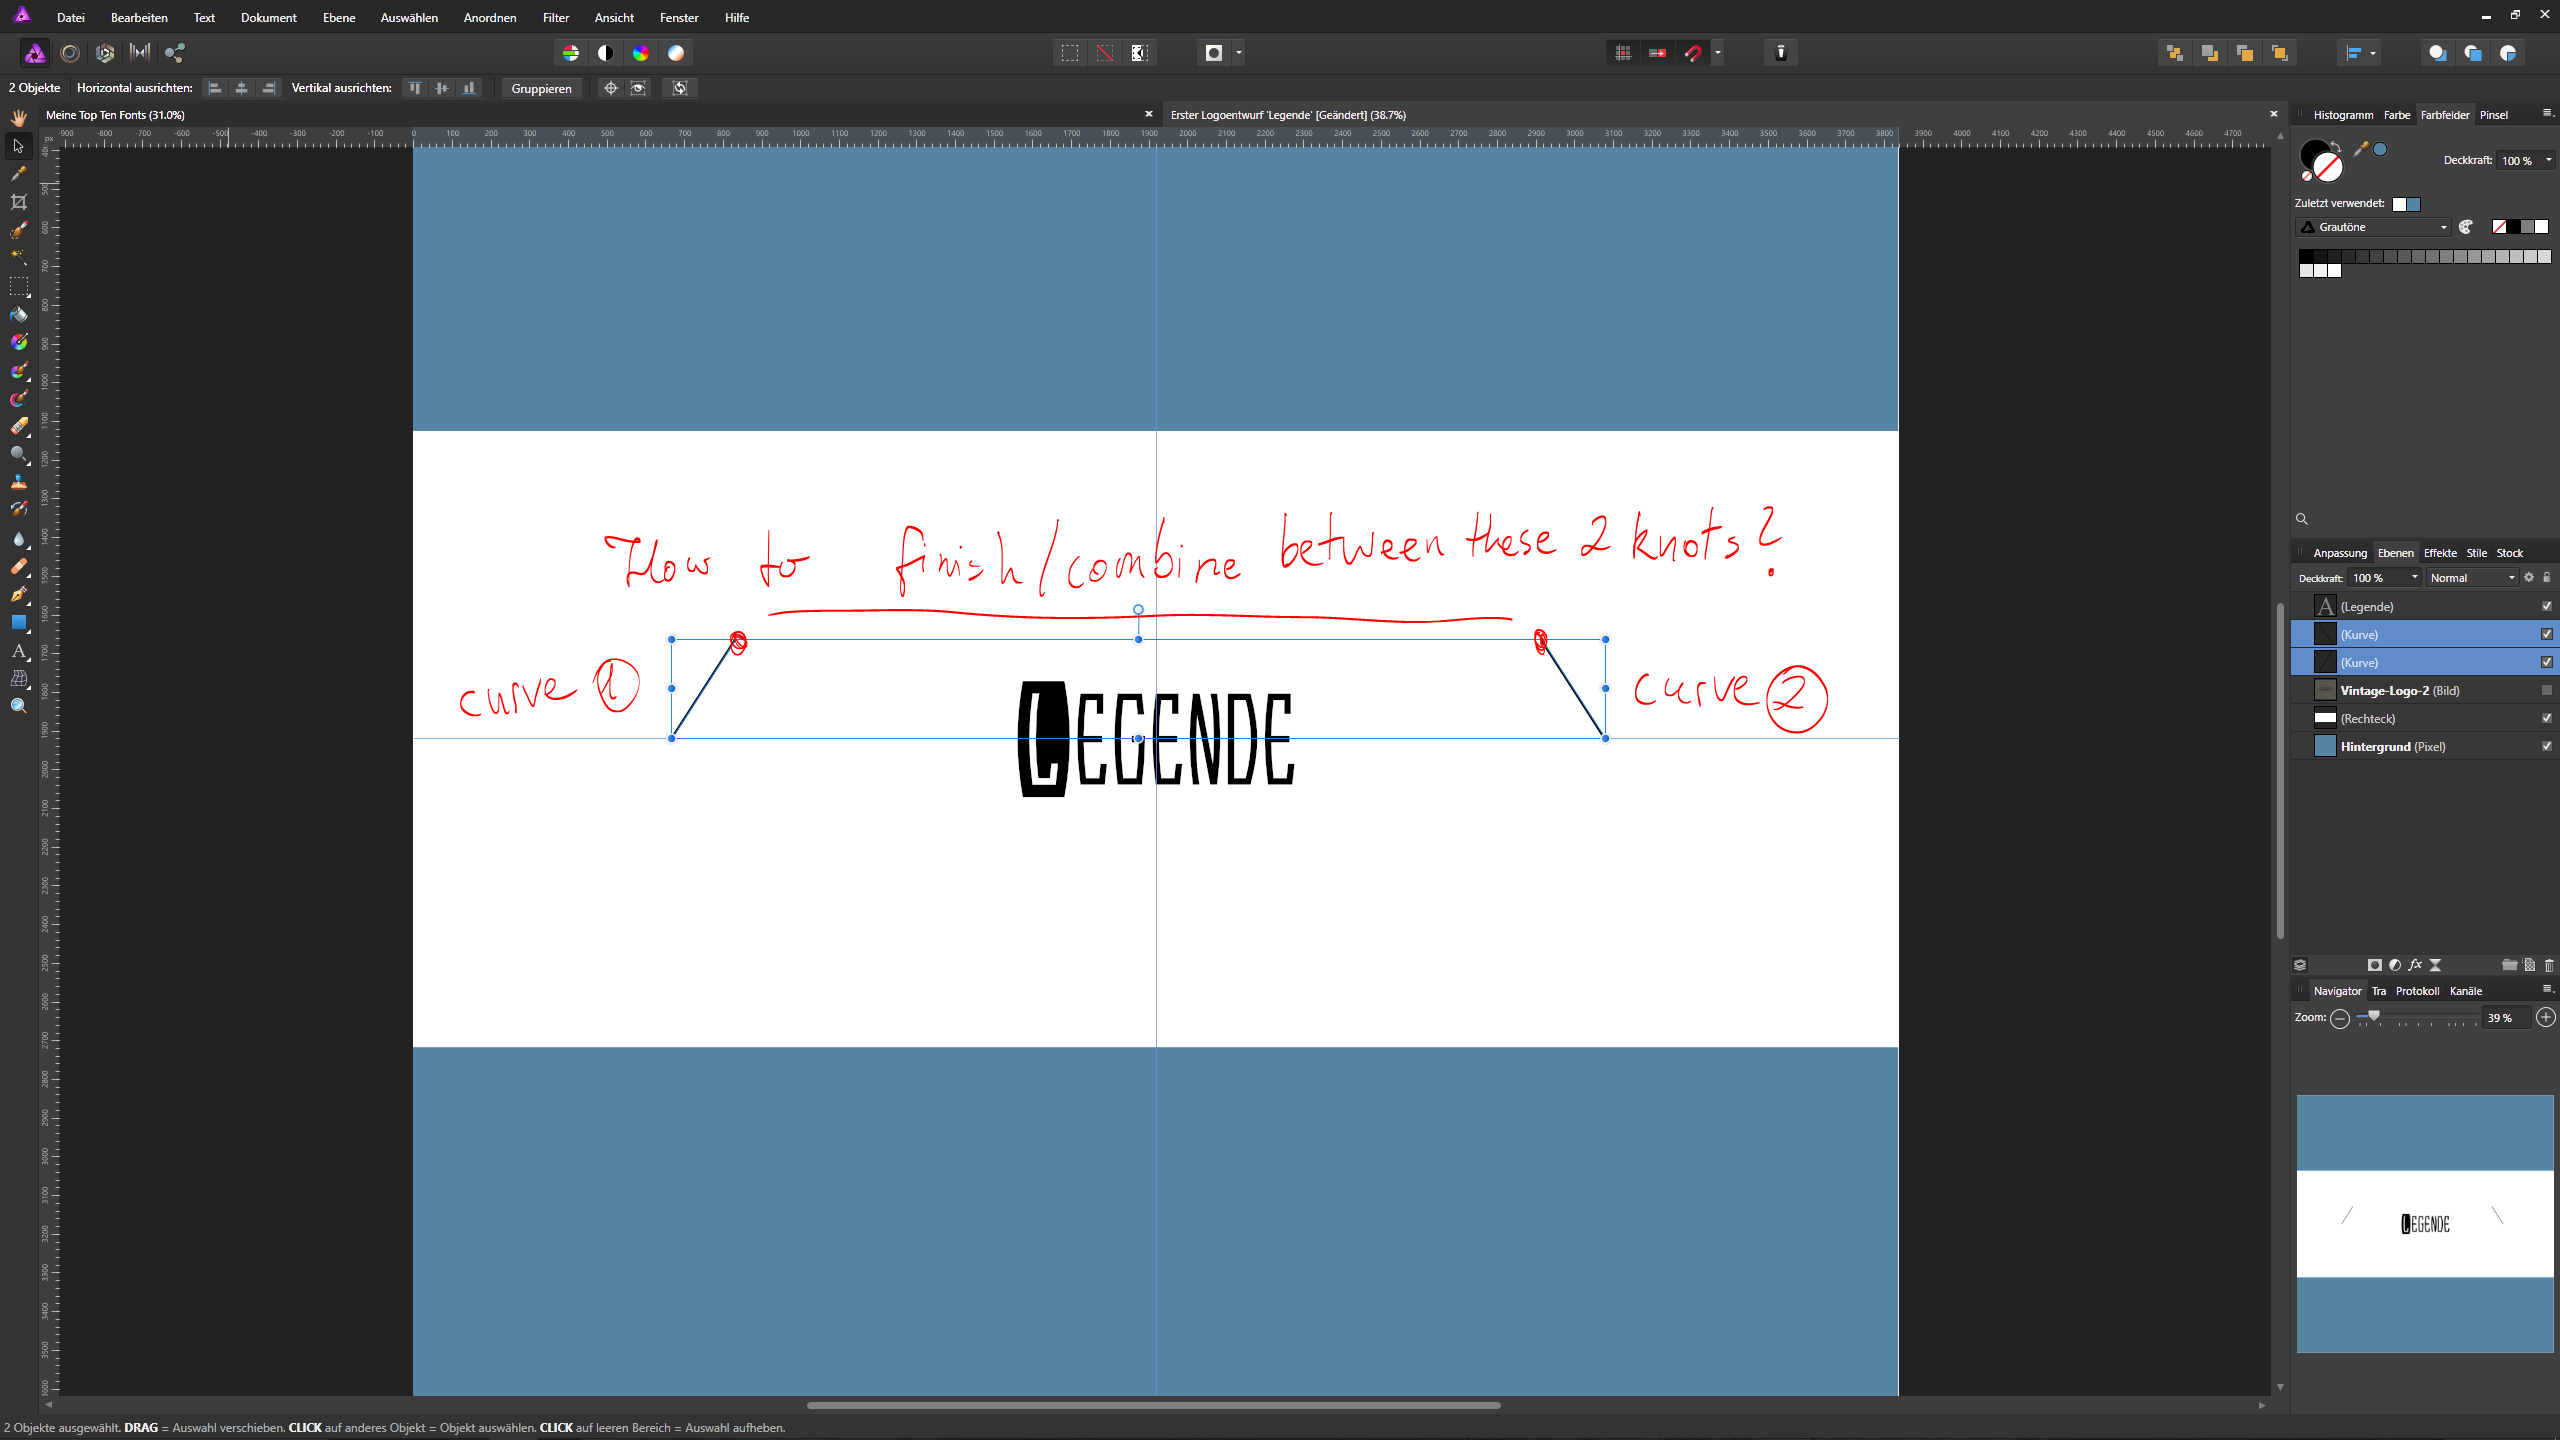
 Hey, I'm new to Affinity Photo and I would love to know how to finish or add a curve/line between 2 separate curves. Enclosed you will find a screenshot, so that you can understand better what I mean with this issue.
-
Attached is an AP file containing just a group of adjustments. Copy and paste the group as a child of an image (or above if you like). Then open the Curves, HSL or Vibrance sub-groups and double-click on any of the adjustments to tweak blacks, shadows, mid-tones, highlights or whites. It's quite simple - just a curve in Blend Ranges for each. You can constrain changes further with masking. You can also use it in conjunction with macros from a previous post (https://forum.affinity.serif.com/index.php?/topic/38379-luminosity-mask-selection-macros/), for example to preview area of the image that will be affected. 5-Stage_Adjustments.afphoto
-
- 1
-
-
- luminosity
- curves
- (and 1 more)