Search the Community
Showing results for tags 'curves'.
-
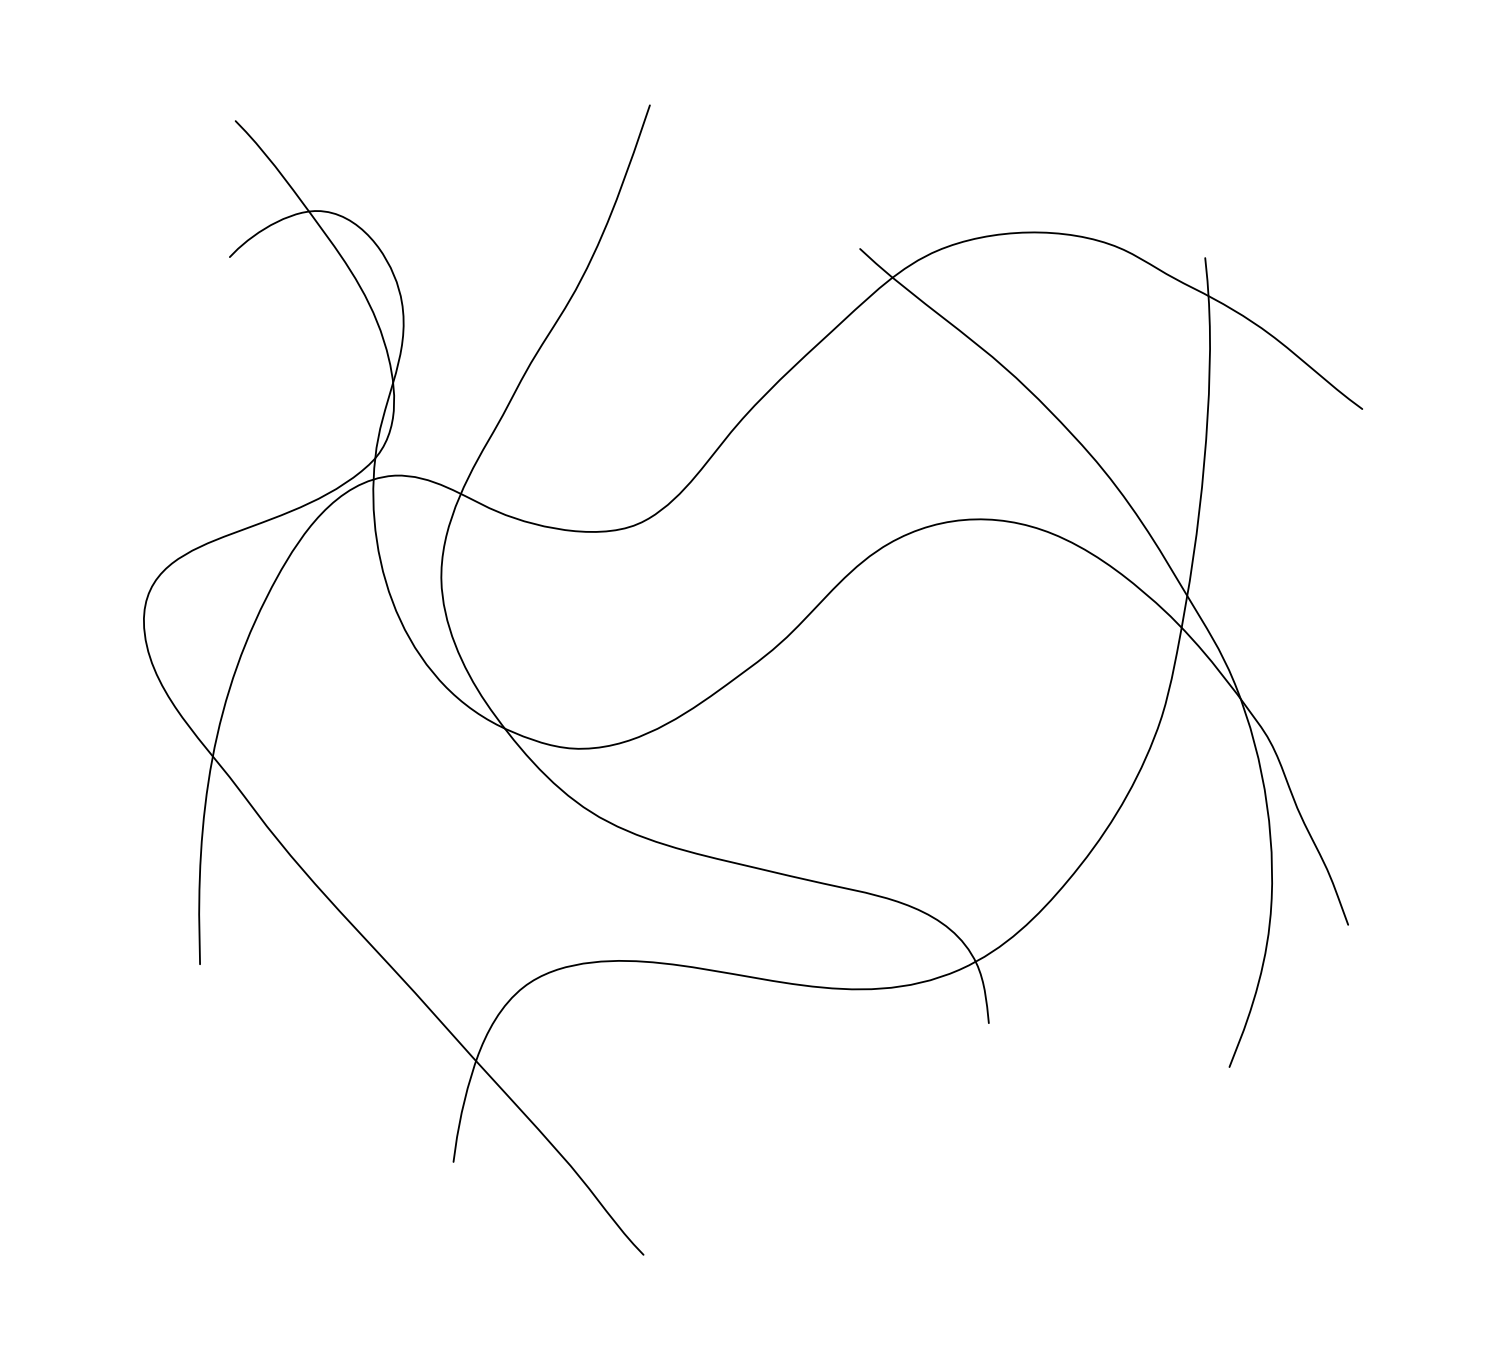
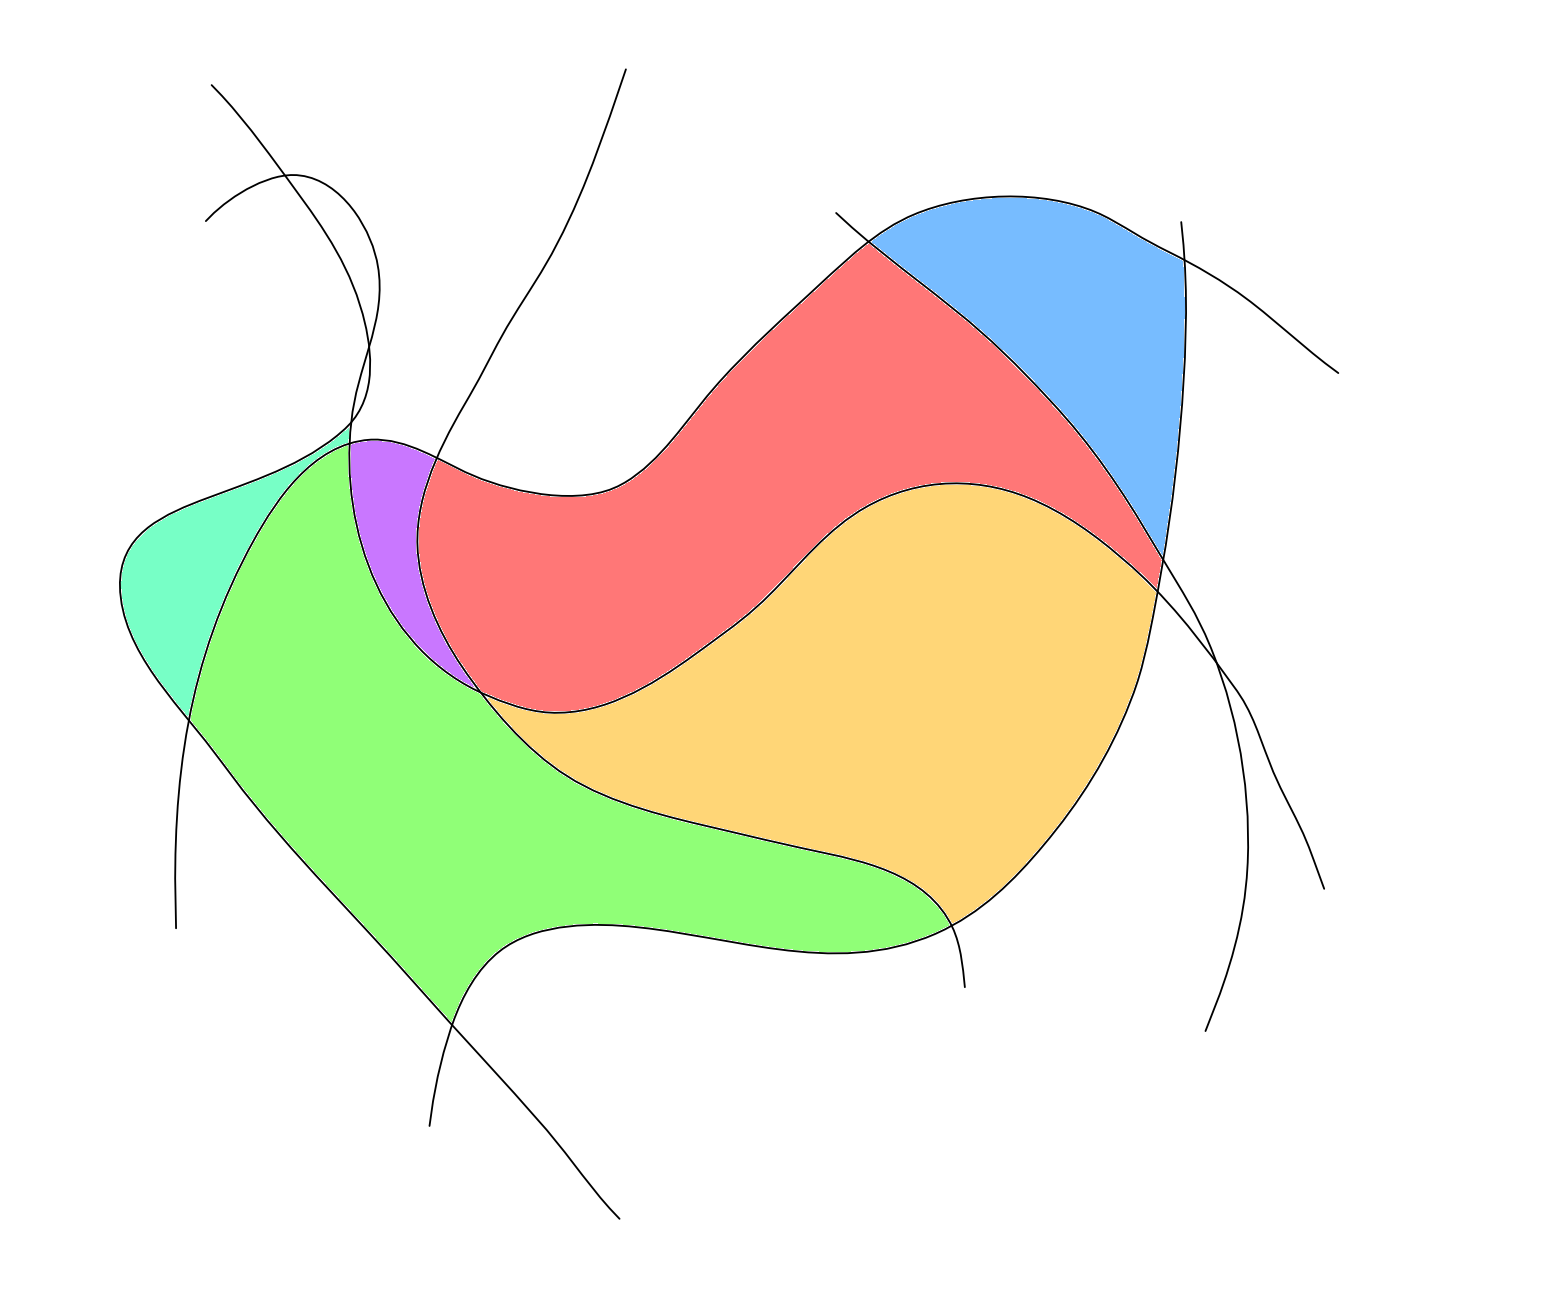
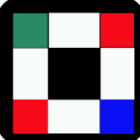
 The image below shows some curves I drew with the pen tool. How would I go about filling in the space in between each curve with a different colour? Here is an example of what I need: All help is appreciated. Thanks, Dan
-
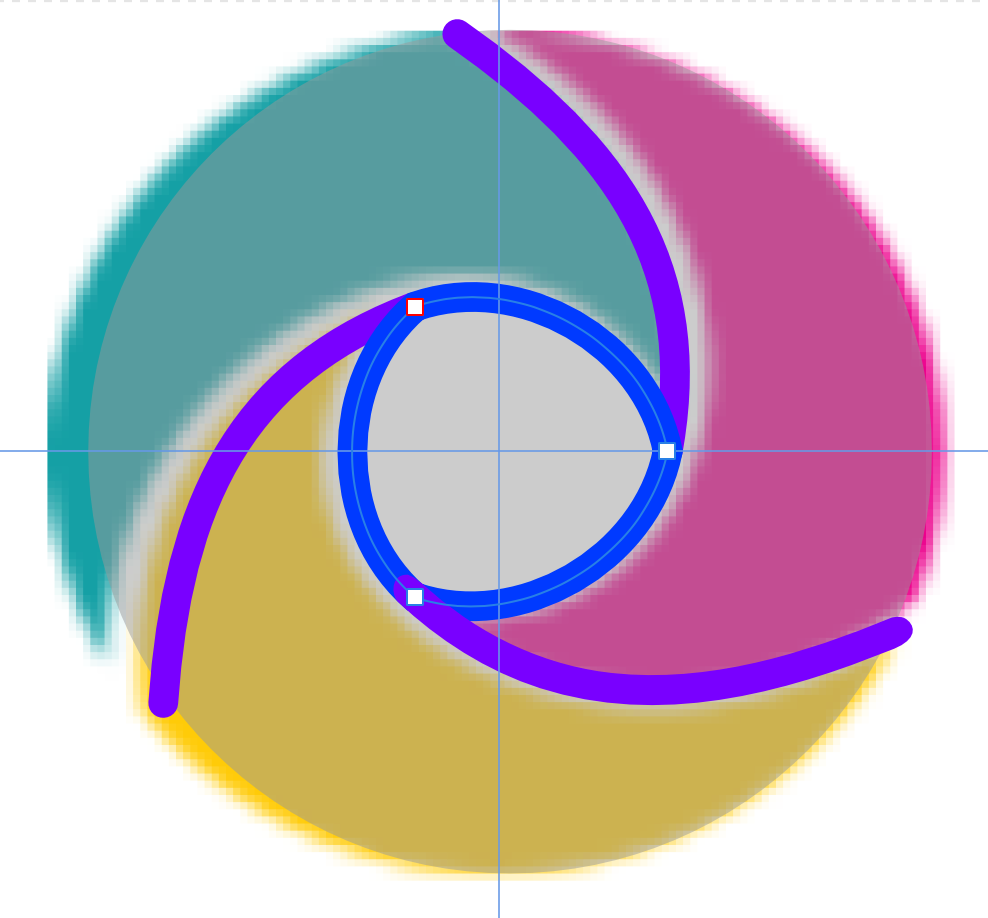
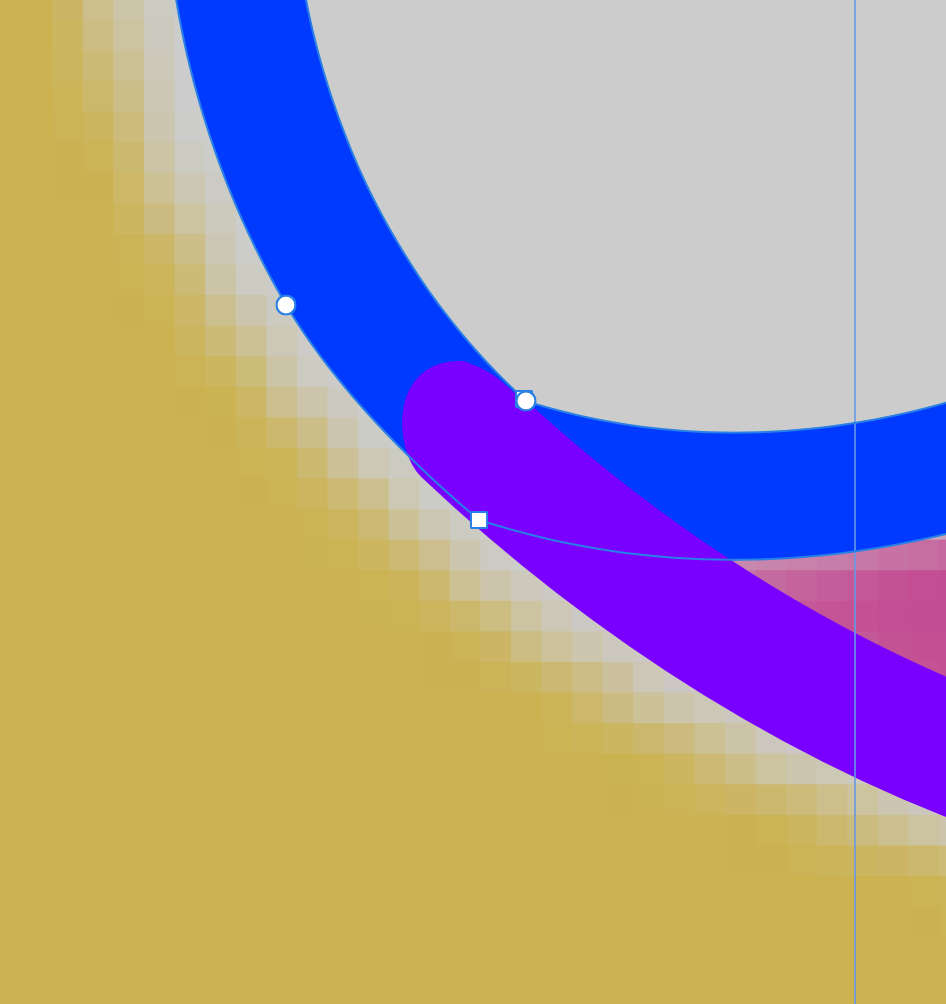
 Hello Am trying to learn and achieve a logo copy by drawing curves and am running into issues. 1. Is there a better way to achieve this logo trace ? the figure 1 is what am trying to achieve and have drawn curves to match the underlying drawing. I propose to subtract curves from the underlying light grey circle to get solid bodies. 2. When I go and expand the stroke to add/combine the curves for subtraction - I get the figure 2 issue with uneven boundaries. Can someone help me with combining the curves or show a better way to achieve the result ? thanks
-
 what i'm thinking is another slider on the stroke modal window that controls how much the stroke is offset. on closed curves it would read outwards on one side and inwards on the other, or something like that, and i'm not sure for open curves, but it would be leftwards along the normal vector when moved to the left and rightwards when moved to the right.
-
 I have an open curve with a sharp end point and a smooth end point. I want overlap them without closing, but it closes the curve automatically. Thus, changing the handles of the node (because it has to covert it to either sharp or smooth after closing). Is there a way to disable auto closing of the curve on node overlap?
 -
 Hi, I'm working a lot with the pen tool to draw smooth curves or straight curves, but I find myself a lot of times wanting to make one handle in a 90 degrees straight angle (no curve) leaving the other side smooth (curved). Look at the video of a simplified situation I have almost dayly here. As you can see there's no way (at least I know rightnow) to make one side of the curve 90degrees straight. Just to be complete: I know about boolean operators and masks, but boolean operators unfortunately result in a lot of junk anchors at the current version of Publisher and change the way the curve is build. That's not what I want. Neither do I want to use non-destructive methods like masks, clips, artboards or whatever. I really want to cut off the shape destructive without creating extra/different anchor points that messes up the shape. So in short: I'd like to cut of one handle or make it straight... 1) Is there a way to cut a handle, or making one handle a 'straight' one, leaving the other one curved? 2a) Is there a way to snap a handle to a 45, 90, ..., 180, ... and so on degree angle or set the rotation from anchor to handle by numbers? 2b) Right now I can't find a way to know if the angle is straight. Is there any way to know at what exact angle a handle is to its anchorpoint? If this would be possible that would make my day(s) how-to-cut-a-handle.mp4
 -
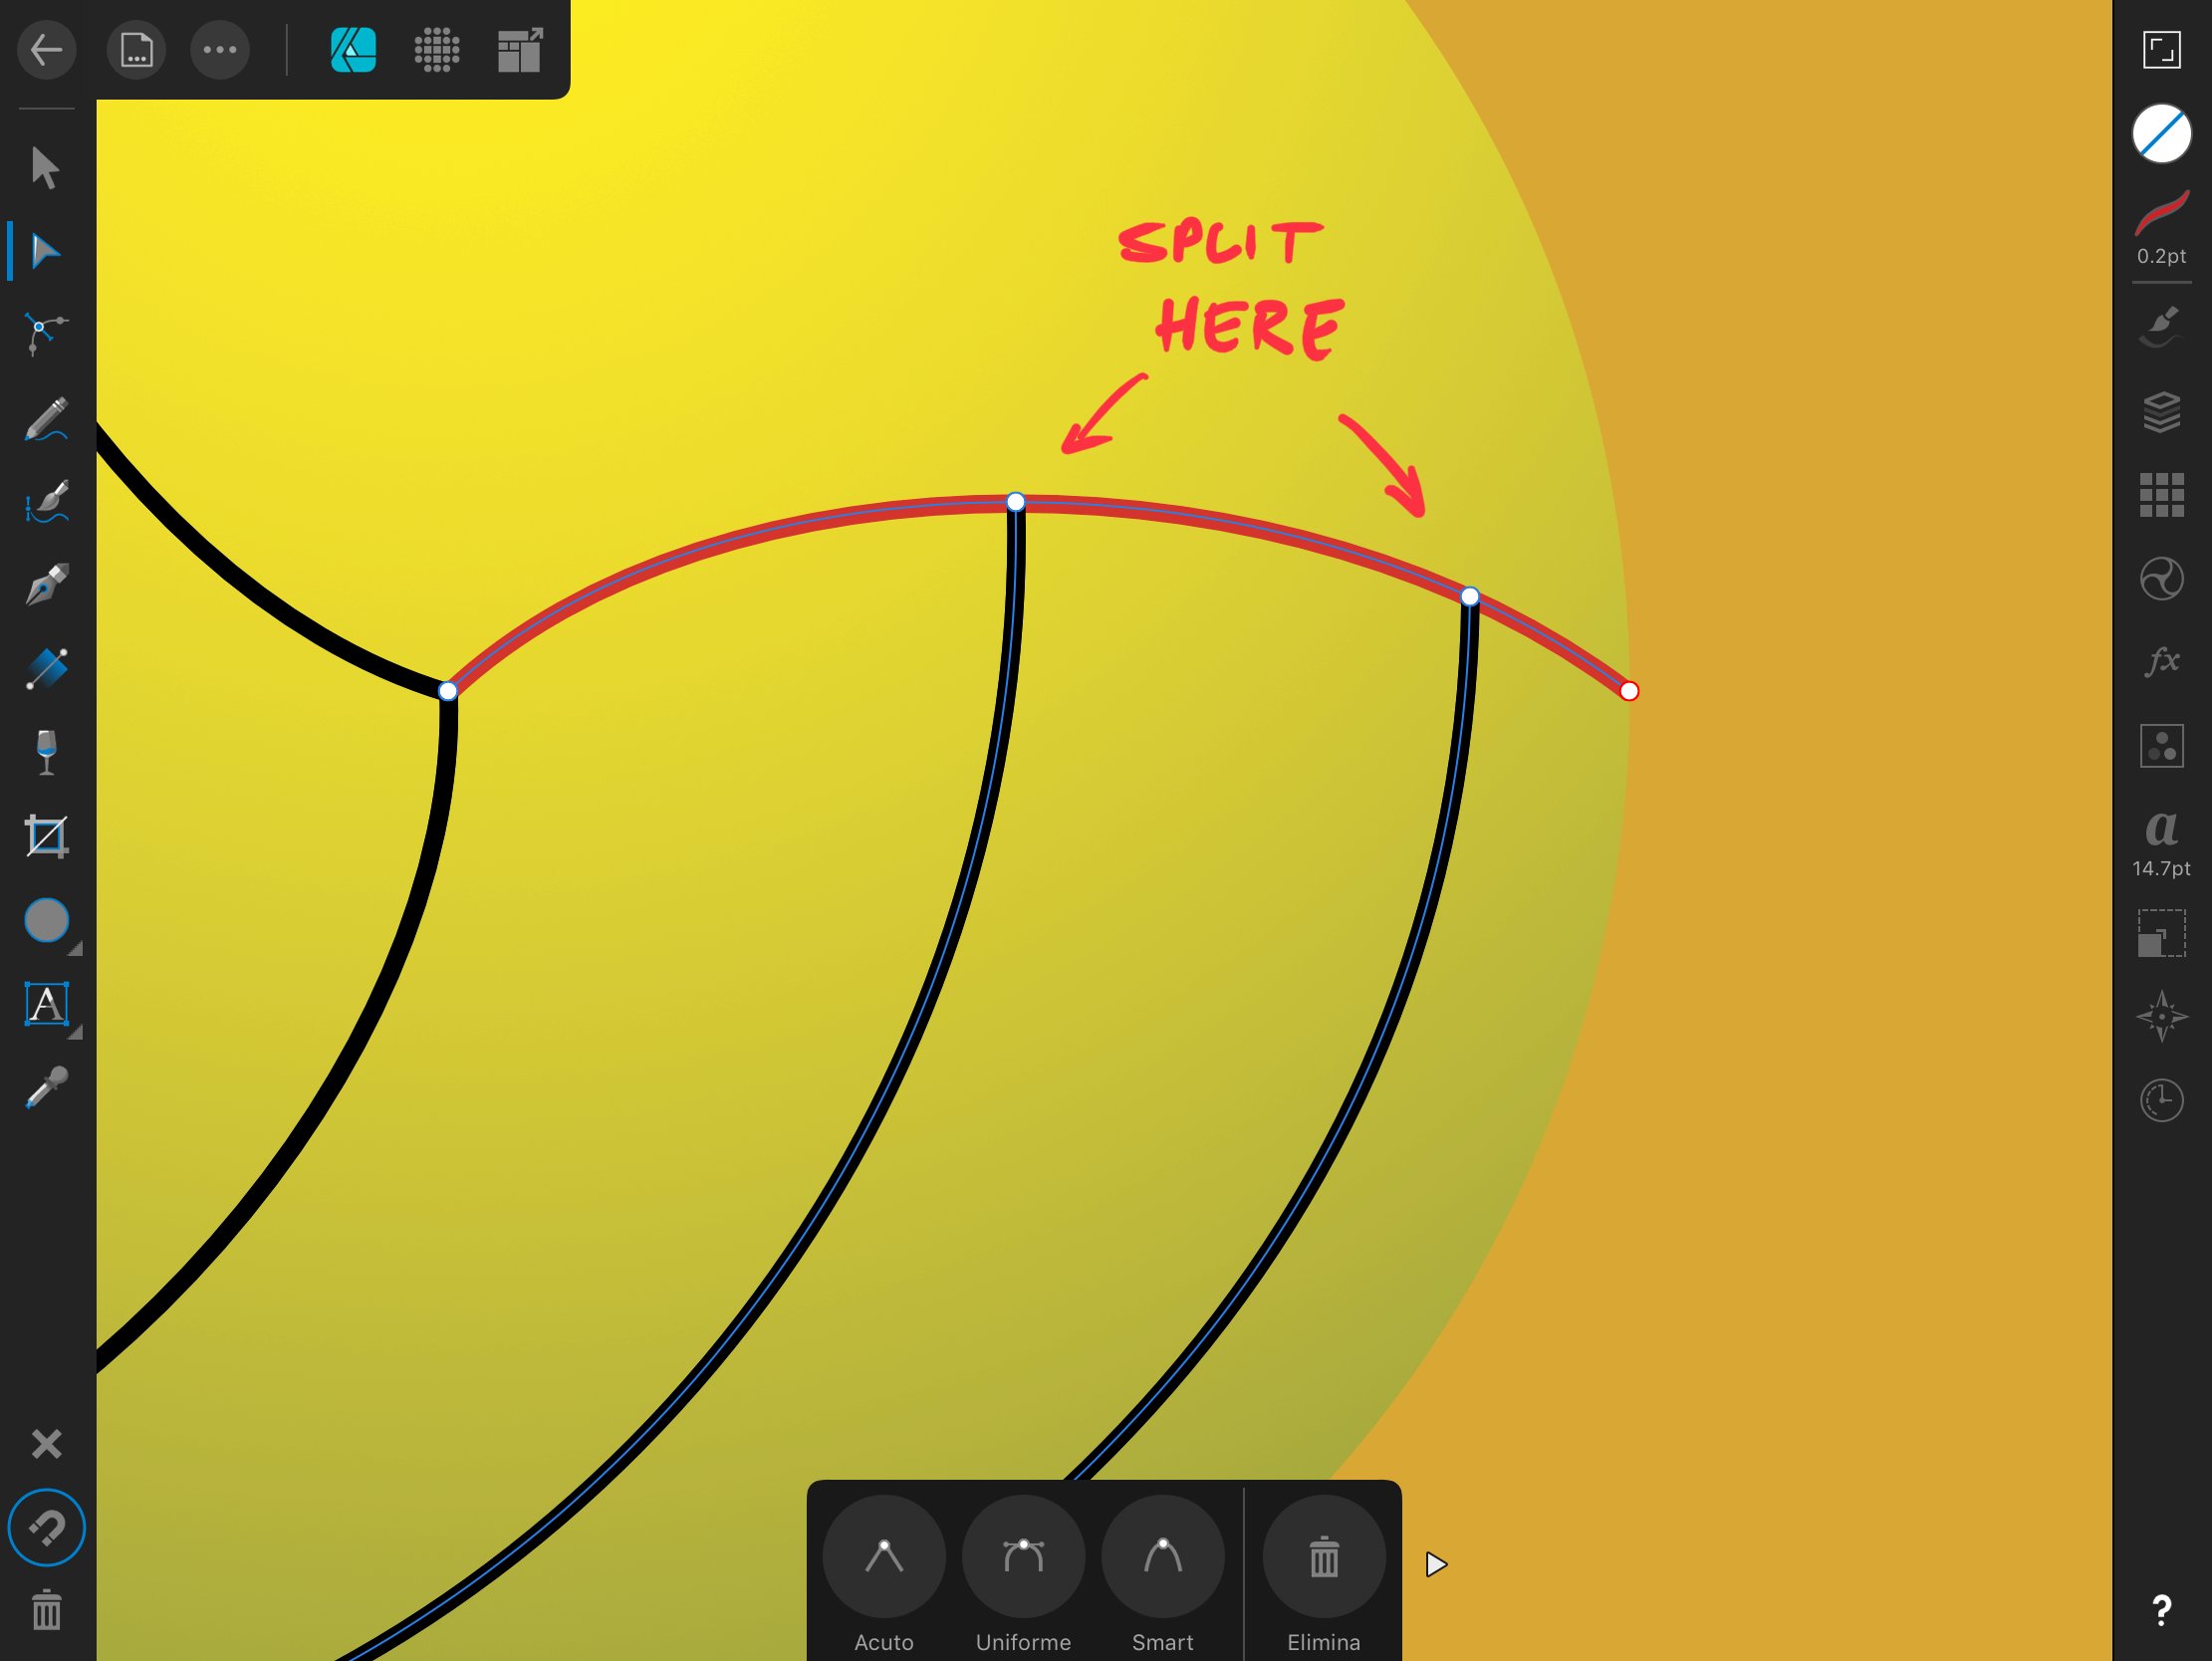
I’m looking for a way to add new points in a curve by snapping to other points/objects on the iPad. In this case there are two curves with the endpoints snapped on the red stroke; I need to put two points on that curve exactly over the two endpoints, so then I could split the line into three pieces. On desktop this should be quite easy since you can move the cursor first, snap it and then put the point. Of course I want to preserve the current curvature of the stroke, so adding a point and then moving it to its destinations it’s not the right solution.
-
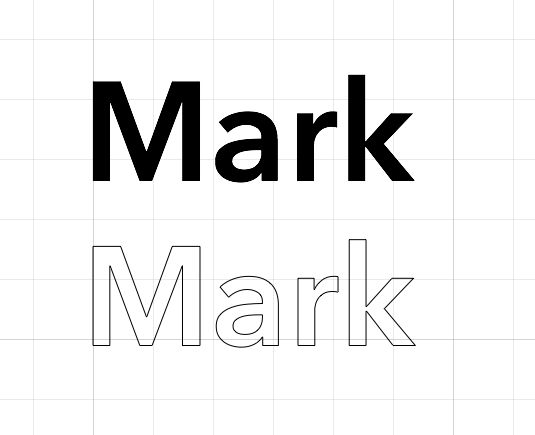
 Hello - Is there a way to visually differentiate between (real) Text vs Text that has been converted to Curves, when viewing in Outline View Mode? As it stands, I only see a "wireframe" outline of the text which looks exactly like the text that has been converted to path curves. In the first example below, the top is still text and the bottom have been converted to curves. This makes it difficult to understand which element group is actual text vs. paths when working in Outline View mode. Sorry if I've overlooked a function or feature. Otherwise, would love to see a feature like I'm showing in the second image where the text is solid black in outline mode.
-
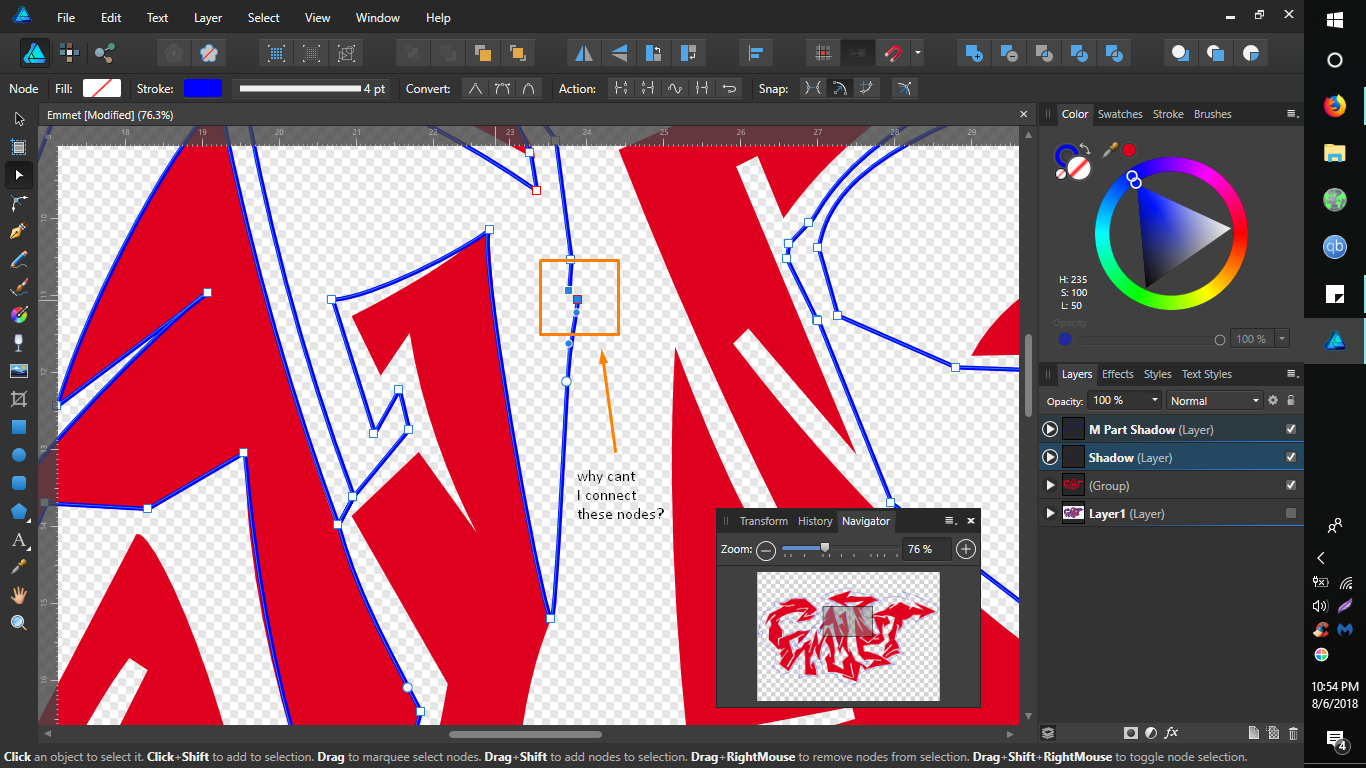
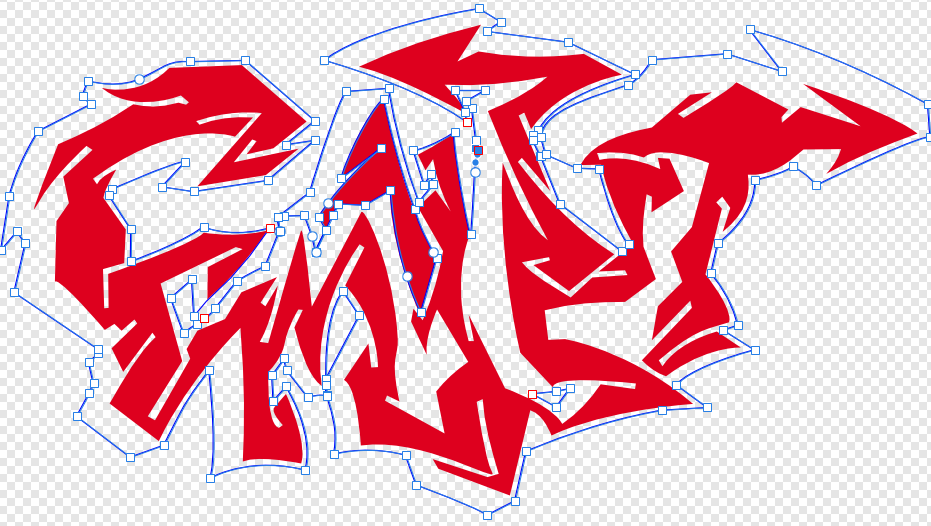
 Being a beginner, I jumped the gun on designing this. I had to split my poorly designed shadow. And now, I cant seem to combine it correctly without getting it all, well; wonky. Please help me finish this battle once and for all. How do I connect these nodes?
-
A continuing annoyance is that when I go to selected an existing node in Curves, AP creates a new one, with the result that the slightest movement makes the curve go haywire. A simple fix is a 'snap to node' where a click close to a node results in the node being selected rather than a new one created. Perhaps this feature could be selectable in preferences. Intelligently, this would take account of screen size and resolution (and maybe even eye-screen distance, such as where desktops are likely to be further away than laptops, which are further away than tablets). Tx
-
 Hello! Please have a look at the following image: https://drive.google.com/file/d/1O8yEvxtFKmYVeJZn5QgdxLKUXv_eRsdO/view?usp=sharing It's a low-res artwork of a neuron, often found in scientific contexts. The left part is the original image, the right part is the original image where black has been replaced by white (so that this image can be put on dark backgrounds). The right part is also the result of Photoshop, where I've simply used "Replace Color", chose full black to be replaced by full white, tweaked a little bit with the tolerance, and that's it. I'm having trouble getting the same result with Affinity Photo, unfortunately. I think the fact that the image is basically low-quality makes it a little bit harder. The goal would be to replace the black stroke with a white one, but leave the red color inside exactly the way it is, just like Photoshop did. Here's my first naïve approach using Curves: https://drive.google.com/file/d/140_HbrpTRi7PwpjuwgKQmbqCb6zA78k9/view?usp=sharing As you can see, I can keep most of the red color, but I'm getting some chromatic abberation around the red circle (why?). Second approach, using Gradient Maps: https://drive.google.com/file/d/1AwJtaEAy58O-O0ZWMno89S0sLIc1xbpC/view?usp=sharing The problem here is that I have to hit the same shade of red of the original image at any specific value point, which means I'm recoloring the red circle unfortunately. Any other approaches I missed, and which I could learn? I'd greatly prefer a non-destructive way (compared to Photoshop's) and keep using Affinity Photo/Designer (as always), so I'd be thankful for any help! Affinity Photo's Color Replacement Brush doesn't seem to work at all, it will try to do this: https://drive.google.com/file/d/101TrlMsApn2OfKwgkvKsM1bTs8M9-eEk/view?usp=sharing
 -
Just an idea. What if you had a curves-type control with colour wheel (like in HSL) input and output? Come to that, what other controls could use this interface? Tx
-
 Hi There, I'm tryin to fill a curves shape so it has a black outline and a white fill. This file though has curves and a fill already, so I'm not able to fill it any further. Changing the outline to be black by changing the fill is no problem. How should I go about doing this...? Lily.afdesign
 -
 Is there a way to set grays in Affinity Photos? Many images I run across have color casts, normally I set grays, then blacks, then whites. Is there anyway to do this in Affinity Photo. So far the only way I see is to manipulate the Channel Curves.
 -
When I buy vector clip art with a commercial license it usually comes in the form of an eps file. Usually all the designs are on one "page". I am finding it very time consuming and hair pulling to isolate what I want from that. I can't "draw a box" around it because it selects everything (the whole "page"). Say I bought 20 cats. They are all on one main layer and I want only one cat. Sometimes I can click on something in the layers panel and when that itty bitty dot is selected I can then click on the cat I want and get one itty bitty little dot in the right cat to be highlighted. From there I can "show in layers". Then I have to hold down the shift key and randomly select a bunch of layers (we are talking so many I have to scroll a lot in the layers panel) and hope I got all the cat. Often I don't and then I have to go through the whole mess again. (Yes, I am smart enough to first group what I found that was correct and then label it so I can find that part again). And more maddenly, the entire cat may not be on sequential layers. But my question is, why can't I surround that cat and have it be selected. Even at the highest magnification I can not directly select on the image - it will select the whole page. Why can't I zoom in until just that cat is showing and then click on it to select just a piece of it? Like what someone here told me to do when I couldn't seem to select just one node to move (it was just moving the handles until I zoomed in a ridiculous amount so I could isolate the node itself)
-
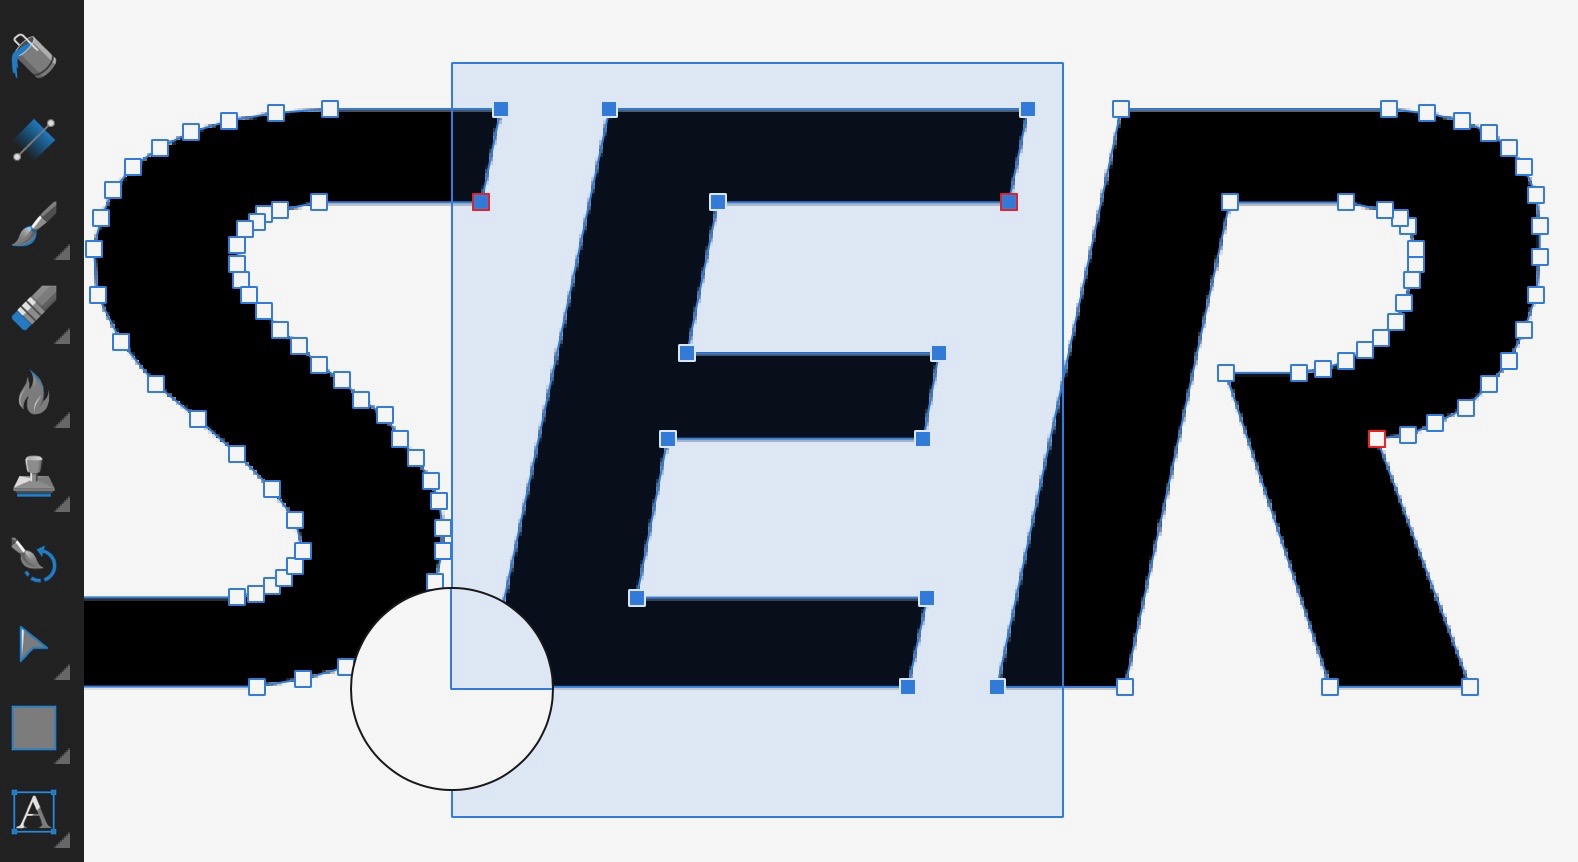
 I'm sorry if this is an obvious question but I simply can't figure out how to select nodes on a path in any way other than the rectangular selection. If I want to more precisely select nodes (eg, with a more freehand selection or through multiple selections), how can one do that? For example, how could one select only the 'E' in the attached example?
-
Missing in Photo: more options for output format in export (important for TIFF - more compatibility with old software) BMP export on/off dither for rasterizing tolerance option for "Selection brush tool" user presets for all filters snapping for "Crop tool" circle overlay in "Crop tool" "Mesh warp tool" for curves (without rasterizing) "Warp text" like in Photoshop "Invert mask" function base RGB adjustment (3 trackbars with range -255 - + 255 (in 8 bit)) adjustment presets in DESIGNER Thanks for considering proposals.
-
 The Secret to Sexy Curves is a 19 minute video about how to use the pen tool in Affinity Designer. I share the secrets to a perfect sexy curve and together we cover everything you need to know to successfully use the pen tool to create your own sexy curves. This is a great video for both beginners and intermediate users. You’ll learn how to join lines, add and delete nodes, determine the perfect placement for a node, and how to use and adjust the control handles. I’ll show you the shortcuts to moving in and around your artwork, and we’ll even set your mouse up to zoom in and out as you work with the pen tool. In no time at all you’ll be an expert user of the move, node, pen, and view tools. Join me in exploring the versatility of using the pen tool for all types of drawings: perspective, graphic designs, illustrations, fantasy, manga, cartoons, silhouettes, and literally anything you can trace with the pen tool. Using the pen tool is considered a core skill in creating digital media. Take your time, practice, and you’ll find it becomes easier every day. I’ve had a great time creating this video for you. If you like it - if you learned something - please show a bit of appreciation by subscribing to my channel. It really does make a difference. Feel free to leave comments, suggestions for future videos, and don’t be shy; go ahead and share your art with us. :-) Thanks for watching, & Happy Creating. Jen Timelapse segment begins at 15:00 Final summary & and complete illustration starts at 17:30
-
- 6
-

-
- affinity designer tutorial
- pen tool
- (and 8 more)
-
intelligent_rulers_upd2.afdesign Because some are waiting tooooooooo long for better rulers including a “change origin point” feature, we made a flexible ruler for dm, Berthold points, Pica points, Didot points, DTP Cicero and other units that you can change easily for your own needs just in seconds. Even if you need furlong, light-nanoseconds, Fournier point … no problem. Now you can have many rulers with different units at the same time. And they even can measure curves. Some backgrounds can be found somewhere. Have fun and help to improve Affinity apps. The old ones: intelligent_rulers.afdesign intelligent_rulers_upd.afdesign
-
Hi, just as I like this software and need to share some stuff, here are 2 or 3 pictures using stacking (panorama, and stacks) some effects have been applied with Nik Collection (HDR effects)
-
 I created a curve in Affinity Designer. I copy over, flip the horizontal to create two equal symmetrical shapes. With snapping on I move them so they are flush together, then I add curves again to create a new shape which are these two, identical and symmetrical shapes together. Why then does it add these nodes to the new curve?
-
 Hi, I'm on Photo 1.6.6, Mac OS 10.13.3. Just wondering - is there a trick to using the pen tool to draw multiple curves on the same layer? I draw the first curve, and I get image one (stroked to make it a bit clearer). What I'd like to to do is continue drawing on the same layer, to create a second curve. But as soon as I start to draw, Photo creates a second curve layer (image 2). I know that I can now select both layers, pull down the Layers menu and Choose Geometry... Add... (giving me image 3). This gives me what I want to achieve, but I wondered if it was possible to continue to draw additional curves without having to combine the layers afterwards. Thanks H
 -
 I purchased Affinity at the Mac App Store yesterday and I am enjoying it greatly. I haven't been able, however, to activate or enable the picker on a curves panel. Is there a setting I have missed in the preferences or a particular keyboard shortcut? I watched a video where someone clicks on the picker and then on he image in order to place nodes in the curves adjustment. In my case this process is not working, I am unable to place nodes on the curves panel. Thanks for your help.
 -
 I'd like to suggest the curves sub panel under Tones in the Develop Persona have the input / output values displayed for given points. In addition, I'd like this panel to include an 'editor' feature, whereby the option of entering the numerical values for each point on the curve. It would also be appreciated if the x and y axis (0-255) could be delimitated in 10ths like Photoshop. Either replacing quarter tones, or, in addition to the quarter tones. :) Nick
 -
In AP 1.6.1 I have a live Curves adjustment with changes to the Alpha channel, nested inside a mask. This does affect alpha channel of the mask, and indirectly what the masks makes transparent. I would like to destructively merge the adjustment into the mask it affects. Clicking on the Merge button in the Curves Adjustment does nothing other than adding a new entry to the history. Please implement the feature to be able to destructively apply live adjustments to masks. To be clear I am looking for a way of getting a mask, with identical behavior as my current combination of mask with nested adjustment. As a separate feature request, please make the Merge button in the adjustment dialogs disabled in cases when it doesn't make sense, and won't actually merge anything.
-
 In AP 1.6.1, I have a mask with a Curves adjustment in Alpha channel nested as child layer of the mask. How can I merge the adjustment into the mask? For example clicking the Merge button in the dialog of the Curves layer does not seem to do anything other then adding a new entry to the history.