Search the Community
Showing results for tags 'curves'.
-
 Some sharp corners are rendering at a different "pointy-ness" depending on how close I zoom. The difference is quite dramatic, and can change how the design looks significantly. I have build 1.10.6.1665
-
 Info: Camera: Canon EOS R6 OS: Windows 11 PRO CPU: AMD Ryzen 7 7700 VGA: ATI RX 6600XT RAM: 32GB HW acceleration: on (disabling has no effect on the bug) How to get the bug: - develop RAW - adjustment -> Curves - move the bottom left point up The procedure and result can be seen in the attachment. It also shows up in the latest public beta (2.3.1.2217) Maybe related to: CurvesProblem.zip
 -
 It would be great to have the ability to set the white, grey and black points using the eyedropper tool. Having switched from PS this is a feature that I really miss - especially when working with scanned images to ensure that the white balance is correct and the background is 100% white.
-
- 3
-

-
- affinity photo
- levels
- (and 3 more)
-
 Have you ever wondered what the Curves adjustment actually does? In this video, I’ll explain it and also show the basic curves adjustment that works in 99% of scenarios.
 -
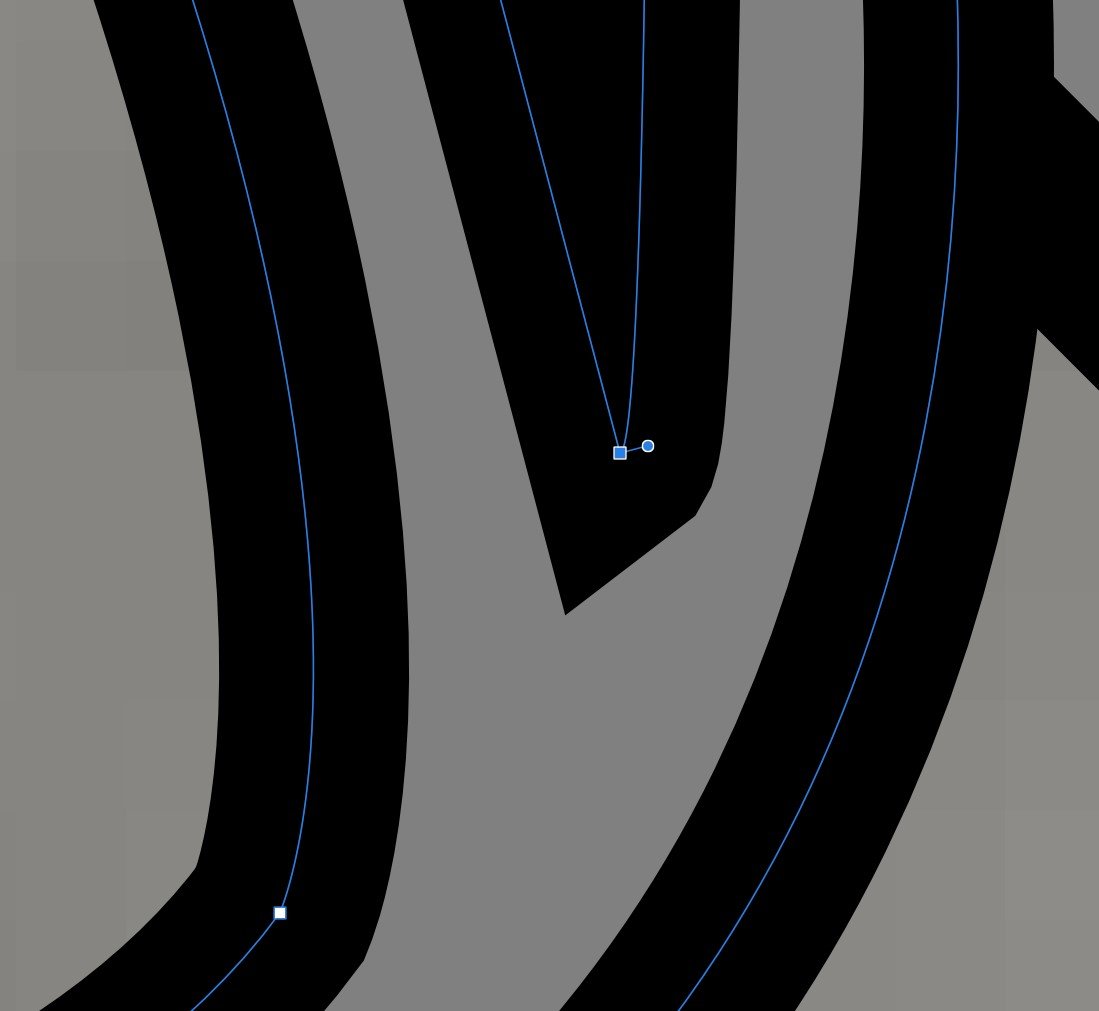
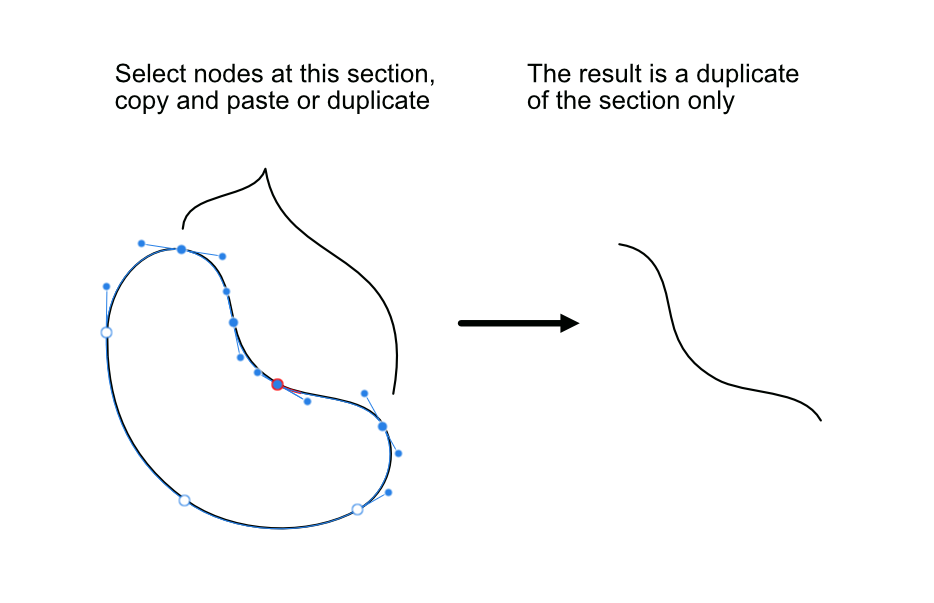
 I'd like to suggest adding snap option to corner tool so it can perfectly snap as shown at the image attached. Another option I'd like to suggest is after the perfect half round side achieved with corner tool, it can have an option to remove the redundant points. Redundant points are two points that perfectly stack together so when you see it as one point and want to modify it, it turns out as two points (see image attached). I hope it will make sense. Finally, the option or function I really want in Affinity Designer is to copy and paste (duplicate) a section of a curve by selection the nodes (image attached)
- 5 replies
-
- 4
-
-

-
- corner tool
- redundant
- (and 2 more)
-
Is there an option to Resample/rebuild curve to reduce number of anchor points in Affinity Designer 2 ?
-
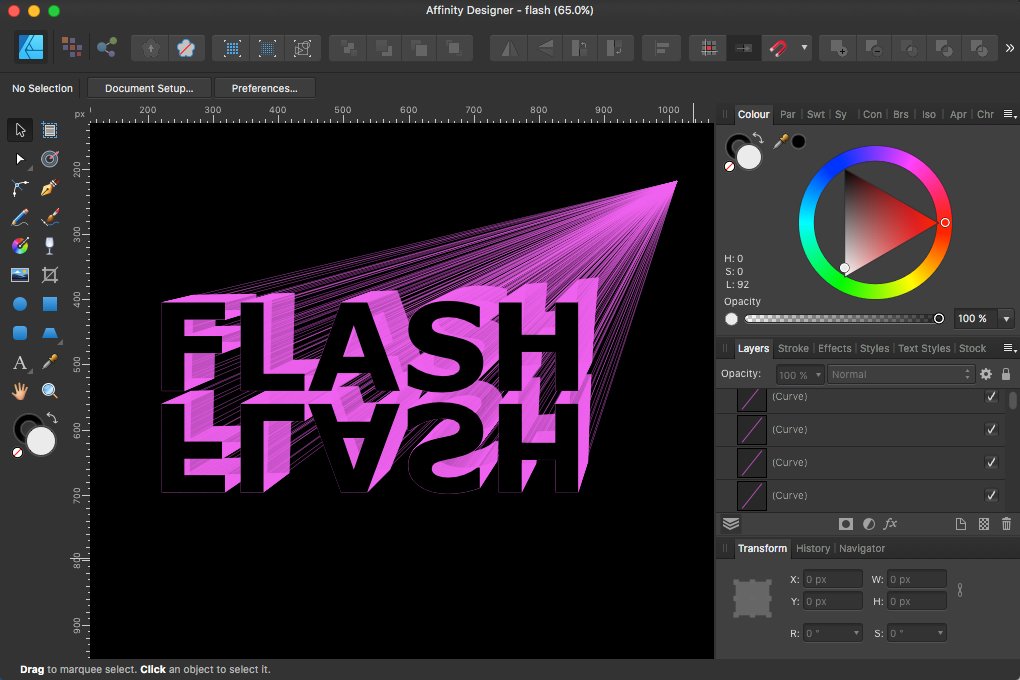
Building some flashy text effect out of vector curves (~6600) ... (HE ~15105 curves)
-
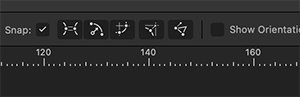
 Hi I wish to have snapping option to the midpoint of curves in node tool. Snapping works with a single line segment, but not with poly lines or curves. Snap.m4v Please add a tick box ☑️ in Node Tool for turning node snapping on or off. More convenient than toggling individual snap options one by one.
- 7 replies
-
- 1
-
-
- affinity designer
- snapping
- (and 3 more)
-
Is there ever gonna be a quickshape like feature for Designer2 for iPad and Publisher2 for iPad? Not having a feature like that makes it harder to draw and make nice lines and nice circles. The stabilizer feature still isn't close enough to that. I know that there are features for picking a certain type of curve to use if you're drawing a curve or circle and we can fix each line and circle with dots in each line or circle in Designer. That just takes way more time to get the perfect line or circle by having to switch shapes, curve lines, and or edit the lines/curves. It would save everyone tons of time to just add auto line, curve, or circle maker option without having to change tools constantly. To be able to just draw a circle and hold the stylus down on the screen and make a circle and we can easily edit it after that. Same goes for curves and lines. So we don't have to edit a wonky line, curve, or circle. Which is i.m.o. more work than just editing a nice straight line, curve, or circle. I.m.o., that's why most people use Procreate instead of Affinity just for that reason. Affinity has tons of great features, but it's hard to use them or want to buy the program(s) for them if it means way more work to make nice lines, curves, and circles. Then a person is spending more time trying to get that correct. That's a big reason as to why a lot of people don't do digital art and why tons of people just get Procreate or Infinite Painter (can be used on iPad and Android tablets) just 'cause of the super ease of doing those things. If you guys can, please make a quickshape type version for Designer and Publisher. I have the version 2 lineup of iPad apps and I don't use them just 'cause I spend way too much time fixing the lines, curves, and circles. When I get that done much faster in Procreate. Procreate is lacking in a lot of features that Designer has, but quickshape feature in Procreate makes it worth skipping out on those features. A $70 one time fee for Designer isn't an expensive price. Though I feel like the price would be worth it compared to the $10 fee for Procreate if you guys have your own quickshape feature. Since your programs come with a lot of extra stuff that Procreate doesn't have.
-
 Hello everybody, I am really a Rookie... but I hope to find help here... Can somebody help me to create the outer curve shape like in the attachement shown.... I don't know how to do it... 😞 I would appreciate every little help.... Thanks for your support in advance... with kind regards.. AD_Rookie49 Temperature_Level_Design_4.afdesign
-
 Hi everybody! In Designer v2 I notice a thing that is a little bit disturbing. It didn't happen in v1. If I open a vector graphic in Designer 2 it looks normal first. If I click on an object in this graphic, the path lines become visible (purple outlines). Is there a way to make them invisible? I can't find any working function for it. And it is really disturbing, especially if I'm painting with vector brushes (in that case the path lines are center lines). I already checked the Pixel Preview Mode, but the path lines stay visible. Possibly a bug? I'm on Windows 10.
 -
 Hiya, So I created a H and e letters, converted them to curves and placed the e over the H. When I go to Layer>Geometry>Subtract with both layers selected, the layers just disappear. Trying it on two boxes worked as expected. Is this a bug? Mike
 -
 One of the things that really stops my workflow is that I have to go to the toolbar to determine whether or not I want to continue drawing with a curve that I have already created. But every other time I don't want this — and forget to change the mode — I have to undo my tracing work to create a new curve object or hit the divide button if my shapes are closed. This is just tedious. So I would propose that if you have a curve already selected and click on one of the nodes of the end points of the curve, you should automatically resume editing the original curve (meaning, adding the new curve segments to the original curve). If you don't have the other curve selected, Designer should assume that you don't want to continue drawing from another curve. That's how it works in Illustrator and this forgoes that you have to check the toolbar. This also makes it much easier to close curves with another curve or join two curves, because you would simply select both curves and then draw the connecting curve in between the two. No need to go to the Node tool (or hold Ctrl), select the curves and then join them after the fact.
-
 How do I do this again? I cannot replicate it. All I can do is CTRL Z & CTRL Y to see that it can be done. AligningToStroke.mp4
 -
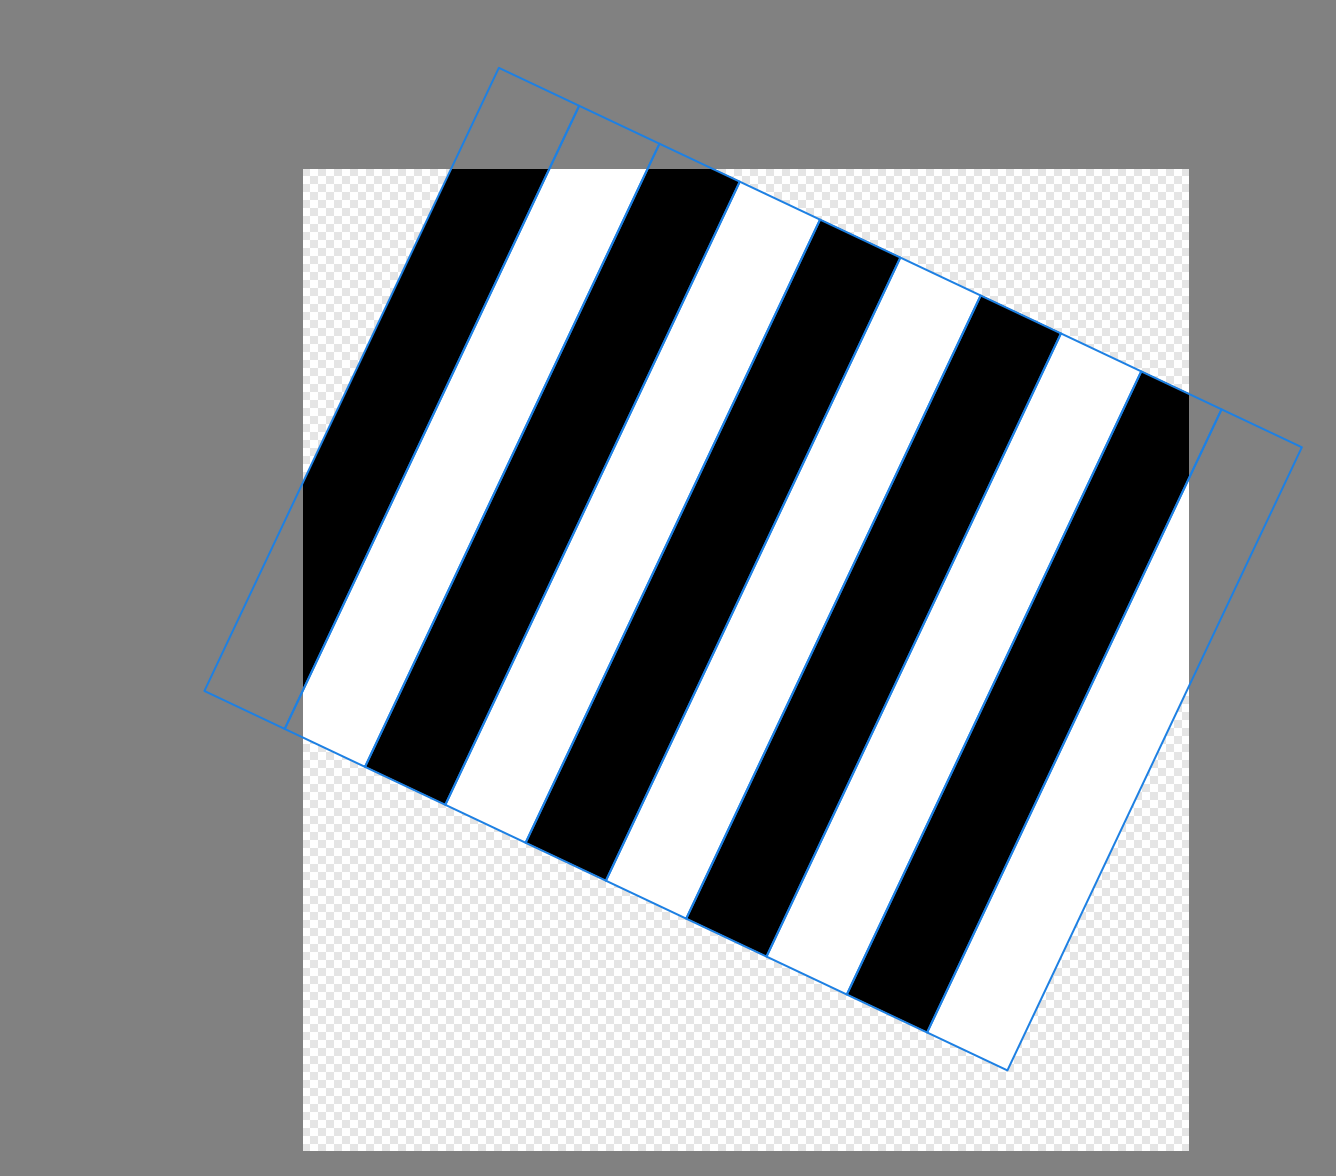
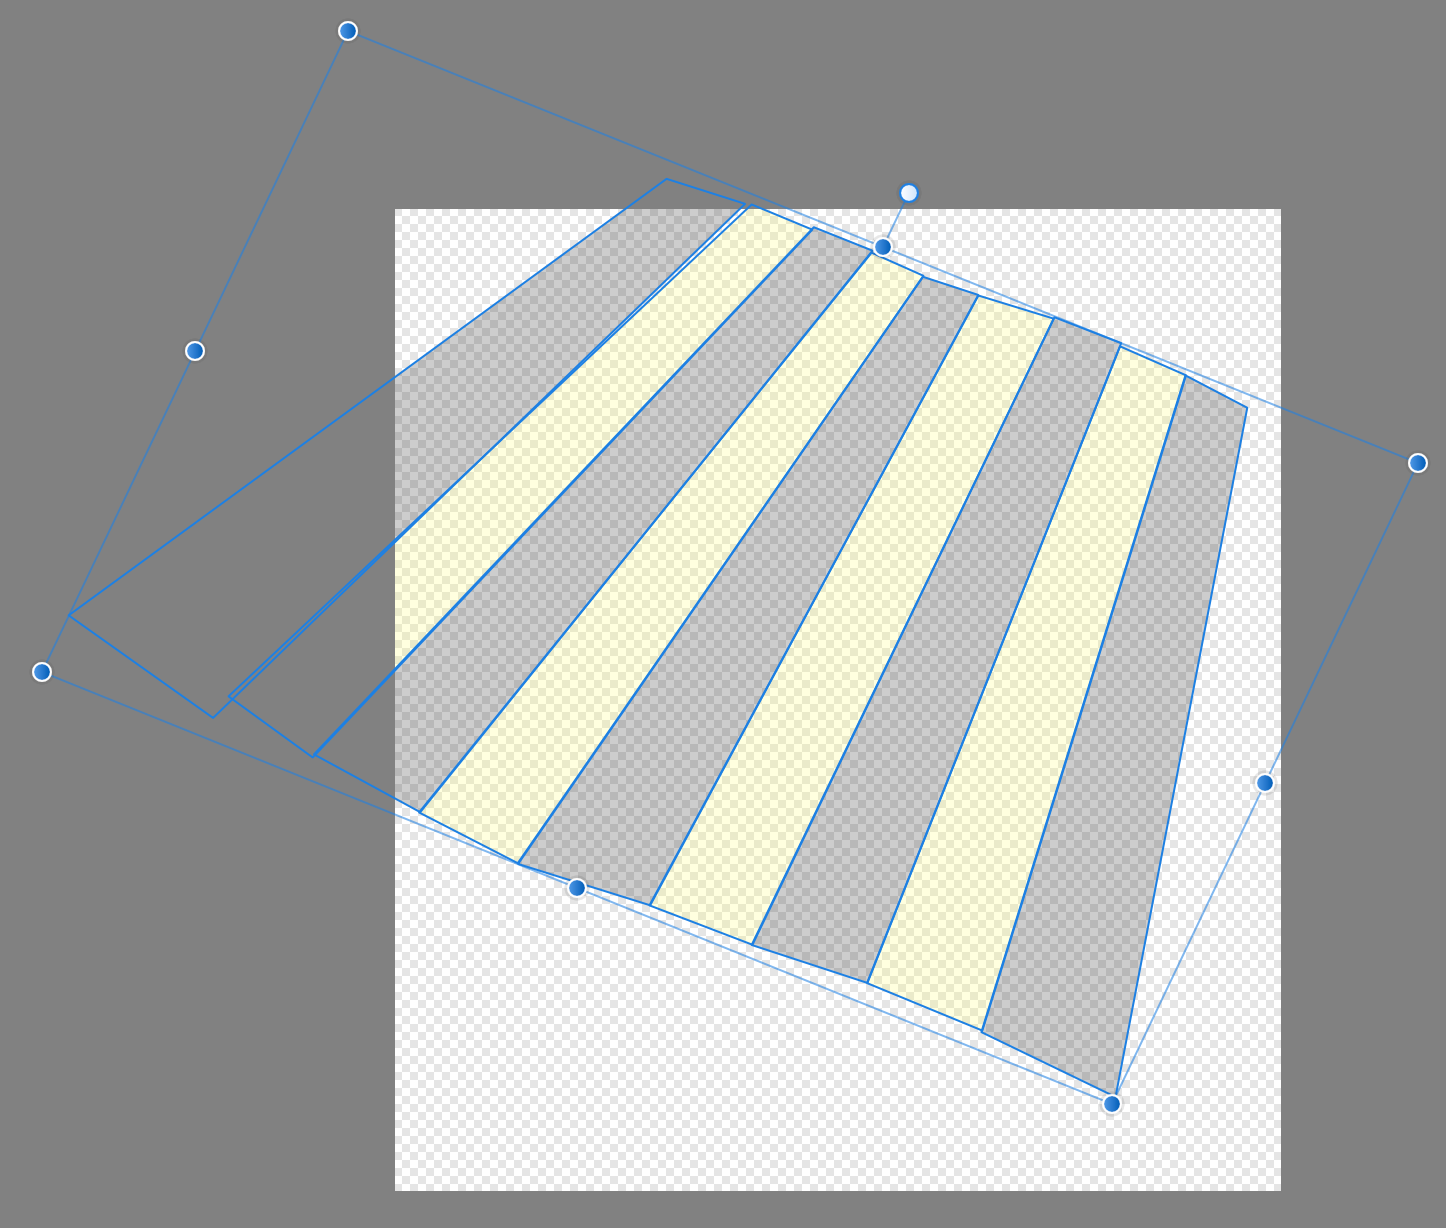
 Feature Request: Ability to distort/skew perspective of curves in Affinity Designer. I drew a rectangle shape, converted it to curves, and duplicated it repeatedly into stripes. I would next like to distort, skew, stretch the perspective. But I don’t see how with the current set of tools. Best I can discern is to grab nodes and randomly pull them where they look close enough. But this is time-intensive and imperfect. I also tried drawing trapezoid shapes, but their controls seem even less precise. I asked in the support board how better to do it, and I was told there is no way (https://forum.affinity.serif.com/index.php?/topic/166065-how-to-distortskew-perspective-of-curves-in-affinity-designer/). Thank you.
-
 So I was searching around for any and every video on YouTube to give me a better understanding of how to use the pen/node tool. I stumbled across a video on YT: "AFFINITY DESIGNER CURVES FROM SINGLE STROKE. This tutorial helped me solve one issue (finding the easiest way to trace an image with a lot of curvy lines BUT with each curve flowing smoothly together from one to the next). I had created a logo (i can't show the whole logo) but as you can see some of the curves i created originally APPEARED smooth when i zoomed in close but some noticeable errors when i zoomed out/away from it. Once I zoomed out the logo had these subtle curves that made the logo look like it was starting to form corners. As I followed the tutorial, I got to where I was only using the SMART MODE tool, with these options selected: - ALIGN TO NODES OF SELECTED CURVES - SNAP TO GEOMETRY OF SELECTED CURVES - ALIGN HANDLE POSITIONS USING SNAPPING OPTIONS - MOVE BY WHOLE PIXELS - SNAPPING while I was working through, I was going by what I would always hear from the pros and amateurs "move the node handles around until you get as close as you can to the images/shapes. so that's what I did! Still wasn't perfect though. A-HA!!! THERES A PATTERN ("not sure if I'm just late to the party lol") Once you put your first node, you get the CURVE option after putting the second node which is your first line. You then go and make that line fit as perfect to the curve as you can which is the easy part. Then comes the hard part as soon as you add a 3rd node and however many more you want, trying to make that second curve fit PERFECTLY with the first curve usually doesn't match the way you want it to because at the same time you're also trying to make it fit with the 4th node. It then becomes this tug of war between the nodes LOL. node A. node B. = line/curve a-b node B. node C. = line/curve b-c node C. node D. = line/curve c-d node D. node E. = line/curve d-e **USING THE SHIFT KEY EVERYTIME (USUALLY)** **USING THE SHIFT KEY EVERYTIME (USUALLY)** **USING THE SHIFT KEY EVERYTIME (USUALLY)** Once you have the first curve (line/curve a-b) set to your liking , before adjusting the second curve (line/curve b-c) YOU WANT TO SELECT THE NODE (node C.) AND USE THE HANDLES ON IT TO START BUILDING THE END OF THE SECOND CURVE (line/curve b-c)...…..THENNNNNNN...…GO BACK TO THE PREVIOUS NODE (node B.) AND ADJUST THAT ONE TO MAKE THE SECOND CURVE (line/curve b-c) FIT and FLOW SMOOTHLY WITH THE FIRST CURVE (line/curve a-b). so therefore once you move onto the third curve (line/curve c-d) start by adjusting the handles of node D. FIRST then jump back to ex. node A. node B. node C. node D. node E. etc. line/curve a-b, line/curve b-c, line/curve c-d, line/curve d-e after the curve between node A. & node B. has been made (line/curve a-b), jump to node C. and using the handles to adjust the curve (line/curve b-c) to your liking THEN start adjusting the handles on node B. creating line/curve b-c which flows perfectly with the previous curve line/curve a-b AFD - nodes.mp4 HOPEFULLY I HELPED SOMEONE!
-
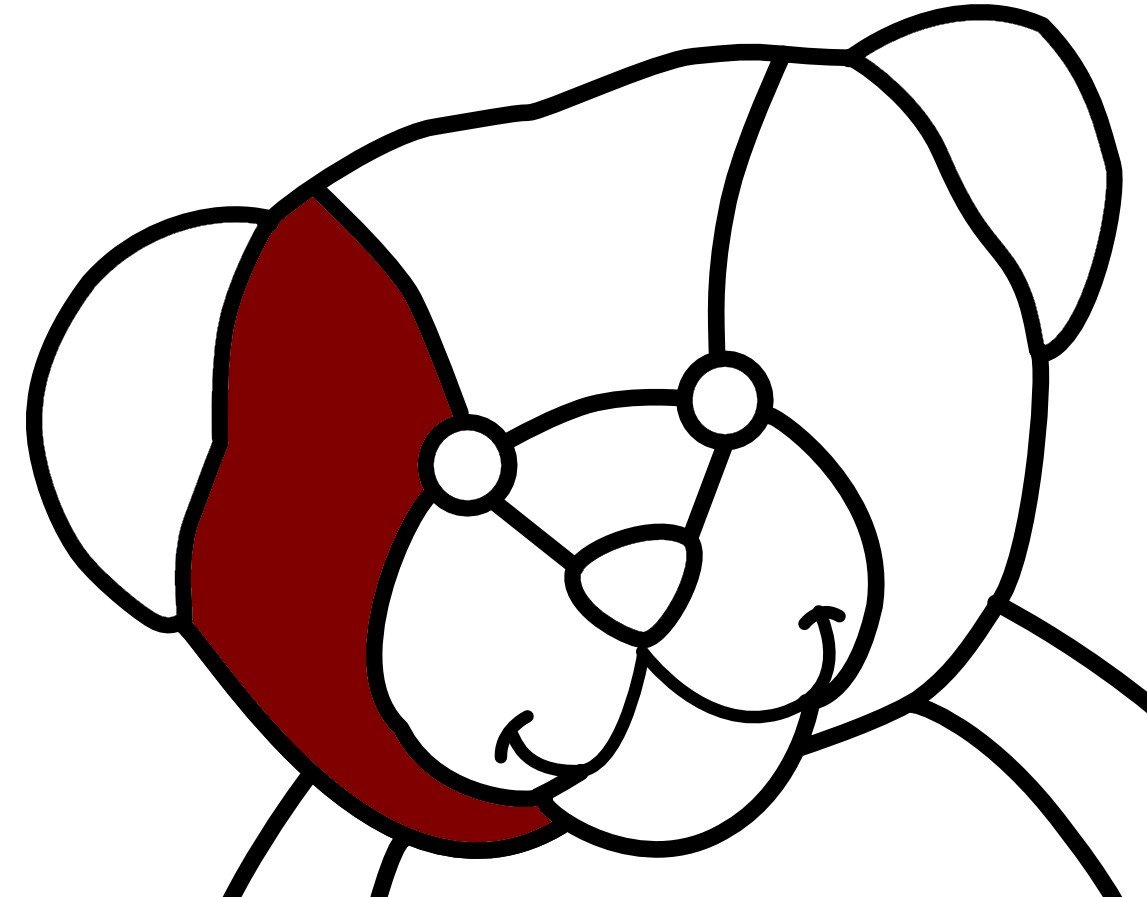
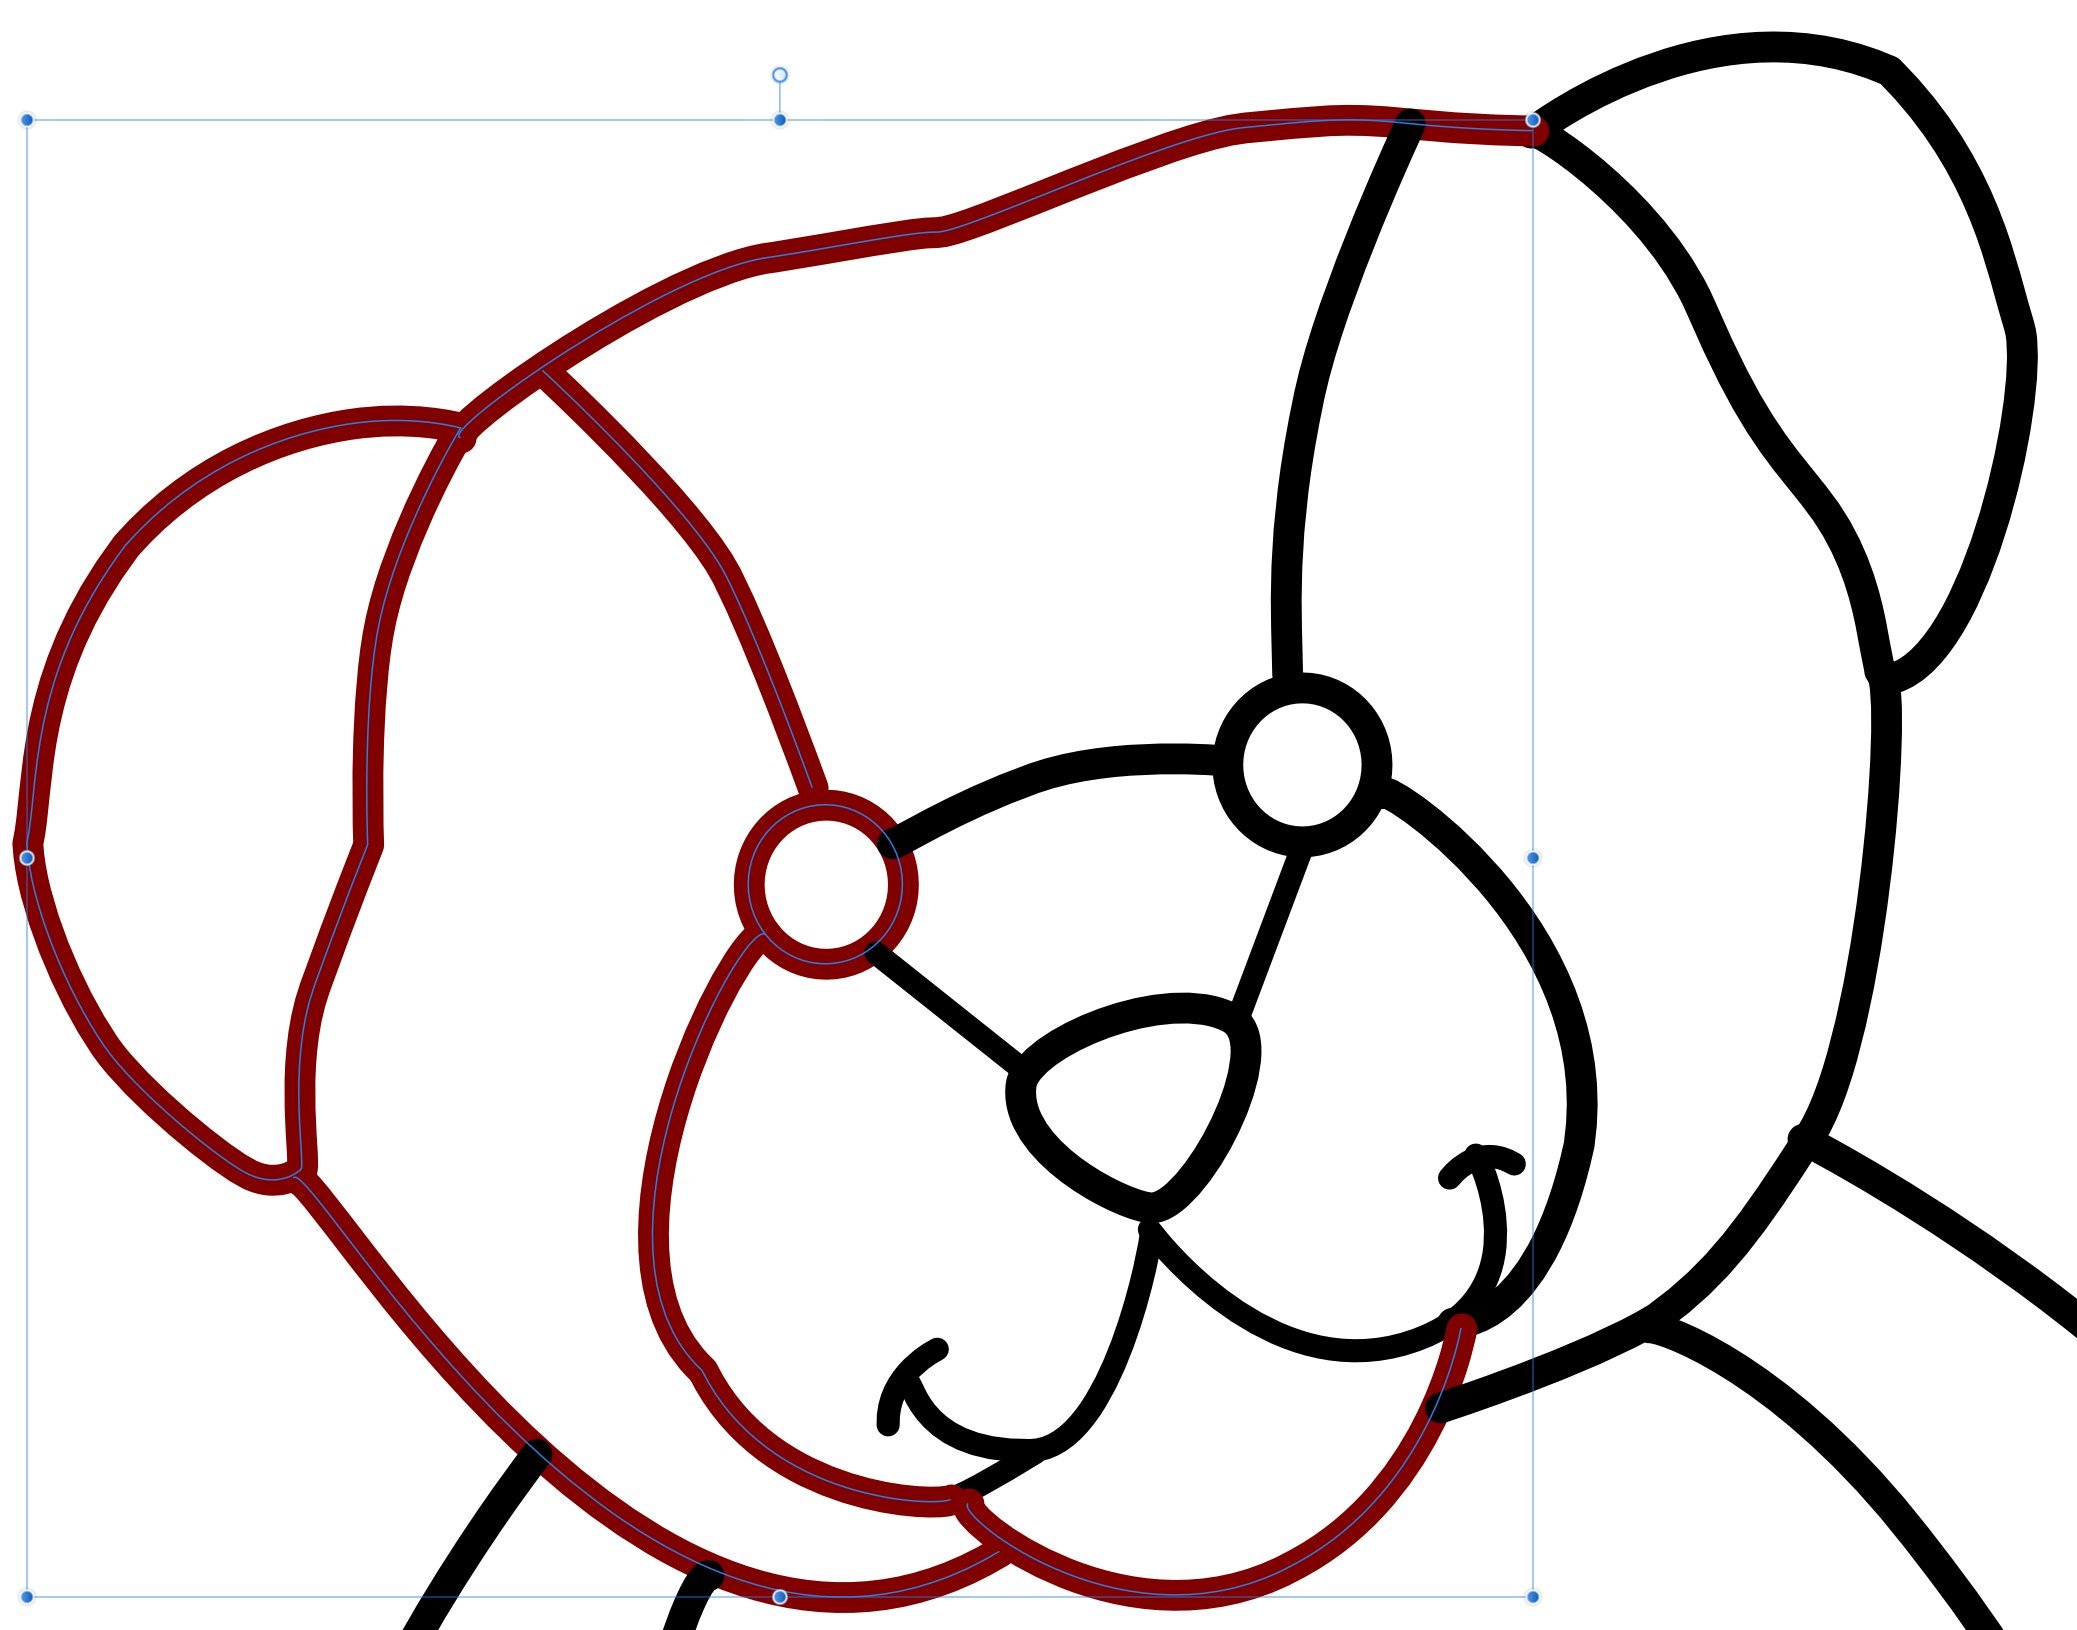
 Umm. Sorry if that title isn't great. I couldn't think of a better way to word it. Anyway the problem is I created a picture (in this case, a teddy bear) out of curves: I'd like to be able to colour in individual sections like this (without rasterising it and using the paint bucket like I did for this example): But the whole thing is sort of a mess of curves, e.g. for that part of the face, it uses all of these: Is there an easy (or hard, as long as it works) way I can get just the perimeter for each enclosed area as its own shape, so I can just set the fill for each area? I can't just rasterise a high res version and fill each area, because I need curves, preferably individual ones for each area, I'm intending to use this for 3D printing (which means I'll probably have to export it as an SVG, but that would just be a bunch of closed curves anyway.... I hope). Thanks in advance for the help!
-
 Hey guys Sorry if this has been asked before I googled it but I found no answers. I want to curve multiple curves as one straight line. I've created lots of shapes like about hundreds of curves in a row and I want to convert them into one straight curve. as you can see in the pic I uploaded I can only move individual shape which is going to be a lot of work to bend them around. Is there a workaround this?
-
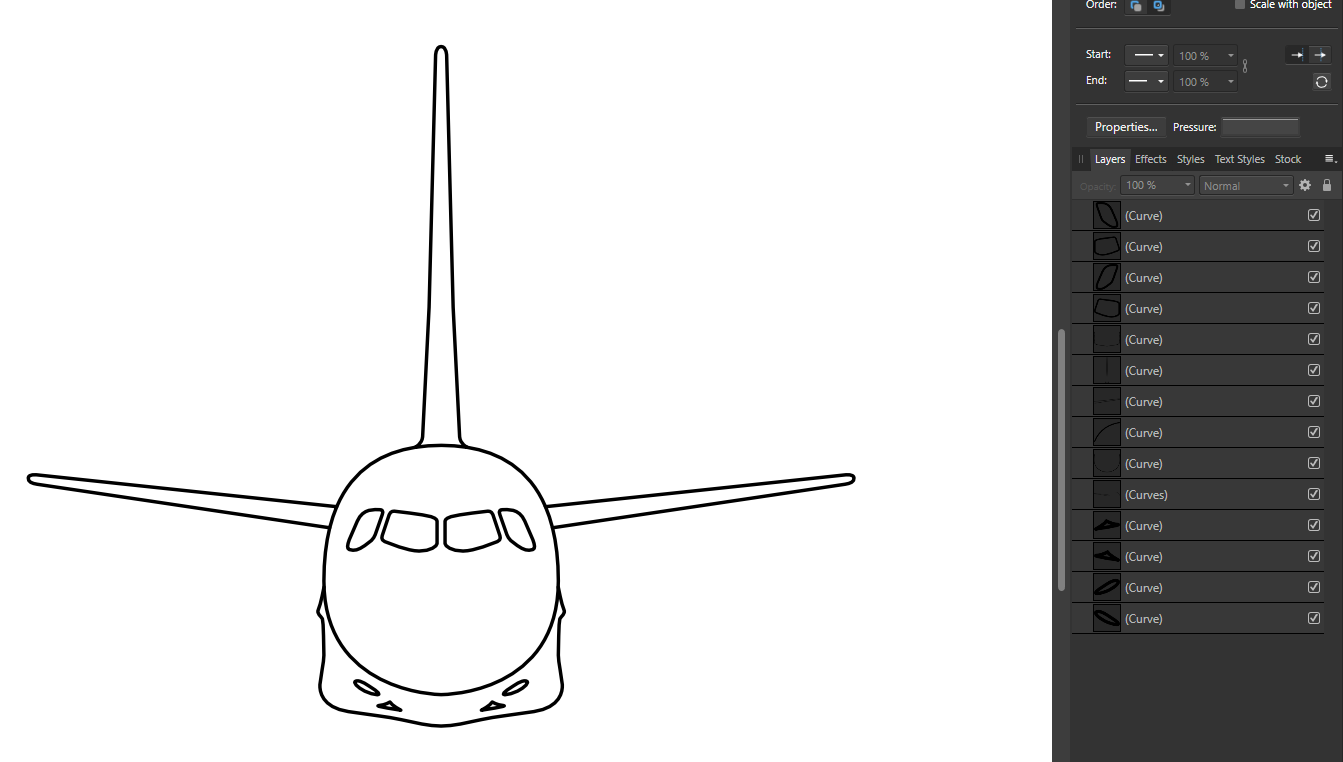
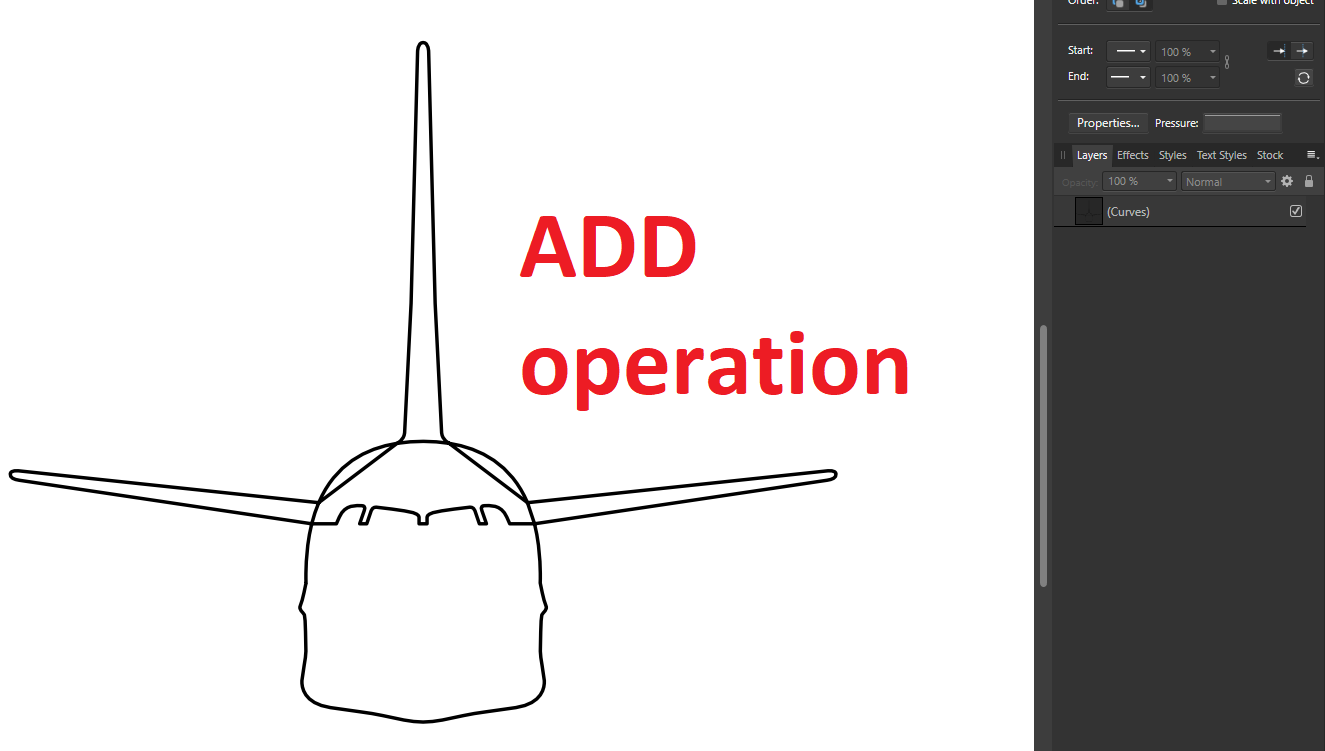
 Hi, I'm trying to create a singular curve by joining multiple individual curves together using the ADD boolean operation, but it is not working as expected. I have the following design below consisting of multiple curves, and basically I want to join them together so it becomes one single curve: When I used the ADD boolean operation to attempt to join the curves together it came out looking like this: I also tried to use the XOR boolean operation and then use the "Break Curve" and "Join Curve" options respectively to remove the newly intersecting pen curves, but for some reason the areas where the curves should join right after implementing the XOR operation become a jumbled mess (which makes using the Break- and Join Curve actions almost impossible): Hence I'm asking for help with this because I truly don't know how else to achieve this. Not sure if this question has been asked before in the Forum, but any help would be truly appreciated :).
-
 Affinity Photo Are Levels and Curves The Same? – A Beginners Look PC-Mac version This tutorial looks at the Levels and Curves adjustments in the PC-Mac version of Affinity Photo. Are they the same? Which is better to use? https://youtu.be/AKN4XltrnlY
 -
Affinity Photo iPad version Are Levels and Curves The Same? Beginners Guide pt 16 This tutorial looks at the Levels and Curves adjustments in the iPad version of Affinity Photo. Are they the same? Which is better to use? https://youtu.be/qf8ywvP5o-A
-
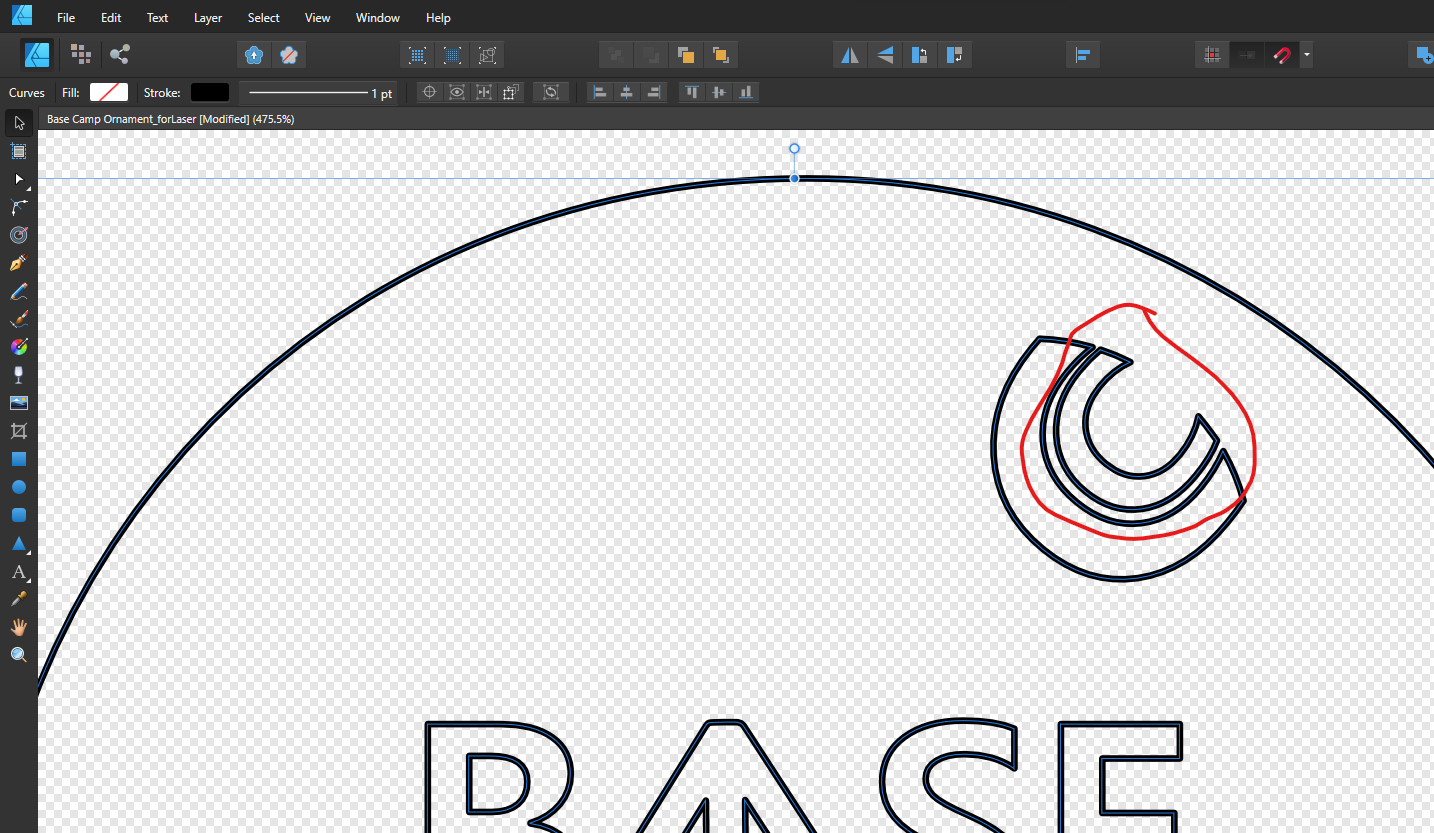
 In Adobe Illustrator you can select all of the points on a curve by Alt-clicking with the point selection tool. How do you do the same in AD. Need when you build complex objects with Booleans and want to select a part which is difficult to select with marquee without selecting the all of the parts - like the smaller C in the red circled area.
-
 Hello! I'm currently designing a logo for my friend using AD for iPad but I'm still quite new to the program. Basically, I'm trying to merge the curves together but when I select "merge curves", it merges the curves in such a weird manner. Can anyone please advise me on this? How should I merge it such that it doesn't create those weird fills within the curves? (Please take a look at the video I've attached) FullSizeRender.mov
 -
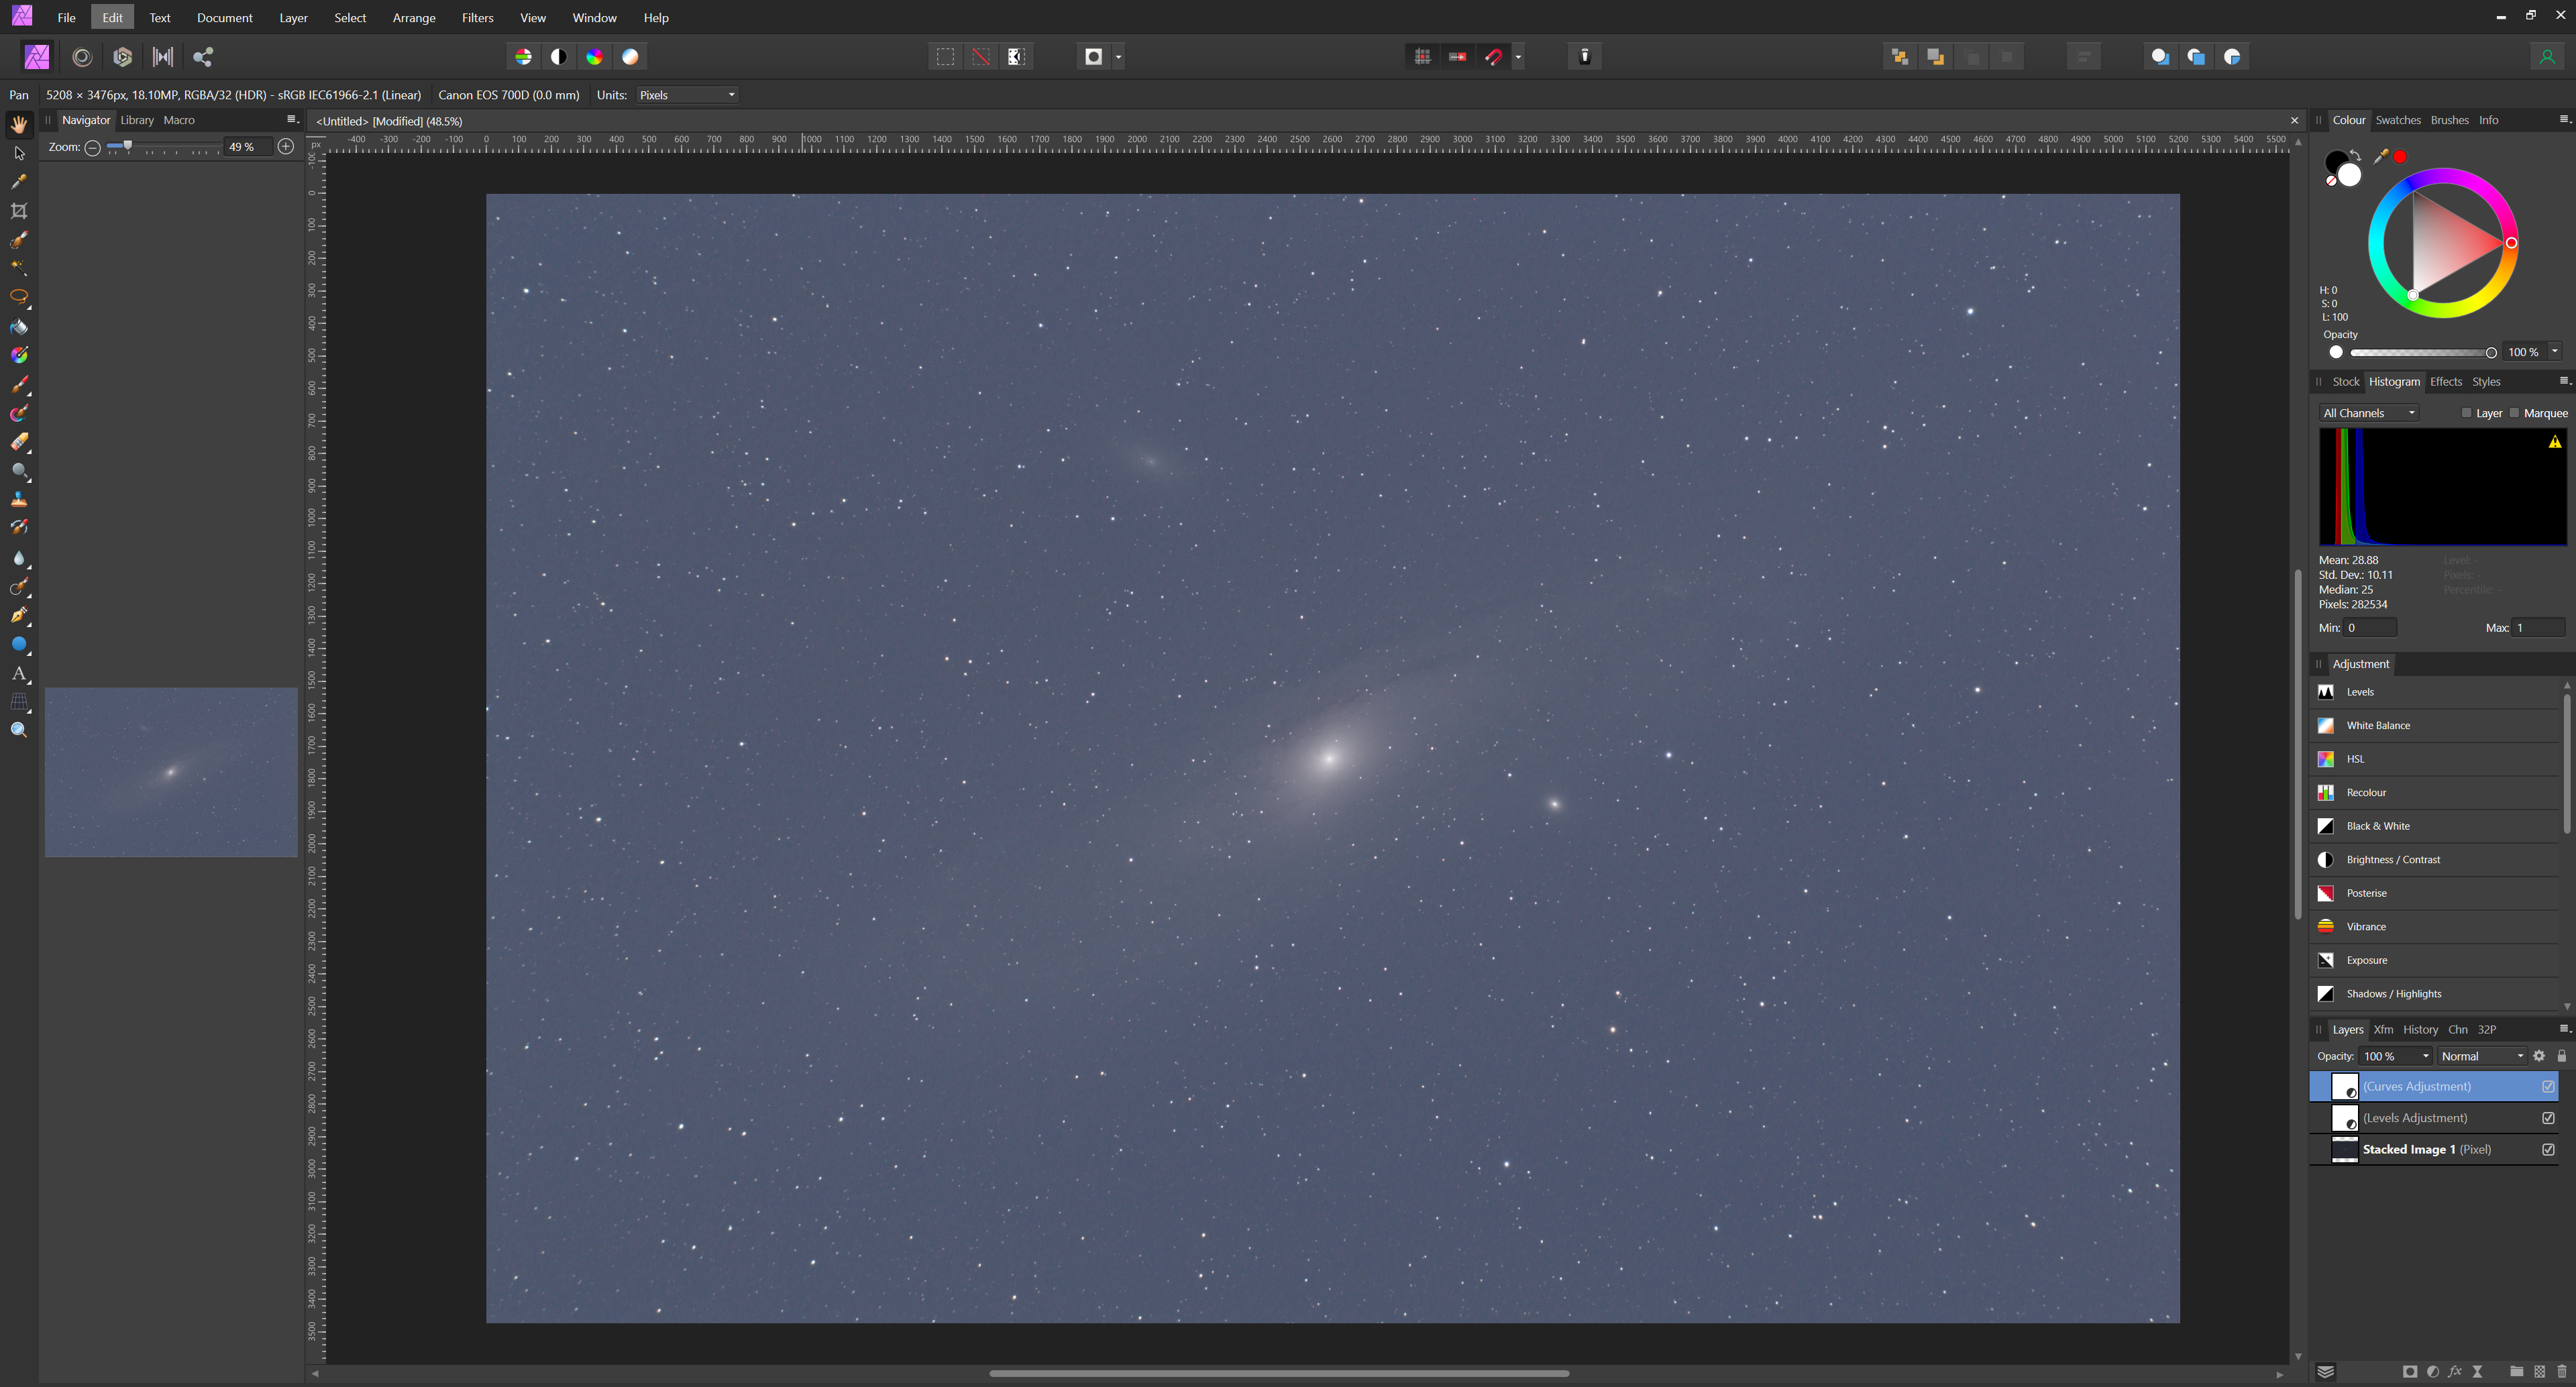
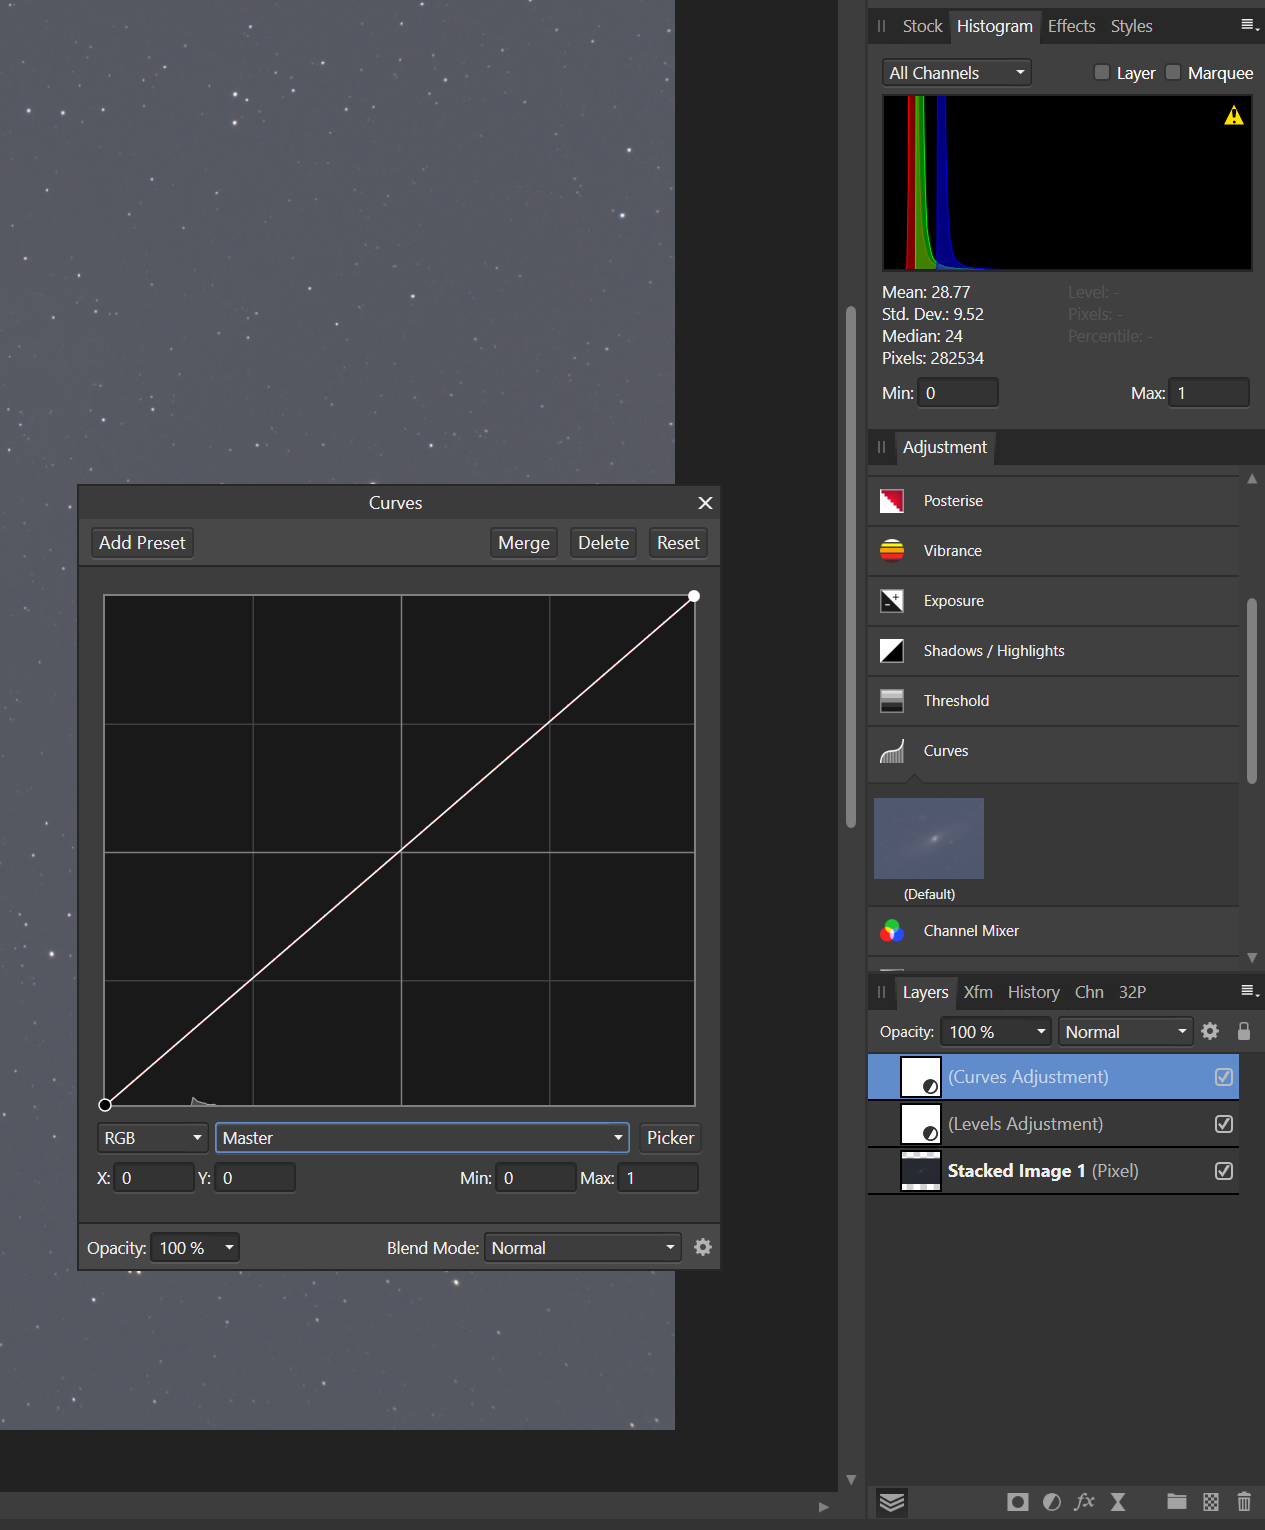
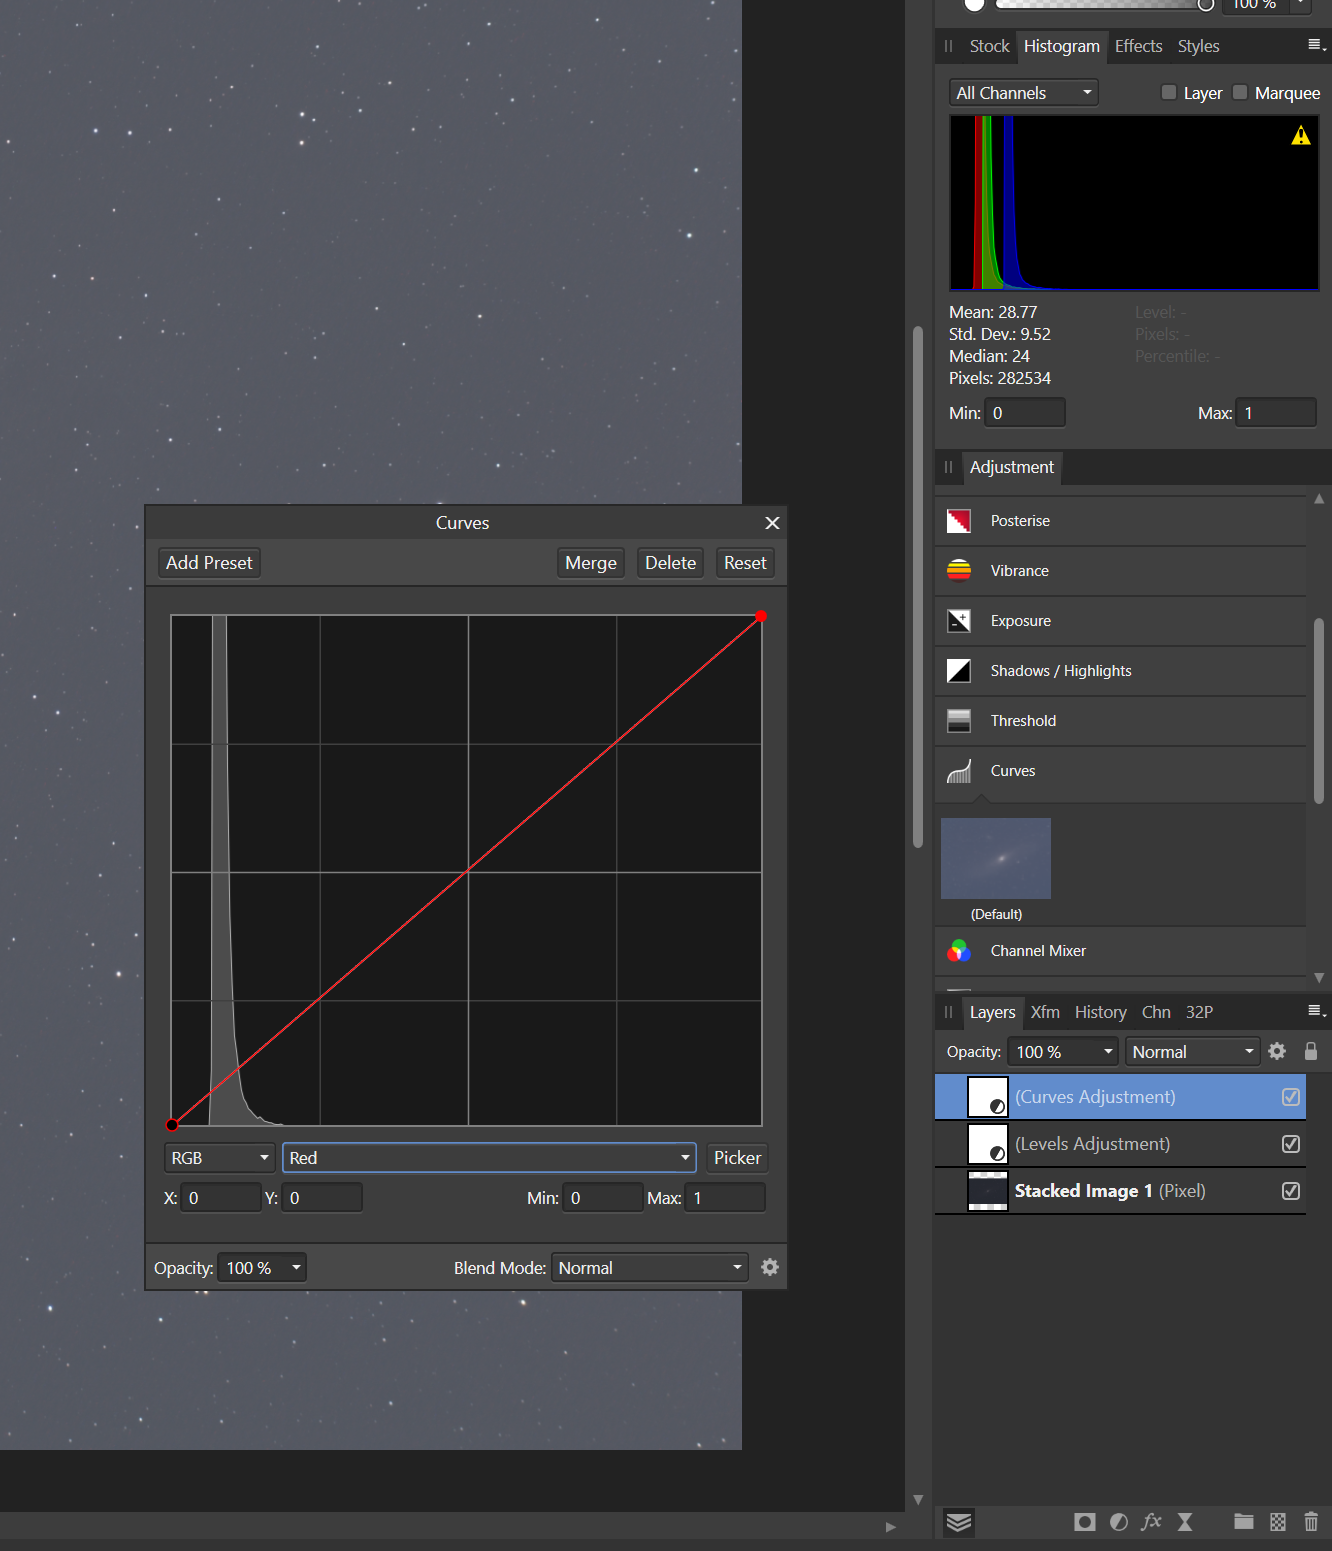
 Hello, I'm hoping somebody can shed some light on this. I'm trying to edit an astro stack, however when I apply a curves adjustment, (manually or adjusting the automatically applied one during the stack) there is either no or very little histrogram data, despite the standard histogram working as normal, and other adjustments such as levels working fine too. While the master selection in curves isn't working, the red green and blue are, as well as grey and so on. I have a pretty decent Windows machine so performance isn't an issue. I thought it may take a short while for the histogram to render in but it never does. Funnily enough, I downloaded a sample stack online of the same subject, same document settings (32 bit etc), and it seemed to work on that image, so I'm at a loss. Any help would be appreciated. I've attached screenshots and my project file for reference. Thanks 452161177_TestStack.afphoto
-
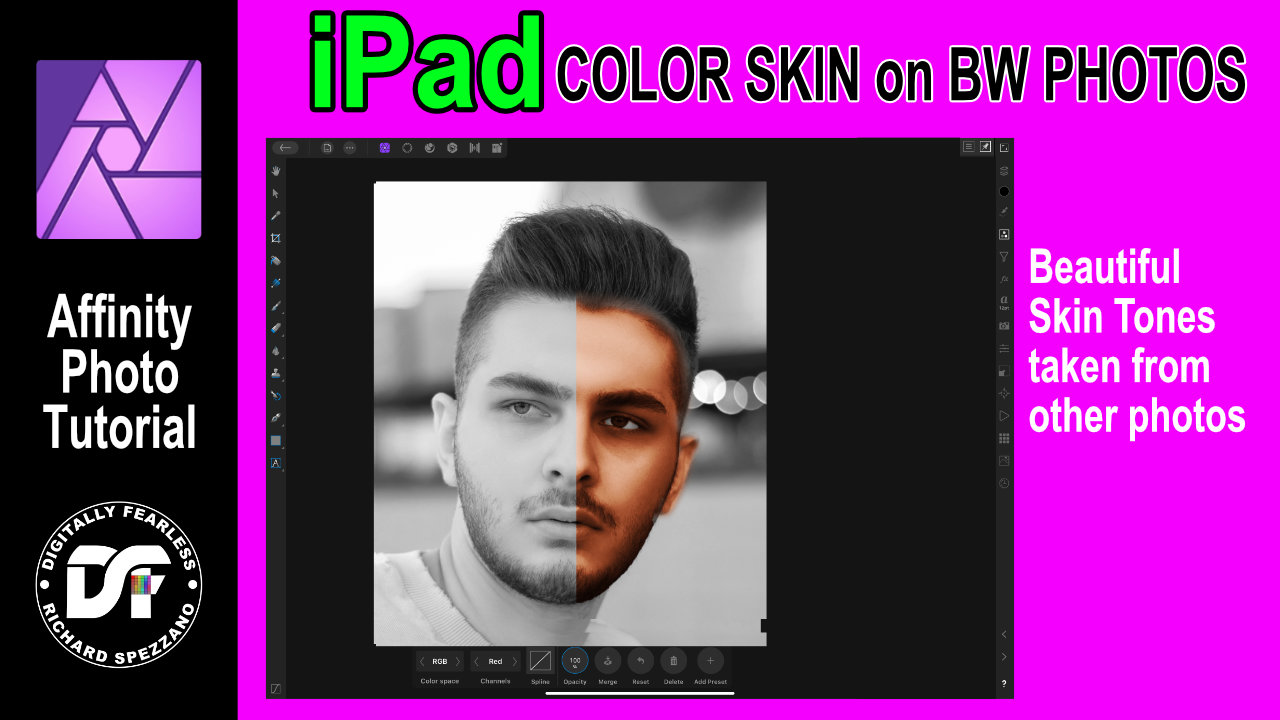
 Add skin tones to black and white photos Affinity Photo tutorial (iPad version) I steal skin tones from other photos to colorize the skin on a black and white photo using gradient map levels and curves. You can also view the desktop version of this tutorial on my channel. #iPad #affinityphoto https://youtu.be/Z6wHBdZU7Pc


.jpg.7691567c4f251b5af498d40143519916.jpg)