Search the Community
Showing results for tags 'cropping'.
-
 Hey everyone, I honestly don't know exactly how to describe what I've been missing for a long time (actually since day one of Photo) other than the title. But I can try to describe what behaviour I would expect. As you can already tell from the title, it's about the Crop Tool. From certain other tools I am used to being able to click on the top and bottom and left and right centre nodes of a selection, a shape or an artboard and adjust the element symmetrically by holding down the ⌘ key. Here is a short demonstration of what I mean by this (Sorry for the poor quality, but I didn't want it to be a big clip): Crop_Tool_function.mov You could say: »Why don't you just move the active area so that it snaps into the middle?« But here's the thing: Snapping to the centre of the current canvas for some reason does not work with the cropping tool – only document edges and rulers are recognised. All other elements in the document are ignored as snapping candidates. For some reason these two functionalities (simultaneous crop opposite sides and snapping) apparently never made it into the crop tool and I really don't know why because these to me are the most basic functions I use on a daily bases – to crop equal parts from the sides or to snap to elements/candidates on the canvas. I really miss these – am I the only one? 😔
- 4 replies
-
- 1
-

-
- affinity photo
- crop
- (and 2 more)
-
AP 2.0.0, macOS Ventura 13.0.1, Intel iMac AP Settings: Retina Rendering: Automatic (Best) Hardware Acceleration: Enable Metal compute acceleration, AMD Radeon Pro 555 (Metal) When trying to enhance multiple scans from diapositives, AP crashed several times when cropping the image (JPEG): Cropping with Custom Ratio Straightening the image by ⌘-dragging the mouse Dragging handles to set crop size to eliminate transparent edges: AP crashes When I restart AP, cropping the same image as before works without crashing AP. After processing more of such images (without restarting AP each time) AP breaks again at the 5th to 10th image while cropping. I reported the crashes to Apple and also got several crash reports in Console. Grüße Hans-Peter
-
 I’m really frustrated and demoralized...after 2 hours searching on web and this forum. I have several images with different sizes, i just drop them all in a AP canvas in order to export those singles images with same size. 1. export persona ask me to set every slice manually...do i really need export persona to export some files??? 2. then i came back to crop the canvas so to have all slices at the same size but AP doesnt really crop images even if i already rasterized them (ONE BY ONE MANUALLY!!!!) 3. i just opened Photoshop and done the job in few seconds. This is just one of the many issue i get daily, no offence, maybe it’s my fault but i wondering if who made the app really use it to work or just test it beacuse its something really different. Im using PS since 1997 and i never ever had to bare this madness to do my job.
 -
 When I load an original map image (JPG) into AFFPhoto, I create a duplicate of the untouched image as a new layer below the original. My intent is to preserve the duplicated layer as a backup in case I go down a rabbit hole and I can't find Alice. On MAC, it seems that edits to the original image file such as cropping, rotating, etc. are "synced" to the duplicate layer below and now both layers are identical. How do I crop & rotate and edit the original image without carrying over the edits to the duplicated image in the layer below the original image layer?
 -
I've several thousand images to process. Camera "scans" of transparencies. Each inevitably has a border as it comes out of the camera, so each needs cropping. After processing a fair number I know the exact pixel width and height that gives satisfactory results. To save me the effort of having to choose "Unconstrained" + handle dragging on each one OR entering the known dimensions each time, I want a user defined option in the "Mode" dropdown list (preferably one that can be positioned at the top of the list.) I need a means of seriously reducing the number of keystrokes. Presets are not a viable method, choosing from a long dropdown (thousands of times) isn't an option - even if one could figure out a way of adding one's own preset. Macro doesn't work because entering the dimensions into the boxes doesn't constitute a command so nothing is recorded in the macro until one actually crops. (I'd want to be able to move the crop area slightly each time just to ensure it's central) Can anyone suggest the best solution - or have I hit on a desirable new feature "User defined crop dimensions"?
-
 I'm using the most recent version from the Mac App Store & for some reason I cannot crop. Specifically I cannot click & adjust the crop handles in either the Photo or Develop Personas.I click & hold on the track pad, nothing. I double, triple click, nothing. It is driving me round the bend. Is it a glitch or am I doing something stupid?
 -
 I just purchased Affinity Photo and can't figure out how to crop a layer. I have found some tutorials from a couple of years ago that walk mr through it but they want me to use the "Copy Flattened" feature under Edit, and that is not there. do I need to do something to get that feature to appear, or is there another way to crop a layer?
 -
 I place an image on a page in Publisher, then right-click and select Convert to picture frame. Then, if I move the frame's selection handles, the image shifts here and there within the frame and its magnification might change—what happens depends on how I manipulate the selection handles. This seems like normal behavior. But I discovered a different approach by accident: I place the image onto the page and select Convert to picture frame. Before doing anything else and with either the frame or the image selected, I use the Image control in the context toolbar to resize by some minute amount—say, by as little as .01%. After that, moving the frame's selection handles has an entirely different effect: It crops the image, and the image does not shift position or change magnification while the selection handles are being moved. It's almost as if I'd selected the frame, switched on the obscurely located Lock Children control at the extreme right side of the toolbar, and moved the selection handles only afterward. I actually prefer it this way — it's faster, enabling cropping without the need for Lock Children or having to use the Vector Crop tool. Is it working as designed, though? I'm not finding anything in the online help about this effect of changing magnification.
 -
 My aim was to use photo to crop some photos to add into an email. I downloaded them to Photo, cropped them, clicked Apply, then did copy/paste into email, and all the cropping was lost. This surprised me! Any solution? thanks
 -
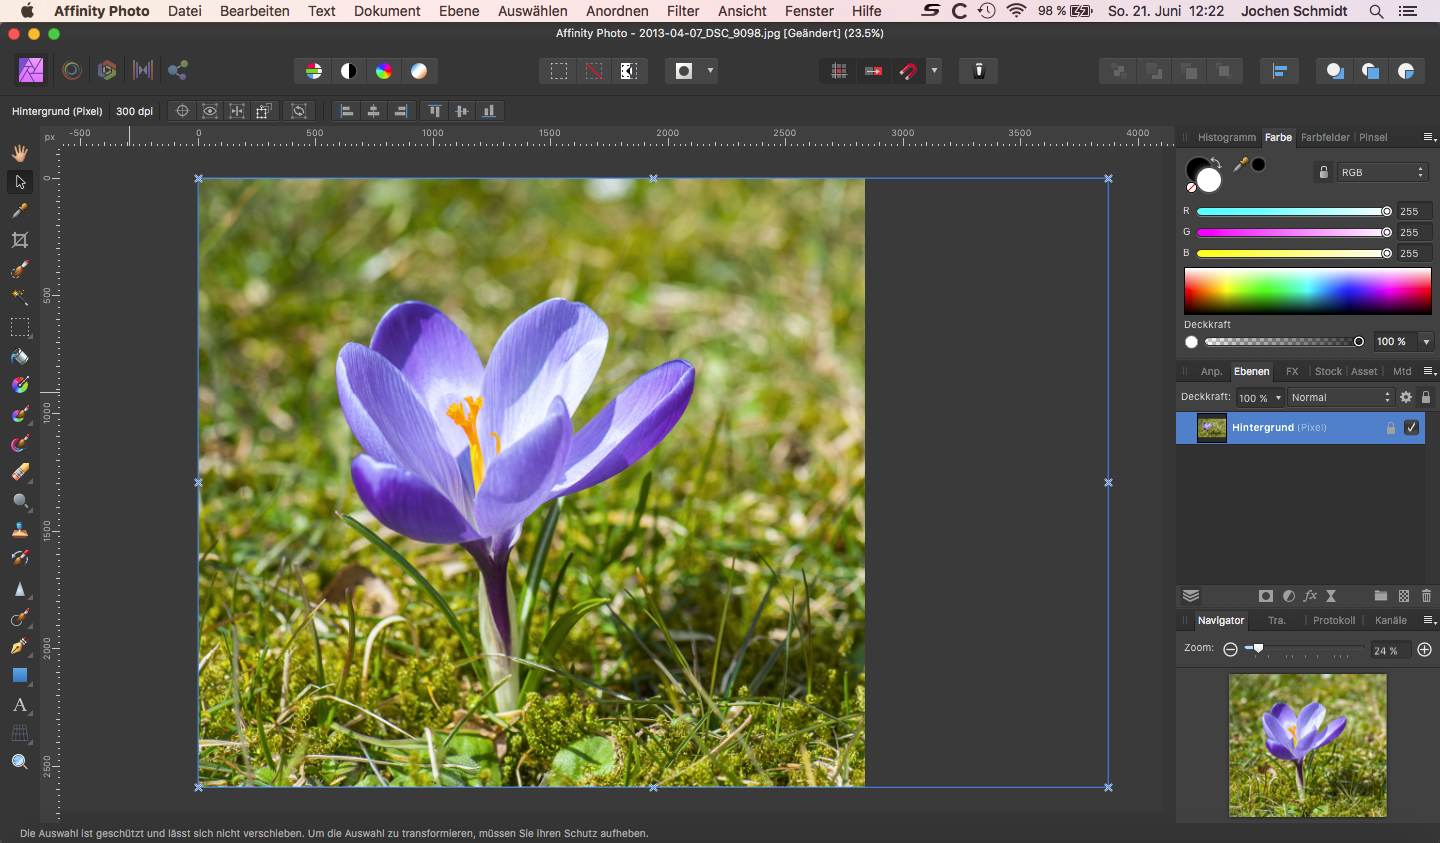
 When I crop an image, the image itself will be cropped, but the canvas remains still in the original size (see picture, blue frame of marking). When I now copy this cropped image to another Affinity Photo image or file it appears again in the original size - not in the cropped size. For me this looks like that cropping in Affinity Photo does not make a "physical" crop. How can I make a "real" physical crop? Should I always trim the image after cropping? I yes - what is the right way to trim? Can somebody tell me the best practice to crop an image physically? Thank you very much!
-
As I'm still unable to add screen shots to forum posts I have to do this as a link to an image on Google Drive. I hope it works. https://drive.google.com/file/d/1aABcWxnxTHtgUFO7z6o-MmPuWg9LbsOK/view?usp=sharing That screen shot shows the aftermath of the following steps: With an image in the clipboard (a screen shot): 1. Draw a frame with the Picture Frame tool. 2. With the frame selected, right-click and select Paste as Content The screen shot now appears within the picture frame. But there's something missing. There should be a second outer handle at the lower-right of the frame. But there isn't. When that kind of additional handle is showing, moving the picture frame handles can crop the image, though moving the outer handle at the lower right will resize frame and image together without cropping. Have I omitted some required step? What became of that outer handle?
-
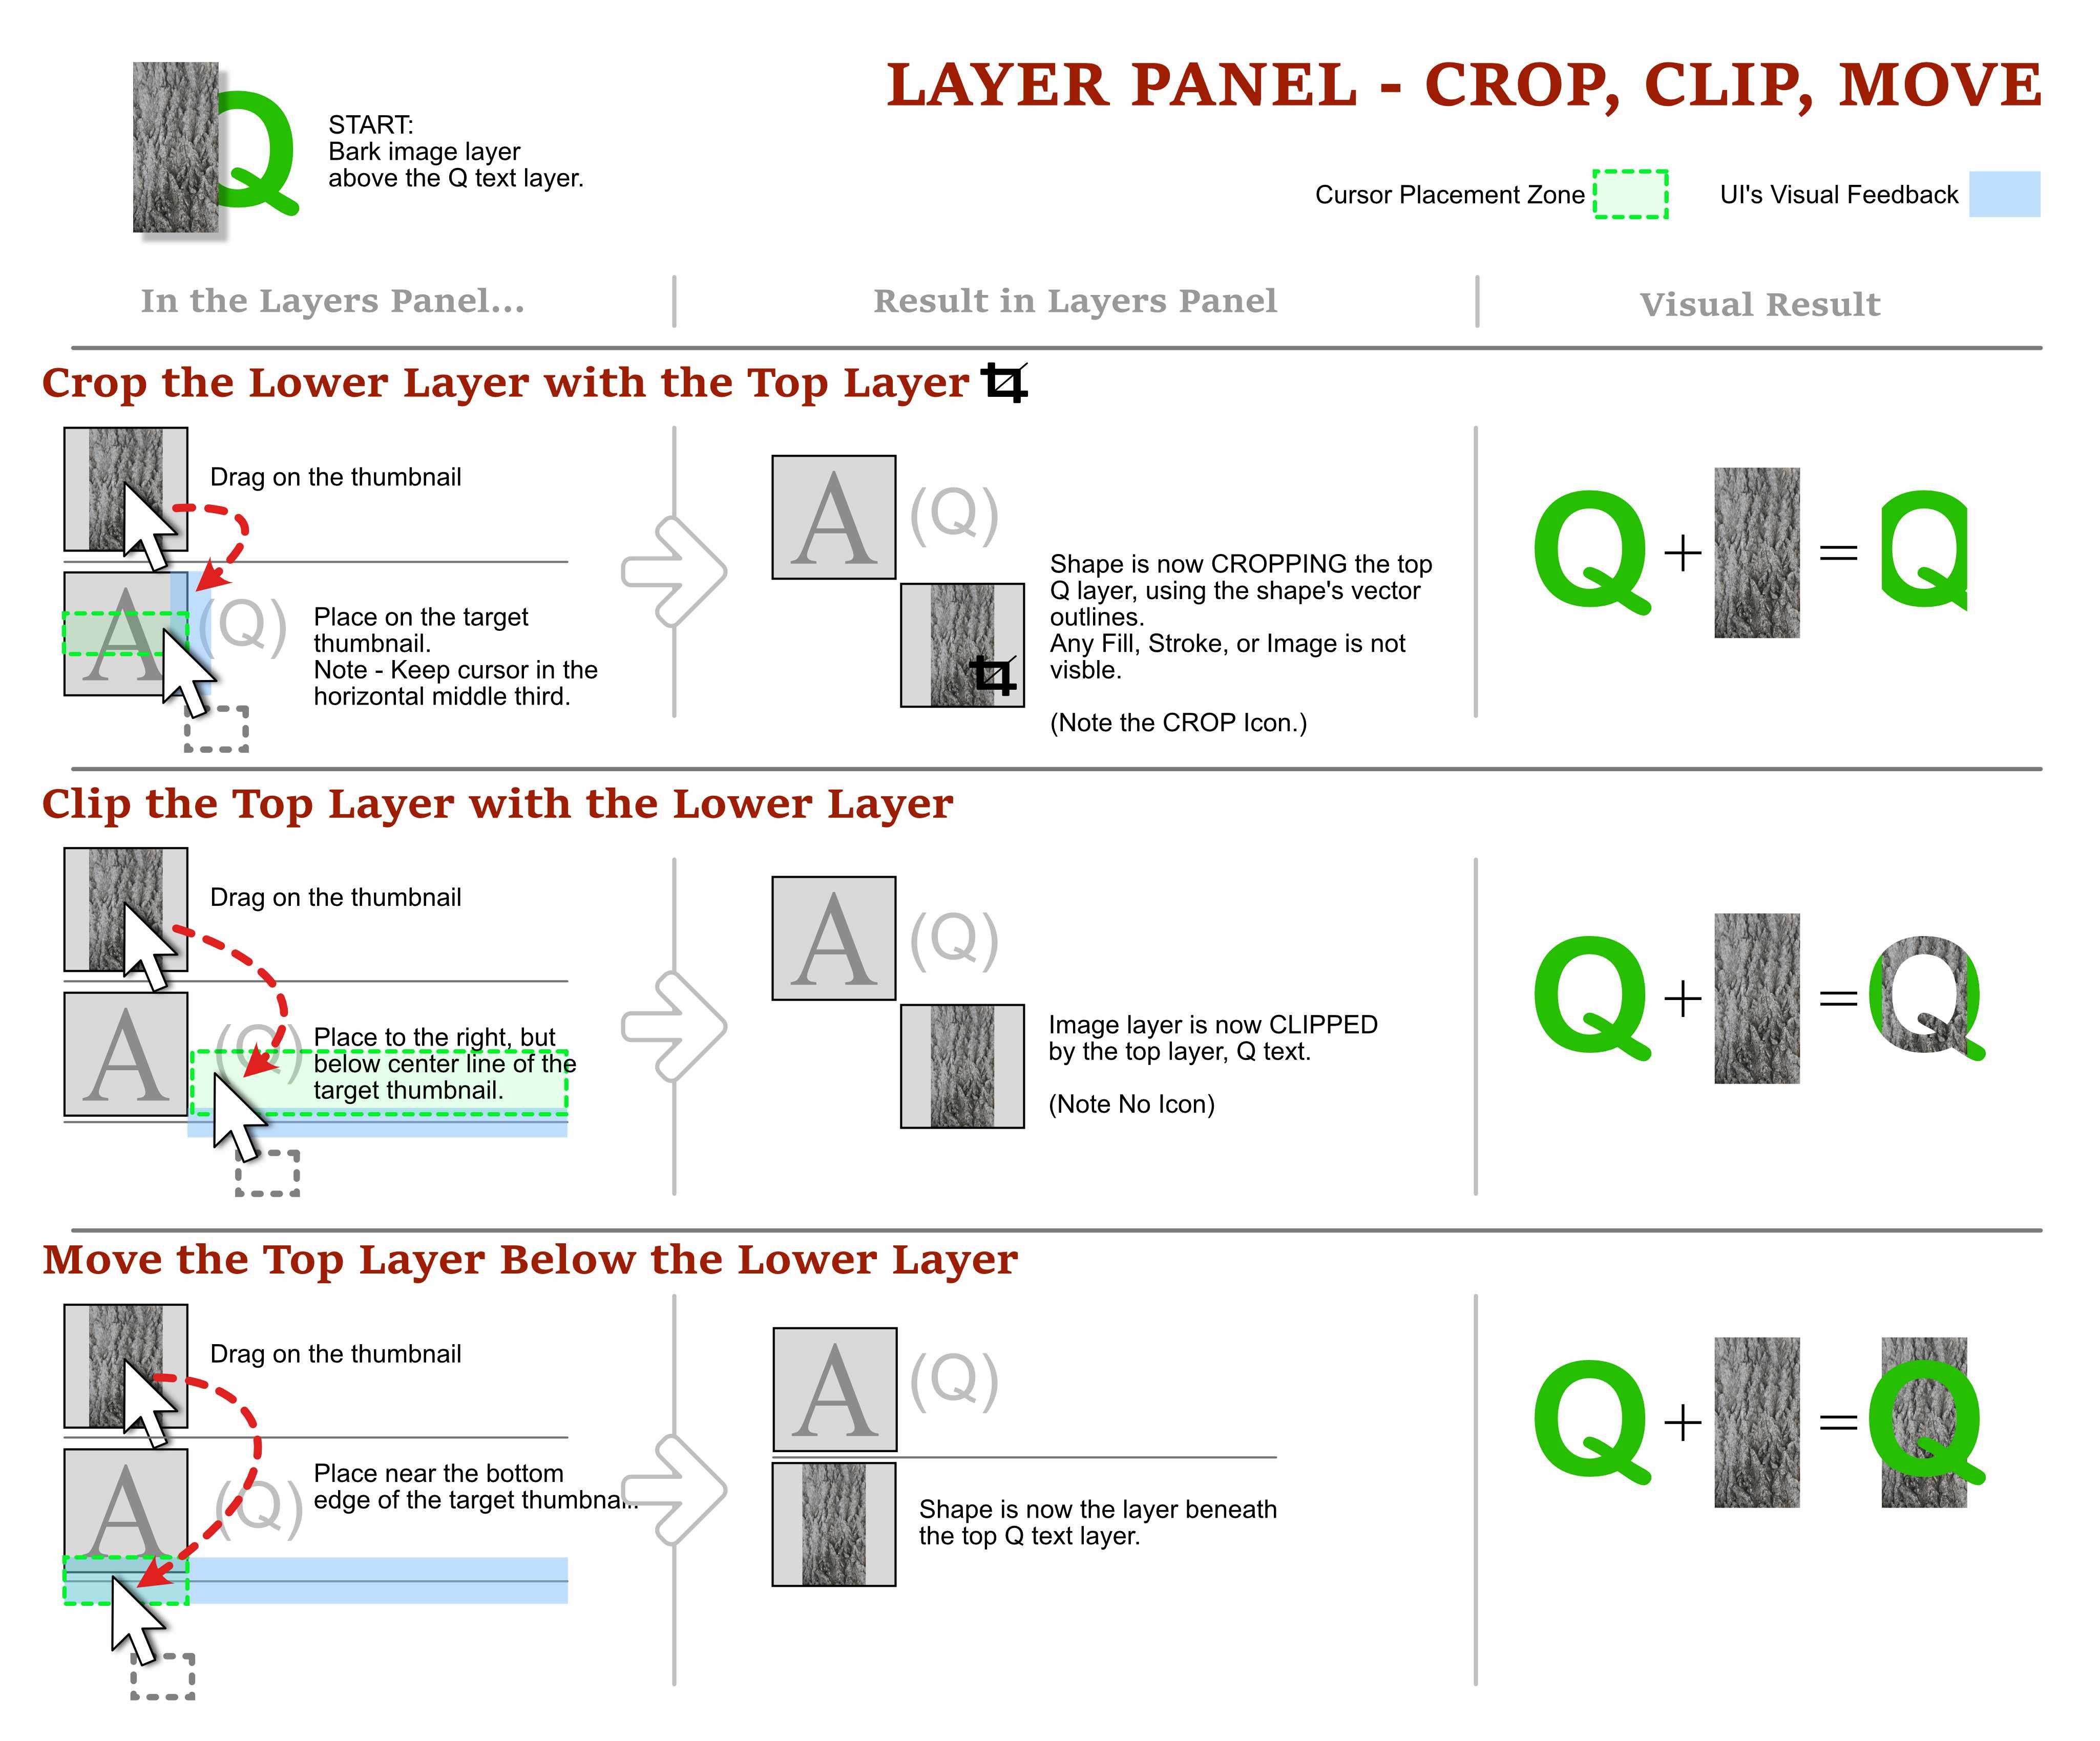
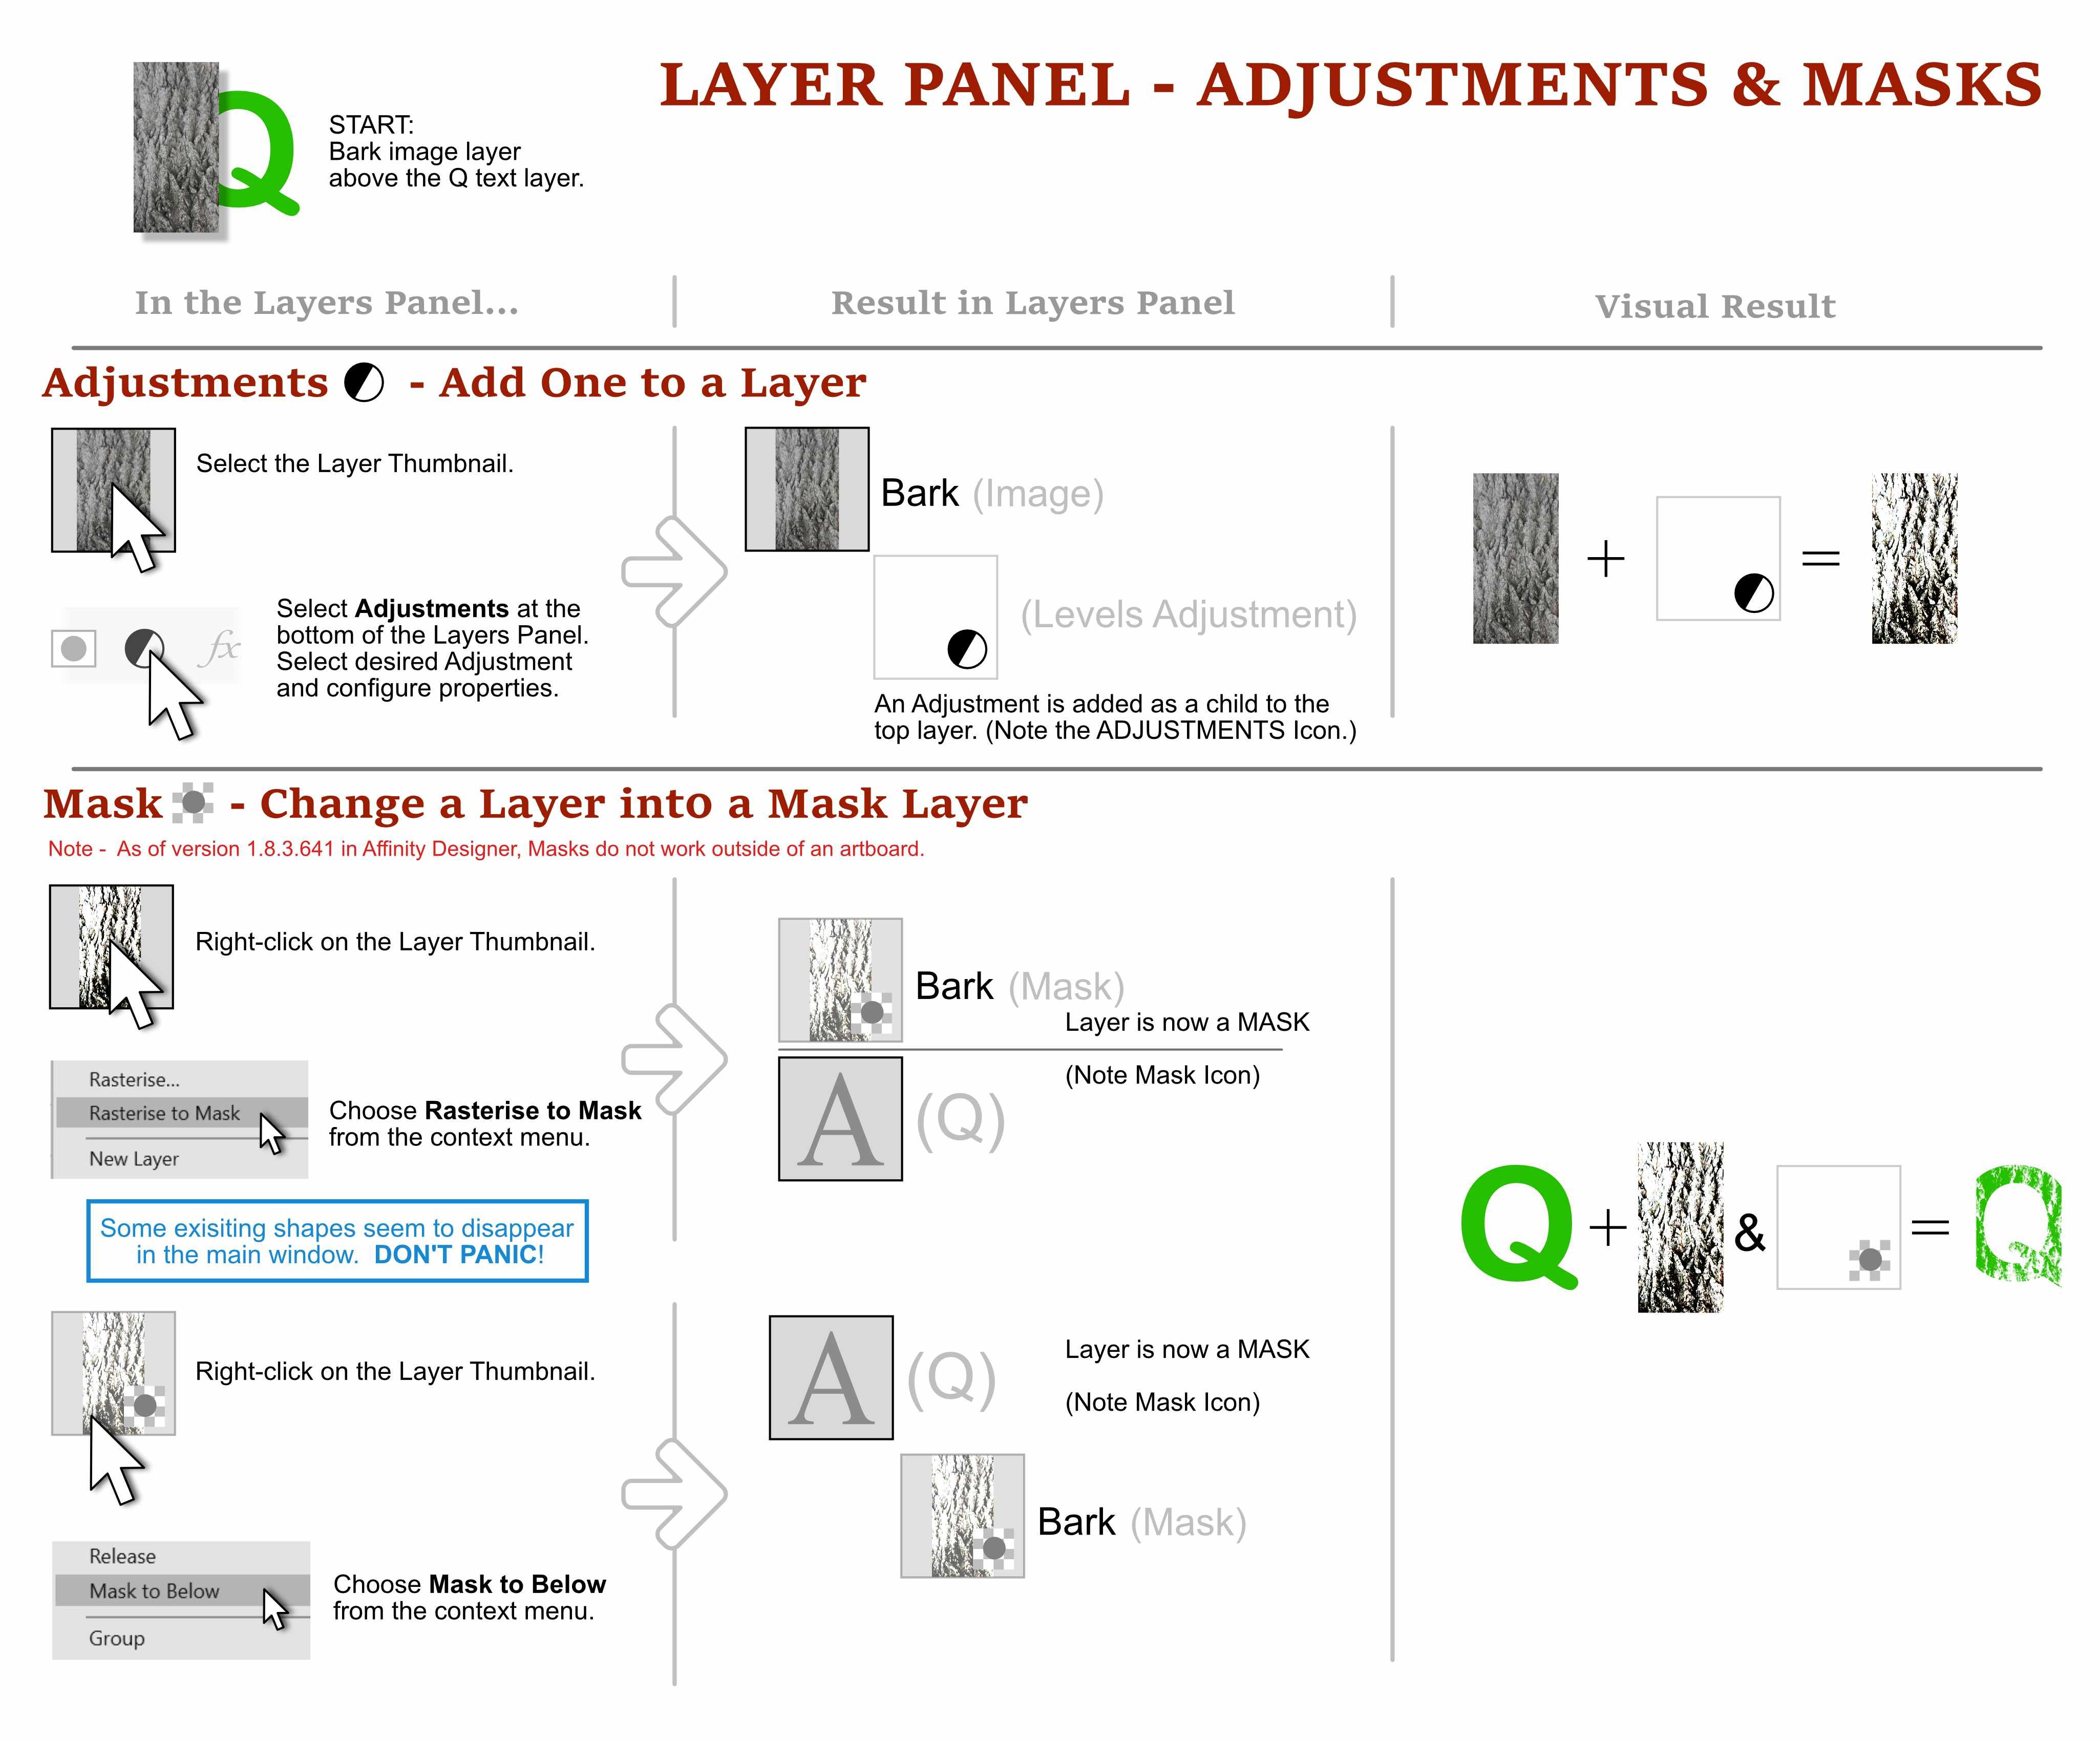
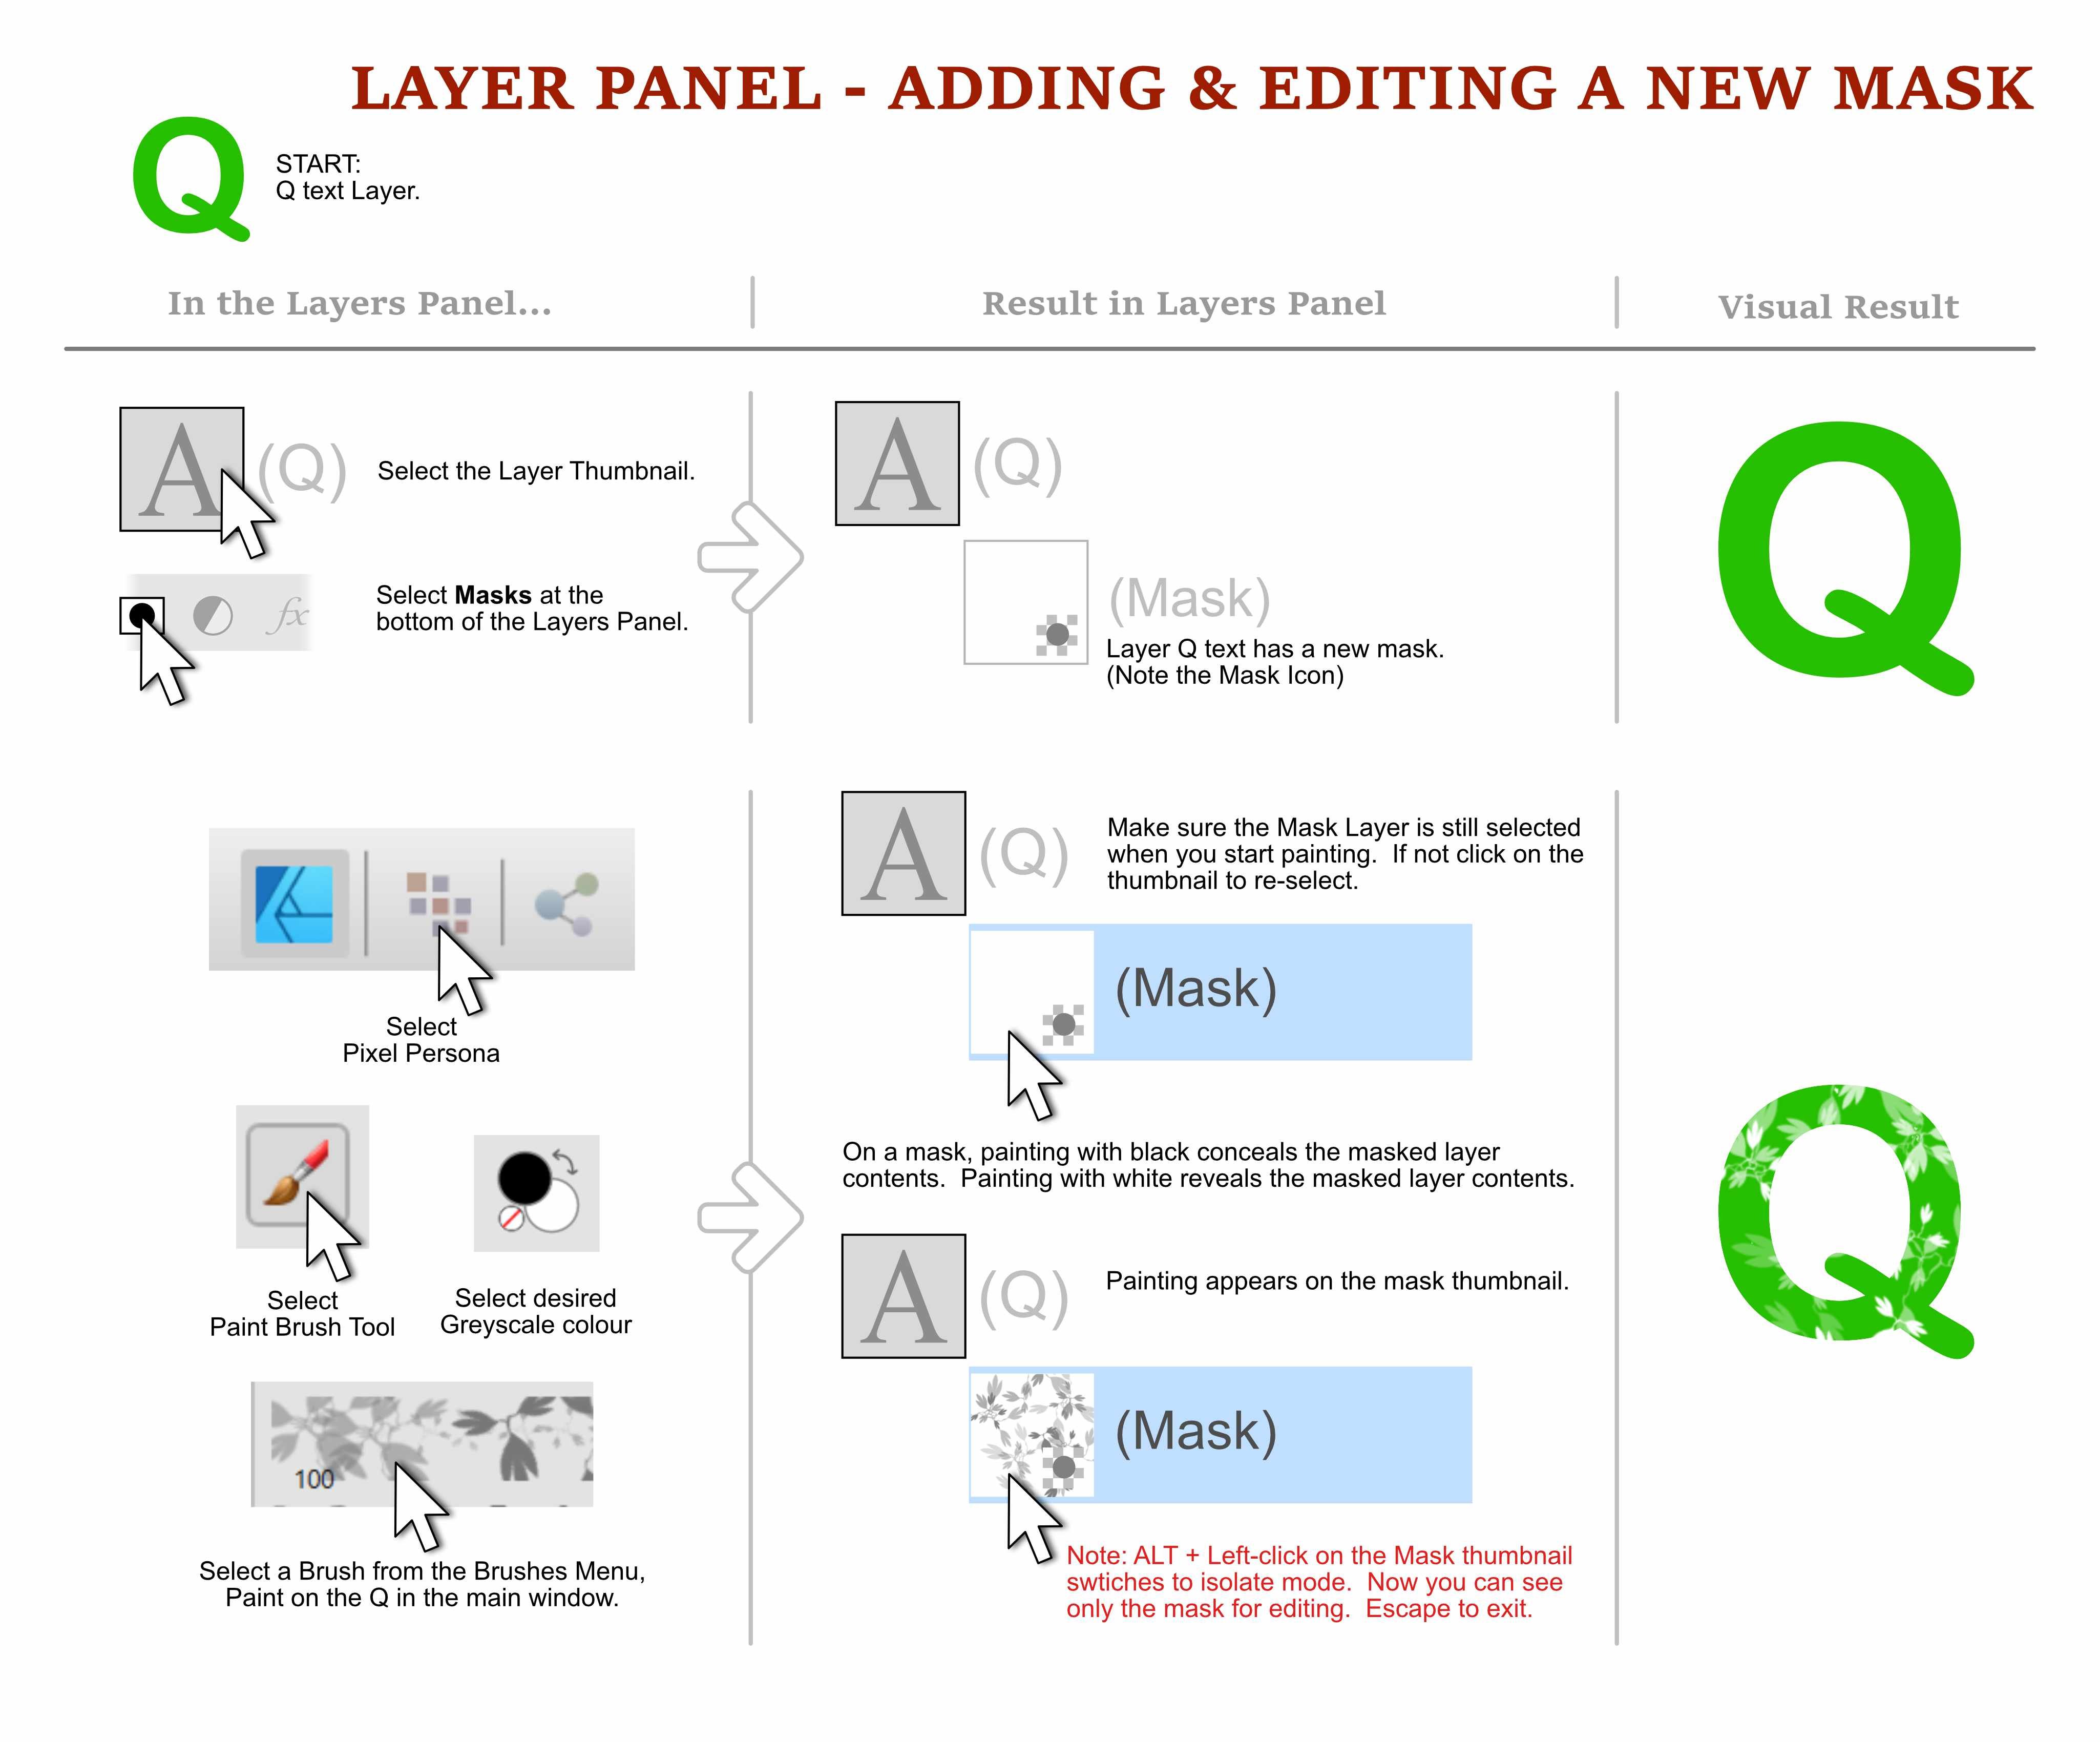
 Have you ever tried to arrange objects in the layers panel only to loose them, and then find it nestled in a collapsed group of objects? Ever try and move an object so it clips anther object and it ends up with an unexpected result? Ever wonder what those enigmatic icons in the layer thumbnails are trying to tell you? This guide is for anyone with those questions. From folks that are new to Affinity Products, to people who has been using it for years and struggled with the behaviour of layers. This 3-page visual how-to guide will hopefully help reveal any or all of the cryptic layer mysteries! The guide is in English for desktop versions of the products, designed the Windows version, tested mostly in Affinity Designer, but should translate well to Affinity Photo and Publisher. I would love to hear your feedback, if you notice any errors, have any additions, and/or let me know if it helps you, please chime in! NOTE: PDF DOWNLOAD AT THE BOTTOM. Please download it! Cheers, Dave Vector Affinity Layers Guide - Understanding Masks, Moves, Crops, Clips, Adjustments.pdf
- 46 replies
-
- 19
-

-
-
Hello, I'm not entirely sure if this is a bug or if I'm doing something wrong but I can't seem to figure it out. Sorry in case I'm just being a idiot here What is your operating system and version: Windows Version 1909 (Build 18363.720) What happened for you (and what you expected to happen): If I want to cut out a motive, like for example the astronaut in the picture, with a mask layer the background won't go away completely. Instead there is this weird grey there which I have to erase with the eraser tool. I expect to see straight to the layer below ( In this example it would be the default white background). Provide a recipe for creating the problem (step-by-step what you did).: 1. Take a picture with an object you want to cut out. 2. create a mask layer. 3. set brush to white. 4. go around the object. ( I used the fil tool afterwards to color the rest of the background white, it's the same if I use the brush for the rest). 5. You have the grey color that you have to remove through the eraser tool. Any unusual hardware (like tablets or external monitors or drives that may affect things) or relevant other applications like font managers or display managers.: I have a Laptop. I use the AOC Agon AG271QG as an external Display. The Logitech Hero G502 mouse. The Massdrop ALT Keyboard and a BlueYeti Microphone. For whatever reason that might be relevant. Did this same thing used to work and if so have you changed anything recently? (software or hardware) No on both questions. Thanks for reading! astronaut.afdesign
-
 On page 94 of the Affinity Photo Workbook it takes you through an aspect ratio example, but then tells you to enter the modes input of 16 and 6 respectively, This obviously can't be correct. It crops the image to near nothingness. On closer testing I found that what they mean is to click the Gear next to the mode to find the predetermined setting. It is not as the tell you to "use the two input fields next to Mode".
 -
Hello forum, Just purchased the product and overall it is excellent. That said, it is missing a genuinely needed option within cropping. This being the ability to lock/align the cropping tool to the center of the image so that when you click and drag from the left; the right also crops to the same amount, and like wise from top to bottom. Most importantly to me is the need to crop from a corner and for all other points to move the same amount (whilst being locked at the center) framing the image equally and effectively. I believe although do not fully remember that to do something similar in the overly priced competitor of affinity photo is by holding down alt (or maybe it was shift, but not both together) whilst cropping. For now i am manually center cropping by adding/taking away the x and y value to achive an equal border. Thanks
-
 Each week I have to crop 200 photos to 1:1 size. These are a mix of portrait and landscape. The focal point is not in the same position in each image. So, I need to be able to change the crop area for each photo. To open, crop, save for each photo is slow and tedious. I'd much rather use batch that has a macro that automatically opens each photo, opens the cropping dialog, waits for me to set the crop area, then saves the photo. Is this possible with Affinity Photo? (Is it possible in Photoshop?_ Thanks
 -
 Recently I've been having trouble with the cropping tool in Designer. It was working very well before but now it's not working at all. I"ll open an image file that I need to crop, select the crop tool, go to the blue bar at the top-middle and try to drag down. But I no longer get the up-down arrow key and in the rare occasion that I do, it doesn't actually drag down. It also fails to drag from any corner or draw a new rectangle. In a possibly related issue, the middle mouse button pan no longer works. It doesn't even give me the grab hand. And, believe it or not, even using the spacebar will not allow a pan. It will show the hand but won't actually drag the view. I feel like there's something that needs to be purged. Preferences maybe? I'm running the latest version 1.7.3 on Windows 10 I've tried reinstalling. Nothing is working here. Any thoughts? Thank you David
 -
 Hello again! Unless I'm missing this somewhere, but giving us the ability to crop the entire document and not just layers. Thanks!
 -
 I have a picture in an Apple photo album that I cropped using the Apple edit software; I then tried to import it into Affinity for additional processing, but Affinity imported the original uncropped image even though the original no longer exists in the iPhoto album. I realize I can crop with Affinity, but I find Apple’s software easier to use. How can I get Affinity to import the cropped image?
 -
Hi Would it be possible for the crop tool to remember the last used crop ratio. I always use 'original ratio' and I have to keep reselecting that on every new photo. I see that you now have 'darken border' pre-selected and that is good. Thanks. Keep up the good work.
-
 Any help would be appreciated.
-
 Hi I'm on 1.7.0.120. 1) When cropping, the presets are too hidden. There is a simple solution: label the button 'Presets' instead of putting a cogwheel icon on it. 2) Adding my own presets is possible, but not obvious. In addition to how it is now, can you bring back the option 'Add Preset' in the pulldown menu behind 'Mode:', like it is in 1.6.7?
 -
 I've been looking for the solution for this for while. If i have an image masked by a vector, how can i edit the vector without stretching the image? eg. in illustrator i'd use the node tool and it would only effect the frame, not the content
 -
 I just noticed the clip feature which is a pretty neat function. I would like to make an unclipped version of the project I am working on and was wondering can I have both version in the same file? Do I make a duplicate of this file and have two separate files? When I make variations with Design and Publisher I do it within the same file.
 -
Hi. I'm splitting an older post in the hope that the single issues get addressed. This would not be a problem if my settings were sticky (as Darken Border is by now). I'm on a 13 inch MacBook. Until 1.6.7. I have to change the Overlay setting to None for every single photo I'm cropping. In the 1.7.0 beta (now on .107) you introduce an additional click for me, because the Overlay setting is hidden behind the >> in the top right corner. Please make AP remember that I want Overlay set to None in 99% of all the photos I'm cropping. Until then, please let me decide which settings are hidden behind the >>, either by letting me drag&drop their position or by letting me uncheck the display for the one's I'm never using in Preferences – User Interface. Thank you.