Search the Community
Showing results for tags 'crop'.
-
 A simple problem: I have a photo, and I want it cropped to become Facebook's cover photo (or a featured image on my blog, I have many presets). I have the exact pixel dimensions: 820x340 and want to crop it from a bigger image. But I want to actually draw the area I want cropped and scaled. In Photoshop it works like this: you select pixel dimensions you drag a rectangle on the image, it has a fixed aspect ratio, but can be any size double clicking then crops the image and scales it to the exact pixel dimensions. I can't figure it out in Affinity Photo. I can have a preset with exact pixel dimensions, but when I scale the area, the pixel dimensions change as well. I want the program to apply the pixel dimensions after I drew the area I'm interested in. Can it be done?
 -
 New member here but I have been using the forums for information for a while, so than you to everybody who has unknowingly helped me so far! As you might have guessed though, I haven't found the answer to my latest question, which is: Is it possible to have Photo automatically crop remaining dead space to the original aspect ratio (or maybe a predefined one from your presets), or with a single click after using the straighten tool, or manual rotation? I usually take landscape, or architectural type shots so doing it manually occasionally is no problem, but I'm finding it can be a little tedious when doing batches of images that all need adjusting by a few degrees. If it isn't possible, is it something that could be implemented? I think it would be incredibly useful! I apologise if this has been asked before, i just couldn't find the answer. Thanks in advance, Carl
- 4 replies
-
- 1
-

-
- Crop
- Straighten
- (and 1 more)
-
 When using Straighten in Crop, the grid appears in Portrait orientation and the top node where you can actually rotate the image is off-screen. It's unhandy and a right royal pain to have to drag the grid down every time! Why not use the Straighten tool instead? Because Rotate is faster and easier if you have a good eye for level. At least, it would be faster and easier if you didn't have to go chasing the grid every time. Could this please be fixed to fit both the size and orientation of the image like it is when simply doing a crop?
 -
 Just downloaded and installed Affinity Photo Trial on a fairly new Win 10 laptop. CROP is unable to work because there is no APPLY button on the Context Menu. The Context Menu is visible, and seems to have all the appropriate buttons and switches for the Crop function as explained in the Help documentation, except there is no Apply button. Attached is an image of the context menu as I see it. I can adjust a crop area, with or without constraints, and rotate it, etc, but there is no way to finalize/accept/confirm/apply the crop. I can only cancel it or choose some other tool. Perhaps I am misunderstanding where it should be...
 -

Batch Progress for slicing import/export
paristo posted a topic in Older Feedback & Suggestion Posts
Have a scanning process or task to edit huge files that requires lots of memory but need to load the files and edit them with just 4-8GB? That can happen and when it does, you can get so frustrated about removing dust etc on the huge files. On Unix commandline I used a ImageMagic a lot for that task to automatically process a input file and slice it to smaller ones without really loading the whole file to VRAM etc. And then use the image editor to open the separated files that were sliced pieces and after each edit to combine the files back to one big one (a la panorama stiching). It made possible to load on a computer with 512MB RAM a files size of 400-500MB and do the spot healing for dust removing, build a script for the contrast etc editing and then apply all those separately to multiple 50MB files without stressing the hardware. This would help many photographers who use film and does huge file scanning or even panoramas with high megapixel cameras (80Mpix shooting a 5-20 frames for panorama) so you could just use computers with 3-8GB RAM with others software loaded too. And then just apply same curves etc to all files in batch, run the "new panorama" and then let the computer heat up! -
 I really need to know how to trace and crop or cut out a logo or image from a photo to use in another banner or photo. Could anyone please explain how to do this?
 -
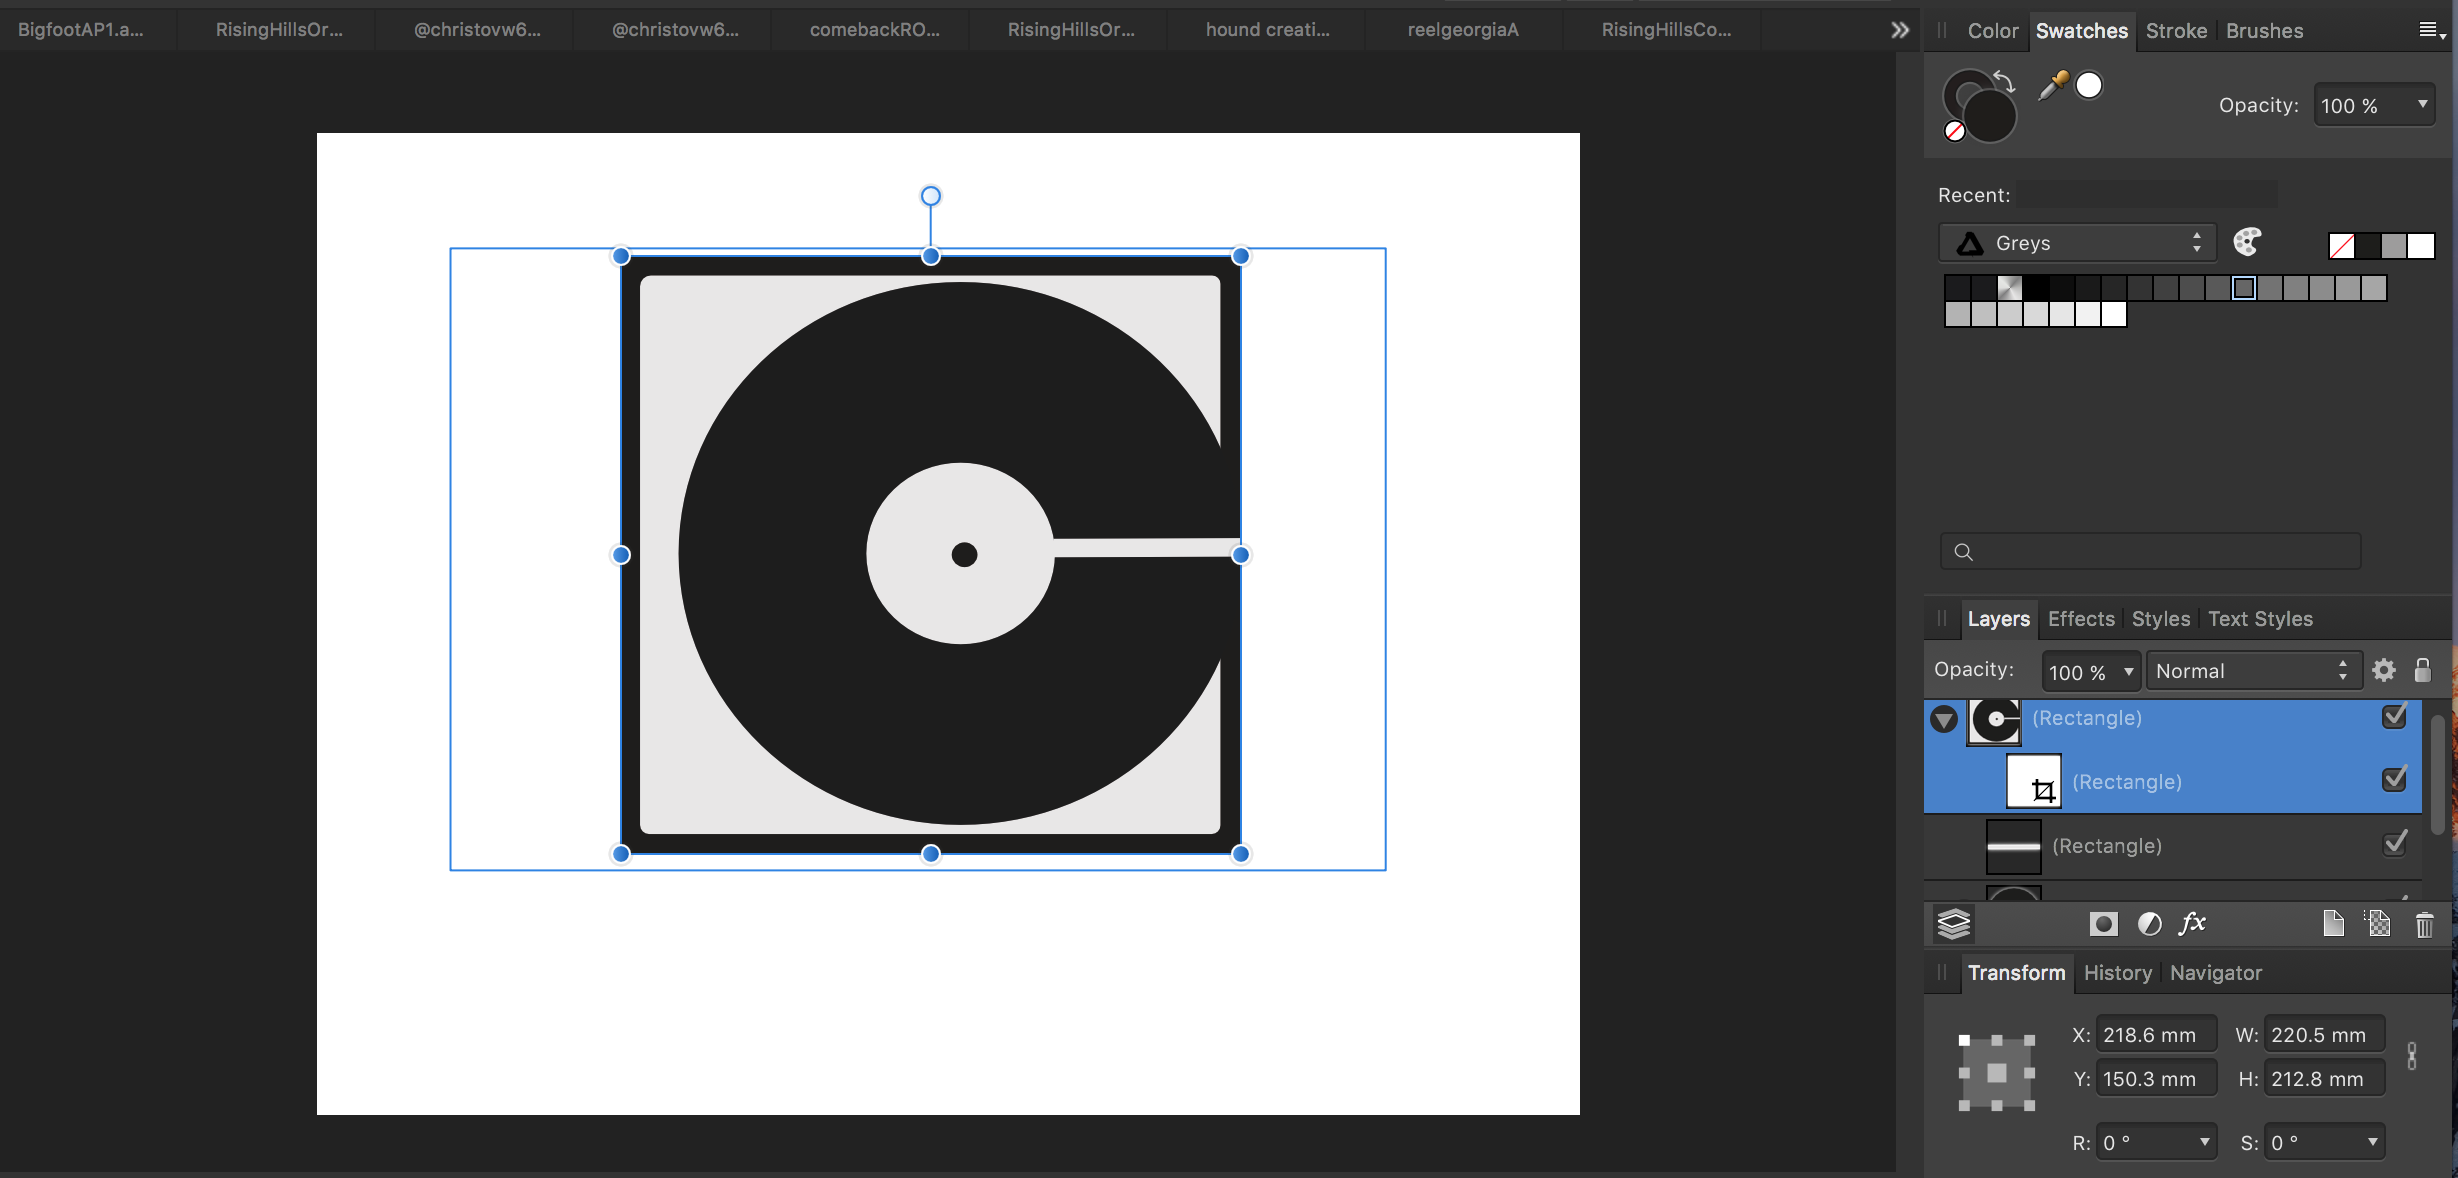
 'morning guys/gals, 2 quick questions please (and thanks): 1) in the image below (thumbnail and file attached) you will see a logo image that was originally on a black rectangular background. I cropped the L and R sides to get rid of portions of the background so as to create an even-ish border. How can I get rid of the still-remaining blue lines outlining the original boundaries of said black rectangle background? ...and, 2) in order to distort/stretch this image (logo portion), don't I simply 'convert to curves' the grouped layers then click/drag whichever node I'd like to 'pull' on? My goal is to be able to manipulate the image by independently move nodes to create perspective changes in some cases, or make the image look curved in other cases (as if on a cylindrical surface such as a telephone pole, etc). Does the image/layers need to first be flattened. Big thanks from a newbie! -Christo CVlogoBlueCropLines.afdesign
-
Quick and simple question guys... What is the best/most efficient way to reduce the outer dimensions of this document, while MAINTAINING the size of the logo image within it?...masking?...cropping? Not sure what direction to go. I attached a copy of the file for your viewing. My desired end result is a thin border around the outer edge of the white curved corner portion of the logo. Thanks! -Christo (sorry for all the newbie questions) @christovw66ComebackROUNDEDprimary2.afdesign
-
 I would like to be able to use the Compositional Overlays when designing as well as when cropping. Additionally, is there a way to flip the Golden Spiral both horizontally and vertically?
 -
Affinity Photo is just incredible. Been a month since i use it and i'm very happy with it, getting more and more productive. That said, here's a little question : is there any option that i've missed, like a checkbox where you can force Photo to remove the blank part of the image when you rotate it or adjust the perspective. I've done that a several times, and it would be very useful and time saving.
-
 I've exported an A4 sized PDF from Design and I noticed that the trim dimensions are not exactly correct. They show as 296.93 mm x 209.97 mm in stead of 297 mm x 210 mm. Is this going to be a problem when giving the files to the print shop for print?
 -
 The crop tool is not working properly when set to "unconstrained". I cannot drag the handles, or, two of the eight might work. On the rare occasion when it does work, I lose control of the handle movement when I get close to the edge of the image. Does anyone know why, or what I may be doing incorrectly? Thanks in advance for your feedback.
 -
The Leica Q is a full frame camera with a fixed 28mm lens they did something quite clever they set it up so you can crop to a field of view of 35mm or 50mm. naturally this loses some pixels and reminded me of a few arguments. argument no1 is that a lens doesnt change if it is on aps-c or full frame the difference is crop because of the different sizes of the sensors. so a 50mm full frame lens on aps-c has the fov of a 75mm lens recorded on the sensor, and if you cropped the fullframe image to the size of the aps-c image they would be the same. So I was wondering if we could have a crop box to size to a fov of a longer lens. so if I have a photo taken on 28mm i could put a crop box on top that when applied made it look like it was a 50mm lens took the shot. we know that a 28mm with a 1.5 crop factor has fov of 42mm and with a 2.0 crop 56mm so for 50mm fov 50/28 = crop factor needed if you use 1 / crop factor 1/1.5 = 66.67% and 1/2 = 50% so the cropbox would want to be 2/3rds of the side length for a 1.5 crop and 1/2 for a 2x crop. is there anyway we could crop by a percentage of the original image size? or even be able to calculate what lens should have been used in order to avoid cropping :) just a thought :)
-
 When opening an original photo with a ratio of 2:3 and I select the crop tool. Having forgotten about this unlucky standard setting of unproportional rezising I change the ratio to something unwanted other than 2:3. Switching the crop mode now to "original ratio" does not switch back to the original picture dimension of 2:3 ratio but just keeps this mistakenly edited crop dimension from the step before and fixes it. Is this a bug or a feature? This way one has to rollback protocol until point of mistakenly changed crop or one need to know the exact doc ratio of the original file to enter ratio manually (great!). Next issue: custom presets do not work! They can be edited but except the first new entry they can not be selected. If selected the dimensions are not executed. The whole individual preset stuff seems to be screwed. I entered a couple of standard new ratios to the panel. Watch the video and see how the mode setting does whatever it likes to afterwards: https://youtu.be/w2CSFy1hTkE Cheers, Timo
 -
 Which tool would you recommend for drawing crop marks in Affinity Photo? Thank you.
 -
Some changes and new features will help 1. It would be useful to drag rectangles from scratch somewhere in the picture with the crop tool 2. If I make a selection with the selection tool, it would ne nice to find a point in the menu like "crop to active selection" 3. I cannot use the arrow keys to change the position of the current crop before cropping 4. If i rotate the crop and get some transparent/ empty pixels in the corners, it would be nice when AP will have an option to automatically crop to a smaller crop ratio 5. If I hit ESCAPE key it should left the crop tool like I hit "cancel" with the mouse
-
I would love it if you could make a perspective crop tool. I photograph a lot of artwork and every now and then despite my best efforts a painting might be slightly out of square and such a tool would be very useful, a conventional crop tool doesn't always work if the camera back isn't perfectly parallel to the artwork, this sometimes happens when working on location in makeshift studios. I am sure such a tool would be brilliantly useful for other crops also. Thank you :)
- 1 reply
-
- 1
-
-
- perspective
- crop
- (and 2 more)
-
 Hey guys, I'm fairly new to Affinity and was wondering if there is a way to crop or mask a selection slightly less than the actual selection itself. What I mean is, when you mask a shape, it leaves a slight layer of the background pixels on your cropped image. I have tried to 'refine' this, however, this does not work effectively enough. Just looking for something which will save me going around the entire image with a small eraser. Thanks very much, Ash
 -
 Dear Affinity/Serif, Trying to find a really basic feature of something that is very easy to accomplish in Photoshop, but I cannot seem to find how to do this quickly in Affinity Photo (or Designer). Example: - I've made a screenshot with a border of white (or black) around it - I would like to trim the image by removing only the white (or black) border In Photoshop I would use the Image > Trim... option from the menu. With that feature it is possible to quickly trim the image using transparent pixels, the top left or bottom right color. Another option in Photoshop would be to make a selection, and then choose Image > Crop from the menu. Affinity Photo does have a Crop tool, but I cannot seem to combine this tool with making a selection. Is there an easy way to accomplish this in Affinity Photo? Thank you!
 -
Hello everyone! I would like to request a feature that doesn't seem to be included in Affinity Photo. In Photoshop, you can use an additional key (I think it's alt) to move the opposing crop border as well as the one you're moving with the cursor. This way, symmetryical cropping can be achieved. Can you inclide this feature in a future release? Or is this already included and I just don't know how to use it? On a Mac, cmd would probably make sense since the "Move Tool" already includes that behaviour (mirroring border movement) when using cmd. Best wishes, Shu
-
Hi, It looks like the crop tool in Affinity Photo is not as flexible as in PhotoPlus. With the latest crop tool update in PhotoPlus we were able to go anywhere we wanted like creating a fixed dimension crop from any size crop marquee: Constrained 658 x 498 -> crop marquee became this dimension and could be manually dragged bigger and moved. When applying the effect the selected area was cropped and automatically downsized to 658x498 (image size). This seems not possible in Affinity. Additionally, when recording a crop in a macro there is no way to select an image area to be cropped: Affinity just crops the area recorded, period, while no way to select the area to be cropped. This makes the crop tool useless for macro recording. That truly exciting crop flexibility was very useful for quickly transforming (part of any) images to required sizes like website uploads, wall papers, optimizing images for DTP purposes, etc. Hope PhotoPlus crop power is going to make it in Affinity :-P Roberto
-
Hi folks and Happy Birthday to AP and all the team!!! I just figured out that an option for the Crop tool to instantly crop to a selection bounding box, would be quite helpful. Also, providing an option to snap the crop area to selection edges could be very nice. What do you think?
-
 Hi all When I've setup a bunch of vertical and horizontal guides, they jump or moved when I crop the image. For example if I have an image 5000 X 5000 and have horizontal guids on the bottom of a house's roof line, then crop from that line down, then the lines move and now suddenly those lines are somewhere moved down well below the roof line where they were.
 -
Is there any information on when, or even if, we will ever get a Destructive Crop option? Finally learned (thanks again to all who helped) how to create more than one border for an image but I still have to Save it as a Tiff, close the window, and reload the image if I have done any cropping or leveling.
-
 This is probably an easy one, but I haven’t been able to figure it out: I adjusted my photo to show only the portion of the canvas I want by using a mask, and now I have a cropped portion of my image over a transparent background. After I mess around some more with adjustments, I want to save a jpg-copy to use elsewhere that only includes my cropped image and does away with the transparent background. Unfortunatly, I can't figure out how to do that ... Bouns question: In order to be more flexible with the selection, I'd like to have a vector mask for a layer that I can non-destructivley resize. Any chances? Thanks, Ben