Search the Community
Showing results for tags 'control'.
Found 21 results
-
 Hey there, I'm a bit late to the game – only today updated Designer (and only Designer) to the latest app version on my Mac because I was wary of another bug on Win and iPad and wanted to sit it out. Now, I'm facing a new issue that's got me scratching my head. What I expected: I hoped the update would refine how alignment options work, especially in scenarios where a key object is involved. Ideally, I wanted the ability to set a specific distance between objects while using a key object as the anchor – distributing other objects evenly around it based on their relative positions. What actually happens: It seems like this feature has been scrapped or is malfunctioning. If I set a key object, the distribution for Space Horizontally/Vertically are fixed to Auto Distribute, which doesn't help at all when I want precise control the distance between each object on the fly and see live how it would look. It’s making it really frustrating to work with. I’ve compared the behaviour between the previous version, though in Photo. I’d rather get back that behaviour back and see what distance looks best on the fly instead of having to control the distance before even using the alignment function with the new way. Now it’s super intuitive in my opinion. 😮💨 Distribution_Missing_Feature.mp4 Am I the only one who’s missing the previous functionality dearly? Greetings, Dennis
 -
 Hi volks, why do I'm missing a complete control of exposure in Affinity Photo Persona? I'm coming from darktable in there do I have every time these control?
 -
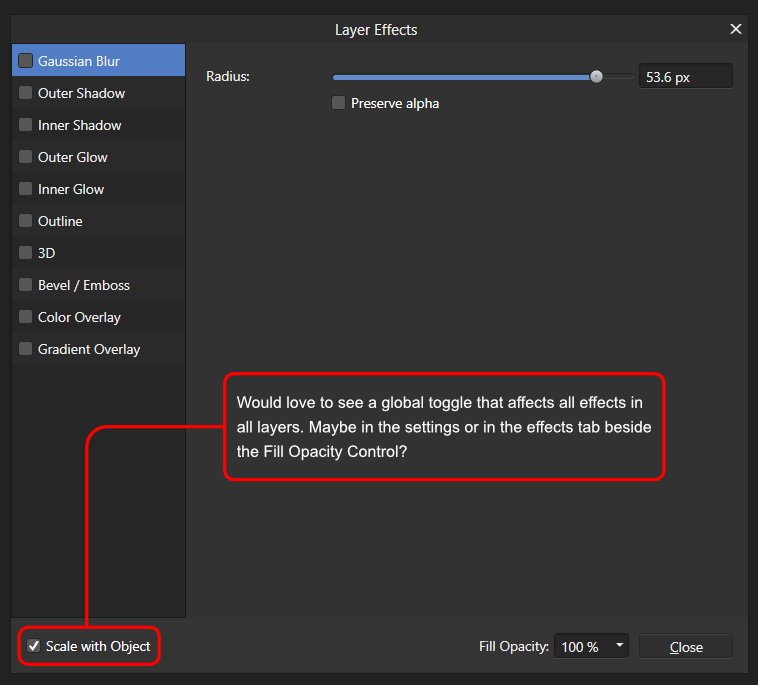
 Loved the recent updates serif have been pushing for Affinity Designer, but I do have a very minor proposal for scaling with regards to layer effects. Currently how they work is that the scaling will only apply to a specified layer, opening the panel with another layer selected will reset the toggle making the scaling independent between layers. This actually worked very well, no issues, but one drawback I find is that when working with an artwork with multiple layers and multiple effects there is a need to constantly check the toggle for each layer in order to make sure that the visuals stay the same in the event you find the need to resize. The initial thought I have is maybe a global toggle that will apply to all layers would be a really awesome timesaver. But come to think of it, maybe it would be an even easier implementation if the panel saves the state of the toggle for every new layer after that? That way it's still independent for each layer, at the same time, if I am starting on an artwork and need to scale effects I could just toggle the option on the first layer and wont need to toggle each time a layer is created.
-
- 1
-

-
- layer effects
- control
- (and 1 more)
-
 Is there a possibility in levels to control the colour clipping separately by colours? I just see the clipping in master level with pressing ALT while using the sliders. This doesn't work in RGB colours separately - but would be extremely helpful.
 -
 I am on the hunt for the best vector freehand-sketching tool with a high degree of input precision. I really want Affinity to be that for me, except I can't seem to find how to adjust the number of control points rendered for each stroke. What currently happens is that, despite stabilizer turned off, my lines are being too "simplified." For example, I do a lot of zigzag hatching in my work, which have very tight direction changes. After I release and the stroke is created, those acute angles kind of "bubble out" because AD is simplifying/smoothing my stroke into fewer points than I would like. Is there a way to change this, somehow? Thanks.
 -
What if you had something like a "Parent Control". So if you had two Artboards and one had an element that is from the other. However, if you made an adjustment to the "Parent one" that had just a specific element. When you make an adjustment to the parent it automatically and real time adjusts in the same way the element in the "main" template. I hope this makes sense and is easy to understand. It's just an idea and wanted to share it. Thank you for having forums!!
-
Hello! Affinity Photo is a really good software (except for the constant crashes). But it still lacks a simple basic and very important feature: BRUSH OPACITY CONTROLLED BY PRESSURE. If this option is somewhere hidden, please tell me. Oh and I don't accept that using pressure for the "Flow" option is an alternative. Common guys, many simple and free softwares have this: Krita, Gimp, Blender, or simple and cheap softwares like Artrage. I know this software is not made for digital painting, but I don't use it for that. I use it for render post processing, which is the same as phothography editing. And opacity pressure is very important to softly change masks, to add a bit of overlay or color dodge. So, (maybe someone already made this request) my suggestion is to simply add an opacity pressure button, just like the one Photo already has to control brush size, right beside it.
-
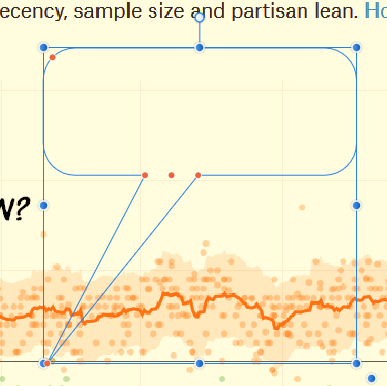
 Is there a tutorial showing the most direct way to create comics-style "word balloons"? I've been trying to use the "callout rounded rectangle" tool and and finding it almost completely unpredictable and impossible to control. I was able to work with it a week ago and get a black outline with white opaque infill. I had to create a separate text box and group that because at no point was there any indication that the callout included a text feature. This week, I can put text in it but cannot control anything but the nodes. That is, I cannot change the line color or thickness of the blue shape (see attachment), nor give it an opaque fill. Clearly, there is something about this control that is completely changed by some kind of not-obvious setting. What is really needed is a simpler version of this that immediately produces an opaque white "callout" with black lettering and editing nodes, not something that requires that you understand every possible nuance from the very beginning. Help, please!
-
 (Maybe I'm not finding it, then it is overly complicated and that's to be addressed.) But I'm missing the possibility to do such: if you have multiple layers and all are visible you can click on the little checkbox on the right to make that one layer invisible. But sometimes you want to see only the one you are working on. Instead of clicking 100 layers invisible there could be the option (like in other pro music software for example) to alt-click (or some other modifier key) to de-view all layers but the one the click was made on.
 -
 Semi-automatic masking / masking guide tool for Affinity Photo Here is best example i can find (youtube link) - Zephyr's Masquerade tool is semi-automatic masking tool, user paint guide lines which help algorithm to solve alpha channel. Its very fast, i don't know for sure how it works, but i would guess that those guide lines descrip to the algorithm textures and colors which are wanted (or/and unwanted) for mask. This come to my mind when i saw Adobe's new automatic subject selection demo, where user don't have any control, just some kind of lucky button, so i thought serif could make better, and i think this kind of tool would be much better with better flexibility and control. And it should be non-destructive, it could be based on editable splines/vector paths (like freehand pen tool, or affinity design's Pencil tool) for example? Maybe Affinity Photo should have "Mask persona" (all masking tools in same place, with lasso selection, mask bursh, guide brush, some procedural masking tools? vector tools, refine tools etc. with easy to use possibility control and edit multiple mask channels for same layer, if layer has multiple mask/alpha channels then mask persona would be great way to control the complexity, at least it would be nice to have way to control multiple alpha layers like separated hair mask, head mask, etc. for detailed and flexible workflow)
 -
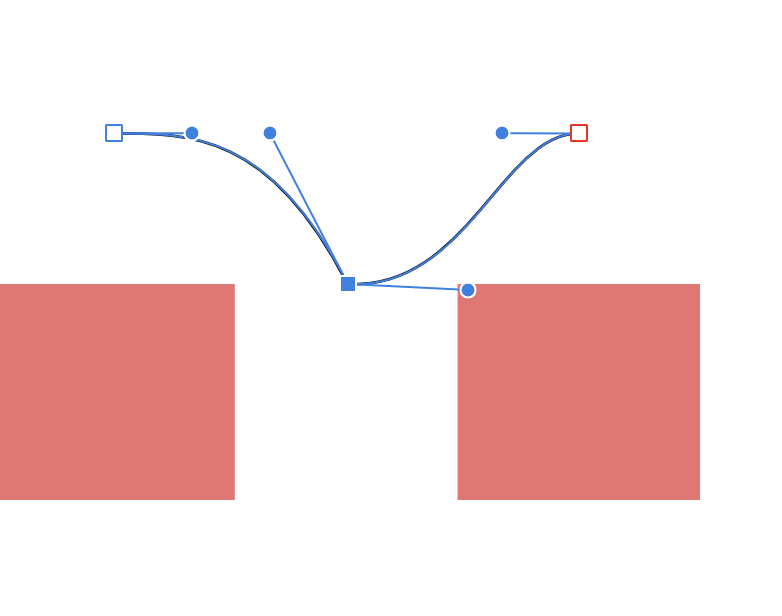
 I want to be able to snap control handles to any object or to the grid. It would be great, if those control handles act the same as every other object when it comes to snapping. That way, I could draw very precise curves, because I can simply lay out helping objects to define spaces and specific angles to snap to with the frontal handles of a node. See the screenshot. It would be nice if that blue control handle of the selected node would snap to the red rectangle.
-
Hello, could be extremely usefull (and near mandatory to work fluently) to have a shortcut to quickly modify brush flow, or to change pixel brushs maybe. scenario: im drawing, im using a lot the finger tool, and sometimes there is small details i need to work with, that need a lot of flow, and other times i just want to melt a bit the colors, so i need a lot less. and i got to change a lot and a lot for my workflow, so having it at top left corner makes it a hell to use. go in the top left corner, modify, test if its ok, if its nto go back with mouse in top left corner... you get crazy in 5 minutes.
-
 Hello, im playing around with the pixel personna of affinity designer, i wonder if i could in any way change the "flux" (i got french version i hope its the correct name), by using only keyboard or keyboard + mouse? because its really frustrating, with the finger tool when you cant change flux (for now i got to go in the upper left corner which is the farest thing on universe from the part i am drawing)
 -
 Hey guys! :) Just joined this forum and started using the trial of Photo. I am coming (what a surprise) from Photoshop and really miss a option in Photo to configure which button has to be pressed for zooming in with the scroll wheel. I am really used to using the "ALT" button (Im on Windows btw) in pair with the scroll wheel. The standard seems to be a combination of "CTRL + Scroll". Other than that I am really impressed with Photo. My not-so-powerful notebook flies through the program; this wouldn´t be possible with Photoshop. (My gaming PC on the other hand just doesn´t care if its open and running :lol: ) Awesome work! When there is money to spare I will buy this awesome piece of software B)
 -
 Hi there, Request for better visual contrast between Smooth Nodes and their Control Handles. Blue Circles, all! Because the Control Handles are only distinguishable by being a bit smaller, when you've selected a bunch of nodes, it can be a real visual challenge to sort them out. It's not a big deal if you're mostly drawing straight lines. But when you draw complex, organic shapes (like sketching in vectors with a stylus), you get long lines full of nodes, and when you select them, it looks like a string of blue Christmas lights! (<—Click attached JPG of the same path: Top is nodes unselected, Bottom is selected.) The Control Handles make it look like 3 times as many nodes. Personally I'd prefer if Control Handles were either - a different colour than nodes, or - a different shape, or - both. (Or customizable in Prefs!) Thanks, - pbass
- 4 replies
-
- 3
-
-
- point
- visability
- (and 3 more)
-
 Hello, When I CTRL+Click in Designer (Windows) it always selects the deepest level in the hierarchy, so if I have a rectangle inside a symbol inside a group and ctrl+click it, it will select the rectangle. Is there a way to set the depth of this selection, so that it doesn't select the "insides" of symbols, or only selects up to the first child of a group? Thanks, Fernando
 -
Currently every time I start a new document I have to set the Pressure Controller for a brush manually. Would like to be able to set it as a default either in the Tools preferences or in Edit > Defaults > Save as Default.
-
 Especially with the stroke width slider I would like to constrain the selection to whole numbers, or predefined common values. I guess I am used to Xara where it is a drop-down offering None, 0.25, 0.5, 1, 2, 4 etc. At present I drag and end up with a value like 1.3 which I then have to modify by hand (typing). Perhaps constraining to whole numbers if pressing Shift while dragging? Or do it the opposite way around (like the Zoom slider in Navigator Panel) where there are fixed stops that the slider snaps to, but holding Alt disables the snapping?
 -
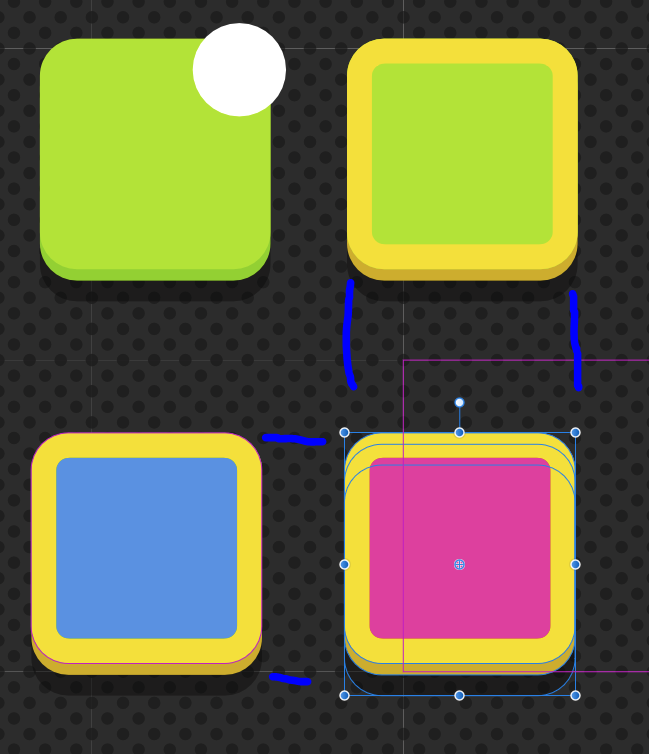
Hey, first of all: I really love the snapping candidate approach. I love to control the snapping by selecting one or two candidates and moving my object slowly to snap it to the gaps (see attachment 1) The problem is: When I'm slowly moving my object, it often happens, that shapes near the desired location are added to the candidate list, messing up my candidates. I'd like to chose the candidates manually, maybe by clicking the mousewheel or another shortcut. Another option would be an isolation mode to exclude other objects temporarily. ~Andrej PS: Ignore the top left object in the second screen.
-
 Can the shape transform and text transform controls be the same or similar at least? e.g. When selecting a corner point and moving mouse to change the shape/transform size etc: For shapes: Hold shift+cmd, move mouse = For Text: Hold Cmd, move mouse For shapes: Hold shift, move mouse = For Text: Hold nothing, move mouse So when I'm selecting an shape and fixing it, then a text, it gets a bit confusing sometimes. I accidentally use text transform protocol for shape transformation vice versa. It feels disorienting like getting used to working in one program or OS, then trying to do the same thing in another program or OS.
 -
Would be great to be able to adjust the amount of curvature ib the leading edge of the teardrop, perhaps oscillating between current (dome shape) and a parabola.... LOVE shapes!