Search the Community
Showing results for tags 'color format'.
Found 3 results
-
 🇬🇧 Hi, the interface of the three software programs in the Affinity suite seems very well done and quite productive. But everyone also has their own specificities in their workflow and the addition of a utility like Keyboard Maestro can fill certain gaps or innovate with advanced functions. In addition, KM knows how to perfectly replace many other utilities for macOS… 😉 As I am working on a document alternating between RGB mode and CMYK mode, I was wondering about the opportunity to be able to visually know, and without action on my part, the current color mode and the possibility of quickly changing it. to change. Unfortunately, AD does not indicate the current color mode and the procedure to switch from one mode to another requires a lot of clicks on the part of the user (from memory, on other graphics software [?], there is a simple and direct submenu within a menu, associated with keyboard shortcuts…). I haven't found a keyboard command for this function in AD!… The Keyboard Maestro utility has solid arguments for performing macros. This software is a marvel of efficiency and provides very valuable services, whatever the software used or the context. Below is a screencast of the KM interface in AD. Sorry if the action is rapid, but that is also the goal, to make it as transparent as possible. macros live.mp4 Attached is a set of two macros KM for AD. Affinity Designer Format de couleur RVB CMYK Macros.kmmacros.zip In detail, this set includes a first macro for the conversion to RGB and a second macro for the conversion to CMYK. The macros simulate the call to display the “Document Setup” dialog box (Command + Shift + P), a first click on the “Color” Tab, a second click on the “Color Format” Menu and a third click in this Menu on the desired profile. And a final press of the “Escape” key to close the dialog box. The initial position of the mouse is maintained during the macro. The two macros are displayed in a palette, in the form of a button, alternately, one replacing the other with the help of a simple toggle. When opening AD and a document, the last state of the button is displayed, the toggle being managed by KM (with a system variable). It is therefore up to the user to make their choice by clicking on the mode they want. In KM, everything is almost configurable. So, pallets have several options. Their positions are defined by the user, using the mouse while pressing the Command key. For the two icons which symbolize here the RGB mode and the CMYK mode are simple copy and paste of two small illustrations created with AD, inserted in the KM interface, on each of the two macros. There you go, I hope this post will give you ideas to perhaps further improve your workflow… NB: we can also add a function (clicks) to the macro to modify the profile of the “Color” Palette at the same time. Finally, porting this set of macros for AP and for AP is possible, you just need to modify the call up of the dialog box because the menus are different... 🇫🇷 Bonjour, l'interface des trois logiciels de la suite Affinity me semble très bien faite et assez productive. Mais, chacun a aussi ses propres spécificités dans son flux de travail et l'apport d'un utilitaire comme Keyboard Maestro peut combler certains manques ou innover avec des fonctions évoluées. De plus, KM sait parfaitement remplacer bon nombre d'autres utilitaires pour macOS… 😉 Étant en train de travailler sur un document en alternance entre le mode RVB et le mode CMYK, je m'interrogeais sur l'opportunité de pouvoir visuellement connaître, et sans action de ma part, le mode de couleur courant et la possibilité de rapidement le changer. Malheureusement, AD n'indique pas le mode de couleur en cours et la procédure pour passer d'un mode à l'autre demande beaucoup de clicks de la part de l'utilisateur (de mémoire, sur d'autres logiciels graphiques (?), il y a un simple et direct sous-menu dans un menu, associé à un raccourcis clavier…). Je n'ai d'ailleurs pas trouvé de commande clavier pour cette fonction dans AD !… L'utilitaire Keyboard Maestro possède de solides arguments pour effectuer des macros. Ce logiciel est une merveille d'efficacité et rend de très précieux services, quelque soit le logiciel utilisé ou le contexte. Plus haut, un screencast de l'interface de KM dans AD. Désolé si l'action est rapide, mais c'est aussi le but, qu'elle soit la plus transparente possible? Joint aussi le set de deux macros KM pour AD. En détail, ce set inclus une première macro pour la conversion en RVB et une seconde macro pour la conversion en CMYK. Les macros simulent l'appel de l'affichage de la boîte de dialogue “Configuration du document” (Commande + Majuscule + P), un premier click sur l'Onglet “Couleur”, un deuxième click sur le Menu “Format de couleur” et un troisième click dans ce Menu sur le profil souhaité. Et un dernier appel de la touche “Escape” pour fermer la boîte de dialogue. La position initiale de la souris est maintenue durant la macro. Les deux macros sont affichées dans une palette, sous forme de bouton, en alternance, l'un remplaçant l'autre avec l'aide d'une simple bascule. À l'ouverture d'AD et d'un document, c'est le dernier état du bouton qui est affiché, la bascule étant gérée par KM (avec une variable système). C'est donc à l'utilisateur de faire son choix en cliquant sur le mode qu'il désire. Dans KM, tout est presque paramètrable. Ainsi, les palettes disposent de plusieurs options. Leurs positions est définies par l'utilisateur, à la souris tout en appuyant sur la touche Commande. Pour les deux icônes qui symbolisent ici le mode RVB et le mode CMYK sont de simples copier-coller de deux petites illustration réalisées avec AD, insérées dans l'interface de KM, sur chacune des deux macros. Voilà, j'espère que ce post vous donnera des idées afin de peut-être améliorer encore votre flux de travail… NB : on peut aussi ajouté une fonction (des clicks) à la macro pour modifier en même temps le profil de la Palette “Couleur”. Enfin, le portage de ce set de macros pour AP et pour AP est possible, il faut juste modifier l'appel de la boîte de dialogue car les menus sont différents…
- 4 replies
-
- 1
-

-
- affinity designer
- macros
- (and 2 more)
-
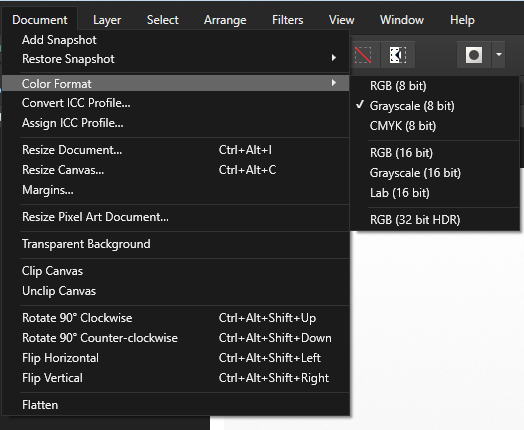
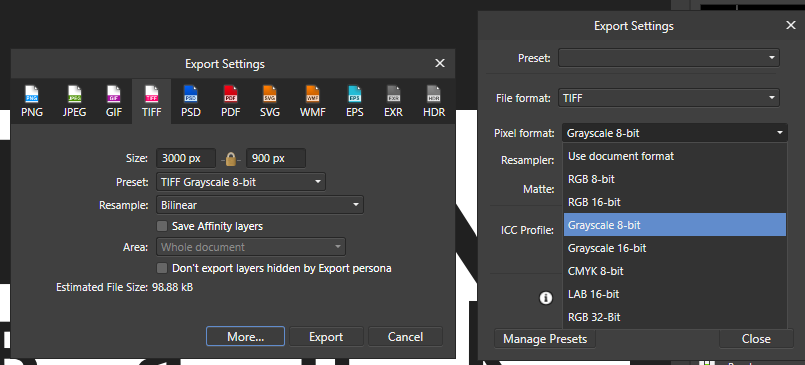
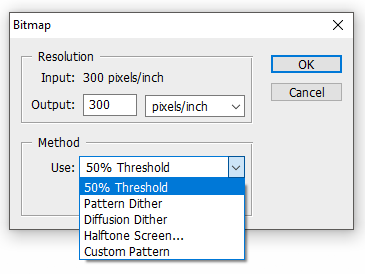
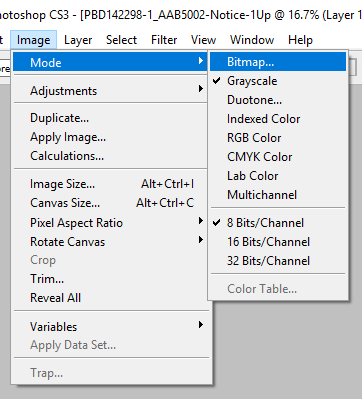
I work at a printing company and we're looking into acquiring Affinity Photo to replace our aging PhotoShop CS2 that we use to process artwork from customers and convert it into a format that can be imported by our main design program used for production (Mecca2000 http://www.amgraf.com/pages/m2k1.html). Mecca treats bitmap tiffs differently than grayscale tiffs and displays them on screen with the white portion of the image being transparent which makes them easier to work with when things overlap and they take up much less file space, but if they're grayscale (which seems to be the closest Affinity Photo can do) they display with the white background to the image with no transparency and every operation on them takes longer than it would in monochrome and certain options like raster tracing aren't available to grayscale images. This comes up quite frequently for us when we're printing solid single color customer logos. The limitations of the aging Mecca program aside, we need to be able to convert an image down to bitmap color mode and export a "monochrome" tiff in Affinity Photo like we can in photoshop. In photoshop the mode menu has an option for Bitmap which then brings up a dialog with different options for how to convert it down to an ONLY black or white image (no levels of gray in between). Below are images showing where this mode option and subsequent bitmap dialog are in photoshop as well as images of where i expected to be able to find them in Affinity Photo, but couldn't. It may well be that Affinity Photo can already do what i need it to and i'm just missing something due to my inexperience with the program, in which case i'd be grateful if someone could point out how to output a bitmap/mono tiff. PhotoShop: Affinity Photo:

- 7 replies
-
- 1
-
-
- bitmap
- monocrhome
- (and 2 more)
-
The export options for TIFF files always remember the last setting, rather than defaulting to the document color mode. I.e. if the last export was CMYK, the default the next time will be CMYK, even if the document is RGB, and the other way round. This is dangerous since it makes it easy to perform unintended color space conversions on export. Especially beginners who may not know about RGB and CMYK or just trust the default export settings might be in for a nasty surprise. Ideally, the export settings would check if the color format in the export settings is set to the same thing as the same as the document color format and in that case offer the document color format of the next document the next time. If the user changes the setting to something else than the document color format, it would offer that specific setting the next time, regardless of document format. That way it won't get in the way of, say, someone trying to manually export 10 RGB documents as CMYK, but it also wouldn't catch someone exporting an RGB file to RGB TIFF by surprise if their last export was a CMYK document to CMYK TIFF.