Search the Community
Showing results for tags 'bug'.
-
 I was trying to export a document using the font Montserrat and Open Sans (all downloaded from Google Fonts) in Affinty Designer, but it looks really strange. This is how it looks in the program: This is how it looks on PDF: Notice that the text in the yellow button next to the Direct Message icon became really different from the original text. And also the text close to the watch, below the main yellow text was white and became yellow too. Also, the padlock icon lost the FX when exported. Sorry for my bad english, it's not my primary language.
-
 I use Affinity Designer to create files that I export – using "SVG (for export)" – for other apps, such as Cricut Design Space. The problem is that the Affinity Designer SVG export contains scientific e notation values like: <g id="topback" transform="matrix(-1,-1.22465e-16,1.22465e-16,-1,854.039,695.404)"> that other apps, specifically Design Space, chokes on. Trying to import that object into DS results in unusable, malformed objects. Sometimes I can "fix" it by editing the SVG file from the above, to: <g id="topback" transform="matrix(0,1,1,0,854.039,695.404)"> resetting the transform matrix, but it doesn't work for all objects, I haven't dug into how to map the space transforms properly, and I'm trying to avoid learning/doing that because this step is a huge pain. Based on a bunch of SVG parsers, the files are technically valid, and Affinity can re-import the SVGs, but I need them to work with the other apps. But this issue doesn't happen all the time and I can't figure out exactly what causes it to occur in the first place. Nor can I figure out how to fix it. I've tried deleting the offending object and re-creating them, but the new objects are affected exactly as the one it's replacing Any ideas would be very helpful. THANK YOU!
 -
Hi, I don't know if this has been mentioned already, but the file size issues in some PDF export options are back in the beta from 11 December -- all the exports I make are MUCH bigger than I expect them to be; The previous beta was better in this regards. Please don't answer this with any well-meant tips on how to decrease a PDF file size -- this is just a beta report, because it seems to me that an issue that had been resolved has crept back into the newest beta.
-
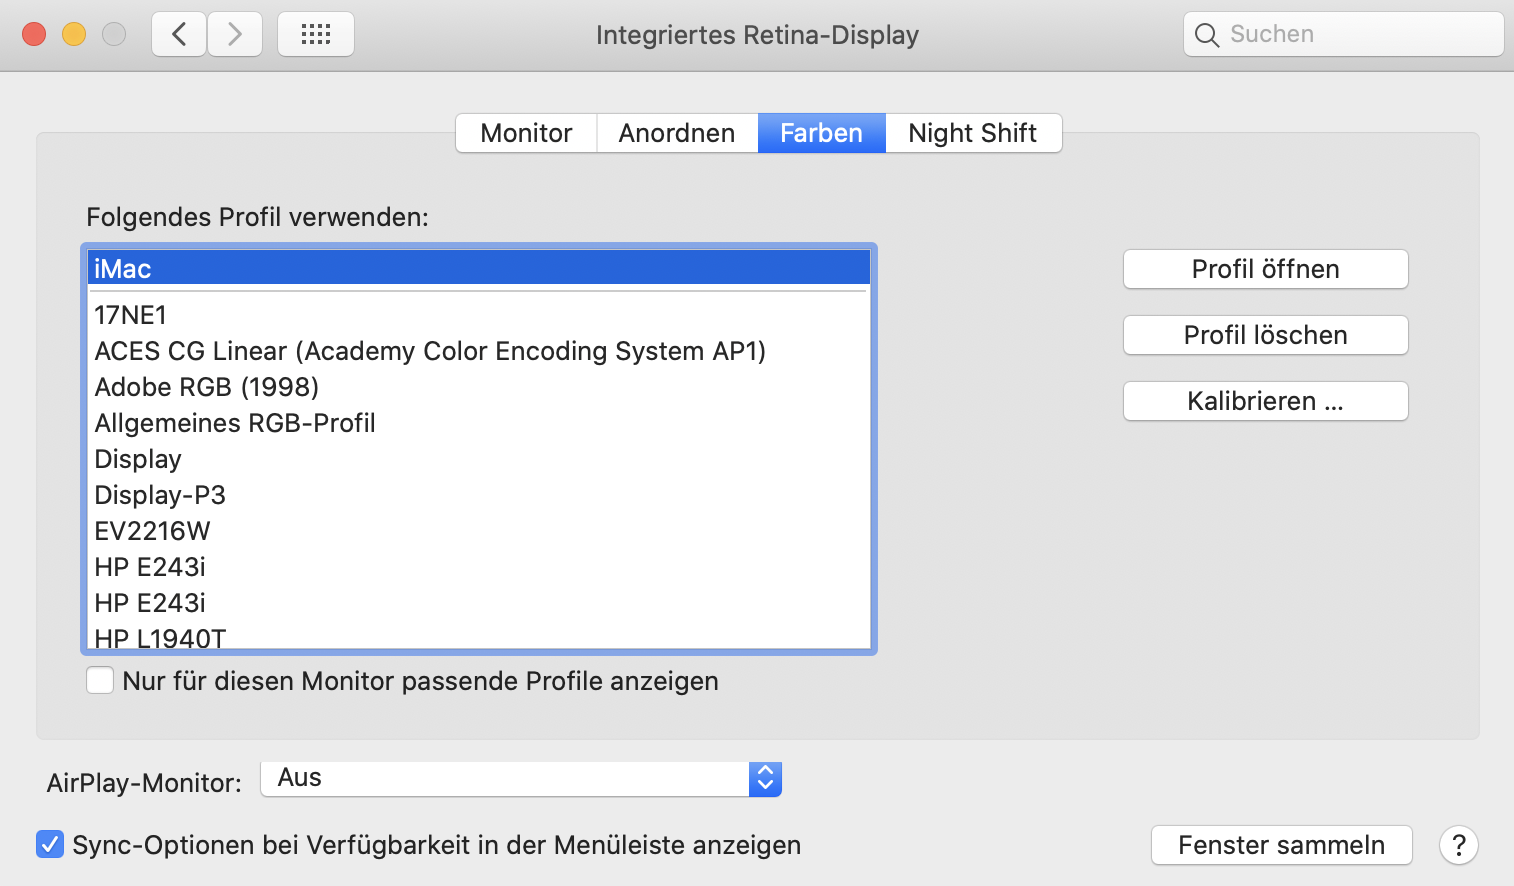
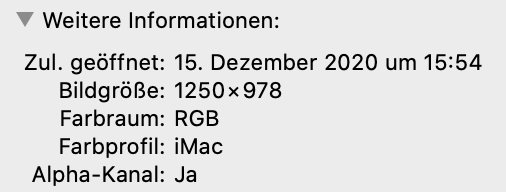
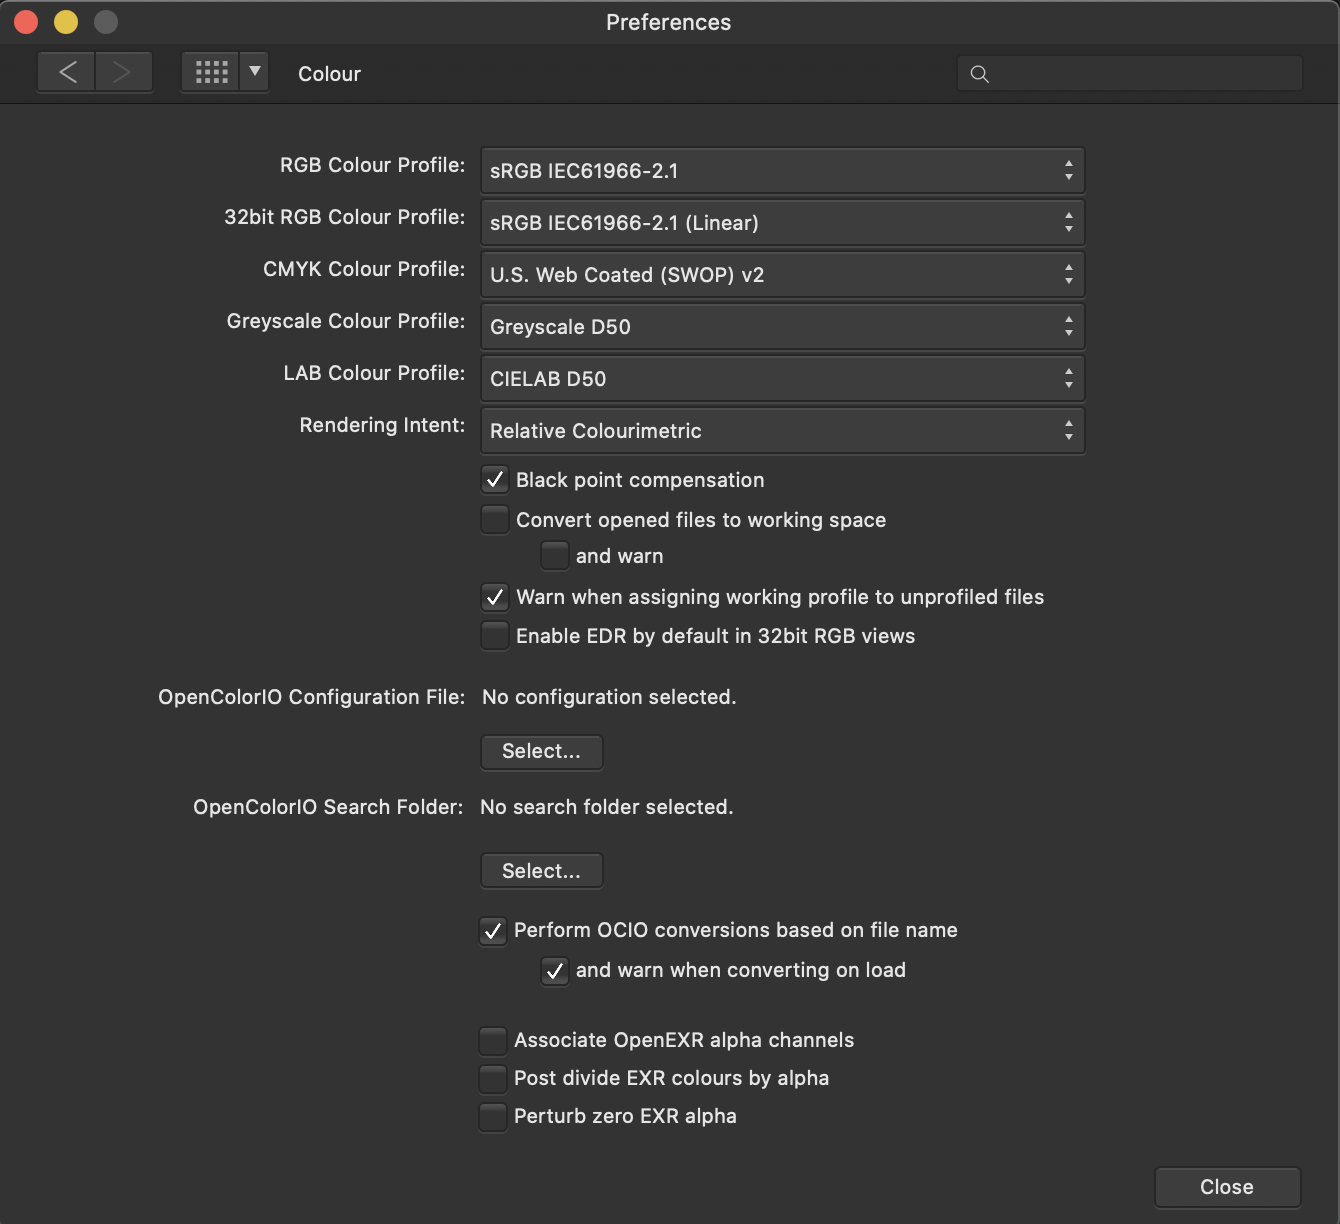
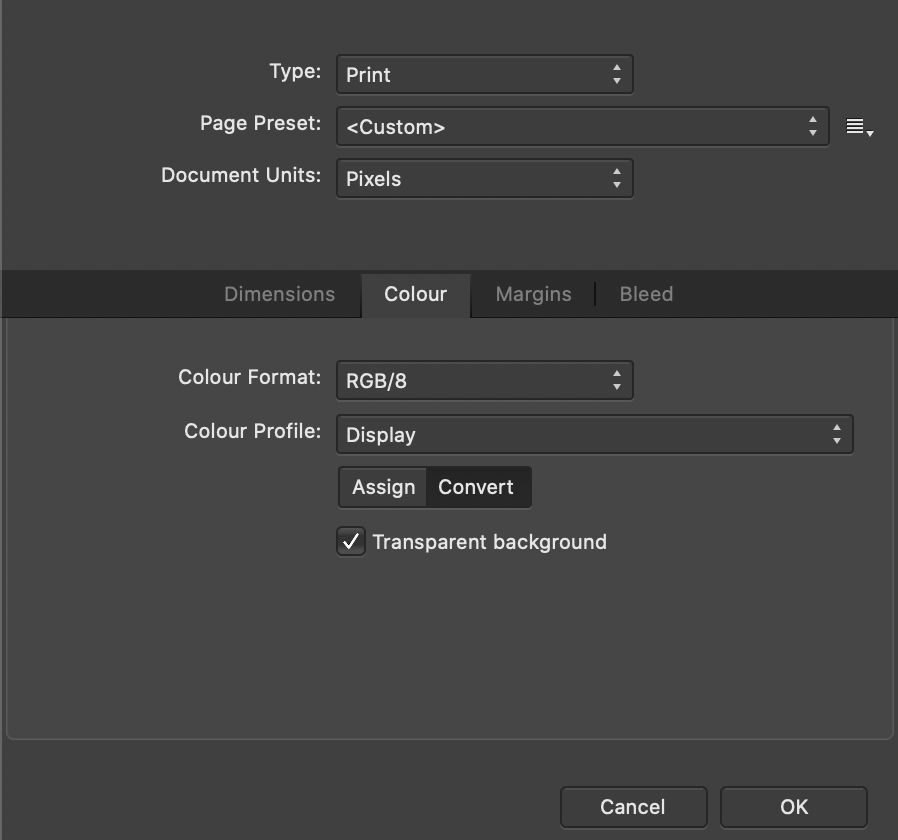
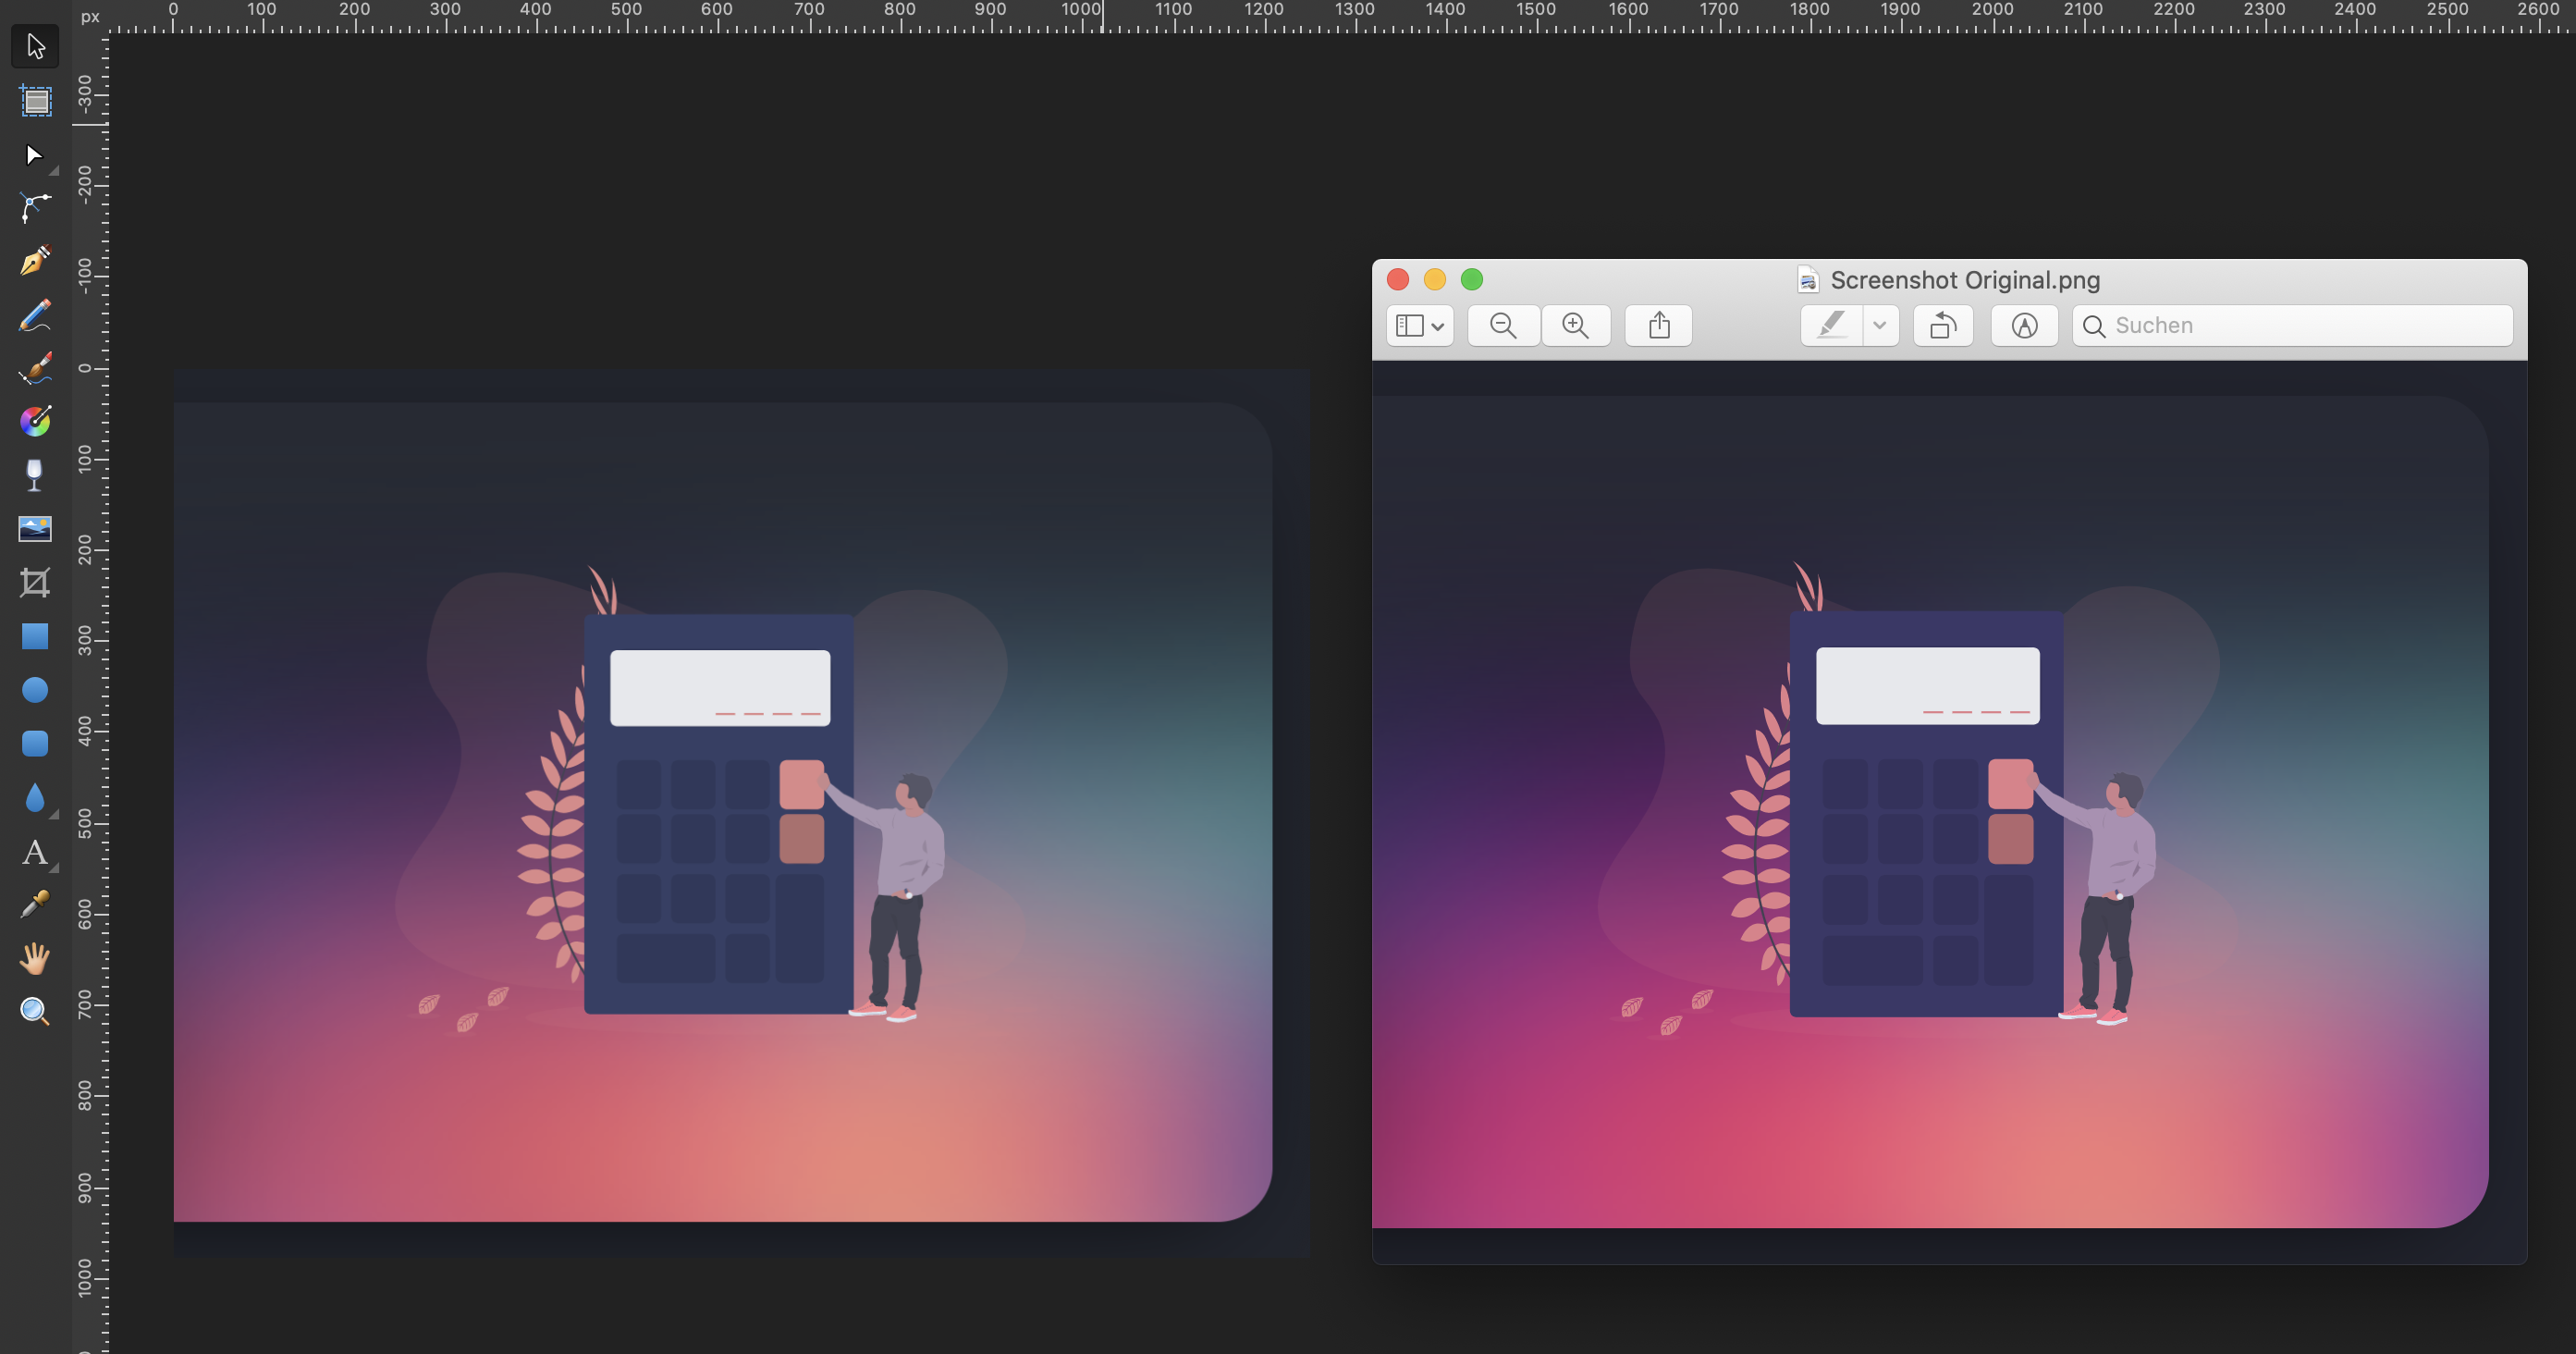
 Just encountered a bug that seems to be still present with wrong color representation (washed out colors) when adding screenshots to Affinity Designer. It's a very similar issue as posted here and is not solved: https://forum.affinity.serif.com/index.php?/topic/85359-colour-distortion-drives-me-nuts/ https://marketmix.com/de/affinity-designer-photo-fehlfarben-screenshot/ (only German) Here the author sais that it was fixed in 1.6.1 but this bug seems to be back then because I still need to use the workaround from this blog. I try to give as many examples and data so you can track down this bug. - - - Steps to reproduce: 1. Create a screenshot with the mac internal screenshot tool (also tried another one from the app store with similiar results) with Command + Shift + 4 for example. 2. Save it to the desktop 3. Open Affinity Designer 4. Drag the screenshot from desktop into Affinity Designer (or File > New from clipboard or creating a canvas first and then pasting or dragging the screenshot) > Colors in AF are different than the screenshot with the mac preview app (see comparison screenshot below) File "Screenshot Original.png" is attached to this post so you can try it out. - - - Information: - iMac 21,5" Late 2015 - macOS Catalina 10.15.7 - Affinity Designer from the App Store (v1.8.6) - 2 Displays attached (HP E243i & Eizo EV2216W) Screenshot was taken on the internal iMac Display (and also tried it out with the external displays completely disconnected). - - - Screenshots to track down the issue: iMac Display Color Profile (German but relevant info is English) Information on the Screenshot itself (German but relevant info is color space RGB and color profile iMac) Affinity Designer Preferences Affinity Designer Document Setup Screenshot Comparison (left wrong color / right screenshot with mac preview app correct) - - - Other tests and workarounds: When inserting the same screenshot to Adobe XD or other Design apps the colors are fine. So seems to be an Affinity specific issue. Workaround is currently: Opening the screenshot with mac preview app > Tools > Assign profile > Color Sync Profile (Adobe RGB (1998)) > OK Then inserting it to Affinity Designer and the colors are fine and the document setup has set the profile to adobe instead of display. - - - Original Screenshot.png for you to try it out
-
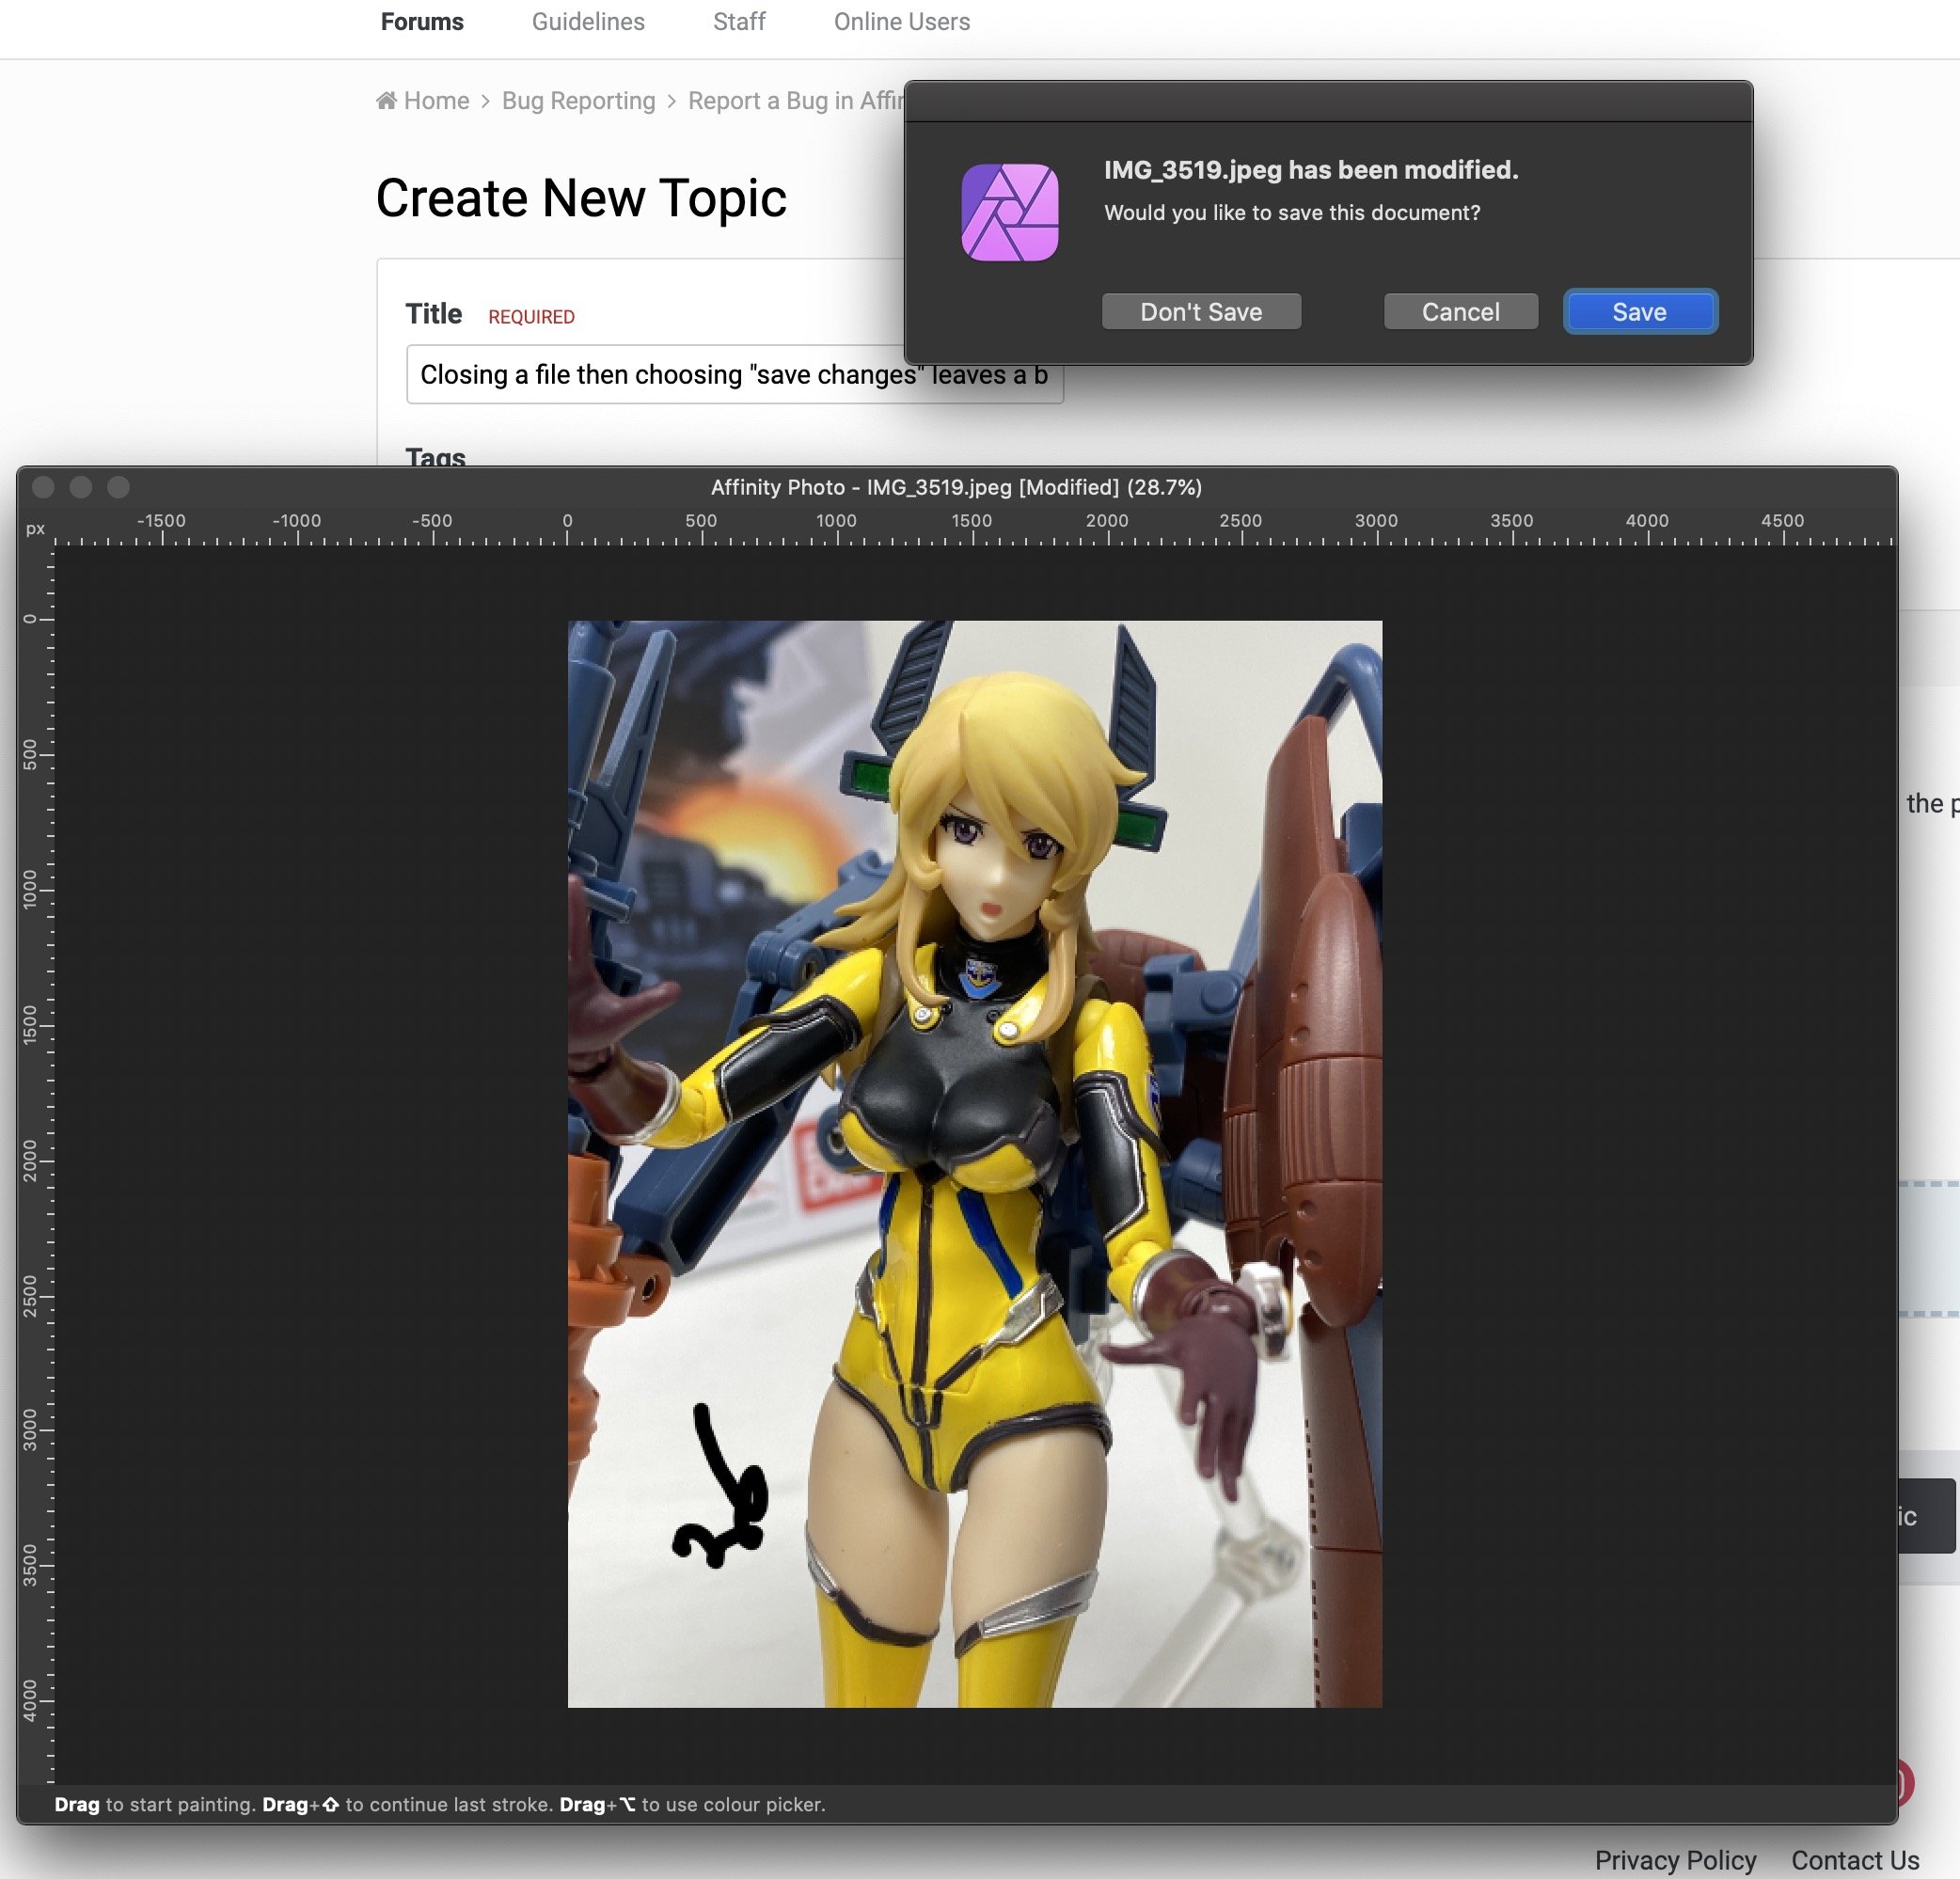
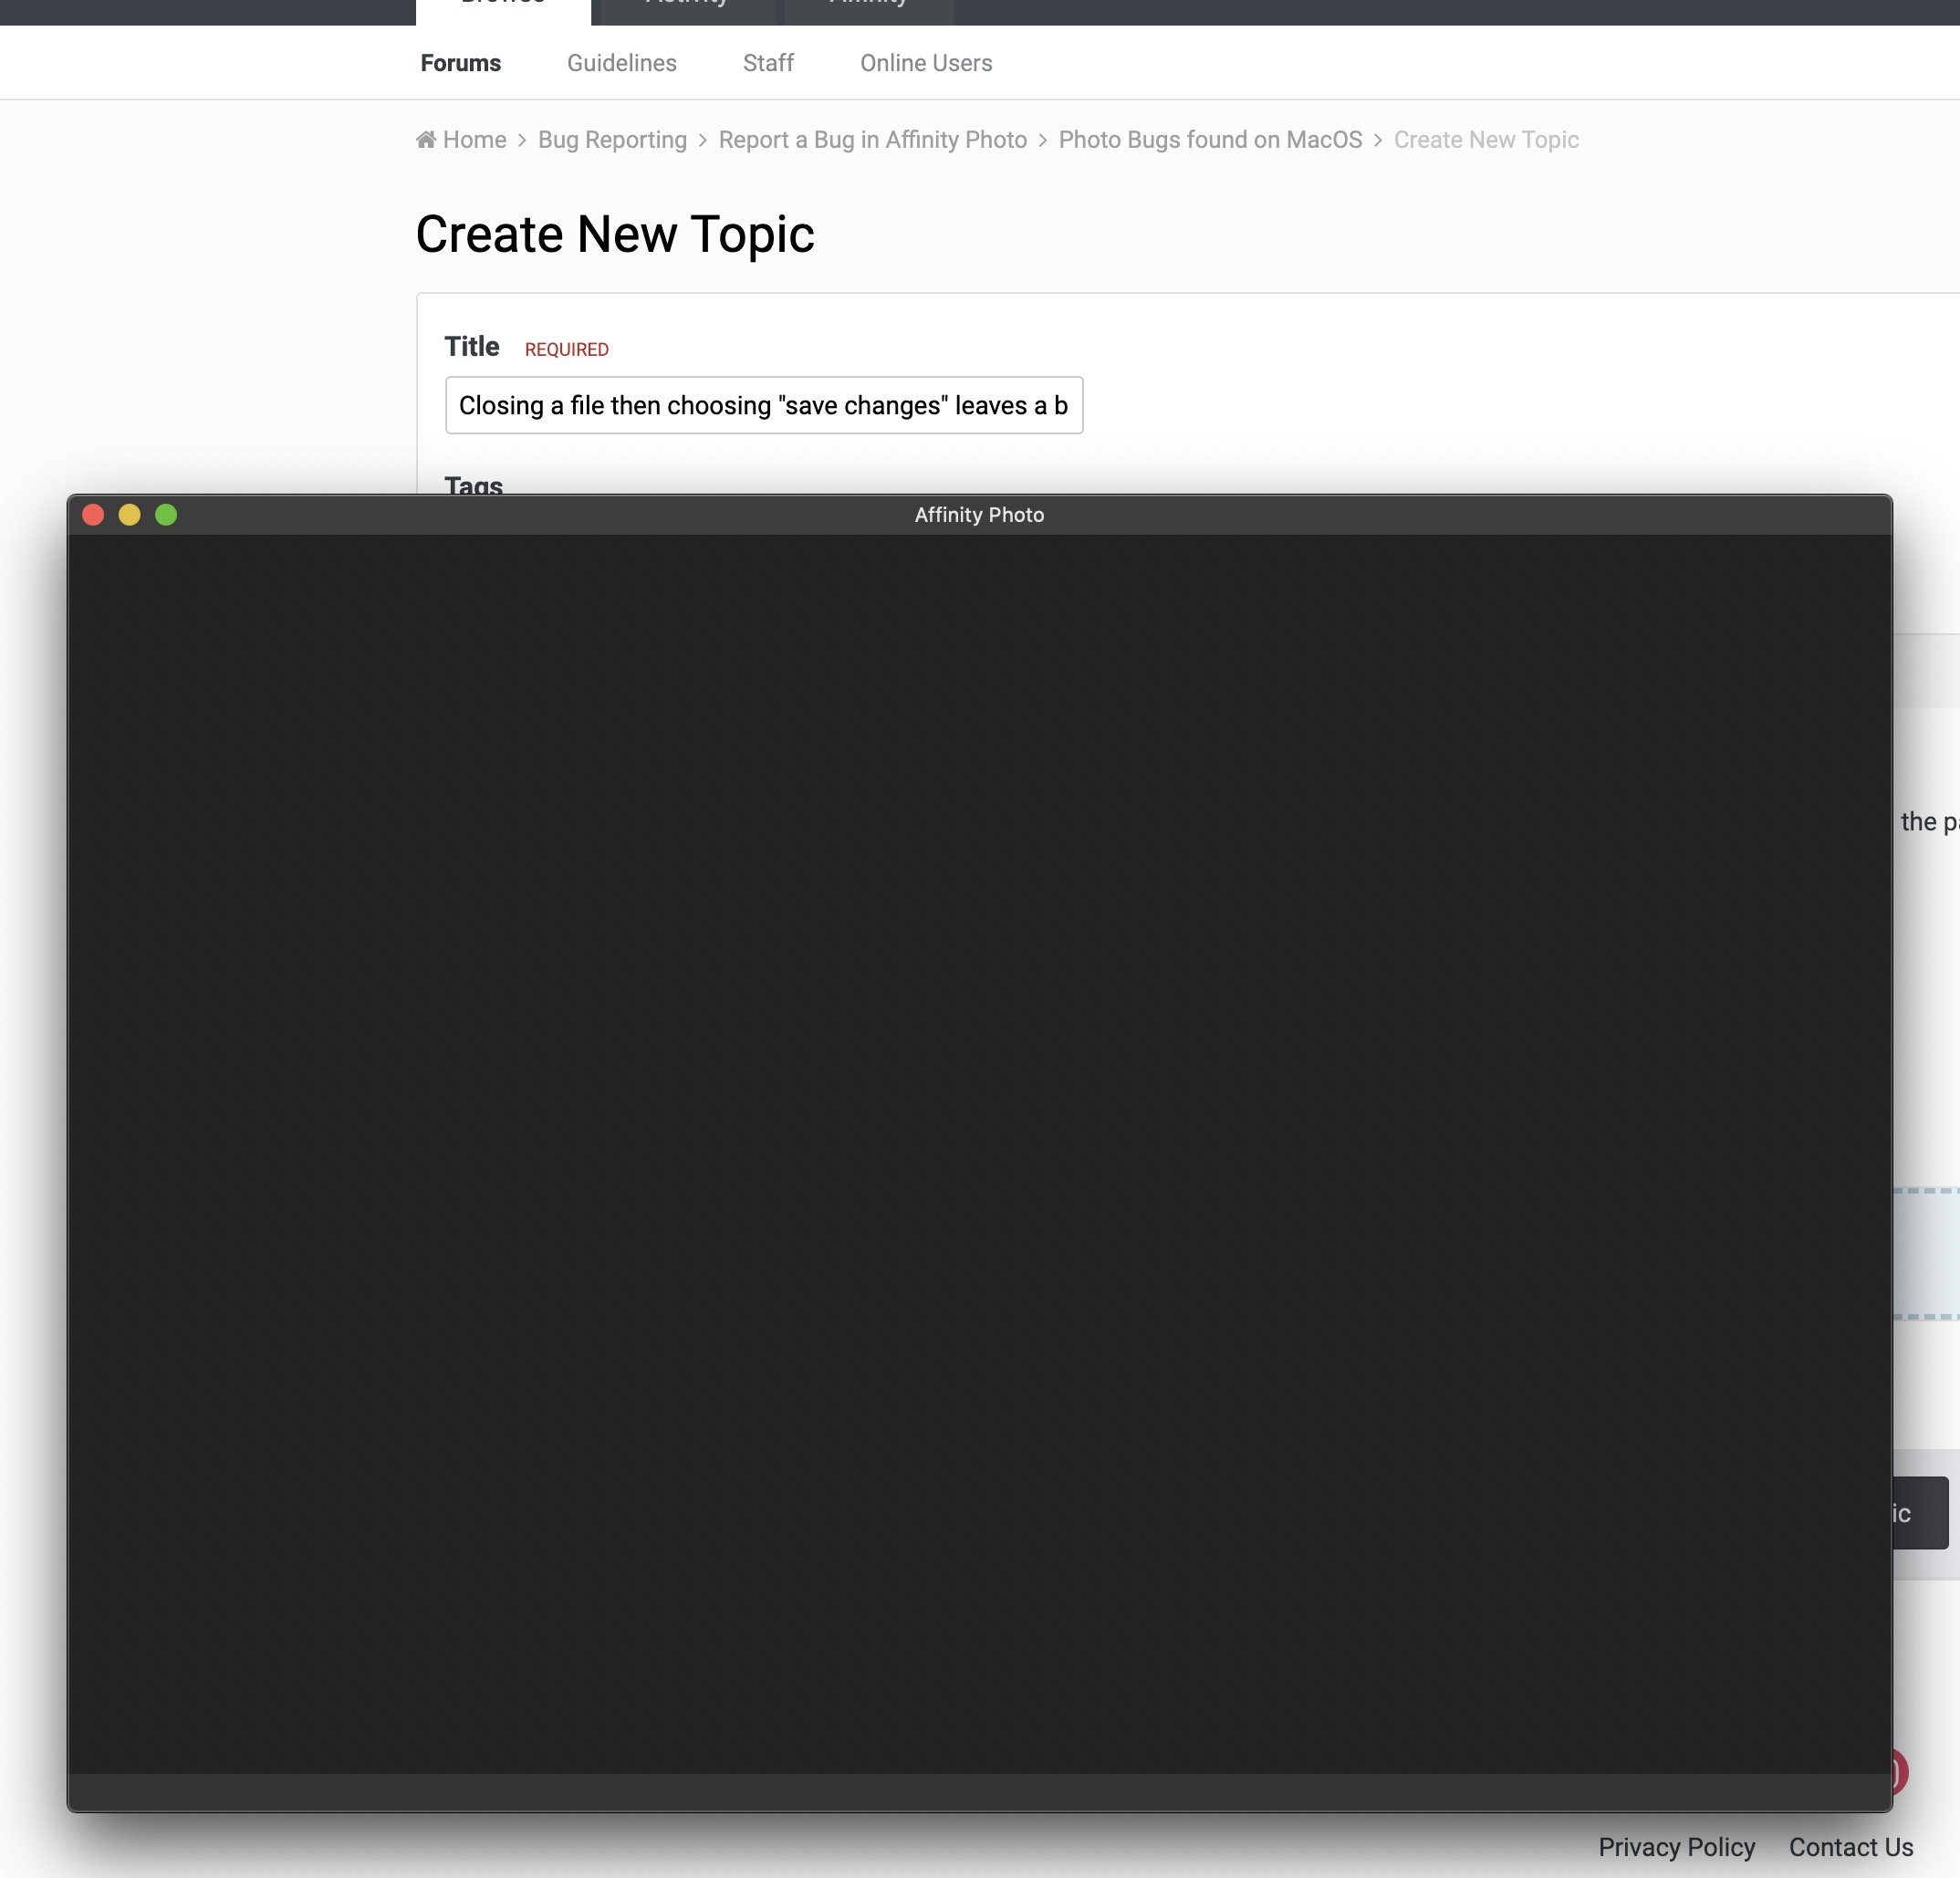
 Using Affinity Photo 1.8.6 on a fully updated Intel iMac running Mac OS 10.15.7 (19H15), I have the following repeatable bug: Closing an image that has changes that need to be saved causes the program to ask me if I want to save (which is normal), but after it saves and closes the image, I end up with a blank functionaless window where my open file used to be. Since the blank window is a bug, I can't even close it with command + W and must use the mouse to click the close box (frustrating). Steps to recreate: Open an image Draw some random lines somewhere Type command W to close The app asks if I want to save (which is expected) If I click Save, it saves and closes the document...but leaves the dead window behind. If I save the file first, then close with command W, everything works fine. This is a frustrating visual bug that I would love to have fixed. Incidentally, closing a changed with the close box instead of command W also leaves the dead window behind. So it's not just the keyboard shortcut.
-
 Hello, I'm getting this error message whenever I am trying to save a document in Designer as .afdesign. I then click "Close" and the document shuts down. It saves the document as a .afdesign file I re-open it The file is corrupt Designer sort of freezes Troubleshooting: Re-installed Designer Shut down the program I am pretty sure I restarted my PC, but not 100% The problem about this It's super annoying that i can't re-open files I have to re-open Designer each time Does it happen 100% of the time? Well, yes. It did it ca. twice and then it worked again and now it's everytime. Please help me Thanks in advance - Vitus
-
 Hello developers, Please fix broken EMF and WMF export in Affinity Designer 1.8.5.703 in Windows 10. The bug is there at least since 1.6 (that's when I started using AD). Bug is also present in Affinity Designer Customer Beta 1.9.0.864. Steps to represent bug in EMF export: Start Affinity Designer 1.8.5.703 Create New Document > Web > SVGA 800x600 Create grey circle 600x600 in the middle Export file to Circle.EMF Create new document in Word 2016 or 2019 (I cannot test in earlier versions) Drag and drop Circle.EMF into Word document Save Word docment as PDF using File > Save As > PDF Resulting PDF should display grey circle, however there's nothing displayed in PDF (white space)! Steps to represent bug in WMF export: Start Affinity Designer 1.8.5.703 Create New Document > Web > SVGA 800x600 Create grey circle 600x600 in the middle Export file to Circle.WMF Create new document in Word 2016 or 2019 (I cannot test in earlier versions) Drag and drop Circle.WMF into Word document Expected Word should display grey circle. The circle is displayed but it is 1/2 smaller and has a lot of extra white space around it. Save Word docment as PDF using File > Save As > PDF Resulting PDF has grey circle but it is still small Steps to represent correct behavior when exporting to EMF/WMF using Inkscape 1.0: Start Affinity Designer 1.8.5.703 Create New Document > Web > SVGA 800x600 Create grey circle 600x600 in the middle Export file to Circle.SVG Open Circle.SVG in Inkscape 1.0 Save Circle.SVG to Circle.EMF using Inkscape > File > Save As > Circle-Inkscape.EMF Create new document in Word 2016 or 2019 (I cannot test in earlier versions) Drag and drop Circle-Inkscape.EMF into Word document Save Word docment as PDF using File > Save As > PDF Resulting PDF shows grey circle correctly Same accepts (works correctly) to WMF export using Inkscape 1.0 I'm attaching source files (.AFDESIGN, SVG, EMF, WMF) mentioned in steps to this post in 7z archive — Broken EMF-WMF Export Bug Report Source Files.7z Black lives matter, mumbojumbo
-
When using Gaussian Blur on objects in Affinity Designer (Mac version), I am always seeing an undesired color banding side effect, as you can see on the attached screen shot. I'm not encountering this issue with other graphical applications. As far as I can see it, the root cause seems to be that Designer does not use dithering for Gaussian Blur effects, even though it does dithering for gradients. Are there plans to address this? Or are there plans to support Photoshop filter effects in Designer, like it is already supported on Photo side? Because then we could use some Photoshop plugin as a workaround instead of using Designer's integrated blur effect. I find this an important issue to be addressed, since blur effects are some very fundamental technique for vector based illustrations. Using: Affinity Designer 1.8.4 on Mac.
-
High Sierra: When the Tools are a separate floating palette, if the main application window is dragged behind them (eg they're on a separate display), mouse released, then the main window is dragged again, it will capture the tools and drag them along with it. Problem manifests in 1.8.6 of Designer, Photo and Publisher.
-
 High Sierra, 3 screens, on launch AD opens the main application window offset to one side, instead of on the main screen where it was on Quit. The only Affinity App to display this behaviour.
 -
I've been experiencing three issues related to the layers panel and layer selection ever since I updated to Big Sur. Firstly, when I have multiple layers selected and go to hide them all (by either clicking the checkmark or menu option), the last/bottom layer in layers panel will appear to be deselected even though it actually isn't and can still be manipulated along with the other layers that still appear selected. The second one is harder to describe and I haven't figured out what causes it yet (I think it might happen when quickly selecting between different layers in the layers panel, but don't quote me on that), but on multiple occasions I've had the current layer I'm working on appear to deselect itself (but like with the bug mentioned above, isn't and can still be manipulated). That layer, or any other layer, then can't be (re)selected, often thinking I want to change the layer name when I'm just trying to select it. It's like I'm soft locked out of the layers panel entirely. It isn't until I click an empty part on the canvas, to essentially to deselect everything and have nothing selected, am I able to work in the layers panel again. Lastly, when moving layers around in the panel, often times the layer I have selected won't move to its new location in the panel but the layer above or below it that isn't selected will be moved instead. It feels to me that I experience this more when I'm scrolling quickly through the layers while dragging a layer to its new spot in the panel and when I try to move a free layer into an group that's already been formed. Hopefully that all makes sense.
-
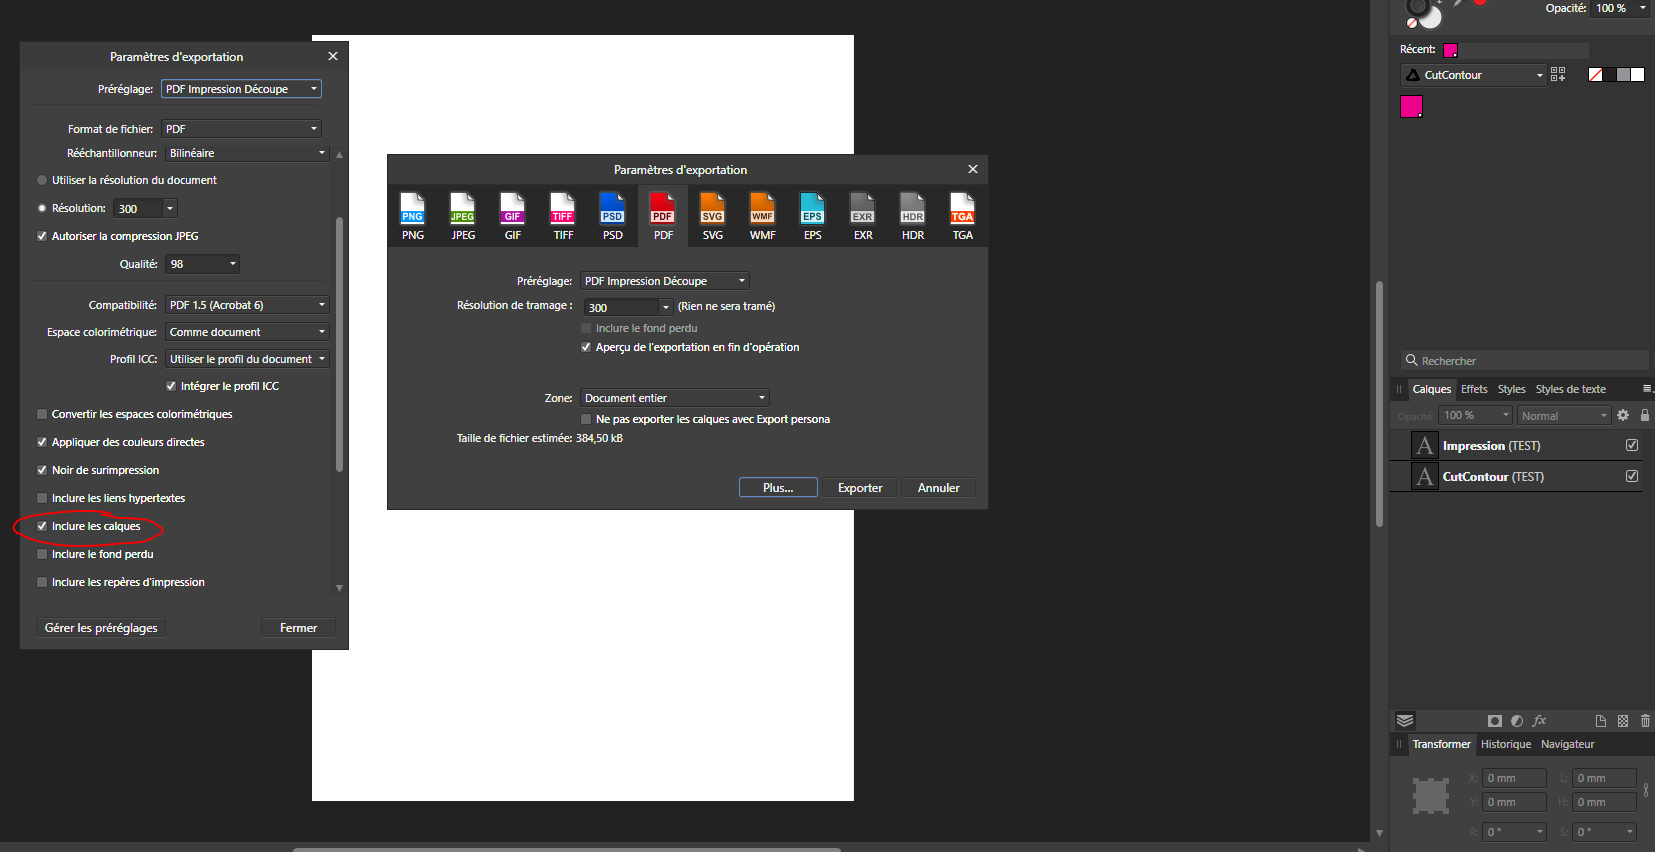
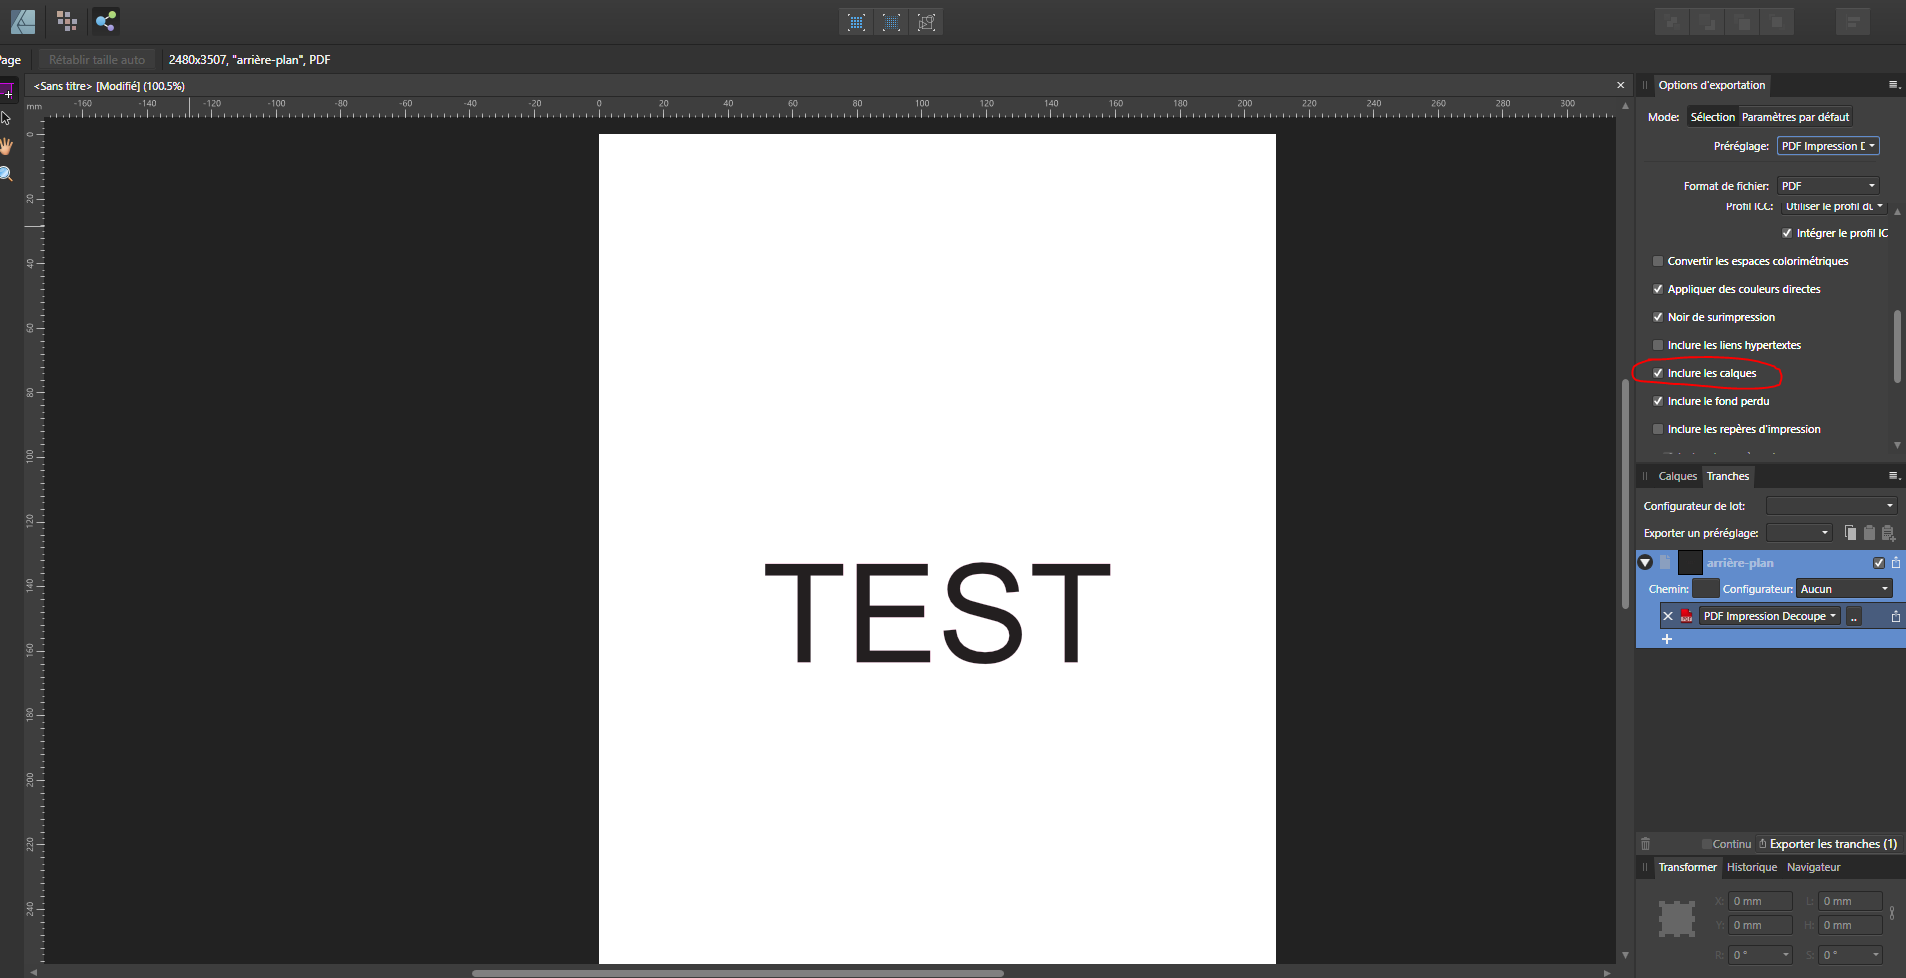
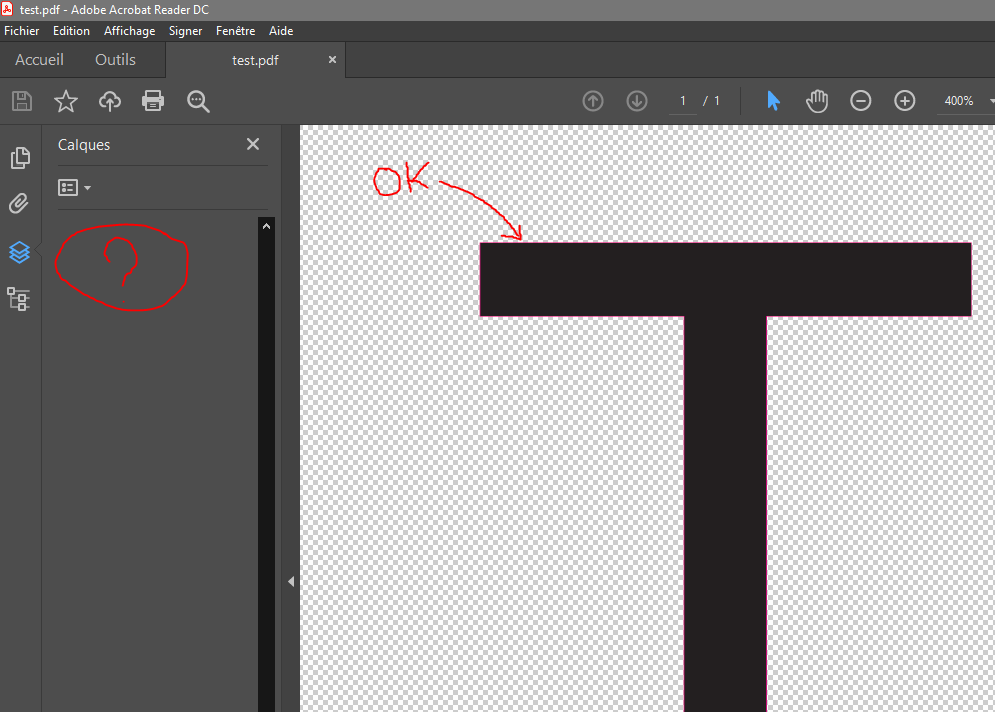
 I am experiencing a bug with the latest Affinity Designer version (1.8.5.703) : When exporting to a PDF file, the different layers are not exported as they should ... Once the PDF file is opened in Adobe Reader (and Adobe Illustrator) the layers preview pane does not show any layers. The bug is repeated as many times on Windows 10 version and this on two different computers. I specify that the bug occurs by using the menu> file> export ... as well as by using persona export ... This is particularly annoying when exporting PDF files with CutContour and cutting printing ... I hope you will solve the problem without difficulties and wish you good luck ... receive my full consideration. Guillaume
-
 I've been piecing together a large image of the first level of the Sierra/GameArts video game "Thexder" from many screenshots. I open each screenshot PNG in Photo, crop off the bottom game UI, copy the image, close it, and paste that copied content into my main document. As I paste these shots into my primary document, the sharp solid colors in the image start to degrade at their edges, in ways you would see if you resampled an image to scale it. I am NOT scaling anything. Sometimes it's REALLY bad upon pasting a new chunk of image into the main document. In THIS specific case, it seems that undoing the paste, zooming WAY out in the document, and pasting again results in a correct paste (this time it pastes in at the top left corner of my document, where as before it pasted where I was working). Moving layers around shows the color shifts happening as part of rendering the layers on screen, but merging down, etc, will eventually start to show that the edges of hard color borders are "smudged" with slight color shifts. Anyone who plans to use Affinity Photo to create pixel art should beware. This could be especially problematic when changing between set palettes and full-color. It also has me wondering how much degradation is going on all the time. How much blur is Affinity Photo adding to everyone's images while they're working on them, unsuspectingly? I only noticed this because of working at the pixel level, zoomed in at them, and knowing the explicit limit of 16-colors in these screenshots (the game only shows 16 colors from an MCGA palette). My main document is a regular Affinity Photo document. I am importing PNG images from Boxer (DOSBox shell in Mac OS) which are 320x200. I've attached an image showing what's happening. I have zoomed way in so that you can see the individual pixels (very important with pixel art). The left side of the image shows sharper content while the right side has areas that have been through layer movement and merging down. One edge even turned partially transparent. EDIT: It seems to be getting progressively worse as I extend my canvas to the right and downward, as the older content to the upper left does not seem degraded.
-
Sadly not good experience while painting. like stroboscope with every brush move between halfres brush strokes. Keeping me back from using Photo more... macOS 10.15.7 iMac Retina 5K, 27-inch, 2017 Radeon Pro 580 8 GB flickering.mov
-
zoom tool context toolbar bug: - also I would expect that I can drag the arrow to set the scale that way. it's stuck in place (just in some case it moves with mouse like on the beginning of screen recording) - you have to click somewhere beside. - slider with arrow doesn't reflect (update) when scale is changed in number-box next to it. Screen_Recording_2020-11-30_at_02_43_10.mov
- 1 reply
-
- 1
-

-
- context bar
- zoom tool
- (and 2 more)
-
 Bug Using either the . or delete keys on the iPad Pro/iPad Air 4 attachable Magic Keyboard return (null) when entering a form field for an attribute (I.e. document dimensions, transform tools, stroke size, etc.) The expected result would be 10.4 instead 10(null)4 centimeters when entering a value into the transform or other tools. Delete doesn’t remove text either. For example, if I enter 10.5 and hit delete the then 4, the output should be 10.4 but the systems renders it as 10(null)5(null)4. Temporary Workaround Can be corrected only by using the touch interface to use the calculator’s . And <x| Virtual key. Devices Used: iPad Air 4 (2020) on iPadOs 14.2 Magic Keyboard
- 7 replies
-
- 1
-

-
- form fields
- bug
- (and 3 more)
-
 "An error occurred while exporting to ...." Affinity Designer 1.8.5.703 Fix those bugs guys... Seriously. plakat.afdesign
 -
 TL;DR: Is there a way to add a background image to a document using a picture frame while avoiding the picture immediately becoming detached from the master? I ran into an issue where detaching an element on a master page resulted in the same element being detached when the styles are applied. It's a bit tricky to explain, but it basically boils down to problems with child masters carrying over too much information. Step 1: Created a master, on which I based all of my subsequent masters (Level 1). At some point I tested adding a background here and changed my mind. Only partially relevant to this conversation, but it does have some impact. Step 2: Created a child template by applying that master to another template. I have three templates created this way, each with a different background texture. (Level 2) Step 3: Applied Level 2 masters to child masters for slight variations among pages that share a textured background. (Level 3) Step 4: Created a few pages based on Level 3 masters. I didn't realize this until later, but adding a photo to a picture frame detaches the element from the master, and this change carries over across subsequent masters/pages. I see no way to fix this without entirely recreating the document, unless it is possible to "reattach" an element that was detached from the master. In the attached images, you can see that my change at Level 2 doesn't carry into the Level 3 master or the page based on the master. In other words, once a frame becomes detached from the master, it also becomes detached on child masters and pages.
-
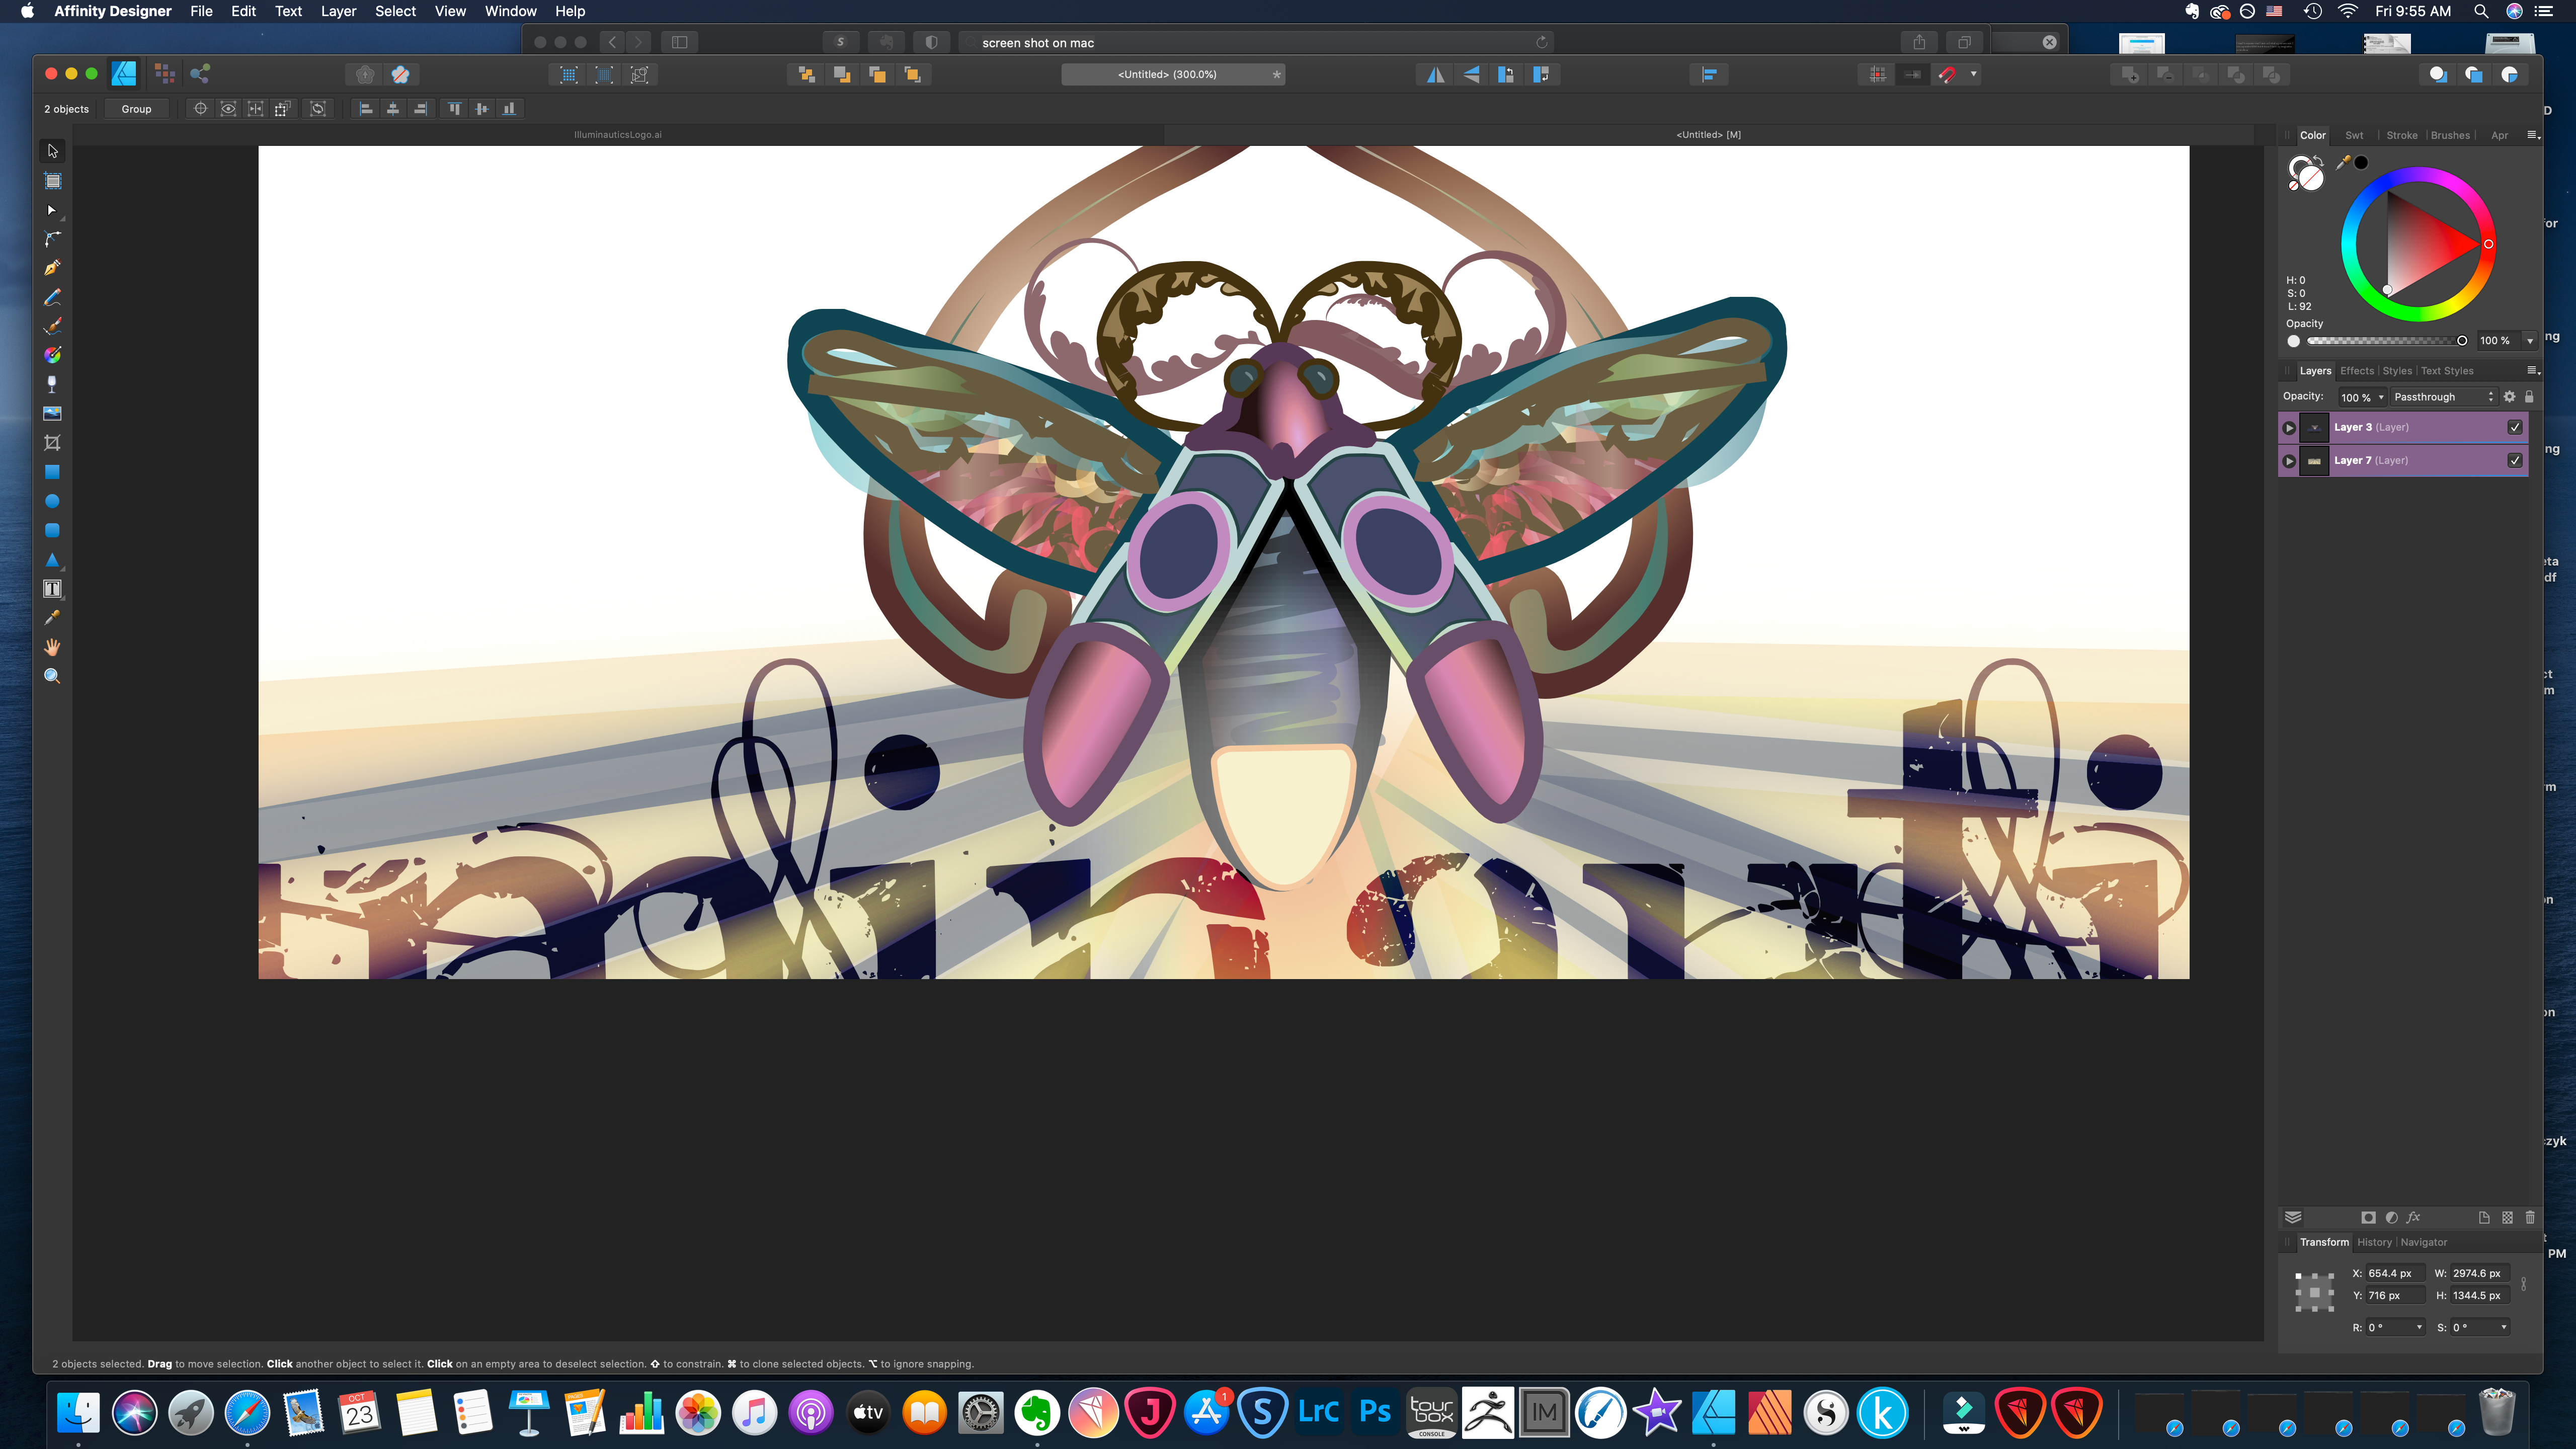
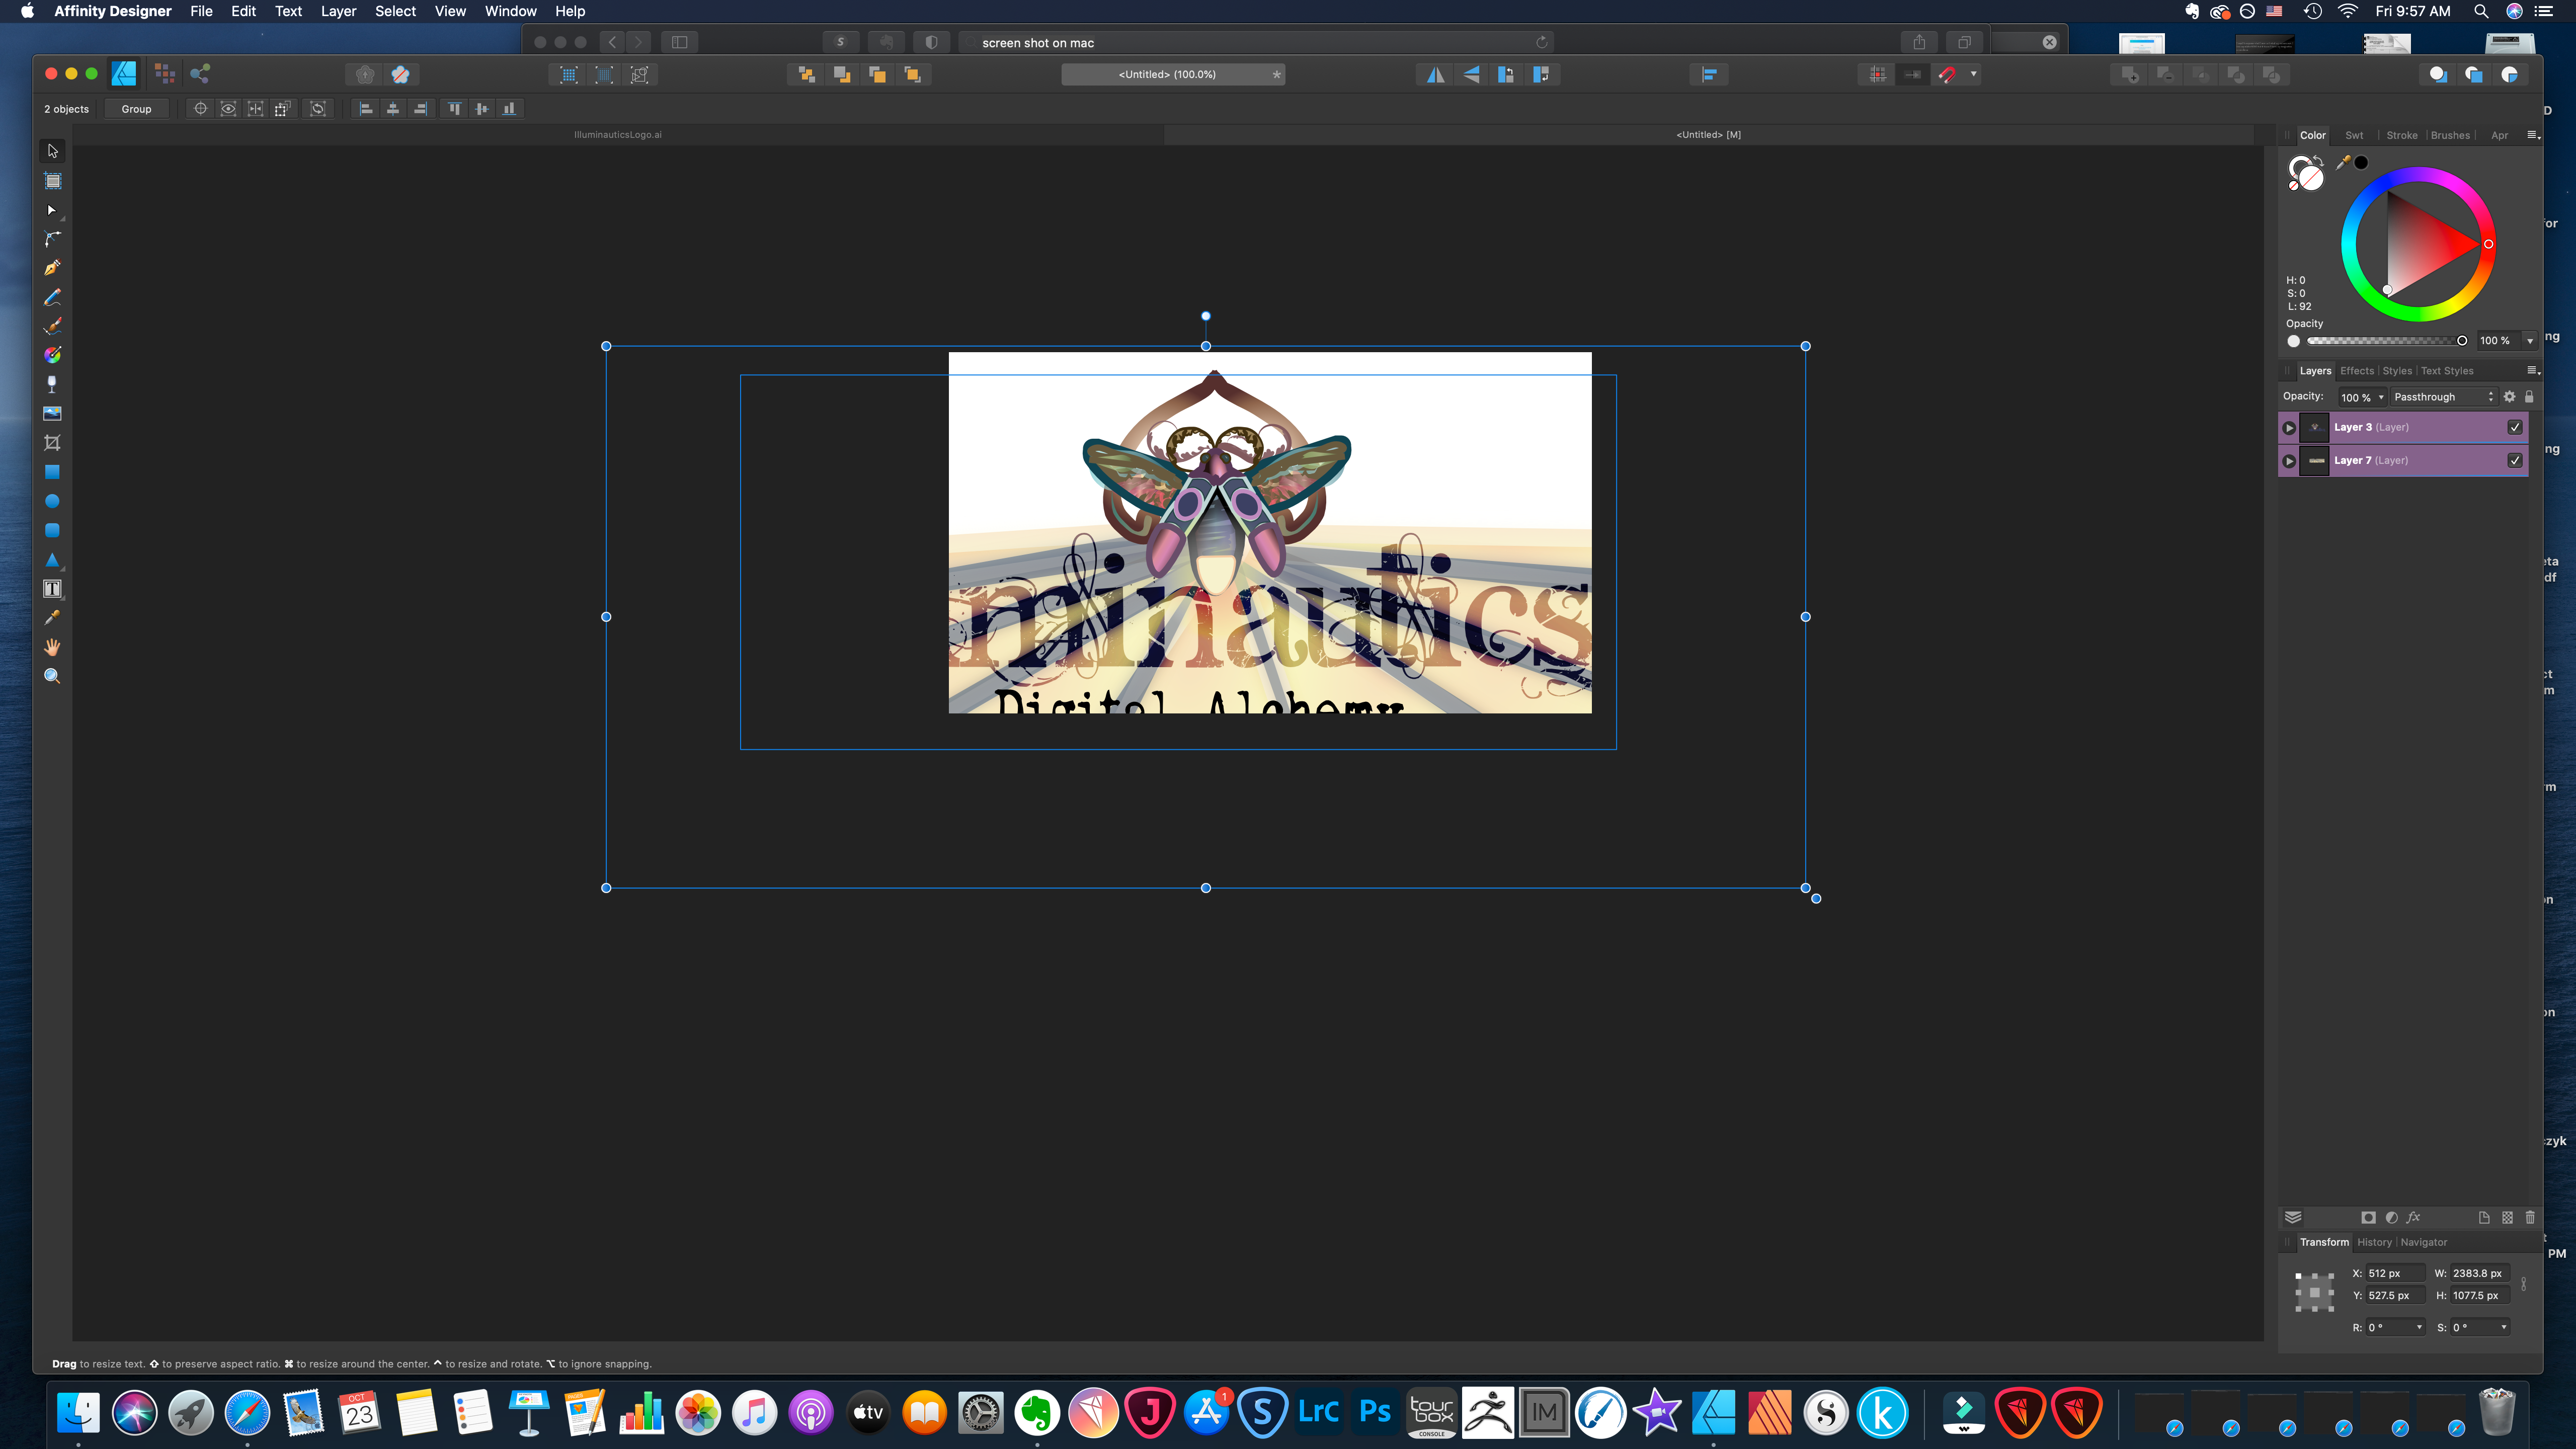
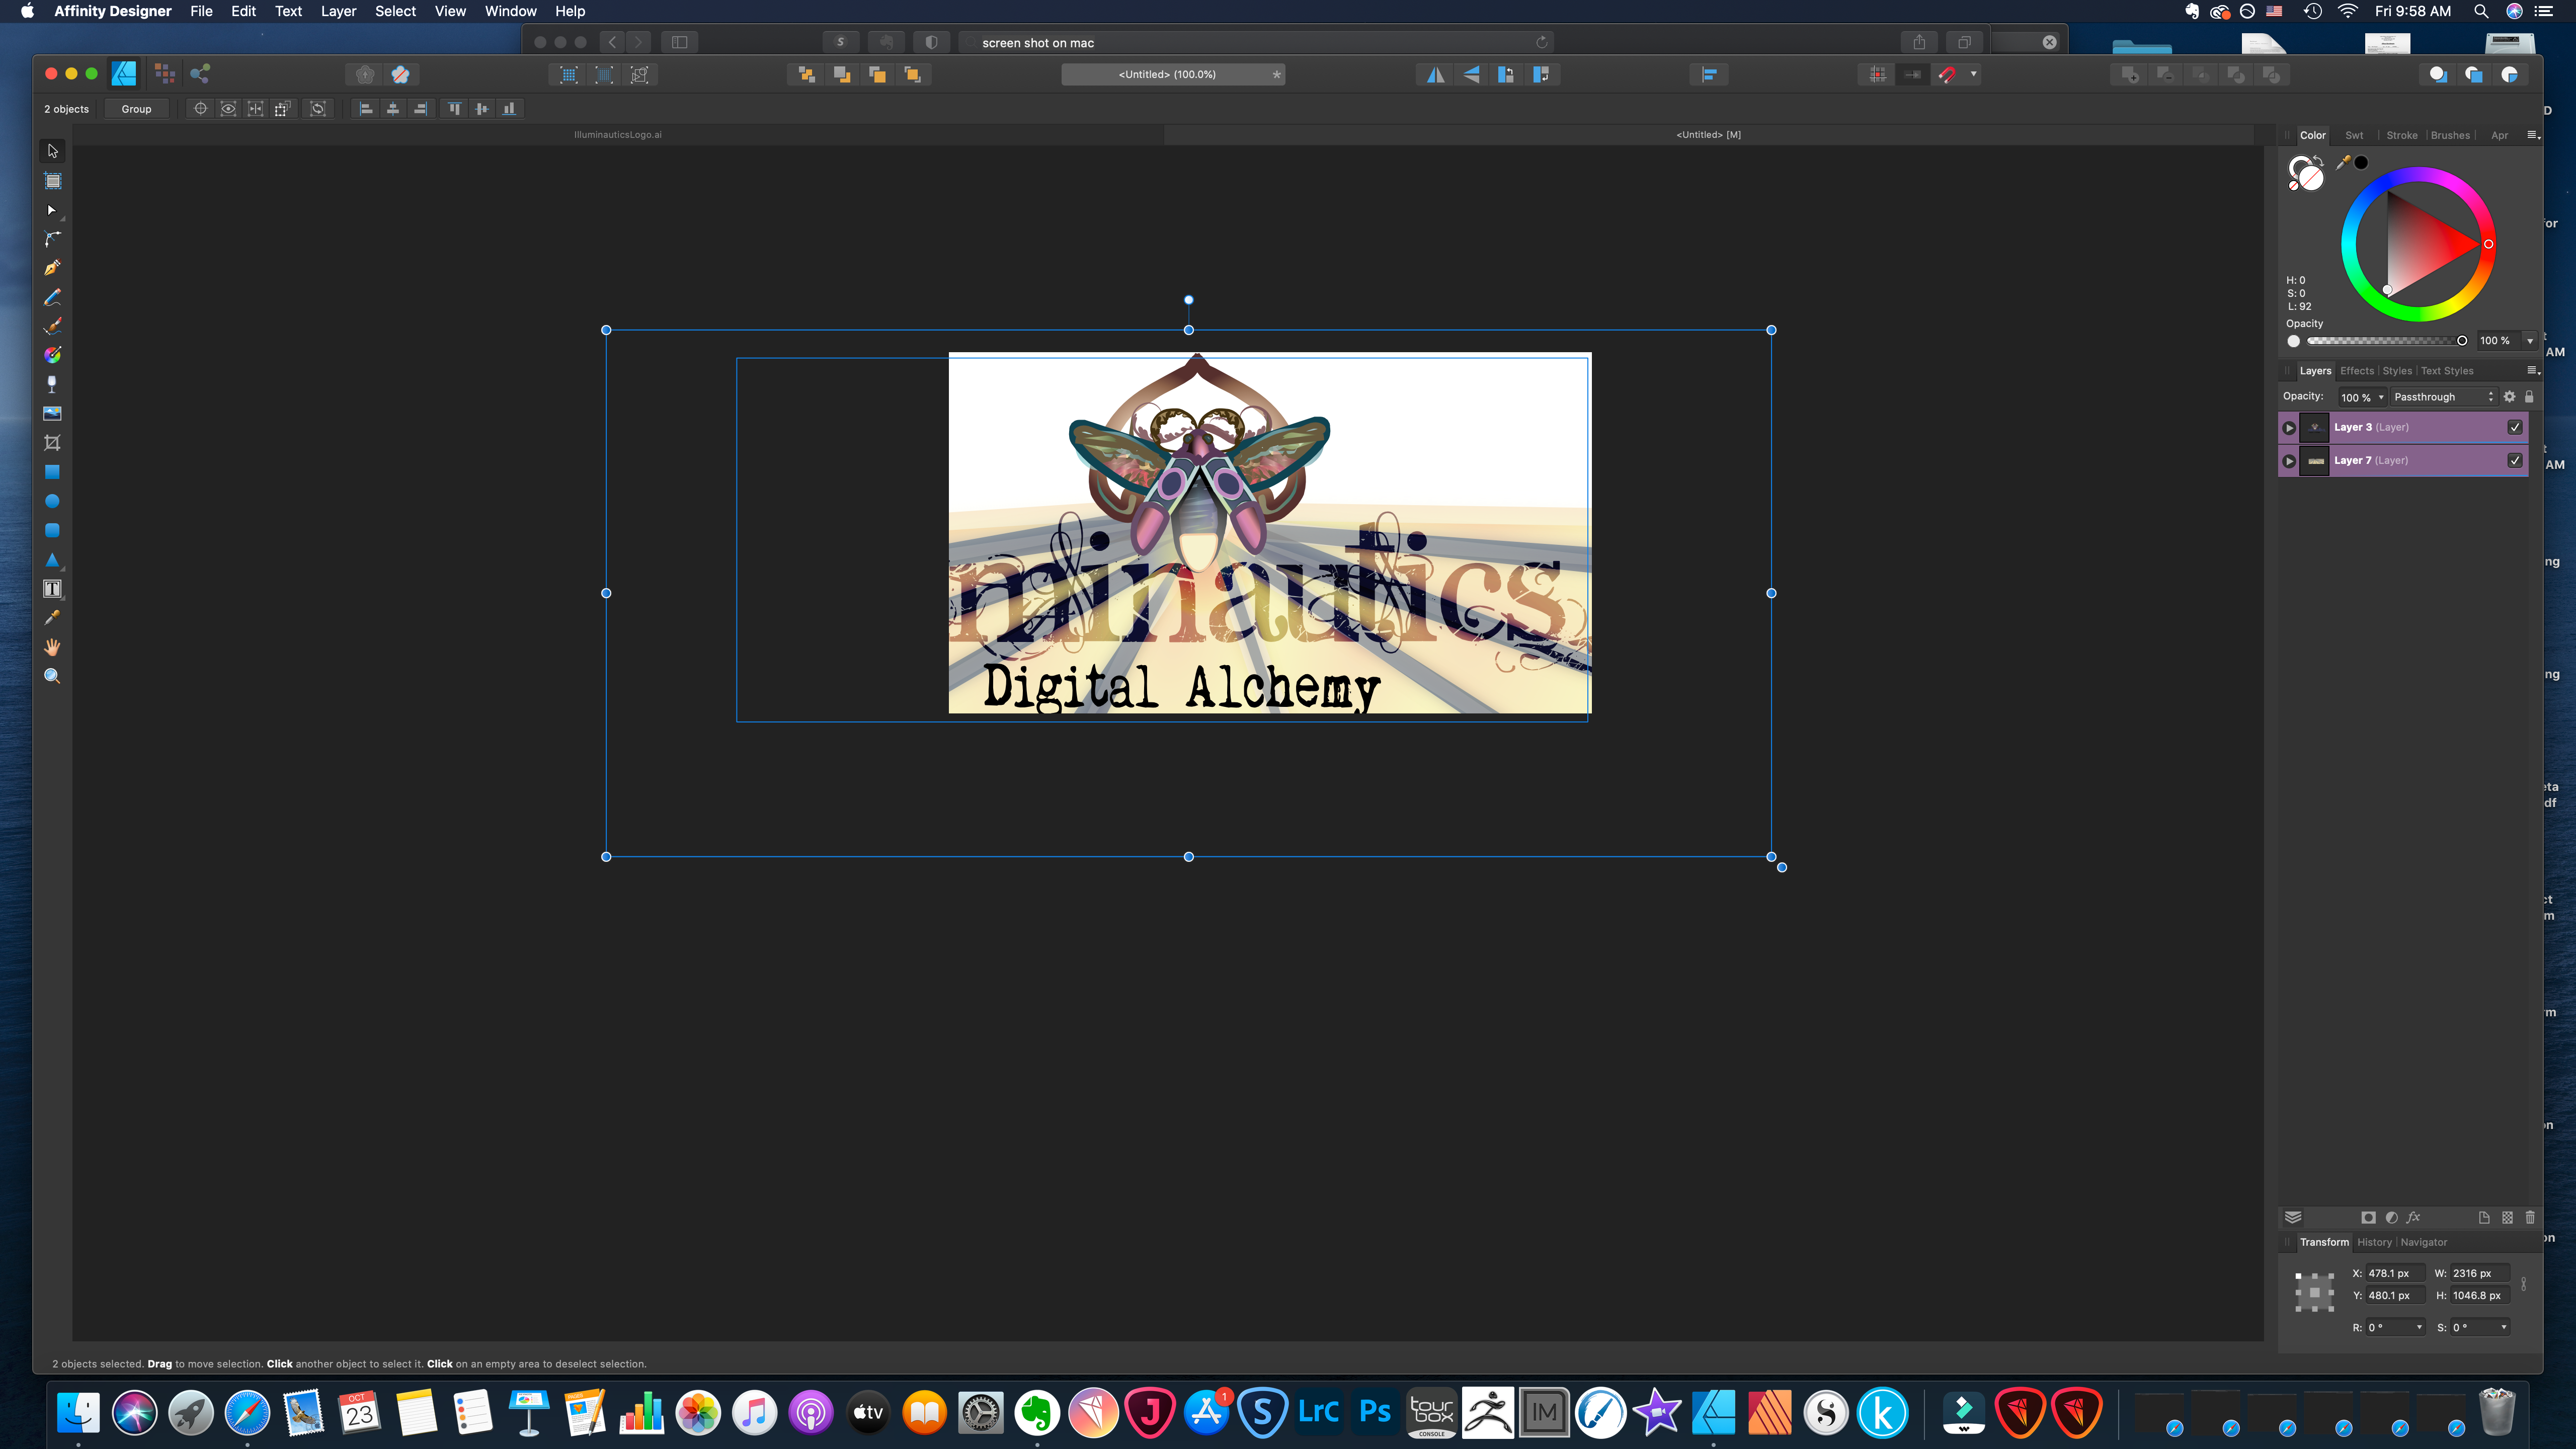
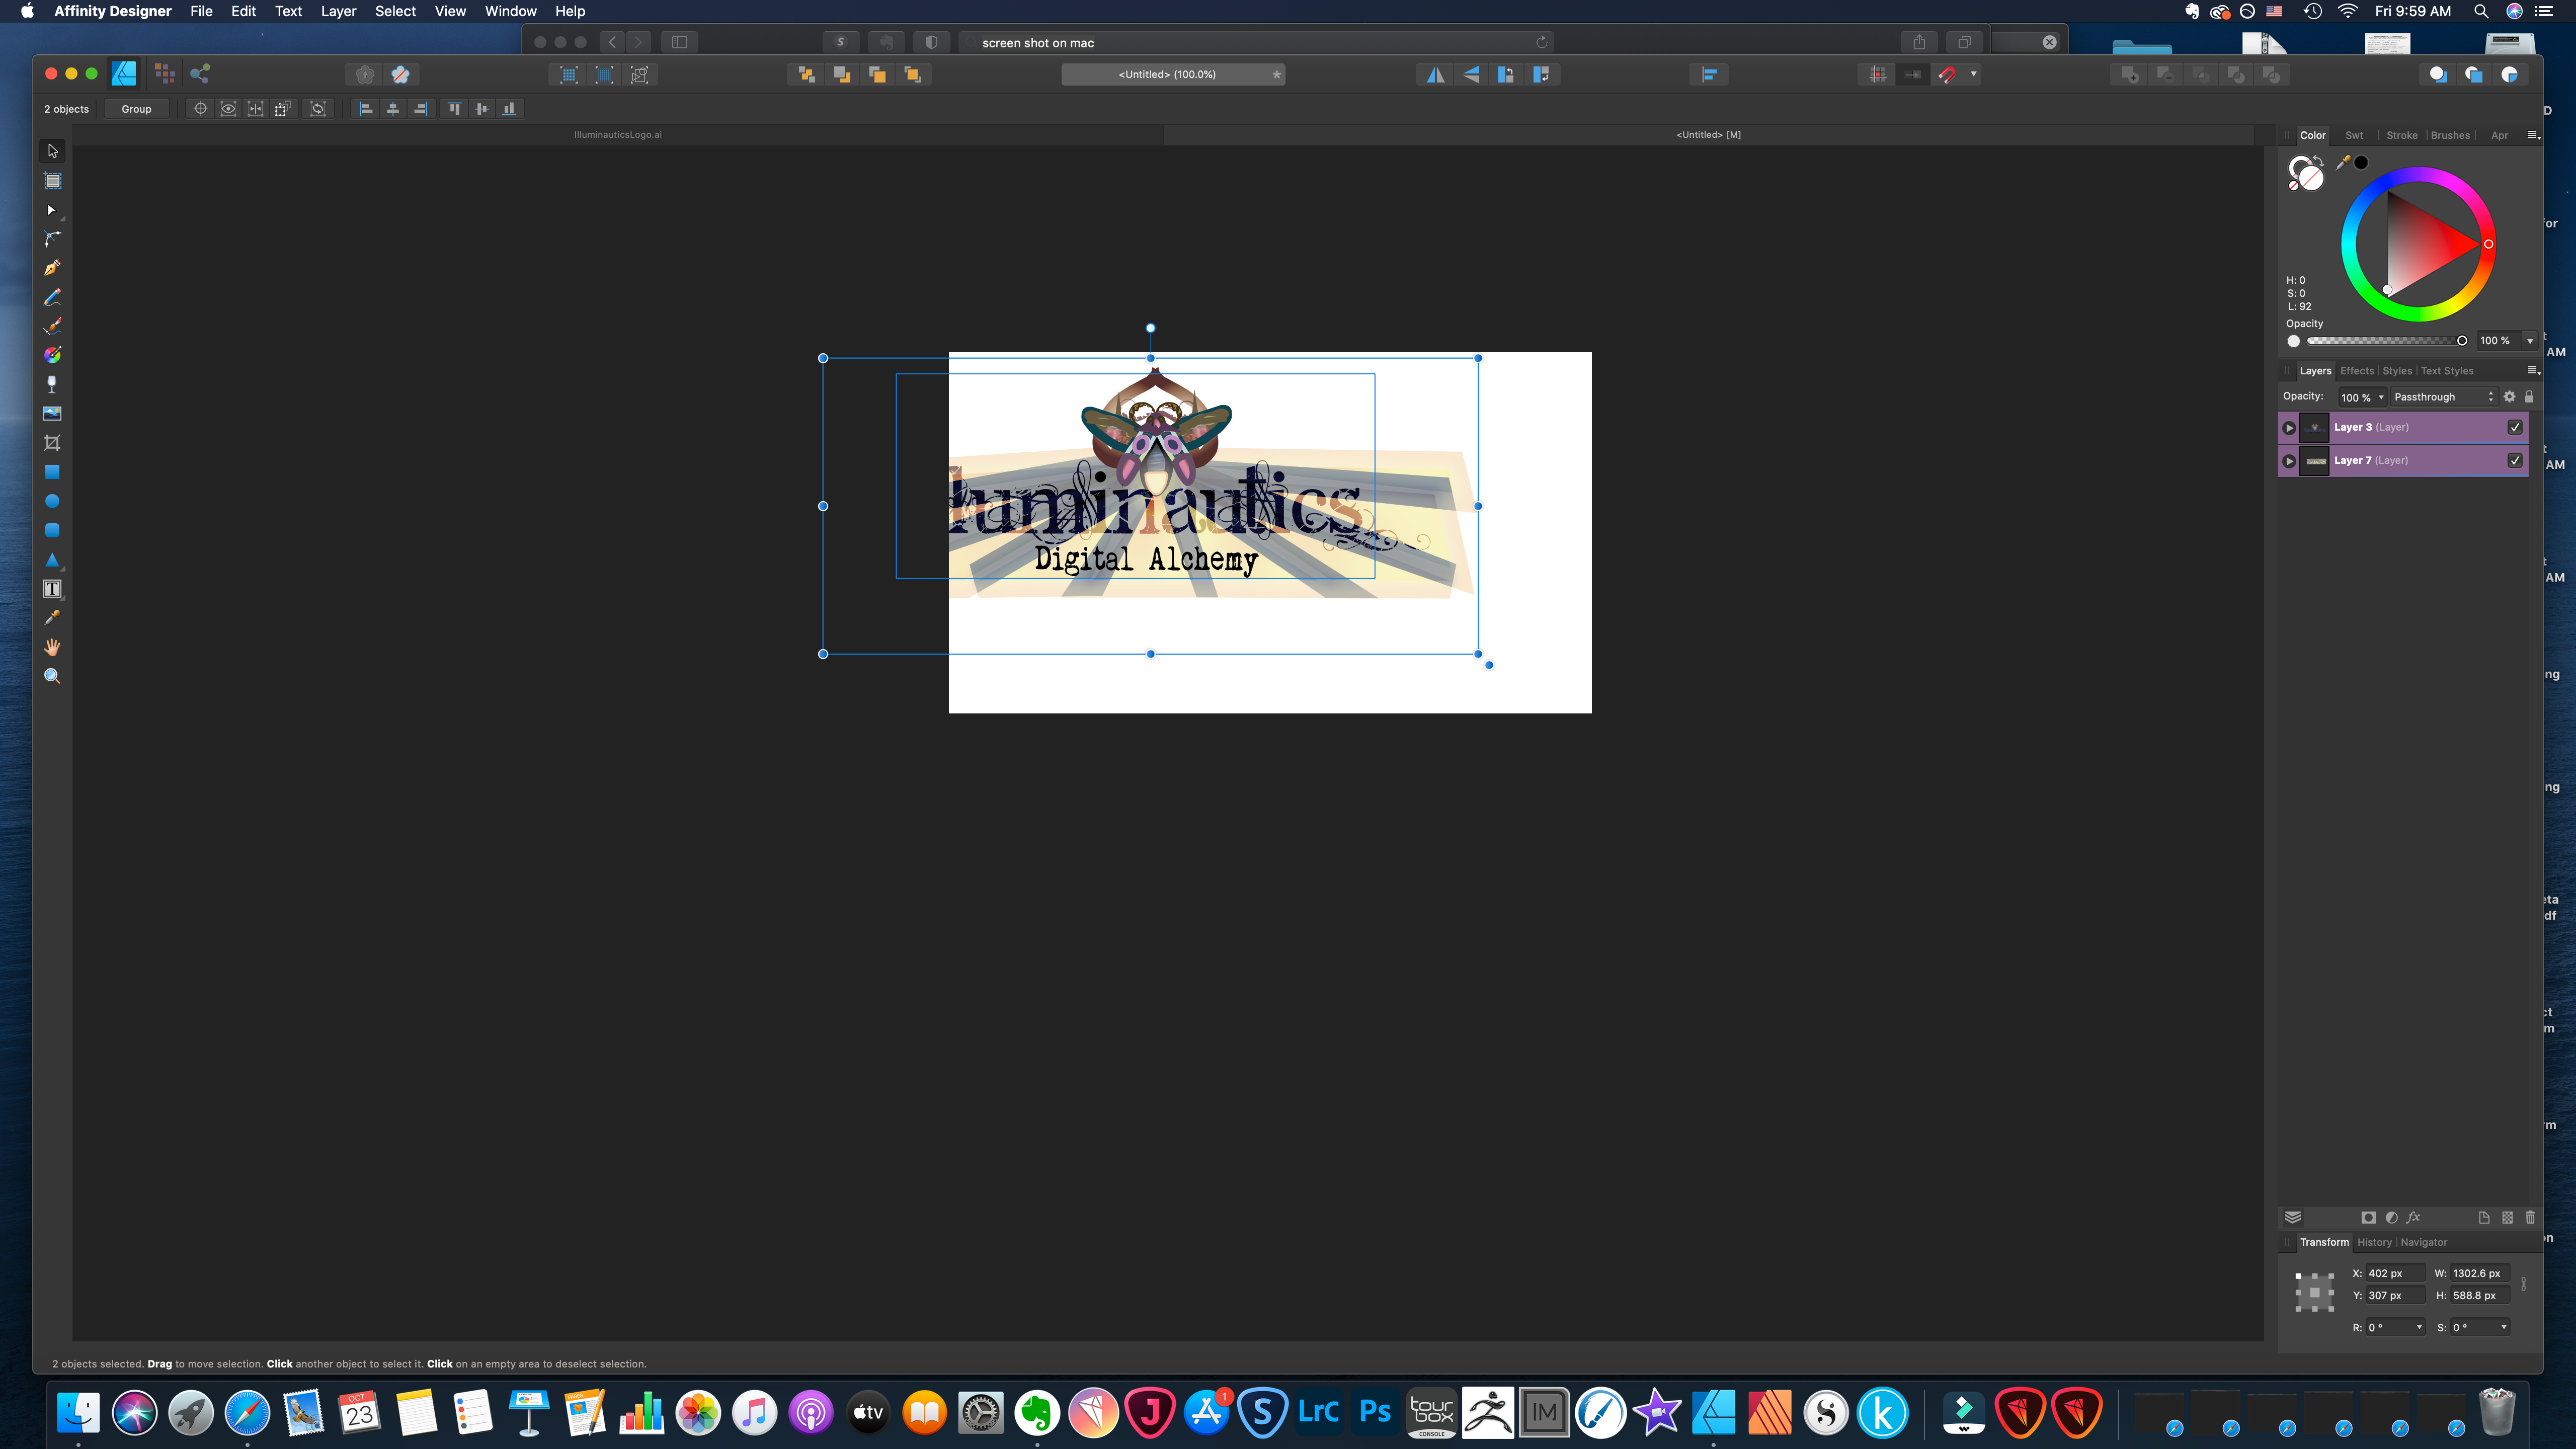
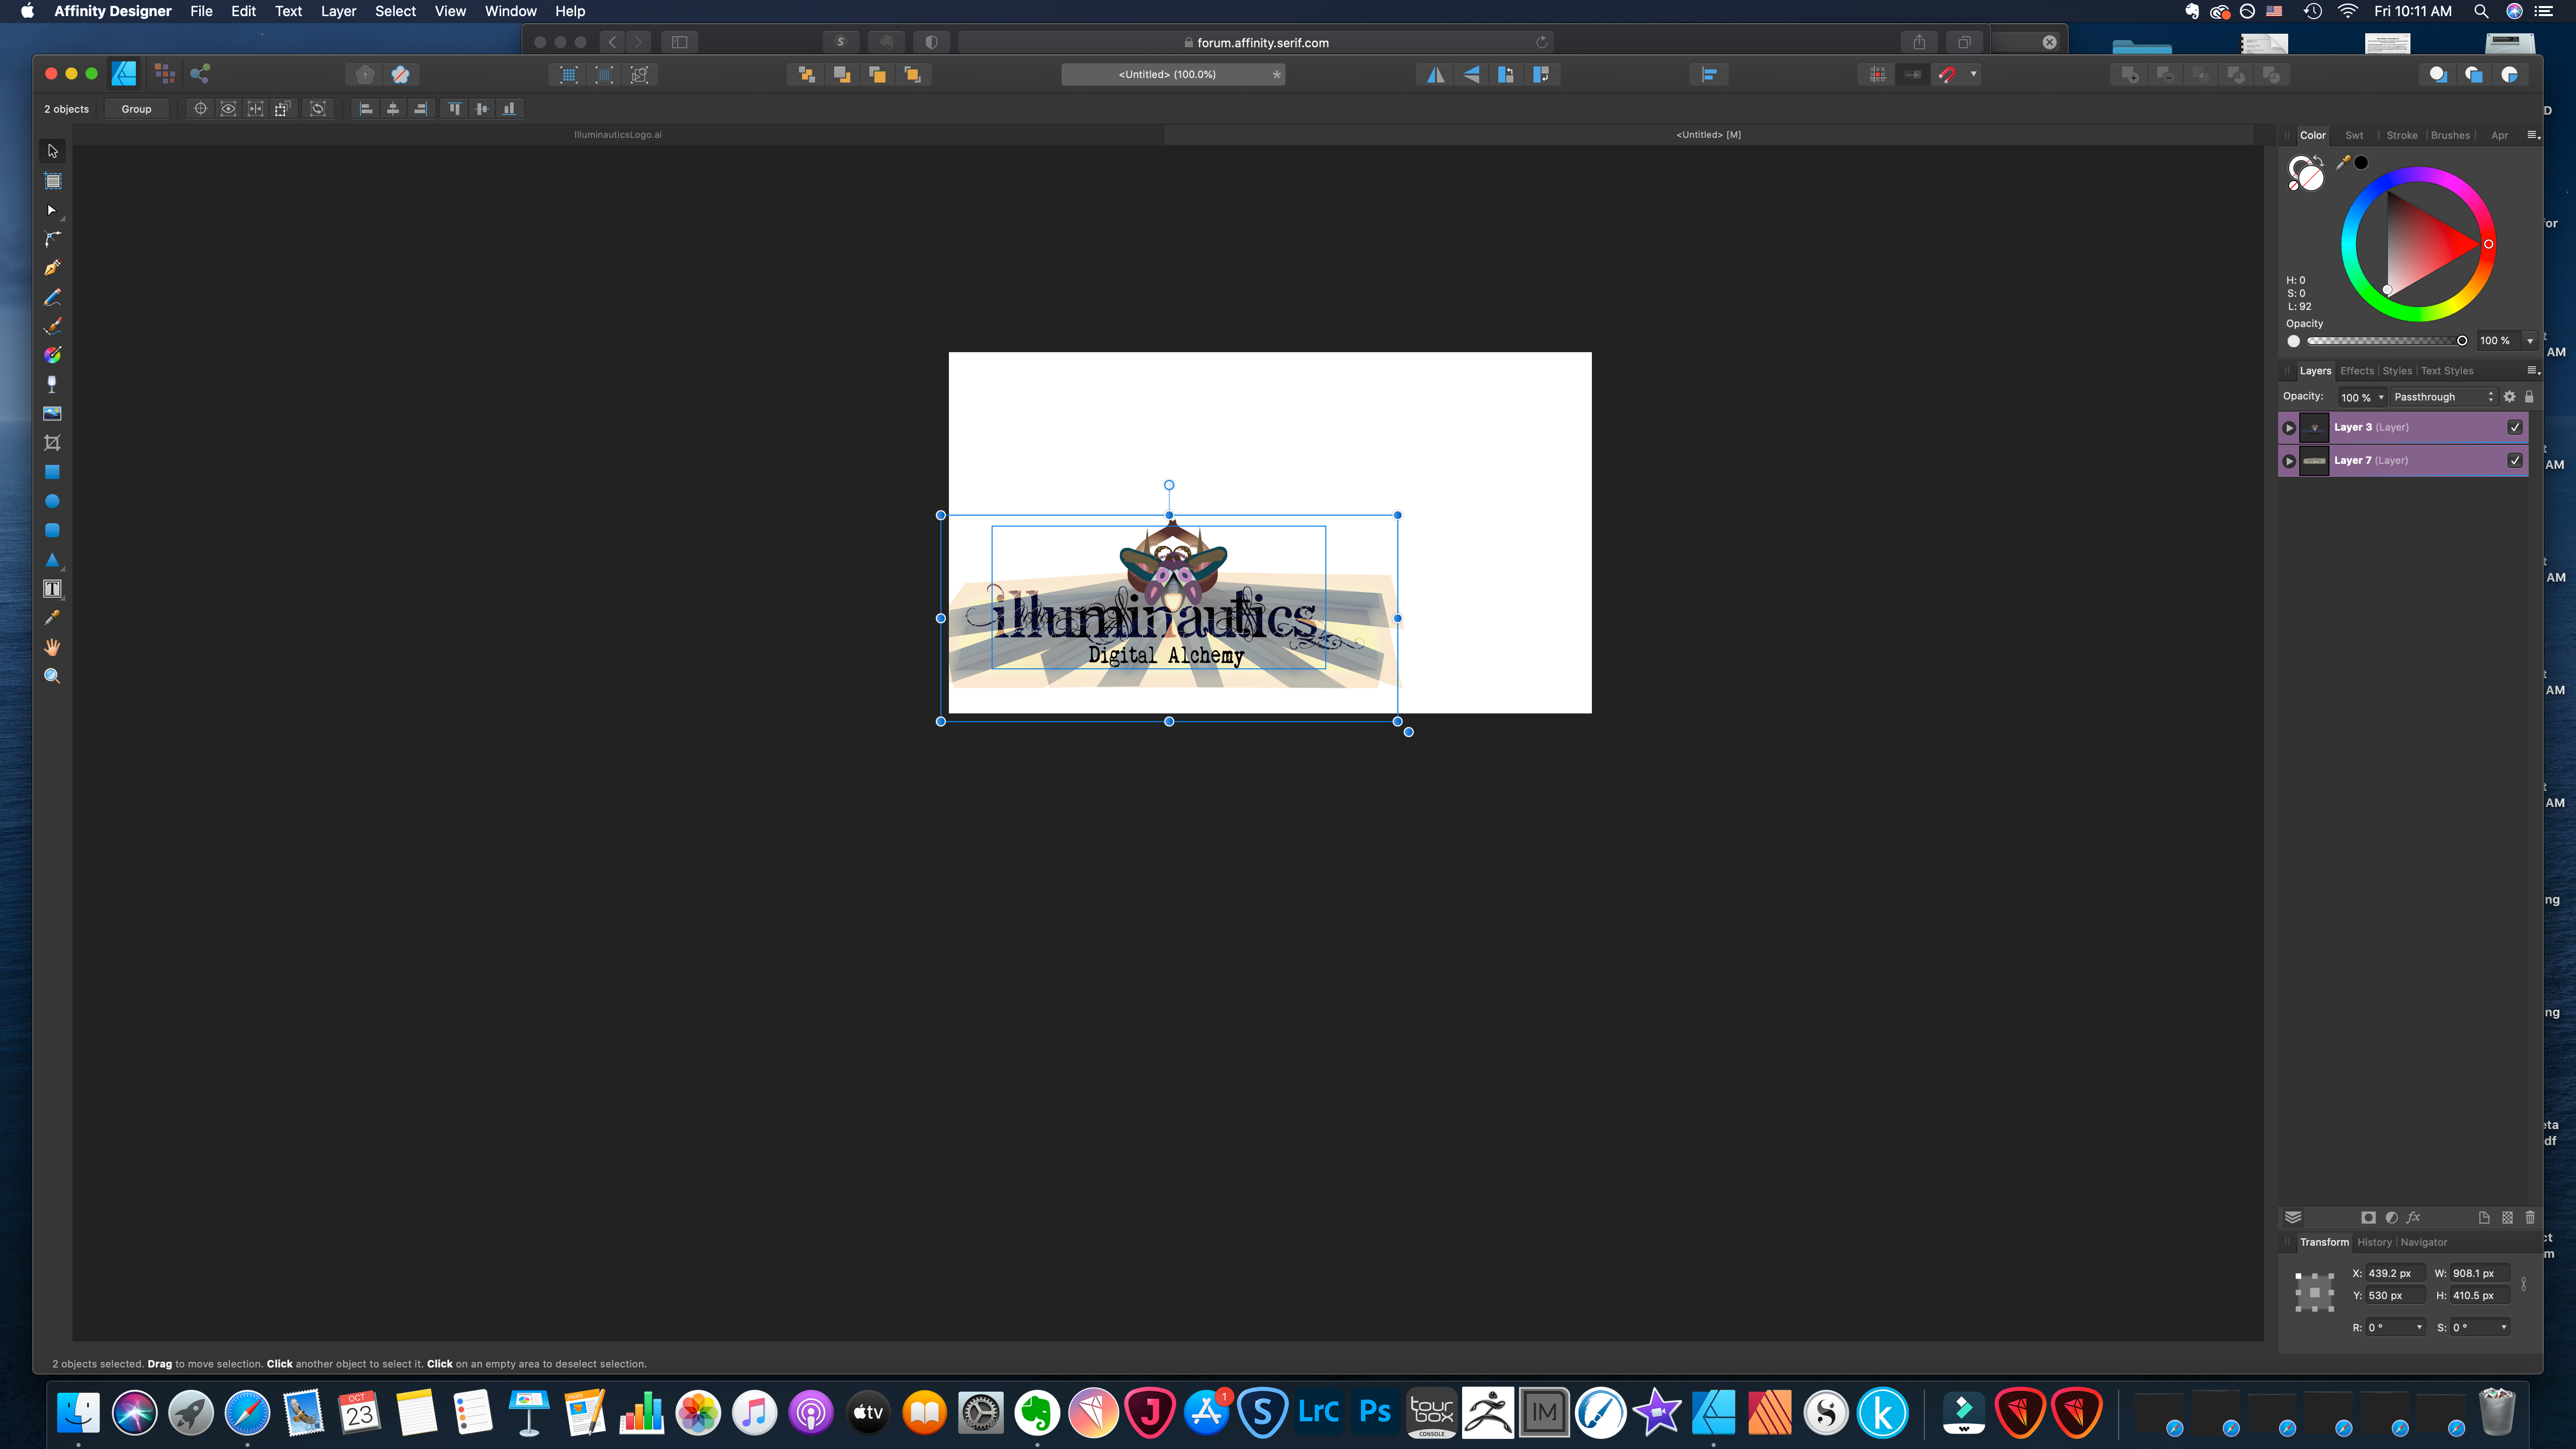
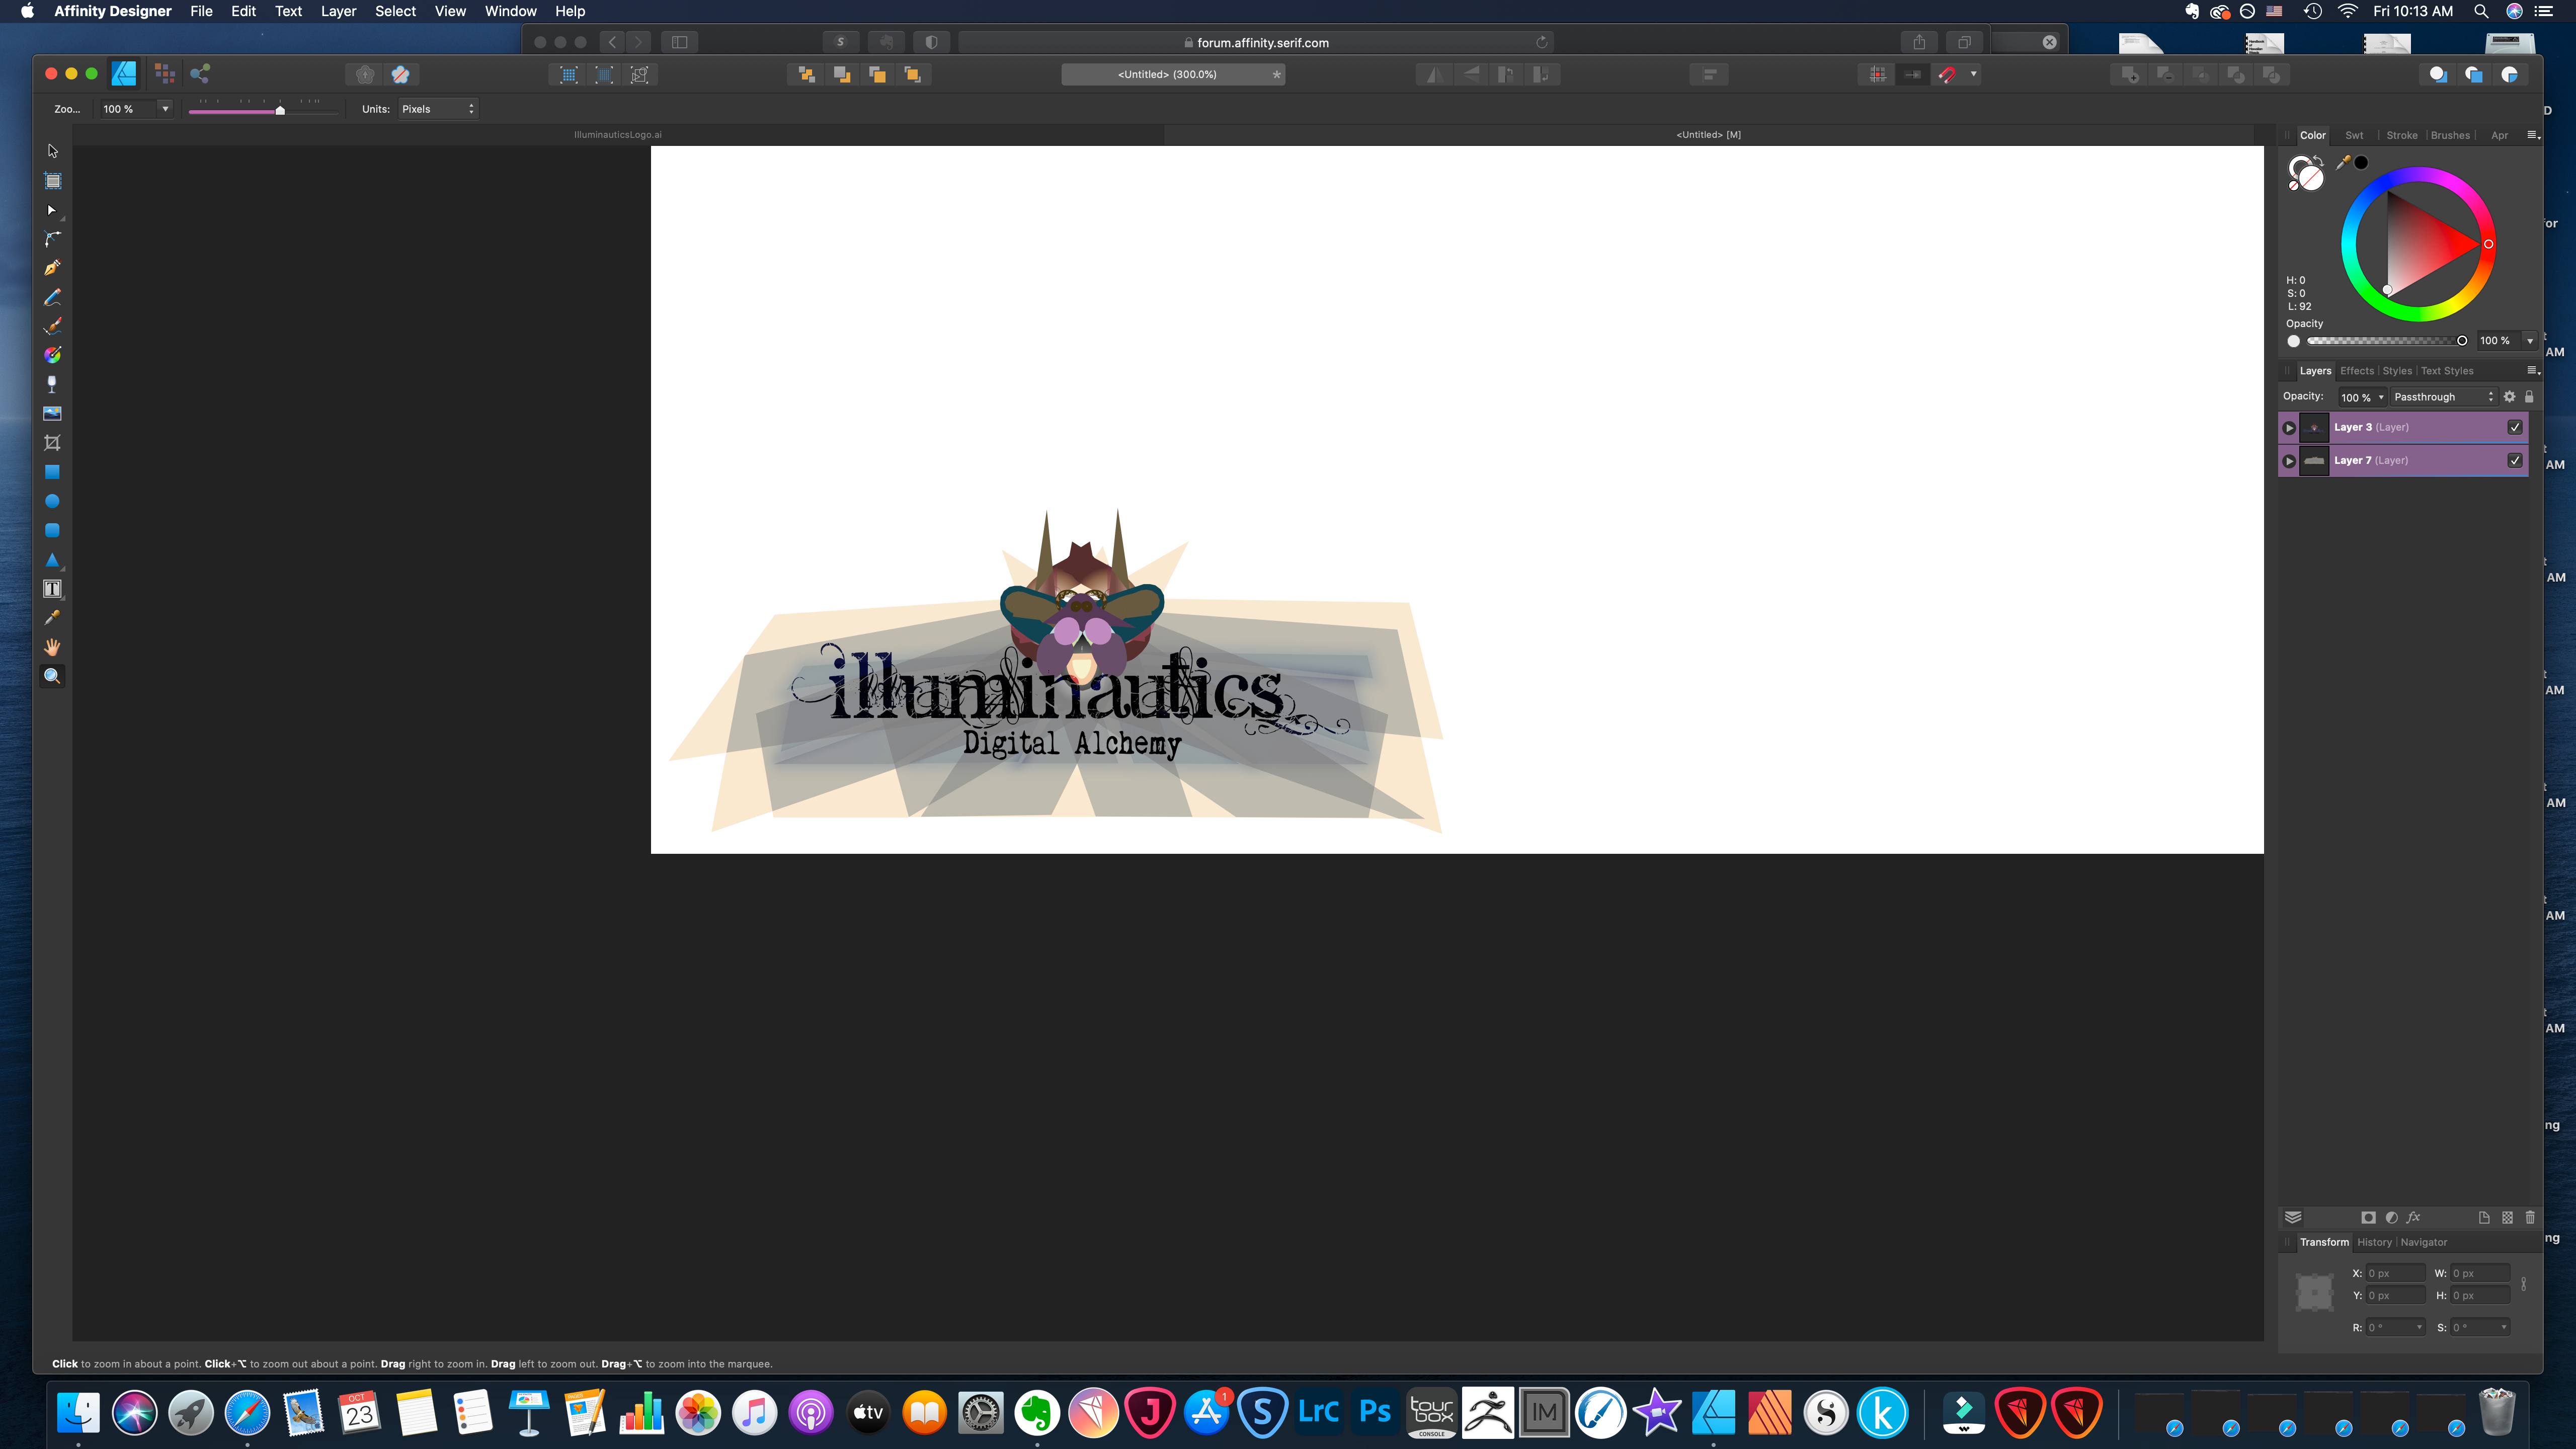
 I copied and pasted layers of vector art from an .ai file into my Designer document. When I resized the document to fit on my workspace, distortions in the design were introduced at particular points in the scaling process. Attached images: The first shows the original (correct) drawing. The second remains correct. The distortions occur around the "antennae" of the stylized insect in the 3rd and subsequent images, and appear as spike-like protrusions and odd scaling of the other elements of the drawing. I would hate to have to re-create this from scratch in Designer. How can I scale these vectors without creating distortions? Another question: I originally tried to work on my .ai file in Designer without copying and pasting the layers into a new document. When I tried to anchor the layers and resize the document, the artwork layers disappeared. The list of layers still showed them as existing, and supposedly visible, but neither the art nor its bounding boxes could be seen in the workspace, even when zoomed out. I have no clue why I am not able to resize the document without losing access to the layers.
-
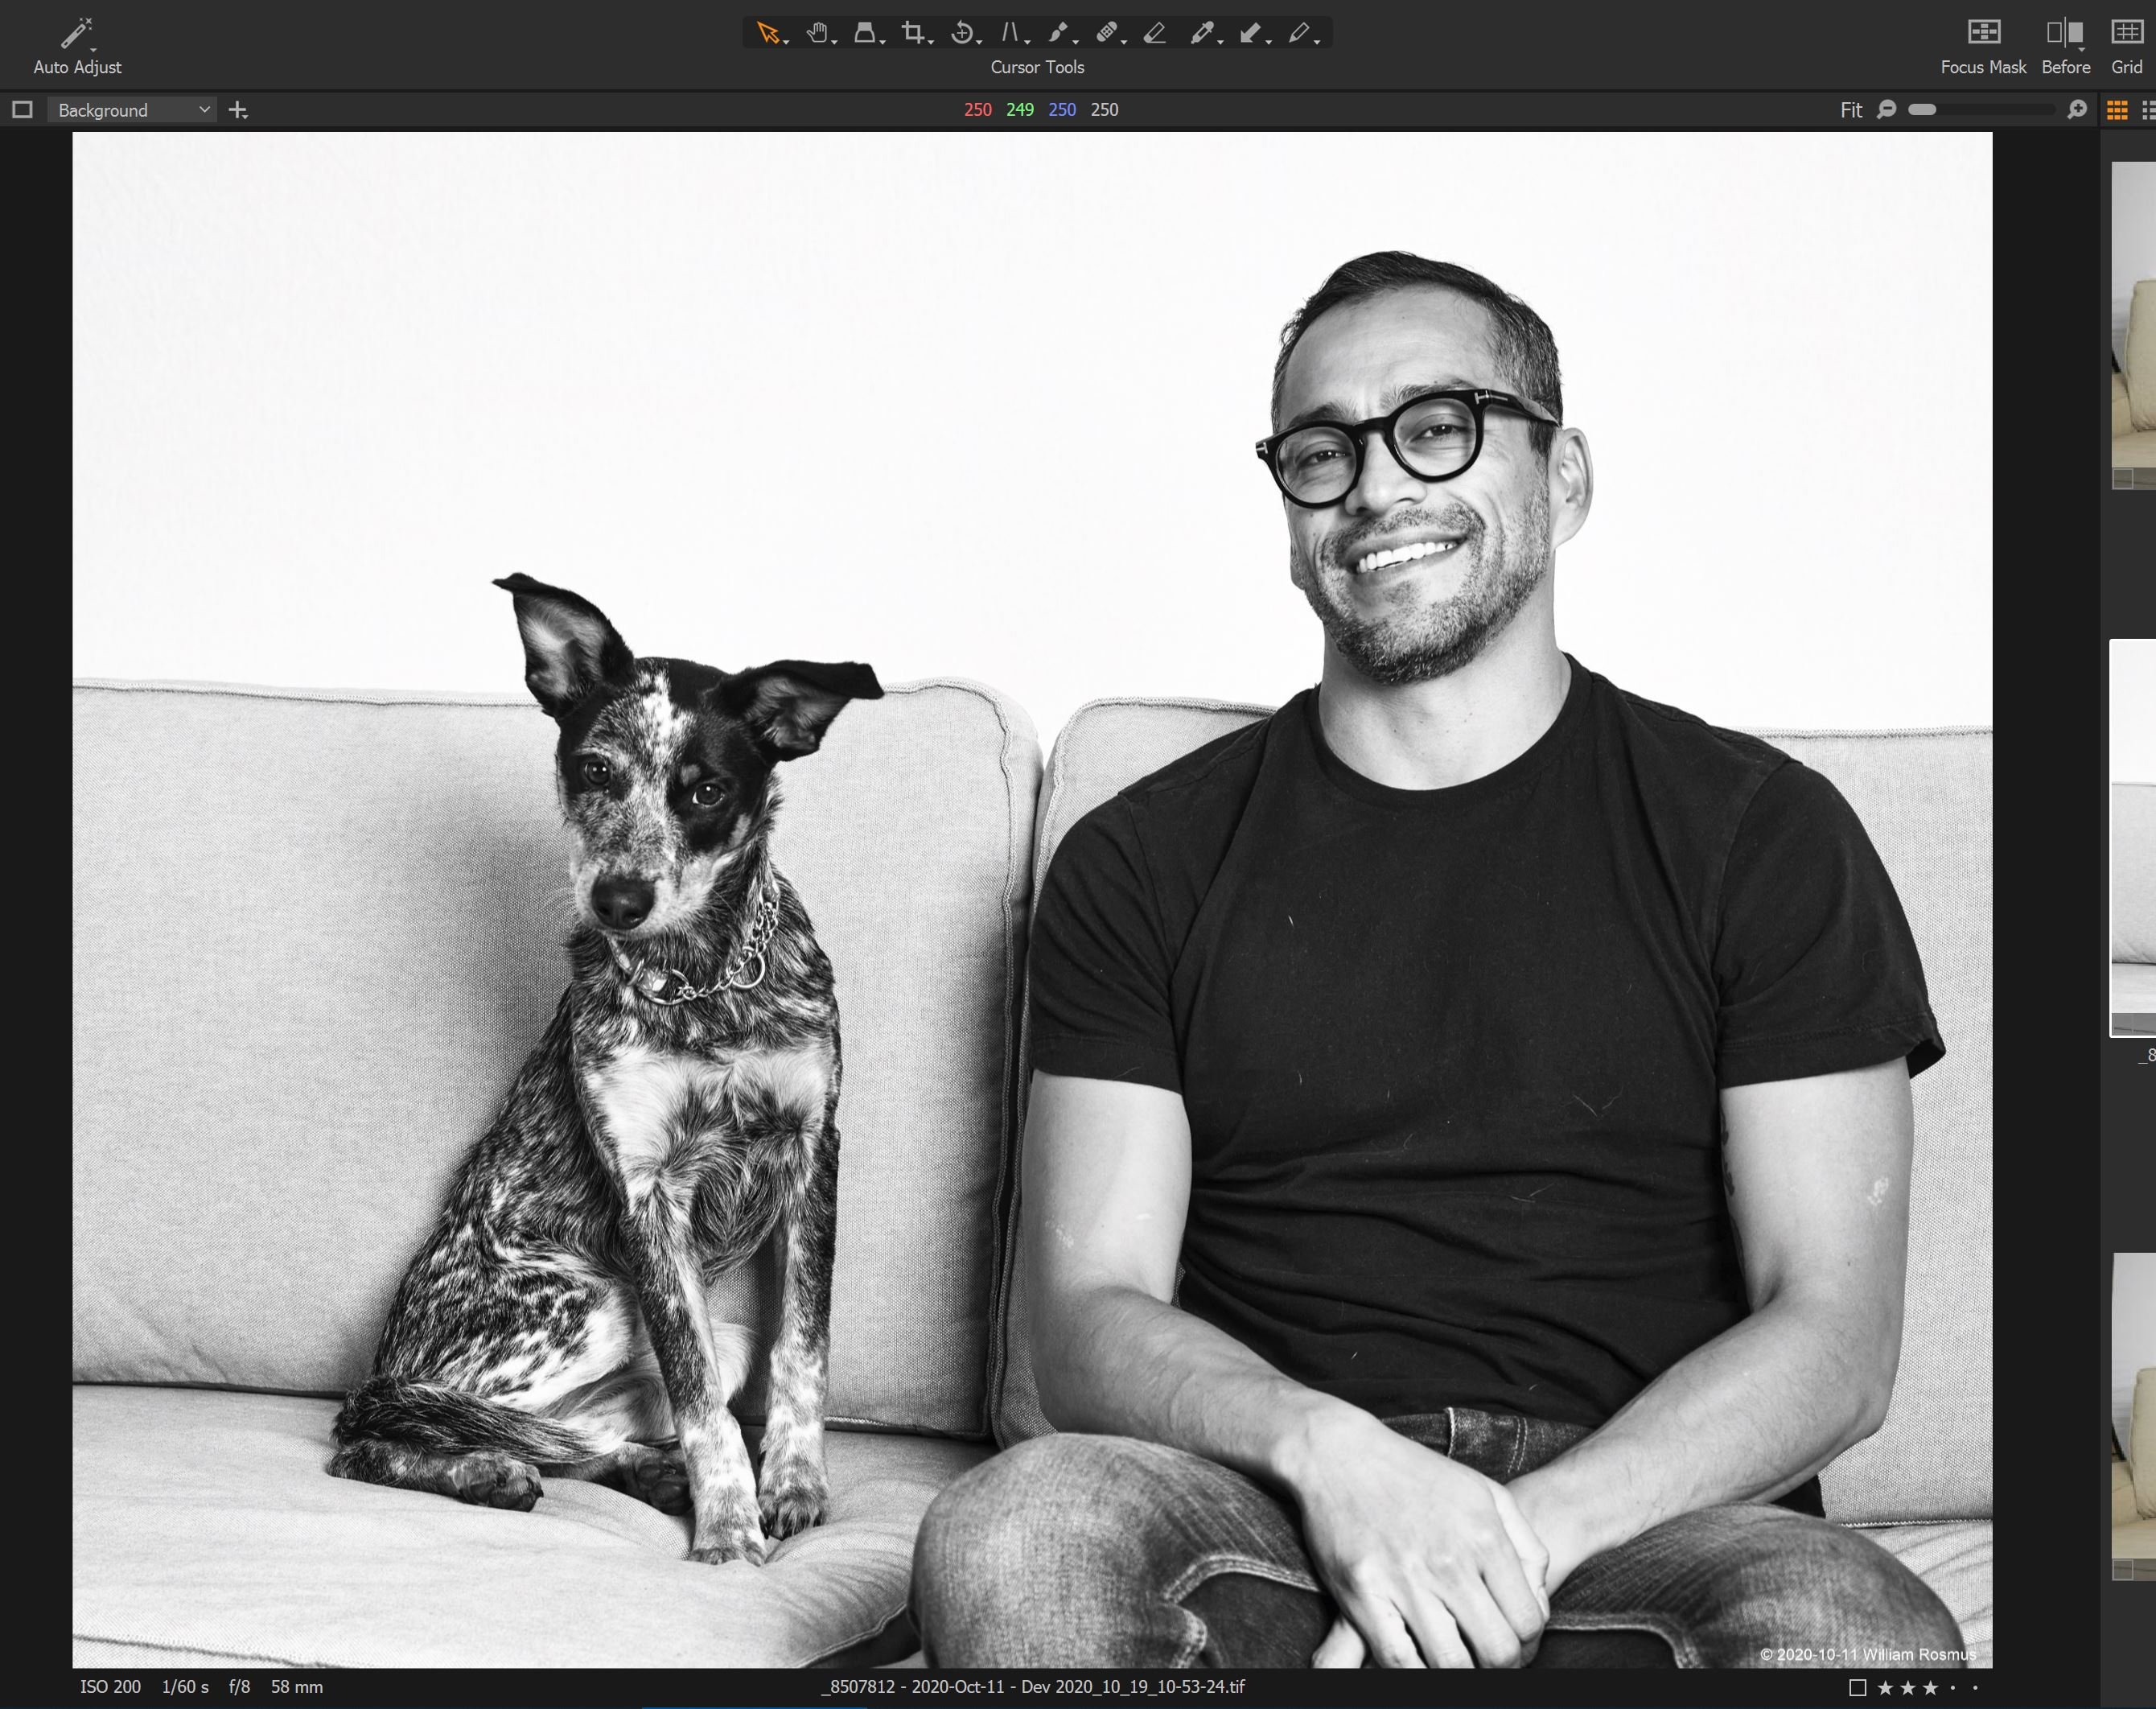
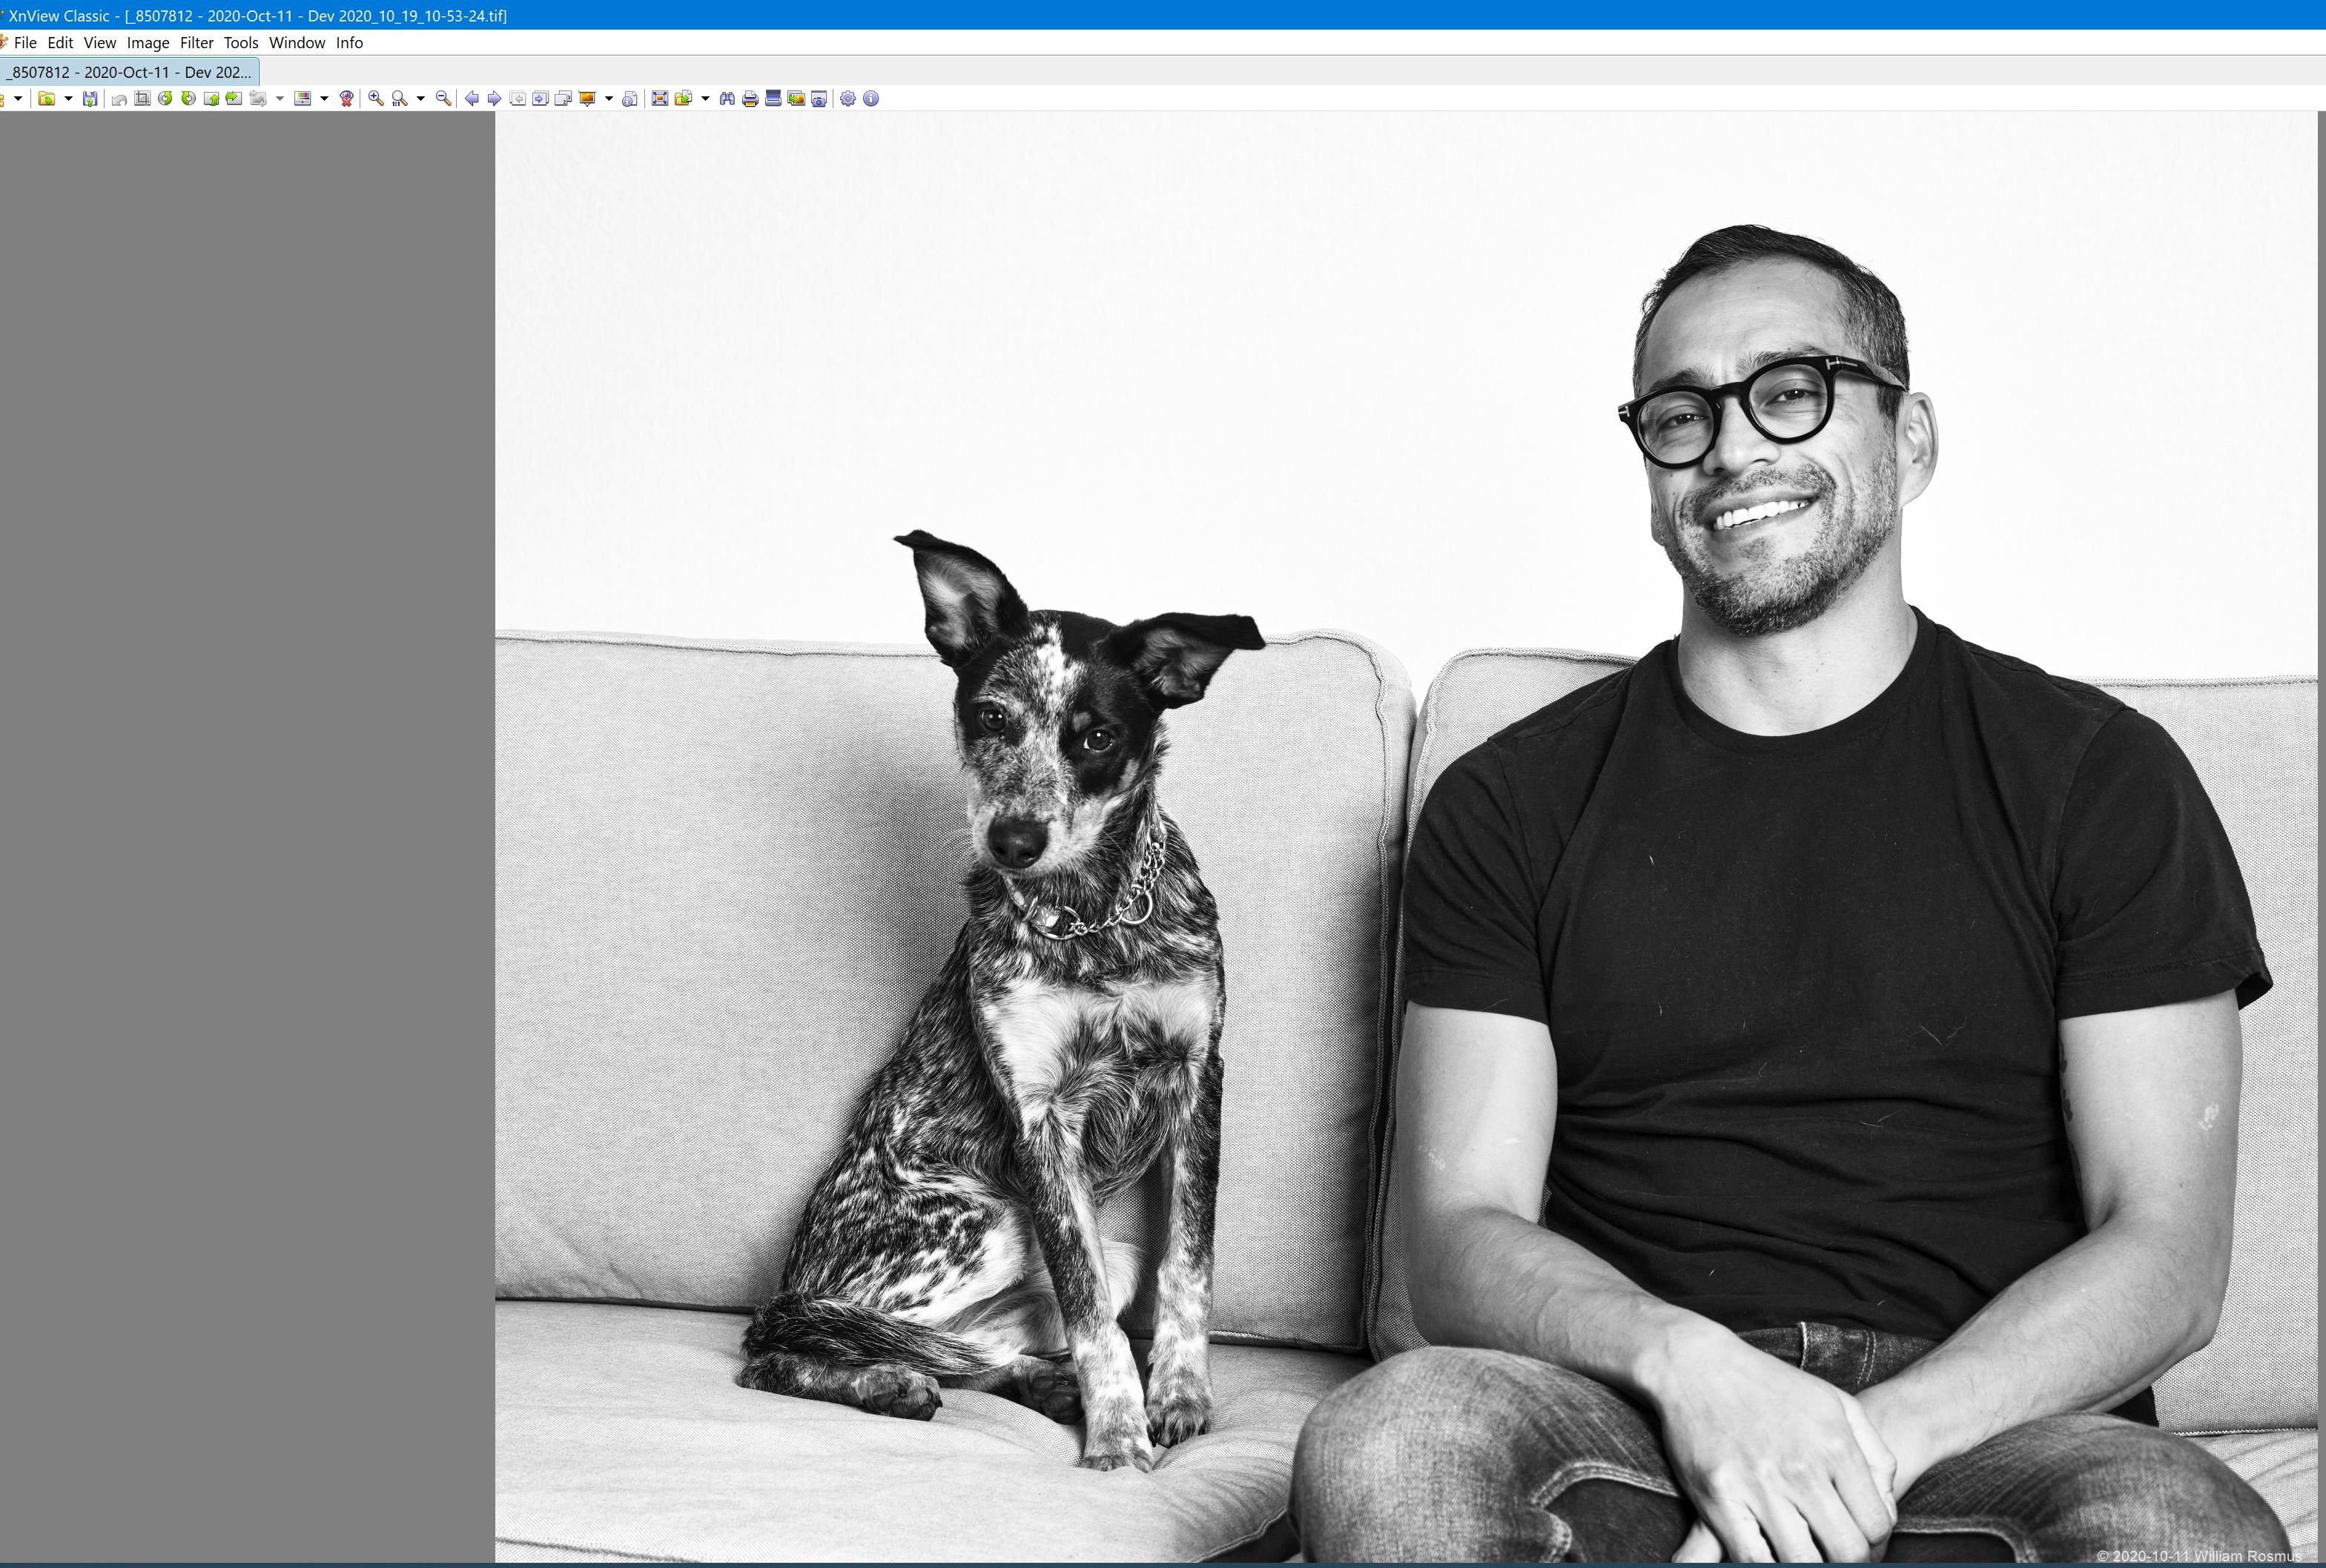
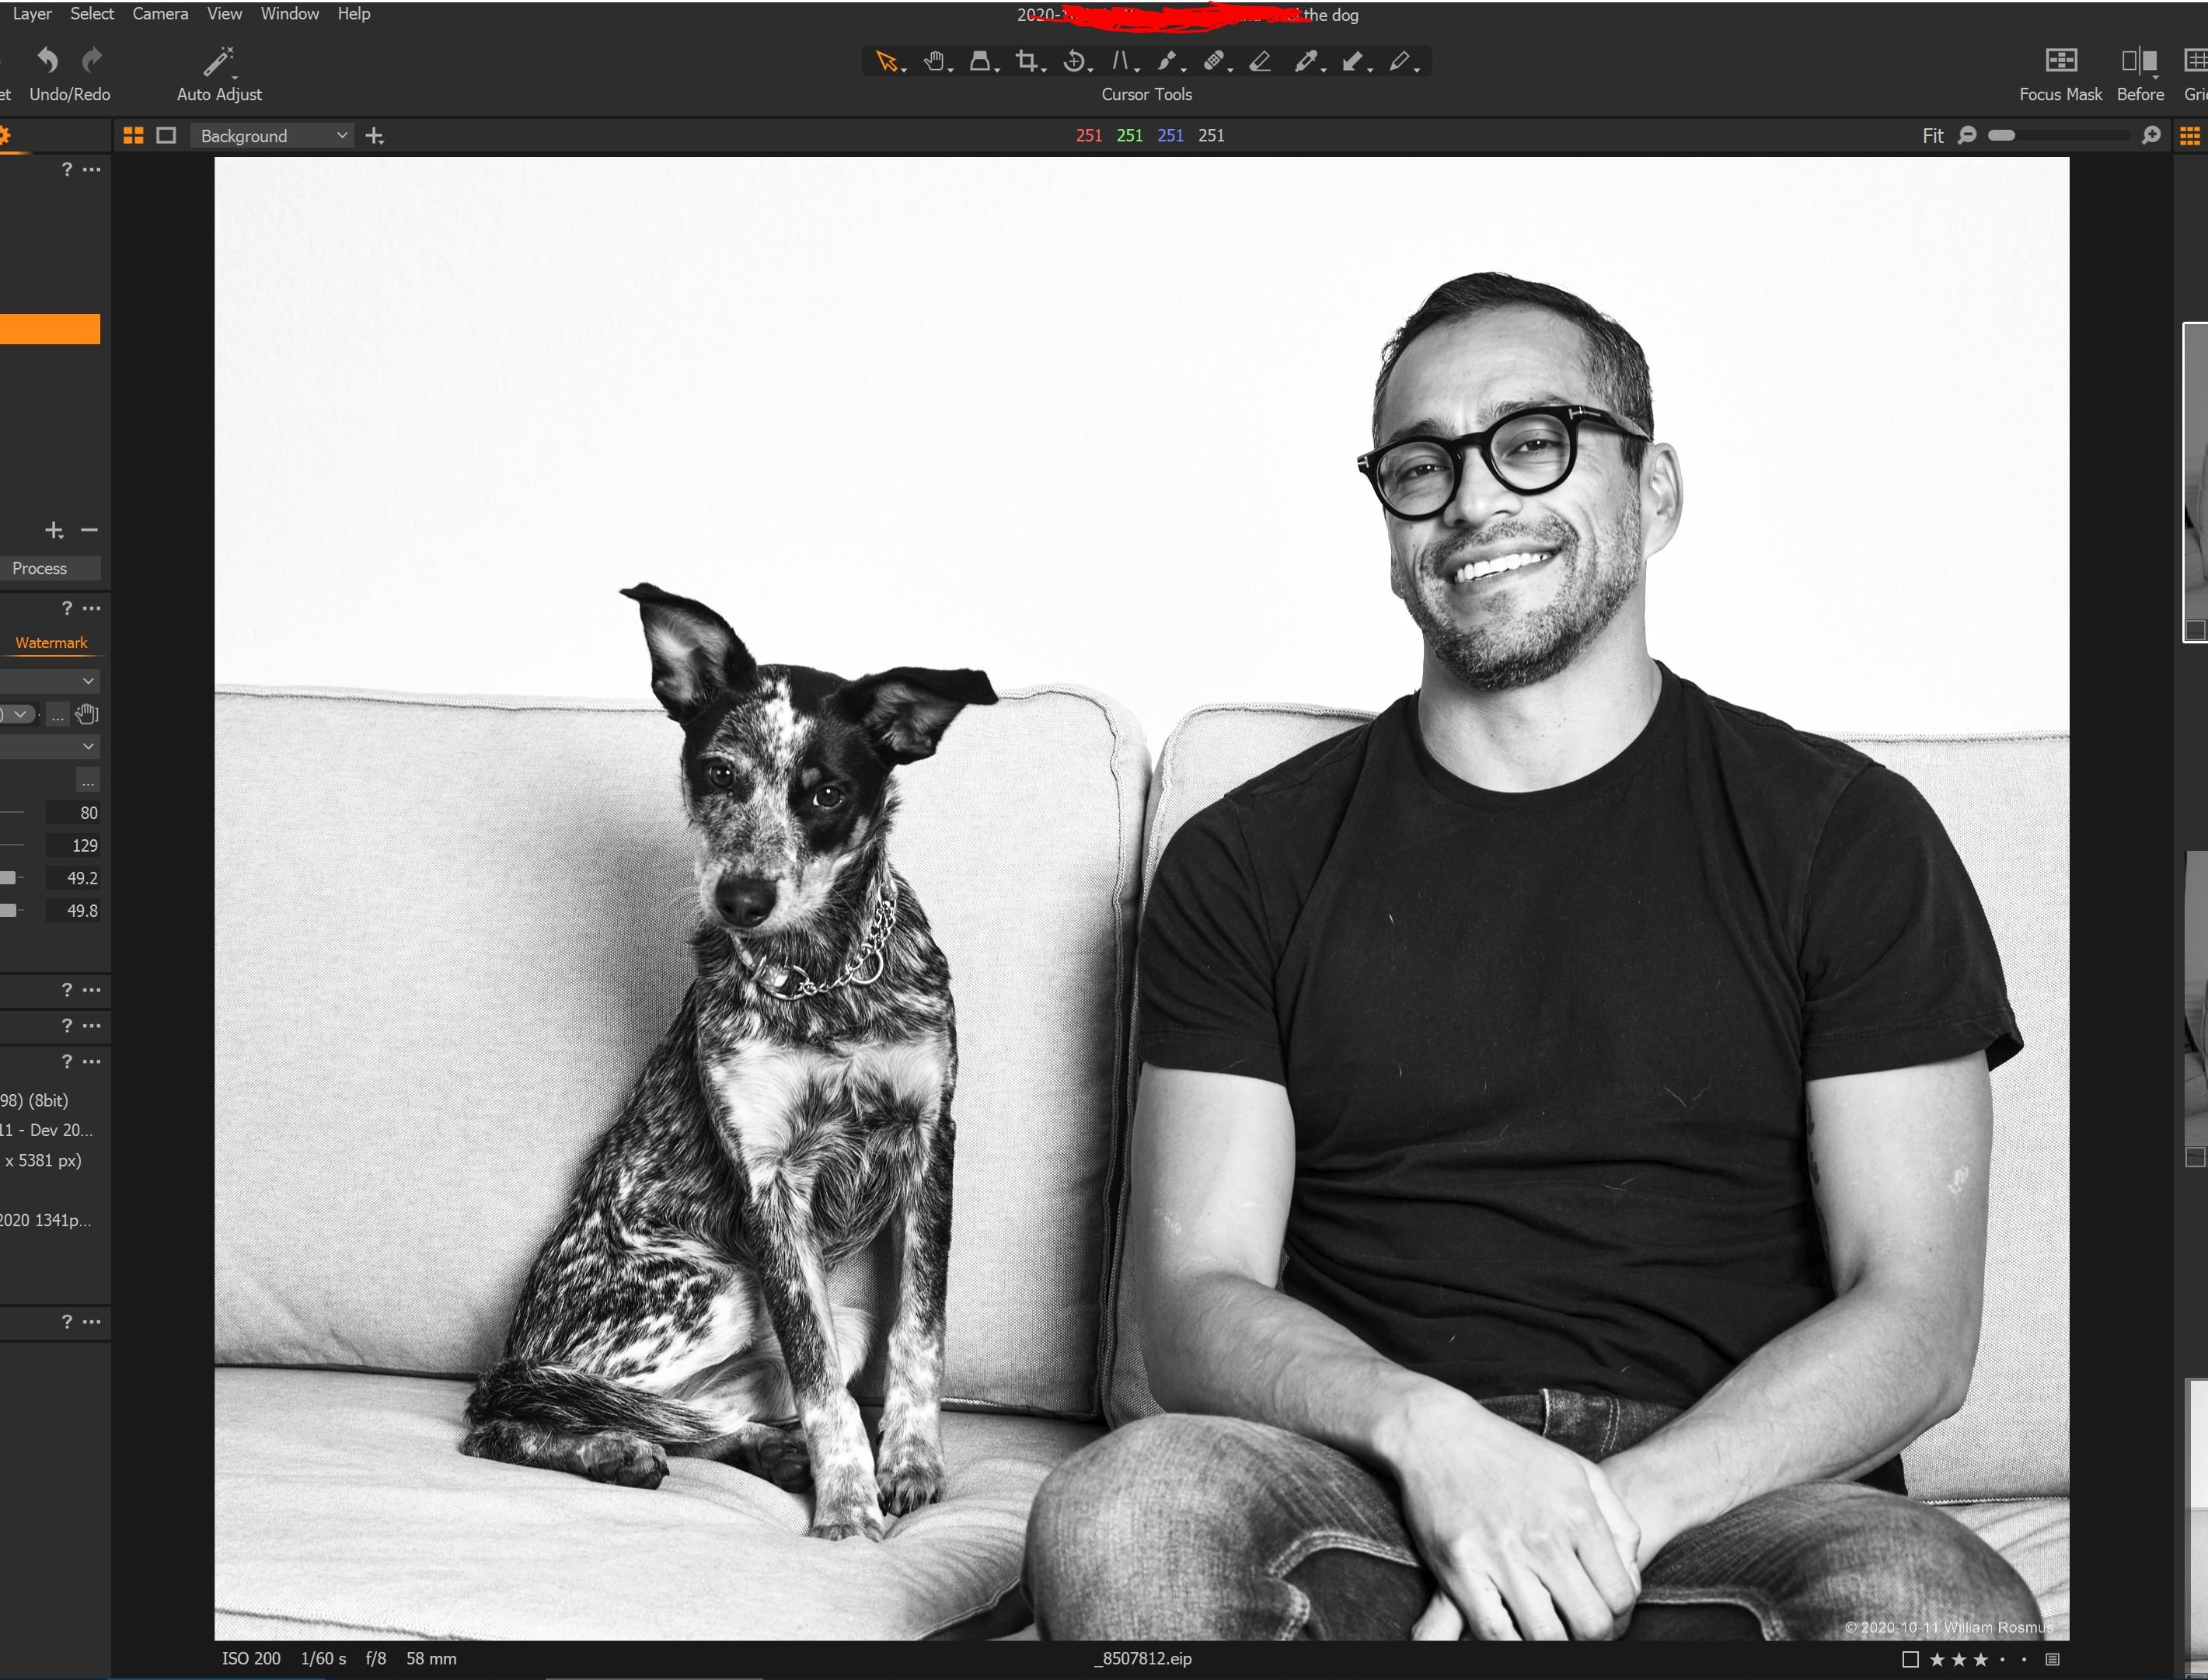
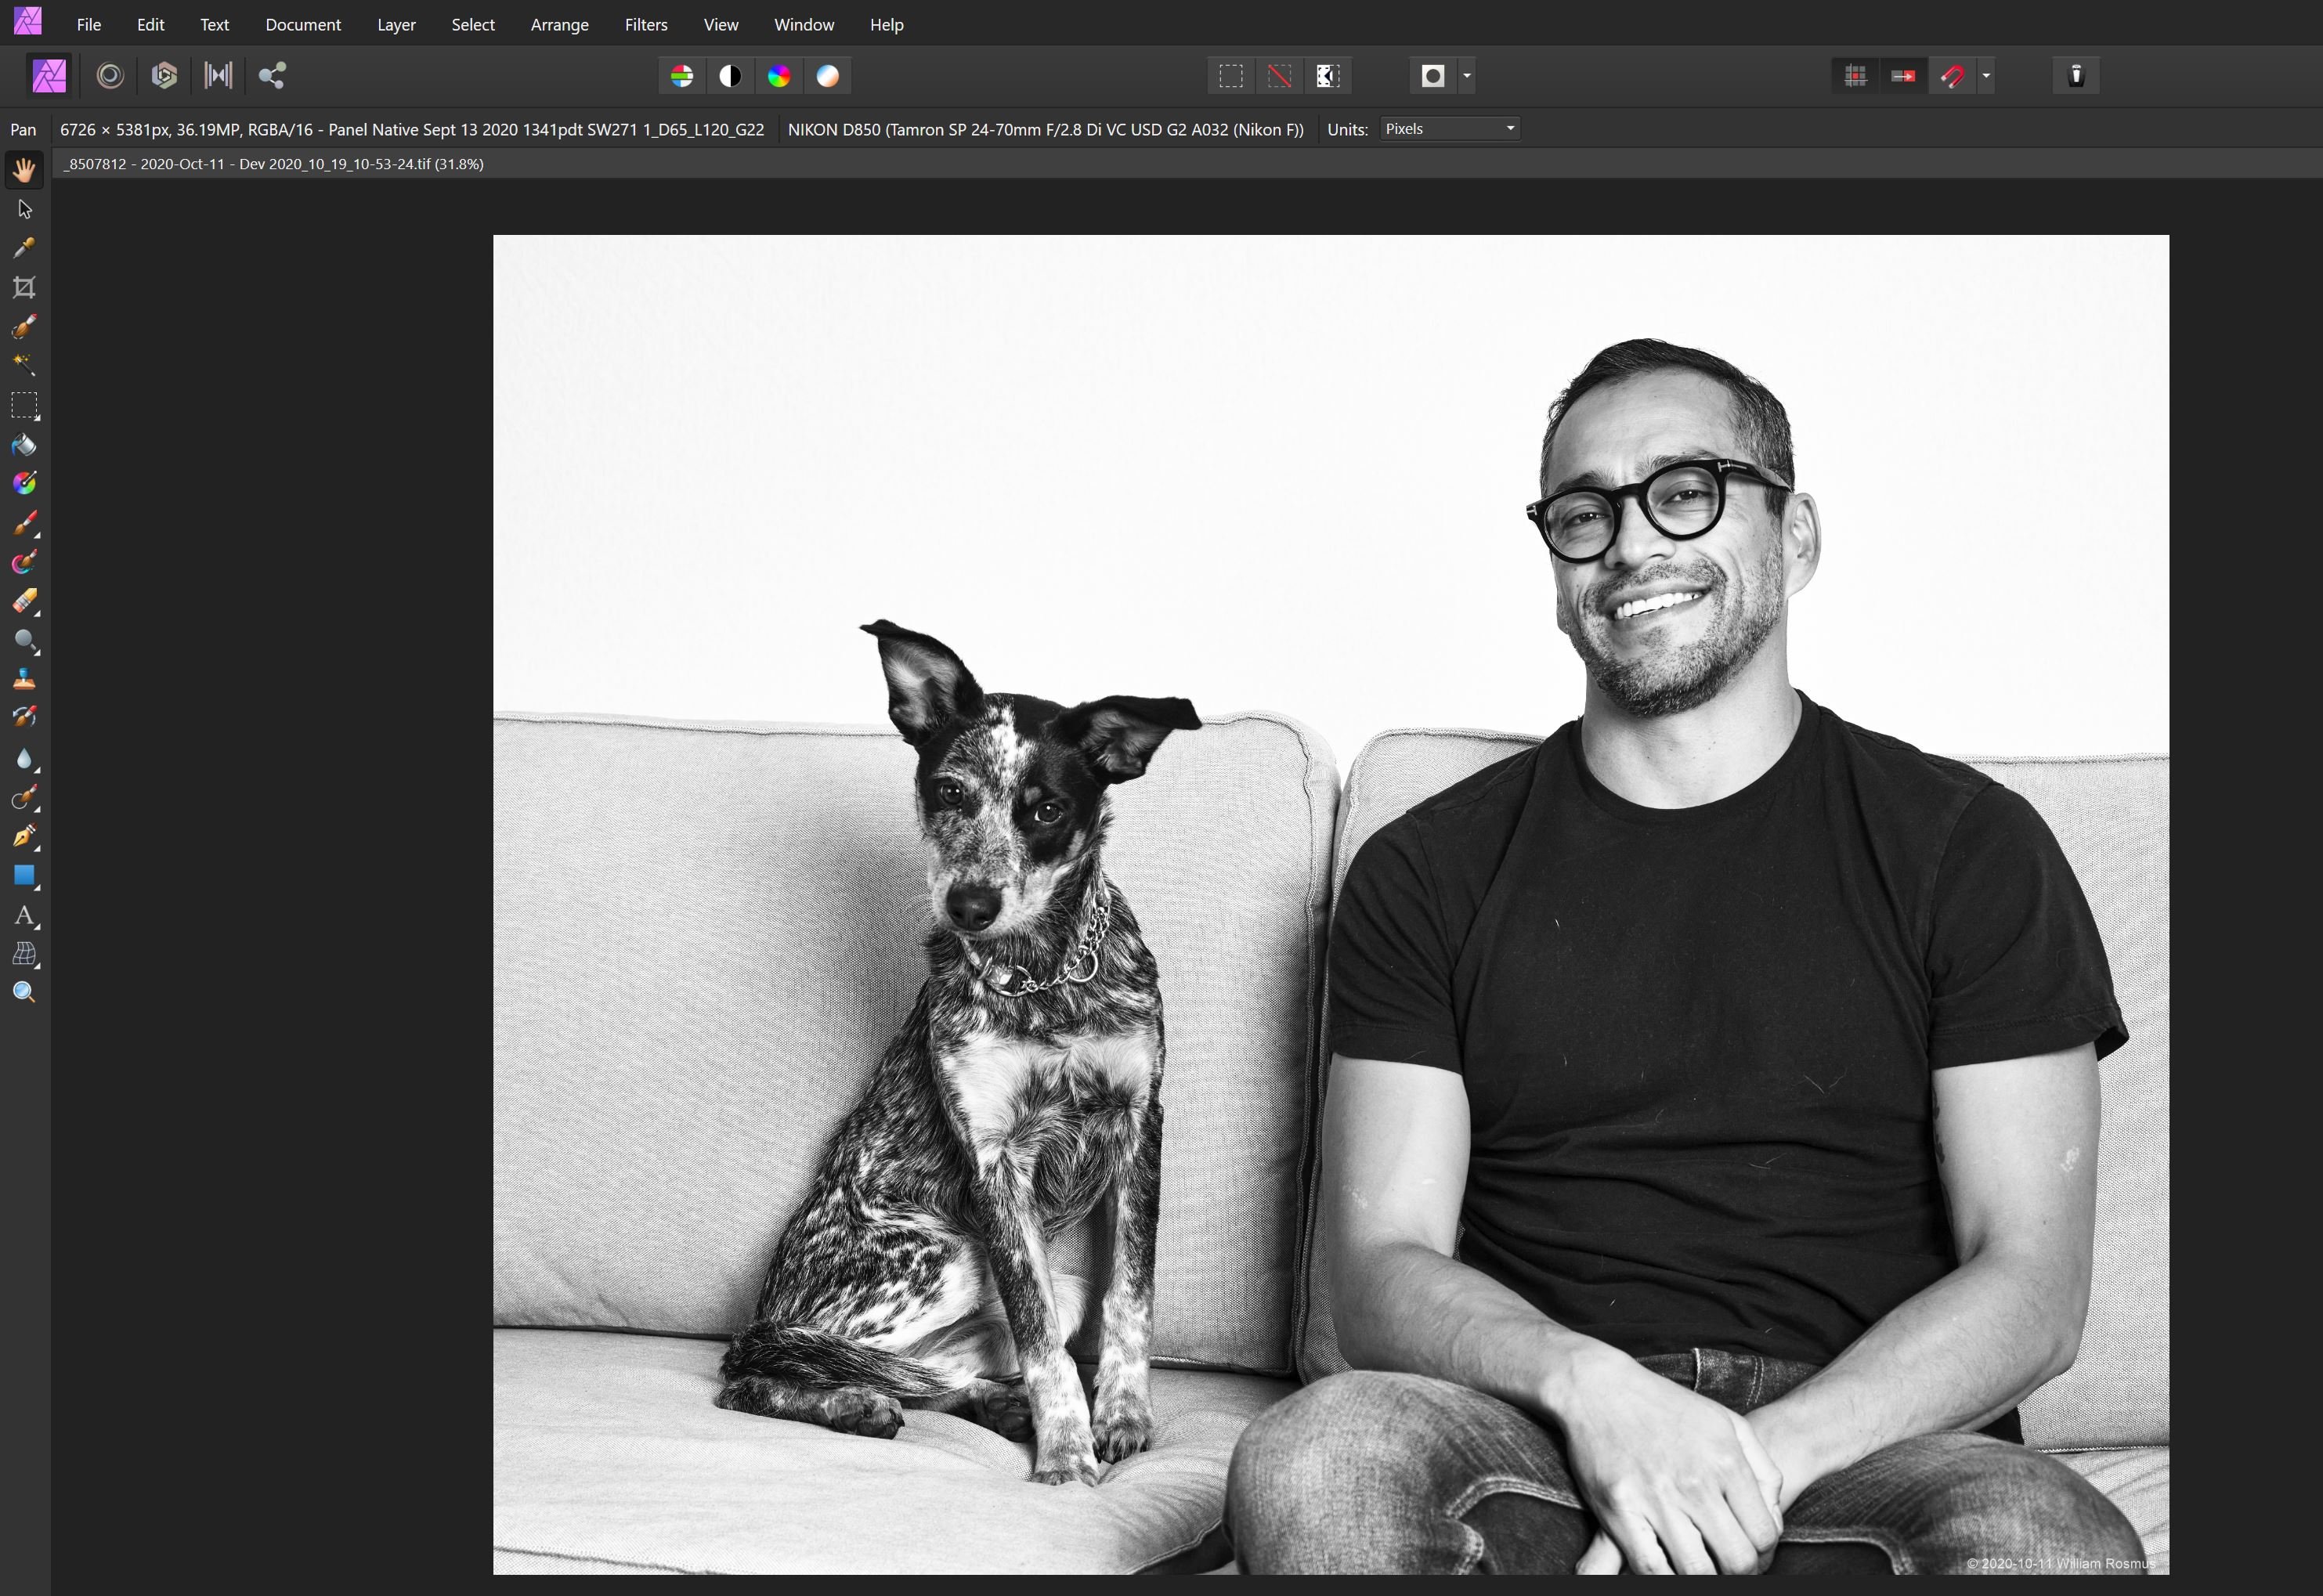
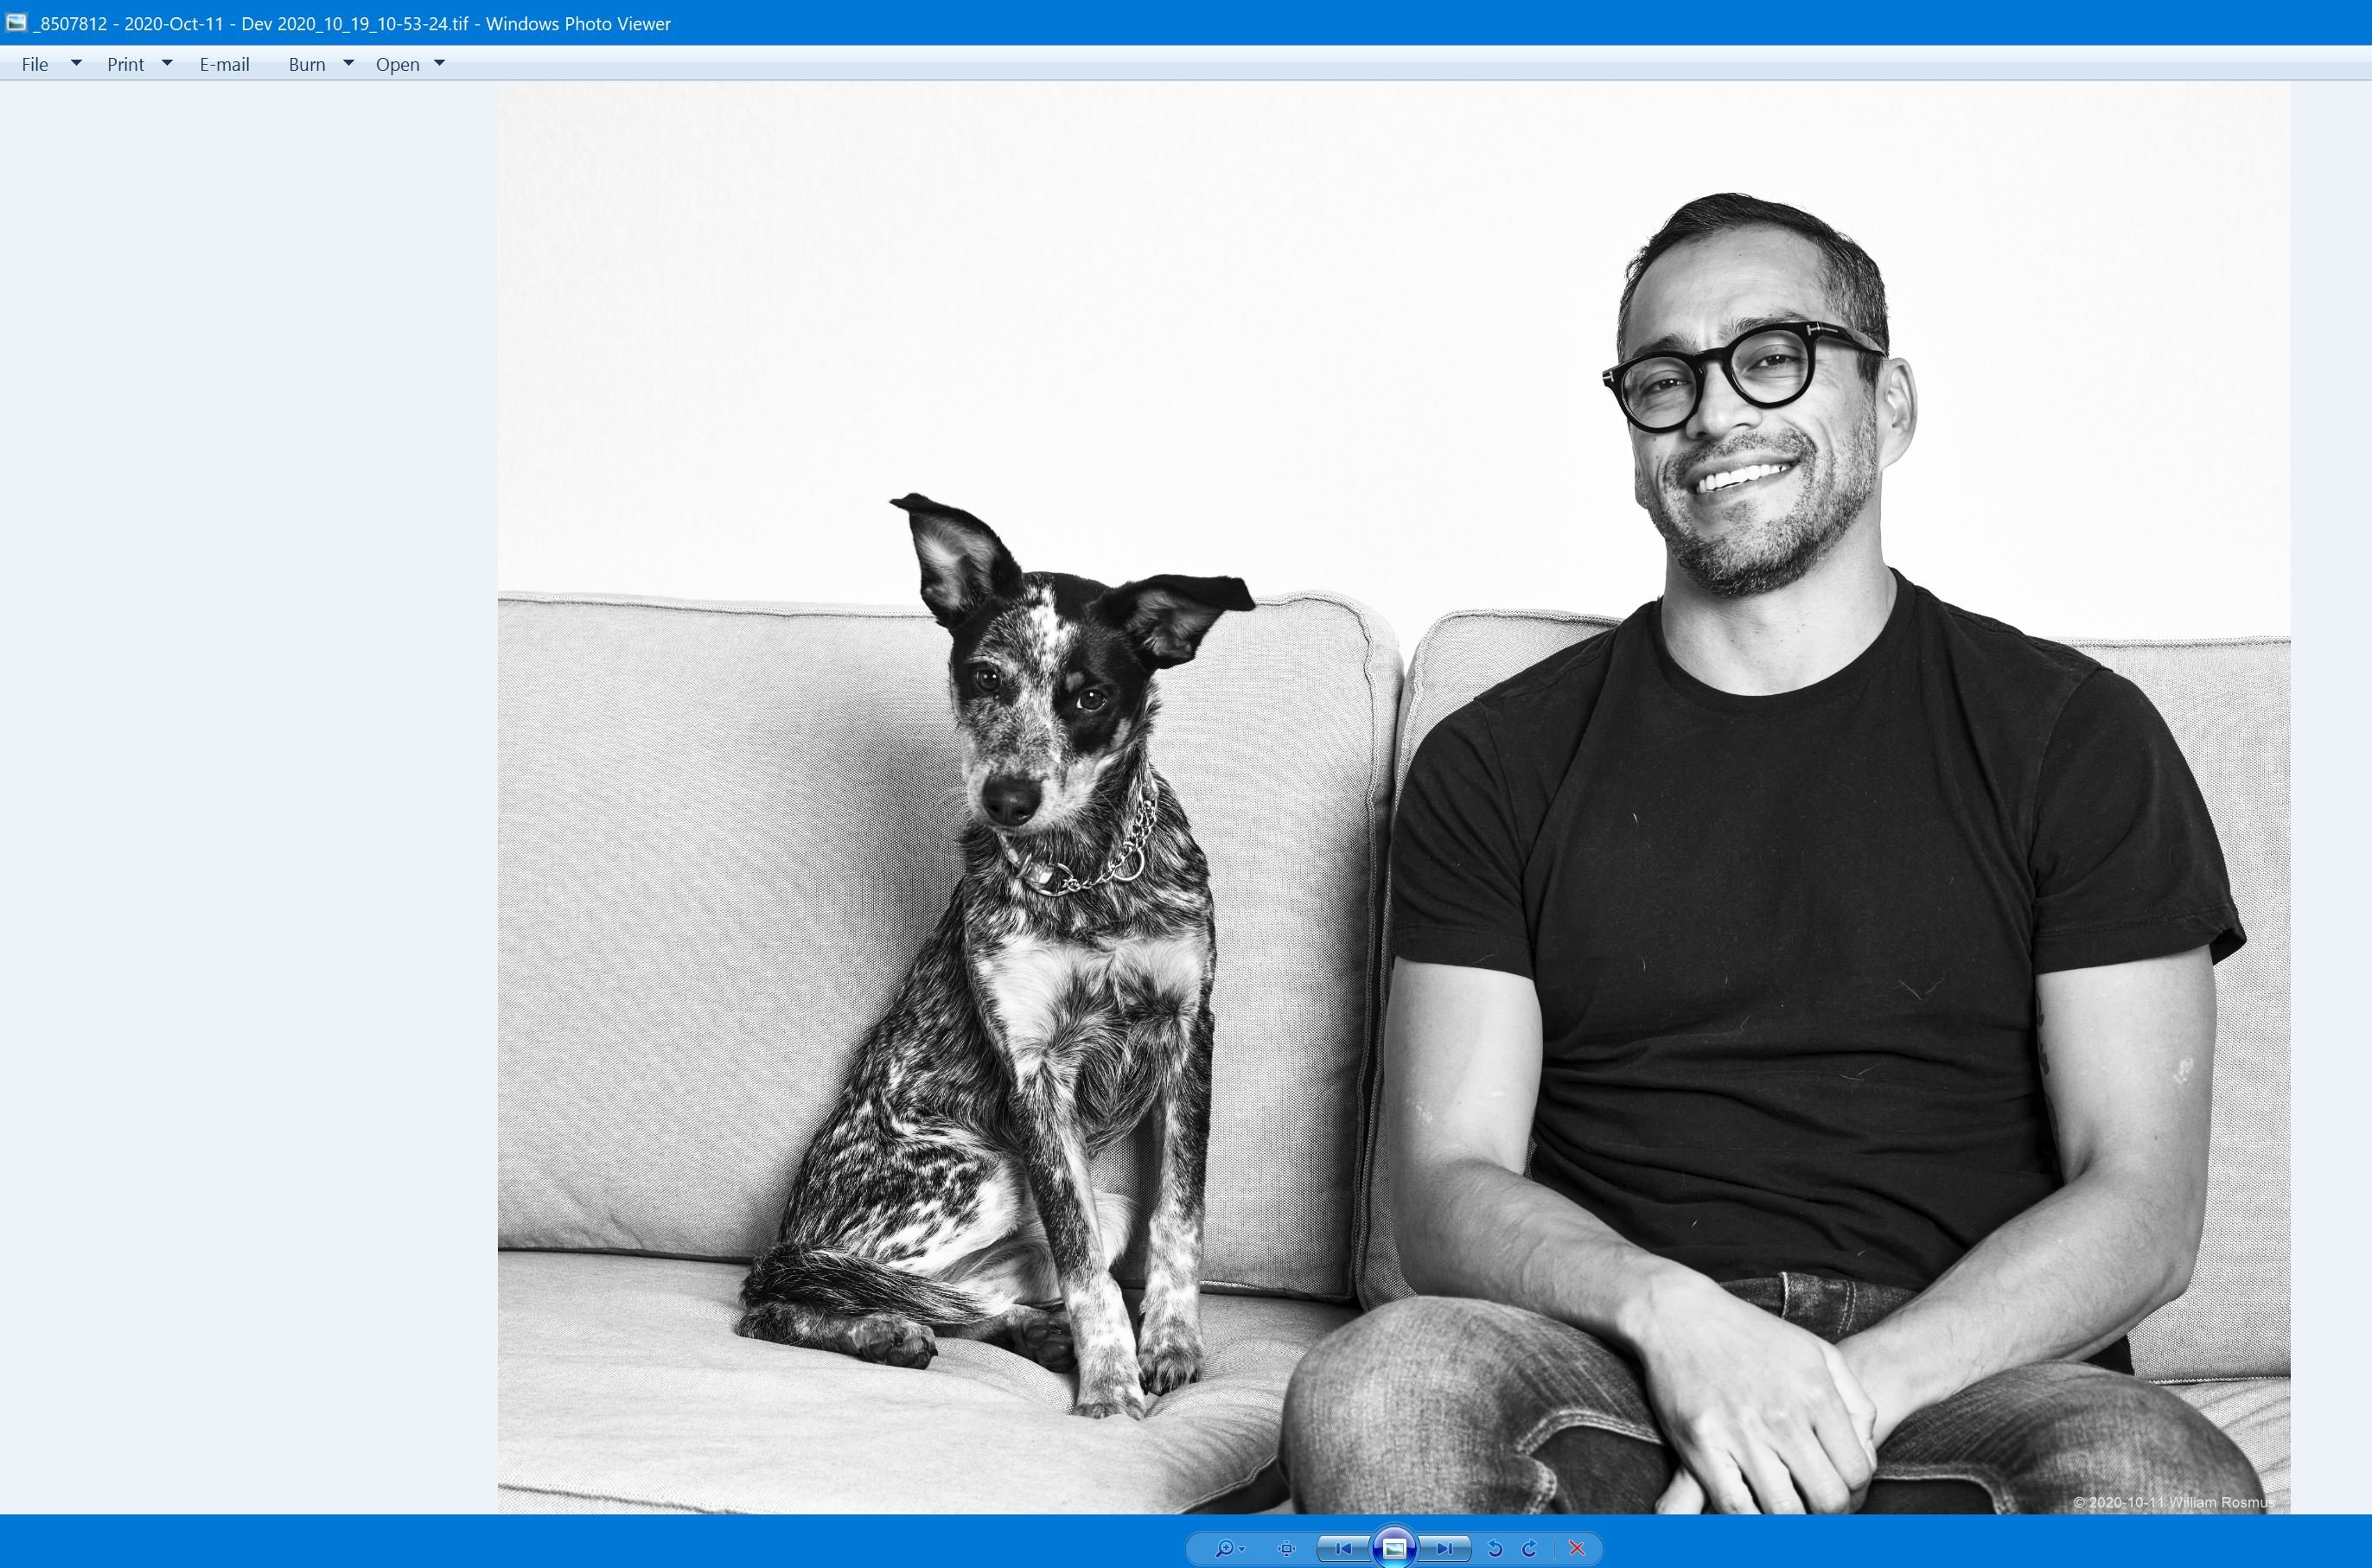
 Screenshot file names provide description to go with the description below. TIFF file exported from Capture One has a very strong moire pattern in the couch fabric that the subjects are sitting on. The moire is not apparent when editing in Capture One, but it is evident in the TIFF file opened by 2 of 3 downstream programs. See the steps below. 2 of 4 (including Affinity Photo) if you include opening the tiff file in CO20. I am not sure where the issue is since it doesn't appear in XnViewClassic, nor in Capture One if you open the TIFF file in C20. Details and screenshots included. I develop a RAW file in Capture One 20 When satisfied I process it, export to tiff There is NO moire pattern in the Capture One application I open the tiff file in Affinity Photo and there is a brutal moire pattern in the couch I open the tiff file in Windows Photo Viewer and there is a brutal moire pattern in the couch I open the tiff file in XnViewClassic and there is no moire pattern in the couch I open the tiff file in Capture One 20 and there is no moire pattern in the couch Affinity Photo 1.8.5.703 Capture One Details: Build: 13.1.3.13 (78b6a17) System Details: OS Name Microsoft Windows 10 Pro Version 10.0.19041 Build 19041 OS Manufacturer Microsoft Corporation System Type x64-based PC Processor AMD Ryzen 5 3600 6-Core Processor, 3600 Mhz, 6 Core(s), 12 Logical BIOS Version/Date American Megatrends Inc. 3.50, 2019-11-07 BaseBoard Product B450 TOMAHAWK MAX (MS-7C02) Platform Role Desktop Time Zone Pacific Daylight Time Installed Physical Memory (RAM) 32.0 GB Total Physical Memory 32.0 GB Available Physical Memory 22.4 GB Page File Space 4.75 GB [Display] Name NVIDIA GeForce GTX 1650 Adapter RAM (1,048,576) bytes Driver NV_DISPSI.INF_AMD64_47A7EA3F1B25EDD7 <<Monitor>> Benq SW271 _8507812_-_2020-Oct-11_-_Dev_2020_10_19_10-53-24.tif _8507812_-_2020-Oct-11_-_Dev_2020_10_19_10-53-24.tif
-

All Affinity Programms are Black - Nvidia Surround
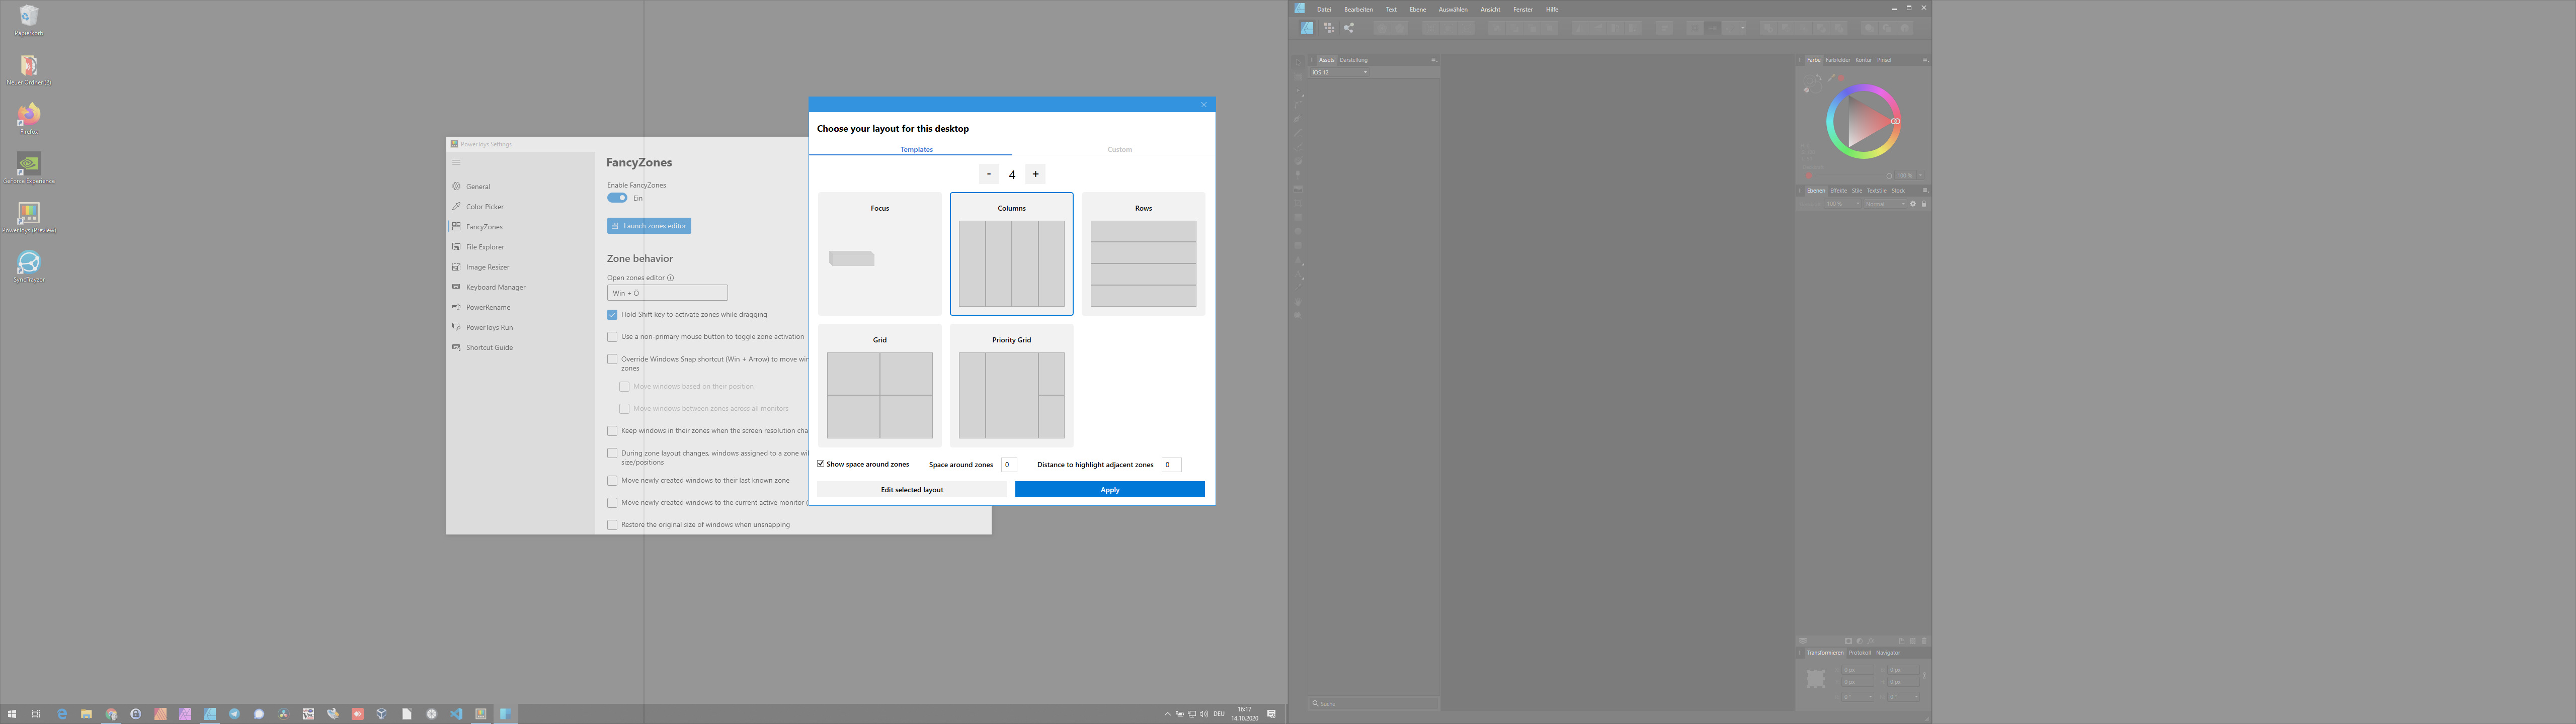
mondze posted a topic in V1 Bugs found on Windows
Affinity 1.8.5.703, Windows 10 64 bit, Intel I7 6700Q Nvidia Gforce 960M By using "Nvidia Surround" with 2 monitors Affinty goes black on right screen on the left side its working. Open in fullsize on left side | Works: Open in fullsize on right side | Don't work: If i use Microsoft PowerToy (Fanzy Zones) it works fine. Example 1 | 2 zones: Example 2 | 4 zones:
-
“Fill tool” is doing multiple fill actions by just scrolling/browsing the “Fill Type” carousel. It’s creating multiple history states by just scrolling the “Fill Type” option and sometimes causing a slow down and even a crash! I’ve attached a video demonstrating the bug, notice the “history studio”. Restarting the app didn’t help! Affinity Photo v1.8.6 iPadOS v14.0.1 (iPad Pro 11 inch 2nd gen) IMG_0903.MP4
-
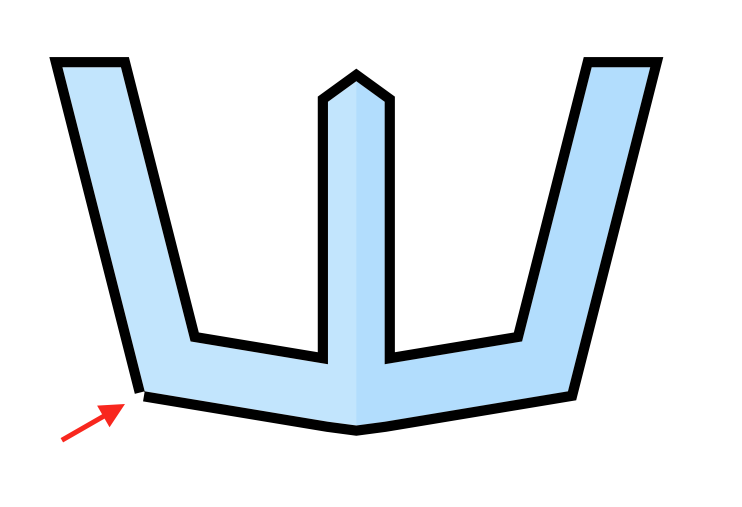
 When expanding the stroke of my drawing, one of the corners break. I've attached images. The first image is before the stroke is expanded, the second one is after. Why is this happening?
-
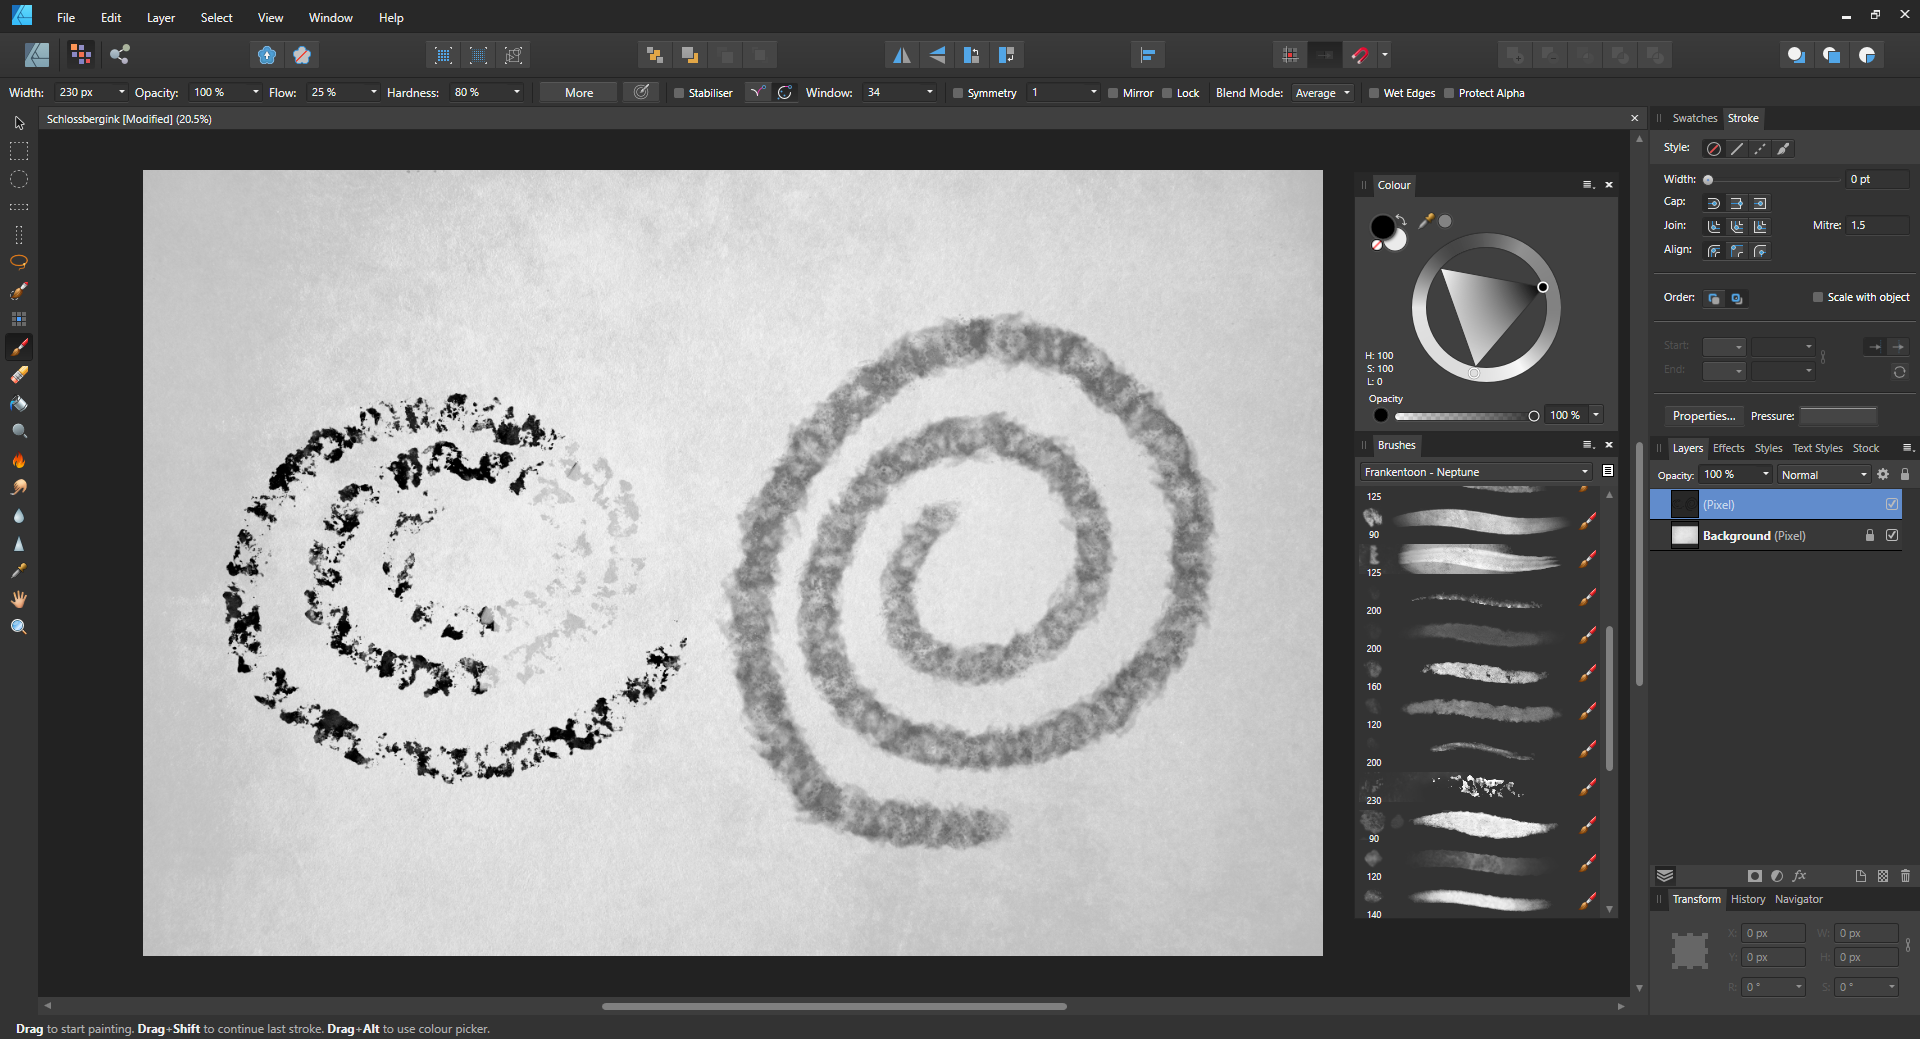
 Hello there, I was trying to enjoy using the Frankentoon Illustration brushes (on Windows Designer) but every time I switched back and forth between eraser and one of the more complex brushes I had to reselect and therefore reset brush size and changes I've made to the brush. After some testing I figured out the texture option is causing this problem because the textures won't get applied after switching back to the brush tool. However if I press "Invert" twice in the texture brush settings the brush works as intended again, but that just kills my workflow so is there any fix for this? I couldn't find anything about it after skimming the forum. Explanation of the pictures: 1.: stroke with brush; 2.: switch to eraser and erase a bit; 3.: switch back to brush and do another stroke After some more testing I found that this issue only occurs in brushes with more than one Texture applied, also non- Frankentoon brushes are affected too (tried with "Watercolours" defaults). I'm running the latest stable designer build on a AMD Ryzen 4700u, 16GB RAM Kind regards, RK
-
I am having issues with paragraph styles. I expected them to work like inDesign or Word -- to click on text and apply the style, or update the style. Click on another button to erase formatting. When I place my insertion point at the beginning of the first line of a paragraph in body style, and enter delete, I expect the line to move up and close the gap from the paragraph above. But no, it acts like I hit return, and body style changes to no style. Similarly when I delete a line of bullied or numbered points I am unable to close the gap by hitting delete. I have to convert to Body, then convert again to the list. When I copy bullet points from one section and add them to another paragraph, then change the bullet points to Body, the space between paragraphs is not maintained, and it's a real hassle to get the 6pt space to work that is part of Body style. When I copy text from a Quarkxpress 2018 generated PDF, the text has huge leading, and does not conform to the style I select in body, or bulleted list. It has taken 8 hours to format a doc that should have taken 1 hour.


_PDF.PNG.11a7ad09f5c39b2a6c93c35f90991e38.PNG)
_PDF.PNG.f5e65026ba40c9f63f22b5a726aac5c1.PNG)
.PNG.8bda6e8b54a7e68f456349a6c123e504.PNG)
_PDF.PNG.1fcf98d21546d0af1d7be8a1a96e8c5a.PNG)
.PNG.59d2c1af546409f0929dcc144c662b84.PNG)