Search the Community
Showing results for tags 'brush'.
-
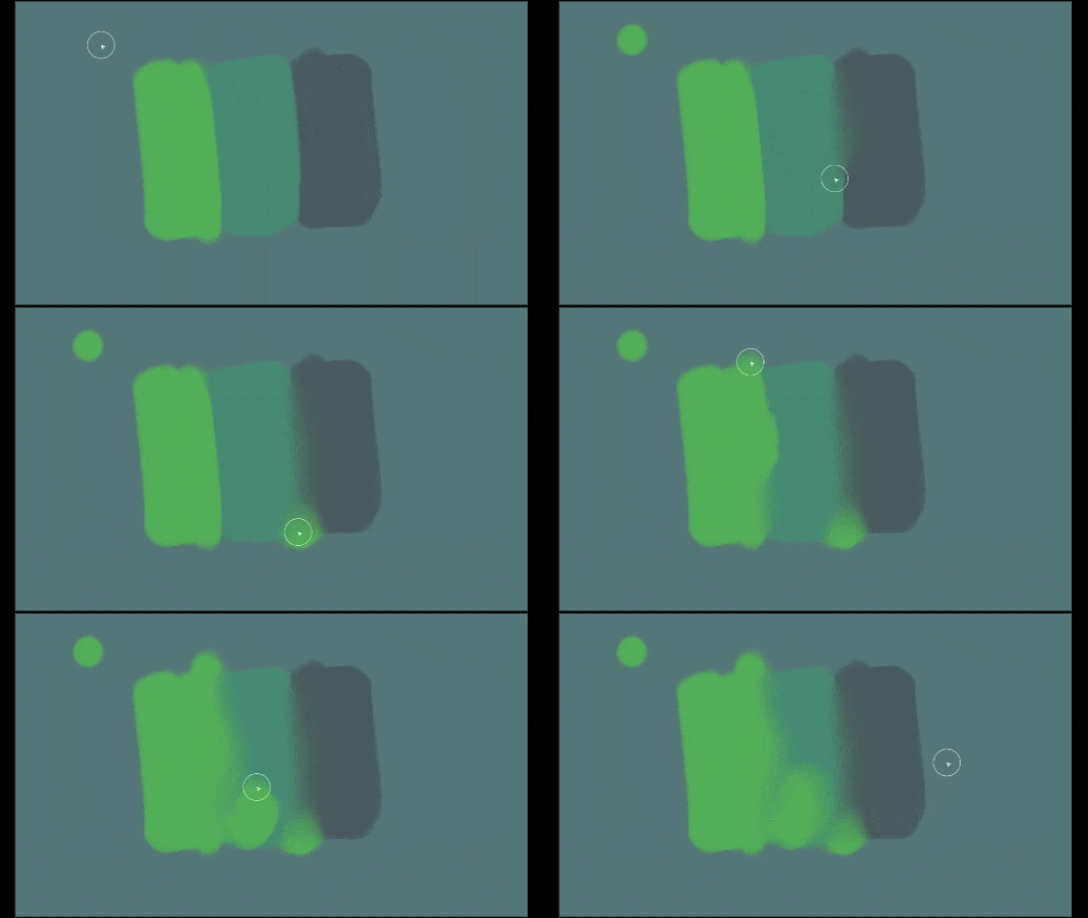
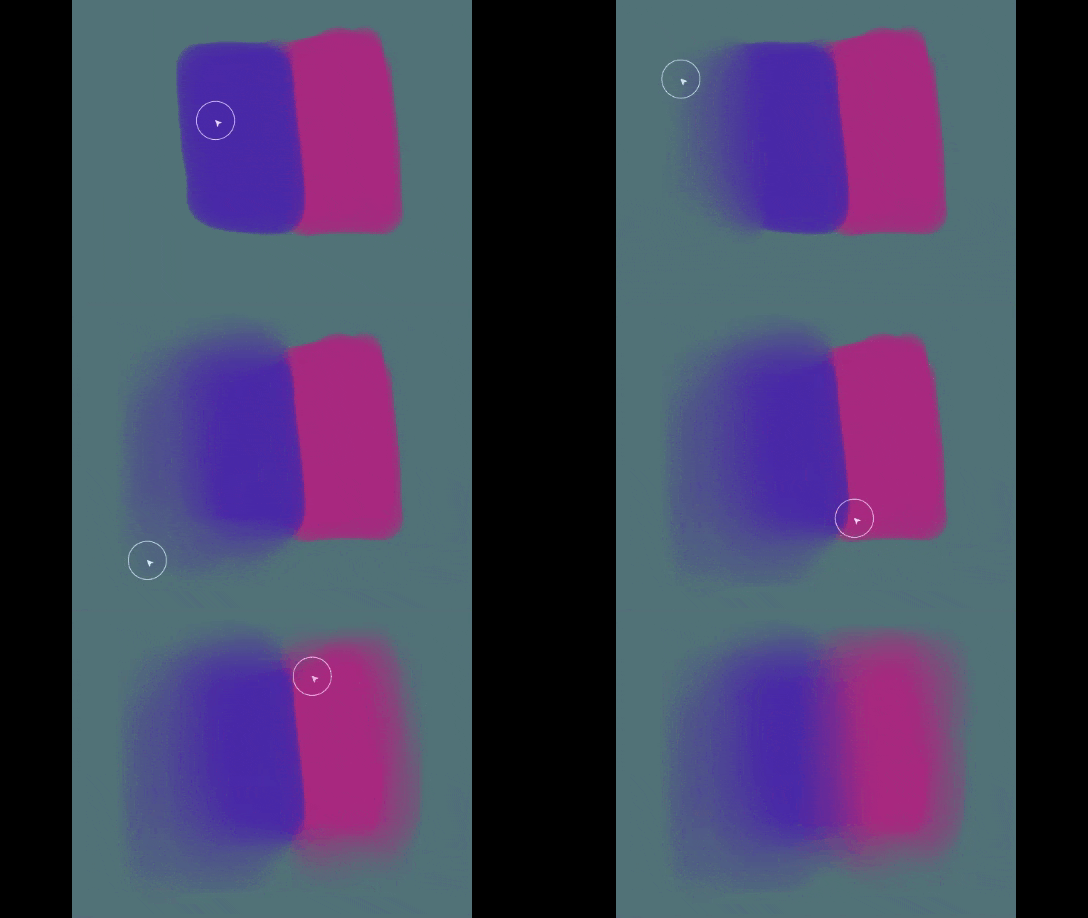
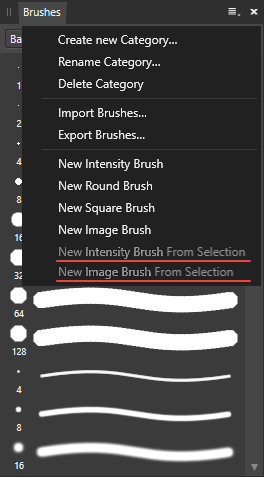
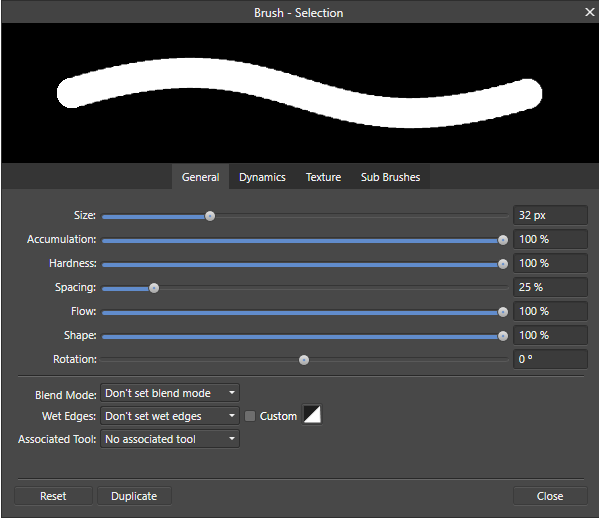
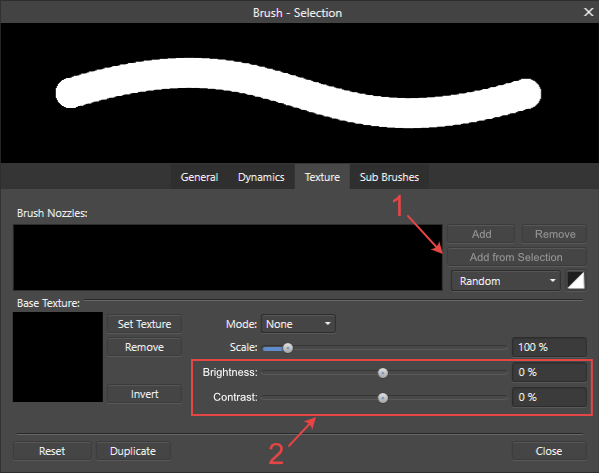
Hi Affinity team. This post is a cry from the heart. I have been using your programs for a long time and I really like them. They are great for designers and photographers, but not for artists. Below I will share my vision of how Affinity Photo can be improved for digital painting. <<I immediately apologize for the quality of the text, I used google translator for translation >> Brush Tool Update Creating brushes from selection Instead of one New Brush from Selection item, it's much more convenient to add two items for each type of brush. No need to worry about using a layer and mask to create a new brush from a selection like in Affinity Photo 1.9. Updating brush settings The brush settings in Affinity Photo are sorely lacking in some features, and also brought in some cosmitic tweaks. I changed the view of the slider for the rotation parameter. It shows the rotation of the brush in degrees. In addition, the pivot point on the slider is in the middle. Important changes are needed in the Texture tab: 1. Add the "Add from Selection" item to add new Brush Nozzles from the selection. This will undoubtedly make it easier to create and customize brushes. 2. Add Brighthess and Contrast settings for the texture. For these parameters, a slider with a zero position in the middle and a range of values from -100% to 100% will also be used. This way you can adjust the strength of the texture on the brush without using Wet edges. Context toolbar Instead of using force pressure for brushes without dynamic settings, it's better to add a pen sensitivity on / off mode. I very often need to draw a line with a pen without dynamics (like when drawing with a mouse), but this is impossible in Affinity Photo. So I have to choose a different brush or turn off the sensitivity in the brush settings. This is very annoying and time consuming. Paint Mixer Brush Update The Paint Mixer Brush needs to be heavily transformed. Now it is only suitable for processing the finished image and is extremely poorly suited for drawing. Therefore, I want to suggest the following changes: 1. Add a pen sensitivity on / off button instead of forced dynamics. 2. Add mode "paint at max pressure". If this mode is enabled, then at maximum pressure with the pen, the brush will paint with the selected color, and with light pressure, the brush will mix colors. This brush behavior is typical of the mixing brushes in Paint tool SAI. If this option is disabled, the brush will have a paint limit as it does now. 3. Add mode "Take Under Layers Color". When this option is enabled, the tool will take into account the layers below, and will mix colors with their color. This will increase the non-destructive editing capabilities of Affinity Photo. 4. Add mode "Blend transparency". Now, if you draw on an empty layer without filling, then the accumulation of color is taking place on the transparent layer, and with the Blend transparency option on, the color will sort of dilute and become translucent. In this case, the options Take Under Layers Color and Blend transparency are mutually exclusive if either of them is activated, the other will be unavailable. All of these changes should significantly improve drawing in Affinity Photo.
- 3 replies
-
- digital painting
- brushes
-
(and 1 more)
Tagged with:
-
yg.mp4
-
Hello all, I've created a batch of brushes in Photoshop that have textures applied to them in the Brush Settings panel. I made the textures by hand, scanned them, then made them into pattern textures in Photoshop. I exported these brushes as an ABR file and tried to import them into Affinity Photo, but the textures haven't translated across. I've attached one of the brushes for your reference. I don't really want to have to create these texture brushes from scratch in Affinity, so does anyone know if importing texture brushes is supported by Affinity? If so, how do I do this? Any thoughts would be much appreciated! Thanks very much Tom's Texture Brush(1).abr
- 10 replies
-
One really annoying bug (feature??) in Affinity Designer on ipad is the constant return of the brush size indicator in the middle of the screen. Every time I pan or zoom or rotate the canvas while using the brush tools it is shown, which is just very distracting and annoying. The only time this needs to be visible is whan I change the brush size, otherwise there is no logical reason for it being there.
-
Hi there, Photo opens up with the last brush used as the current brush. Unfortunately, that brush isn't visible in the Brushes menu tab as it's buried in whichever brush group it came from. There's no way that I can see to "highlight current brush in Brushes menu." Instead, I have to try to remember the name of the brush and where it came from. Not optimal when I'm trying to figure out which brushes I like and want to put into my own brush folder. Is there a way to identify the current brush in the Brushes menu? Thank you, Alec
-
Hi, I was wondering if it's possible to use pressure and tilt simultaneously for controlling brush size? I currently have set up my brush to use tilt for controlling the size, and when I need pressure I turn on the 'force pressure' button, that way I can switch back and forth. However, in Procreate it is possible to use pressure and tilt simultaneously for controlling brush size, so was wondering if Affinity could as well? If not, is there possibly a shortcut or gesture that can be set up for the 'force pressure' button? Louis
-
I started off writing this as a question because I couldn't work it out, but a few times I accidentally got it to work although I couldn't work out how I had done it. (Affinity Designer Desktop v1.8.5, Windows 10). After much fiddling around I have worked out how to make it repeatable. (Admins: please feel free to move this to a better place in the forum if there is one). This is useful if you use a tablet and want to draw vector brush strokes in a mask in pressure mode, see the effect as you draw them and be able to edit them afterwards. Here is the explanation - there are three important steps which are not obvious but omitting them will leave you without editable vectors in the mask: Select the layer or group you want to add the mask to. I'll call this layer A. Click the Layer Mask button to add a pixel mask (even though we are in Designer Persona). This serves no actual purpose except that if it doesn't exist, this method doesn't work. Draw a vector brush or pen stroke (this creates its own layer above layer A). Create a group with this single curve (or more if you want to); the point is, it must be a group. Lets call this M (for mask) Make sure the group is open (i.e. click the triangle so that it points down and you can see the vector curve(s) in the group). Drag the Group M into the mask position of layer A. The vectors in group M are now a mask and the curves are individually visible and editable. A black 100% density stoke reveals anything below Layer A. Select the vector brush (or pen or pencil) tool and click on a curve in group M (select a curve in the group, not the group itself) in the layers window. No points in that vector curve should be selected because this will just extend that curve, unless that is what you want to do. Draw a new vector curve and it will be added to the curves in group M; i.e new brush strokes add vector masks in real-time. You can delete the pixel mask layer created in step 2. I have tried to record a video of the process (the context menu for the layers window doesn't show up in the recording but the actions were creating a group and later, deleting some of the vectors). Affinity Designer 2020-12-02 11-43-09.mp4 Note: if you don't create the pixel mask (step 2), group the brush stroke (step 4) or have the mask group open (step 5) when you drag it to the mask position (in step 6), you get the vector curves as a mask but you can't edit the individual curves or add any others. You can only do that if you drag the mask back out so that they become an editable group again and then re-drag to the mask position.
-
Hi all, New to AD and I've been searching for some information on brushes and the scaling vector artwork in designer. I am working on a piece that may need to get printed much larger than initially thought. So far I have avoided any graphic brushes, but I have some elements where this would come in really handy! If I have a piece that started out as letter size, but now will be printed around 30x40in (or thereabouts) how can I ensure that the brushes I use to make some elements remain sharp and are not pixelated? Can I create vector elements and create a vector based brush? Instead of a png image use a svg (or other vector format)? I ask because in the past with AI (which I switched from) I created a jitter brush with my shape and painted along a path to sort of randomize some of the elements I placed. It was a fast way of filling certain similar areas in my piece. Thanks for any pointers and help with this?
-
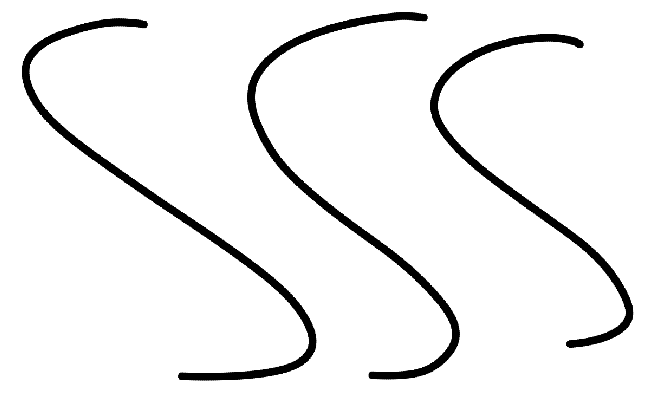
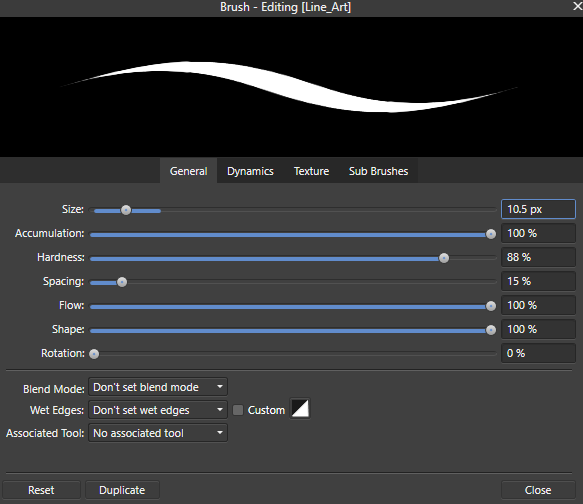
Hi there!, Could somebody help me please, I've tried messing around with the settings on the brush tool to get tappered lines. I use a mouse to draw and when I do in affinity photo I get this; but When I draw in "Fire Alpaca" I get this; In fire alpaca I have, stablizer set to 38 and have "Force pressure on both ends" checked. What do I have to change to get the tapered effect in photo? I've changed the settings to this but still no luck; Please could someone help
-
Hello, I did a dispersal effect with butterflies and it worked (lucky guess). I wanted to do the same with triangular figures made by myself, then exported on PNG files before being integrated as a picture brush. This time it doesn't work like with butterflies : I have a transparent square around my brush that prevents me from making the dispersion effect on the white mask (no problem for the black mask). I notice when I compare the butterfly's brush and the triangles' one a difference in "brush tip", the image is not displayed in the same way, yet I don't know how I did the first time to get my butterfly brush correctly. Do you know how to correctly set up the "brush tip" to make the transparency square of the brush disappear ? Pictures : Menu with the brush tip that causes the square of transparency : "Brush tip" image of the butterfly (without the transparency square). A test image to show you the difference between the butterfly brush and the triangle brush when I do the dispersion effect on two squares of different colours :
-
I draw with a pen and keyboard in affnity photo.I want to use sortcut for change brushs,macros.
-
The Protect Alpha option is hidden on small screens. It is very counterproductive to have to click the arrow each time in order to reach it (My screen is a Wacom Cintiq 13 HD touch). Sometimes I also forget that it is selected since it is hidden. Please make more space so that it isn't hidden or convert some of the options to icons (eg lock, mirror, symmetry). I ignored this for months but it really disrupts my process. The padding on some of the percentage selectors could be less to make space. Eg Opacity, flow, hardness all have pace to the right of the percentage. Thanks.
- 1 reply
-
- digital art
- digital painting
-
(and 3 more)
Tagged with:
-

Apply Raster Brush to Path
ChristiduToit posted a topic in Feedback for Affinity Photo V1 on Desktop
Having the ability to apply a raster brush to a path would be such a welcome feature, even if the path is not editable after applying the brush effect. In many cases there are obscure shapes or angled lines that are difficult to draw freehand, and in those cases it would be great to be able to use the pen tool, but still retain the same texture and style of the raster brush you were using, as if you drew the stroke by hand. I know you can apply vector brushes in AD, but I mostly use the raster brushes in AP to sketch. Furthermore, the brushes in AD are stretched along the path, where in AP it would be great to rather have the ability to make it look like the stroke was drawn as if you were using the brush tool. I’ve recently been drawing out a lot architectural interiors for clients using a drawing tablet in Photo, and have really missed the ‘apply brush to path’ feature from Photoshop - would really speed things up and improve the end results! I’ve seen a few mentions of this online, but wasn’t sure if it was logged as a feature request yet, so here you go.- 11 replies
-
- affinity photo
- brush
-
(and 3 more)
Tagged with:
-
Hello, the stroke is very laggy on some brushes (gouaches…) on my Windows machines. What is strange is that given the same canvas resolution on my iPad pro (2018) and MacMini (2018) there is no perceptible lag with se same brushes (& sizes). Is there missing optimization on the Windows version or this a limitation of the renderer on Windows (compared to Metal) ? Demo video (lag @ 0:35) Canvas : print A3 300dpi Window 10 Laptop 32GB RAM : CPU: Intel(R) Core(TM) i7-8750H CPU @ 2.20GHz, 2201 Mhz, 6 Core(s), 12 Logical Processor(s) GPU: NVIDIA GeForce GTX 1070 with Max-Q Design Screen res: 1920 x 1080 x 60 hertz Windows 10 Desktop 32GB RAM: CPU : Intel(R) Core(TM) i7-4770K CPU @ 3.50GHz, 3501 Mhz, 4 Core(s), 8 Logical Processor(s) GPU: NVIDIA GeForce GTX 1070 Ti Screen res: 3840 x 2160 x 59 hertz
-
I'm pretty conversant with the Brush Editor, but I'm finding I can't actually access it for the brush I'm currently working with in it's current state. Example: To access the Brush Editor, I have to click on a specific brush in the window. If I customize that brush a bit, say, lowering opacity to 50%, then decide I need to add some scatter to it, I can't just call up the Brush Editor window. I have to go back to the Brushes panel, select the brush, and make the scatter edit. Doing so resets the opacity to the original setting, which can get frustrating. Is there a way to access the Brush Editor on the fly?
-
I made a stroke with a brush in pixel persona. Do I find afterwards which brush I used ? Where?
-
There is no indication, either in the brush selection list, or even in a brush properties UI, which brush is selected/ in use. Please add this support. I have to keep manual notes and screenshots of what brush I'm using. Would also be a great feature to be able to assign a color, like you can do to a layer, to a brush.
-
How to Make Your Own Brush
Krisna posted a topic in Tutorials (Staff and Customer Created Tutorials)
Hi guys, I just uploaded a tutorial video about how to make brush in Affinity Photo. I hope you enjoy this video. Thank you-
- affinity photo
- brush
-
(and 4 more)
Tagged with:
-
In Develop Persona, Overlay: 1. Click on Brush Overlay icon. 2. Set brush size to 307.1, Hardness 50%, Checked Edge Aware. 3. Using the brush made a stroke on the image moving left to right on the area I wanted to affect. Result: Stroke appeared in another part of the image as a vertical stroke. Once I saw this happened I tried again to make a vertical stroke and sure enough the stroke appeared on another part of the image as a horizontal stroke. Did further test and sometimes the stroke does not appear at all. It all depends on where you are in the image as to whether the stroke appears or not. In any case the area actually painted over is no where near the area of your brush stroke. Windows 10 Version 2004 OS Build 19041.450
- 9 replies
-
- overlay brush
- overlay
-
(and 2 more)
Tagged with:
-
I recently downloaded the "Fineliner brushes" pack for Affinity photo. When I install the brushes they say "vector brushes installed" How can I access the vector brushes on Affinity photo? I don't see them show up in the brushes panel
- 6 replies
-
- affinity photo
- brush
-
(and 1 more)
Tagged with:
-
When using Affinity Photo (or Designer) for illustration or digital painting, there are two features that I use super often - the brush moodier shortcut (ctrl+alt+drag left/right) and canvas rotation. The issue is that the direction of the shortcut changes to the rotation angle of the canvas, meaning I keep accidentally changing the hardness of the brush instead of thew size while working. It would be great to have this shortcut act independently and irrespective of the angle of the canvas, so that dragging left or right still affects the size of the brush, regardless of how much my canvas is rotated. As an example, if I've rotated my canvas by 90 degrees, dragging left/right changes the hardness instead of the size as it usually would when the canvas isn't rotated. When working fast, it's incredibly difficult to keep track of how much the canvas is rotated to be able to use the shortcut properly. *PS. A dedicated rotation tool for freely rotating the canvas would be an amazing addition to Affinity! 😉


.thumb.png.3b69f83f40d75cca18ddf41214ef3365.png)

