Search the Community
Showing results for tags 'brush settings'.
Found 11 results
-
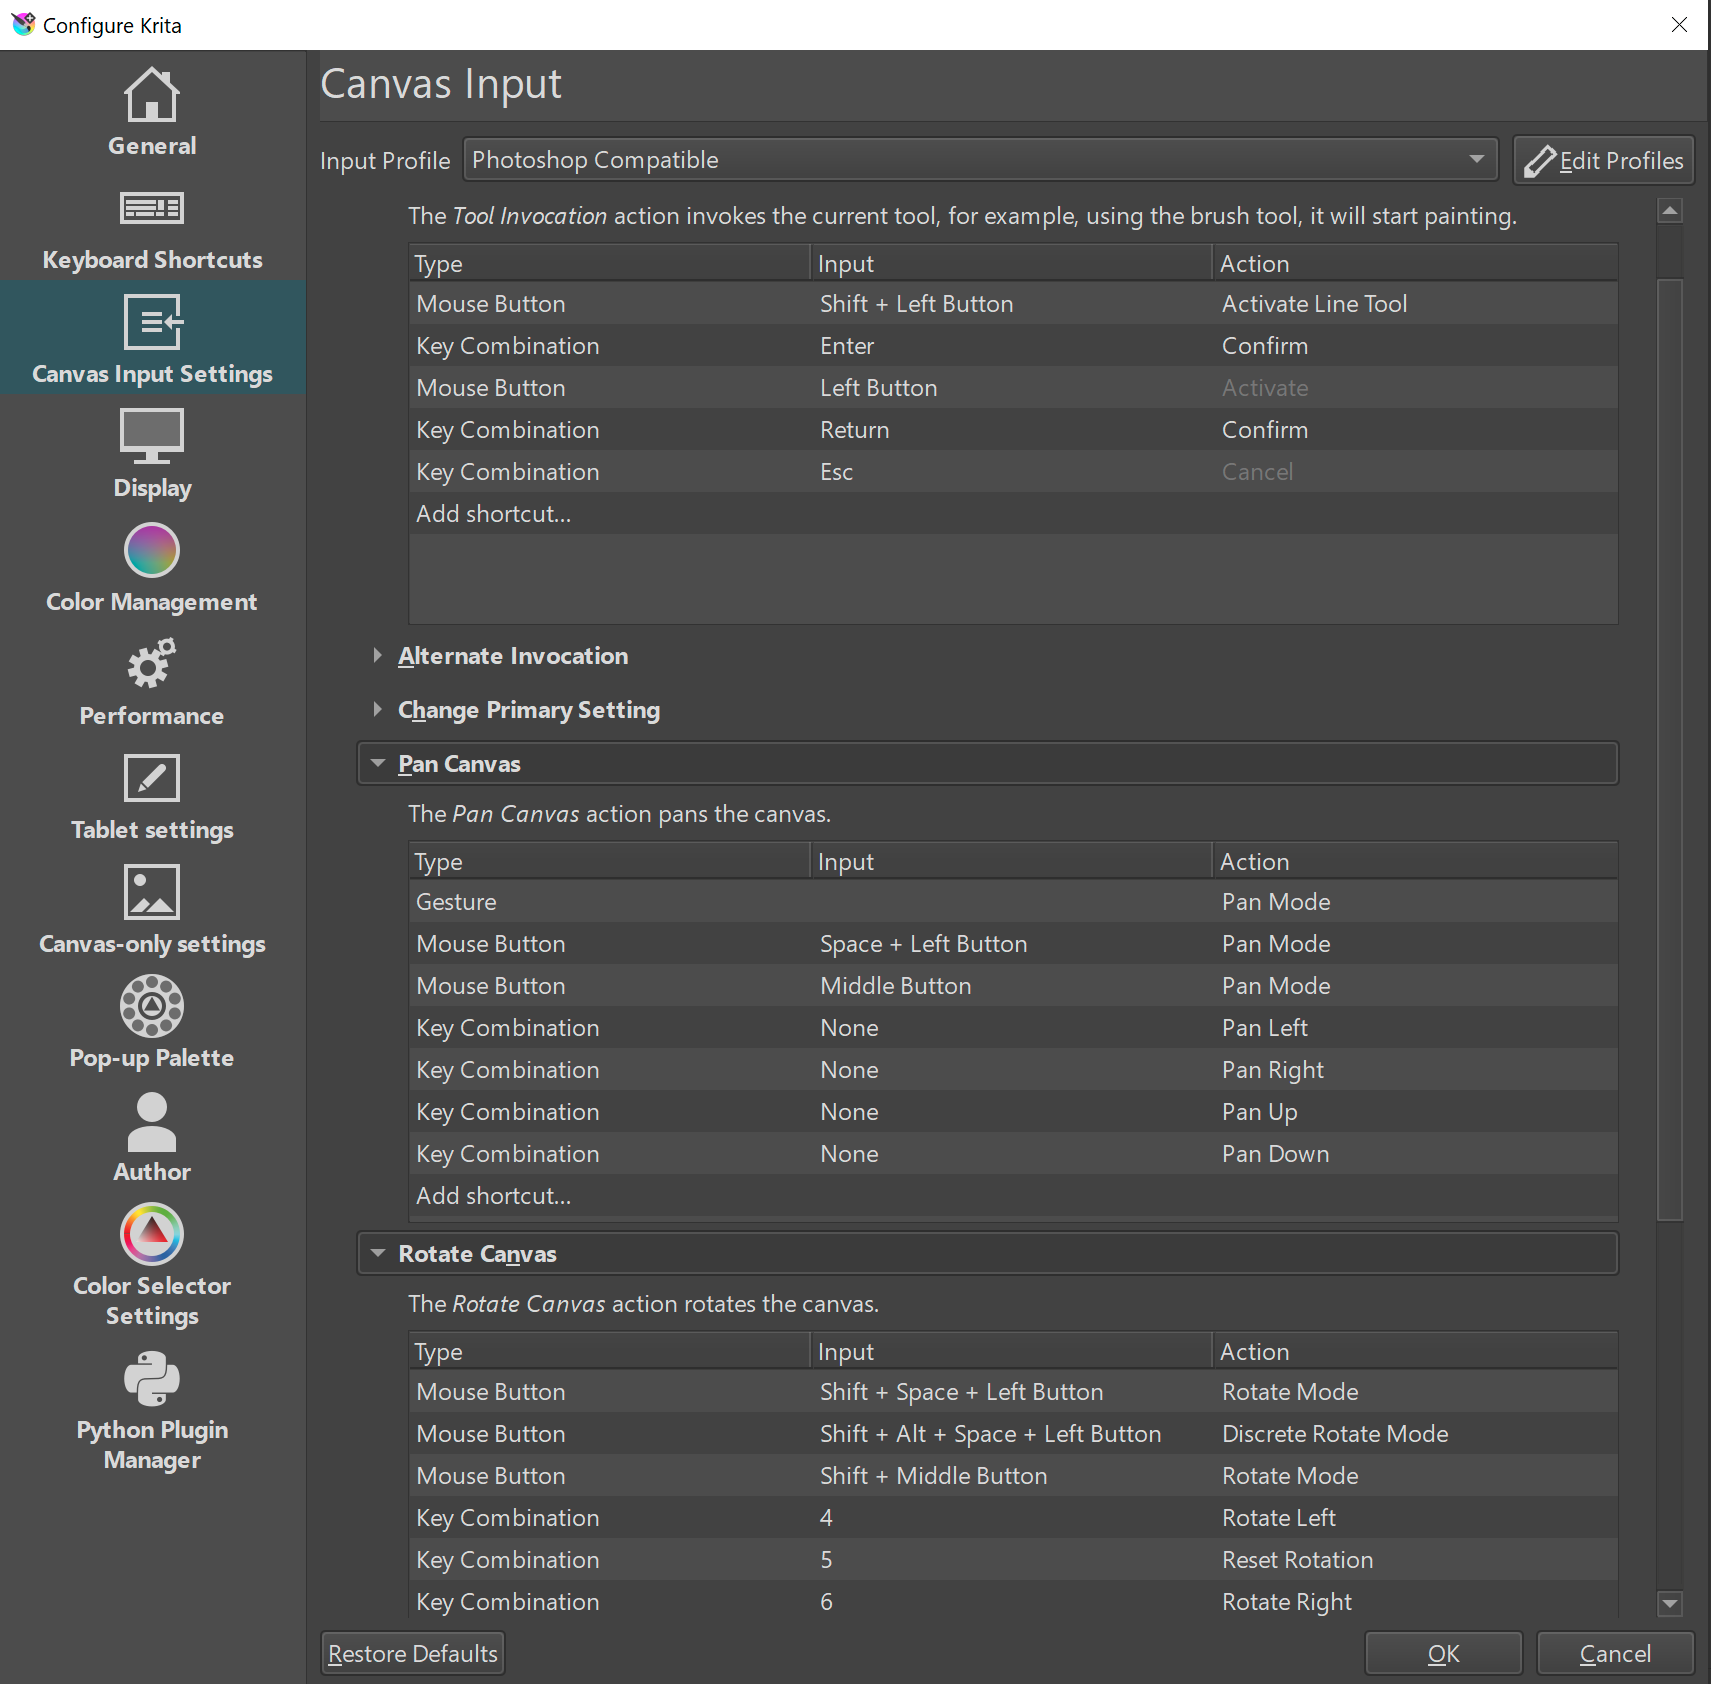
 I have an issue with UI scaling the brush variable settings on the side of the workspace when in my usual landscape orientation (iPad) The three options for hardness, size & opacity bleed off the screen and make them unusable at the higher or lower values (see pictured example) These options fit on screen just fine in portrait mode, however I almost never work in portrait mode, and having to flip my iPad around every time I need to change brush values is annoying. Is there a future fix for this?
-
 is topic is all about keyboard shortcuts and the ability to use the software through custom keyboard shortcut functionality. With these suggestions I aim to reduce mouse movement and leverage the keyboard to alleviate muscle tension. Custom Shortcut to delete objects (for vectors), layers (including content and pixel layers. Perhaps, some may prefer there being separate options to delete vector objects, layers and pixel layers, though this proposal this particularly concerns deleting whatever is highlighted in the layers panel. Shortcuts to navigate through the layers panel by selecting the layer or object above or below. Illustration of 1, 2 using Krita, notice that I didn't need to move the mouse for this: F2 to rename layers/ objects (this is as though you clicked to rename the layer). Delete pixel layer content Illustration of 3 & 4 using Krita, notice I first deleted the layer, then undid this to show that you can delete the contents of the layer while keeping its location within the layers panel intact, as well as its name, the clear pixel layer content function circumvents the multi-step procedure of ctrl+a > delete > ctrl+d by enabling this operation with a single button press (e.g. delete, whereas backspace deletes the layer, but this should be user configurable). Delete pixel layer content and rename layer.mp4 Add new layer with a rename dialog pop-up (this is the default ctrl+shift+n command in Photoshop), which resolves the two step process of creating a layer and renaming it. Currently, you can configure shortcuts to switch between studio presets, however, I think it is just as valuable to be able to toggle between two different studio presets using a single keyboard shortcut. I use a one or two column setup and it would be nice if I could toggle between the presets I desire (e.g. to switch between studio preset 1 and 2 and back to 1, just like tab toggles hiding the interface) with a single shortcut. Ideally, you should be able to assign a given studio preset to either end of the toggle in the presets. Additionally, the name of the preset should be represented in the keyboard shortcuts section. So, basically, the name of the first studio preset in the list becomes the new name for "Studio Preset 1" in the keyboard shortcuts section and the second becomes the name for "Studio Preset 2". In other words, a list of studio presets with 1. Lineart, 2. Logo design, is listed similarly in the keyboard shortcuts as opposed to the current generic naming scheme. A change brush size shortcut (as replacement for Ctrl+Alt+LMB drag, pressing down two modifiers is quite demanding, Krita and Blender allow for assigning a alphanumerical key for this reason instead of a modifier key. It works as follows: press and release the shortcut key, then drag to the new settings (position) to confirm or, hover and click to confirm. The latter reduces muscle tension by quite a lot. In this case, it could still be multi-axis (left-right for strength, up-down for hardness or opacity). Also note, showing that showing the previous brush radius helps to indicate whether the new size is appropriate or not. Brush widget.mp4 Krita has a pop-up for the colour selector, which negates the need to the mouse/ pen to a studio panel, it is invoked with a hotkey. Krita also has a colour history pop-up, which shows the colours that were last used and is invoked with a hotkey. Though this could very well be paired with the colour selector pop-up. These two pop-ups are illustrated below: Colour selector and colour history pop-up.mp4 A shortcuts to activate the brush stabiliser (which should remember the last mode and length setting per mode), but perhaps people would also like direct control for either mode through keyboard shortcuts. Similarly, there's no shortcut to activate symmetry shortcut for brush strokes. The numeric shortcuts to set opacity to 10, 20, 30 ... 100% opacity interfere with my ability to set shortcuts to the numeric keys, therefore, these should be listed in the Keyboard shortcuts section so they can be disabled at will in favour for other shortcuts (i.e. changing personas with 1, 2, 3, etc. (also taking Affinity Photo into account where you have more personas). Instead, there could be an option to change settings for opacity and hardness by pressing a shortcut key, after which the cursor moves to the value box for the associated option (much like the F2 rename proposal). See discussion here: A configurable mouse & keyboard shortcut to rotate the canvas non-incrementally. This is different from the alt+mousewheel functionality, since pen tablets don't have access to this. Instead, this funtionality should be a combination of mouse/ pen input and a shortcut or modifier keys (not excluding spacebar) to invoke the command. For instance, spacebar + mmb drag is one of the combinations that comes to mind (or shift/ alt + mmb drag). Illustrator has shortcuts , . / for fill, gradient fill and no fill (or stroke depending on the context), from these I miss the gradient and regular fill shortcut. For cloning objects, I don't understand the reason for using both Ctrl and Alt, I am aware that control enables snapping and alt disables it, but for me personally, I would prefer to use Alt and toggle snapping manually (using a custom shortcut assignment), the reason for this is explained in 16. For the sake of muscle memory and working with various software packages, it would be great if the selection keys could be assigned manually. Currently, Shift is used to toggle selection, while Ctrl cannot be used. Instead, by using just Alt for cloning, Ctrl could be used to add to selections, meaning that if I hover over multiple nodes, the ones that are already selected won't be deselected. Similarly, instead of toggling selection, Shift could be used to remove from selections. The combination of these two creates a very consistent selection workflow. Though some software switch the Ctrl and Shift behaviour around, so therefore it is best to let the user decide which one does what (and maybe they prefer Ctrl constrained cloning in conjunction with Shift toggle, but that's currently not a decision that can be made. See 3. below. For scaling objects, Adobe uses alt to constrain the transform to both directions and shift + alt to scale from the centre. This should also be an option in Affinity to aid muscle memory. There is no scale tool, as in, there is no shortcut to open a pop-up to get to a bunch of value boxes where scale values can be typed and committed to with enter. As it stands, I seem to need to open the transform panel, hover the mouse to the width and height dimensions and type in the size followed by a percentage sign, which could be reduced with a dedicated scale dialog pop-up. Increase potential for keyboard shortcuts Differentiate between numeric keys and the numpad for additional keyboard shortcut options Modifier keys should be allowed to activate a tool Customise keyboard + mouse behaviour as you can other software like Blender and Krita. This would allow for specifying a combination of keypresses and mousekeys (click/ click drag) to invoke a command. Similar to the default fluent zooming with ctrl+spacebar, users should be able to specify the way they want to zoom, access GUIs and rotate the canvas. For canvas rotation, this could entail setting hotkeys of preference from any 3D package to navigate in 3D (e.g. alt+MMB, shift + MMB) to rotate the canvas fluently (non-incrementally).See: Adding multiple keyboard shortcuts to commands would also be welcome (as in having a plus icon to add a second keystring to invoke a command). For instance, ctrl+] moves an object forward and ctrl+shift+] moves it to the front. However, some keyboards have dedicated PgUp, PgDown, Home, End of a numeric portion to which these functions could be assigned. This allows for retaining 'industry standard' shortcuts, while enabling single button shortcuts as well. This is vital for companies where everyone uses the same keyboard shortcut scheme, so everyone can work on every PC or enable collegues to not freak out from different keyboard shortcuts, while it also creates room for certain customisability. This is what I mean, illustrated in PureRef, where you can click on the + sign to add additional entries (once they are there, you can hit the - sign to remove them). Also, feel free to add other missing ones in this thread, so they can be consolidated here.
-
 Does anyone know how to adjust brush settings so that when brushstrokes overlap they multiply, intensify and deepen the color as in the graphic below? I know this works because I did it once, but I changed the settings and can't remember exactly how they need to be. Usually when brushstrokes overlap they just paint the same exact color value. But I need the brushstrokes to intensify or 'multiply' when they overlap, like the graphic below. Thanks for any help!
-
 Hi. I'm sure I must be doing something wrong but I used to have brush and pen settings for hardness, flow, opacity, stroke, etc, on the tool bars at the top of the screen. These are now missing and I cannot find them. How do I get them back? Thank you. Pat
-
Hello! I am a very happy convert from Photoshop to Affinity except for one thing: the brush tool settings. Photoshop still is a lot better with these because of their more sophisticated brush tool modification options. I am thinking specifically about dual brush, brush pose, and build up, which don't seem to be available in Affinity photo. I recently bought a set of .abr brushes to compare and contrast the import success between Photoshop and AP, and I'm sorry to say that while Photoshop was able to accommodate some really nice subtle effects (I just want a nice, natural inking brush. There are a million great "big wash" brushes for affinity, but I can't find good liners for the life of me!) that were set into the .abr files, but Affinity imported them as regular round brushes with a noise texture on them, which looked awful! I would really like: 1. to be given some actually helpful tutorials on how to create natural-looking brushes in Affinity (I've had a heck of a time trying to find what I'm looking for. People make tutorials for really silly, goofy brushes, but nothing really practical for fine art!) 2. For the Affinity brush settings to be upgraded to be more competitive with the Photoshop brush settings. 3. For AP to be able to import .abr brushes properly without cutting out the settings and ruining the brush. Thanks for hearing me out! Again, I am LOVING the program for the most part, but I'm just not able to do inking on this program to the level that I want, because of these settings issues. ~K
- 4 replies
-
- 3
-

-
- brush
- brush tools
- (and 4 more)
-
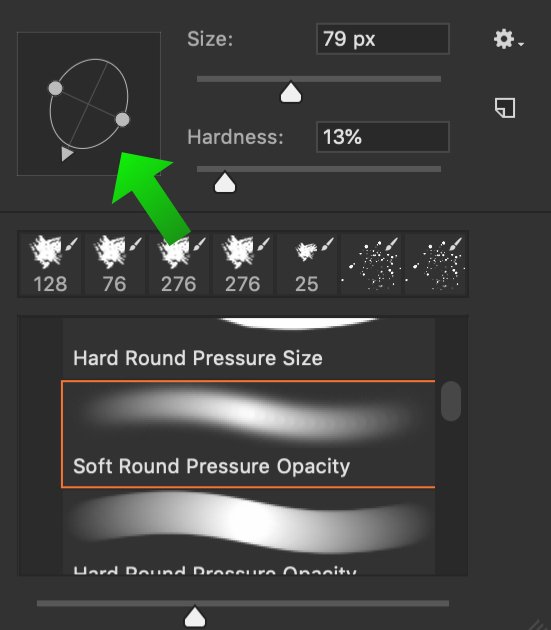
 Did You plan to make the same great menu for adjust brushes by clicking on the mouse2. Especially important is the tool that I highlighted with the arrow. These are very useful and important settings. Roundness is very important setting, you partially implemented it in your option Shape, but it work only for basic brush, so sad. Please add this window like in Photoshop on screenshot* You made a lot of settings for brushes, but many useless and no basic major setting.Thanks for attention and great app AD%)
-
 Hello Affinity, I'm a photoshop user currently testing Affinity trial. I have a few questions regarding brush settings in Affinity. 1. I found how to setup my brush more like the 'photoshop' standard: By setting accumulation & flow jitter to pressure. The thing is that these brush settings now ONLY apply to my current brush. Can I set this as a GENERAL setting to apply it to all brushes? I constantly have to setup accumulation & flow jitter to every brush I want to use which is not nice. 2. When I load brushes into Affinity it puts them into there own categories. I just want to see all my brushes together in one window so I can quickly cycle. Is that possible? Thanks! Greetings, Vincent Boudewijn
 -
Hi all, quick question for affinity photo on the iPad, is there any way export/ share the brushes within the app? There doesn't seem to be that function? If not, is that something that might be added later?
-
Would like to see ANGLE jitter and ROUNDNESS jitter added to the brush engine. It would make photoshop brushes import identically.
- 1 reply
-
- 1
-
-
- brush settings
- brushes
- (and 4 more)
-
Would like to set minimum and maximum values in brush settings. Ex. a brush that can be set at 100px min and only increase to 150 px max.
-
 Trying to understand the brush settings panel a little more, and I can't find any brush that changes when I use the Shape slider in the General settings. What is it supposed to do? Is it like the Roundness slider in PS?