Search the Community
Showing results for tags 'blending mode'.
-
Hey everyone, quick question: When editing layer effects in Publisher (before anyone asks, I normally do this in Photo, but I double-clicked and thought it would be easier to change the logo quickly in Publisher), is it supposed to show up like this? It says »Highlight: Screen«, but when I click on it to change/check the blend mode, it suddenly says »Light Colour« (because I set it to Light Colour). The same goes for »Shadow: Colour Burn«, it changes to »Multiply«, which is the blend mode that's actually configured. I would have thought it would show the currently set blend mode in this view. 🤔 Publisher_Layer_Effects_Display_Wrong_Blending_Mode.mp4 A bit confusing to look at without wanting to go in and check everything twice, I think. 🤷♂️ Have a great weekend Dennis
- 3 replies
-
- affinity publisher
- layer effects
-
(and 3 more)
Tagged with:
-
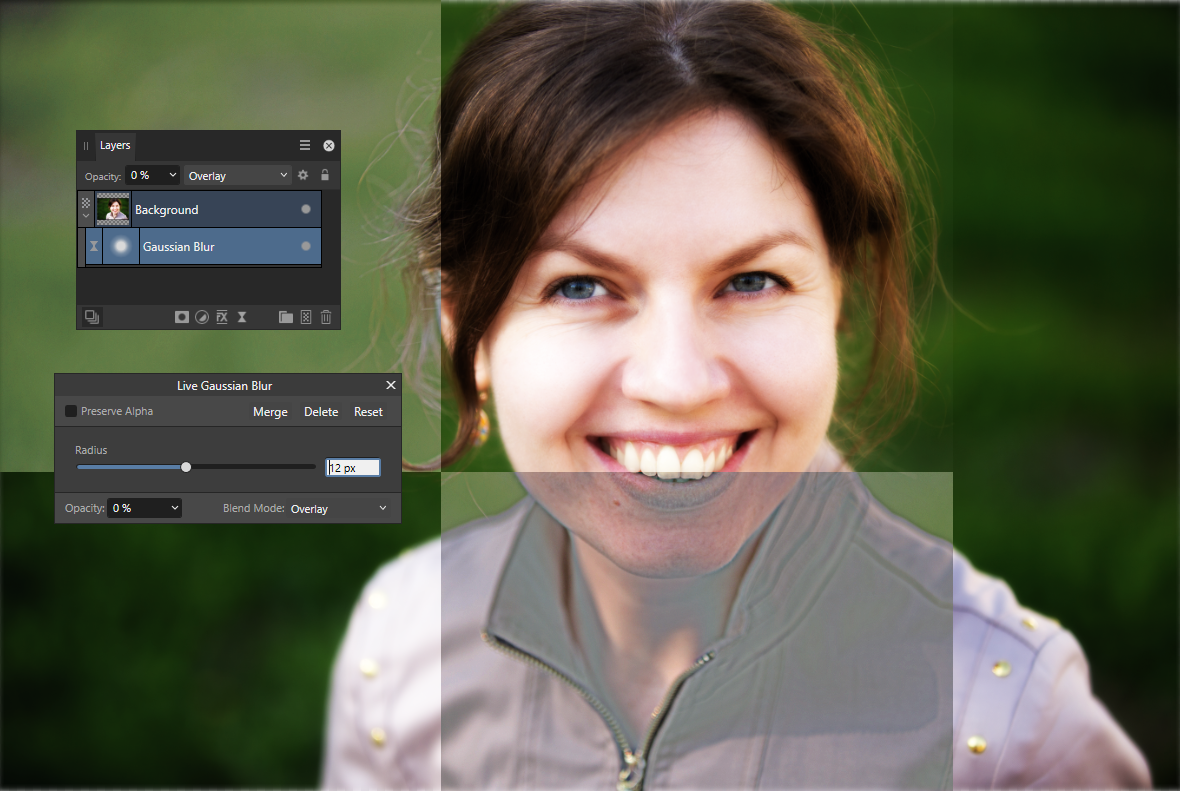
Greetings, Affinity Photo 2.0.3 Steps to reproduce: Take any raster layer, 8bit, sRGB Add Live Filter "Gaussian Blur" with eg. 10 px radius Change the opacity of Live Filter to 1% Change blending mode of Live Filter to "Overlay" Until now, everything seems to be fine. You are seeing an almost unmodified layer content. Now, change the Live Filter opacity from 1% to 0% First bug: Despite that blur itself is actually not visible, obviously the image is being applied to itself in Overlay blending mode, while You should be seeing unaltered image. For reference, You may want to convert the document to CMYK FOGRA39, and check there (it behaves correctly). You are still in sRGB. Grab the "Radius" slider and move it randomly. Image is being divided into semi-random areas, similar to screenshot below. Try to "merge" the Live Filter. The artefacts are likely to be embedded into layer pixels. This procedure takes "gaussian blur" as an example. Same glitchy beaviour occurs also when using different Live Filters. KR,
- 4 replies
-
- live filter
- affinity photo
-
(and 5 more)
Tagged with:
-
Affinity Photo brush editor seems complete although it requires a pair of important blending modes similar to the existing "darker color" but allowing to cover transparent pixels; these new modes could be called, for instance, mix if less transparent (or mix if more opaque) and replace if less transparent (or replace if more opaque) or something shorter. If you don't understand the above explanation or think it is not important then try to repeat the same pencil hatching I did in the uploaded video, and you will come to the conclusion that it is not possible to get such a smooth and easily controllable hatching in Affinity Photo. I hope these 2 options will be added in future releases, they're so convenient and easy to implement. Thanks for paying attention. pencil-hatching.mp4
-
When I export PSD and open it, group layer's blending mode become Normal even though it was set to Pass Through.
- 2 replies
-
- group
- blending mode
-
(and 2 more)
Tagged with:
-
Hi everyone... i have some problem exporting an object that have shadow using AD 1.7.3. Basically i have setted the blending mode of the shadow to Multiply and if i try to export the output seems to have blending mode setted to Normal. This is what the document looks like with blending mode setted to Multiply: This is the exported version: To avoid the problem i have to set the blending mode to Normal and try to get the right darken shadow color. Export_with_Shadow.afdesign
- 6 replies
-
- export
- blending mode
-
(and 1 more)
Tagged with:
-
Hello People ! i'm just installing and testing the recent Beta of APhoto and i can just say OKAY IT WORKS REALLY OKAY ! But ... because there is still a But ... i think Blending modes needs to be arranged or organized according to what they are intended to do. What i mean is simply represented in the attached capture. Well i know this is from another software but also it is not bad to copy (and making better of it) something that already exist. Hope this won't bring up a long discussion or a troll in here but also to every one who ever think this can/could be a nice thing please leave your inputs to help the devs understand it and maybe implement it. Blessings !
- 17 replies
-
When using adjustment layers, if I change the blending mode in the layer panel, the blending mode isn't reflected in the adjustment panel, while if I change it in the adjustment panel it gets (correctly) updated in the layer panel.


