Search the Community
Showing results for tags 'bleed'.
-
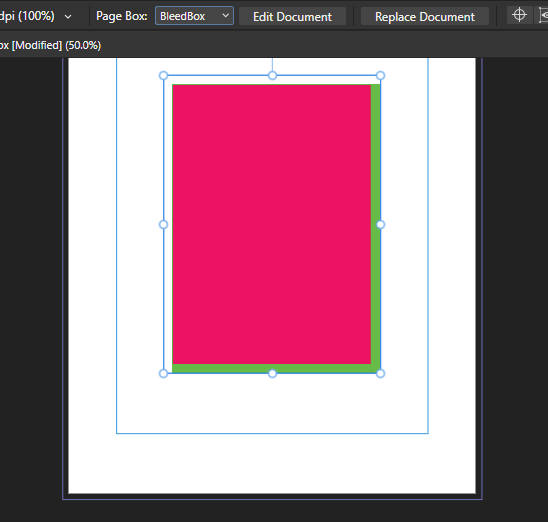
 In the attachment, is it important for the white page (author bio) to be taken up to the bleed when the previous page is? If so, I am unable to make it bigger, as I think it has to do with the master file. I had another option to insert a new white rectangle and then drag that over. Is that OK? If I just leave it as it is, will that be a problem?
-
 I'm not doing something right, it's maybe a bug or a preference I need to activate, but when I make a background on Affinity Designer with Bleed, it does export fine to a Print Format showing the bleed area, but when directly imported the Designer File to Affinity Publisher, it imports it trimmed to the page format and disregards the bleed area. Anything else I can do differently to fix this? I'm on V2. Thank you so much in advance.
 -
 I love to work with artboards in Designer to create Flyers and other design elements all in one document. Designer also offers Bleed for artboards, which is great when creating PDFs for printing. One thing is a bit annoying though: Designer will not show the elements within the bleed area. It will indicate the bleed edges, but not show anything outside of the artboard but within the bleed area. This sometimes makes it hard to see how the final output will look like. Perhaps adding an option to the viewing settings to enable this? Thanks!
 -
I created a document and forgot to add a bleed. Is there a way of adding a bleed after a document has already been created? I’m trying to prevent doing a cut and paste to a new document if possible. thanks!
-
 Hi everyone, First post - I'm hoping to be able to lay out a B1 print sheet with designs montaged onto this sheet. What I'm looking for is a simple way to select any of the placed artworks and to apply tick marks to the trim size of the artwork and not of the sheet. I.e - place a PDF at trim size, apply ticks, reselect the pdf and expand to the bleed box size. Possible? If not, all suggestions will be most welcome, Thanks! I know this is possible in Ad*be InD*sign using the 'Cropmarks' script, fingers crossed for something similar in Designer or Publisher...
 -
 Hi, I stumbled upon something unexpected and want to check if anyone has a solution for it. I have a Designer V2 file that I'm trying to export to PDF. I have 10 artboards but only want to export 5 of them to PDF. The file is configured with a 3 mm bleed for all the artboards. When I select the 5 artboards and try to export by using either "selection only" or "selection area" the option to export including bleed is unavailable. If I try to export just 1 artboard the "include bleed" option is available. As is if I try and export the all the artboards. Is there a way to export just some artboards with bleed? Thanks for the help. Eduardo
 -
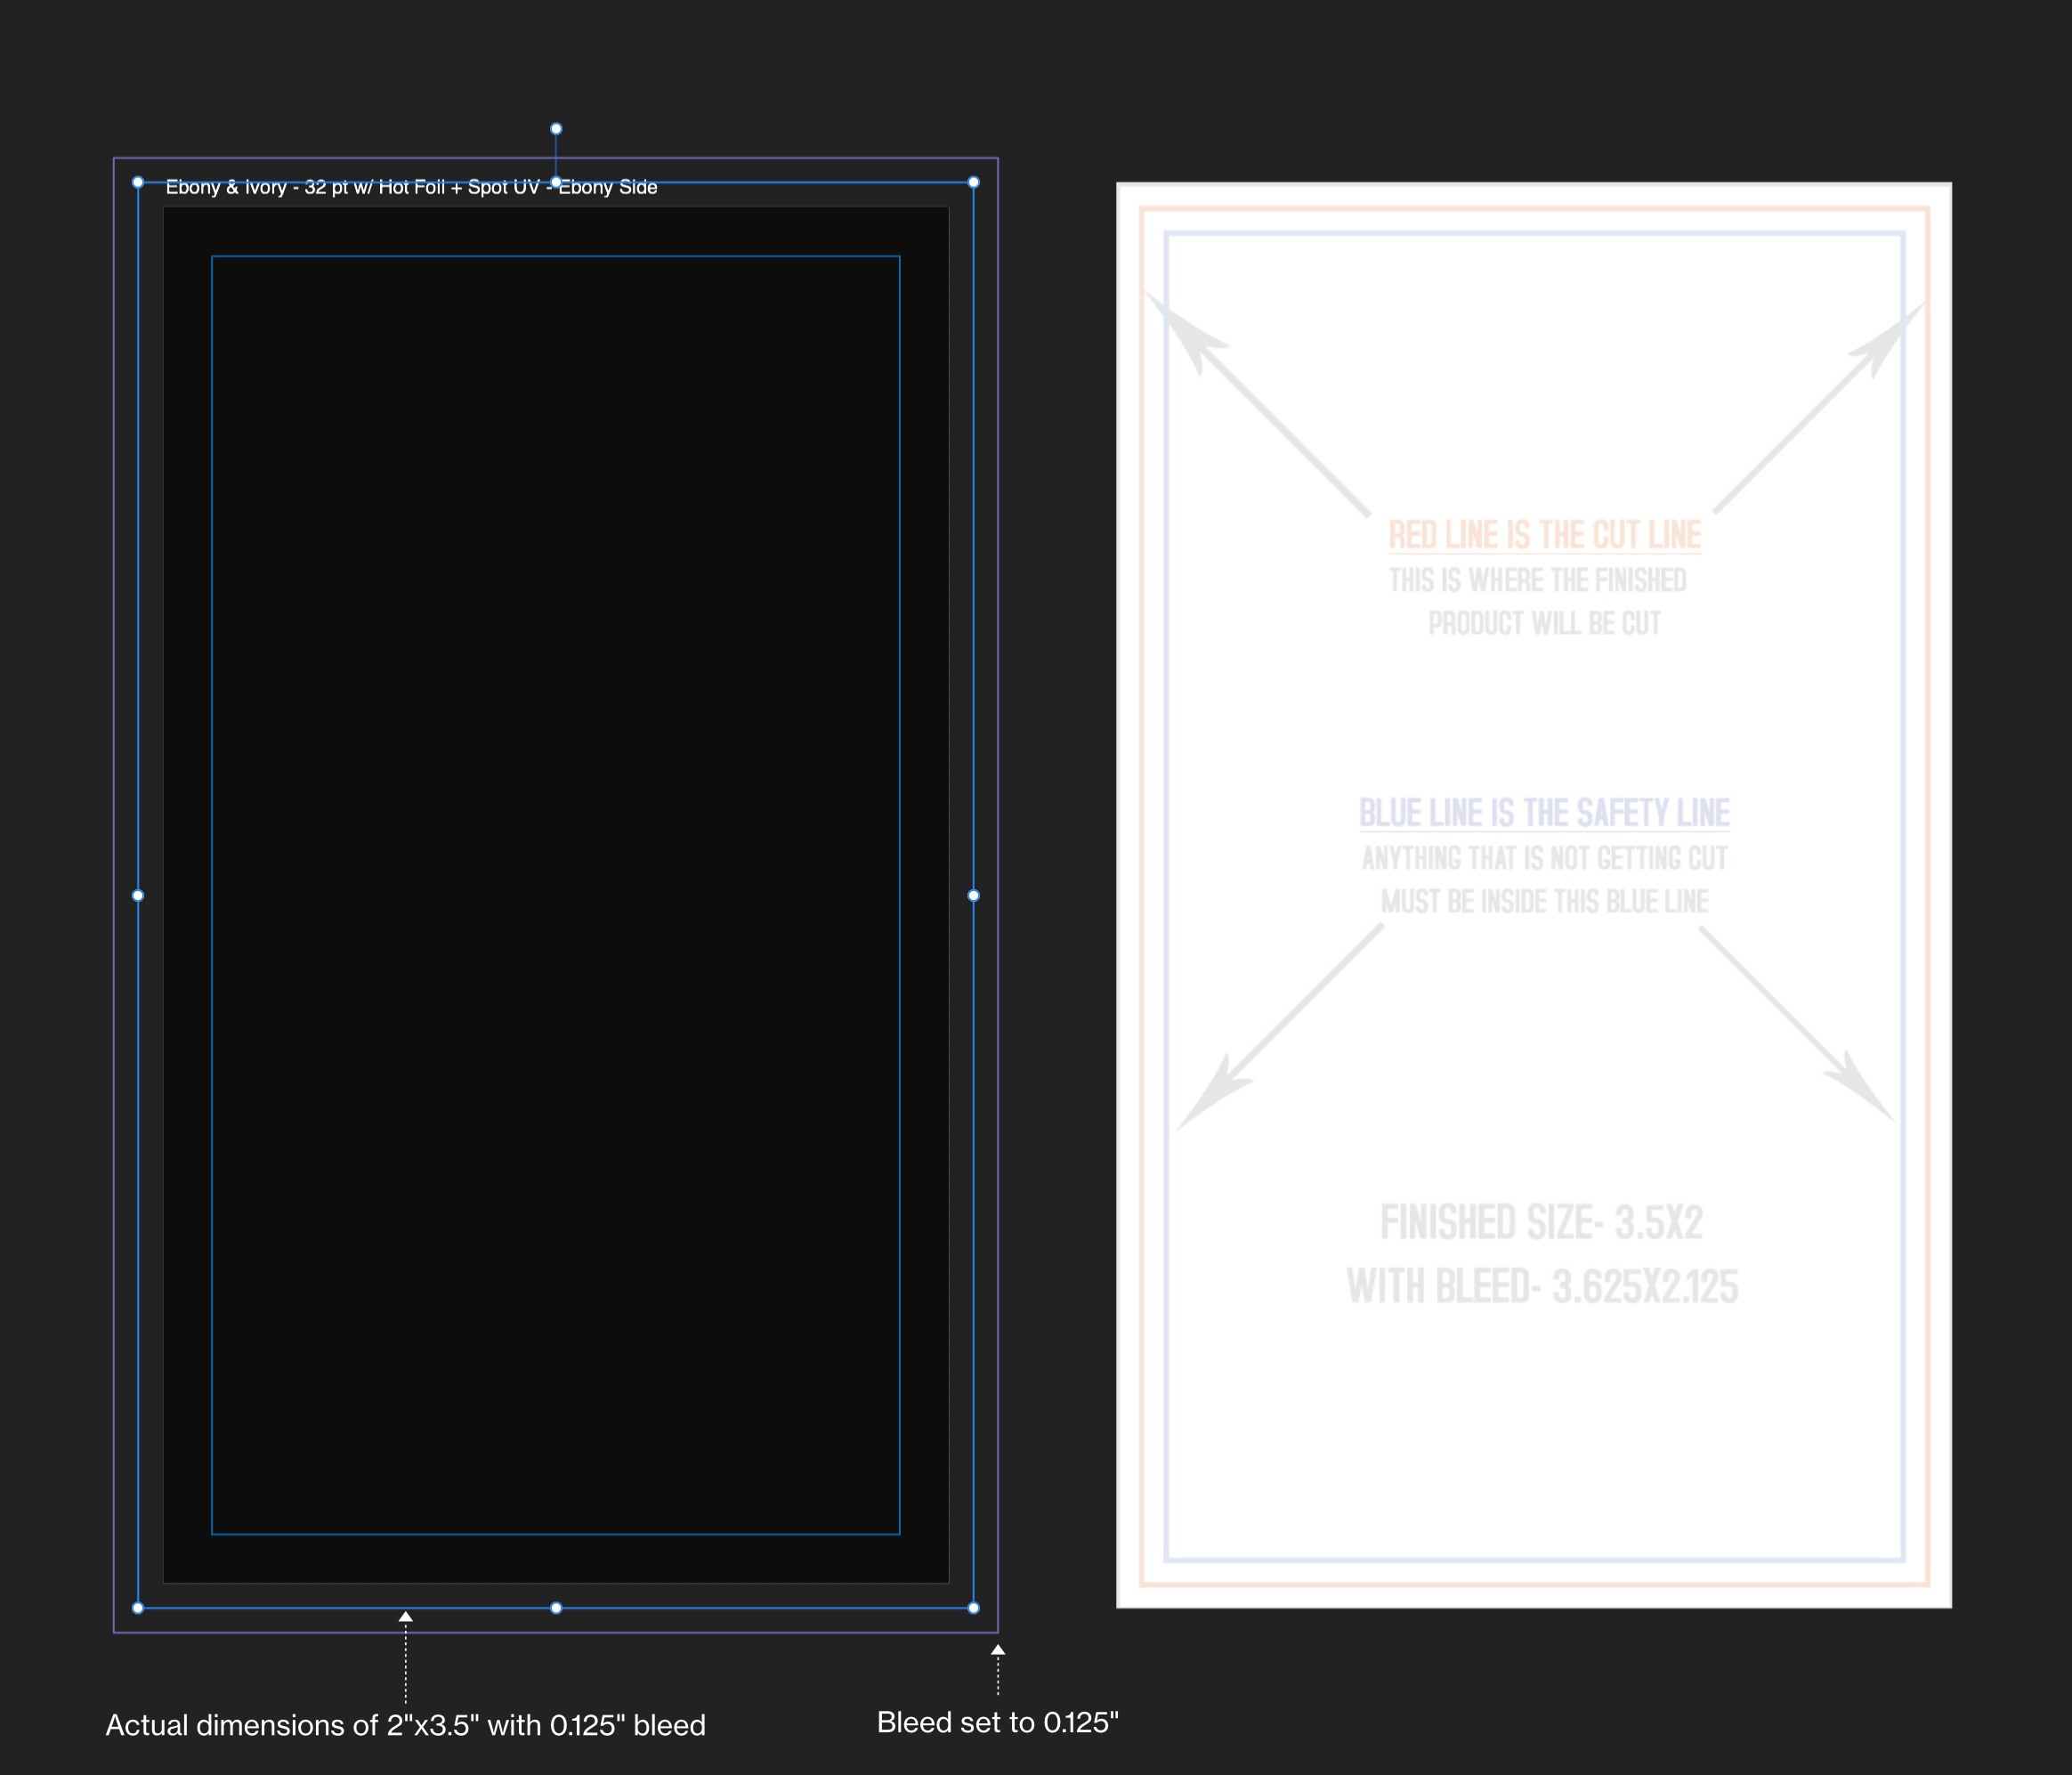
 Hey Affinity Designer aficionados! Hoping to get some help here as this issue is driving me nutso today! I'm trying to setup a 2"x3.5" print file with 0.125" Bleed. The issue that I am running into is that both the Bleed and the Margins are showing twice their size when displayed. When I create a rectangle of 2.125"x3.625" to account for the 0.125" Bleed, the dimensions do not match as shown in attachments. Can anyone advise what the issue is and or how to resolve this? Many thanks in advance for taking the time to look into this. Hang Tag Designs - Bleed + Margin Issue.afdesign
-
 Hello everyone, I would like to cover one of our shop windows with decals applied to the back. In the print specifications, there is a trim margin (3mm) and a safety distance (3 mm), so a total of 6 mm. Since you can only print up to 1.30 m in width, I have created several artboards in Affinity Designer and simply added the 3 mm trim margin in white. However, in the final print, it did not quite fit with overlapping fonts, even if you cannot see it from a further distance. What is the best way to handle this in practice, so that it looks seamlessly perfect when fonts/logos/images span across several window sections (decals)? Thank you very much!
-
I see that it can create a document with a bleed but how do I add or adjust it after the document is created?
-
Hi there. I have produced a single-page booklet with all-around a bleed (3 mm). When I turn the document into facing-pages the inner-bleed on the right page overlaps the left page. How can i avoid this? Or is it a shortcoming? Is there a possibility of ignoring the inner-bleed only? Thank you for an answer. Cheers, /Paolo
-
 Here is an example how it it could look like. Its really needed to see what we are exporting and work with. Really needed for 2+ artboards works.
-
 Steps to reproduce: Create a document with the following settings: An even number of pages, for example 4 Facing pages, starting on the right Some amount of bleed, for example 3mm Edit the default Master A to have a green rectangle object covering the whole page, including bleeds Create a Master B, do the same as above, but with a red rectangle, for easy visual reference Apply Master A to pages 1 and 4 Apply Master B to pages 2 and 3 Move the page 3 to page 1 position, this immediately breaks the bleed on page 4 For a reference on the above, see the attached Publisher.mp4 video. Next steps: Export the file as PDF with the following settings: Preset: PDF/X1-a:2003 (I think any preset will work, but this get the job done fast) Include bleed Export Area: All Pages Open the PDF created on Acrobat Pro (or any other PDF software that can show bleeds) Page 1 is OK Page 2 rightmost bleed will be a red object, green was expected Page 3 leftmost bleed will be green, red was expected Page 4 rightmost bleed will be empty If using Acrobat Pro, will be able to edit the objects You'll notice the bleeds really are trimmed For example, there's no green object below the red strip in page 2 For a reference on the above, see the attached Acrobat.mp4 video. Thanks! Publisher.mp4 Acrobat.mp4
 -
The bleed of linked documents(afdesign) is shown incorrectly. I thought I saw this report somewhere before but I can not find.
-
 If you attempt to data merge PDF files into an Image frame, it doesn't work correctly if PDF has a trim box defined - all content outside of the Trim Box gets cut. Just to clear things up - Crop Box is used to define which areas of the PDF are cut out. Trim Box defines the cut area for the physical blade cutting, after the document was printed. The content between Trim Box and Crop Box, the bleed area, is supposed to be shown and printed. However, AP cuts all the bleed area out, making it impossible to place a PDFs via Data Merge correctly without altering all of them. Currently I have to delete trim box entirely for data merge to place PDFs correctly, but this shouldn't be required.
 -
 It's quite a while since I last posted anything, and my notes indicate that I had thought this problem had been fixed. In my document, I use facing pages and have bleed round the outer, top and bottom but NO BLEED in the inner. However, when I export pages to PDF and ask for bleed, Publisher ADDS bleed in the inner (gutter). Obviously, this is a disaster when I come to print out signatures as there is a big white stripe (that was NOT there in the original) stuck in between the left-hand page and the right-hand page. Does anyone know how I can avoid this? I had also hoped that printing, say pages 1 through 36, as a Booklet would give me the signature I wanted but, even though I can enter that in the Publisher dialog, Publisher ignores the page range and attempts to print the entire file as a Booklet. I have a 324 page book that I am trying to print in nine signatures. There seems to be two sensible options but problems with both. If Publisher could print a page range as a Booklet, I'd be home and dry. Alternatively, if Publisher could export without adding Bleed that is NOT there then (since my PDF software can do imposition) I'd be home and dry. I've struggled with this problem for almost five years and not yet found a solution. Ideas welcome. Thanks, Robin
 -
When a child Master is used on the document, the right side bleed of the parent Master on PDF export will be cut off. master sample.pdf master sample.afpub
-
Affinity designer version: 1.9.2 OSX version: 10.15.7 (Catalina) Steps to reproduce: 1. Create a document with some bottom bleed 2. Draw a shape that draws both inside the document and inside the bleed 3. Switch to Export Persona, create slice for shape, and enable "include bleed" checkbox in PNG format 4. Export slice Expected: The full shape is exported as a PNG without margins ____________________________________________________________________________________________ Actual: The full shape is exported with the bottom bleed added as transparent at the bottom. ____________________________________________________________________________________________ Attached images of exports (with and without the "include bleed" checkbox) and the affinity file. When disabling the "include bleed" in the export option, the size of the image is the size of the shape without drawing outside the document area. bleed-error.afdesign
-
 Hello! I couldn't fins answer of forum, so decided to start a new topic. I am working on project to print in Affinity Designer. I need rounded corners in printed files. How should I notice it to print house to crop it correctly? Shall I set it somehow in bleed? Is it possible with Affinity Designer? I have made transparent background and put on this retrangle with rounded corners, but I am afraid it woulnd't work for cropping correcty... Any assistance is appreciated, thank you!
 -
 Im trying to set a bleed on the ipad version of AD on an Artboard. But everytime i set a bleed nothing happens. I cant see any lines and if i close the bleed menue and open it again it is set to 0mm again. Am i missing something?
 -
 Hello Affinity members, I am creating assets for a game in Affinity Designer 1.7.3.481. For that I am using isometric 2:1 grid. In the editor everything looks fine. But after I export it, the resulting PNG has a strange outline or shadow around it. Please see picture attached. This is a 512x256 PNG, the outline is there no matter the export resolution. How do I get rid of this? It looks awful in the game. EDIT: I downloaded latest Affinity Designer version and the problem persists.
-
 Greetings, I'm sure this may have been answered already, but I am having a big problem with exporting in Publisher and Designer. I'm really hoping someone can help with this... I've created a book cover for print, for a spiral bound book (which does not have a spine), and even though I have made the document with a transparent background, I always get a white background on PDF export. I have tried pretty much all exporting options. I have even exported front and back cover separately and then placed them in a full spread document, but still there is a white background where there should be a transparent one. Since my book is not published yet I've covered the artwork with rectangles, however the artwork for both front and back cover is fully rasterized (except for text which I choose to export as curves). Does anyone have any ideas? Does this happen upon grouping certain layers? Or maybe a bug with the Designer cropping tool? I also tried the solutions on both of these forums, but with no success: White bleed exporting bug Bleed always white
-
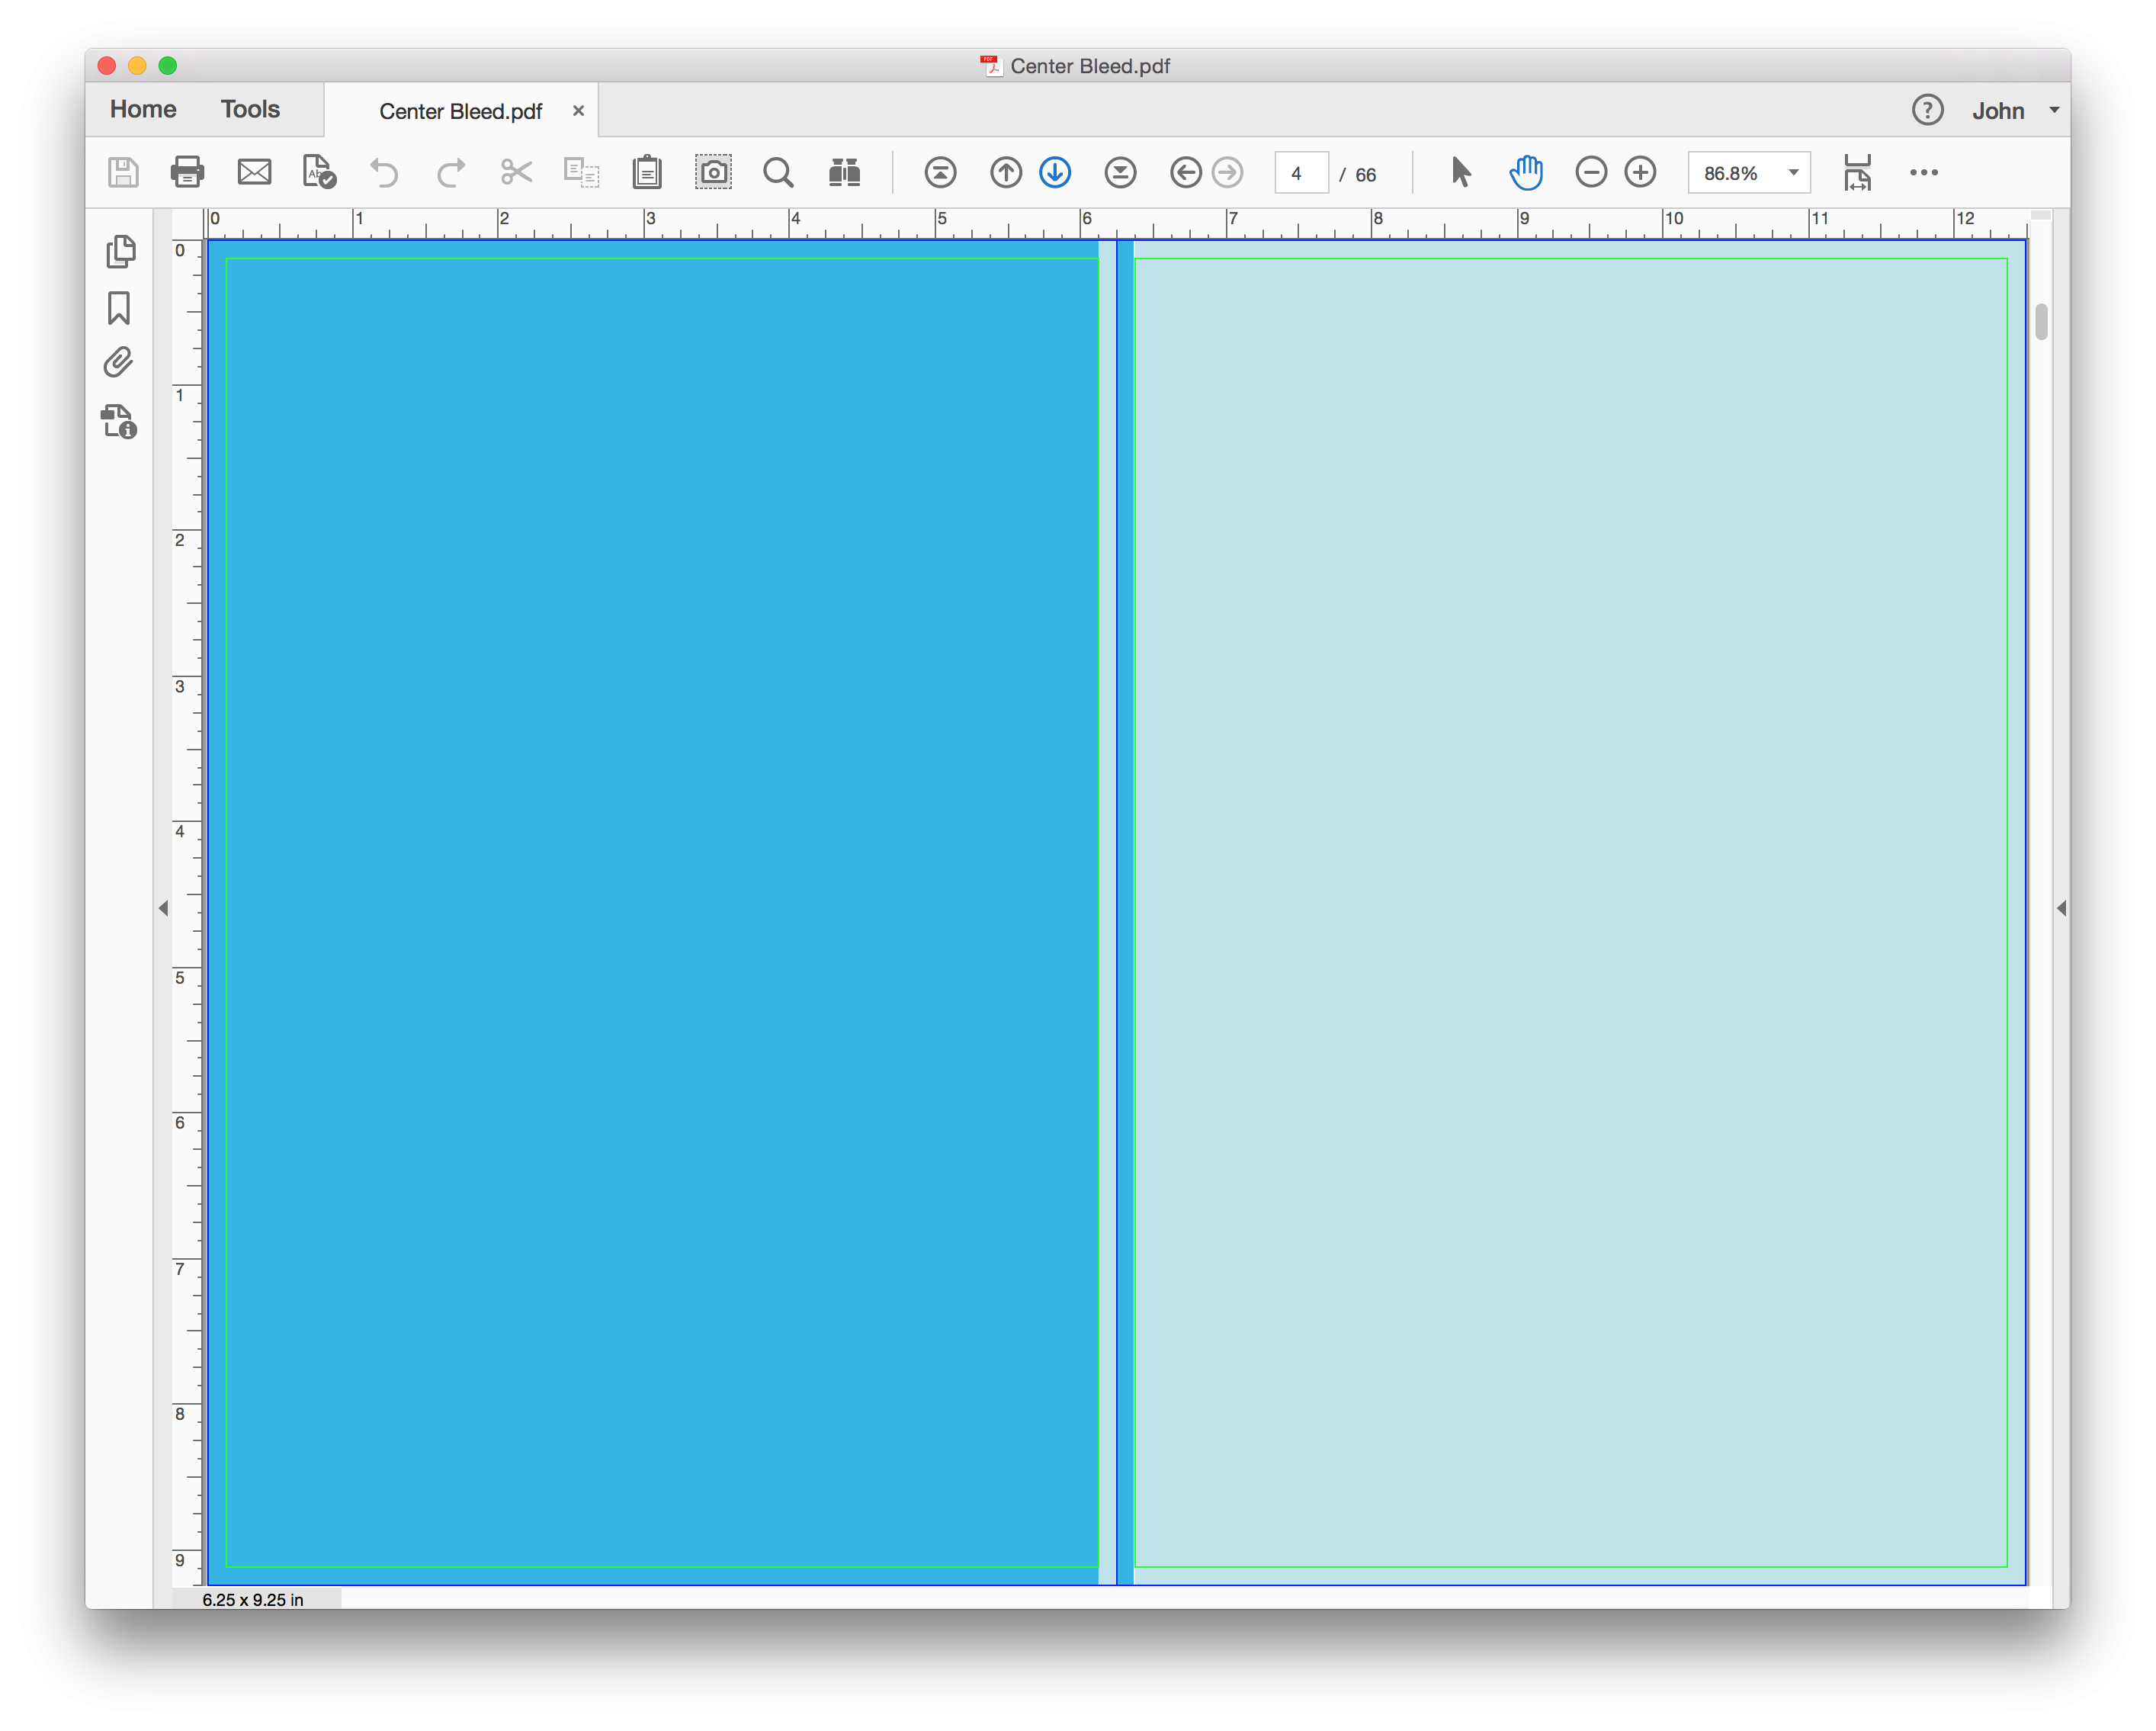
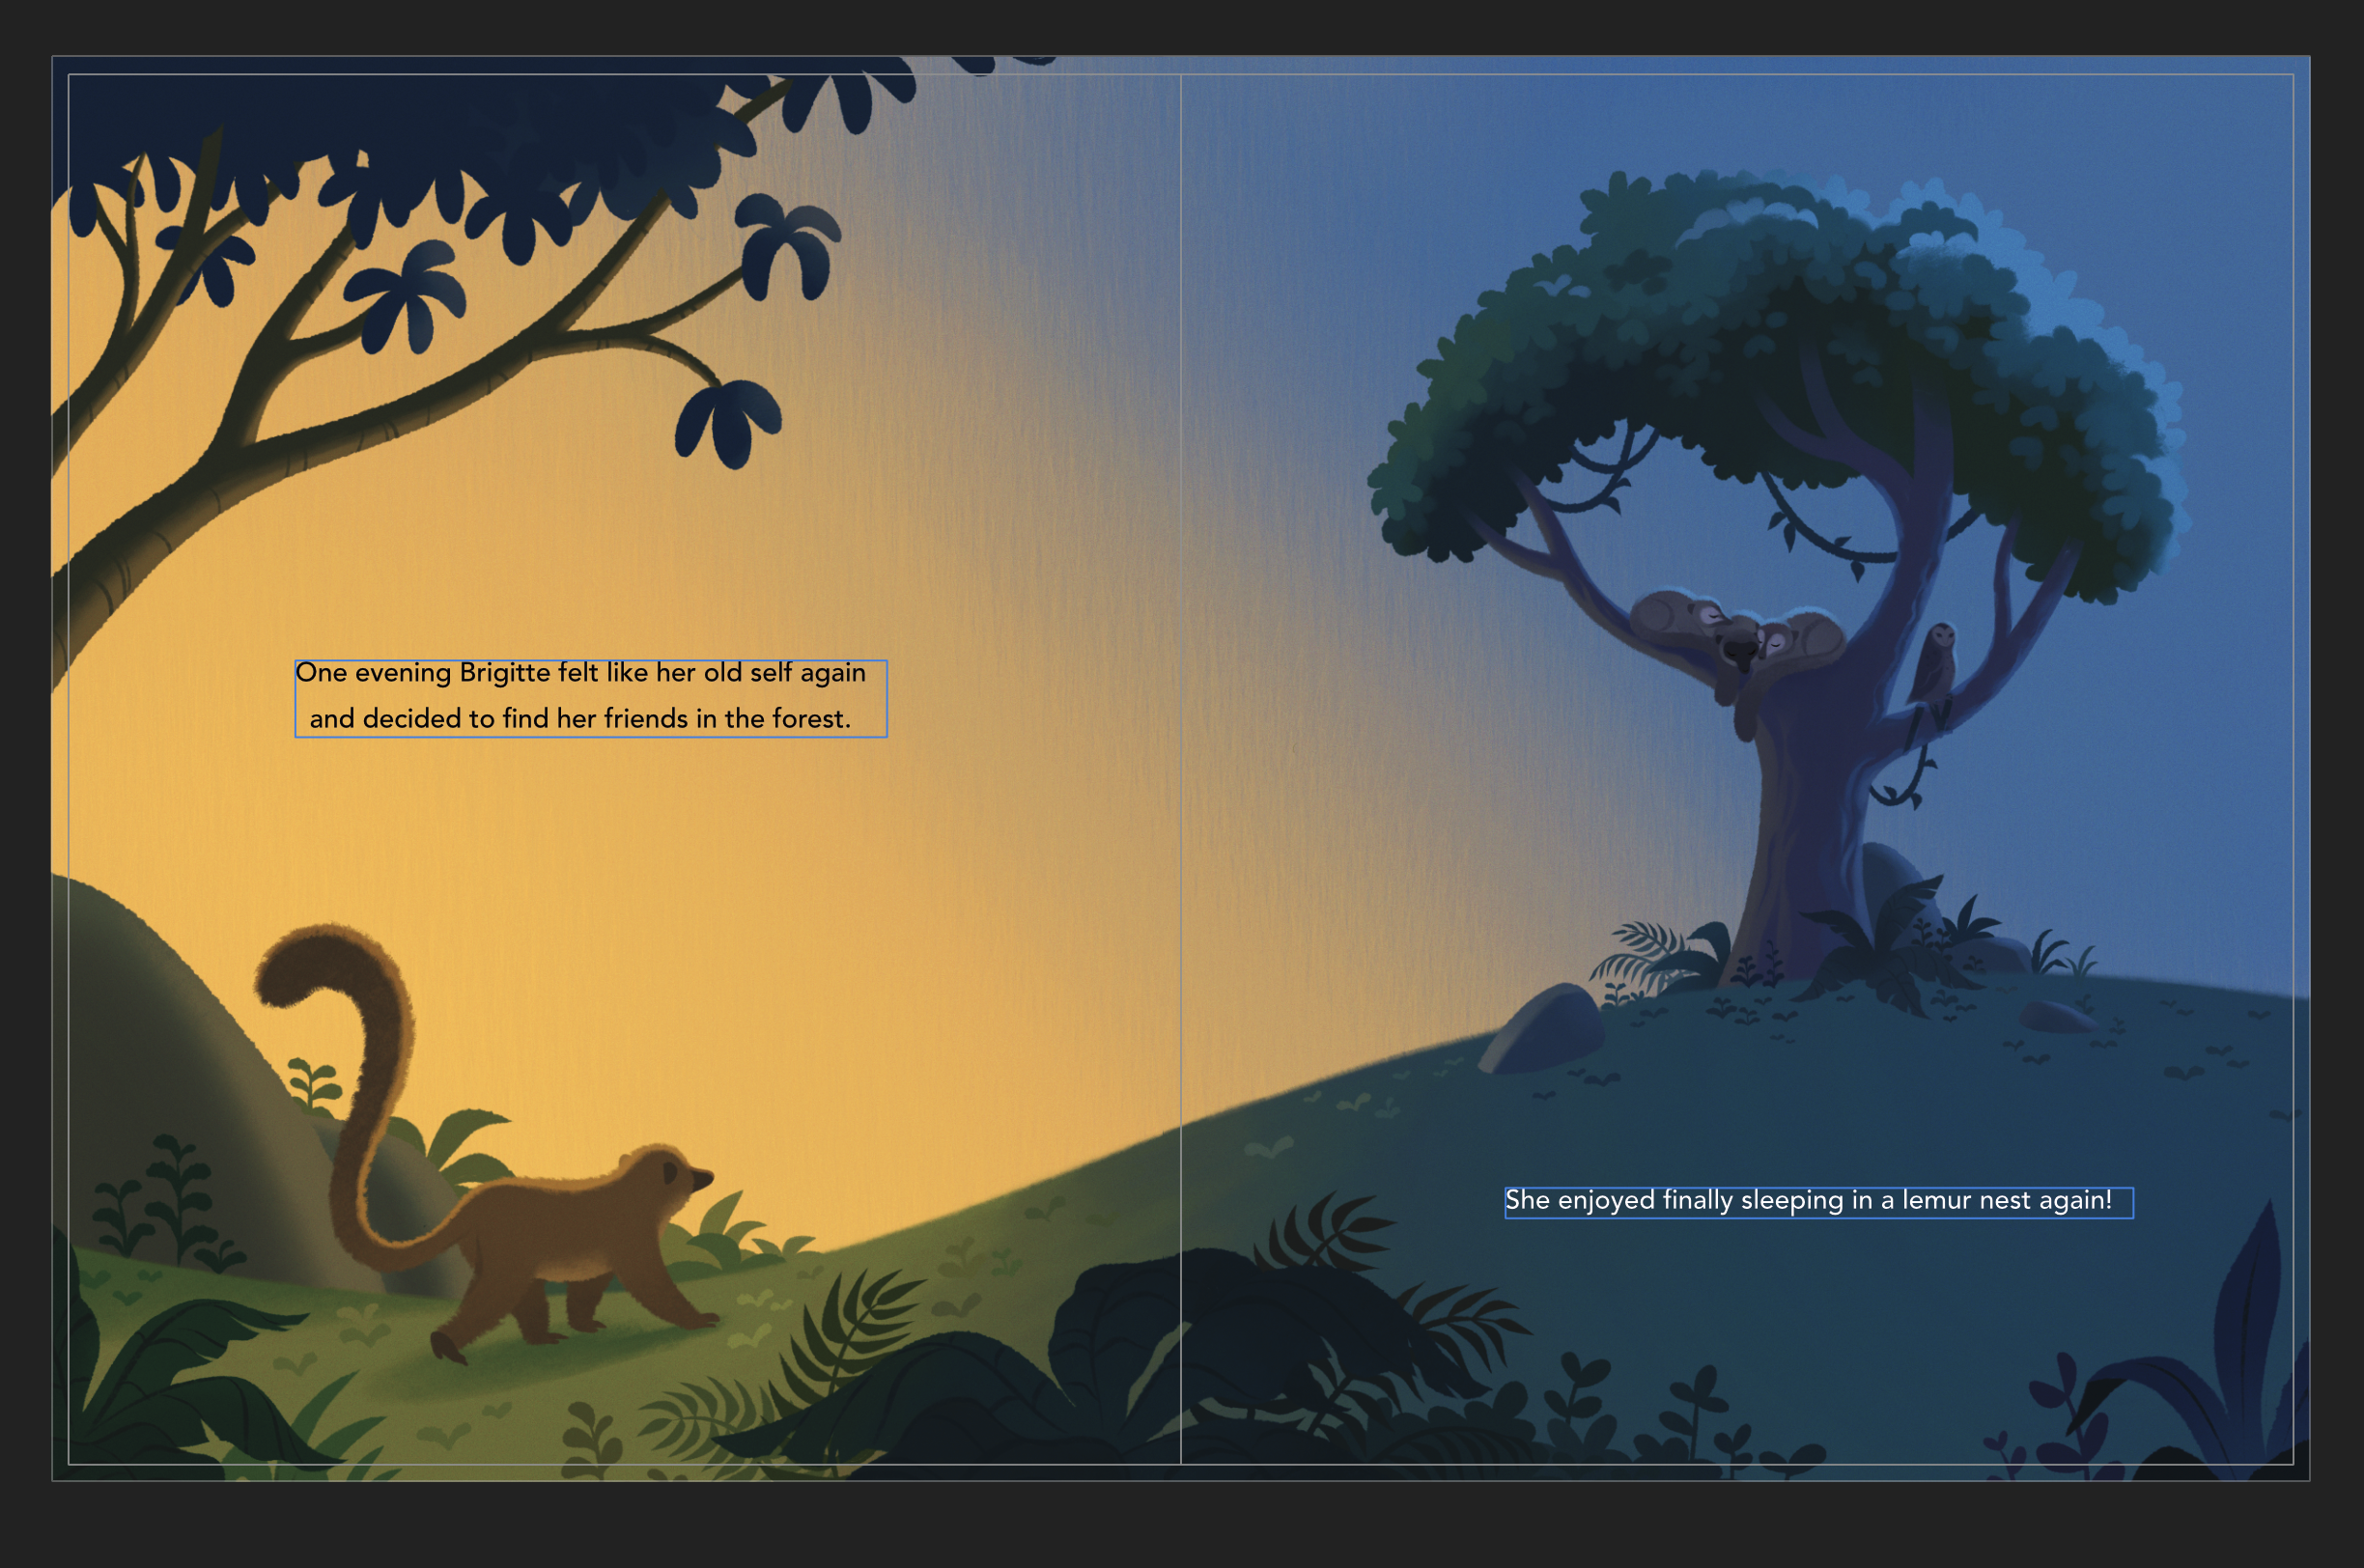
 I'm designing a children's book for a client and have run into a problem with our printing company. The first physical copy of the book we ordered had full page spreads that were not lined up properly in the center. I contacted them about this issue and they said it was due to the bleeds being incorrectly set up. I put the book together as spreads, and then un-checked "facing pages" so I can manually adjust the inner bleed for my full-page spreads on each individual page. When I put facing pages back on to see how it looks, the spread illustration flows across the page just fine. However, my printer wants to see the inner bleed for the corresponding pages to "cross over" so the bleeds appear on the opposite inner edge of the page. I've seen other posts on this forum where people have seen the inner bleed "crossover" as a problem, but my file doesn't do this. How can I set this up in Affinity Publisher? I've attached an example of what they want me to do from their site as well as screenshots of what my spread currently looks like (as facing pages and as individual pages).
-
 I'm new to Affinity, and maybe I'm missing something, but I design and print labels for various products. I start with one file in Publisher that has the labels for a product type, then I'll export certain pages to a PDF, and import them into a new Publisher file that has the layout for the label sheets I'm using. Some designs have a bleed, and I always make sure to include bleed on export, but when I import (place) them into the new file, the bleed isn't included. I'll double check the pdf file dimensions to make sure the bleed is there, but the file gets trimmed to size when I import them. Is there a setting I am missing somewhere?
 -
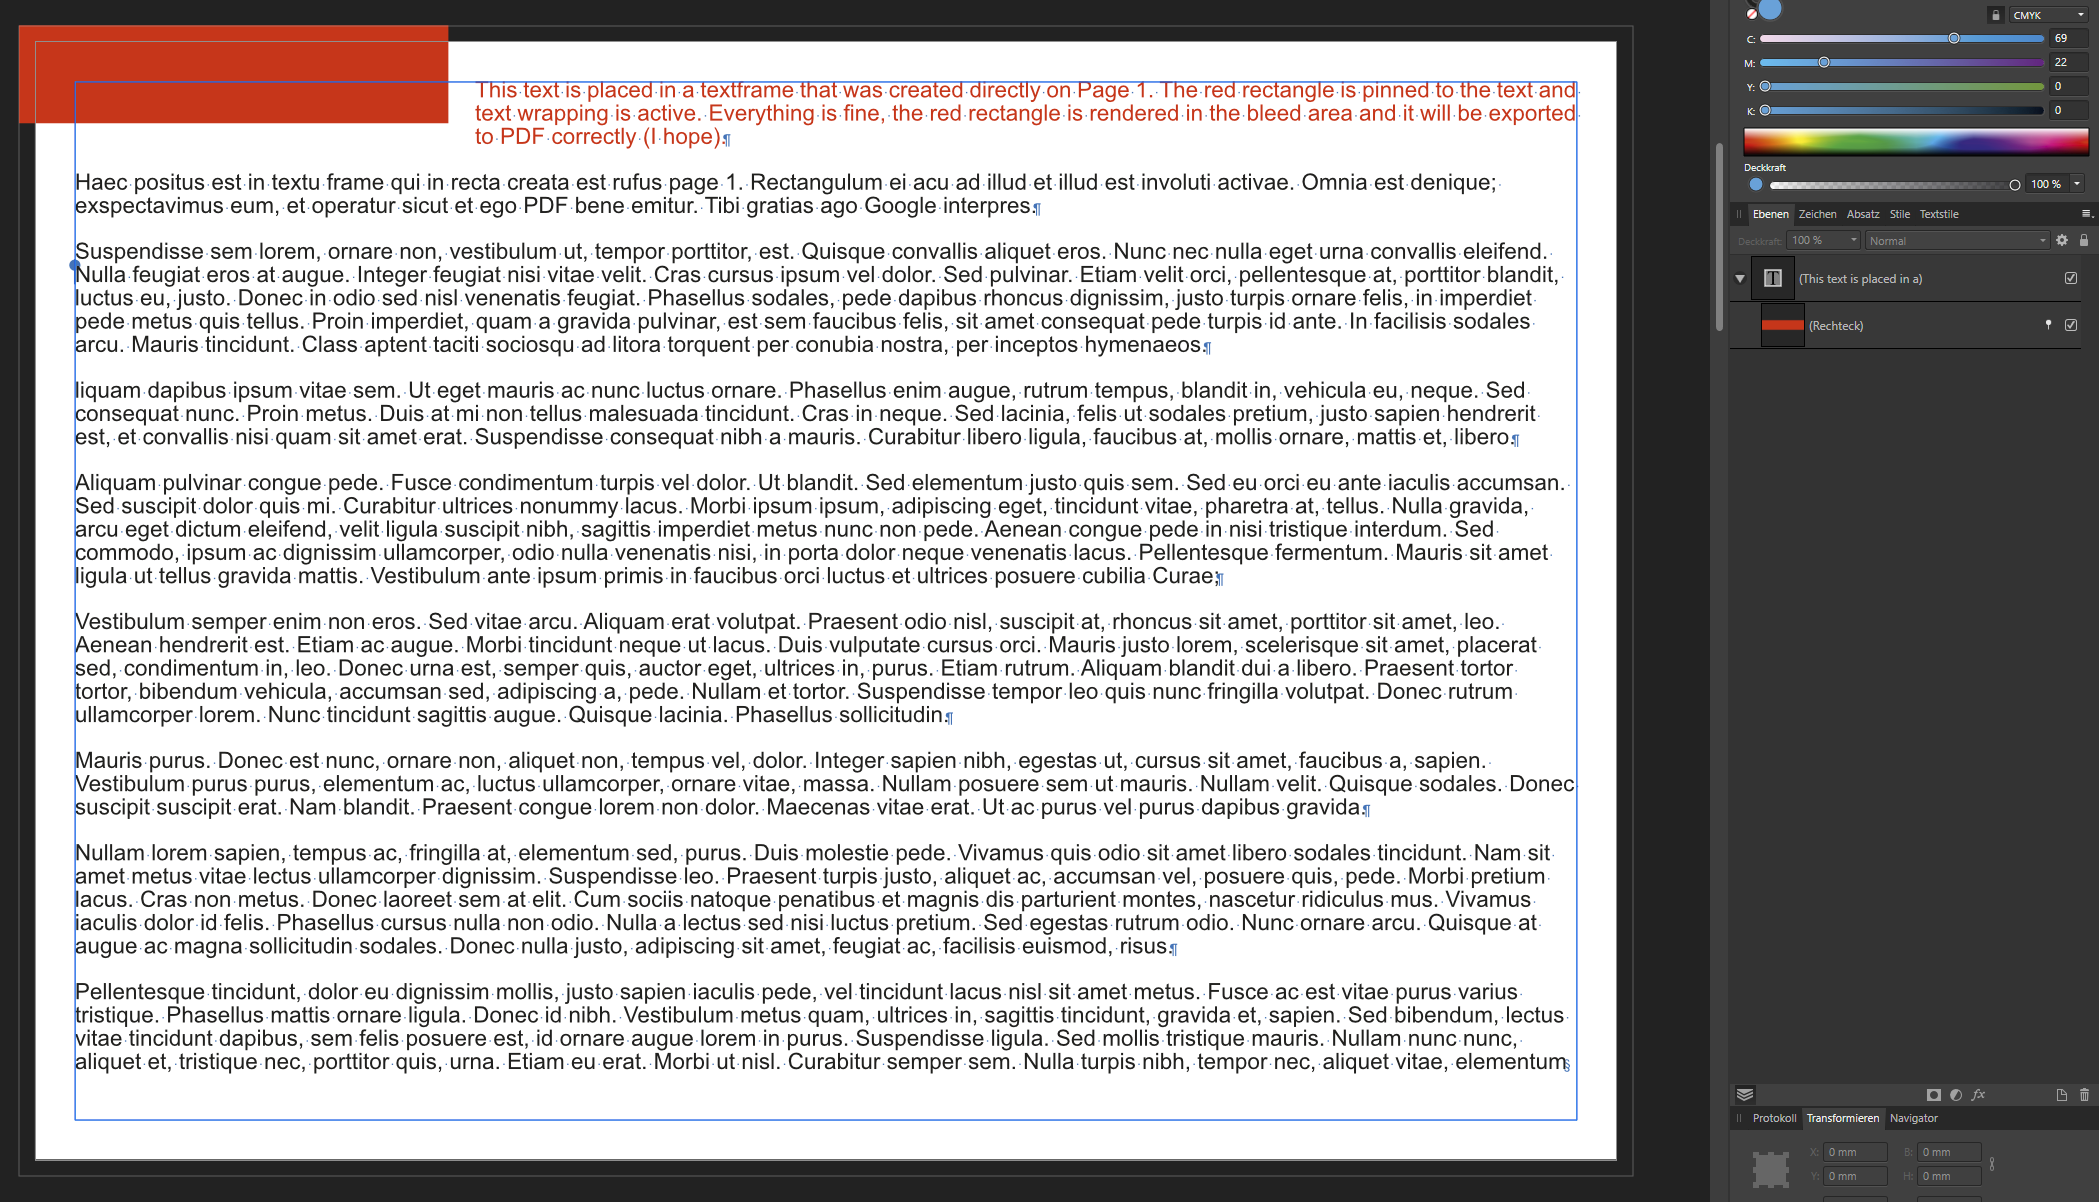
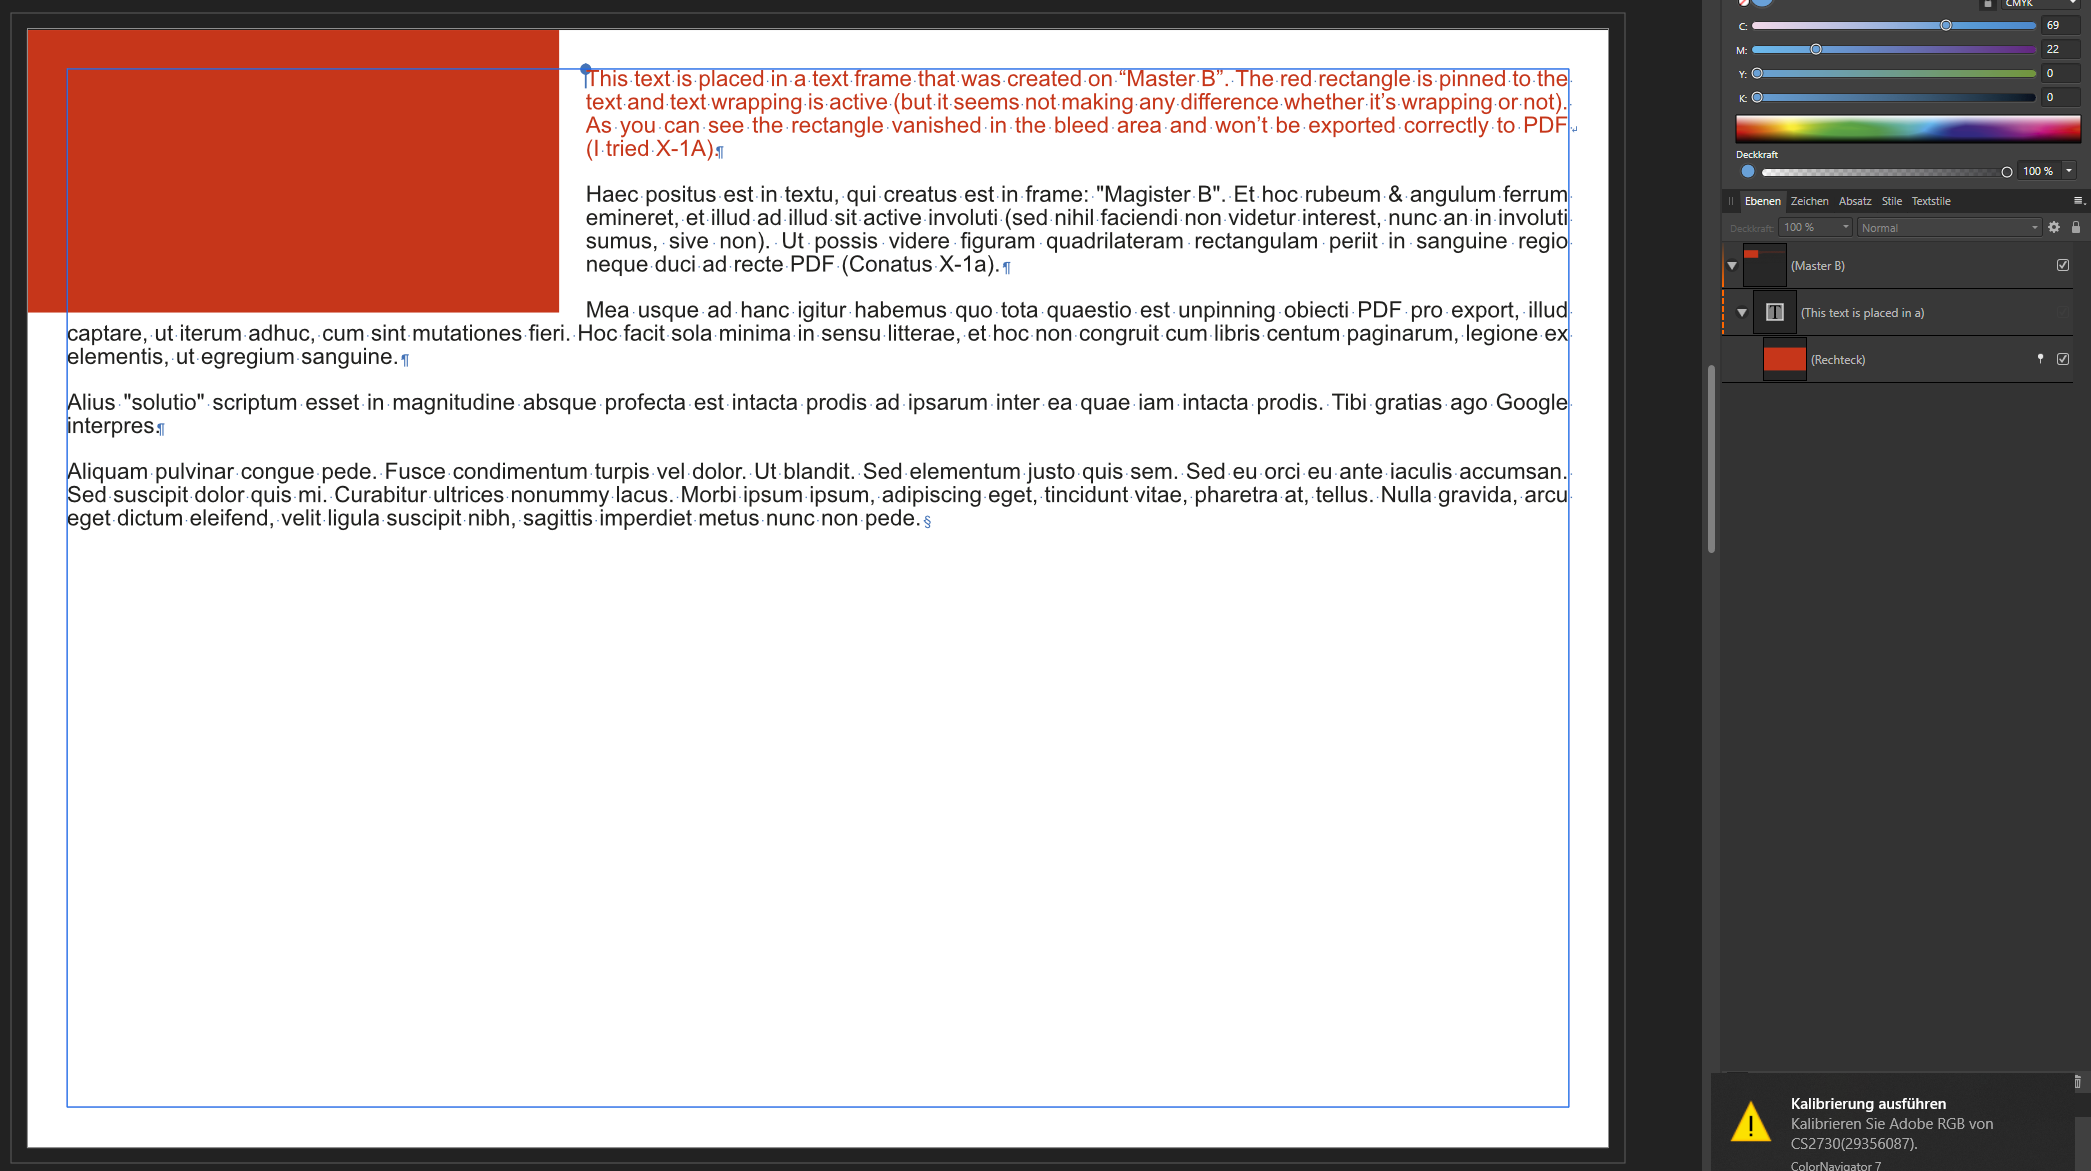
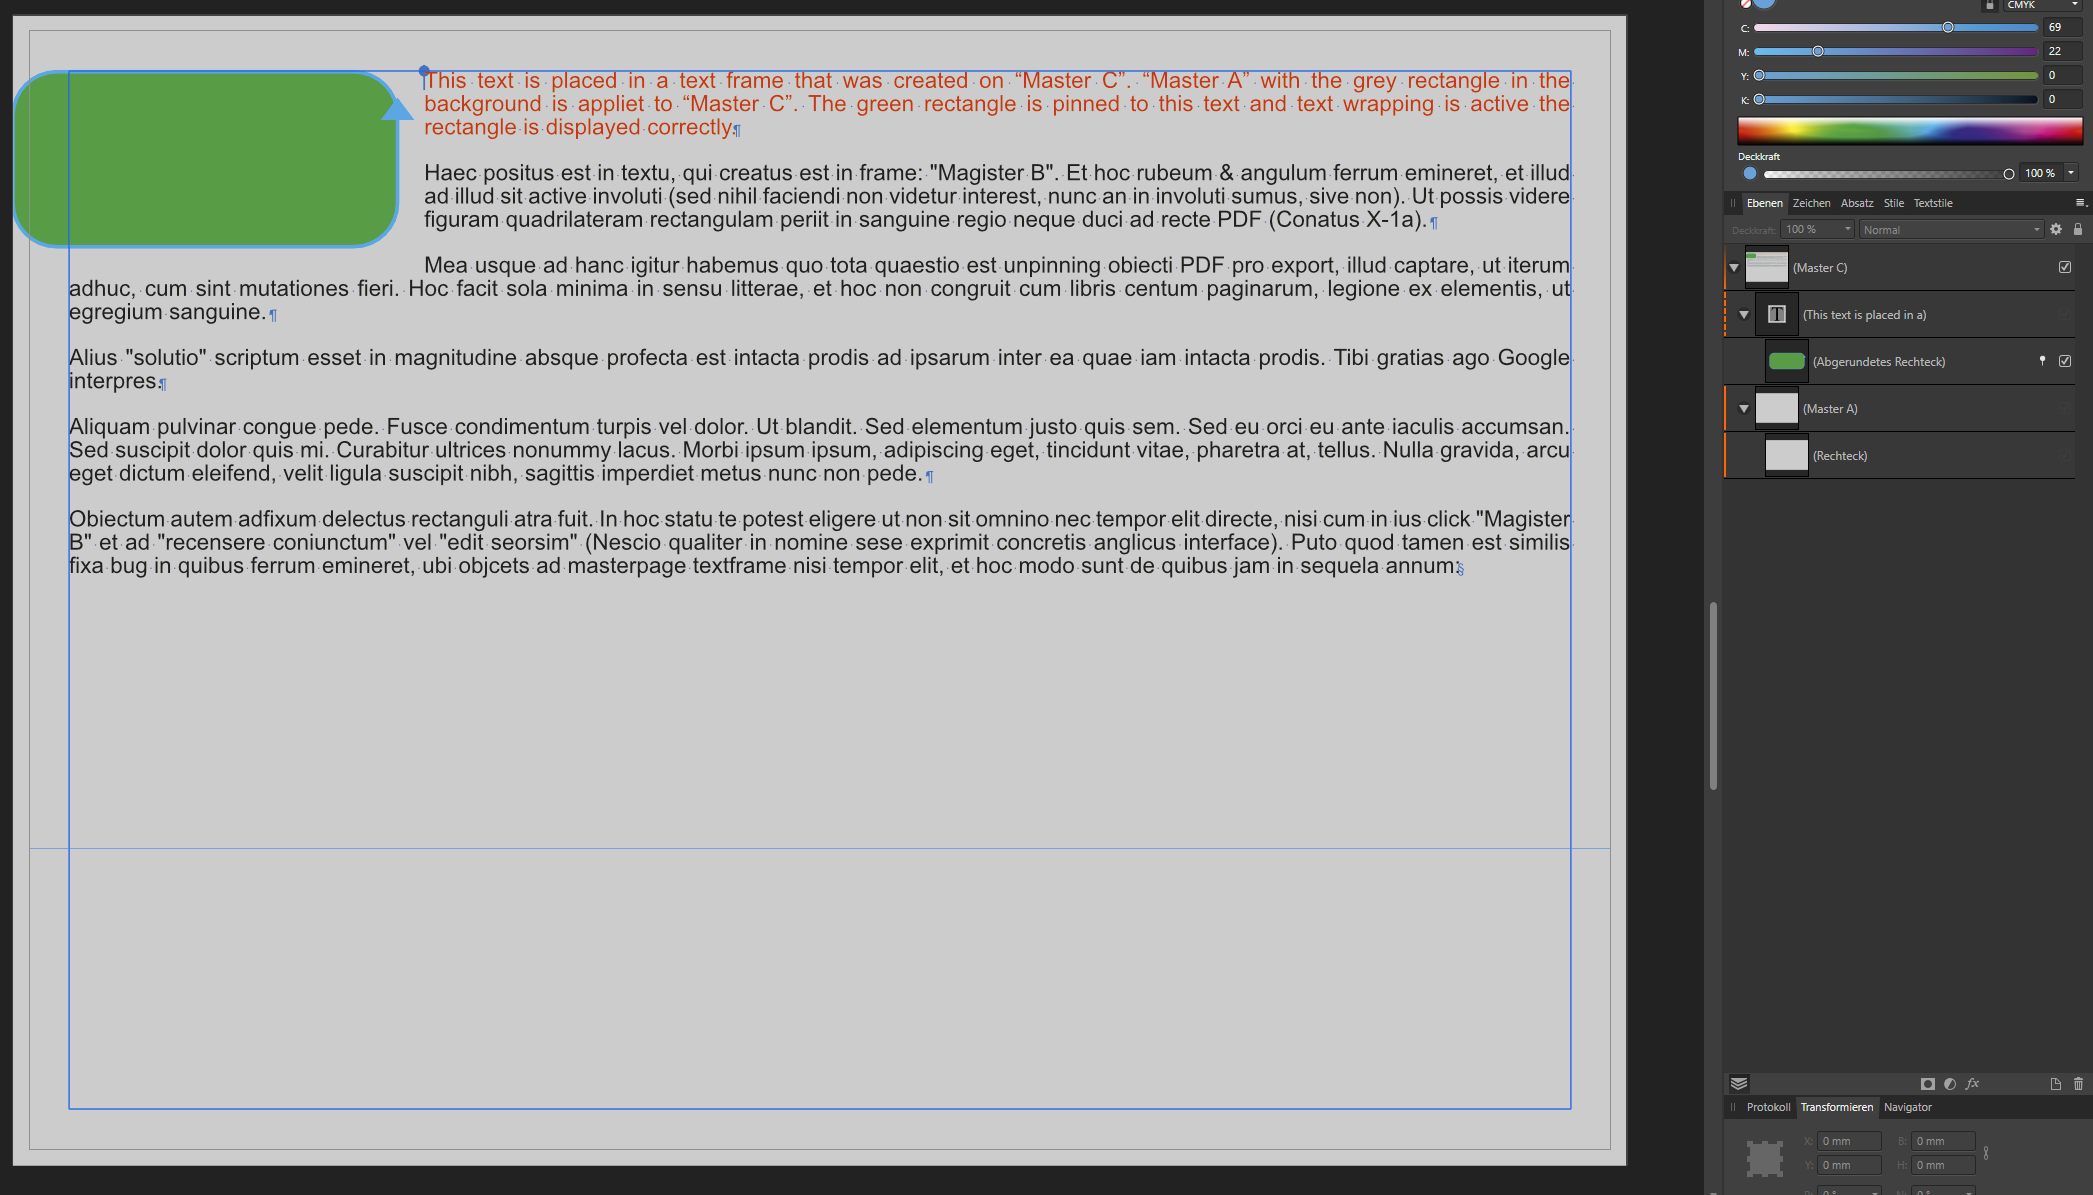
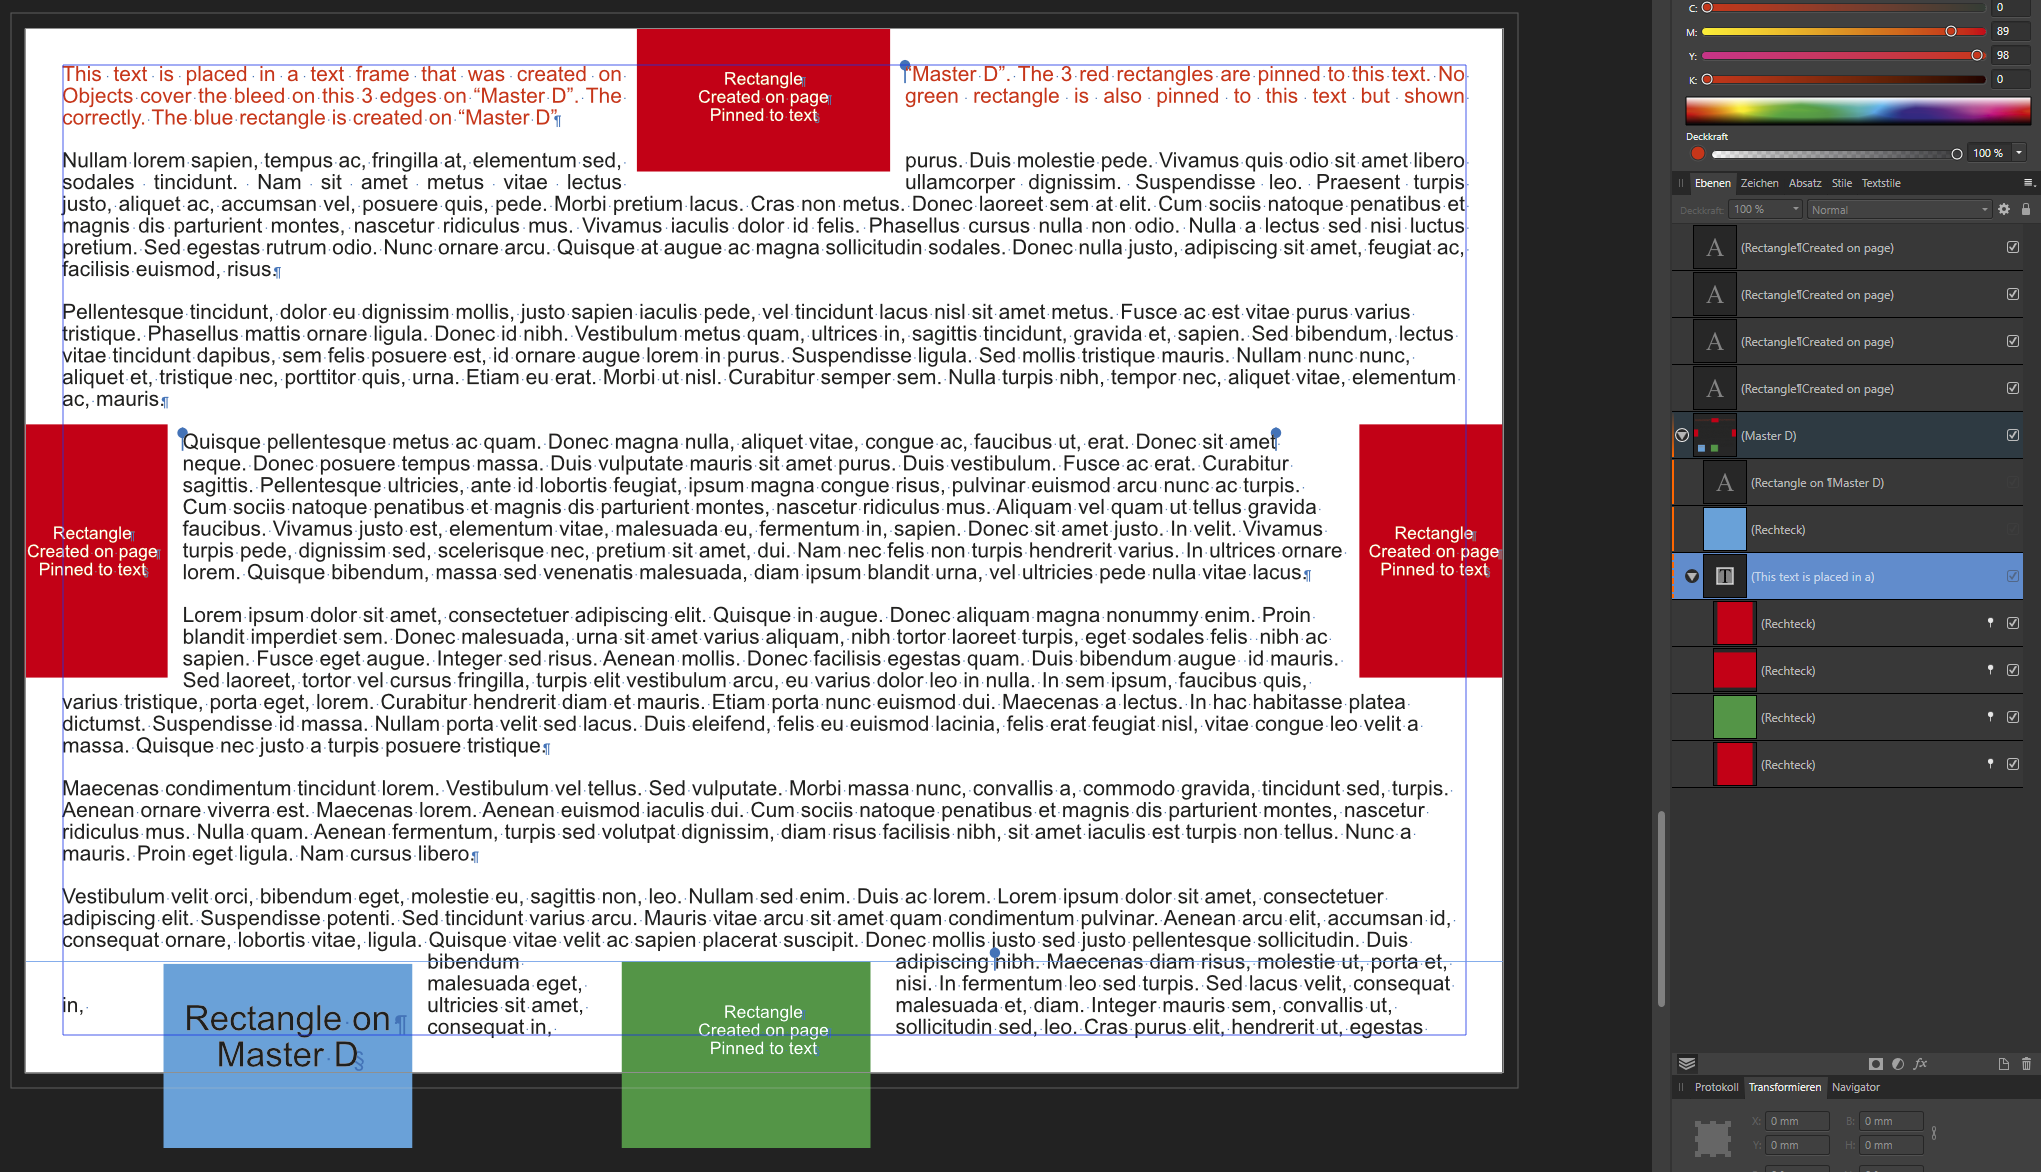
 First I really want to say that I am really impressed what Serif staff has created the last years and keeps on improving the product more and more. I used APub 1.8.5.703 Retail from Serif Store to create the attached file showing the problem / bug. OS: Win 10 Pro 1909 Build 18363.1082 At work we evaluate the test versions of Affinity Suite since last week and I encountered the problem that objects which are pinned to text frames that are created on master pages vanish in the bleed area. They keep vanished after exporting to PDF X-1A. As soon as you unpinn the Objects they reapear in the bleed and exporting to PDF works correctly. That was my solution for the moment, because the document contained just 2 pages. At home I could simply reproduce this behaviour with the latest retail version of Publisher: Create document with single pages and bleed. Create a Master with an empty text frame Apply this master to a Page Place some fill text into the text frame on the page (not on the master! – I don't know if this would make any difference) and expand field (that is what it's called in the German UI to make filler text editable) Create a rectangle with some colour fill on that page; the rectangle has to cover the bleed at least on one side Pin the rectangle to the text Further research to find a global Workaround: It does not / partially happen with pinned objects to text frames drawn directly on a normal page. (Image 01) with unpinned objects from master page text frame. with pinned objects to master page text frames when there are objects on the master covering the bleed on the edges (or all edges) where the pinned object is located. (Image 04) if to the master with the text frame there is applied a master with objects that meet the criteria of 3. (Image 03) It happens on pages with masters applied that don't contain objects in the bleed (Image 02) on pages where the text master and the background master were applied directly to the page on the edges – for example left and top – of pages with applied master with a text frame and objects that don't cover the bleed on the left and top (Image 04) If it's not a bug and the problem is like often in front of the monitor, my apologies and thanks a lot for possible solutions. ____________________________________________________________________________________________________________________________________________________________________ An Text in Textrahmen von Musterseiten angepinnte Objekte verschwinden im Anschnitt Für die angehängte Datei, die den Bug / das Problem aufzeigt, habe ich die Kaufversion aus dem Serif Store von APub 1.8.5.703 benutzt OS: Win 10 Pro 1909 Build 18363.1082 Seit letzter Woche evaluieren wir in der Firma die Testversionen der Affinity Suite und dabei trat der Fall auf, dass Objekte die an die Textrahmen von Musterseiten angepinnt werden, im Anschnitt nicht sichtbar sind. Auch im PDF-Export für X-1A bleiben Bereiche im Anschnitt verschwunden. Sobald man den Pin löst erscheinen diese Bereiche im Anschnitt wieder und der PDF-Export funktioniert auch wie erwartet. Das war auch die vorläufige Lösung, da das Dokument nur 2 Seiten umfasst. Zuhause habe ich mit das Verhalten mit der aktuellen Kaufversion von Publisher einfach reproduzieren können: Neues Dokument erstellen mit Einzelseiten und Anschnitt Musterseite mit einem leeren Textrahmen anlegen Musterseite einer Seite zuweisen Den Textrahmen auf der Seite (nicht auf der Musterseite! – Keine Ahnung ob es einen Unterschied macht.) mit Blindtext füllen und das Feld erweitern Auf der gleichen Seite ein Rechteck mit einer Farbfüllung aufziehen; das Rechteck muss wenigsten mit einer Seite im Anschnitt liegen Das Rechteck an den Text anpinnen. Weitere Untersuchungen für einen globalen Workaround: Es funktioniert richtig / teilweise wenn Objekte an Text in Textrahmen angepinnt werden die direkt auf der Seite erstellt werden (Bild 01) Objekte vom Musterseitentextrahmen abgepinnt werden Objekte an Textrahmen von Musterseiten angepinnt werden die Objekte enthalten, die im Anschnitt der jeweiligen Seitenkante (oder allen) liegen (Bild 04) der Musterseite die den Textrahmen enthält eine Musterseite zugewiesen wird die Objekte enthält die den Kritereien Punkt 3. entsprechen (Bild 03) Es funktioniert nicht auf Seiten mit zugewiesenen Musterseiten, die keine Objekte im Anschnitt enthalten (Bild 02) auf Seiten denen Musterseiten mit Textrahmen und mit Objekten im Anschnitt einzeln zugewiesen werden an Seitenkanten – z. B. links und oben – von Seiten mit zugewiesener Musterseite mit Textrahmen und Objekten die nicht links und oben im Anschnitt liegen (Bild 4) Wenn es kein Bug ist und das Problem wie so oft vor dem Computer sitzt, hier schon mal meine Entschuldigung vorab und vielen Dank für eventuelle Lösungen. Image 01 / Bild 01 Image 02 / Bild 02 Image 03 / Bild 03 Image 04 / Bild 04 File with recreated behaviour: Datei mit reproduziertem Verhalten: apub_1_8_5_703_object_pinned_to_master_textframe_vanish_in_bleed.afpub
-
 Guides, margins, and bleeds cannot be set and have display errors on the iPad. They cannot be set when you are using art boards (they jump back to 0), and when you have multiple art boards, the margin shows up in the wrong place. I noticed margin display error it when opening a document I’d created on my Mac - they are right on the Mac, but display wrong on the iPad. I’m using 11” iPad Pro, affinity designer 1.8.4 linking the original thread from the pre-p 1.8 beta archive as these have been issues since 1.7: plus here’s a video of the margin display error RPReplay_Final1598999987.mp4