Search the Community
Showing results for tags 'beginner'.
-
 Hello all! I'm a complete beginner to creating vector artwork. I'm more of a Photoshop person. I have the Designer trial, and since I work better with text tutorials than videos, I went looking for some. I didn't find many, but there are tons for Adobe Illustrator. I did one and the lack of the warp tool in Designer tripped me up. Can you recommend any Illustrator tutorials (since there are so many more of them) that work with Designer? I'm looking for basic stuff. This is the tutorial I tried that used the warp tool, otherwise, I had no trouble with it. https://design.tutsplus.com/tutorials/how-to-create-a-set-of-flat-animal-icons-in-adobe-illustrator--cms-24710
 -
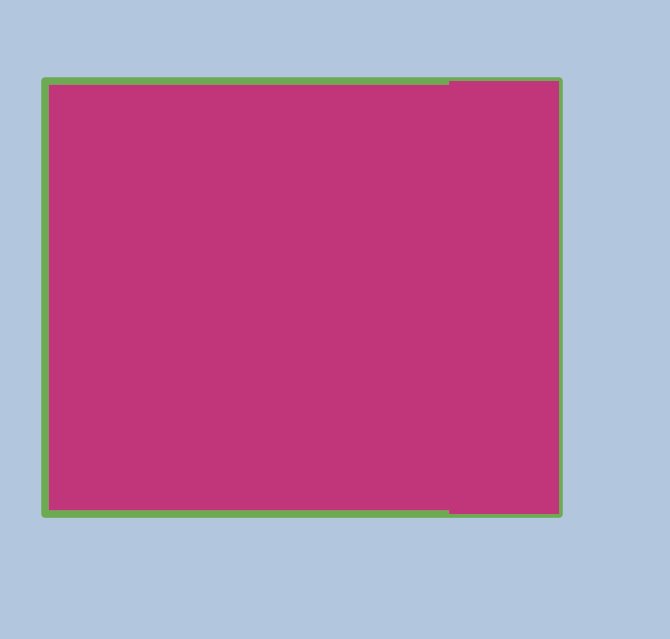
 Hi, I´m a total beginner and I just can´t combine this 3 lines into an area I could fill with color. They just don´t combine. Why is it?
-
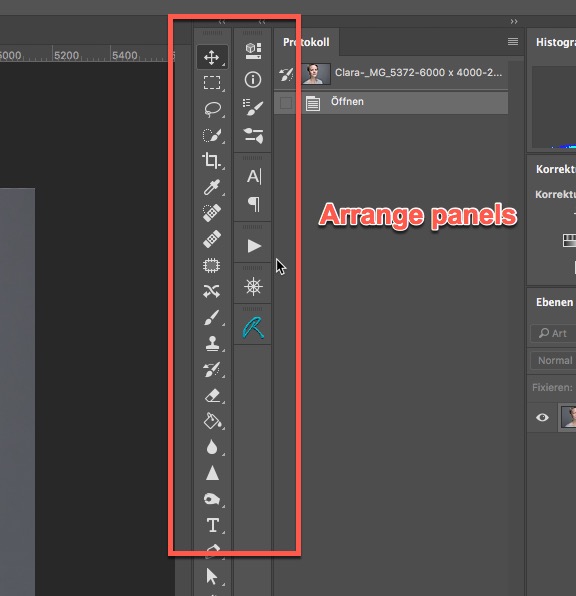
 Hi there, as an Adobe user for years I´m thinking about switching to AP and donwloaded the trial version. From what I see after one day of testing I´m really impressed and I´m sure it not only can replace Photoshop, it seems to be the better software. With that said I have some questions from a AP beginner (not a image editing beginner at all) perspective: 1. Is there a way to "export" images from Adobe Lightroom right into AP? I mean some option to set AP as the external editor in LR 2. Is there an option to save individual workspaces such as in Photoshop? I mean customize the canvas and panels I use the most and save that. 3. If 2. is possible is there a way to use these individual workspaces on two Macs? I´m using an iMac and a MacBook and would like to have the same environment on both machines 4. Is there a specific workflow with CaptureOne? I mean use C1 for tethering, as catalog and for RAW processing and AP for more advanced image editing/retouching 5. Are "panels" available such as in PS? I mean can I arrange my panels and tools in a way shown in the attached screenshots (and save this in my workspace)? I think that´s all for the moment. Thanks a lot for your support. Cheers Michael
-
 Hi Everyone, I just bought affinity designer, but was wondering if there are any good resources for complete beginners? I am looking for something like an in depth guide. I wanted to order the workbook but my country is not listed. Thanks for the help in advance. Regards, HDK
 -
 I'm new to photo editing and when I look at all the different options available, I get overwhelmed and just don't know where to begin. I wish there was an explanation to what all the different options mean and an explanation of when and in which scenario they should be used. So, I'm wondering if such a website or video in AP exists? I watch all the tutorial videos but unless I understand when I should use the different options, e.g. masks, layers, brushes, etc., I won't be able to edit my photo properly. When I try to follow what's being done in the video on Vimeo, my photos look horrible then I get frustrated and just do basic editing on my computer.
 -
 I'm new to design so excuse if this it's a dumb question. I duplicate a shape with no stroke but the new shape doesn't have the same size. There is some "extra" which I believe it's from the stroke. Please take a look at the attached file. Thank you.
-
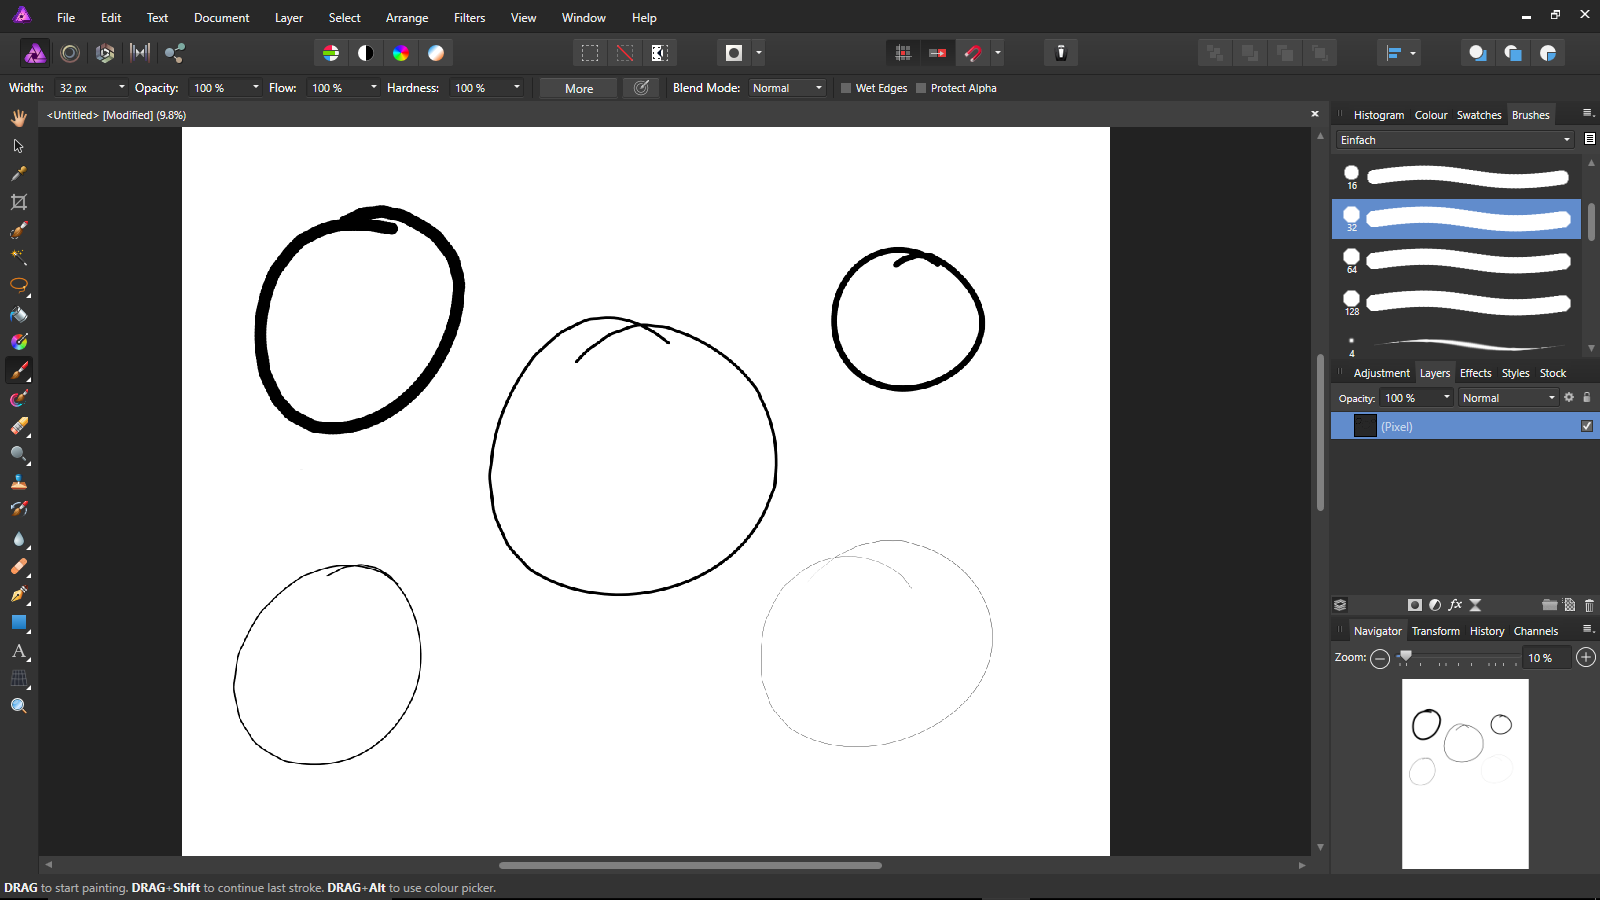
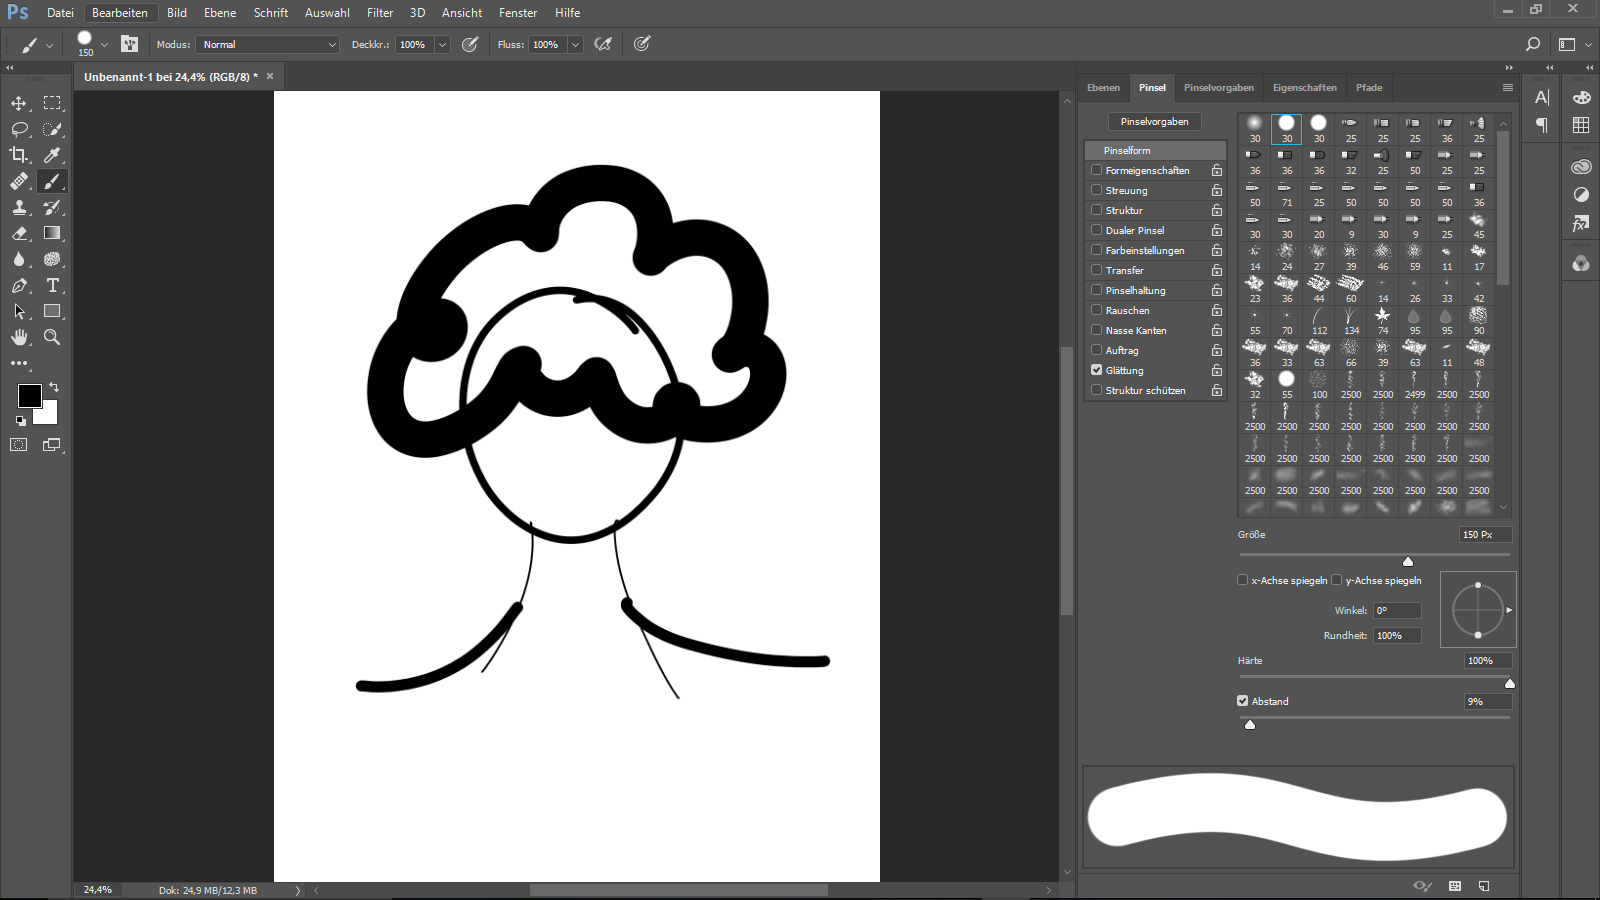
 Hey Guys, I just got Affinity Designer and Photo for my windows surface. Firstly, I'm not a professional, neither in Affinity nor Photoshop. What i want to do: I just want to make some easy sketches in AP, but it turned out to be quite "edgy". When i'm starting drawing with my stylus pen, its not a smooth line (using the brush tool), it's more like little pixel "steps" into the line. In PS i dont have this problem. I will attach some pictures to make it visible for you. I Hope someone is able to help me, maybe i have to do some settings first? The documents used, was 600 x 900 mm sized with a DPI of 300 (in AP) . It would be great getting out of this trouble, thank you! Cheers
-
 Greetings, I have no experience with graphic design, but I am interested in creating simple designs using stock images and incorporating text. In an attempt to narrow the information I have to consume to do this, I wish to find instruction on how to import stock images into affinity and place text onto and around these images. Also, how would I get the final product into vector format? I'm sure my questions are very elementary to most users, but I have never worked with any design software and would like to dabble in some simple designs and be able to see my creations on tangible products. Thank you so much for any support you can give.
 -
 Hi everyone, I've just released a series of 10 videos at 5 minutes each about the absolute basics of image editing at this link: https://www.udemy.com/enhancing-photos-for-complete-beginners/?src=sac&kw=enhan This is not a course about how to use any one bit of software. It just covers the basic processes & in what order you would do them with just about any image editing program. The majority of the videos use Photoshop Elements but I also use Affinity Photo and Pixelmator. *Ahem!* - this course does not recommend any one bit of software over another. The very basic stuff I show was selected because the course is for those people who come to an advanced image editing program with all it's buttons and don't know where to start. It aims to show you what sort of things you should be starting out with. It's for people who have said something like: 'I want to improve my photos. I've looked at one or two programs like Photoshop but all of them are just a confusing mass of buttons. Where do I even begin to understand what to do?' All the processes I describe can be done in Affinity Photo, and it naturally leads into 2 of the Affinity Photo courses I have at Udemy - the Five Steps to Better photos course and the Solid Foundations course. Oh; and did I mention it's free? Right, with that course released I can get back to doing the Affinity Photo 1.5 update videos for the other courses at Udemy. Thanks for your time & I hope the lessons prove to be of use to as many of you as possible.
 -
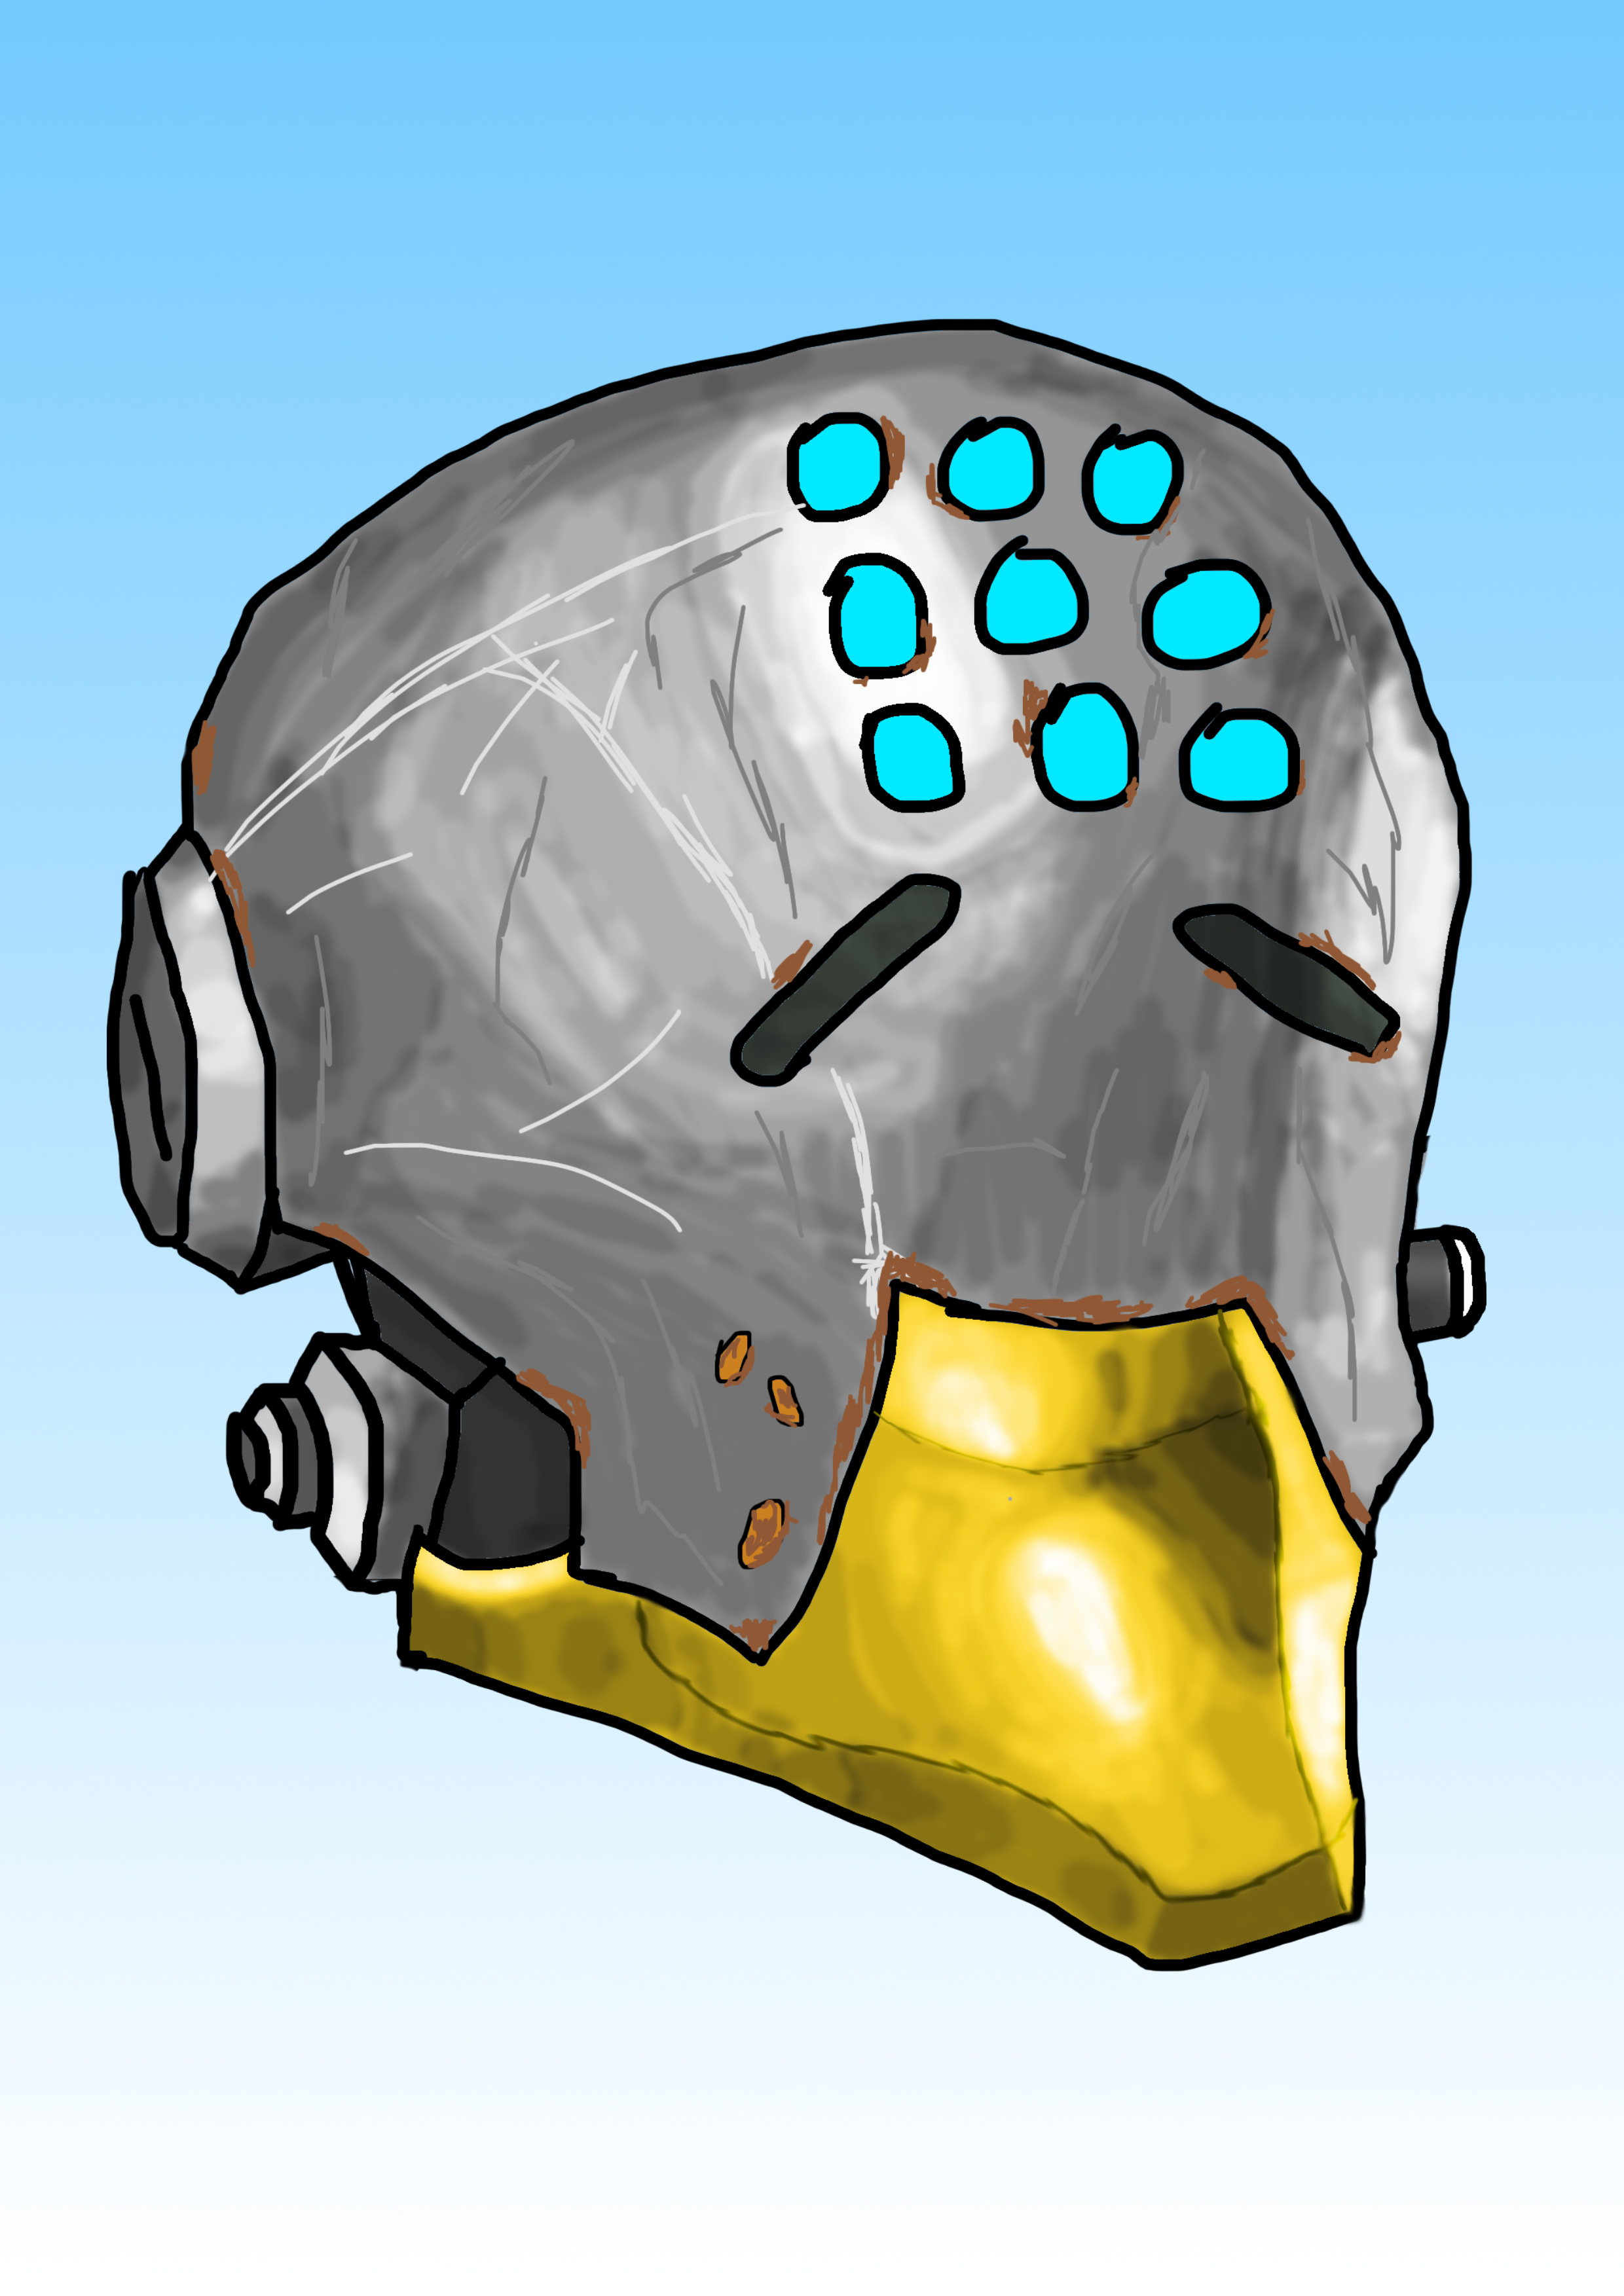
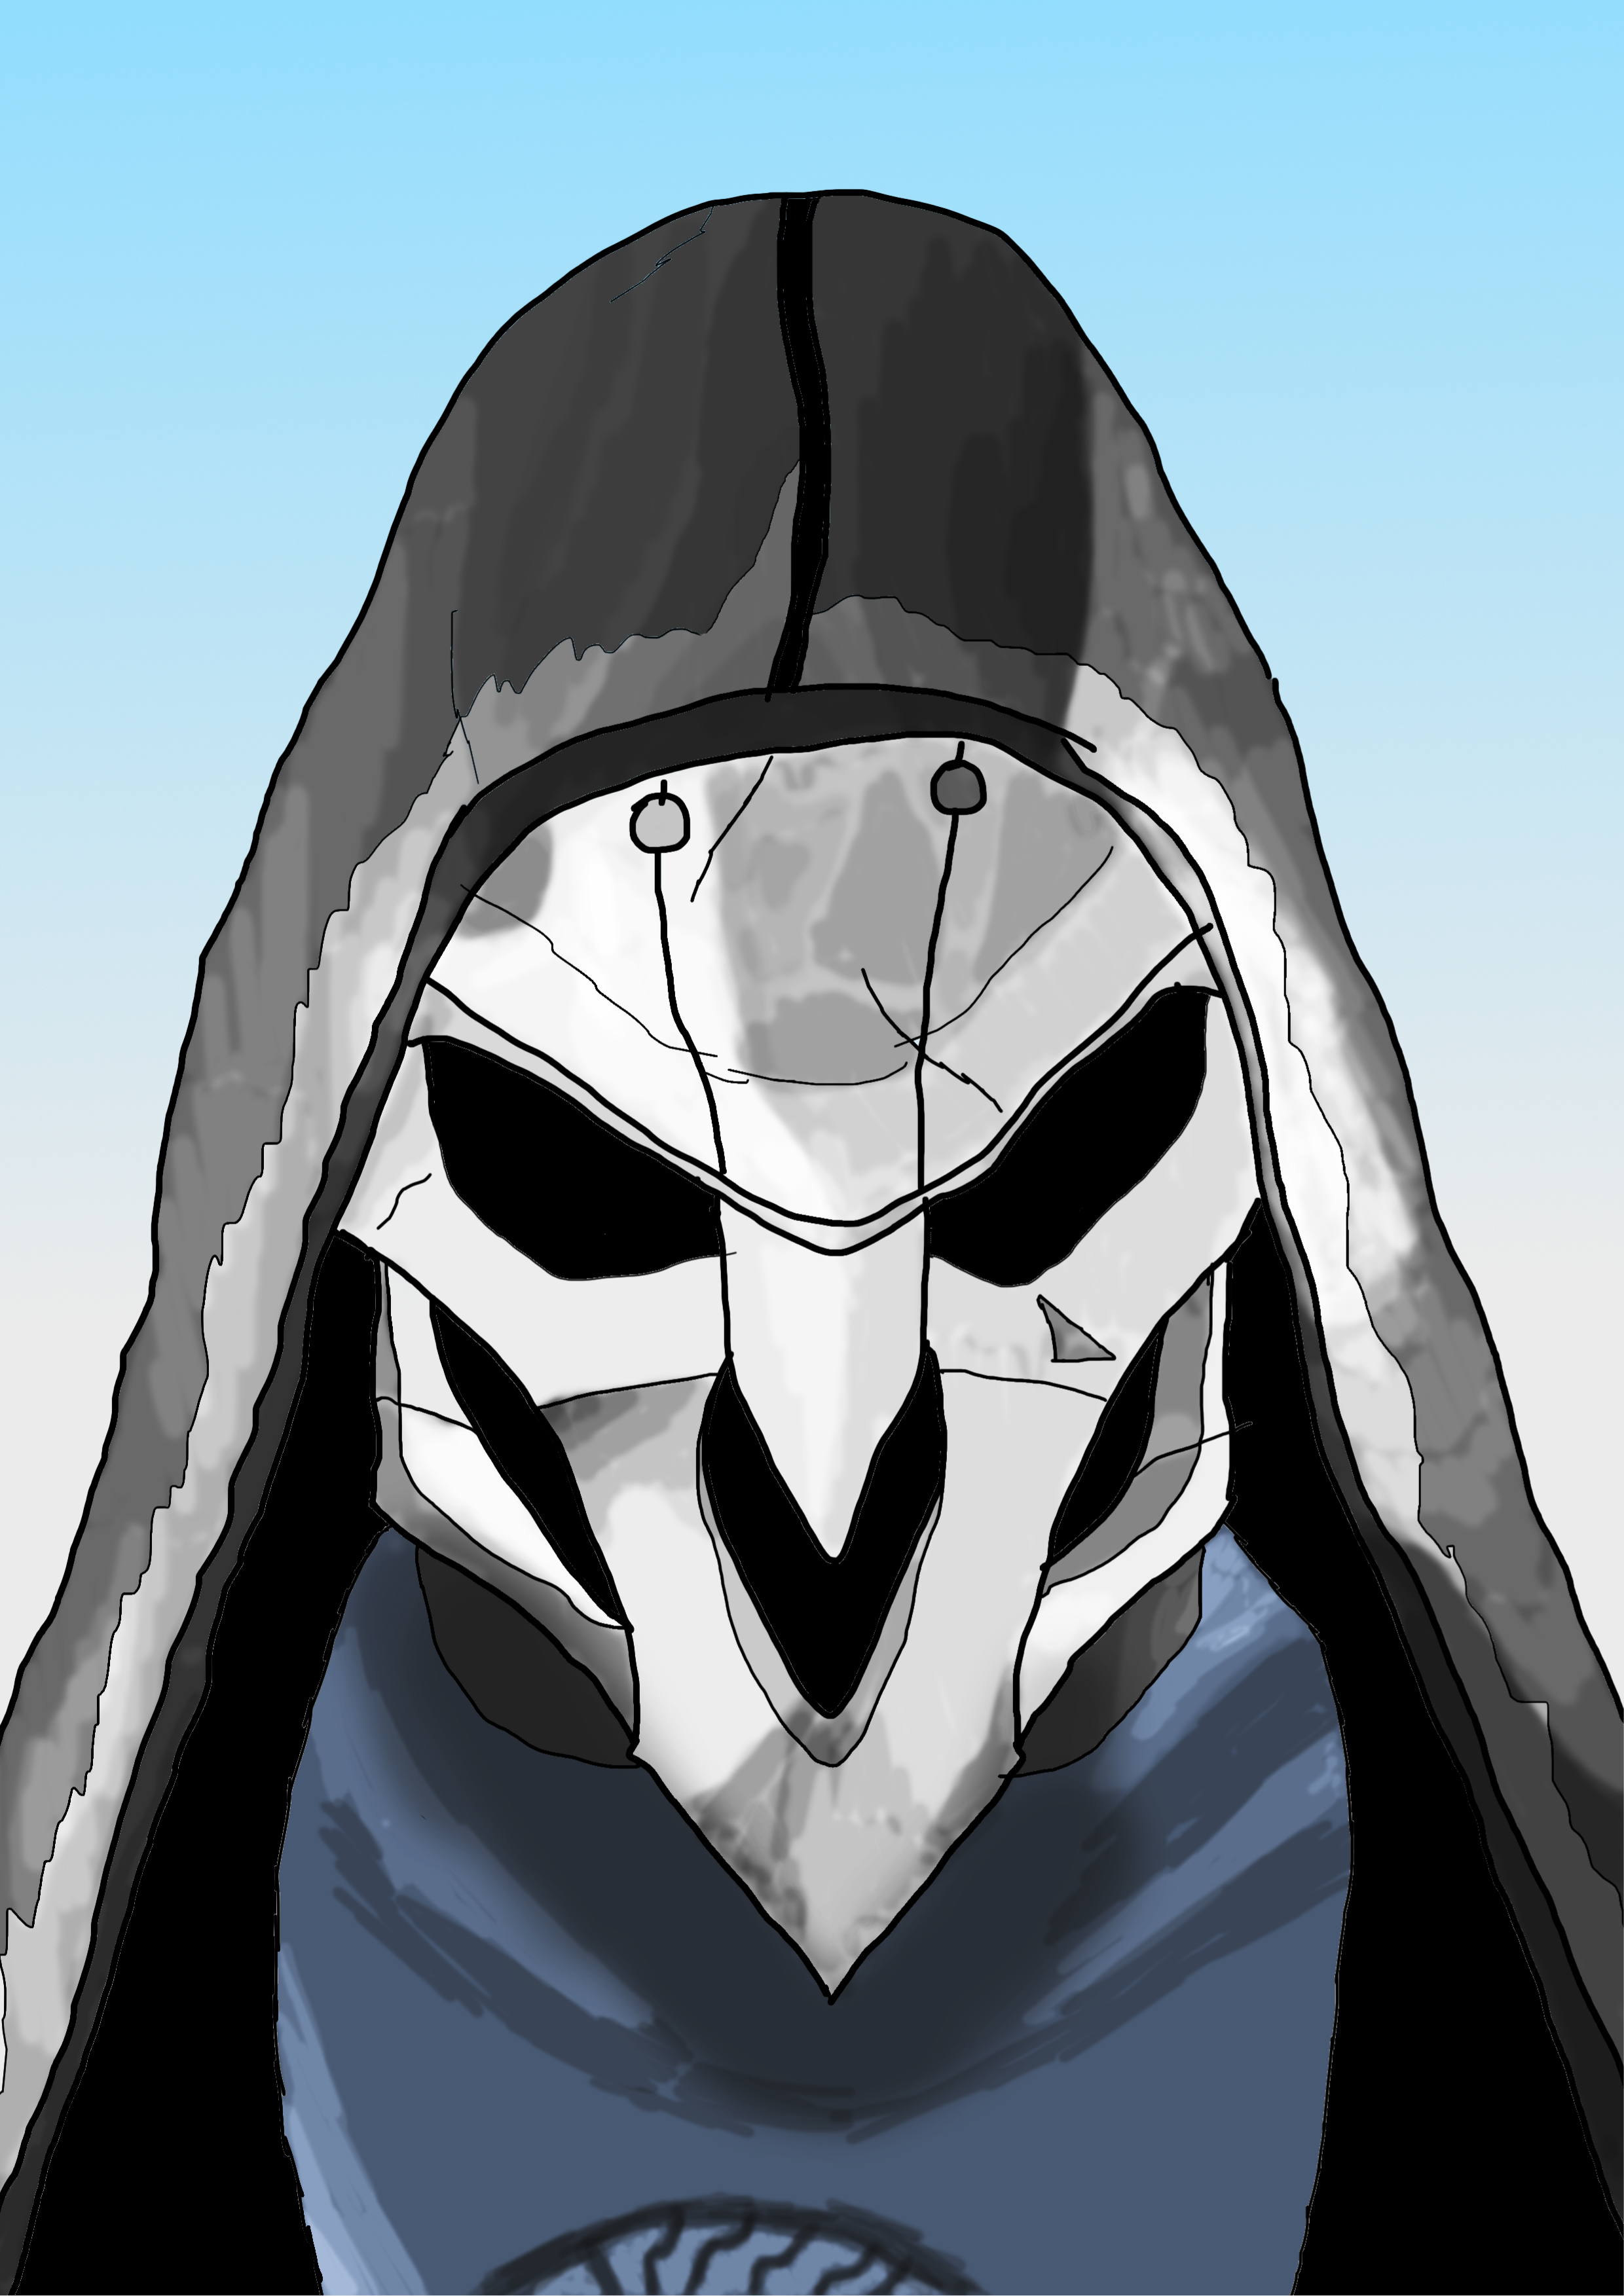
I got Affinity Designer at Christmas last month, and at first just played around to understand the program but I am now starting to do projects. With my small wacom tablet, I drew the two characters who are from the popular video game Overwatch. The robotic looking one is known as Zenyatta, a robot monk. The other is Reaper, a man who died then revived. The 3rd has nothing to do with Overwatch. Just some random thing I felt like making. Supposed to a underwater creature. Hope you like my work :) please keep in mind I just started.
-
 Hi everyone! I recently posted about my lack of knowledge concerning workflow but the kind guys who left a post there assumed that I DID have some sort of knowhow, and- the sad thing is that I (and I presume also many many others who had their socks blown off by this beautiful piece of software) have no idea whatsoever how to wade in... I have been taking photos for many years and have a big collection of raws, but up to now, have mainly limited myself to Picasa for JPEGs, and Lightzone and Adobes Lightroom for the past few months. And now- gorgeous Affinity... Where do I start? Yep- I know that there are great videos and I have gone through quite a few but they go over a specific setup, and I need even more basic than that- e.g: Do I play with white/black point before or after exposure? Why are there color controls in a b&w mix? Do I have to use all the controls? what is a live layer and do I have to use it? etc. etc. etc..... In other words- A course called "basic photo editing 101" Any ideas? Maybe there are a few videos out there for guys like me with low confidence issues? And if we're talking about videos (the guy who talks you through them is a real pro- kudos!) why arent they numbered in order of complexity?
 -
 Hi I have made 12 new Affinity Photo Tips in german I hope you enjoy it. I am planning to make more.
 -
 Hello everyone, I'm new here and new to any Affinity software. I've got AD, thanks to the recent sales (windows) and I decided a couple of minutes ago to give it a try. I start by importing the brushes in "the-box-set.zip" then I moved to "daub-essentials". Here, instead of importing the brushes one by one like I did before, I imported the all at once. The problem is that it added only one category called "DAUB-inkers". I do not know if in that category it added all the brushes or not because there was also one brush set in the "daub-essentials" folder called "daub-inkers" so I tried next to add "daub_pastello" only. This time AD said that "daub-pastello 2" was successfully added. I removed the category called "daub-inkers" and imported "daub-pastello" again but this time the message was that "daub-pastello 3" was successfully imported. I would like to know if there is a way to "clean" or "sort" the imported brushes so this time it will add "daub-pastello" and not "daub-pastello 4" or 5 and same goes for the rest of the daub brushes. Thanks for your time.
 -
Hi everyone, I've just put three tutorials on YouTube aimed at complete beginners, although slightly more experienced users of Affinity can get something out of the third one. So here they are: https://youtu.be/mYwjdx9FJRA- Affinity Photo Tutorial for Beginners - 101 - don't panic! https://youtu.be/_sbuSNiiZWc- Affinity Photo Tutorial for Beginners - 102 - What is a Layer? https://youtu.be/aWx4X-Nes-s- Affinity Photo Beginners 103 - 5 Essential Photo Editing Steps If they are of some use to you then it's all good. Cheers, Simon Foster
-
 I'm yet another refugee from the Apple Aperture camp. I have looked at Lightroom, and found it excellent, but cannot abide the Adobe Creative Studio add-in software, which practically takes over your machine. I've also looked at DXO extensions for Apple Photos. Now I have bought into Affinity, with the intention of creating a workflow in which I first load raw files into Affinity, to take advantage of the editing power, and then export the results as jpegs for loading into Apple's Photos, which will form my primary library. I use Apple Airplay to display images on the TV, and iCloud to share with other members of the family, so the last thing I need is a non-Apple-compatible DAM system. (I understand that you in the process of developing a home-grown Digital Asset Management system). I do not require to manage the original raw files, which I shall progressively discard as storage becomes limited. So the nub of my question is, how do I go about designing a work flow that is efficient, and ends up with my edited jpegs in Apple's Photos? I have consulted the Help application and watched many of the videos, but I'm unable to see an efficient way to proceed. For example, I might take 10 shots of one subject, and dozens of subjects in a day. First off I want to view all shots of the same subject and select the most promising for Developing. Now I want apply some general presets to every selected image. Then I will go into individual images to perform specific edits. Finally I shall want to export the edited jpegs and then import them into Photos. The videos and the Help text do not seem to give me this sort of overview, as they concentrate on performing edits one photo at a time. I'd be grateful for any pointers that you can give me.
 -
 Hey guys, I just wanted to let you all know that I started a YouTube channel that is dedicated to making Affinity Photo tutorials. I have 9 videos posted now, but will definitely be making more. I really love Affinity Photo, and although I'm not a master, I wanted to share the things that I have learned! :) Dispersion Effect Turn any Photo into a Pencil Drawing Giving Photos an Old Look Put a Lake in a Light Bulb Double Exposure Effect Remove Unwanted Objects/People from the Background Set the Earth on Fire Remove/Change the background How to change colors in a photo Let me know what you think of them! And let me know any suggestions you have for future tutorials. Thanks! Ezra
 -
 I'm new to Affinity Photo (coming from years of Photoshop use) and I ran into a simple issue which drove me crazy and would like some clarification. I wanted to add a png image of a logo to a currently open document in Affinity Photo so I did a drag/drop from my Finder. The image was a brown logo with a white background. I wanted to remove the white background. So I chose the Flood Select Tool (as I would've used the Magic Wand in Photoshop) and with the layer selected when I clicked on it...I would get no selection. This drove me nuts. Next, I simply opened the image from Affinity's File ---> Open dialogue to open the image in its own document. When I used the flood select tool here, it worked exactly as I expected as I was able to single click the white area, hit delete and my white background was gone. So I looked at both documents to see what the difference was. I discovered that the drag/drop into an existing document version had the text "(Image)" appended to the end of the layer name. In the stand alone document the text "(Pixel)" was appended to the end of the layer name. That said, I went back to the existing document version, selected my logo layer (Image) and from the Layer menu chose Rasterize. The layer then changed the appended text "(Image)" to "(Pixel)" and the Flood Select tool now worked as I expected in this document. I'm not used to PNG files (which I consider already rasterized) being in a "unrasterized" state. Can someone explain clarify what Affinity Photo considers an Image Layer and a Pixel Layer and the reasoning behind a PNG file (or any rasterized file) needing to first be rasterized? I'm not complaining, just trying to understand so I know the procedure I need to use when working with images. Thanks, Ben
 -
 I have been doing car designs on Affinity Designer for a while now, but have never seemed to have been able to colour them in using the fill tool. Any help? Porsche 918 Spyder.afdesign
 -
 Hi Folks, Not sure this post fits in anywhere on the forum but being as this place is full of really helpful experienced people I thought I would try it anyway. I have been playing around with a design (AD) for a t shirt I am looking at getting done. Would anyone out there be willing to have a look at my design and offer some "creative" feedback on how I can improve it. Every day is a learning day! Sorry if this post is not appropriate to the forum. Any chance a form could be set up on here for such exchanges between designers to share ideas? just a thought. Cheers Folks Mark
 -
 I do know that there is another thread about the manuals and covering the html.index link into Calibre, but does anyone have any idea on how to adjust the settings for a perfect pdf fit? Ive tried adjusting the setting for 2 days now and still comes out looking distorted and what not. This is what I'm trying to achieve....... and this is mine...... Thanks in advance!
-
 I am brand new to shooting raw and affinity and I am slowly going through all of the tutorials. (I do food photography and there is nothing remotely related in the tutorials.) I noticed my photos looks great when I upload to affinity and work on them. After developing, the photos look pixelated in affinity, which distorts things a bit. When I export as a jpeg, it doesn't show the pixelation. Has anyone else experienced this? Sandi
 -
 Hi, I have bought Affinity Photo last night after 2 days of searching on the net. I have been using Lightroom for 1 year, as hobby and semi-pro works. I really enjoy it but i feel that I should move forward and Lightroom is just a quick package edit tool limits you in some ways. I have never used Adobe PS, and I have to learn everything here with Affinity Photo. What would you offer me for the start for fast learning? Should I start to watch all of Affinity Tutorial videos with taking notes and ailing them on my photos? or would it be good to watch Adobe PS tutorials too, as it has more source to watch and read and not that different from Affinity Photo? Thank you' Oflatun
 -
 Hello! I just began on this new application and I have absolutely no idea what I am doing. I am sure that when I get some fundamental basics out of the way, I can refer to other tutorials for further detail. This may sound stupid, but I cannot figure out how to fill color into the objects I create or how to properly snap loose points together. Those are the only two things I have run into trouble with so far. Does anybody have a link to a basic tutorial or a reply on how to find and use the fill tool?
 -
 Hi- I am new to affinity and loving it so far, I just have a super basic question. So I have a psd file which is a mockup of an iphone. I am trying to put my own image into the mockup, but I do not know how to drag the corners of my image to make it fit perfectly. Is there anyway to do this? Thanks!
 -
 I am a complete newbie to Graphic Design therefore would like training right from the beginning. I work in Web Design but have not been involved in graphic design work yet although it is becoming increasingly necessary in my line of work. Are there any tutorials which would be suitable for a complete beginner?
.png.7677bfe0d76c9a3296e68a643e98830c.png)