Search the Community
Showing results for tags 'artwork'.
-
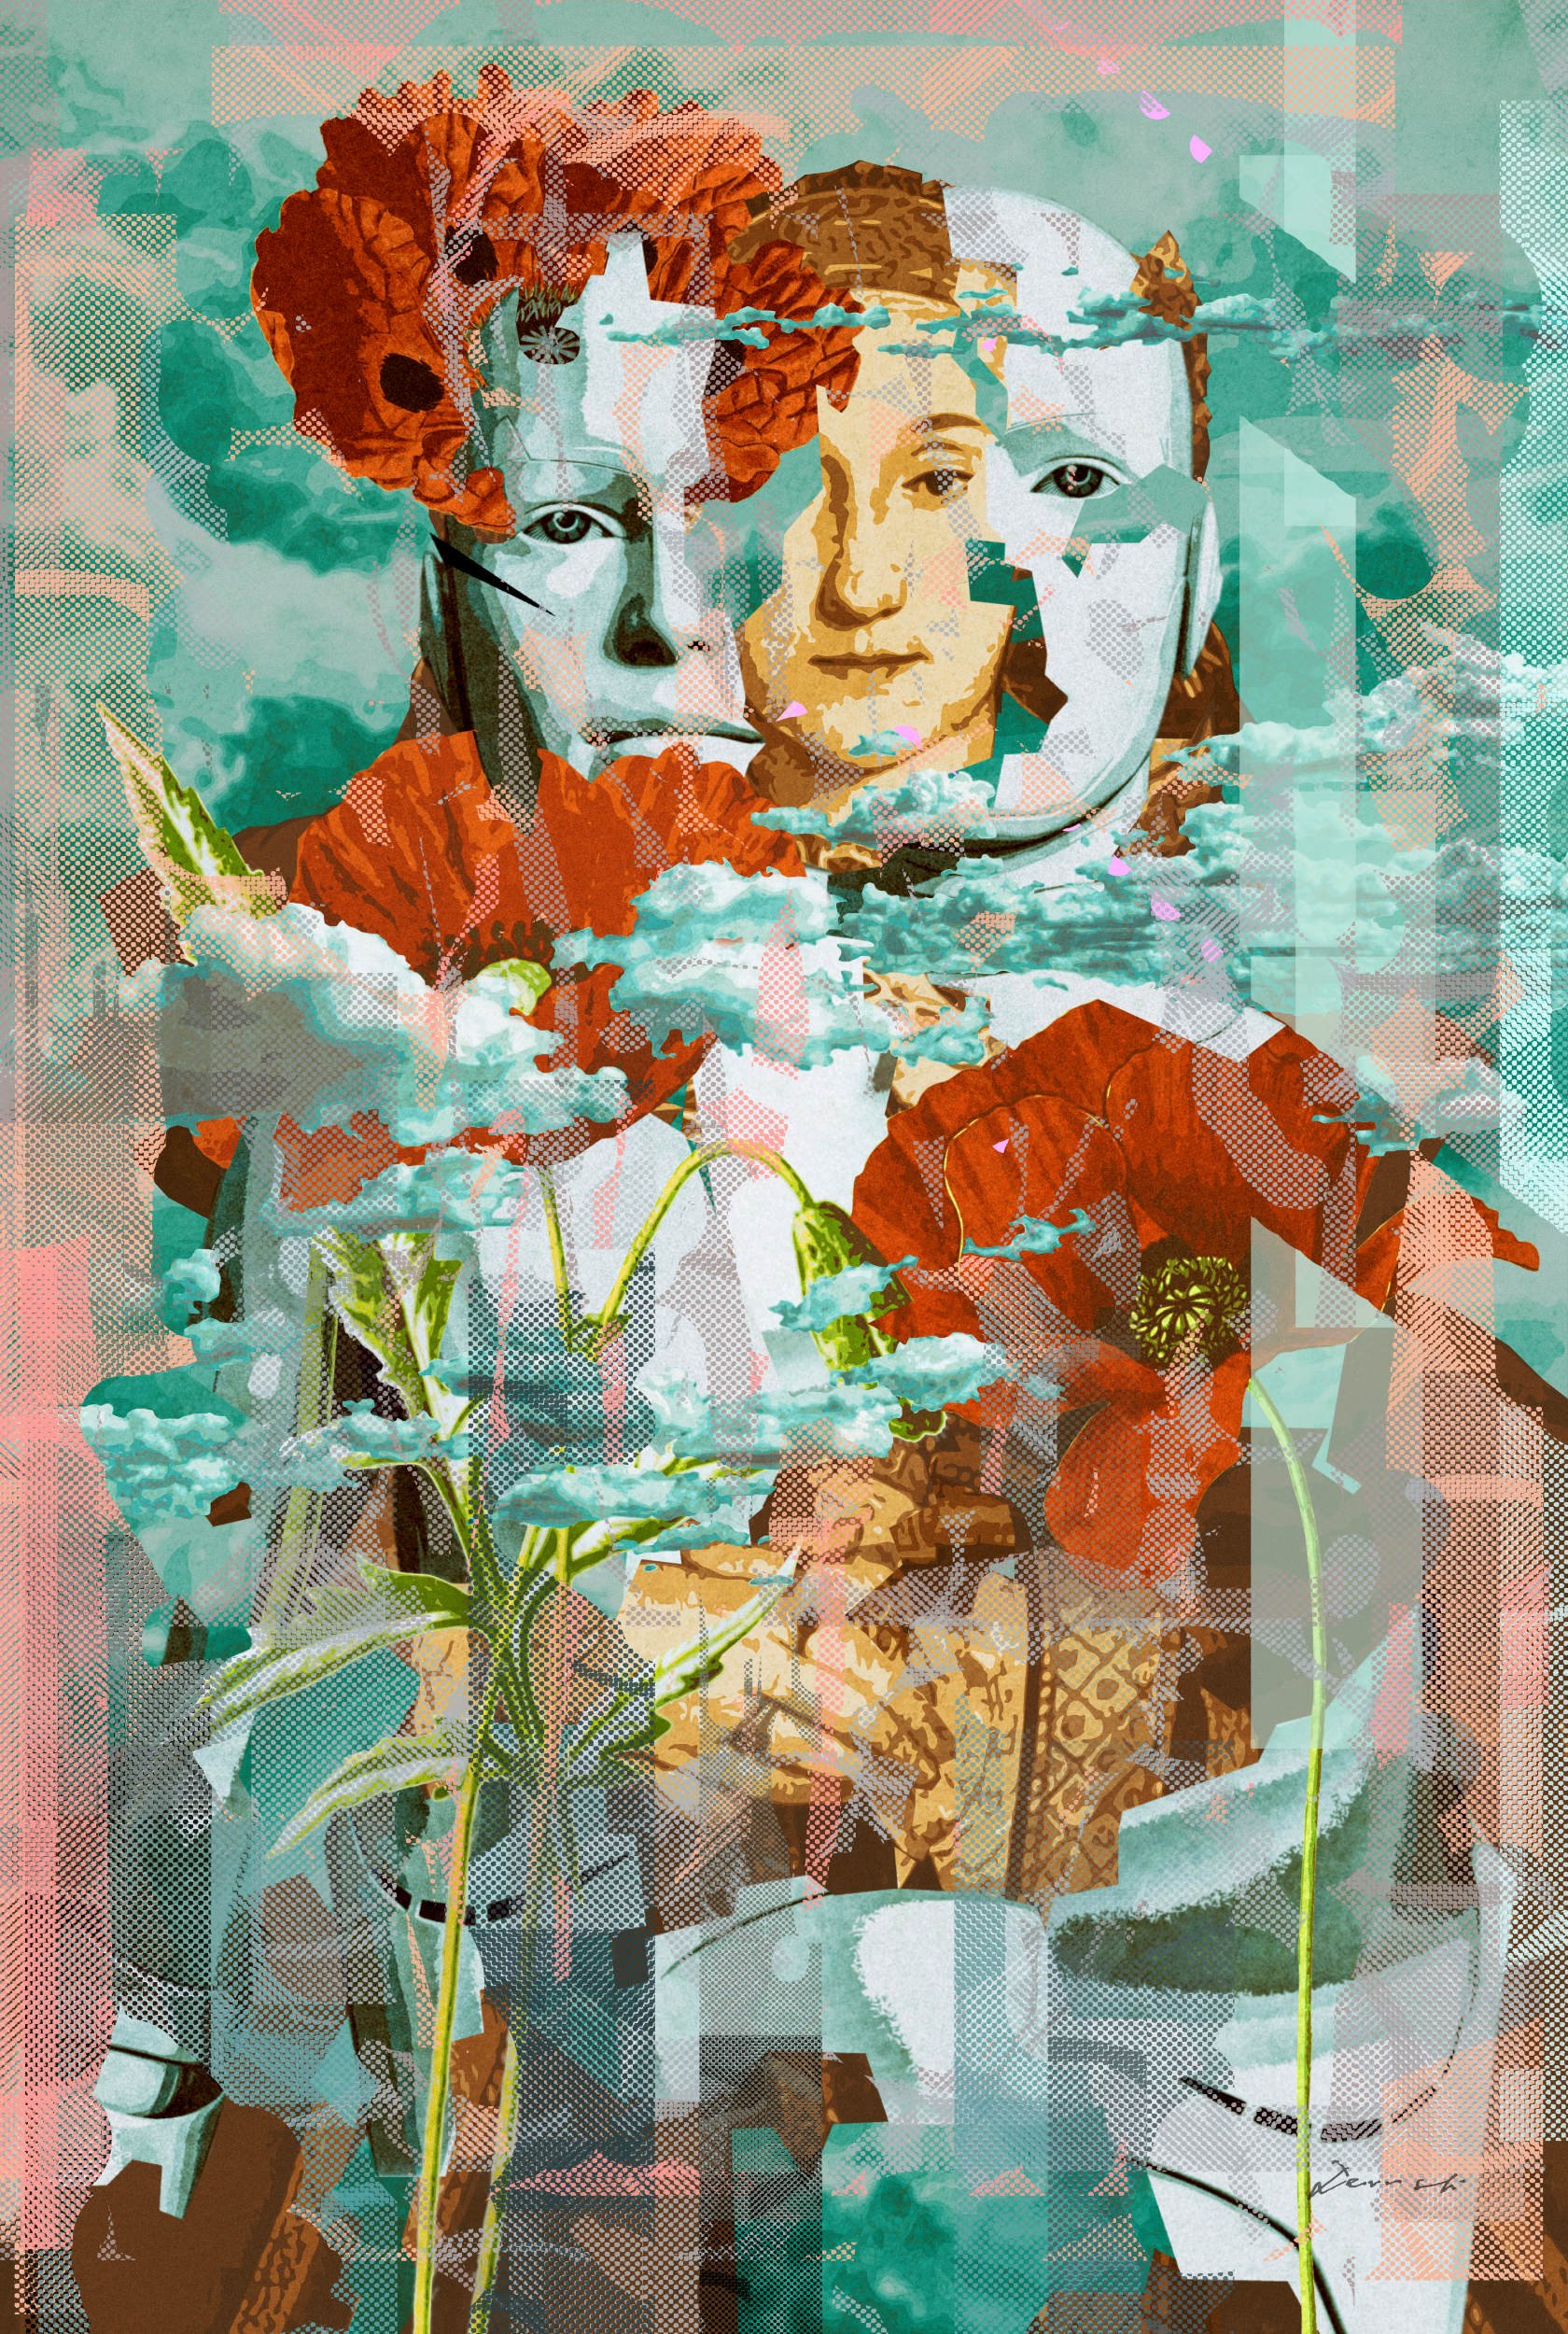
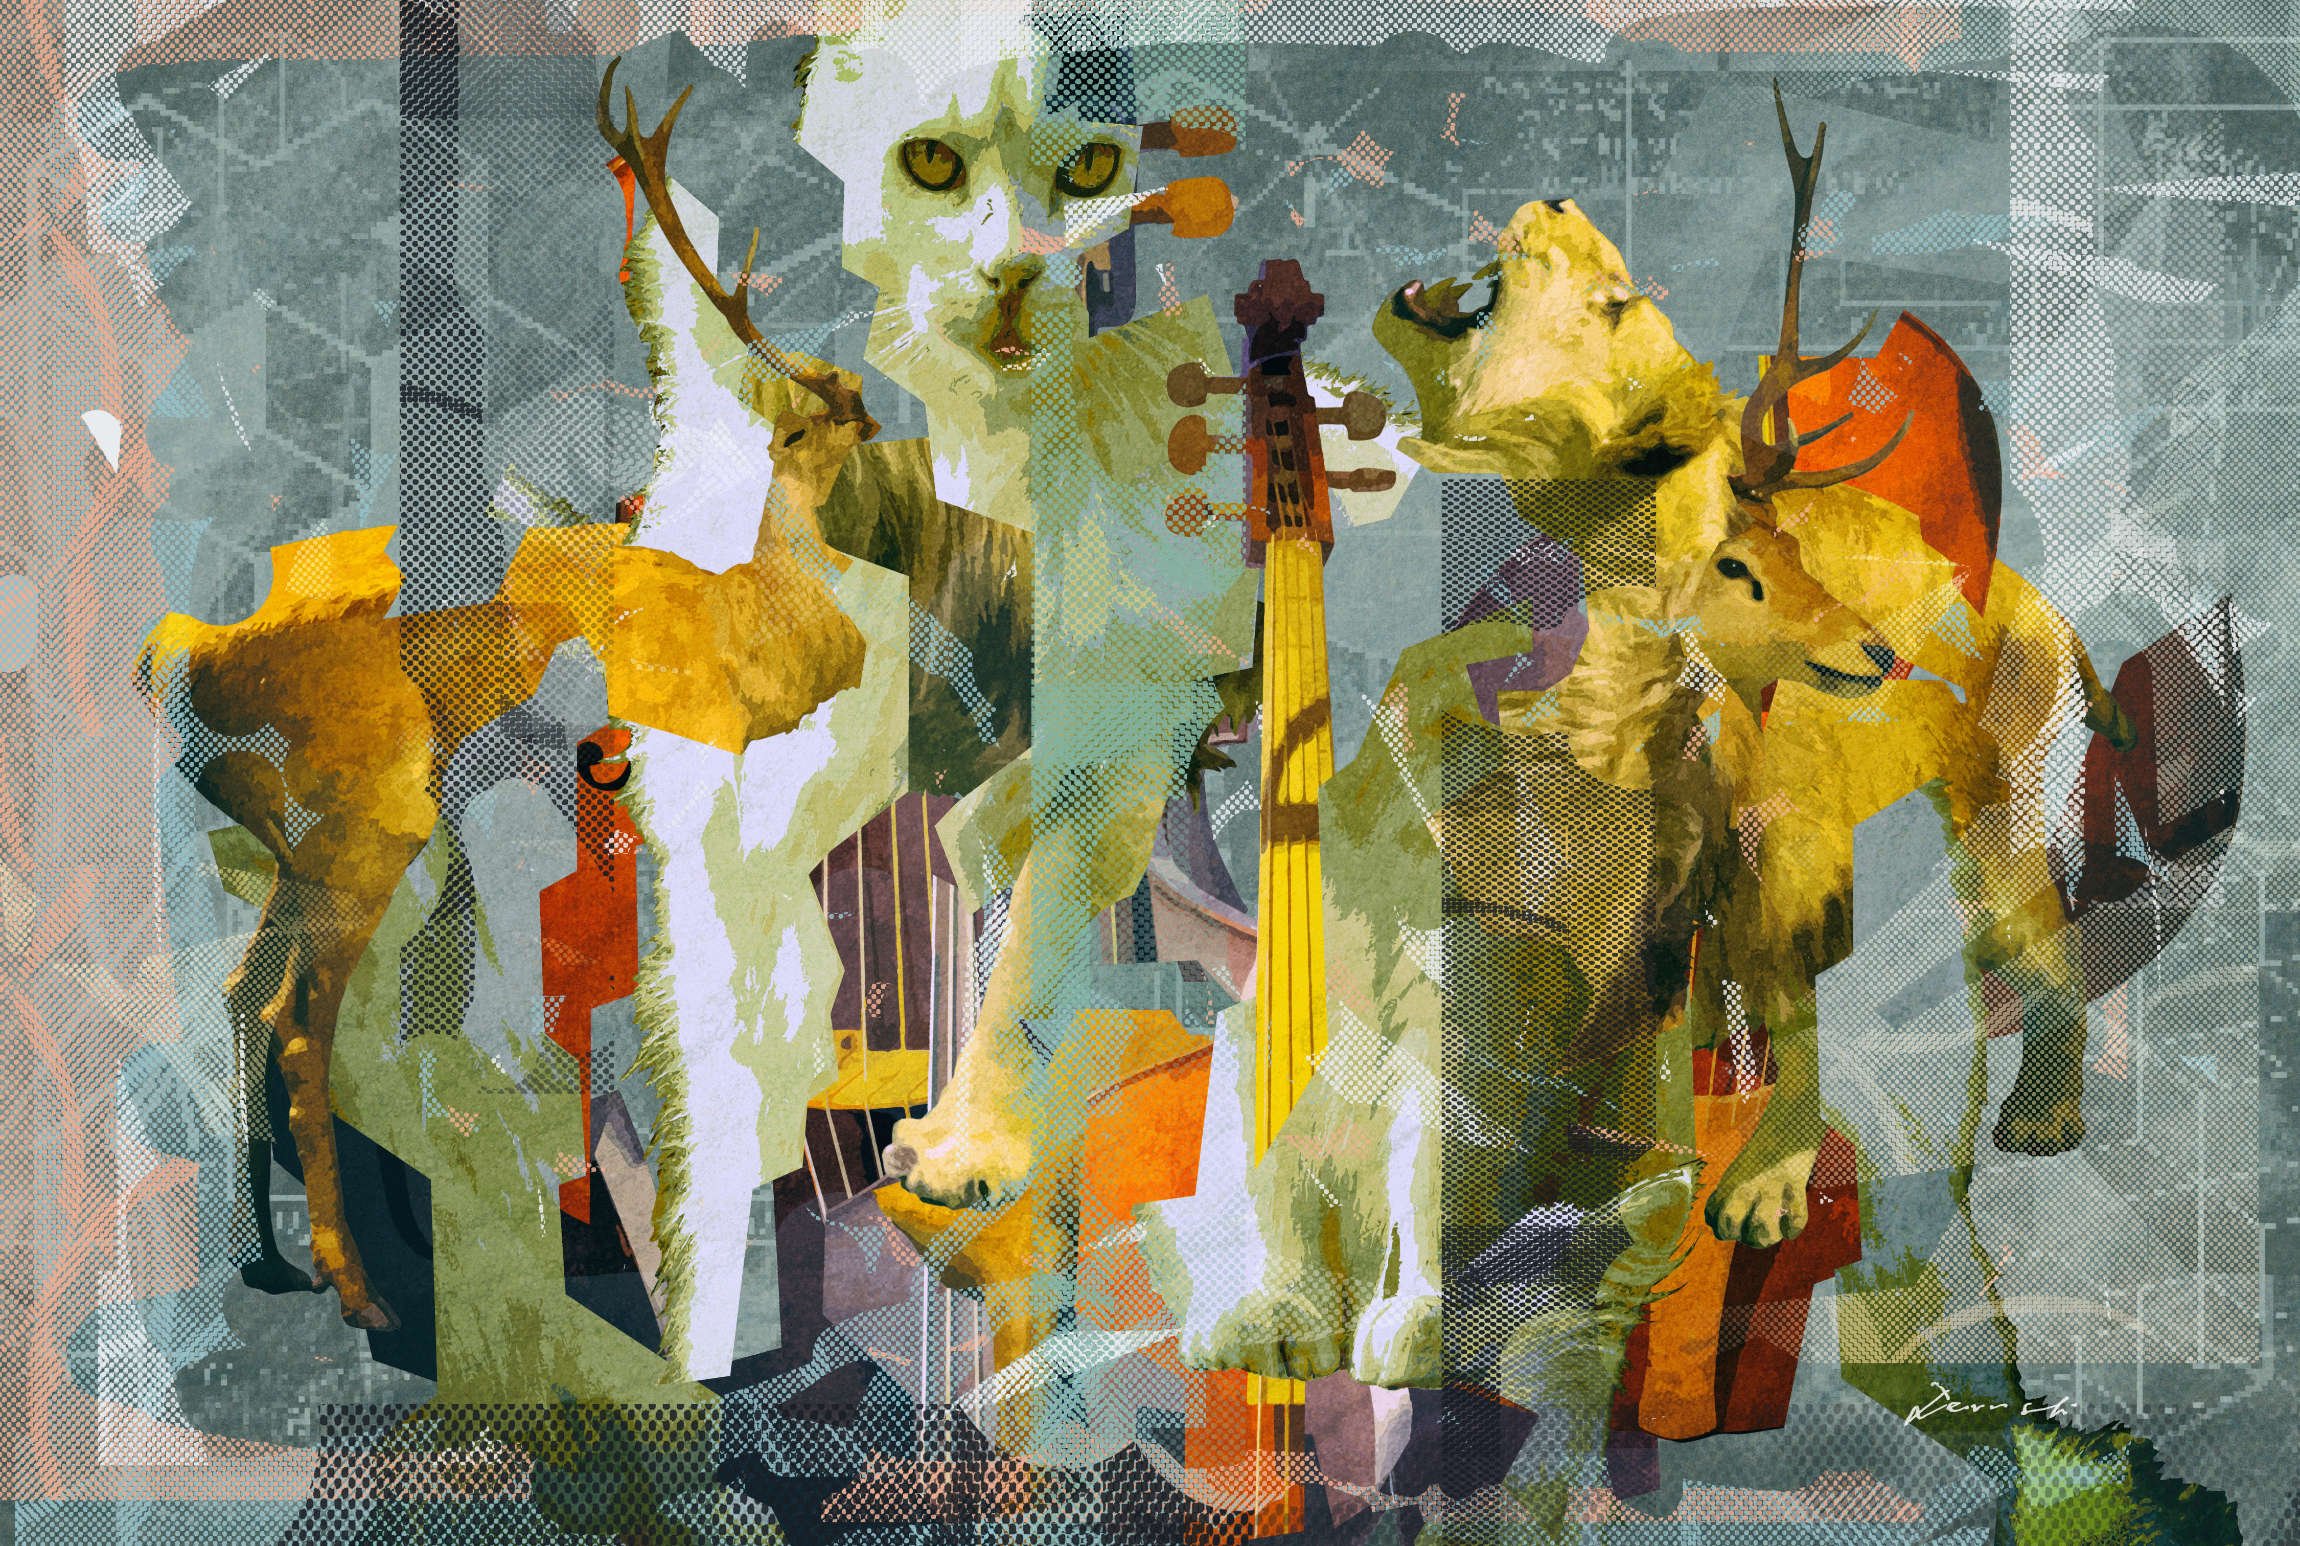
 Three of my last digital collage artworks. I used this time exclusively Affinity Photo and Inkscape with my MacBook Pro instead of other well known software.
-
 This might be a bit challenging to explain what I'm doing, but I'll try. I want to know if there's a way to link specific artwork to appear on the pages in a given section without using master pages? Some background: I'm am using Affinity Publisher for the first time and loving it. I am putting together an art book that is roughly broken down into sections by the year the art was created. It is going to be an illuminated manuscript-style book, so there are some repeating visual elements that are consistent throughout each section. The basic layout is the left hand page will have some calligraphy and text, along with the embellishments that need to appear on every left hand page of the section, and the right hand page has the artwork. I know this could be done with master pages, however, I have created 3 custom old, yellowed paper textures that I rotate through the whole book that I have set up as master pages. If I were to use the master page route to add those repeating art elements, one for each of the 3 sections, I would have 9 different master pages for the main pages of my book (there are a few others for the preface, etc.). Is there a way to accomplish this via sections? Creating an image frame or something that is connected to the section and not a master page? Hopefully I explained that adequately, thank you for your time. Toby
 -
 I have some artwork I have had scanned at 600 DPI and it has been saved as 3 files, a TIFF, jpeg and a PDF. The original size of the piece of art was 30cm x 25cm. I would like to have it printed as a tea towel by an online print on demand site but the template for that is sized at 72cm x 44cm. I can't upload the art to the website, I have to email it at the correct size or aspect ratio. How can I adjust one of the scans in either Affinity Designer or Affinity Photo without distorting it or losing any quality so that I can send it off for printing? Or is this not possible? I am very new to the software so I'm hoping someone can help me with some step by step instructions!
 -
 In the original thread ... PLEASE DO NOT POST IN THIS THREAD ANYMORE AT PRESENT AS IF IT GOES TO FOUR PAGES A SIDEBAR AT THE RIGHT WILL APPEAR AND SPOIL THE APPEARANCE OF THE WHOLE THREAD. DISCUSSION CAN CONTINUE IN A NEW THREAD.
 -
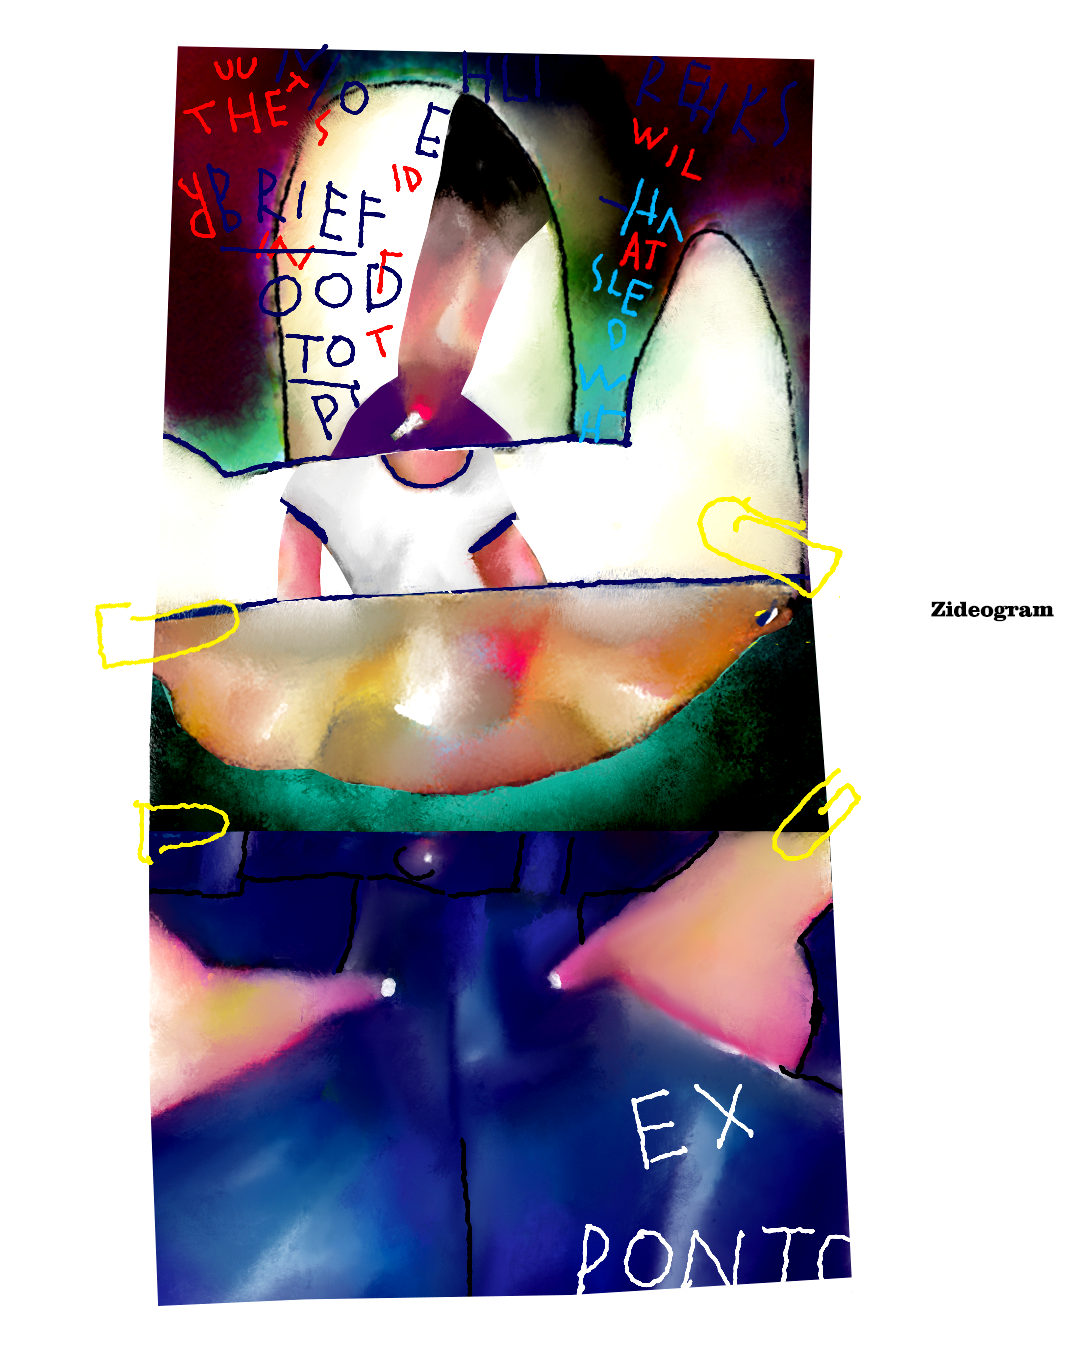
There has been discussion of a problem, but what follows seems more appropriate for Share Your Work, so a new thread, but with a courtesy link to the original thread. https://forum.affinity.serif.com/index.php?/topic/136552-bleed-area-issue-with-designer-bug-or-feature I am producing artwork to make what are notionally photo greetings cards, but I am making jpg files of the correct size at 300dots per inch CMYK colours and using those instead of photographs to produce one-off greetings cards, then uploading to the company's website and in due course receiving a card by post. https://www.papier.com/ https://www.papier.com/photos/photo-cards I have used https://www.papier.com/customise/landscape-photo-313 and https://www.papier.com/portrait-photo-315 I have found that the best way to do this is to work in pixels at 2171 by 1571 pixels, which is 7 inches by 5 inches with a 3 mm bleed area on each edge. The two that I have produced thus far were produced using PagePlus X7 as I was used to it, but they were basically simple images on a white background. This was because I was used to using PagePlus X7. I am now starting to learn how to use Affinity Designer, I am a beginner, The following is a png of a copy of a part of the new design, produced today. I have it in mind that this will be centred in a portrait format card, then using Affinity Designer to add colours at each side and into the bleed areas, with the intention that the finished card will have colour right to the edges. The image is of some language-independent glyphs, some used more than once, so as to produce a poem, with each glyph representing a whole sentence. I produced the designs as abstract designs, but if one knows the meaning of a glyph one can read the poem in any language that you know. I am wondering if readers who like a puzzle might like to try to work out the meaning of the poem. The designs are abstract but there are some clues. William These stars are so that if readers post their attempts or other comments, then the puzzle can still be new for new readers. * * * * * * * * * * * * * * * * * * * * * * * * *
-
 hi, i'm a music producer and i would like to create my own artwork for my music I left you some photos to make you understand the result I would like to achieve, my question is: i'm a affinity publisher user, i need to buy another of Affinity series product or publisher is ok? THANSK!
-
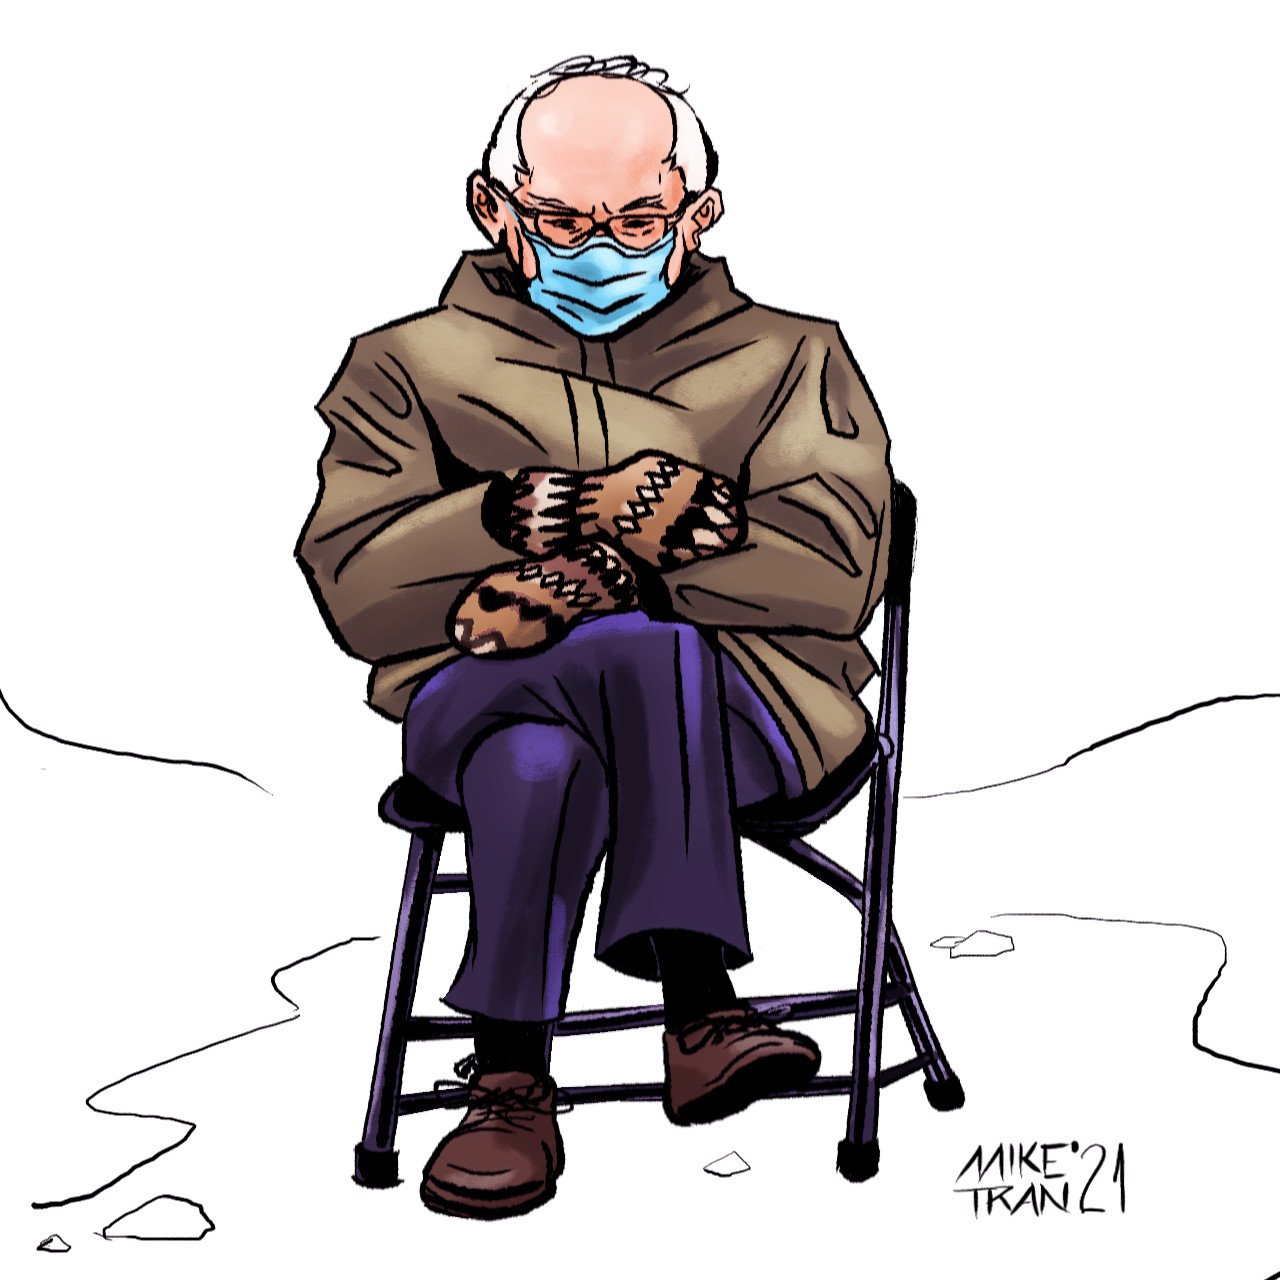
Decided to have a little fun and made this digital sketch of Bernie Sanders 😁
- 1 reply
-
- 5
-

-

-
- illustrator
- illustration
- (and 1 more)
-
Recentartwork. BD's Museum-Illustration. Series.
-
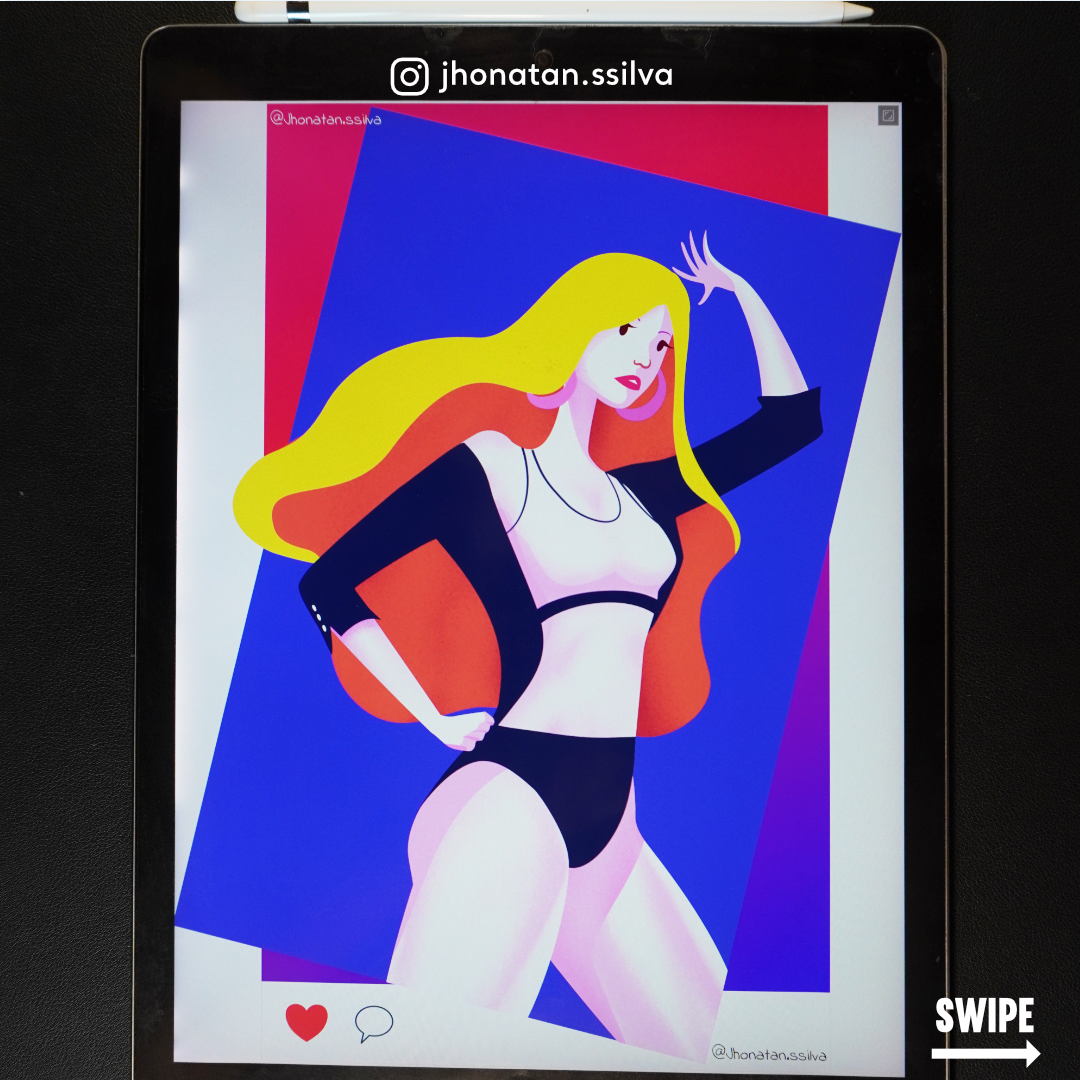
 my illustration created today Minimal design style plus Colorful, With flat shadow, using subtile texture. my design philosophy, less is more made using affinity designer on ipad pro
-
Hello! My name is Mikołaj but you can call me Mik. I've been using affinity software since first release in 2014 for graphic design(any kind of user interface design and visual identity assets). Lately some idea popped in my head – I am using the same tools in the same way all the time, so to prevent some kind of stagnation I want to challenge myself to create different kind of artwork that I usually do. Goal: Creating artwork from scratch in a poster format using every tool that is available in the software. I invite you to enjoy this journey with me. 001
-
I was wondering if there could be a Affinity competition like the sadly now defunct Worth1000? Not just a showcase for artwork but something to bring out the best in us.
-
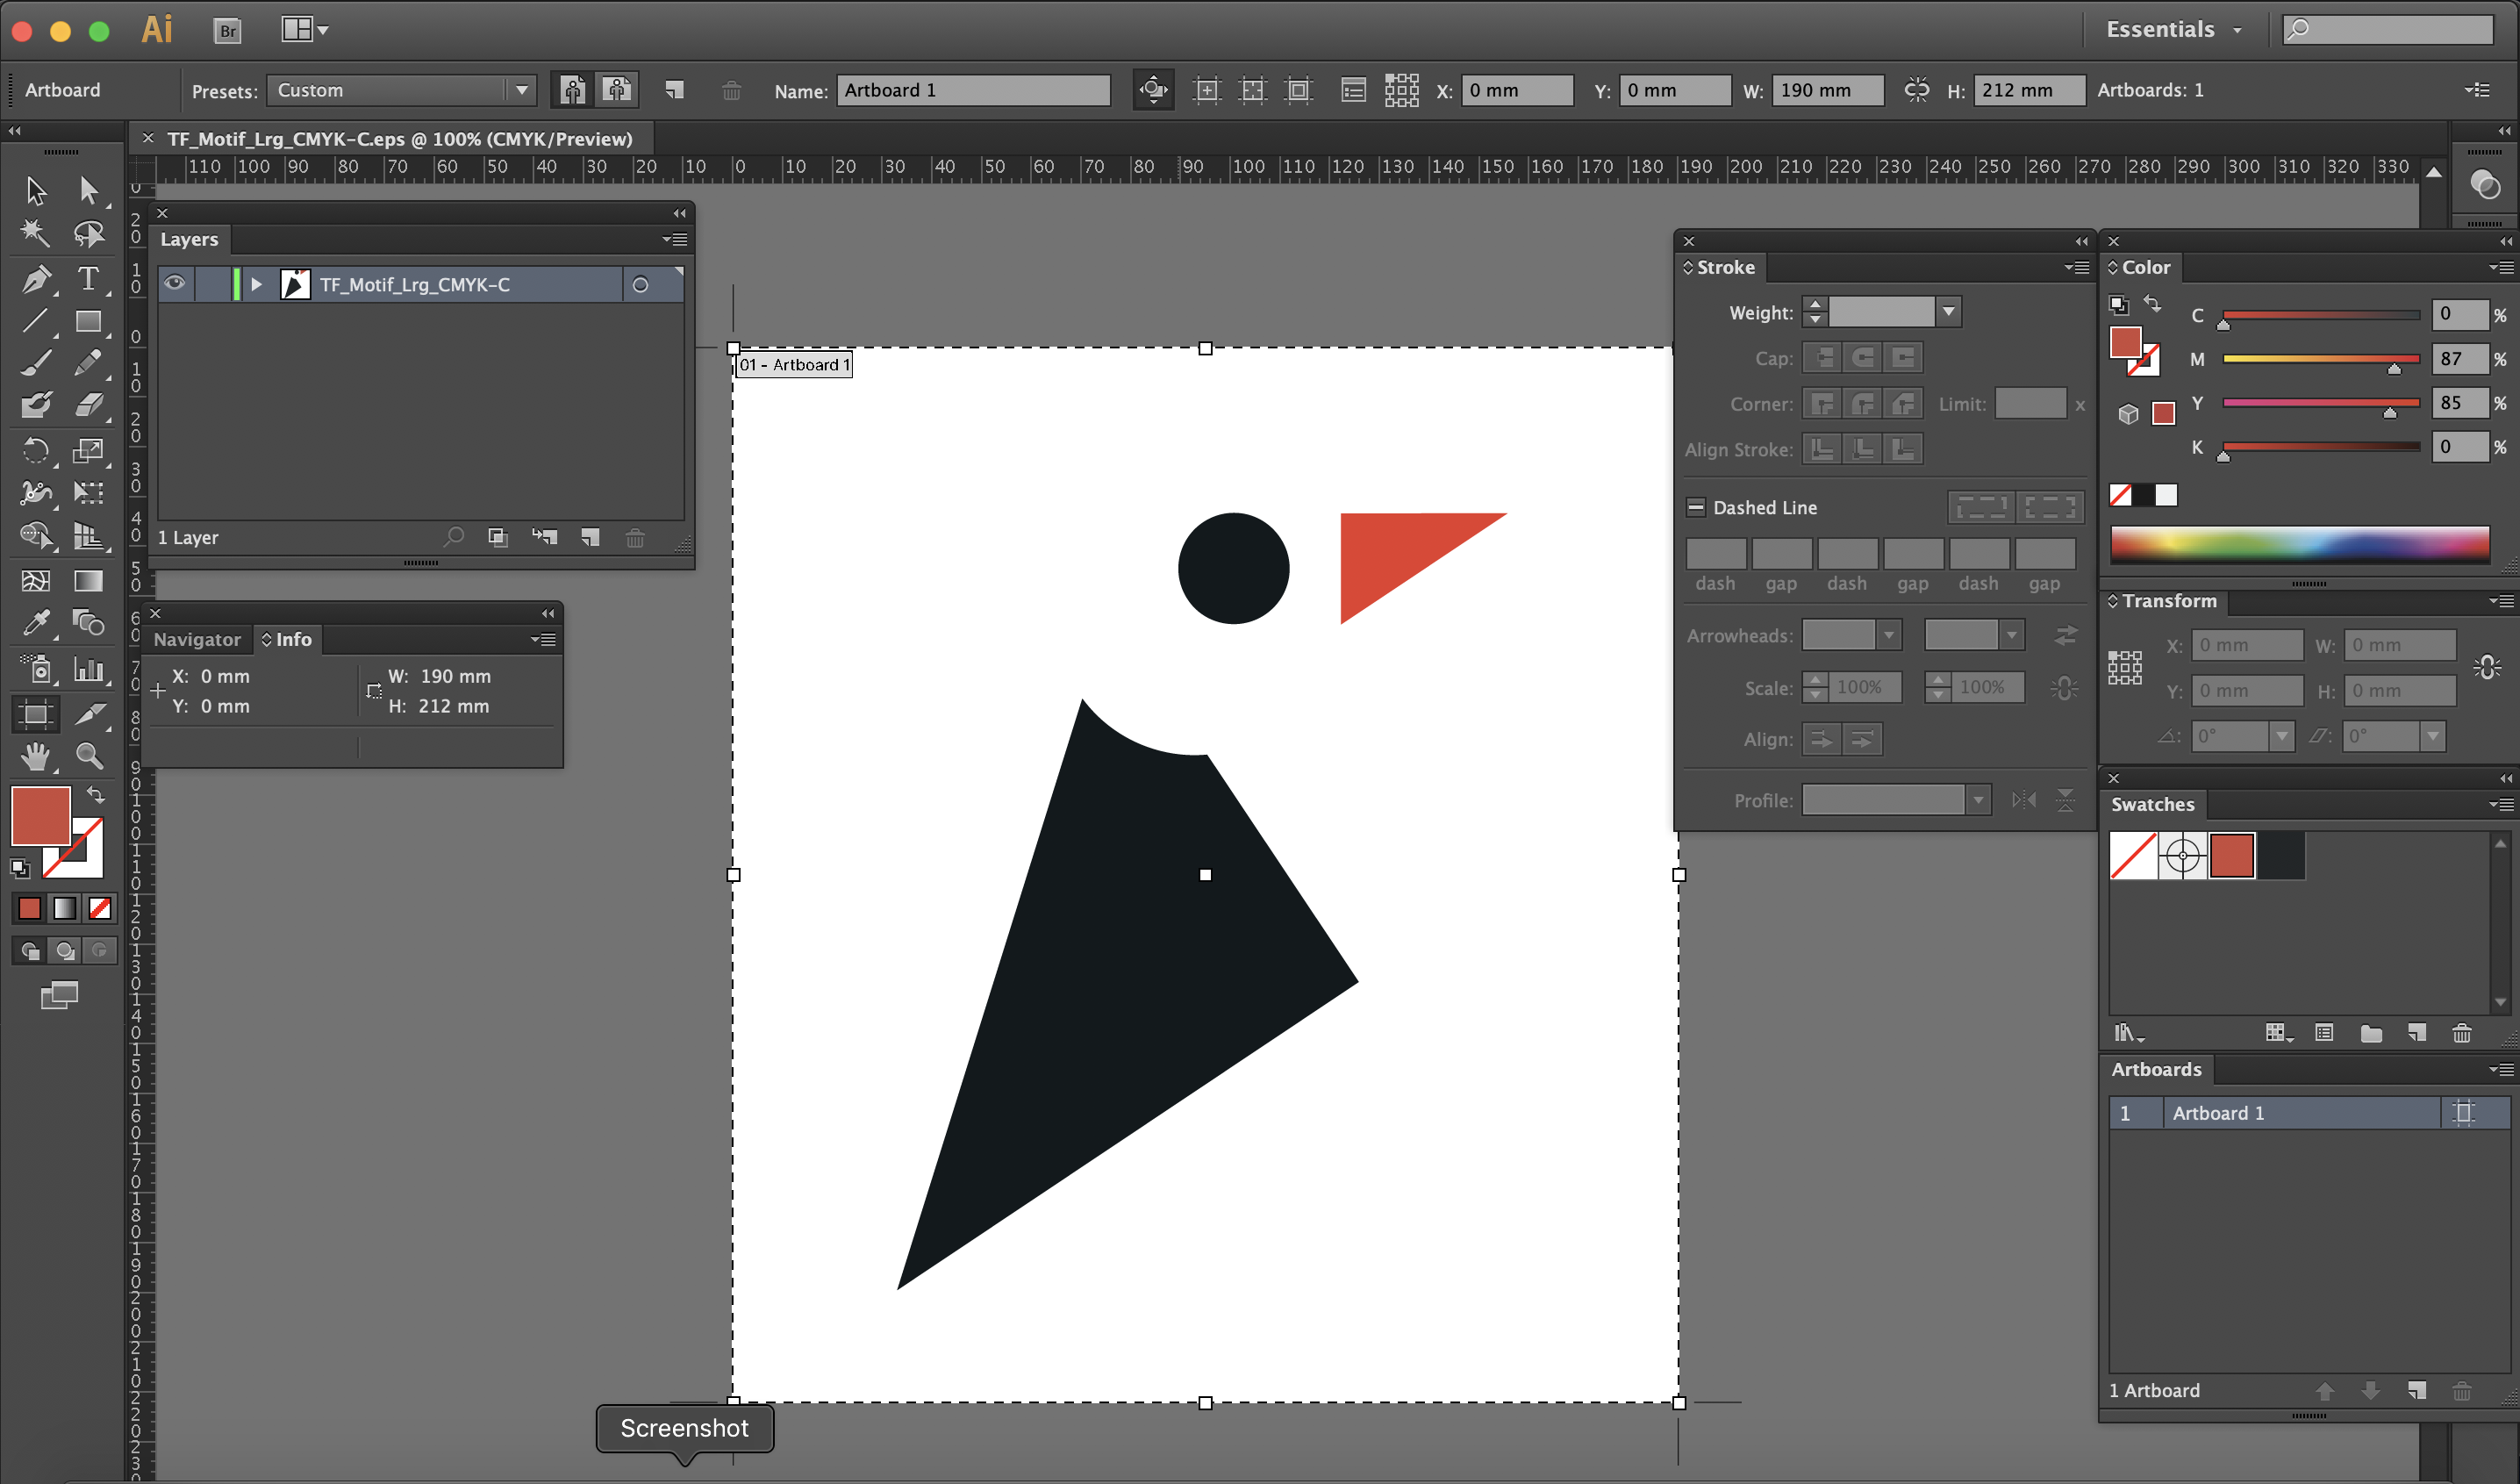
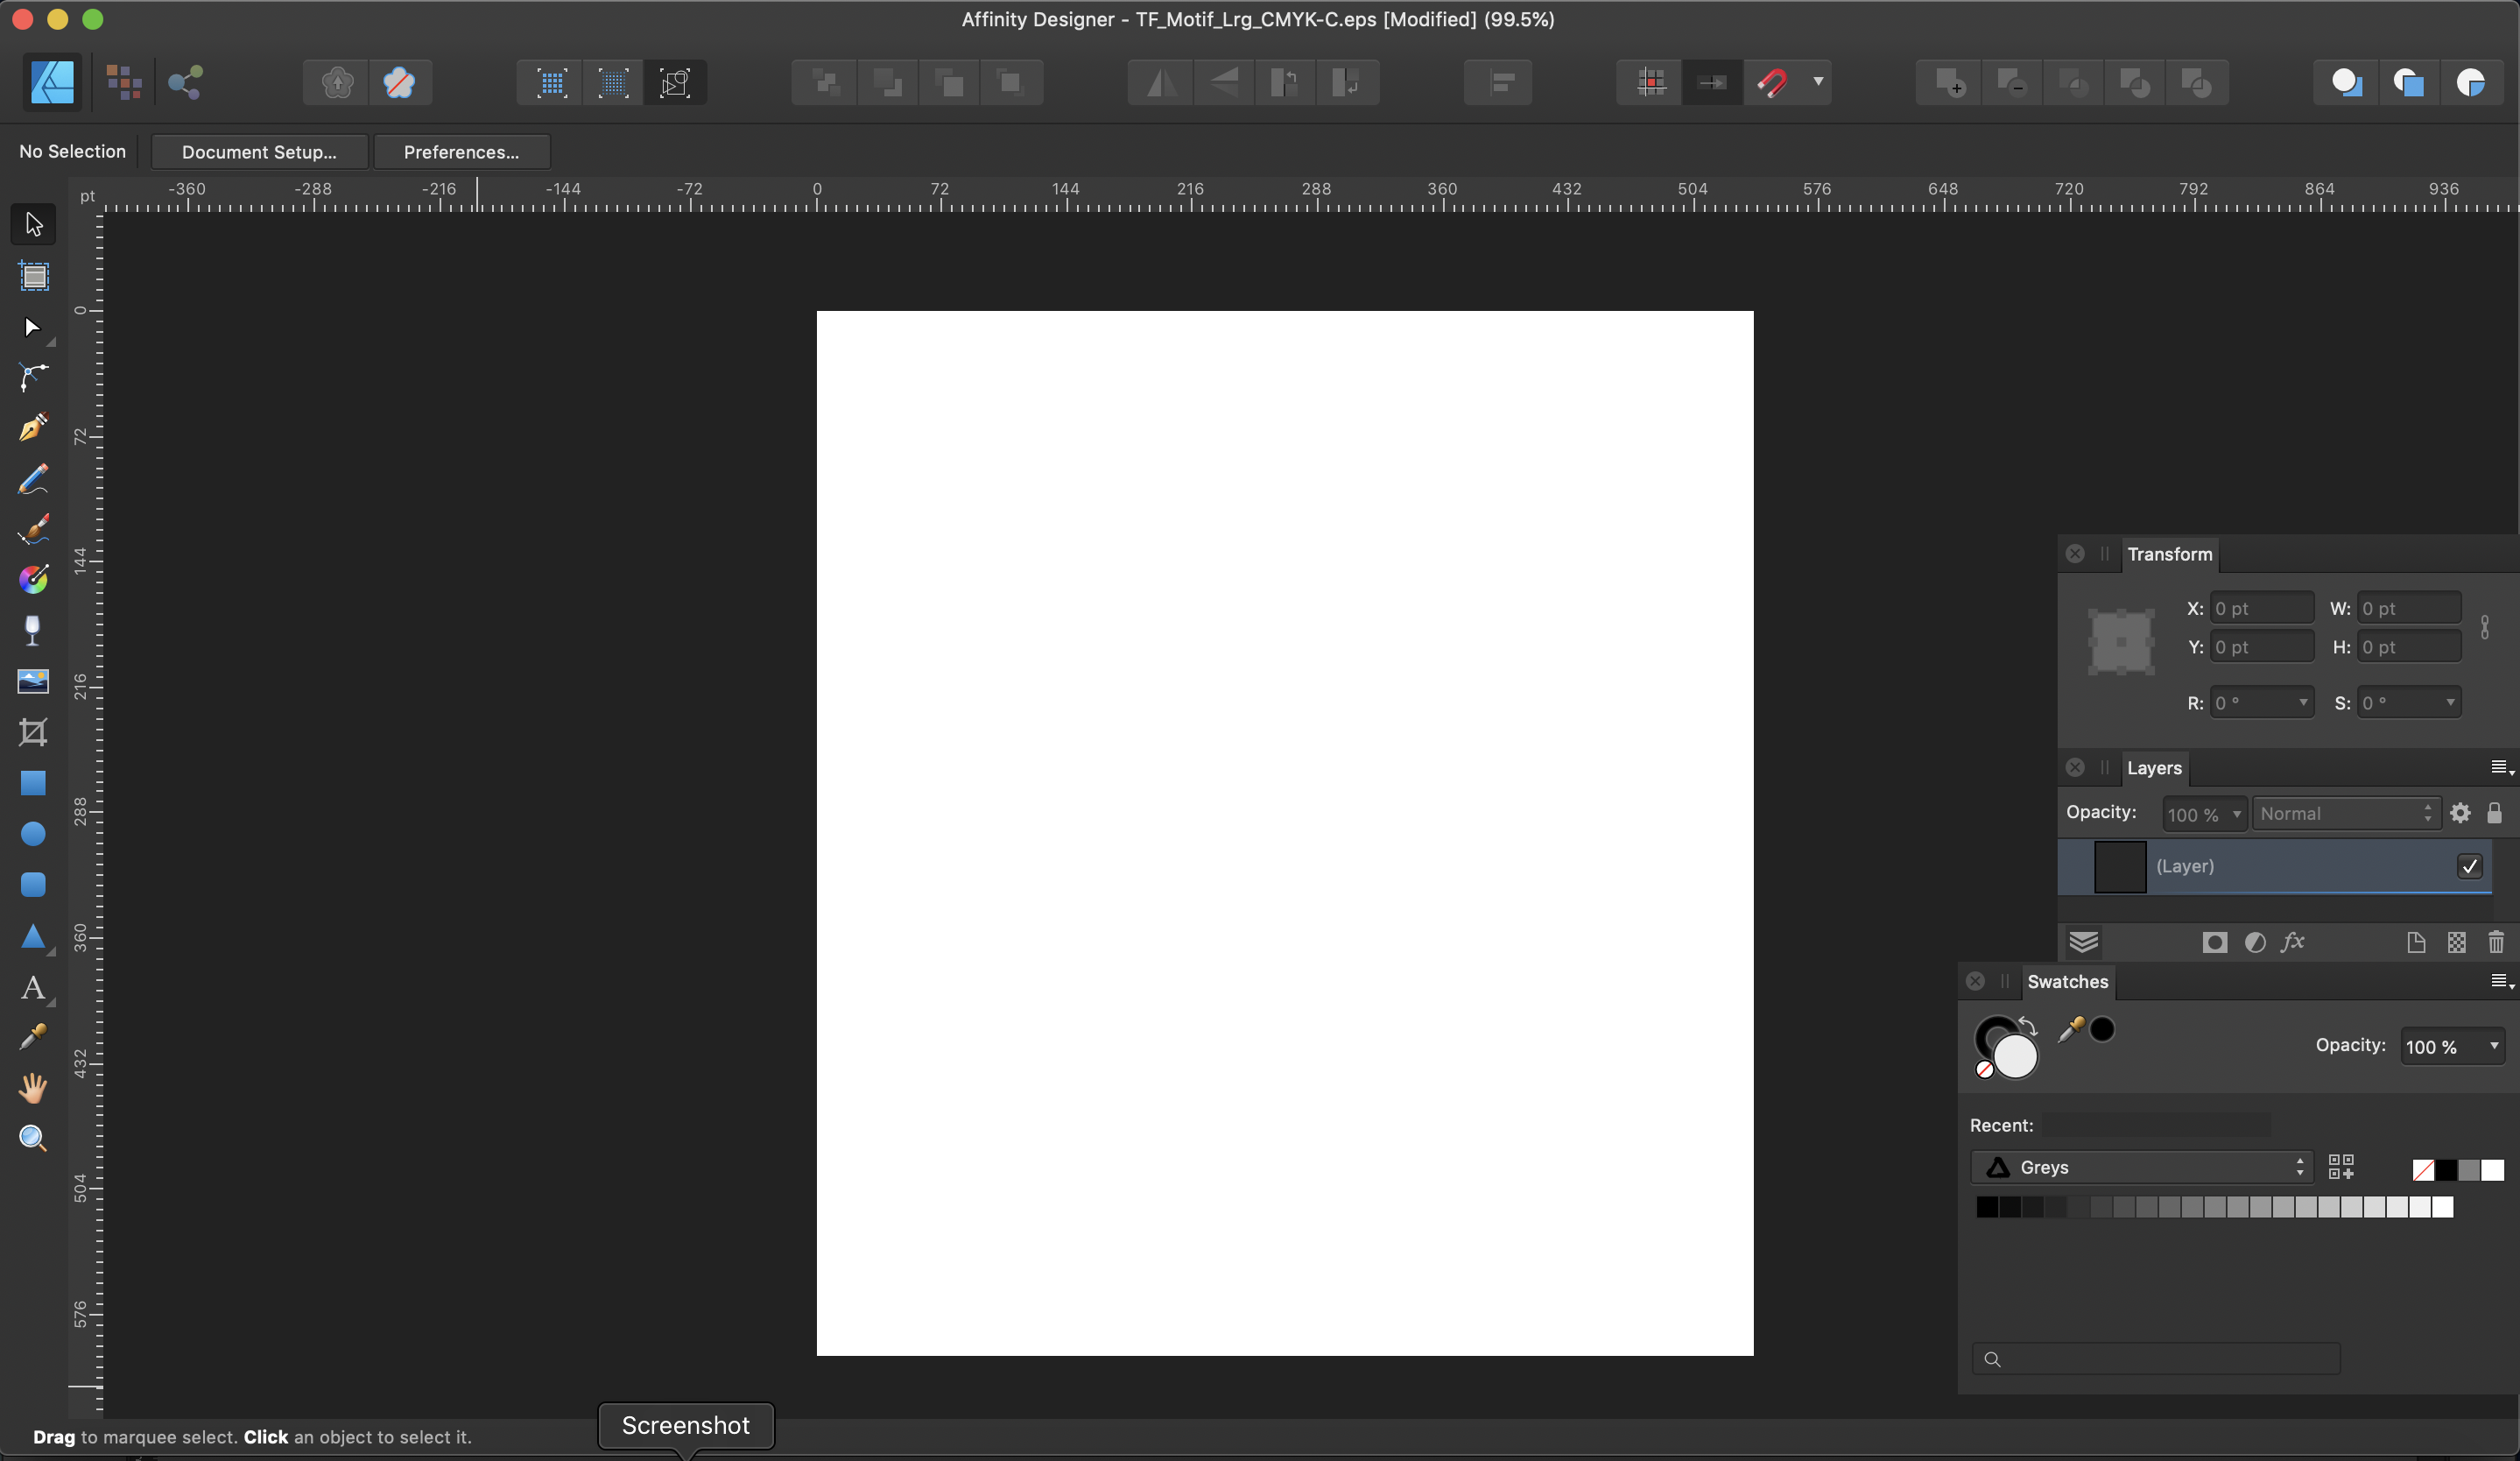
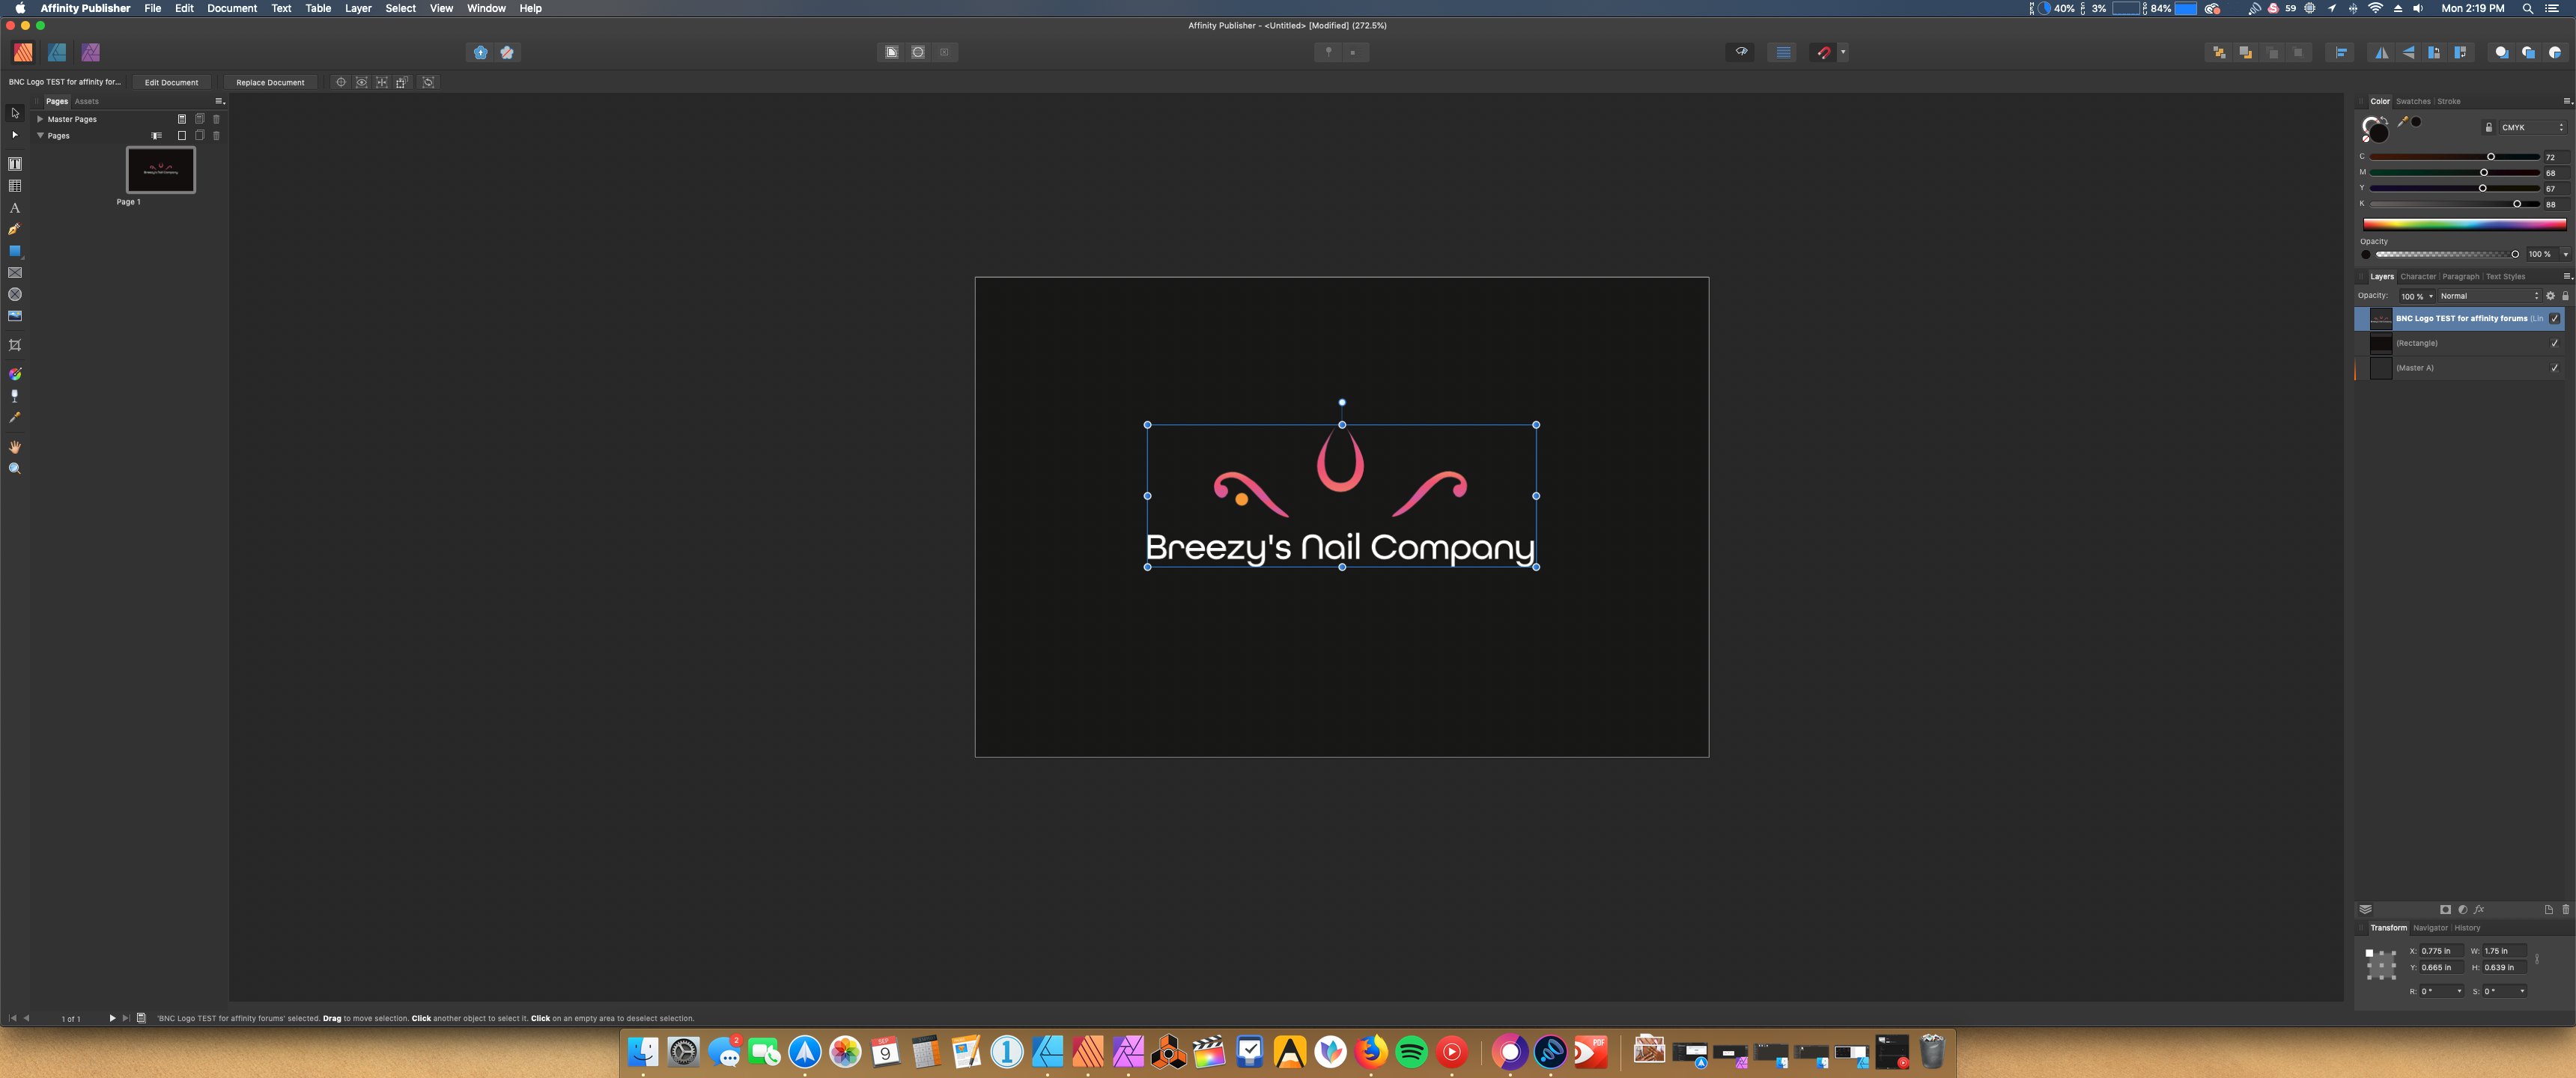
 Hi, appreciate there's a lot of posts about the blank artboard issue on Affinity when opening files, I couldn't find the answer to mine so here goes: I artworked all our brand logos on Adobe Illustrator and saved the master files as EPS. These logo EPS files have been prepared for print, so they have their assigned colour profiles and brand swatch colours with fixed CMYK and pantone values. We have set up our colour environments to FOGRA39...2004) and sRGB...1966-21 in both Affinity and Illustrator. I get that Affinity wont import file-specific data, but can show the vectors on the layers panel, but the layers here are blank. There is a path tool that was used in Illustrator to subtract the head of the bird from the body, but nothing else during the drawing stages. I checked the X/Y axis and these register at 0. TF_Motif_Lrg_CMYK-C.eps
-
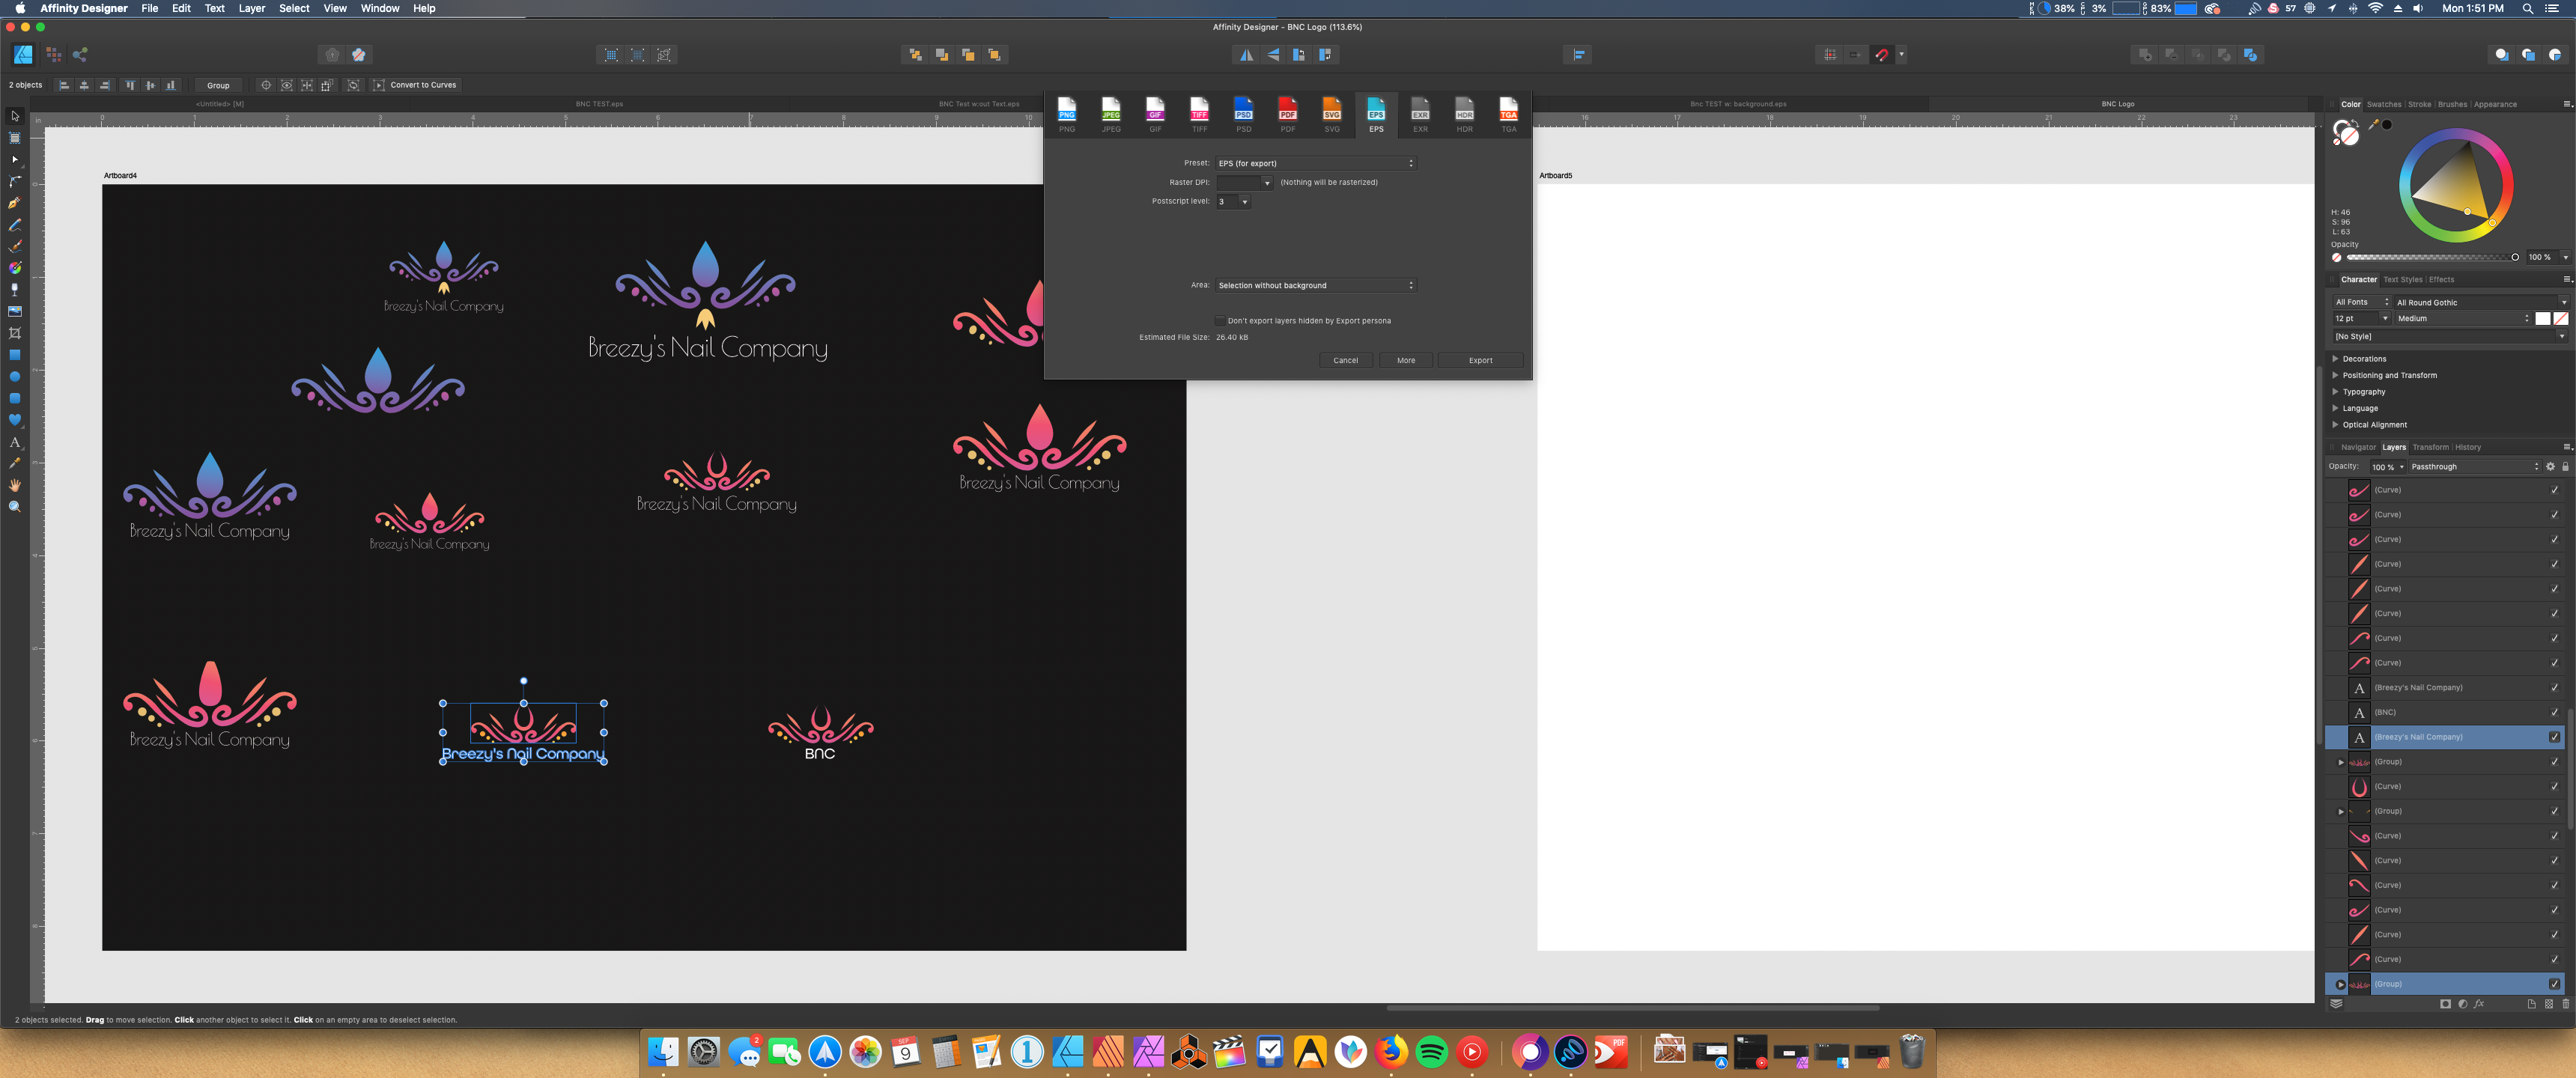
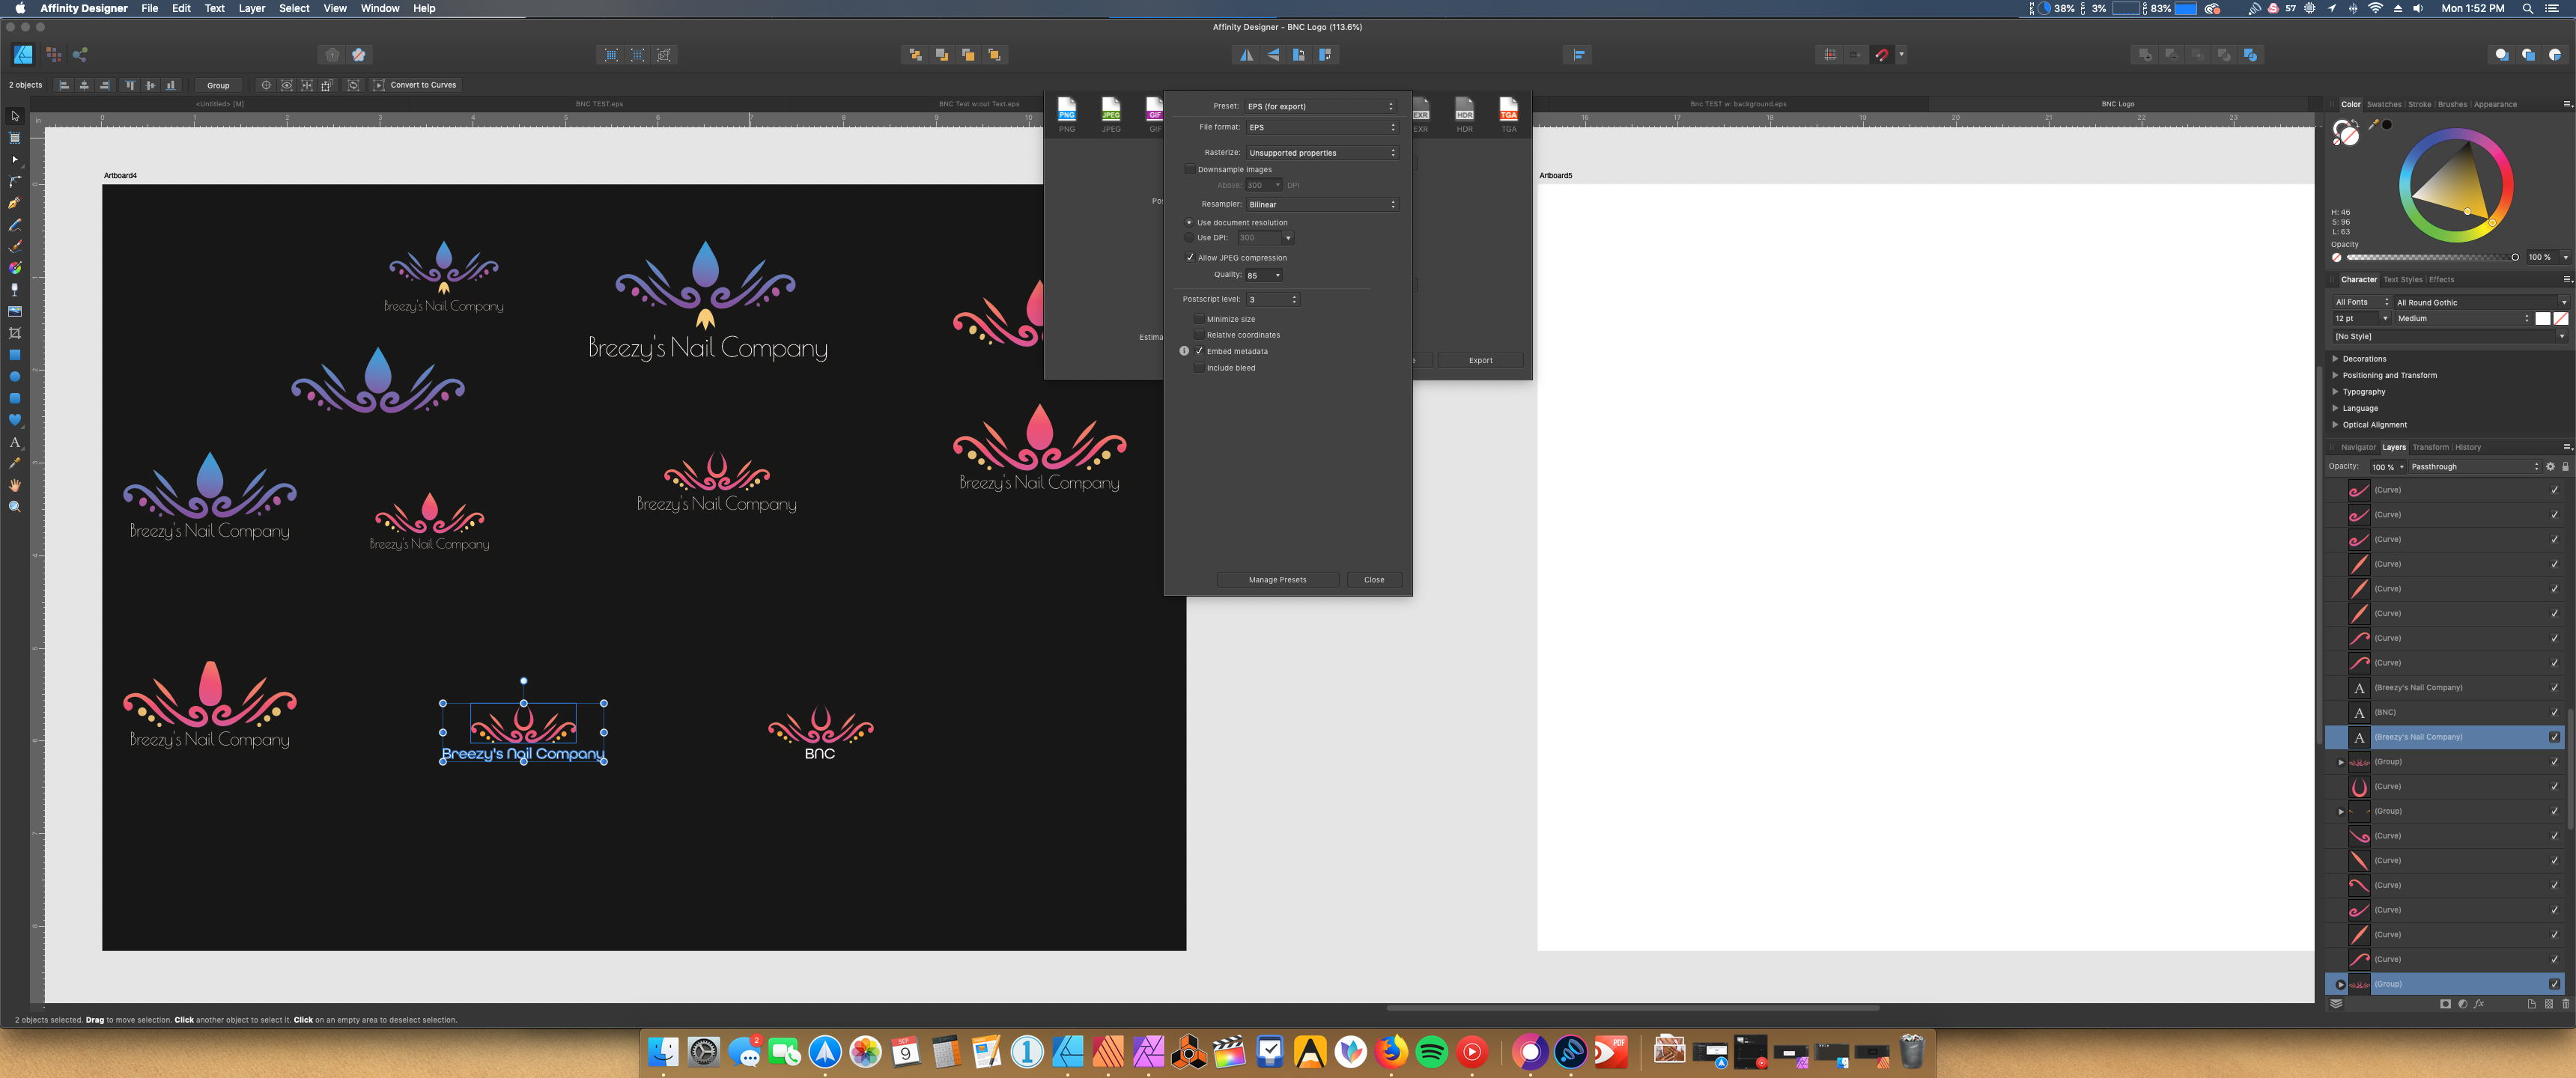
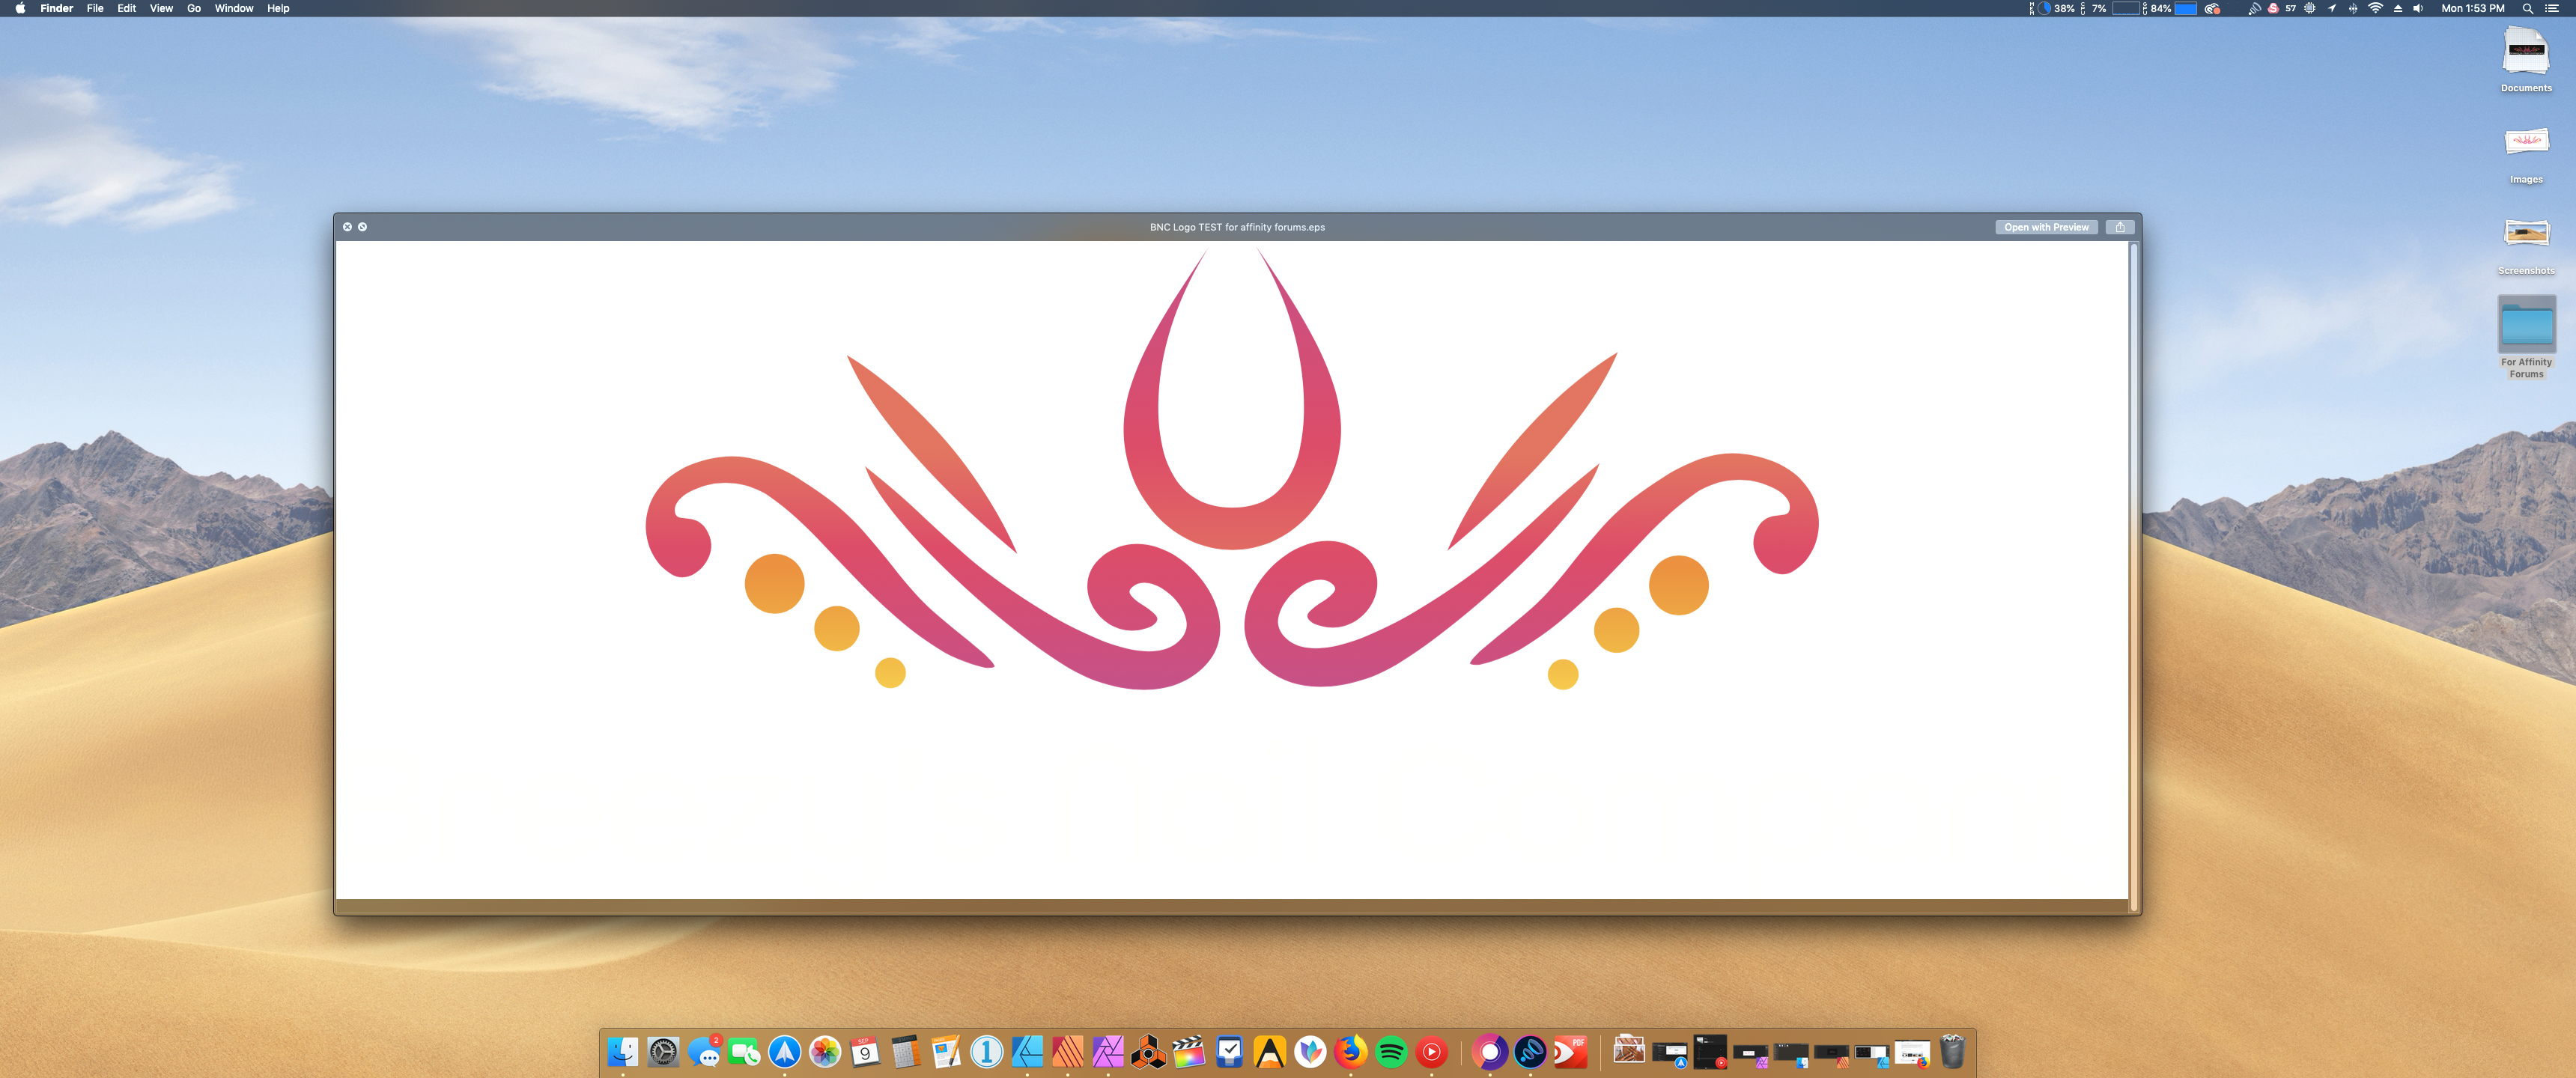
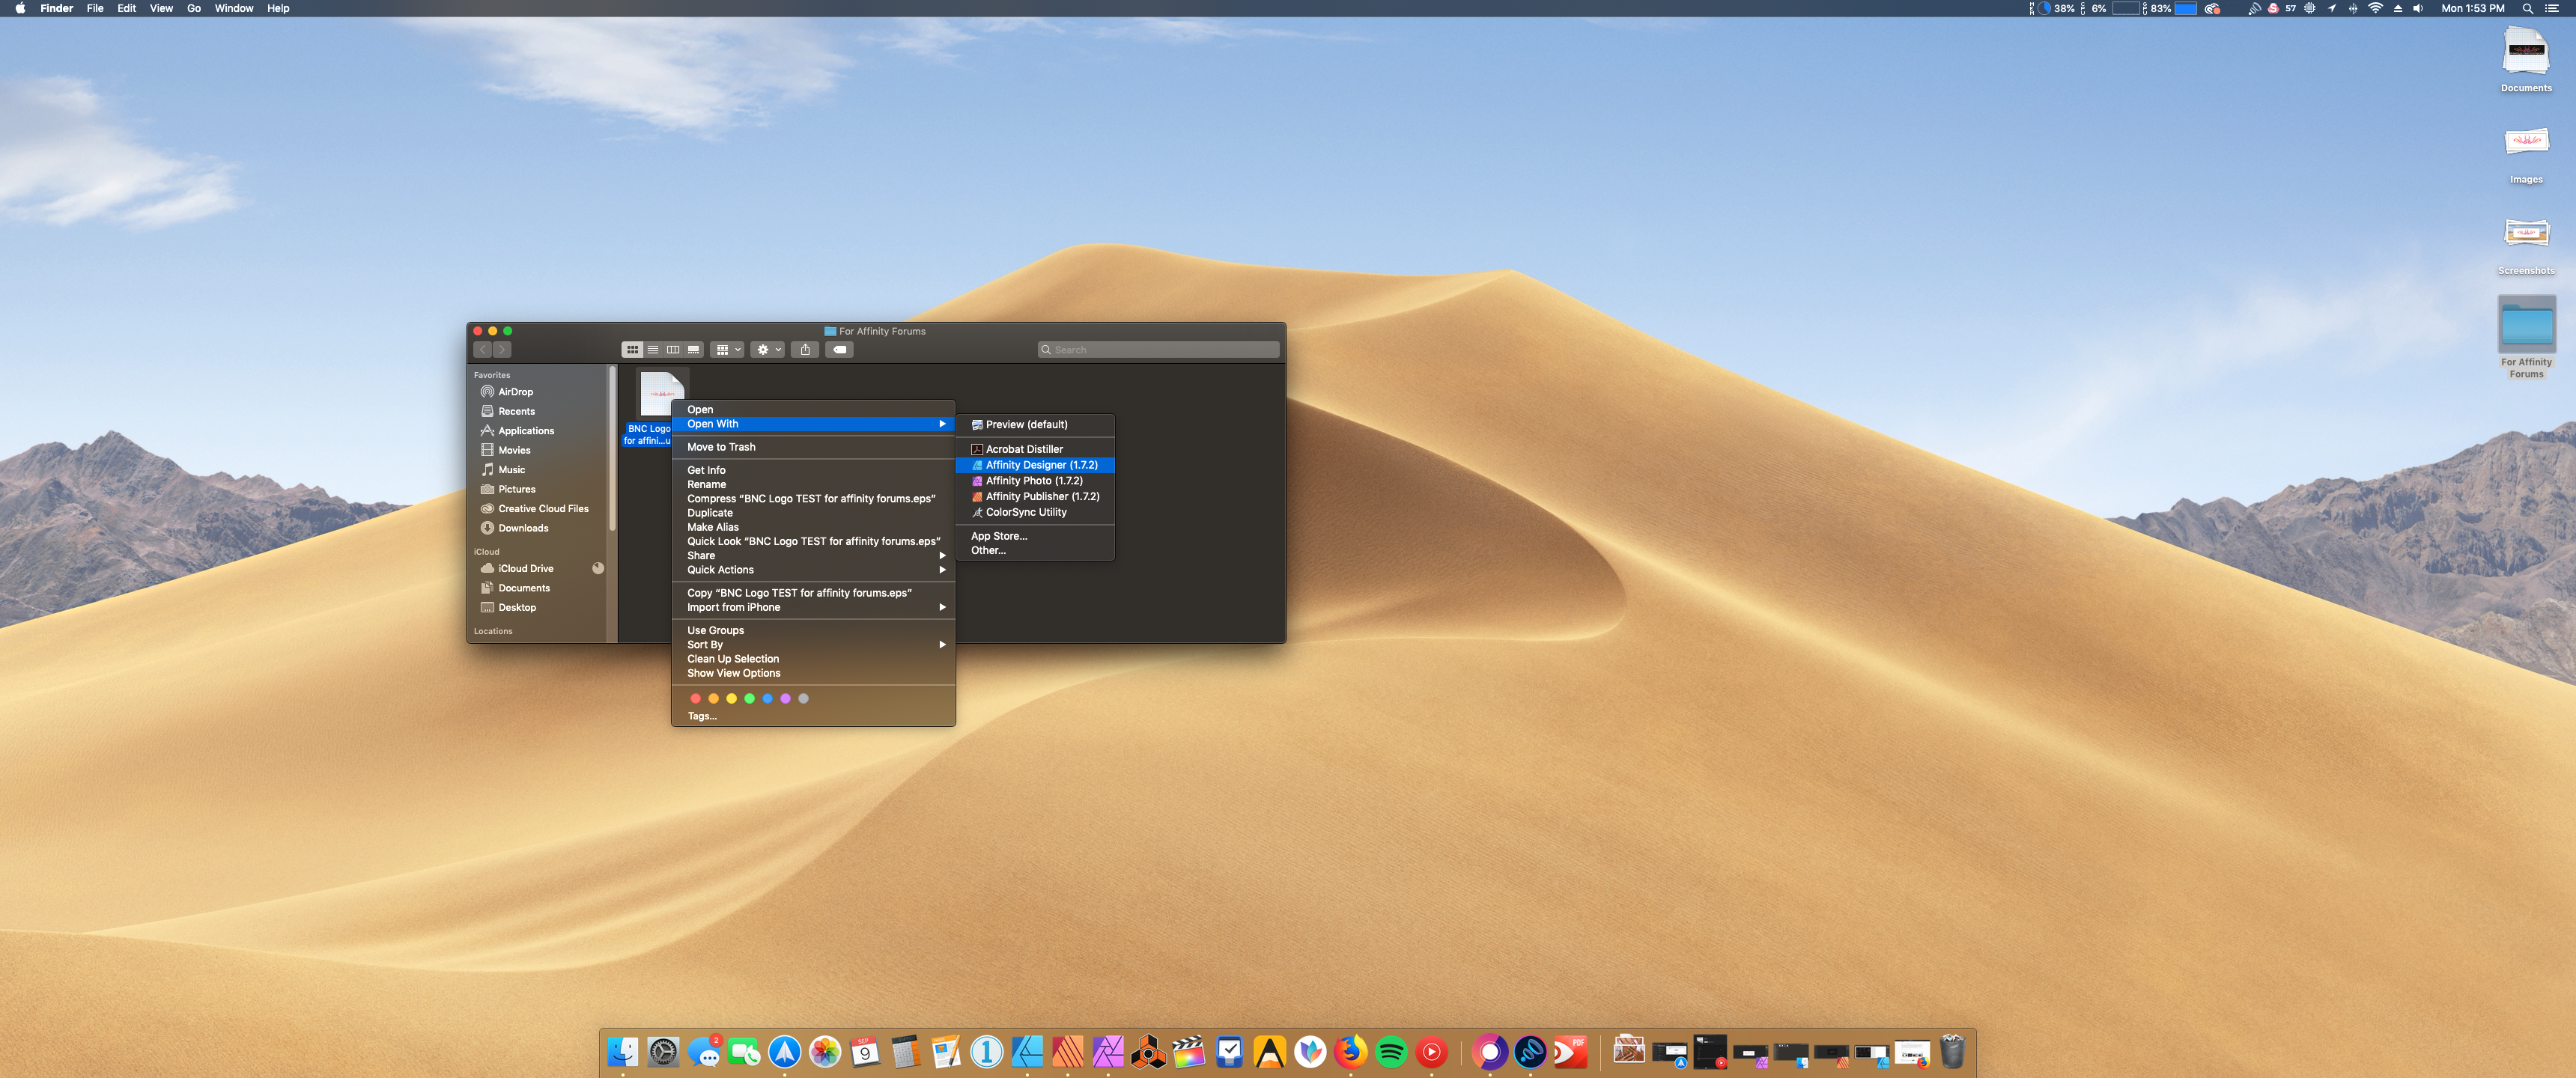
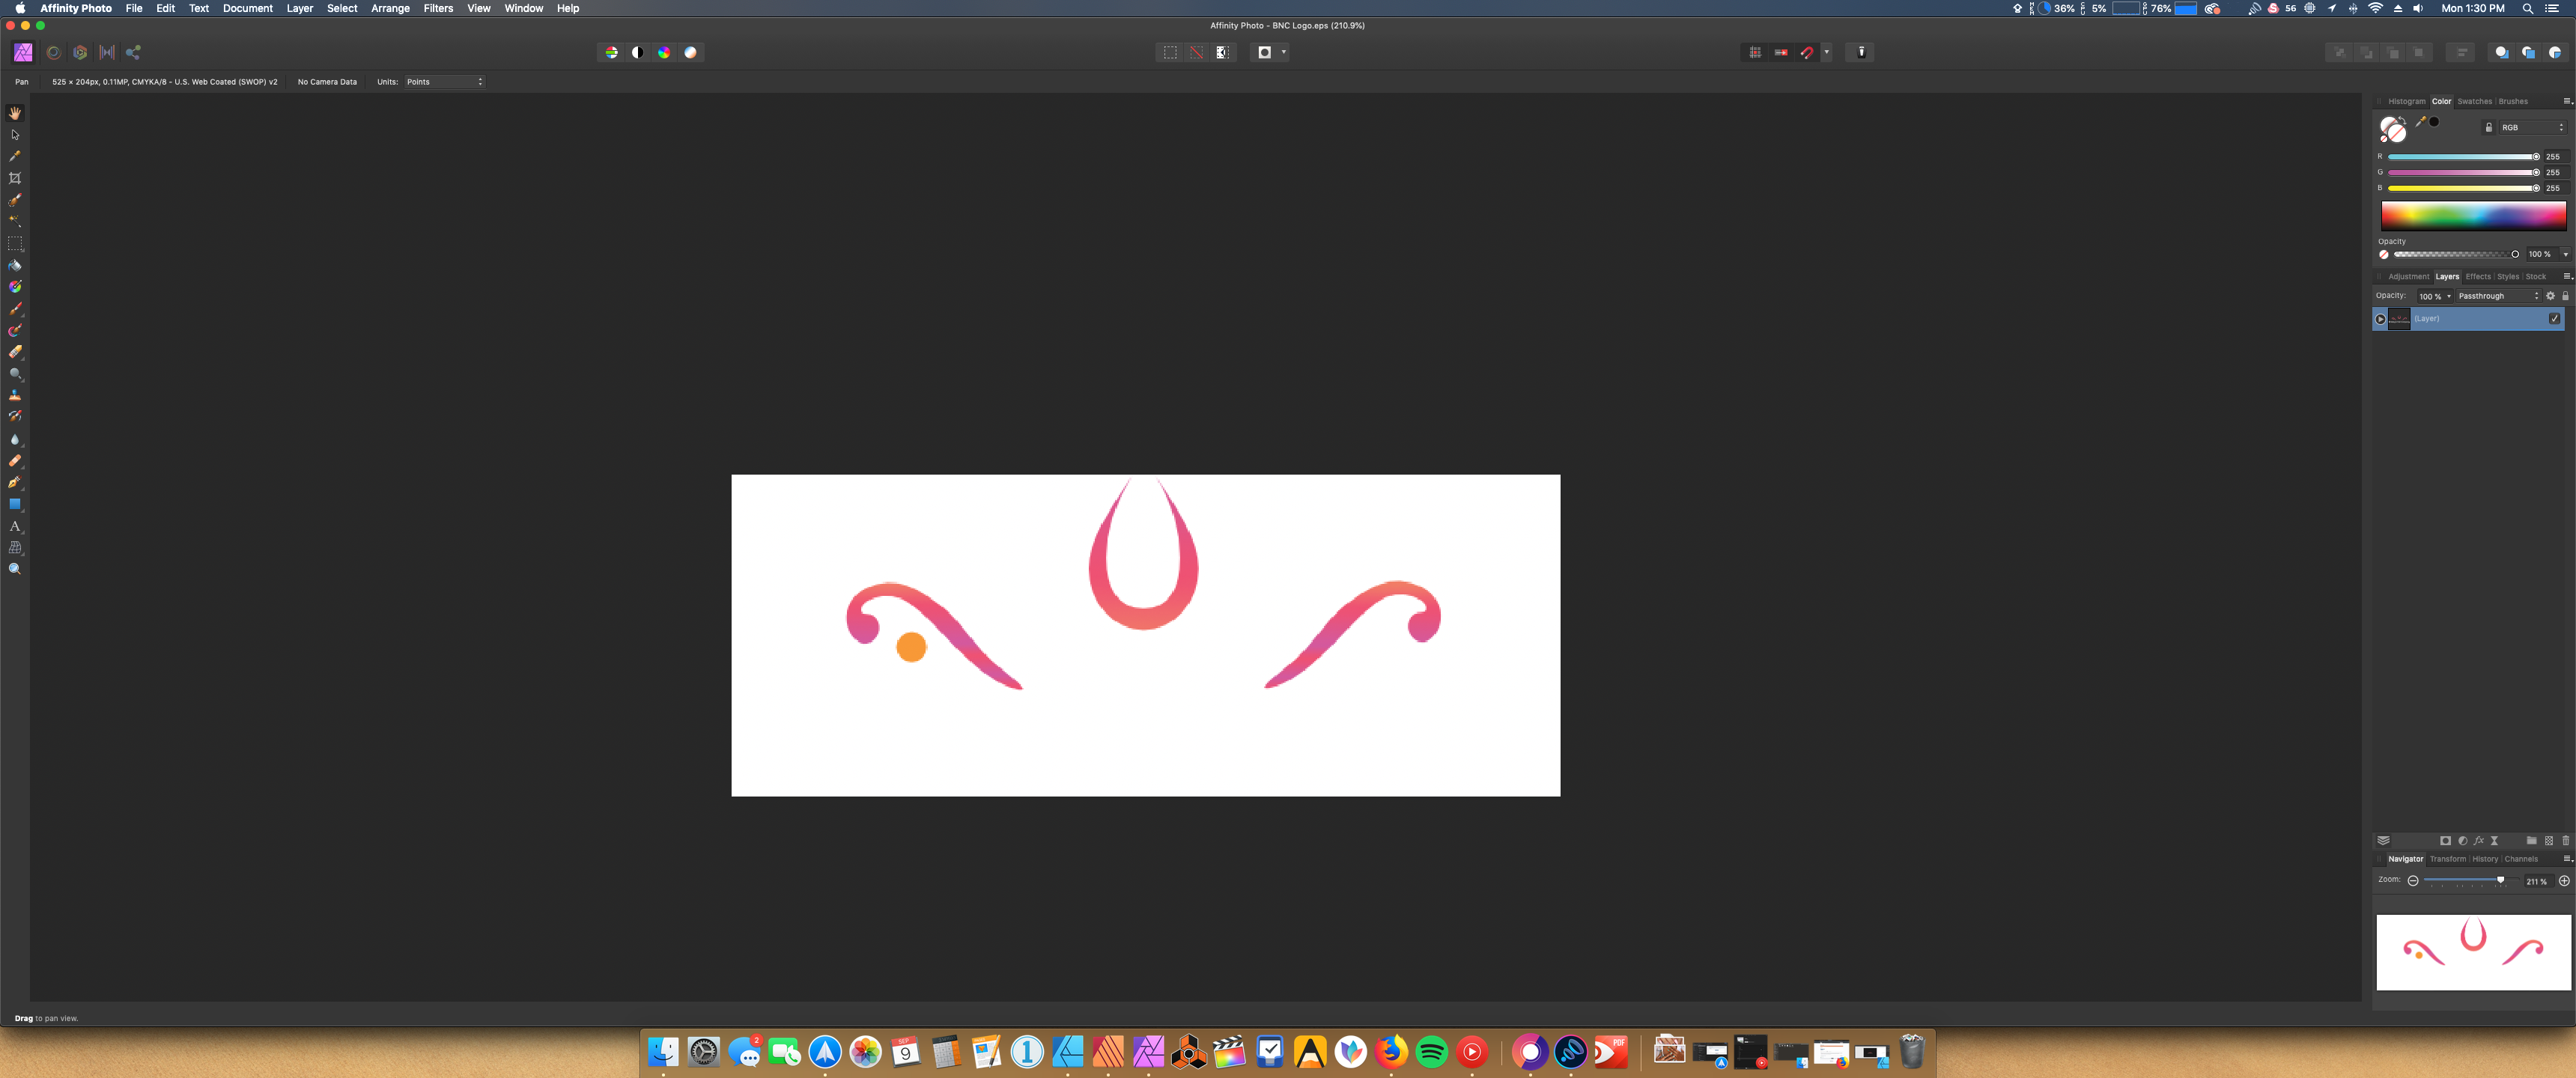
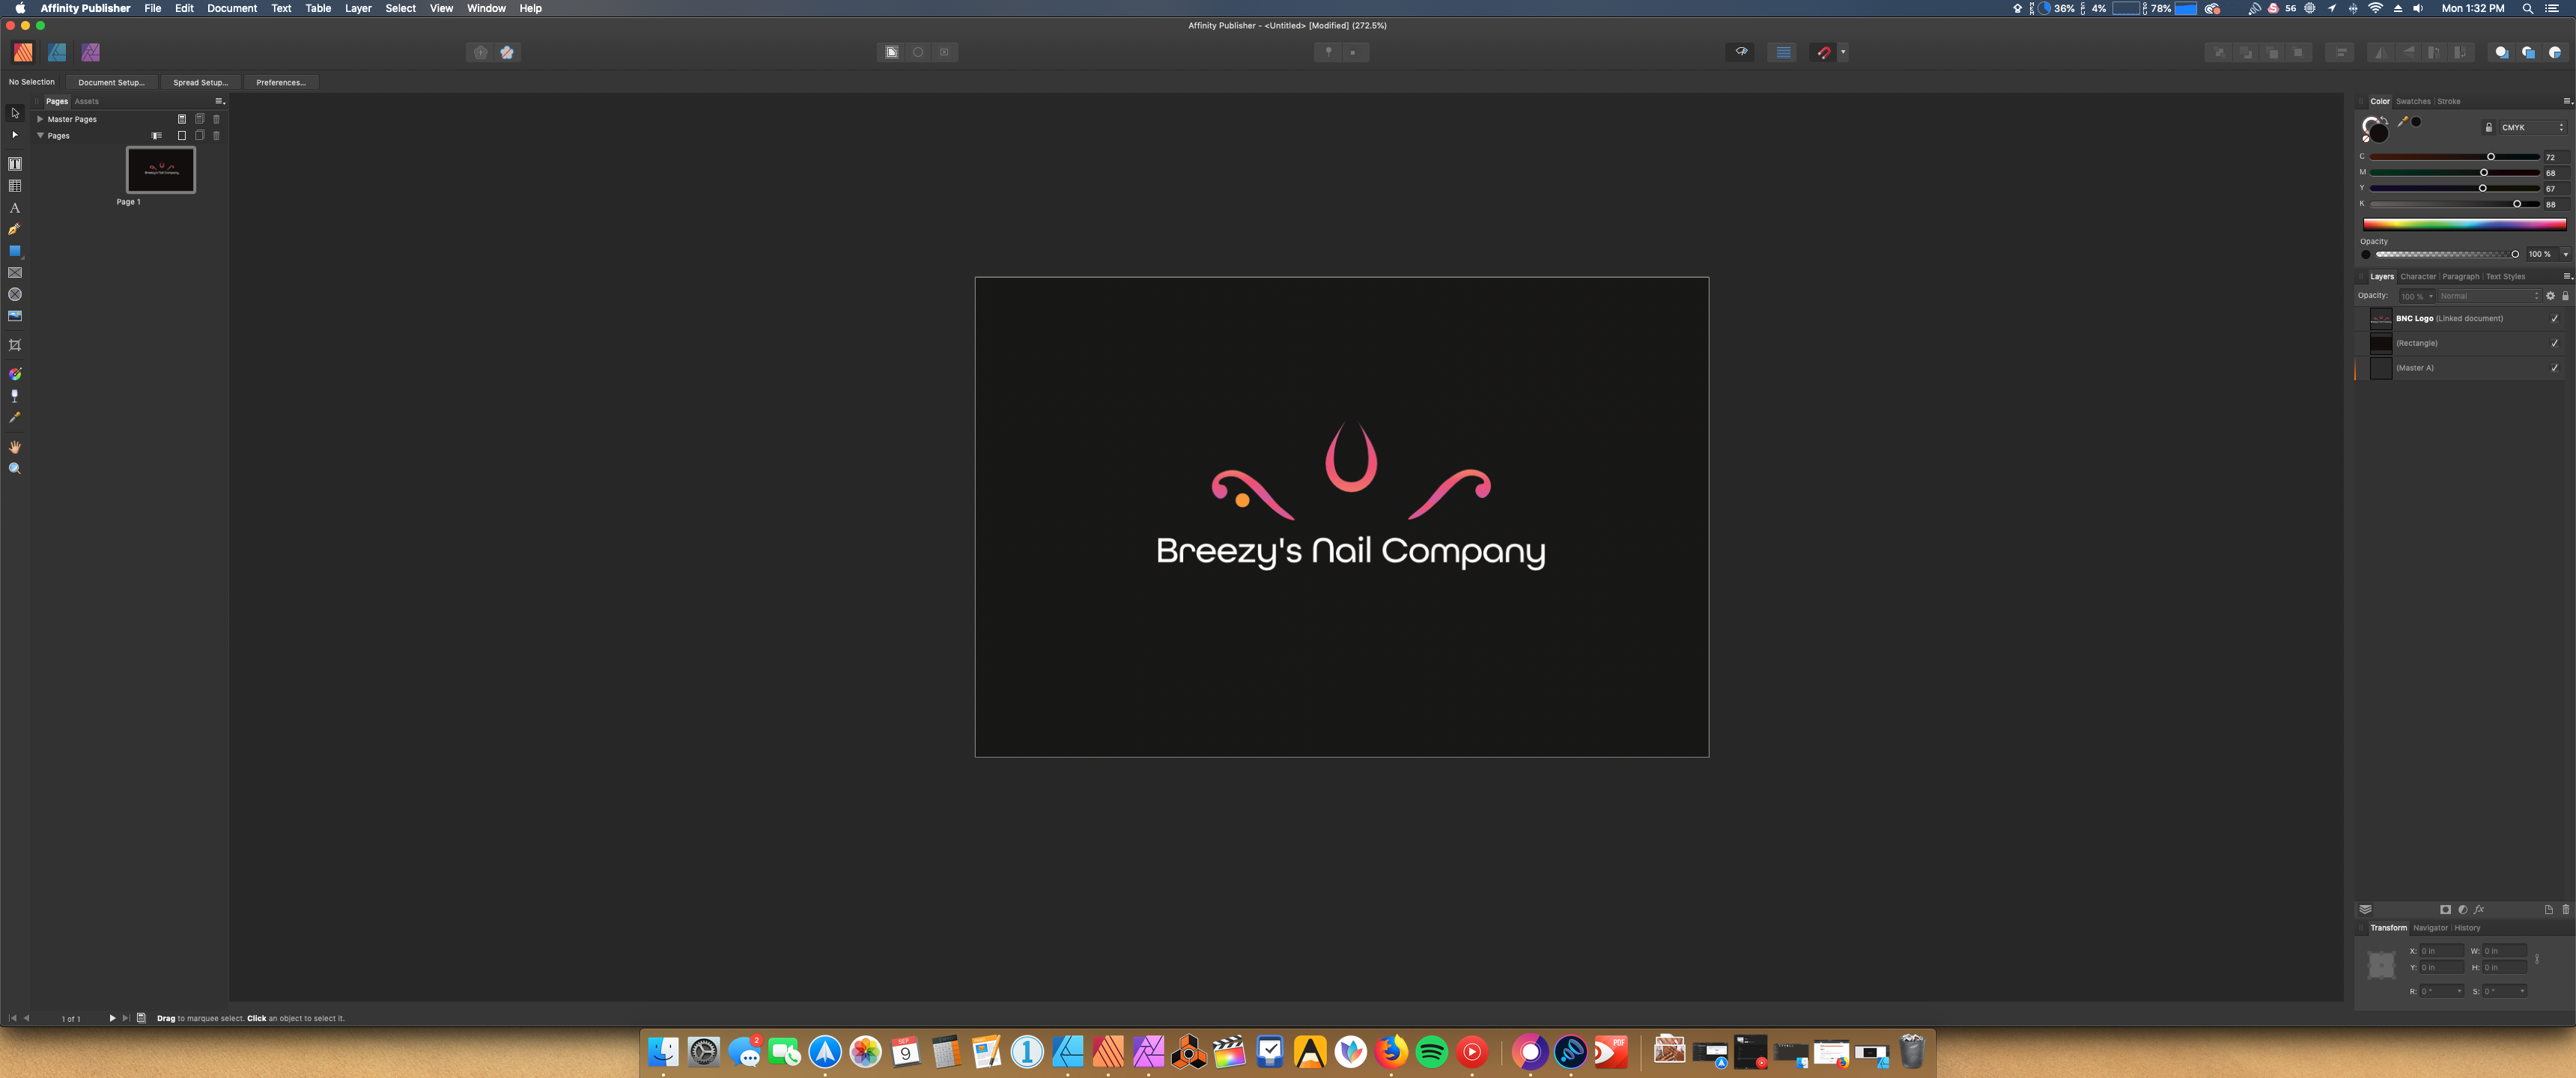
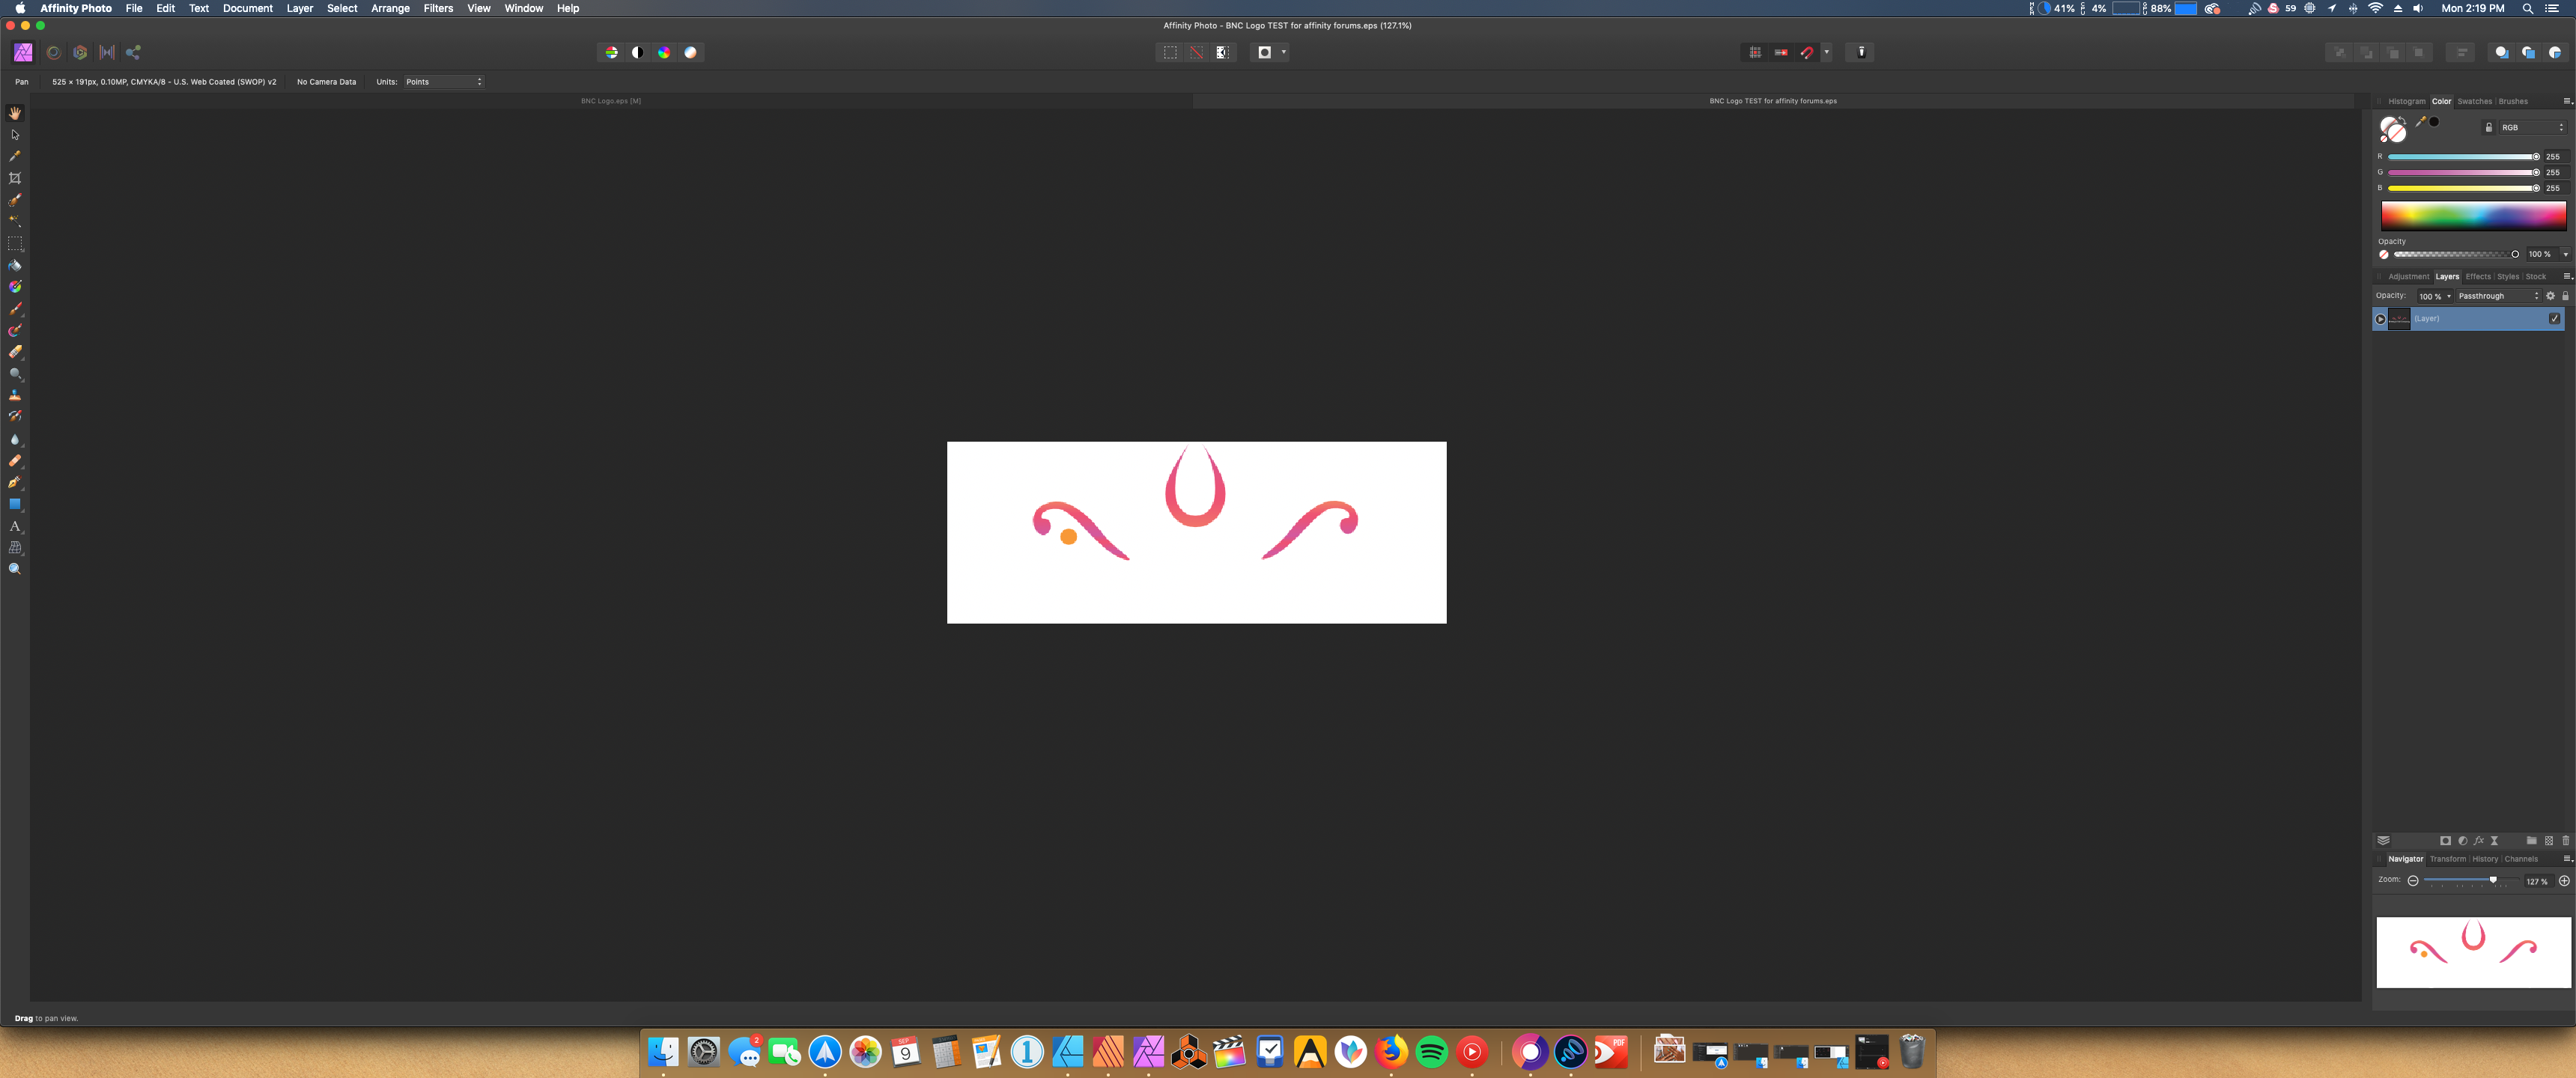
Hello, I've been tasked with making a logo for a client of mine and have ran into a dead end basically at the very end. My issue is this, I have my completed artwork ready to export, I use the default (EPS for export) preset and created the file. When previewing my file on the default Macos image viewer it displays it correctly with my shapes, gradients etc. Now I want to take my EPS files and open them in Affinity Photo and Publisher, both for mockup and business card work respectively. My vector artwork has missing elements and the elements that did stick have wrong gradients/colors. I thought this was a issue with my document so I opened a new one but the problem persists. When opening the said eps file Publisher and Photo they will always display the same missing elements and artwork. Ive tried expanding the artwork but the issue persists. I have no idea what else to do, I can only come to a assumption that Affinity Designer can't export EPS correctly. I even selected the artwork and changed it to one of the default grays found in the swatches and when exporting it the artwork comes out intact!!! Below are the steps I did to come these same results every time along with screenshots. 1. At my original document where the logo was created I then selected the one I want to use. 2. Next hit the menu bar and choose export 3. From there choose EPS for export and for the AREA choose selection without background and leave the other options untouched. 4. For this example I made a folder and exported the file to that location my desktop. 5. Here you can see the file in the folder I created and the preview it ends up showing. * There is no text because it is colored white so its hidden here. 6. Here I'm going to open the file in Designer. Notice how the artwork and the gradient looks. > These are just shots of the same EPS opening in Publisher and Photo. > I copy and pasted the same artwork but changed it to one of the greys in the default Greys swatches panel. Here I opened the EPS and it came it out intact! In the end maybe I'm still doing something wrong with the way the export is. If someone can help me with this I would definitely appreciate it! I want to continue using Designer to make my branding, and logos, etc.
-

affinity designer "Squishy" - Designer Sample Artwork
ChristiduToit posted a topic in Share your work
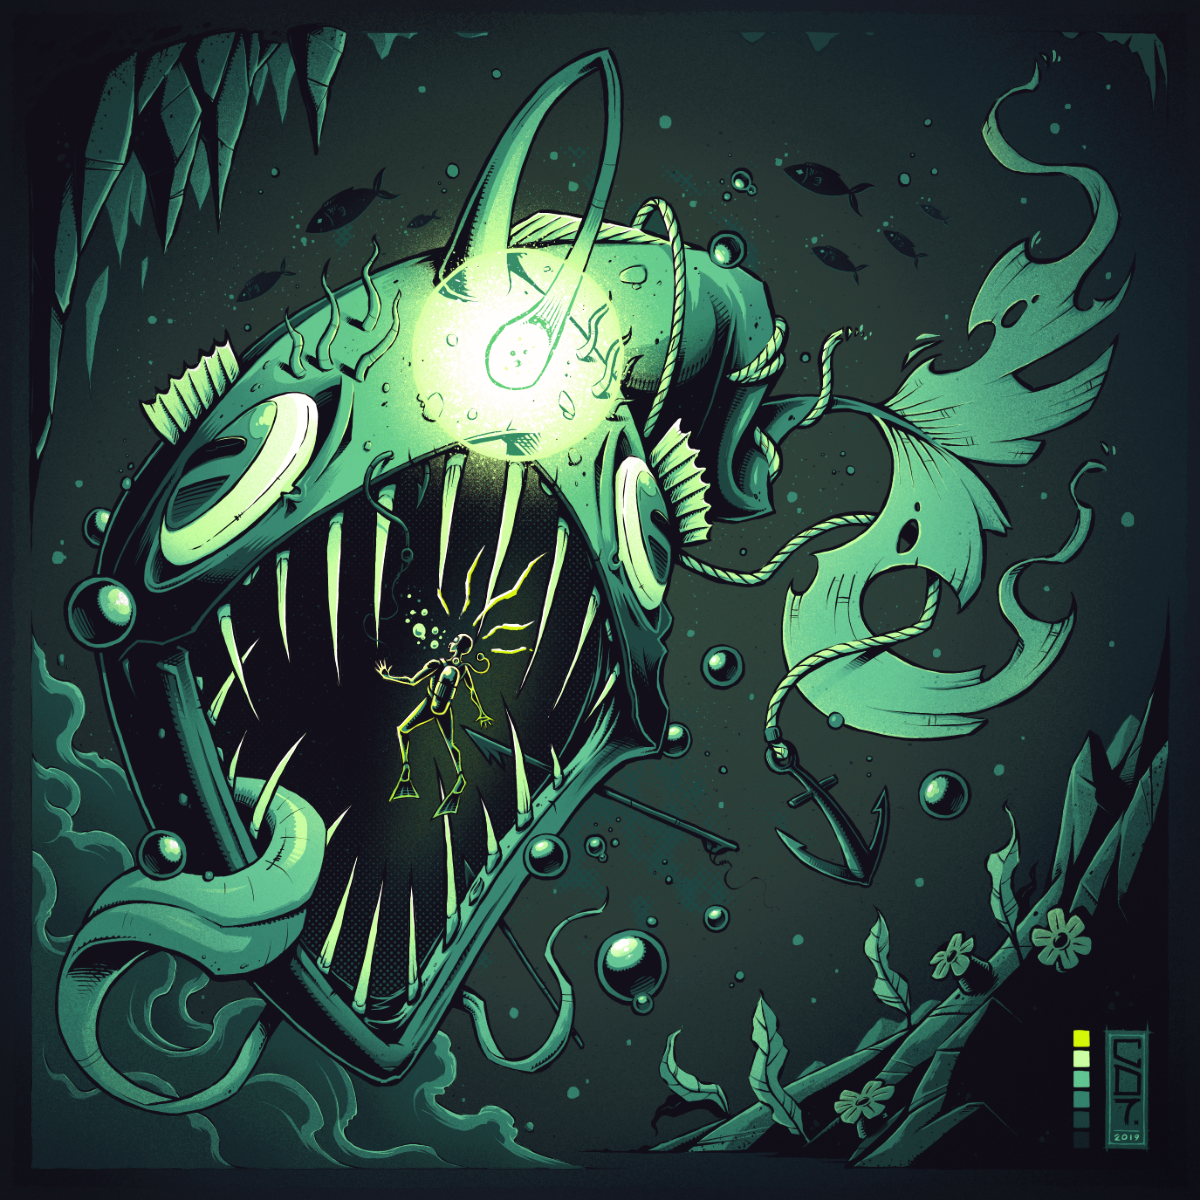
I totally forgot to post this here, which is really dumb of me, because this is probably one of the most important places that this should be posted! I worked with the lovely folks over at Serif/Affinity to create this official sample artwork for the release of Affinity Designer 1.7. You can access the working file of this illustration both on the desktop as well as iPad versions of Designer by browsing the sample artwork section, which will allow you to have a look 'under the hood' to see how the illustration was put together. The artwork also shows up for a moment in the latest Affinity 1.7 video advertisement, and in two of their latest tutorial videos. Though Designer is primarily a vector based app, I created this piece entirely in the Pixel Persona using raster brushes to show just how versatile the app can be. You can see more of this over on my Instagram: http://www.instagram.com/christidutoit ...and if you'd like to read my ramblings, I did an interview on the Affinity Spotlight blog too: https://affinityspotlight.com/article/christi-du-toit-digital-but-hand-drawn-with-lots-of-grit/ Hope you guys like it!
- 14 replies
-
- 16
-

-
-
 Hi! I've recently got access to an iPad Pro and I've been dabbling with Affinity Designer. Great stuff, but I've ran into limitations that break my colouring workflow. First let me explain how I do it on the desktop: Draw a vector shape Apply a global colour to this shape Create a pixel layer inside the shape Apply a Colour Overlay effect to the pixel layer Attribute a global colour to the above effect Draw on this layer, the pixel brush colour doesn't matter since the Overlay effect always overrides it Repeat steps 3. to 6. for every colour I want to draw inside the shape Move on to the next shape and start from 2. again This way if I want to change any colour after the fact, all I have to do is edit the global colours and all parts of the illustration respond accordingly, even the pixel layers. The iPad version of Affinity Designer does not have global colours, nor it does not support attributing swatches to layer effects... this fundamentally breaks the method of controlling colours described above... I've already requested both features on the appropriate forum, but until they get implemented I'd need an alternative method. My question is, what alternative methods of recolouring the artwork should I use? What do you use when you want to recolour the artwork after you're done? Thanks in advance!
 -
Hi all, I haven't really had time to look into this due to time constraints on other work (sorry....), but is there any good IT related (pref. vector) artwork available for the Affinity apps? It would be nice to directly use stuff from a e.g. artwork/icon library instead of importing things. If there's no such thing yet, any tips, links etc. to useful artwork relating IT subjects - think artwork regarding pc, tablet, phone, internet, switches, routers, viruses, malware, hacking etc. imagery - and basic chart/graph/diagram stuff will be greatly appreciated! Anything to make slides more interesting to look at, but avoiding the more standard (cheesy) photo stuff you find on a Google search or at a stock site. So something that looks a bit more pleasing and professional, and make it possible to quickly start building up presentation material ;) Free or commercial work is not an issue. cheers all for any answers, rob
-
-
 I was using the iMac enlarging and exporting my work to desktop. it worked fantastic for weeks and suddenly it no longer works. go through the same process and now nothing on the desktop. i enjoy exploring the Affinity Photo application. have been using it for over a month now. this is the second time asking for help. i am not very techno-savvy. but it is a puzzle that my jpg worked well and then nothing. 16"X20" portraits, 24X36 artwork and others. thank everyone who comments, in advance. thank you so much. your service is greatly appreciated. i would like too one day return the favor. where to start? my images are too large to transfer. they are for printing. thank you for your time & consideration. ali black
 -
Hey folks, back again with a small composite made of three photos from last year's trip to Bali and some burning sky stuff I shot during summer. Result: It could need some more finetuning for sure, but I am pretty happy with how it turned out. What do you think? Sources: Cheers, Marc
-
Hey folks, finished another edit of a photo from my trip through Vietnam. Still not sure what to think about the "water" and its shore... What's your opinion about it - does it look too unnatural? I was trying keep no straight shore line... Original Edited in Affinity Photo Cheers, Marc
-
This time I was experimenting with some layer options (3D for the birds and on me), dodge and burn and blendmodes for painting in some radiation around the lightsource. Hope you like it - cheers, Marc
-
Hey folks, another photo manipulation because of a monsun like weather on the Hai-Van-Pass in Vietnam. The sun looks a bit fake, it is just a white half ellipse with gaussian blur - do you have any recommendations for a better processing? Processed in AP: Original: Cheers, Marc
-
Hey folks, this is my 2nd attempt in Affinity Photo. What do you think about it? Expect more edits soon Best regards, Marc
-
This will be the thumbnail for my next video. The character was drawn in Krita, everything else, Affinity Photo
-
 I have many artboards in Affinity Designer (more than 50) Each artboard will be a single page in a PDF document that I will export. As I understand it there are two routes to exporting PDFs: File > Export > PDF Make a slice for each artboard, and export each page as separate PDF The first option is problematic because in the exported PDF, artwork from one artboard, if larger than the artboard itself, is showing up on neighbouring artboards (i.e. pages). See the PDF attachment: the maroon rectangle overlaps the second artboard and (and the same in reverse for the green rectangle overlapping the first artboard). I'm aware that the obvious answer to this is move the artboards further away from each other but this isn't ideal for a few reasons: As I say, this document has over 50 artboards representing pages in the exported document so spacing them far enough apart from each other such that photos and other artwork don't overlap other artboards isn't feasible, especially as the artboards masks the artwork beyond the edge of the artboard; its impossible to see where the bounds of the artwork is to mitigate overlap on other artboards I'm actually trying to place two artboards side by side to represent each spread in the book in order to actually visualise what the art looks like together as a spread without a gap. So, I was wondering if there is an option I'm missing somewhere in File > Export > PDF that I can turn off artwork from separate artboards overlapping and appearing on other artboards (i.e. pages) in the export? At a push I'm aware that I can use option 2. above as a work around for this problem i.e. slicing up the artboards using export persona and exporting each board as a separate PDF document. But of course this leaves me with the hassle of having to combine all the PDFs back into one document using some third party program every time I want to export a version of the PDF document for preview. I'm also not sure what effect another round of compression will have on the document and am therefore reluctant to use this method especially as this will be going for print. Any help would be greatly appreciated! test5.pdf