Search the Community
Showing results for tags 'apl-290'.
Found 21 results
-
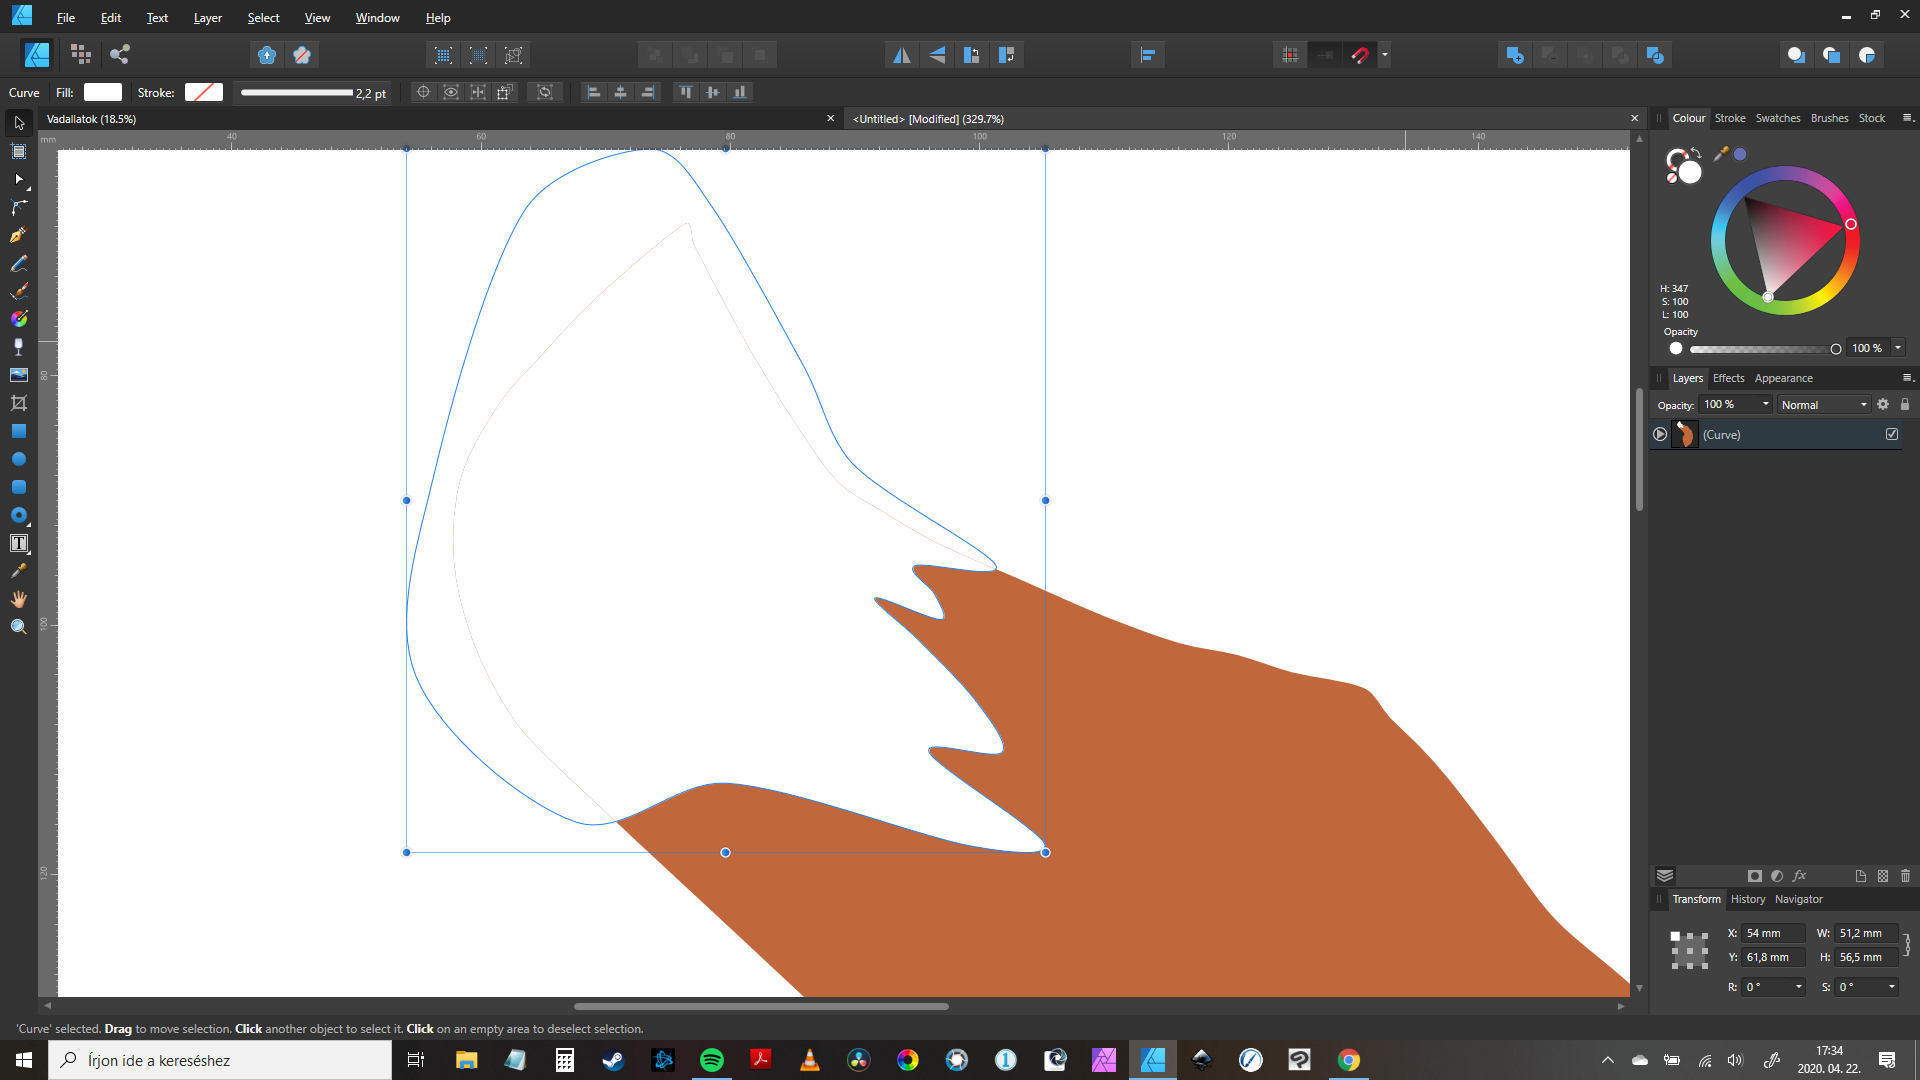
 I think I found a bug? I'm not sure. This is the first time I've noticed this. I was working on a logo and found that when working on creating the black and white variants there is a problem with outside strokes on text and shapes. When you select the stroke to be Outside (which it must be in the case of using lighter weight fonts), Designer is leaving a very fine space that is visible in the application despite the zoom level as well as rendering it in the export. I am on Windows 10. To test that it's not something I'm doing wrong, I created a new document. I add a circle to the document and make the fill black, add a 2pt black stroke, set it to Outside. I can see the fine space immediately. I exported as a JPEG and it also is there very visible and distracting to the image. The stroke should be right up against the fill with no space.
-
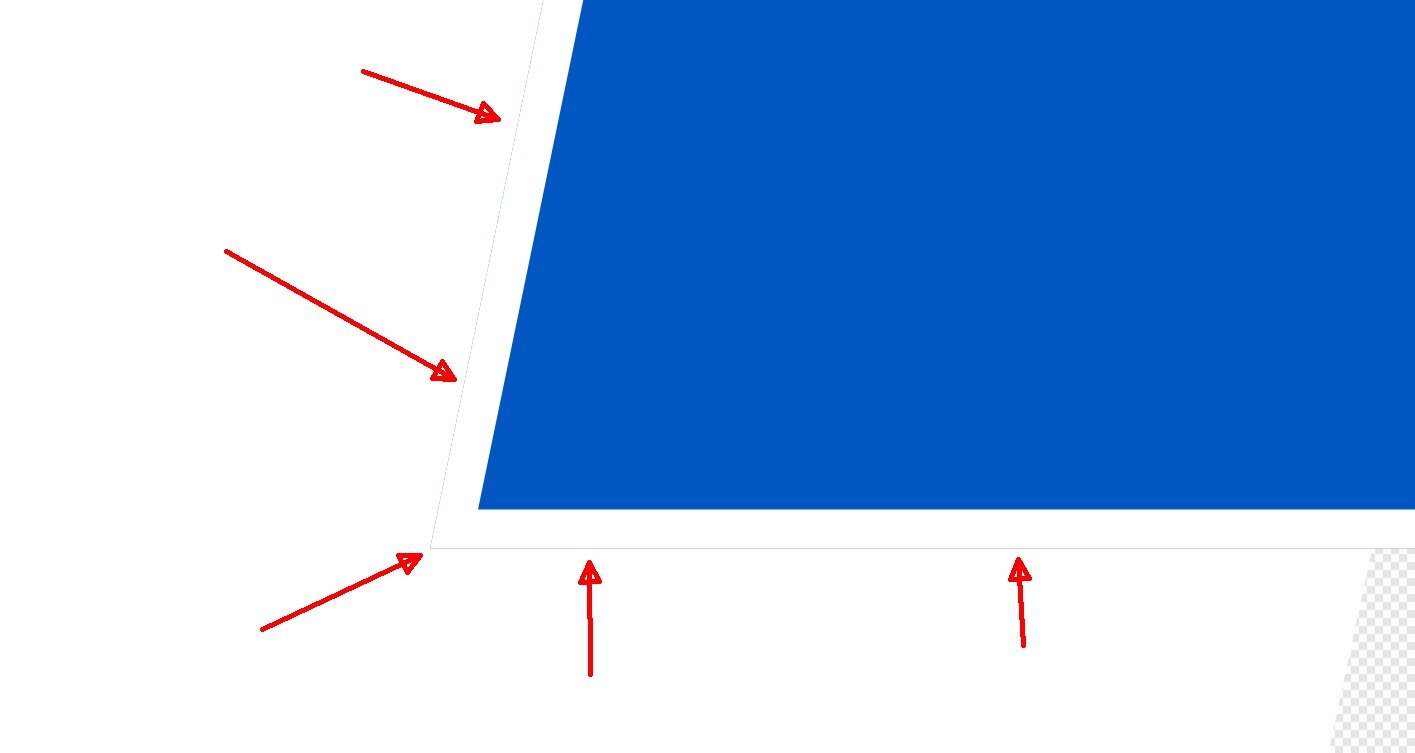
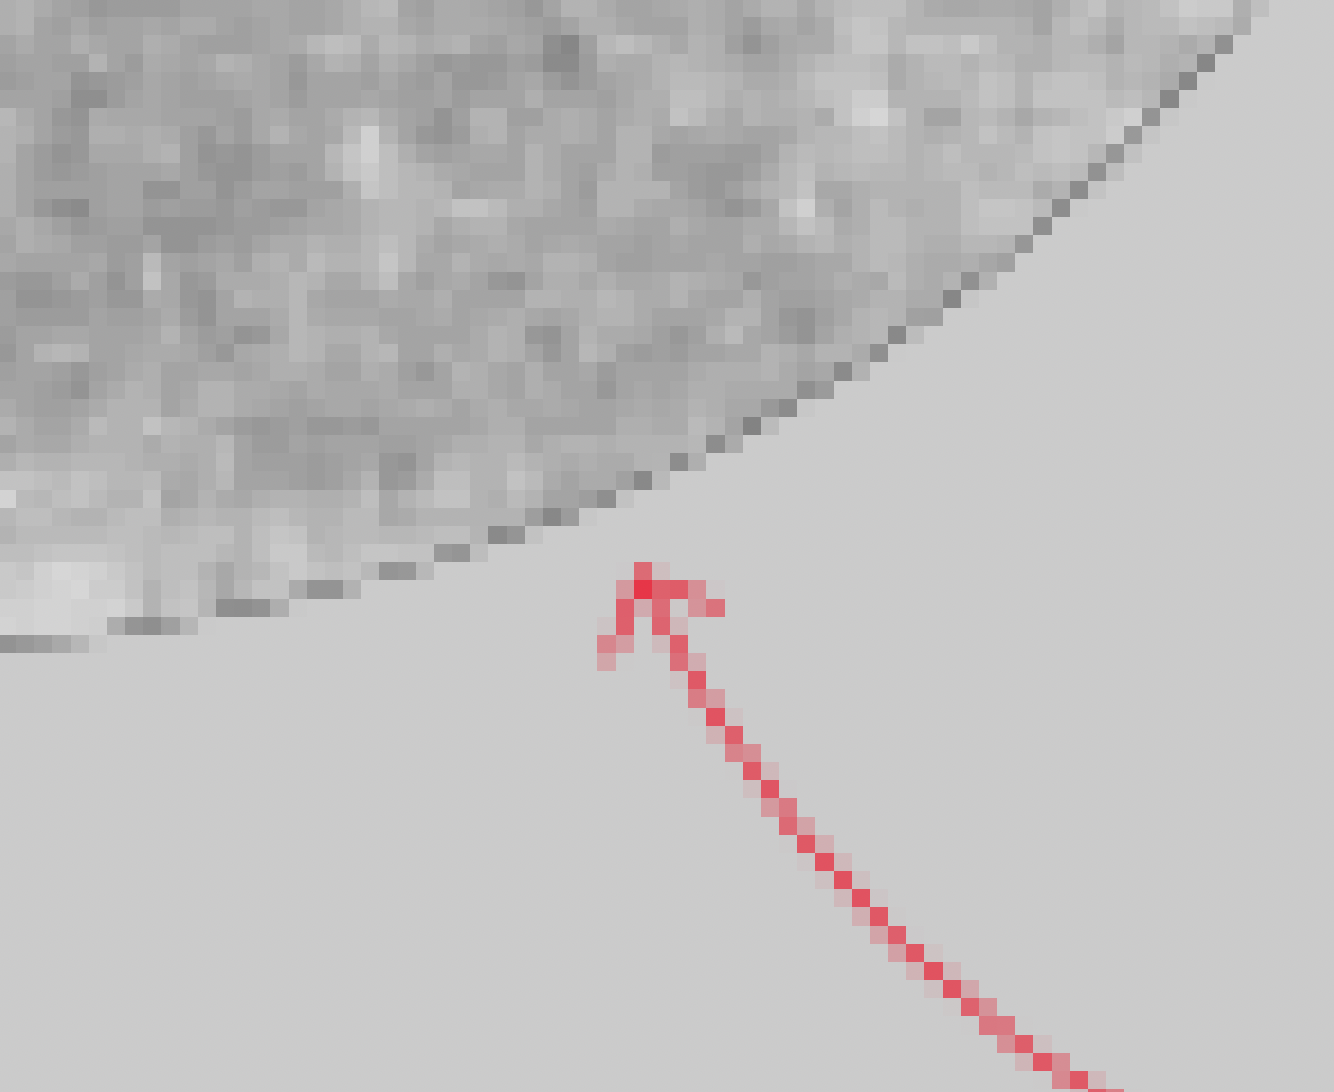
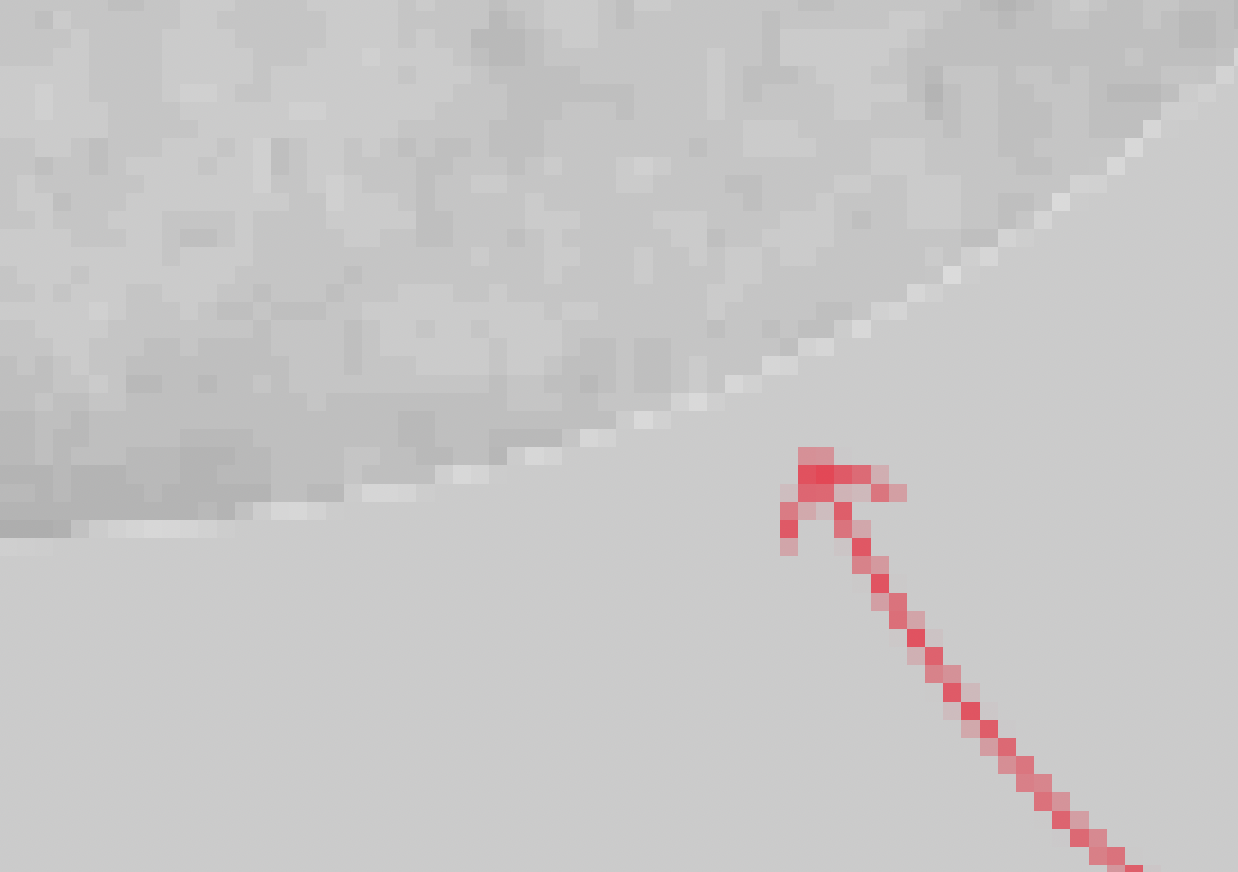
 I have found that with export of white circles with black outline, the white background colour is bleeding out beyond the black outline when exporting it. As a result, instead of transparent black at the edges, the colour is transparent grey. This becomes very obvious when on a black background. This can be seen in the attached Affinity Designer save file. Both circles are diameter 100px. The difference between them is; Left Ellipse / slice1; Outline stroke aligned to inside of shape outline - the edge in the output is grey + transparency. Output image size 100x100px. Right Ellipse / slice2; Outline stroke aligned to centre of shape outline - the edge in the output is black + transparency. Output image size 102x102px. It seems to me that when the outline stroke is aligned to inside of shape, the width of the stroke should be subtracted from the size of the shape when output for correct output. I use the option "Outline stroke aligned to inside of shape outline" to ensure that the output images are a known size. CircleOutlineIssue.afdesign
-
In Designer, a space is visible between shape and stroke designer-2-1-1769.afdesign
-
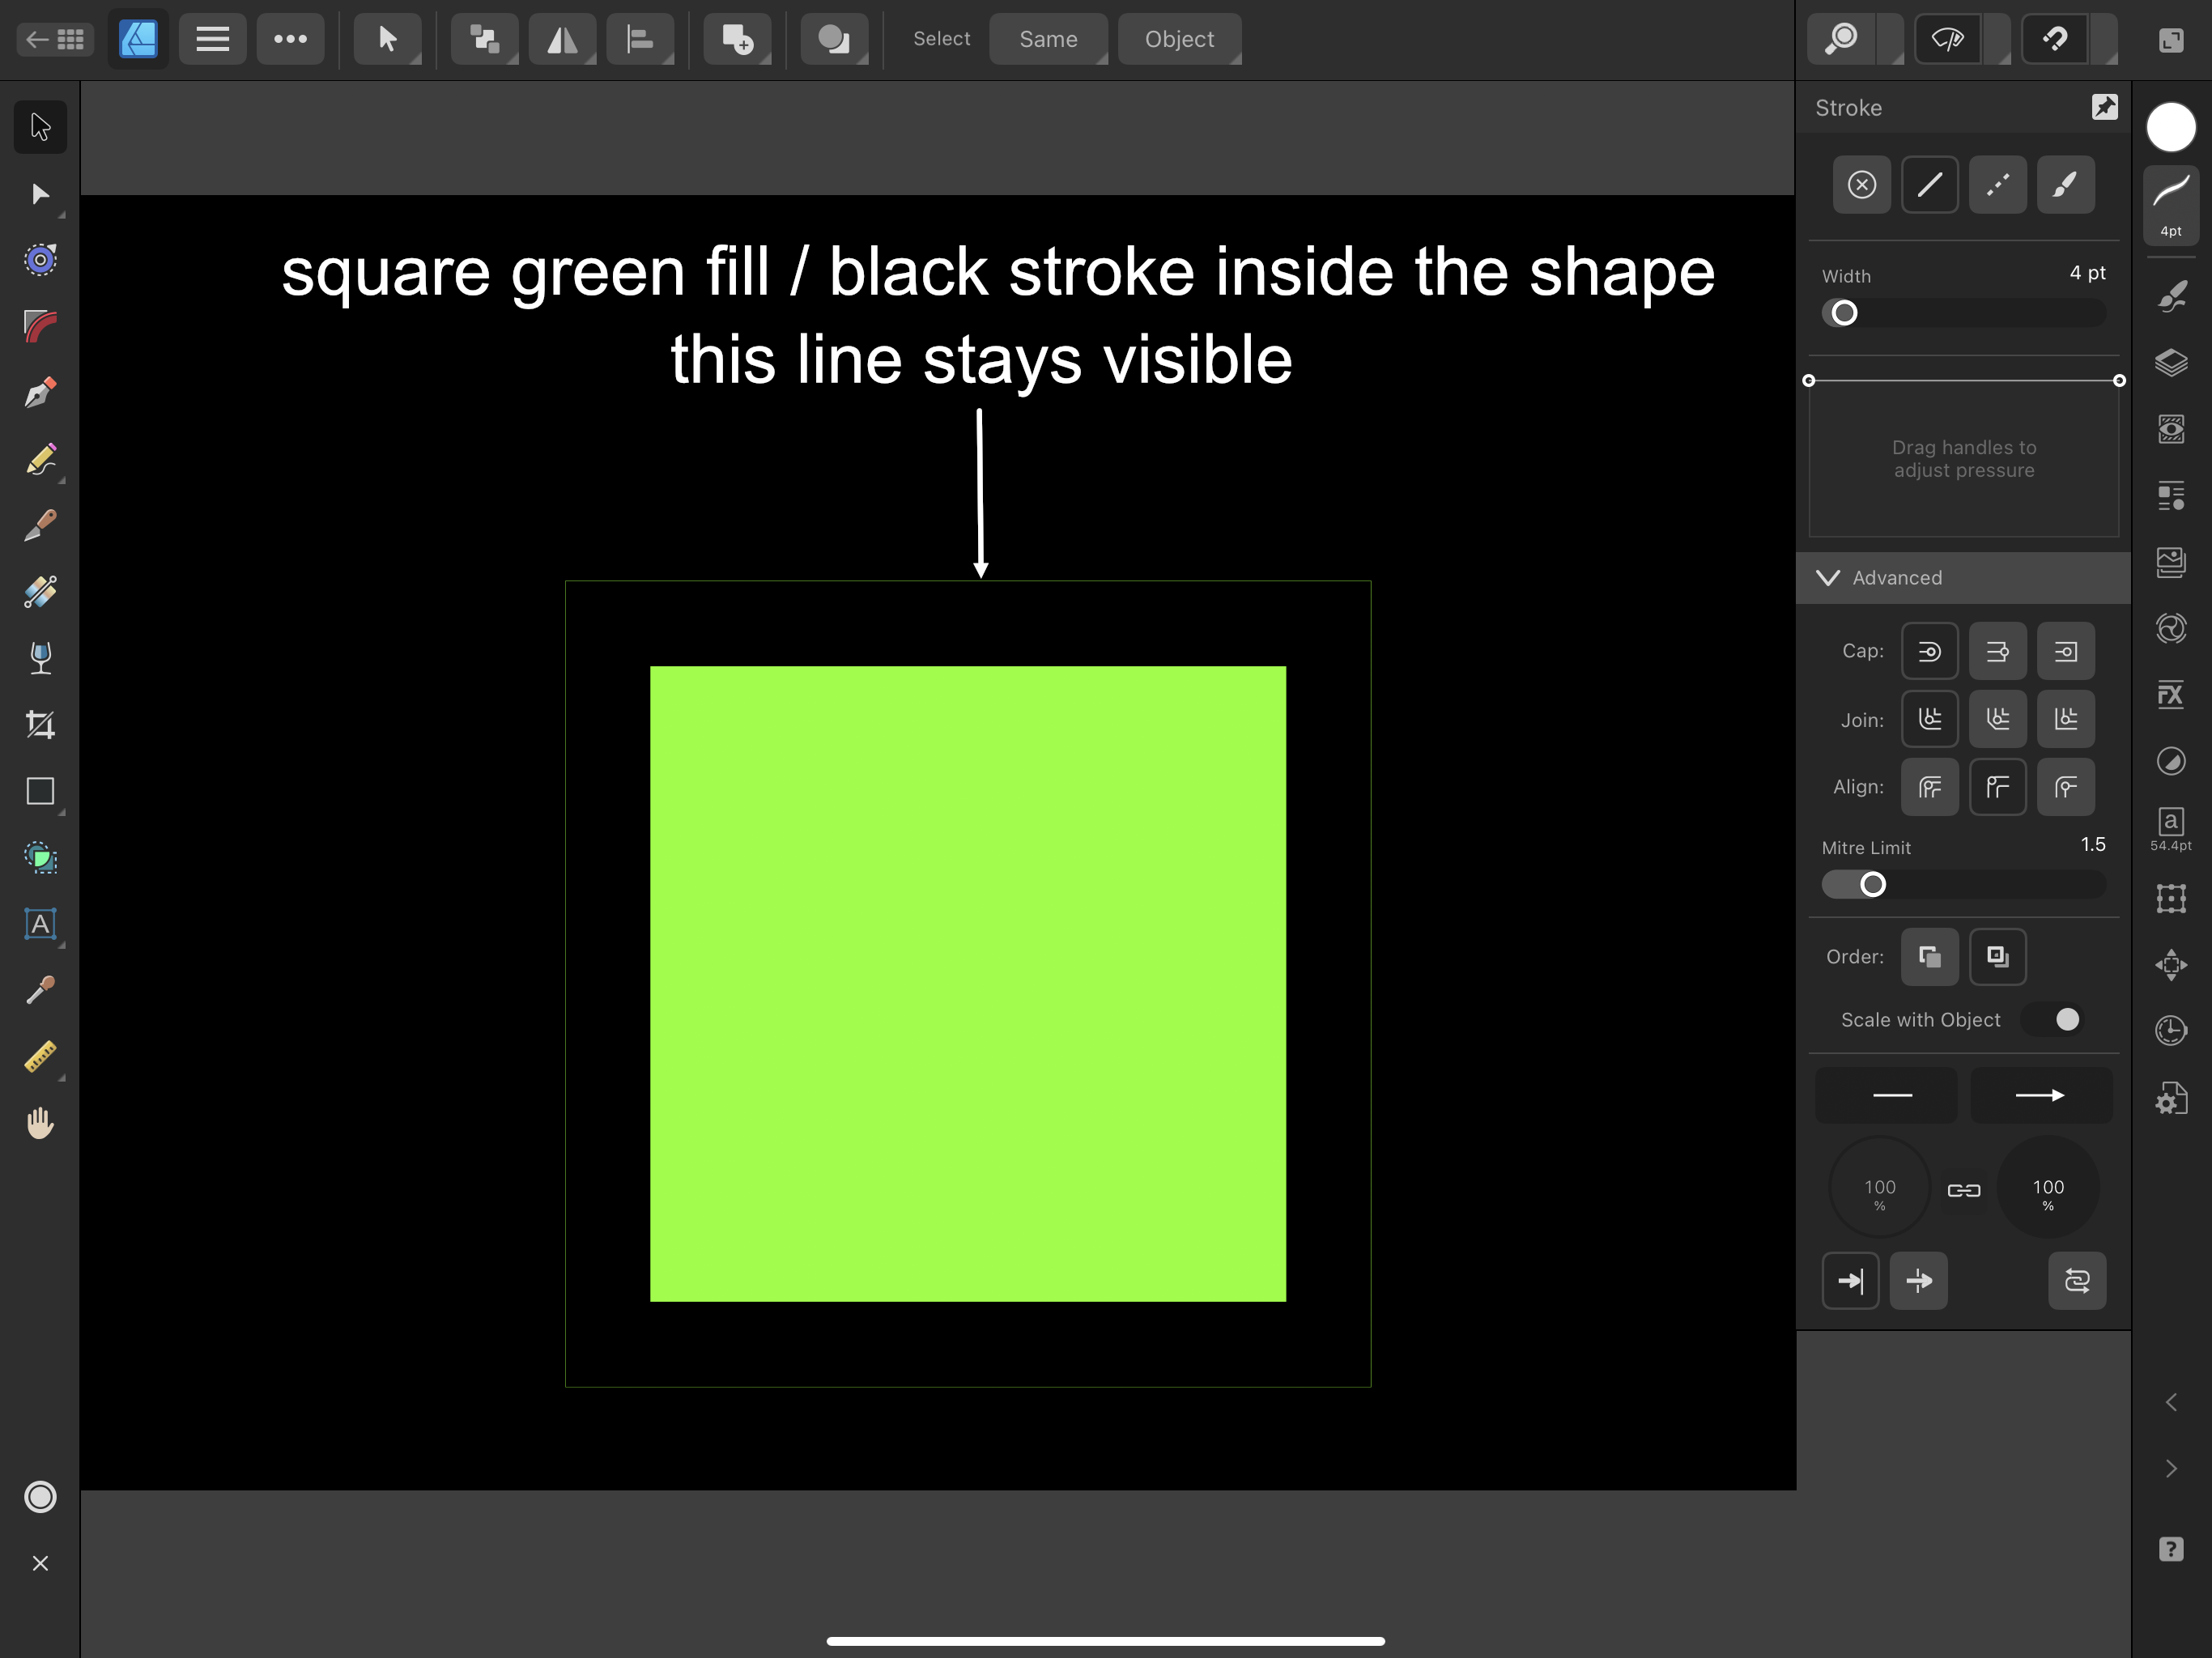
Thin green line stays visible outside shape . Green fill black stroke inside the shape .
-
 Just bought Affinity Publisher and it is great. But, in this example, on a white background, if we draw a circle with a black background and add some width to the stroke => it will show an 1 infinite pixel (no matter how much you zoom on it) line around the stroke based on the background color of the circle. It can be tested if the Opacity is to 0 vs 100%.
-
 Aligning the stroke to inside causes the objects fill color to shine through at the outer border. This becomes obvious and clearly visible when exportet as png or jpg.
-
 Hi there, My precise clipping setting doesnt seem to be working. I have it ticked in PREFRENCES-PERFORMANCE but im still getting thin white lines when i divide shapes. I have restarted affinity and still having problems. Any clues ??
-
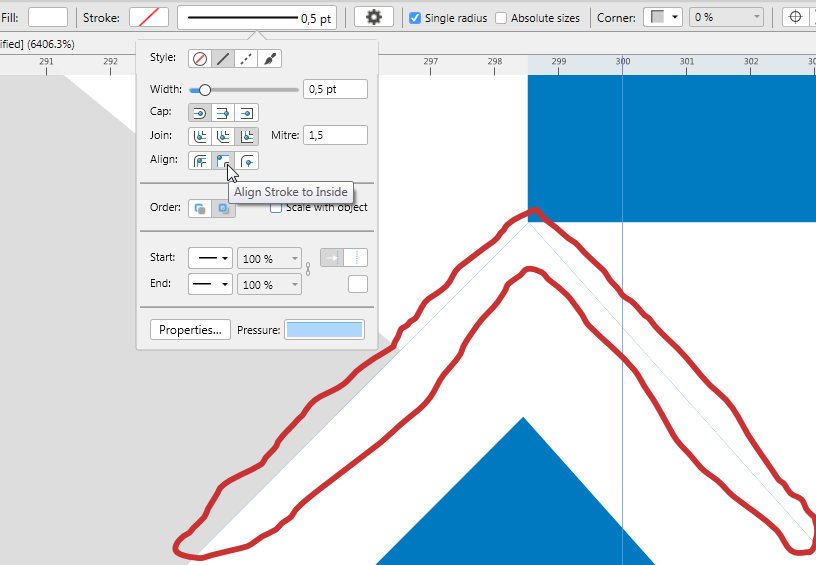
I'm trying to use the align stroke to outside feature but it leaves a blank space between the object and the stroke, the workaround would be to align stroke to center and draw stroke behind. Do you know if there is a way to do this without a workaround?
-
 Hello, I've noticed this gray line that follows the pen tool path. When I apply a stroke (this happened with every stroke, bought from 3rd party or stock from affinity) the line is visible in the program I thought maybe it was a program necessity and would disappear when I exported to jpg, but it still looks like it's there even after exporting to JPG Is this something I need to turn off in preferences or is this a bug? Thanks for any help
-
 Hi, I want to ask if this is expected behavior or not. 1) Draw circle with an inward stroke 2) Draw a line so it will intersect circle and make this line going from thin to thick in stroke settings 3) Put line into the circle layer, so it will mask it 4) Watch where stroke intersects with circle, harsh pixels there. Mask did not mask everything. It seems worst if you make objects white and bg black, much more obvious. I will include examples to be more clear:
-
Maybe someone can explain what is happening here. In support area it was suggested this is an anti-aliasing issue. The black is showing underneath the green layer. The object used as a mask is the same Crossguard object. Theoretically, they should cancel each other out enough that it nothing should show through? Unless I am doing something wrong. Source file: sword.afdesign
-
the title says it all - or... you also want to see the image. 🙂 there is a thin blue line outside of the white stroke - this thin line should not be there.
-
Hi! I have a big problem with vector clipping. I made a lot of graphics with this vector clipping method. This example, there is a fox tale. The tale is orange and i insert a white end. The white area is much more bigger, but there is a little border. You can see the first image. I read there is a solution to disappear this line, in the preferences/performance/use precise clipping. But the problem is: the lines disapper on the monitor, but when i print the file the lines are there. This ghost lines are on the print. Everywhere. So is there some solutions when i use vector clipping, or i must find some other way? Thanks, Tom
-
 Hi. What happens: When adding "Outer shadow" effect to a filled curve with a stroke, the outer shadow produces visible errors. It leaves tiny seams between the shadow and the curve edge. What is expected: Using Outer shadow effect on a filled curve that has stroke added to it, should not produce visible seams even if the offset is set high. Steps to reproduce: 1. Create a closed curve which is filled with color. 2. Add stroke to the curve with good amount of width and select "align stroke to outside". 3. Add "Outer shadow" effect to the filled curve and increase offset. 4. Watch the area between the curve edge and the outer shadow to see the visual error. This was tested and reproduced in the newest Affinity Designer version 1.73.481 Windows 10 64-bit, with Radeon 7
-
Please see the attached file and the screenshots. --- Affinity Photo 1.8.1 macOS 10.15.3 (19D76) clipped-curves-layer-bug.afphoto
-
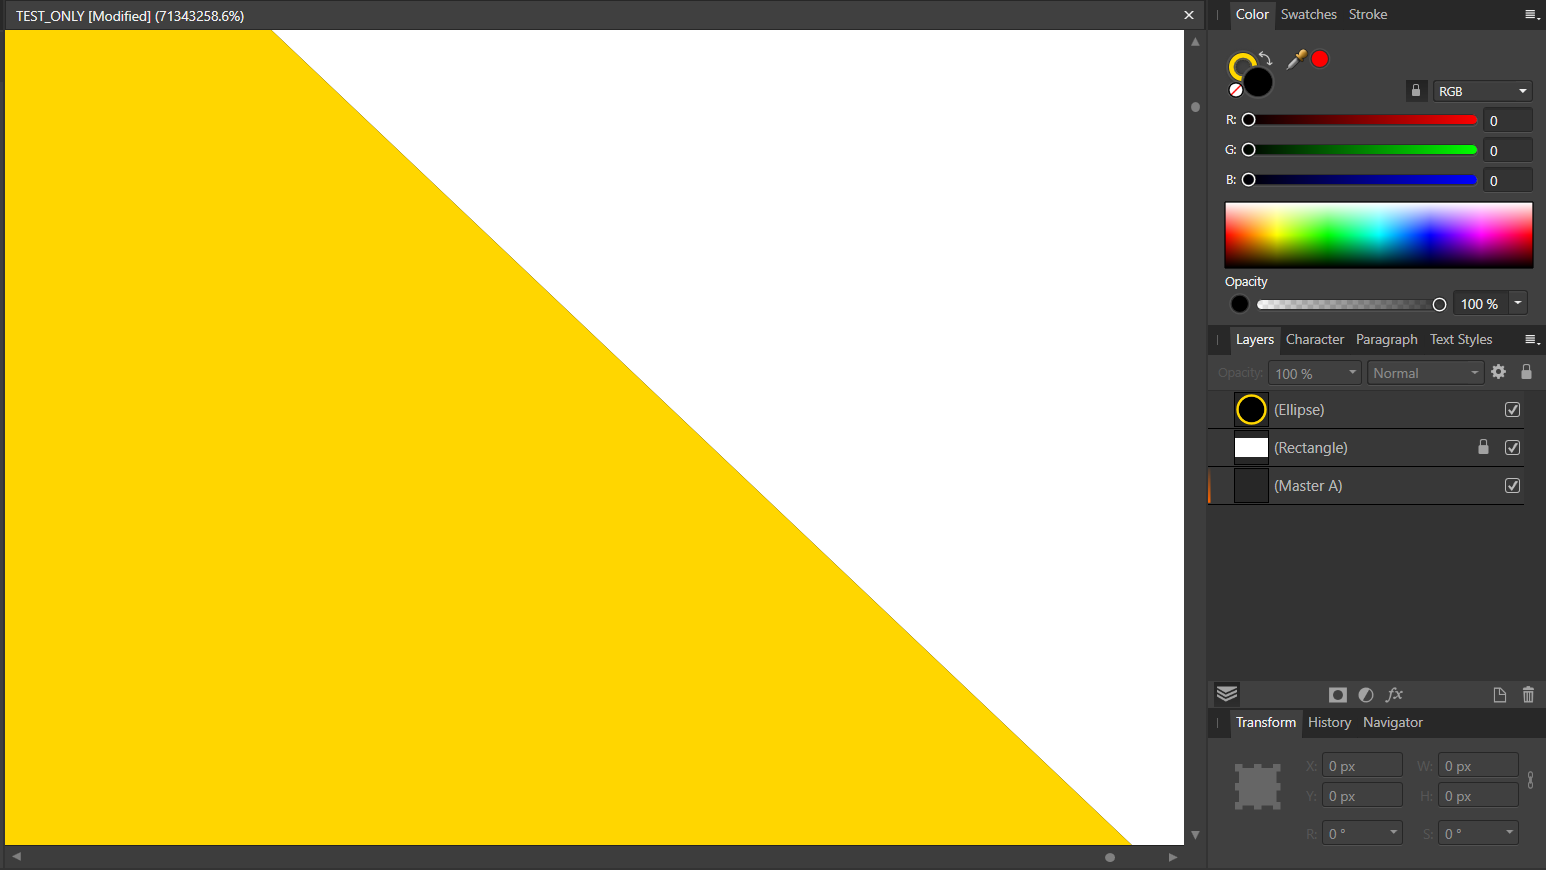
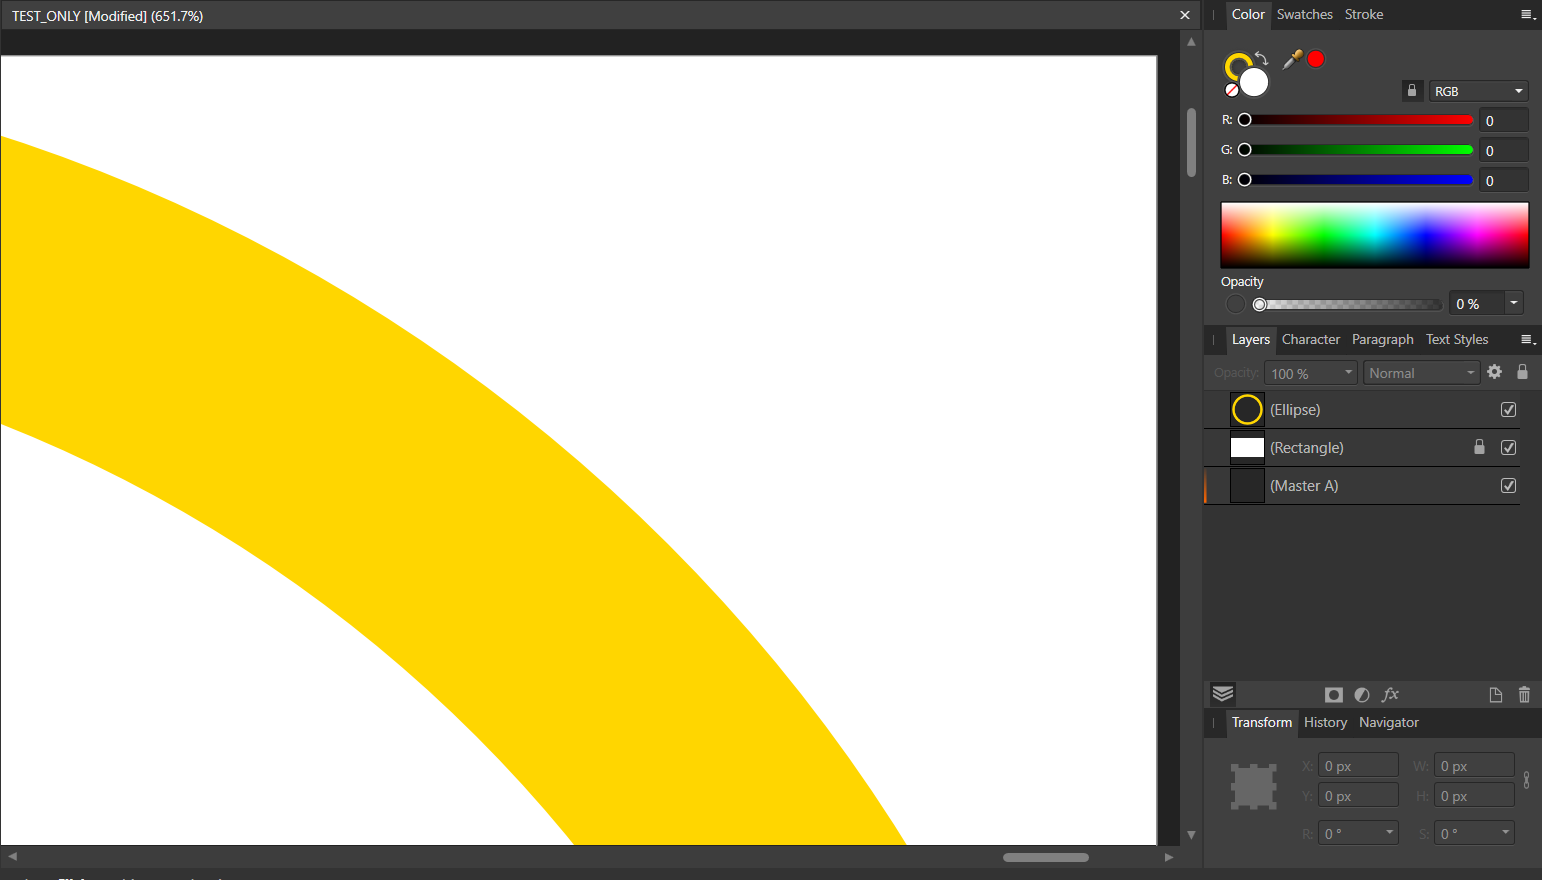
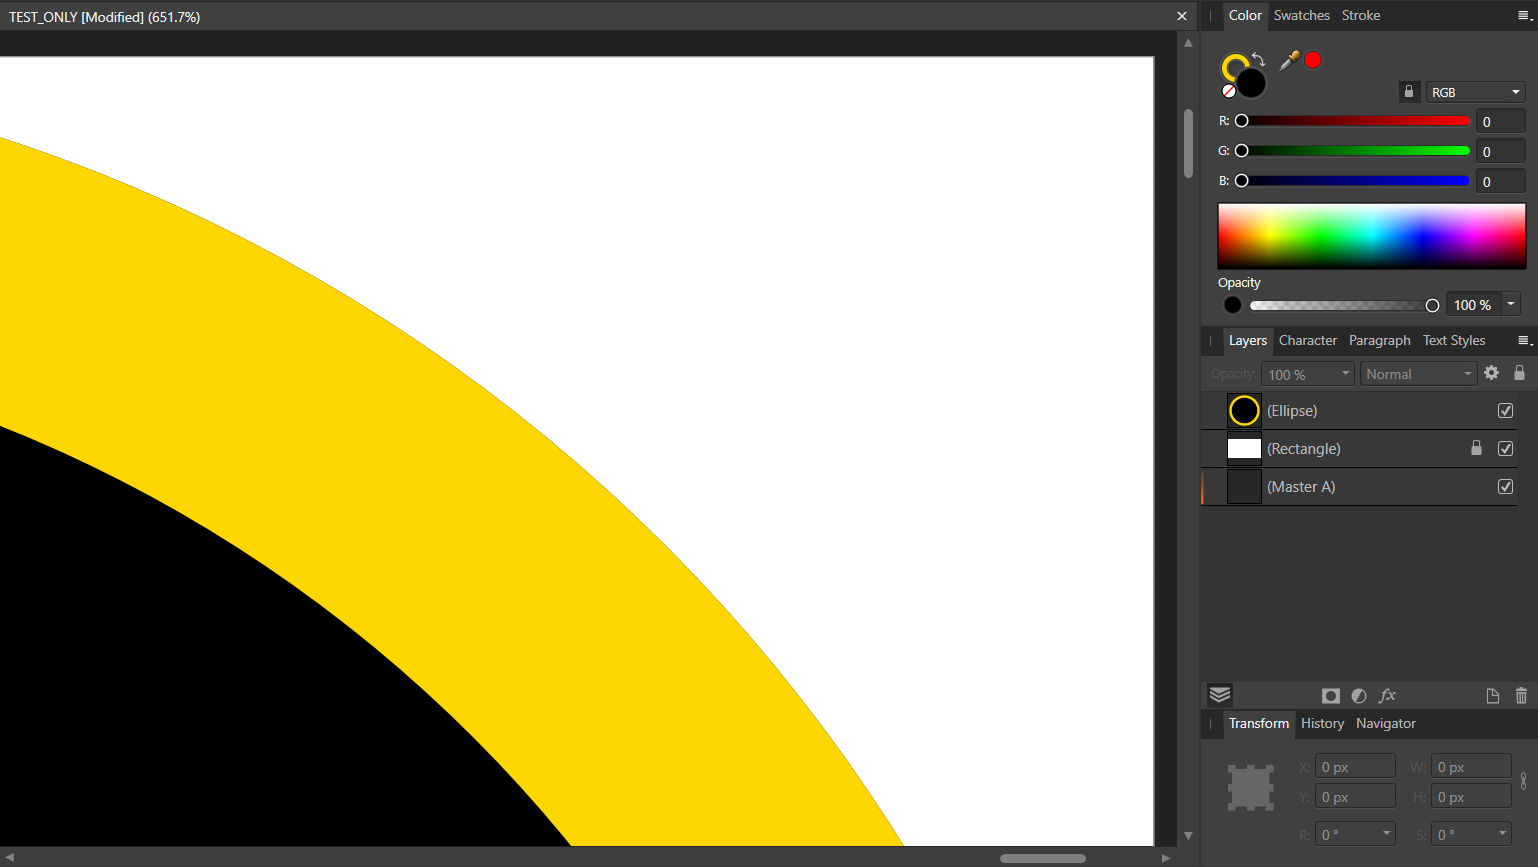
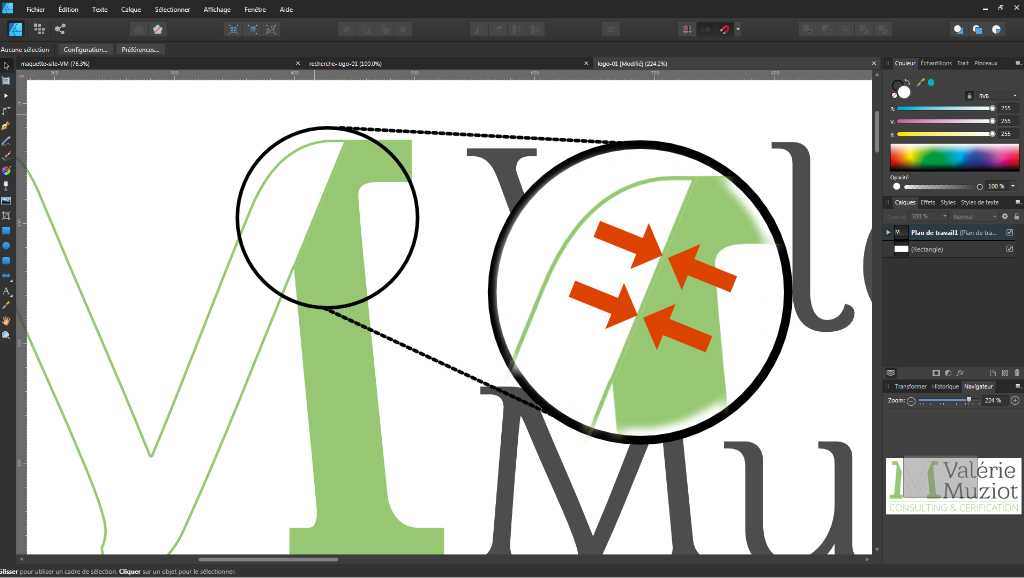
 I noticed an unpleasant bug when you adjust the alignment of the line on the inside, each time the fill color appears on the contours if the outline is not the same color it can be seen very strong in the high contrasts (as on my example). I also notice that this artifact appears on export in any format. This artifact always makes about 1 px. I'm not the only one to have this bug since I discussed it with somebody on a group facebooj affinity designer and one of the members immediately did the test but this time with the desktop version and there is exactly the same problem. Hoping for a correction in the next update, thank you already for the answers. Ps : effects or gradients etc.. don’t affect this problem. Simply draw a red circle with black contour and a black background plus stroke alignement on intérior 2 icon like on image and voilà you see the artifact
-
Maybe I am doing something in the bad way but when I set 'Align stroke inside' on the filled curve there is a thin line outside the curve. The thin line has the color of the curve fill. It is the huge problem for me because the exported image has ugly doubled stroke. Is there any workaround or ...? stroke-inside.afdesign
-
 I have a red shape with a yellow stroke and the red appears at the edge beyond where the stroke is(it's a very super thin display of the red but I can see it and when i export the vector to .png i can see it when i zoom in) .. is this a bug? This is also with Affinity Designer Line
 -
Hello, Superb update 1.7! congratulations and thanks, however i would like to point out a problem. When an object has a border of the same color as an underlying object, a "white border" appears. This is a problem because it persists on the export (see the attached screenshot). I point out that this problem exists when the border is positioned inside the surface. Do you have a solution ? Johan.
-
 White line between fill and stroke. A document with a history attached. 2.afdesign
-
.thumb.png.c1e412a4e3384d171b58a9b378322141.png) If you align stroke other then to middle while rendering there will be some graphic artifacts. Fill color will show up there it should not. Or there will be transperent gap between stroke and fill. That makes stroke alignment feature unusable for quality export graphic. Is there a way to fix this?
If you align stroke other then to middle while rendering there will be some graphic artifacts. Fill color will show up there it should not. Or there will be transperent gap between stroke and fill. That makes stroke alignment feature unusable for quality export graphic. Is there a way to fix this?