Search the Community
Showing results for tags 'affinity designer'.
-
Designer 2.3.0, Windows 10 No problem, just an observation... I have a Print preset, 2000 x 2000 pixels. I open the Document Setup window and change the height to 1000px (width and height unlinked). The height immediately changes to 1000px. If I do something similar but change the width to 1000px rather than the height, nothing happens. Only when I zoom in or out does the width change. No problem, just confusing.
-
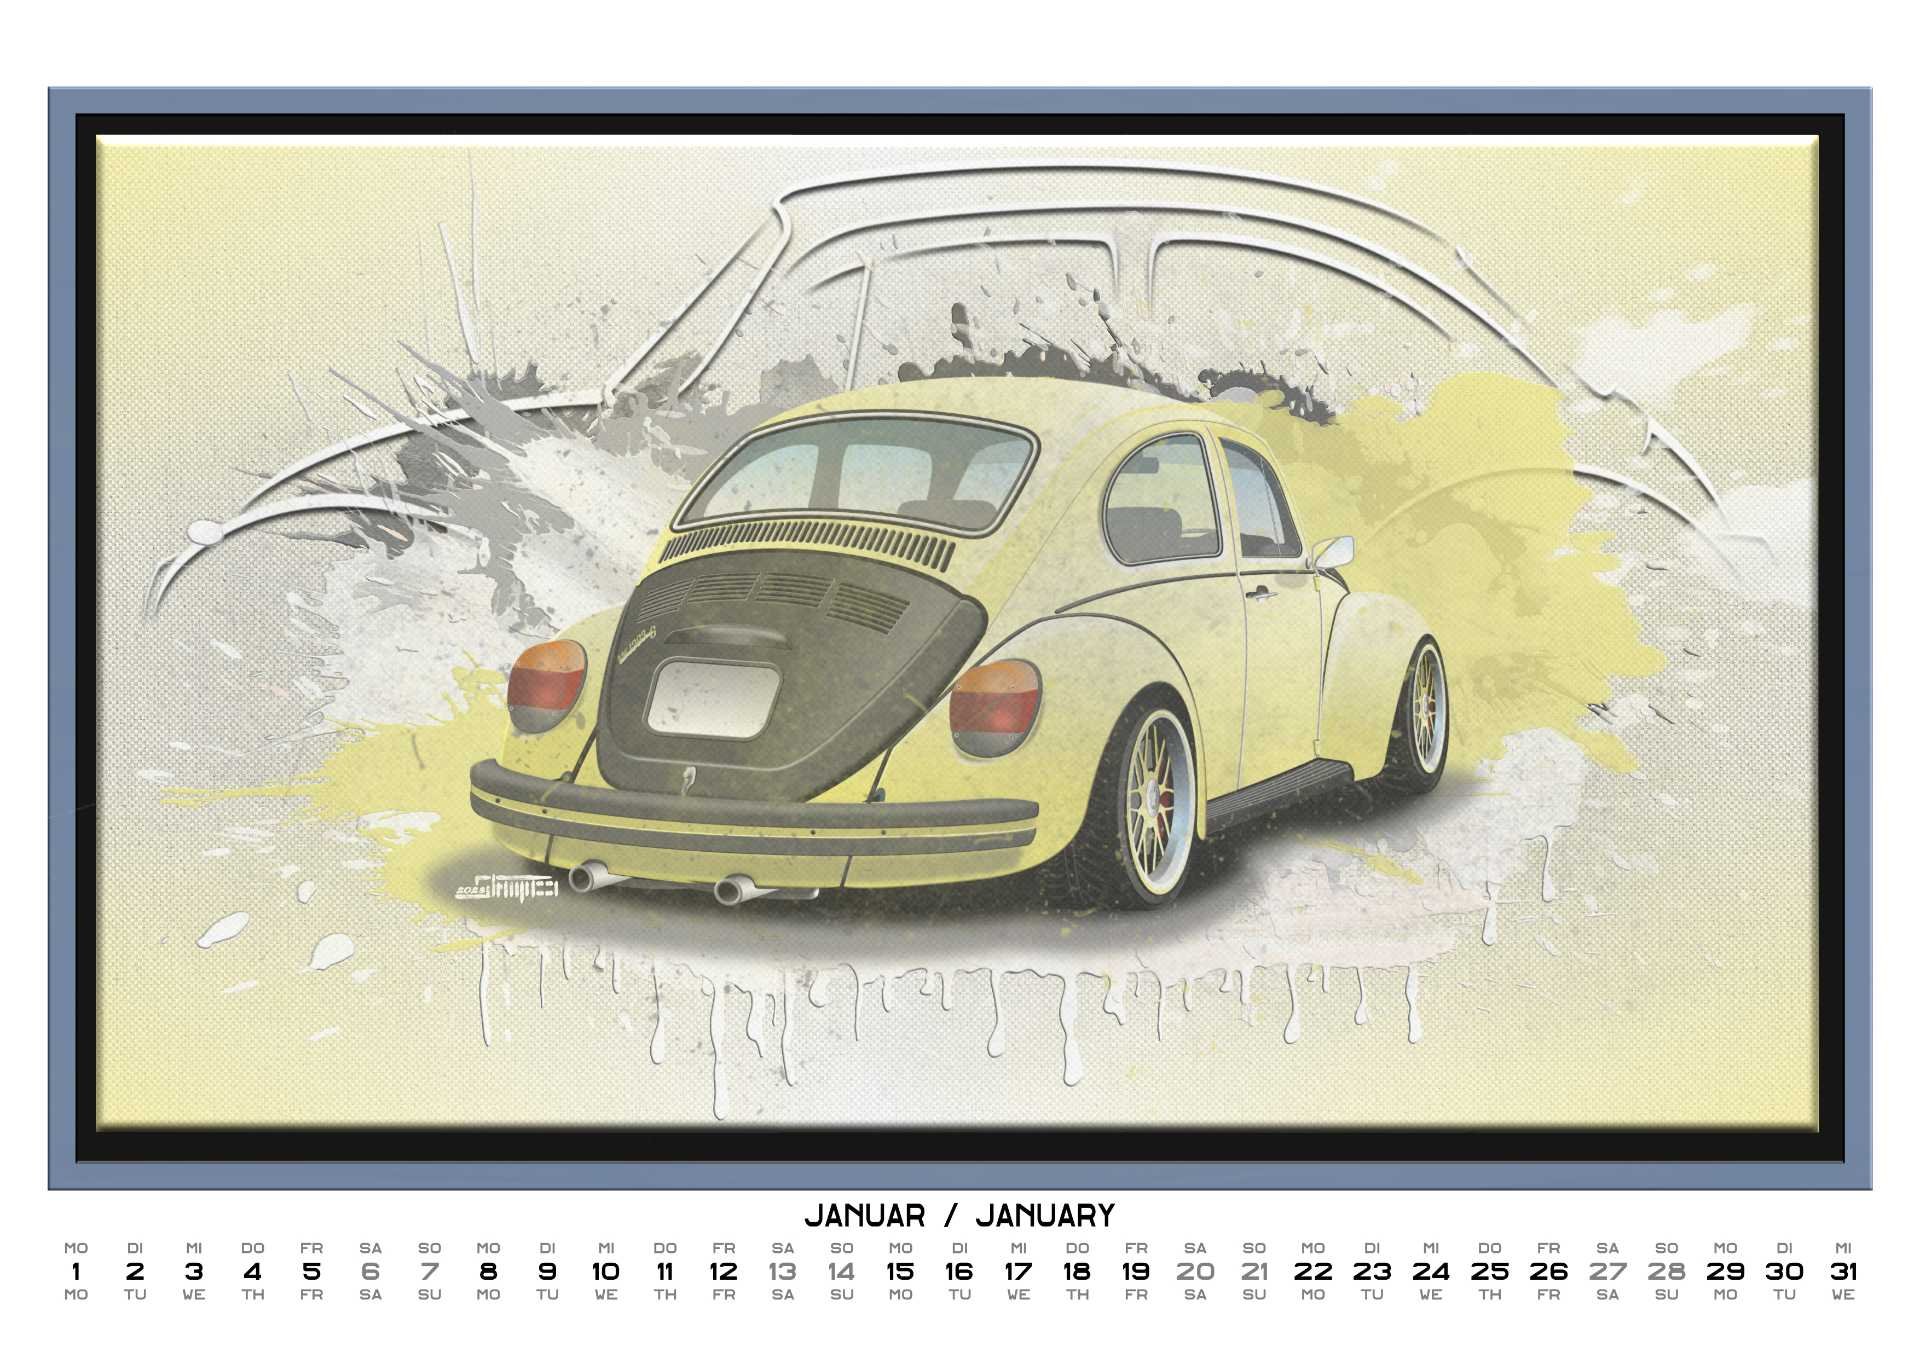
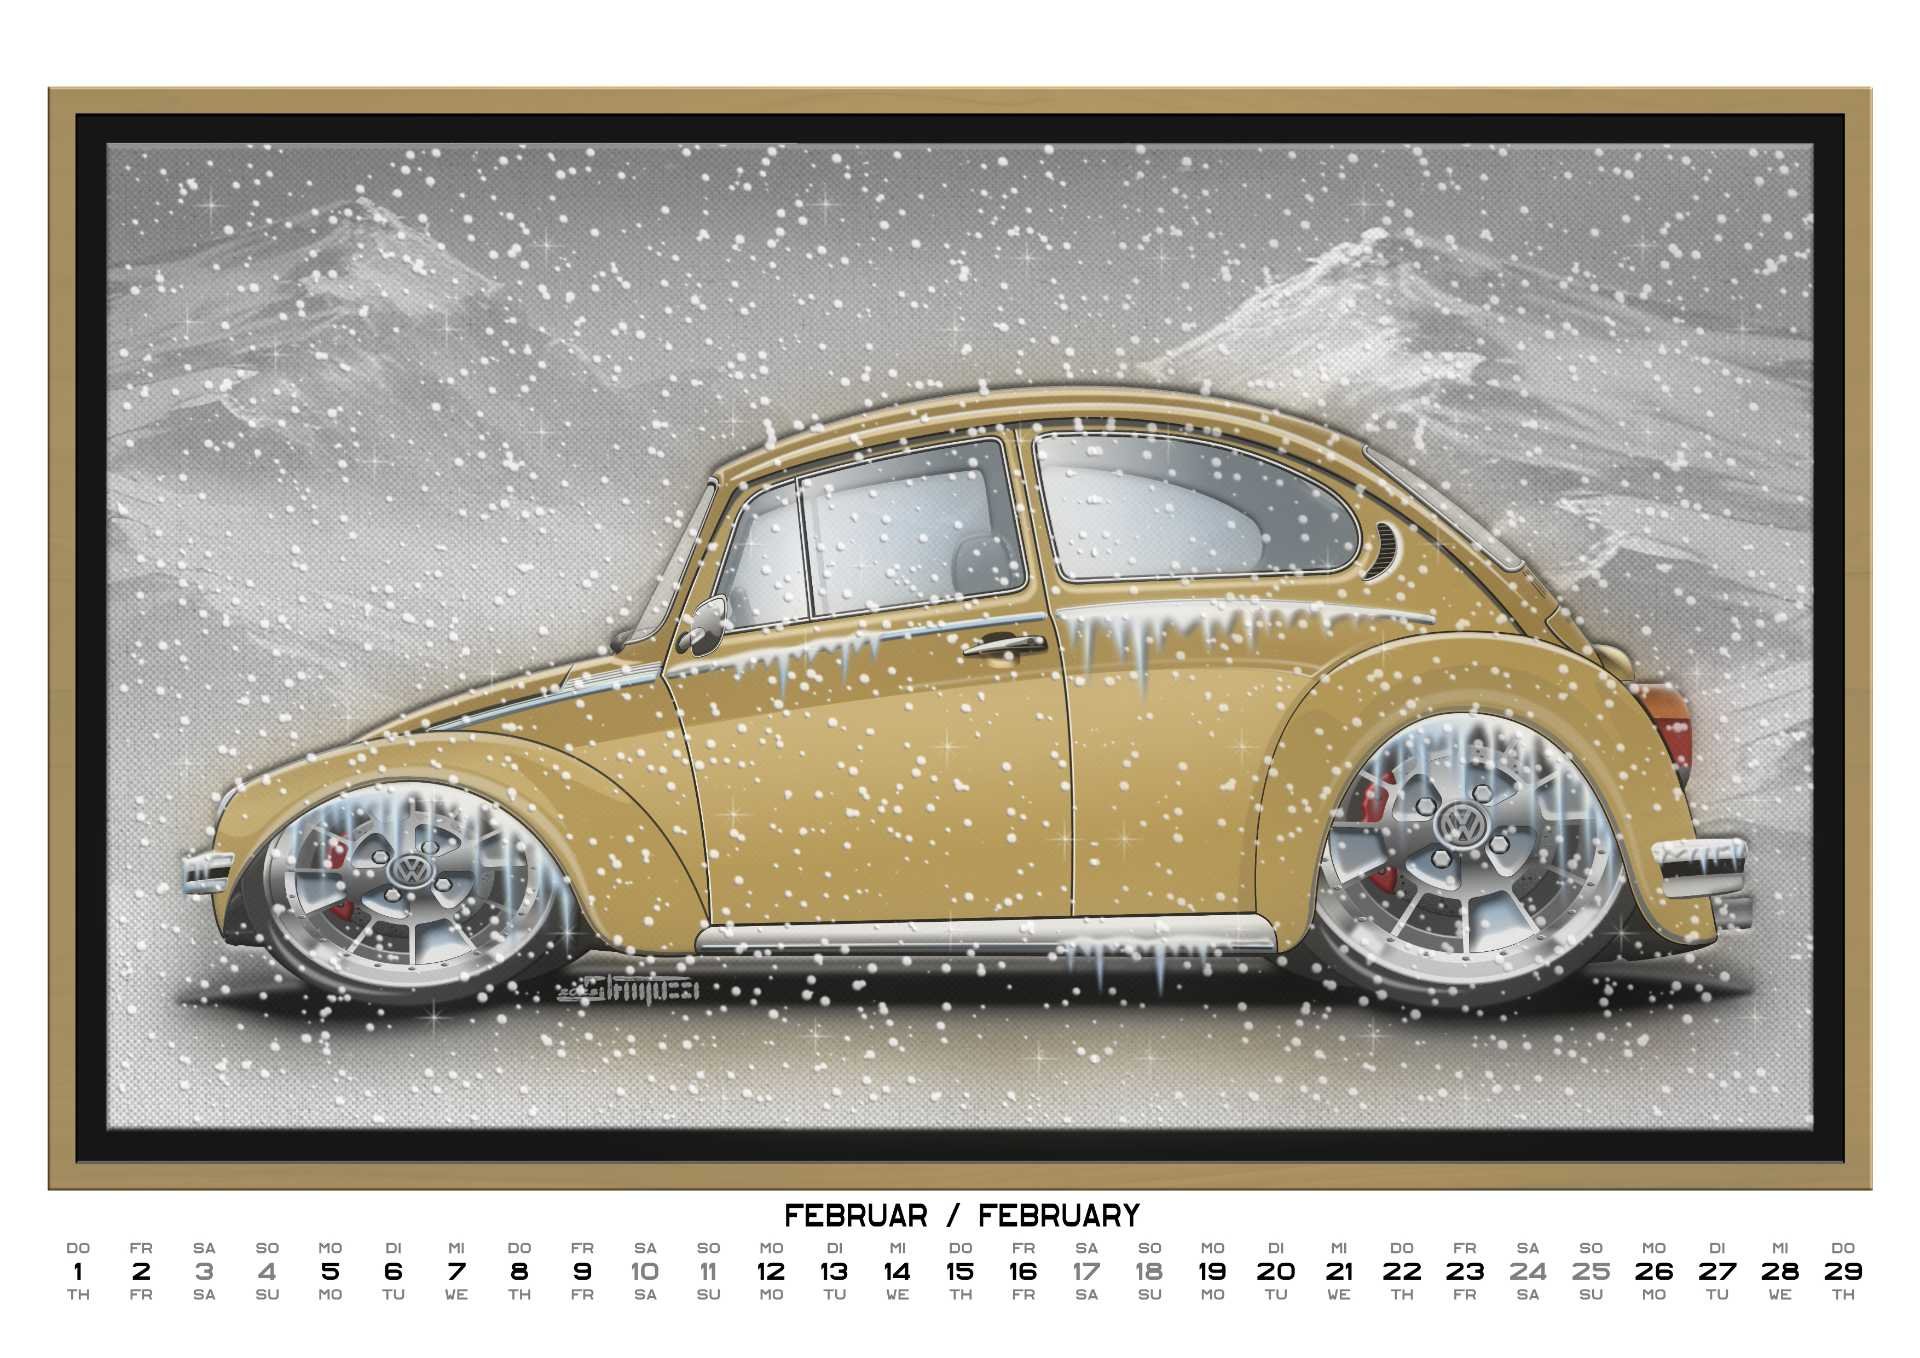
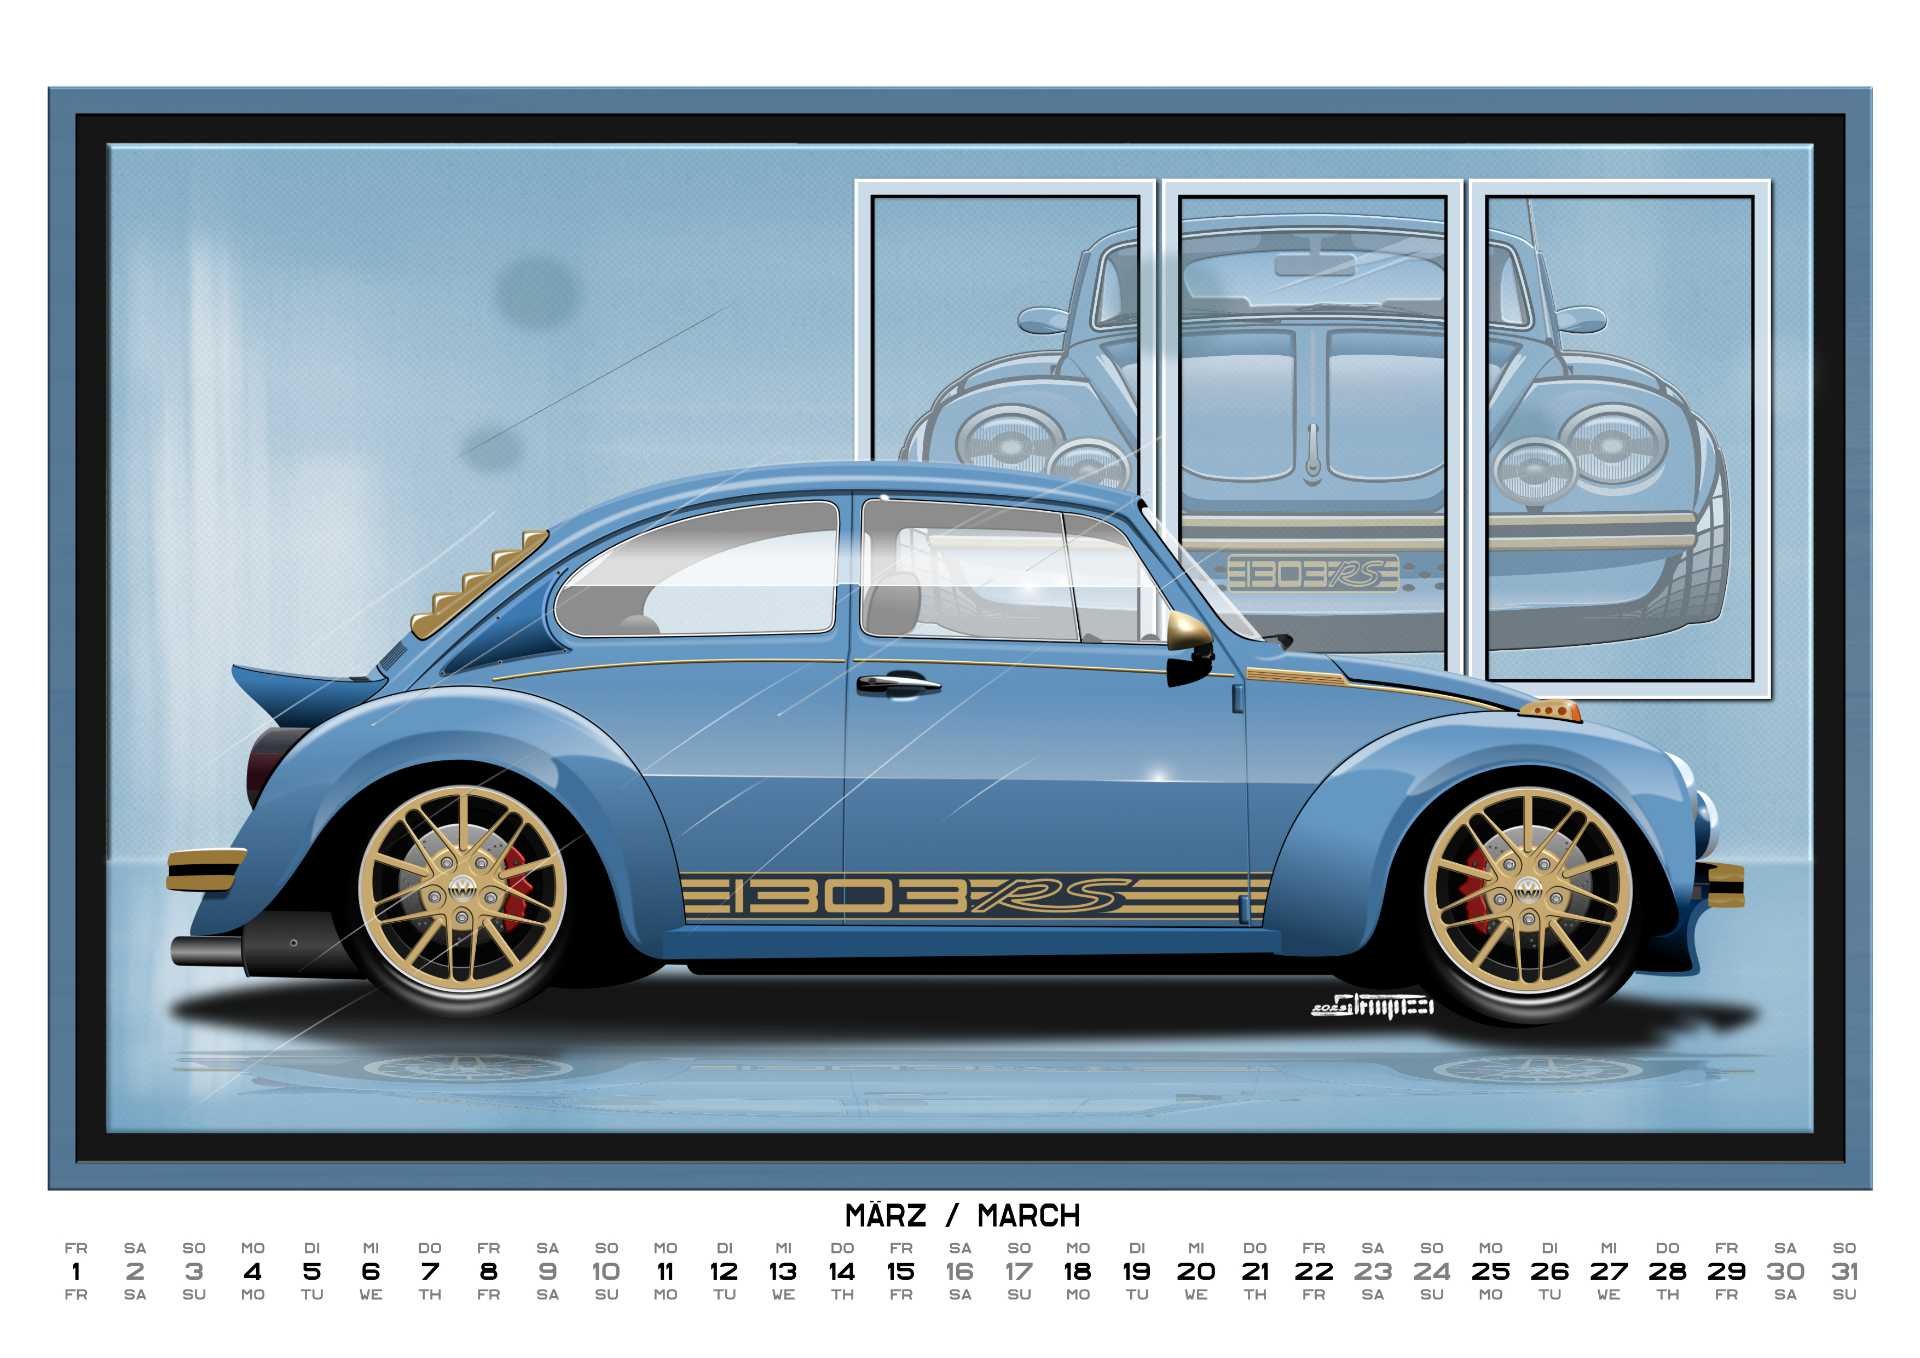
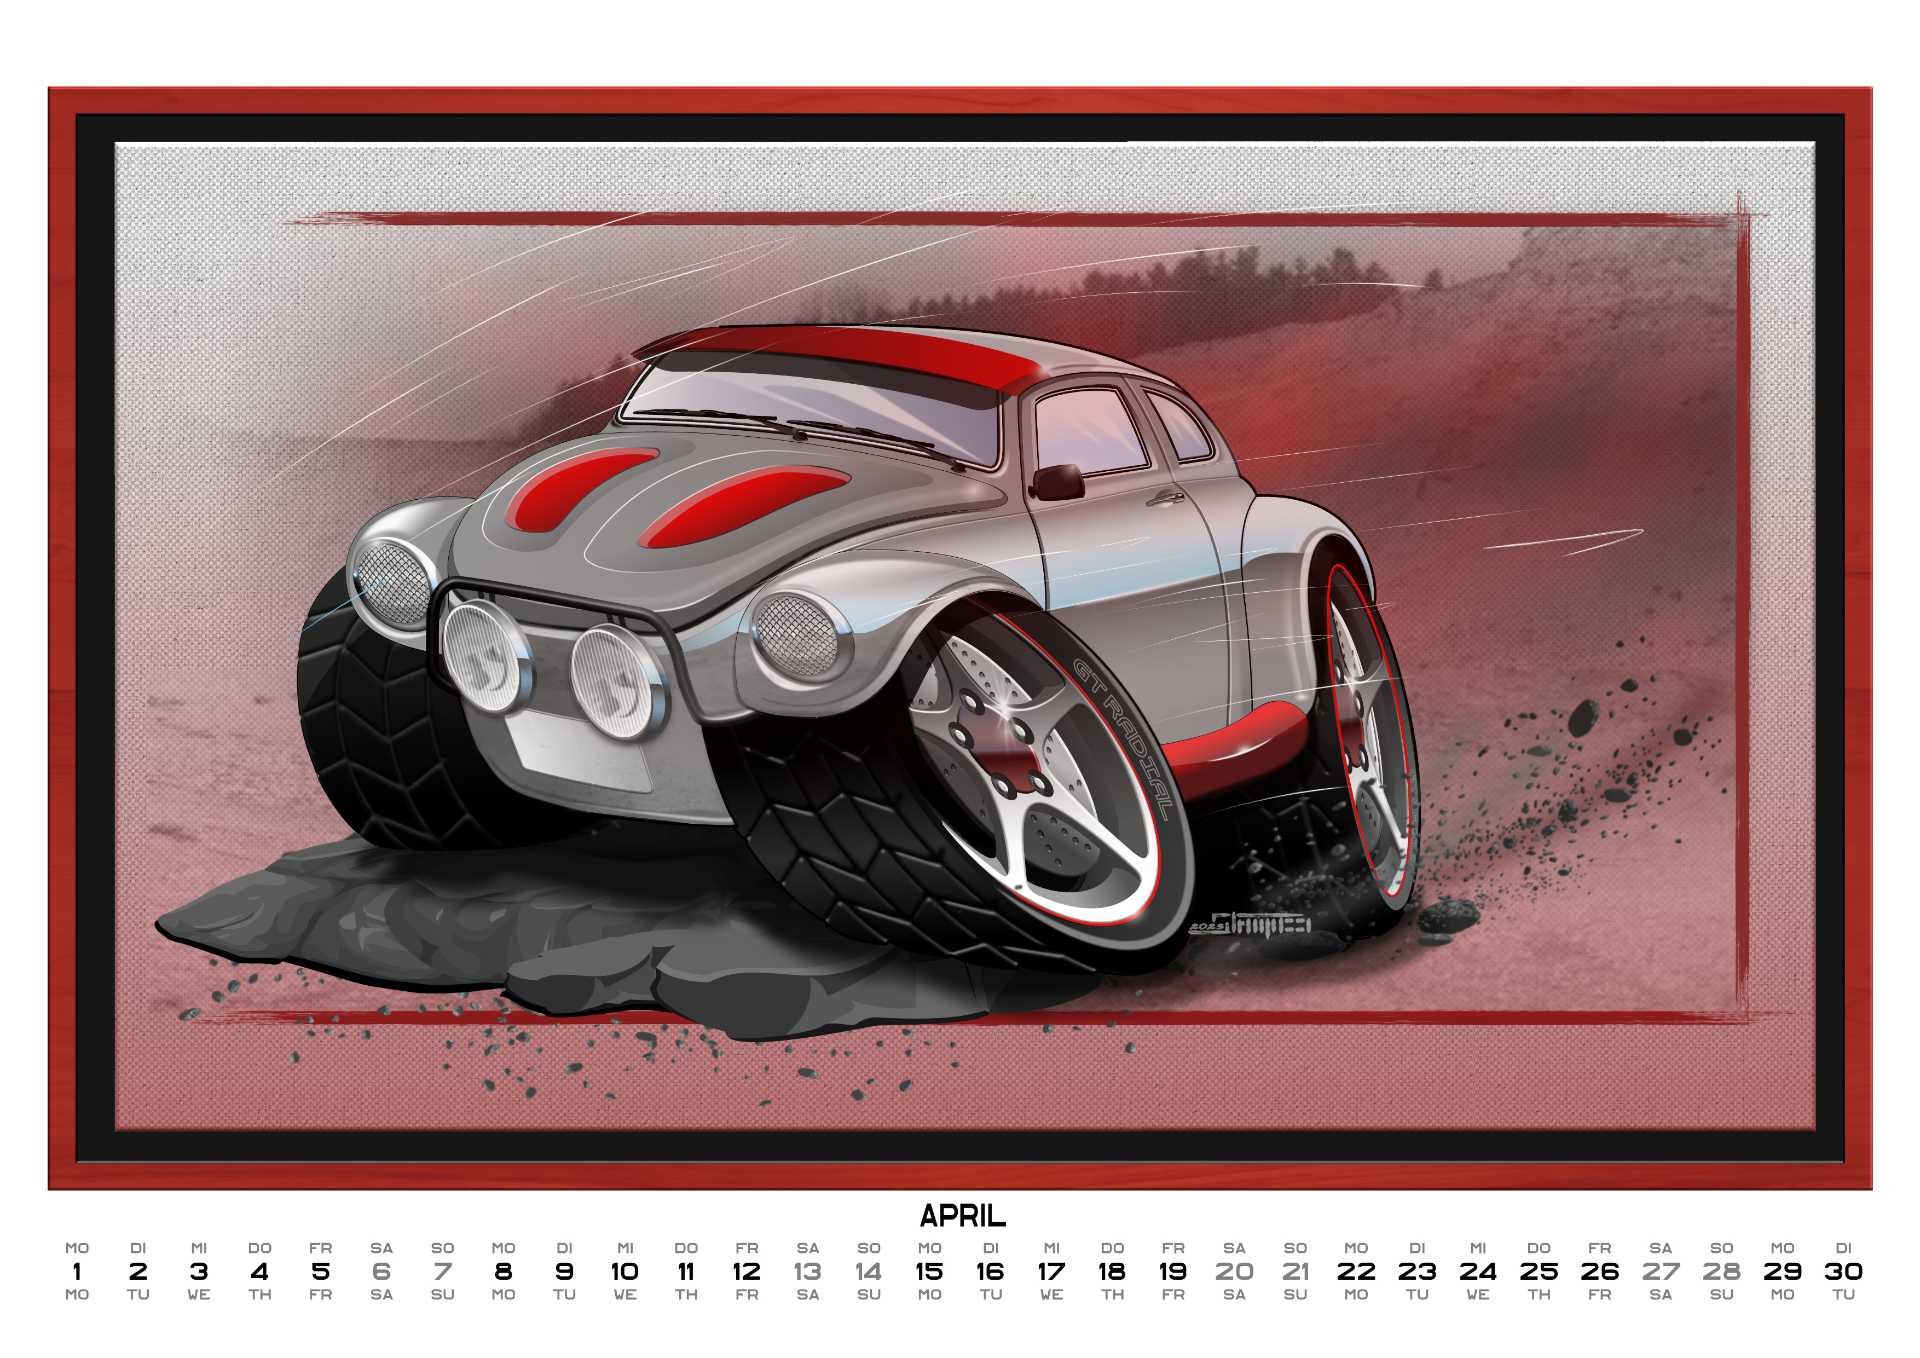
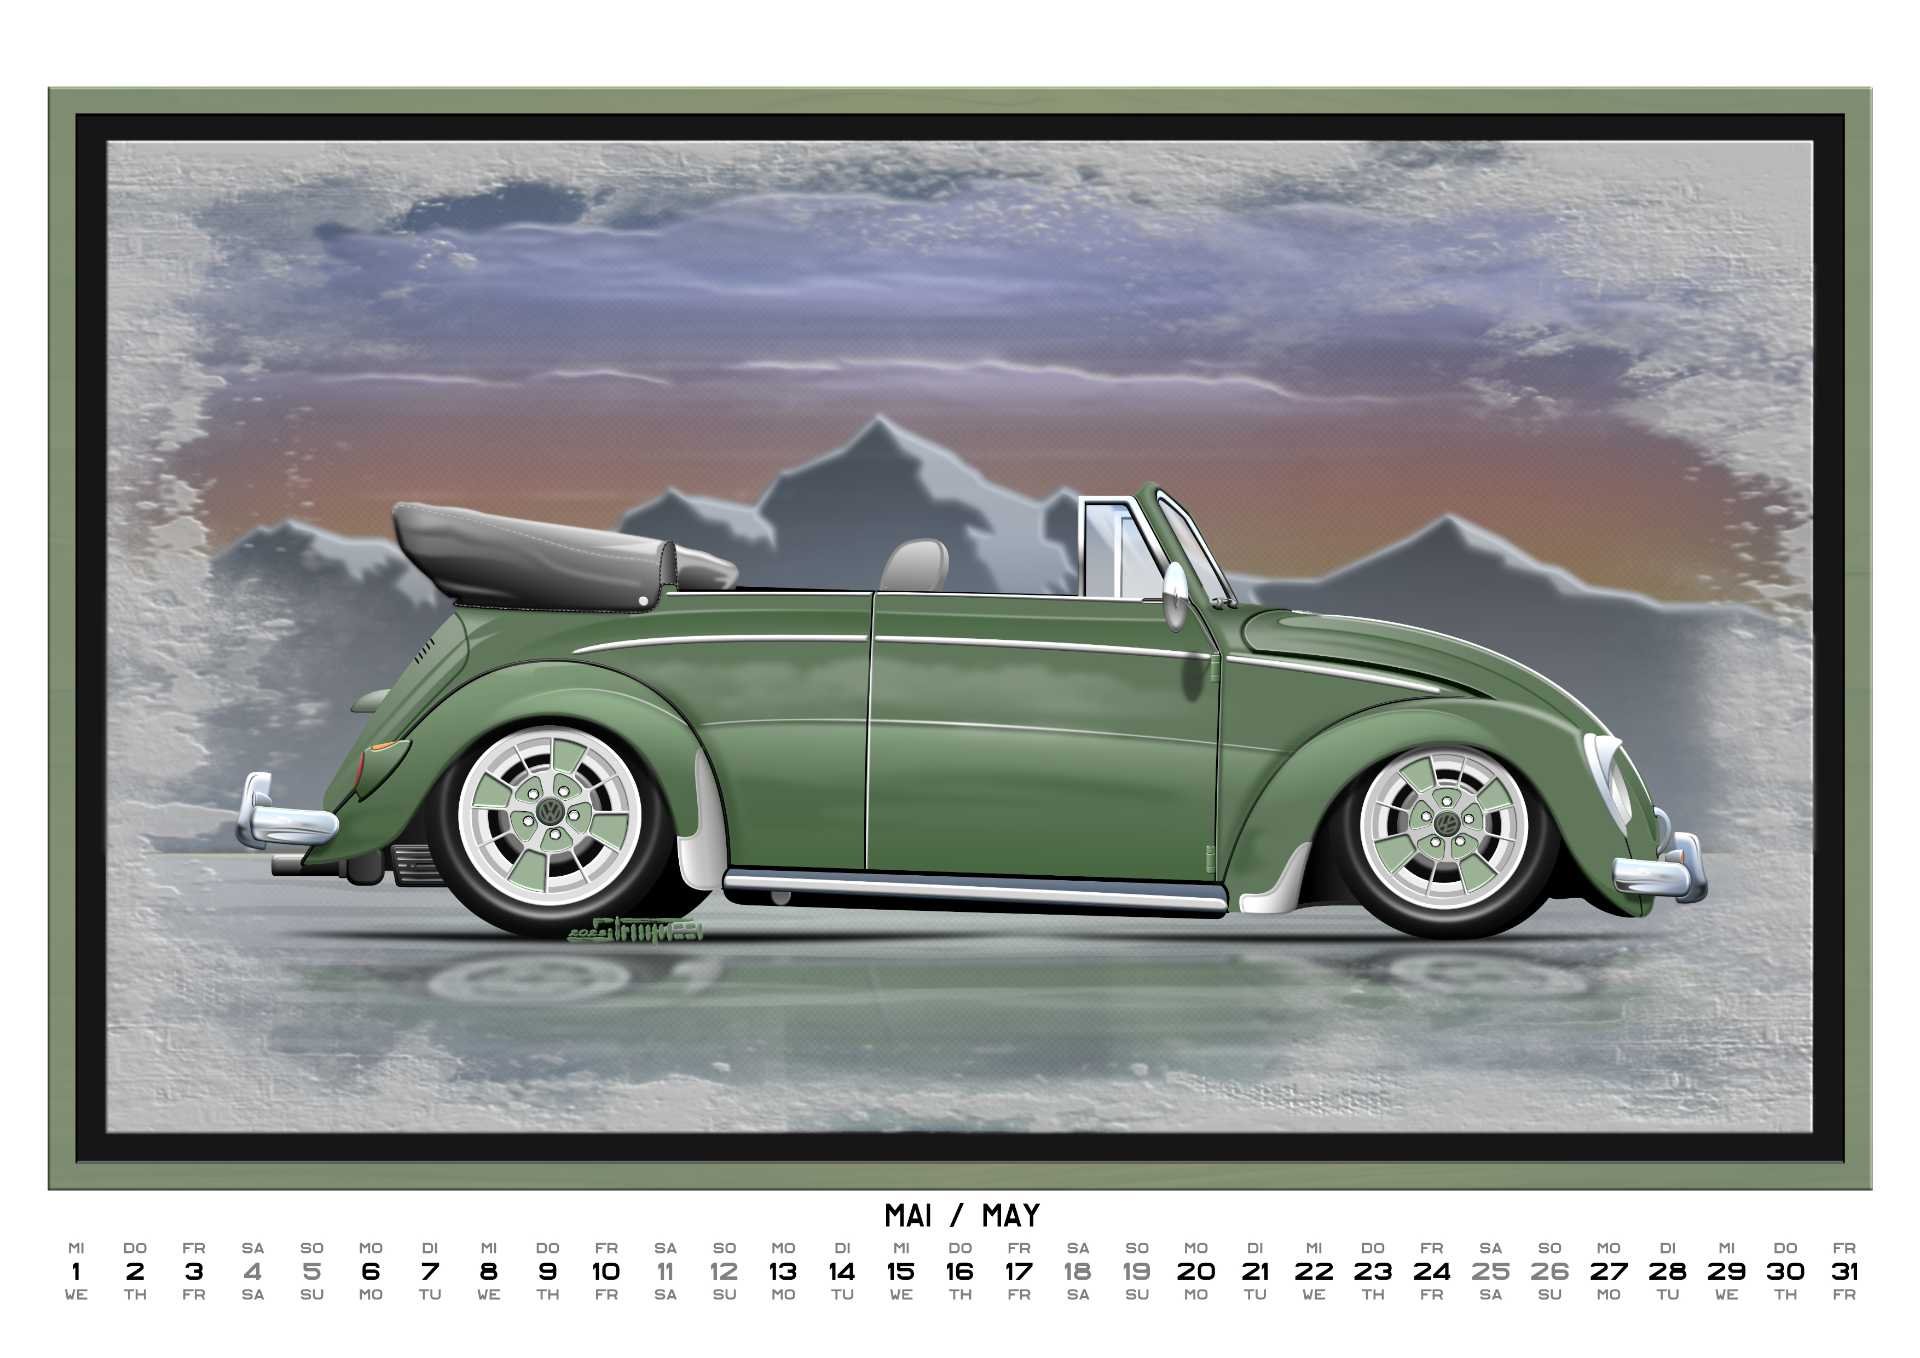
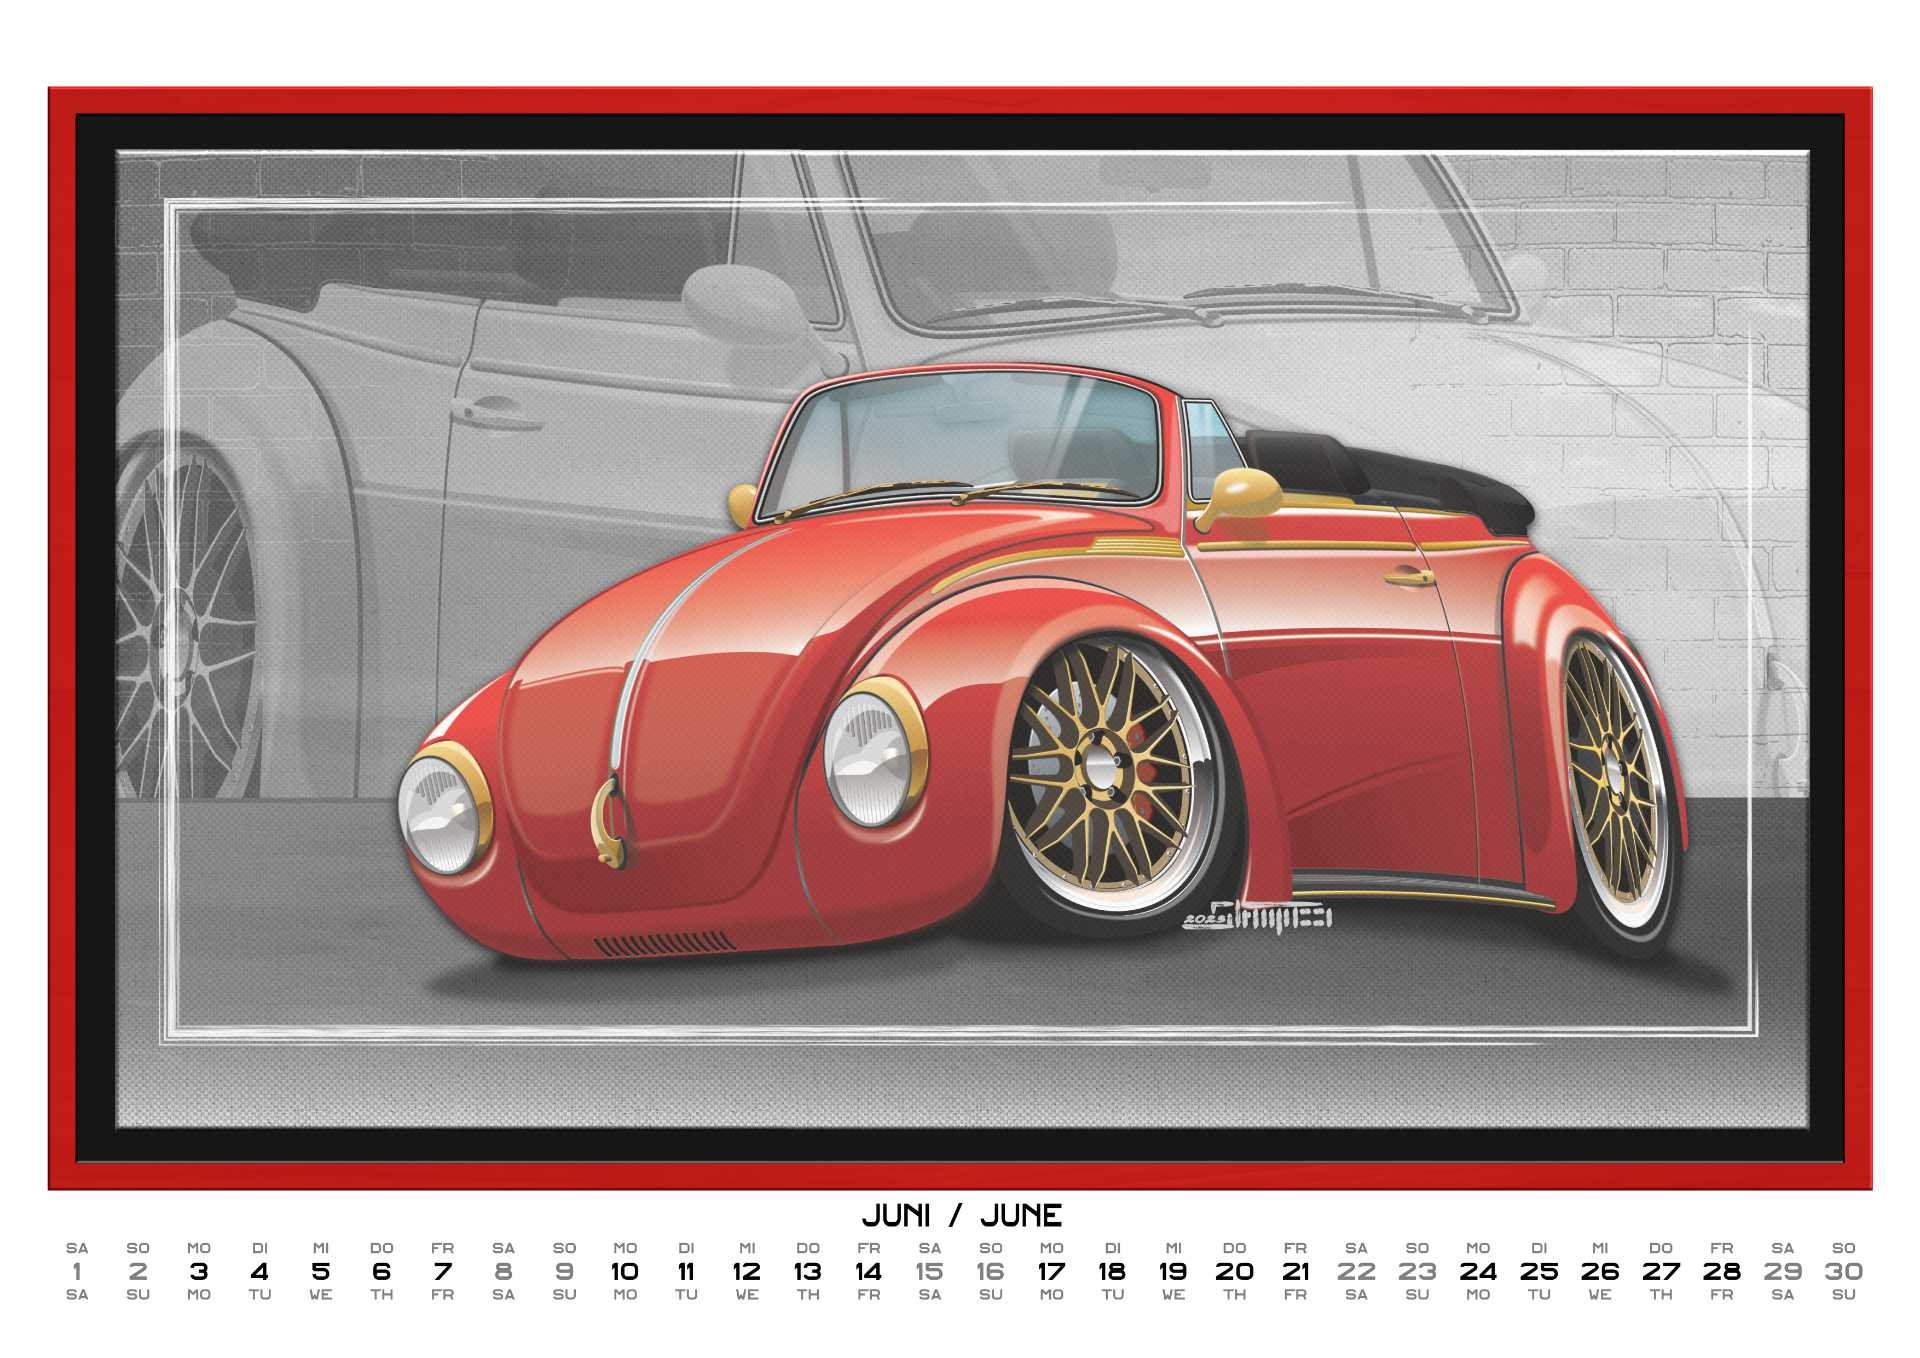
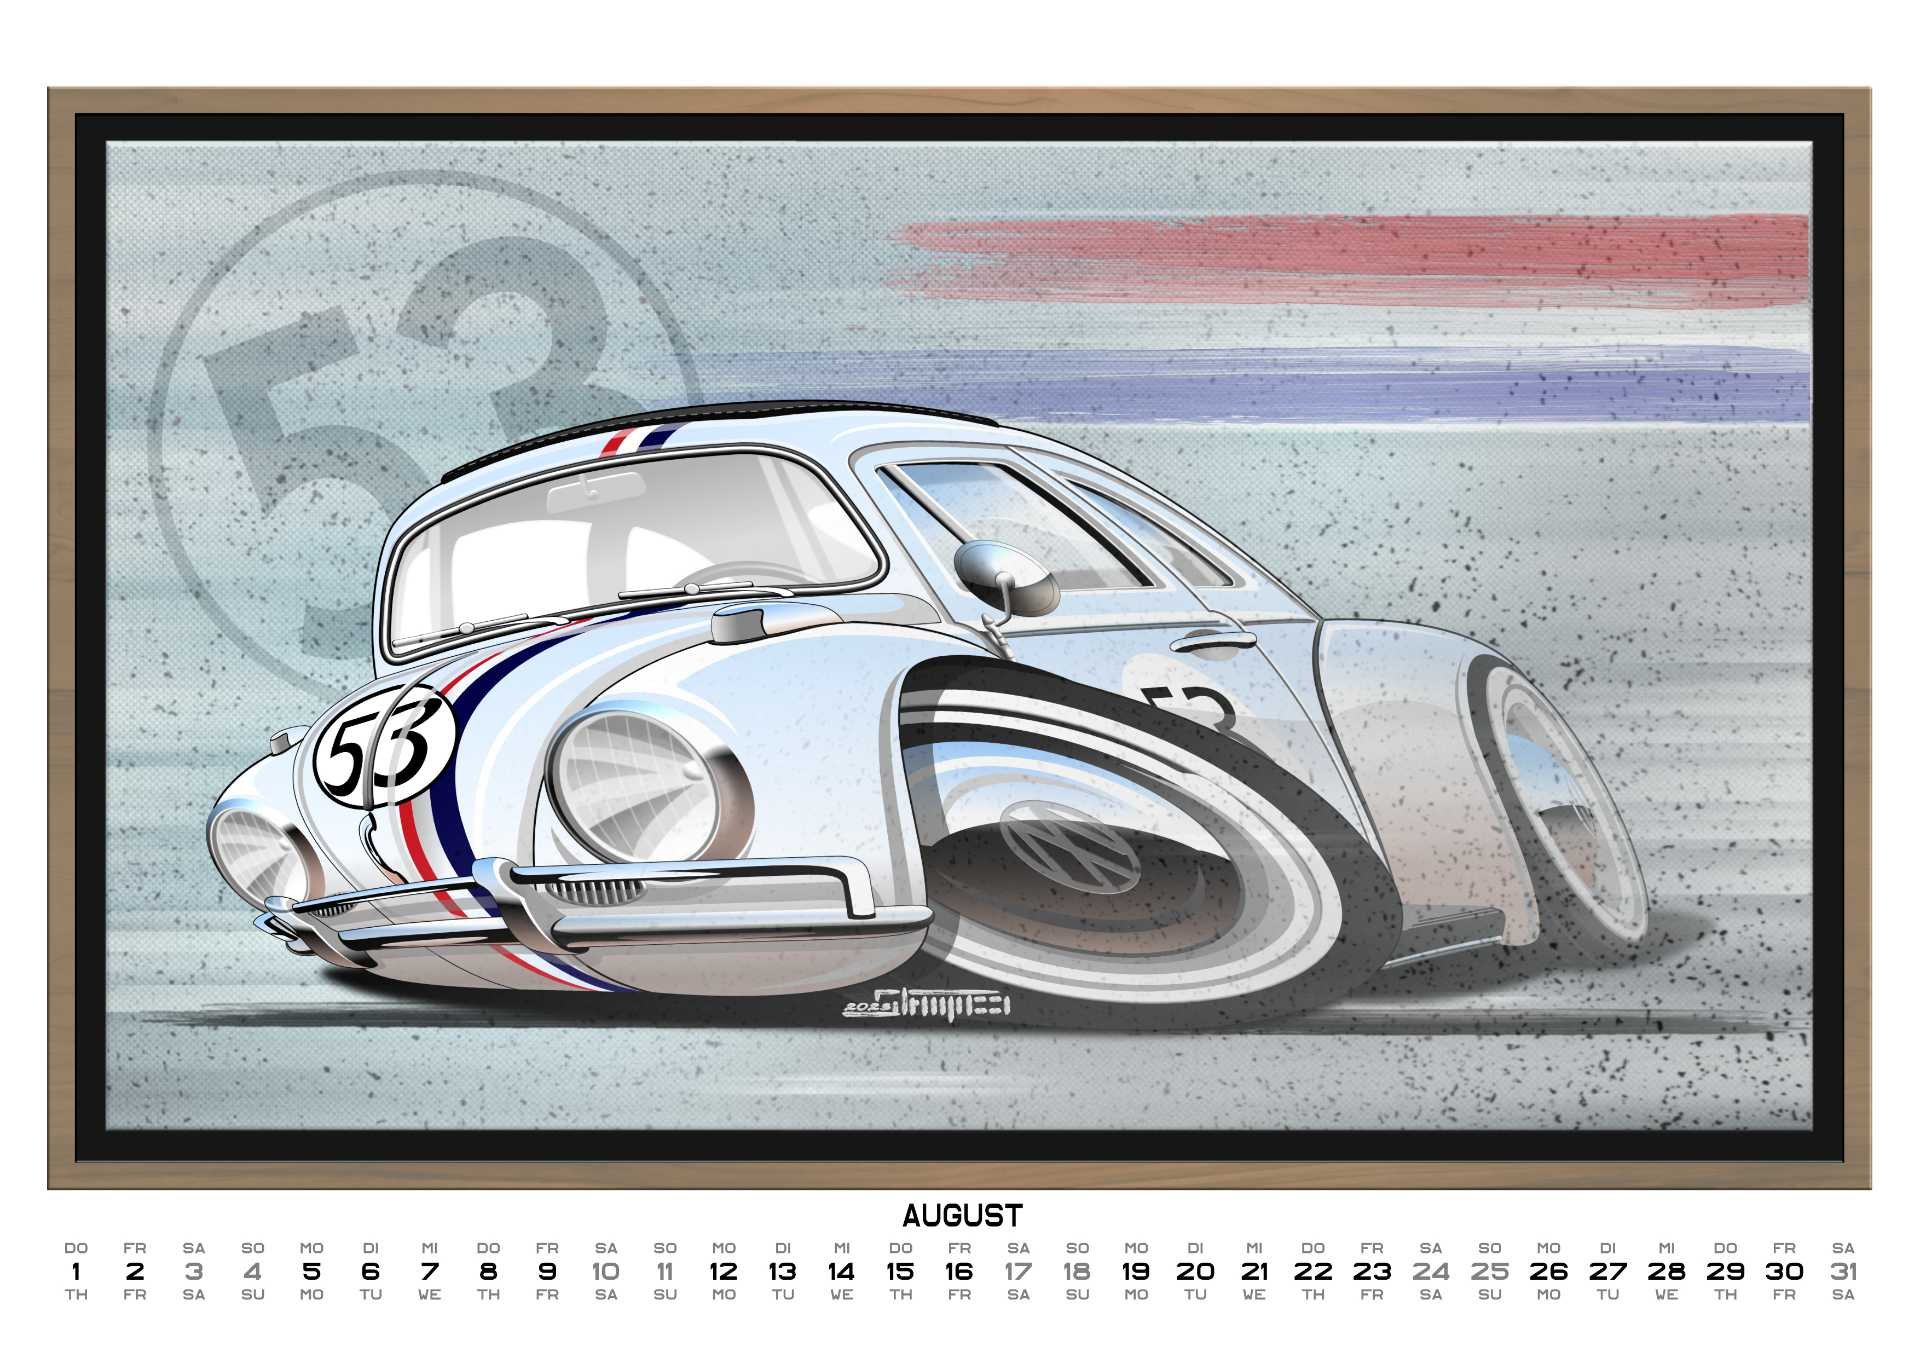
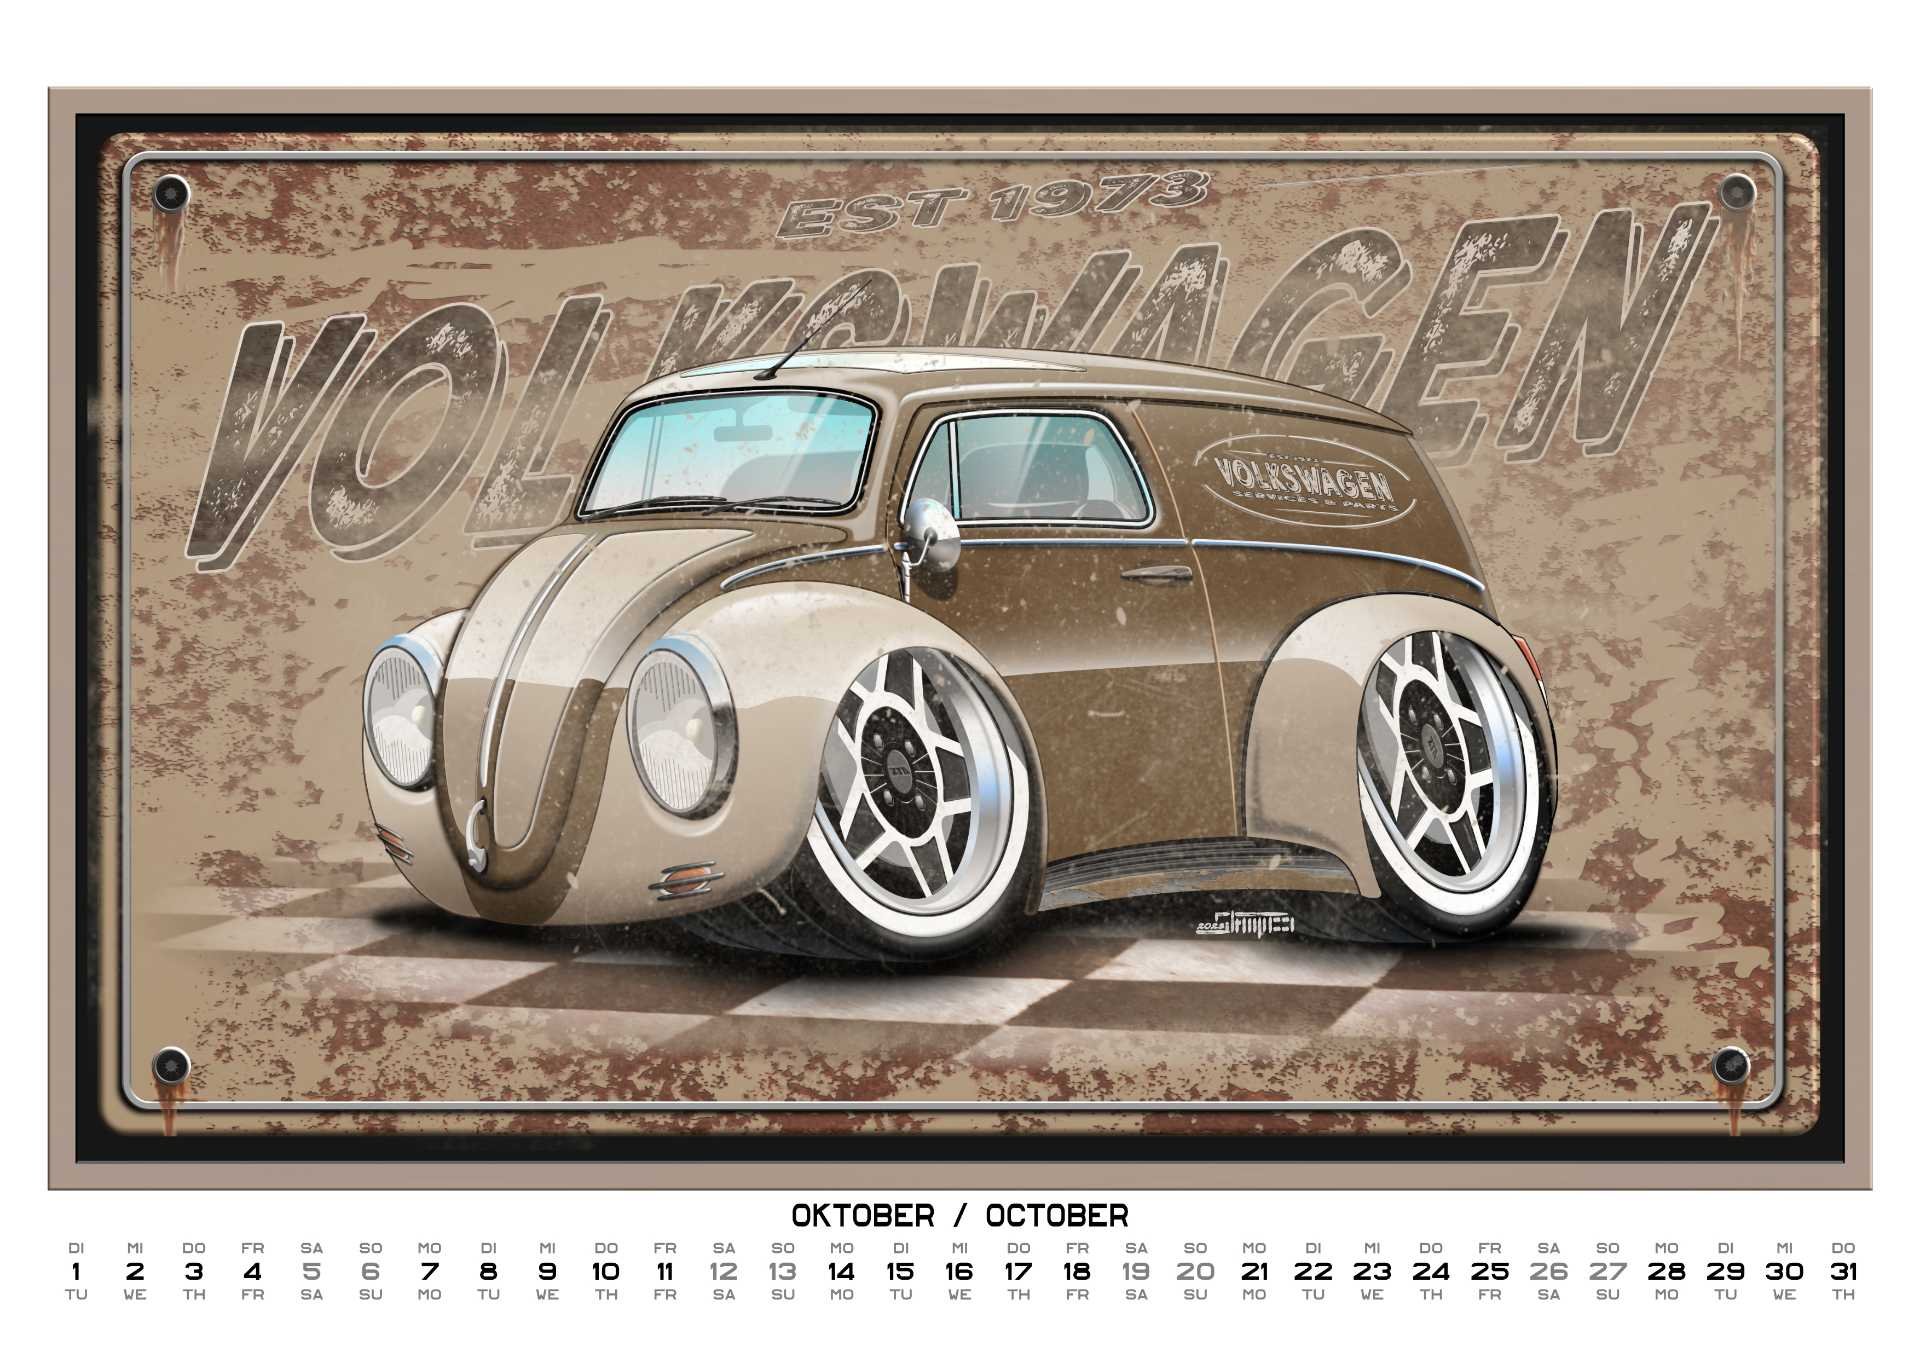
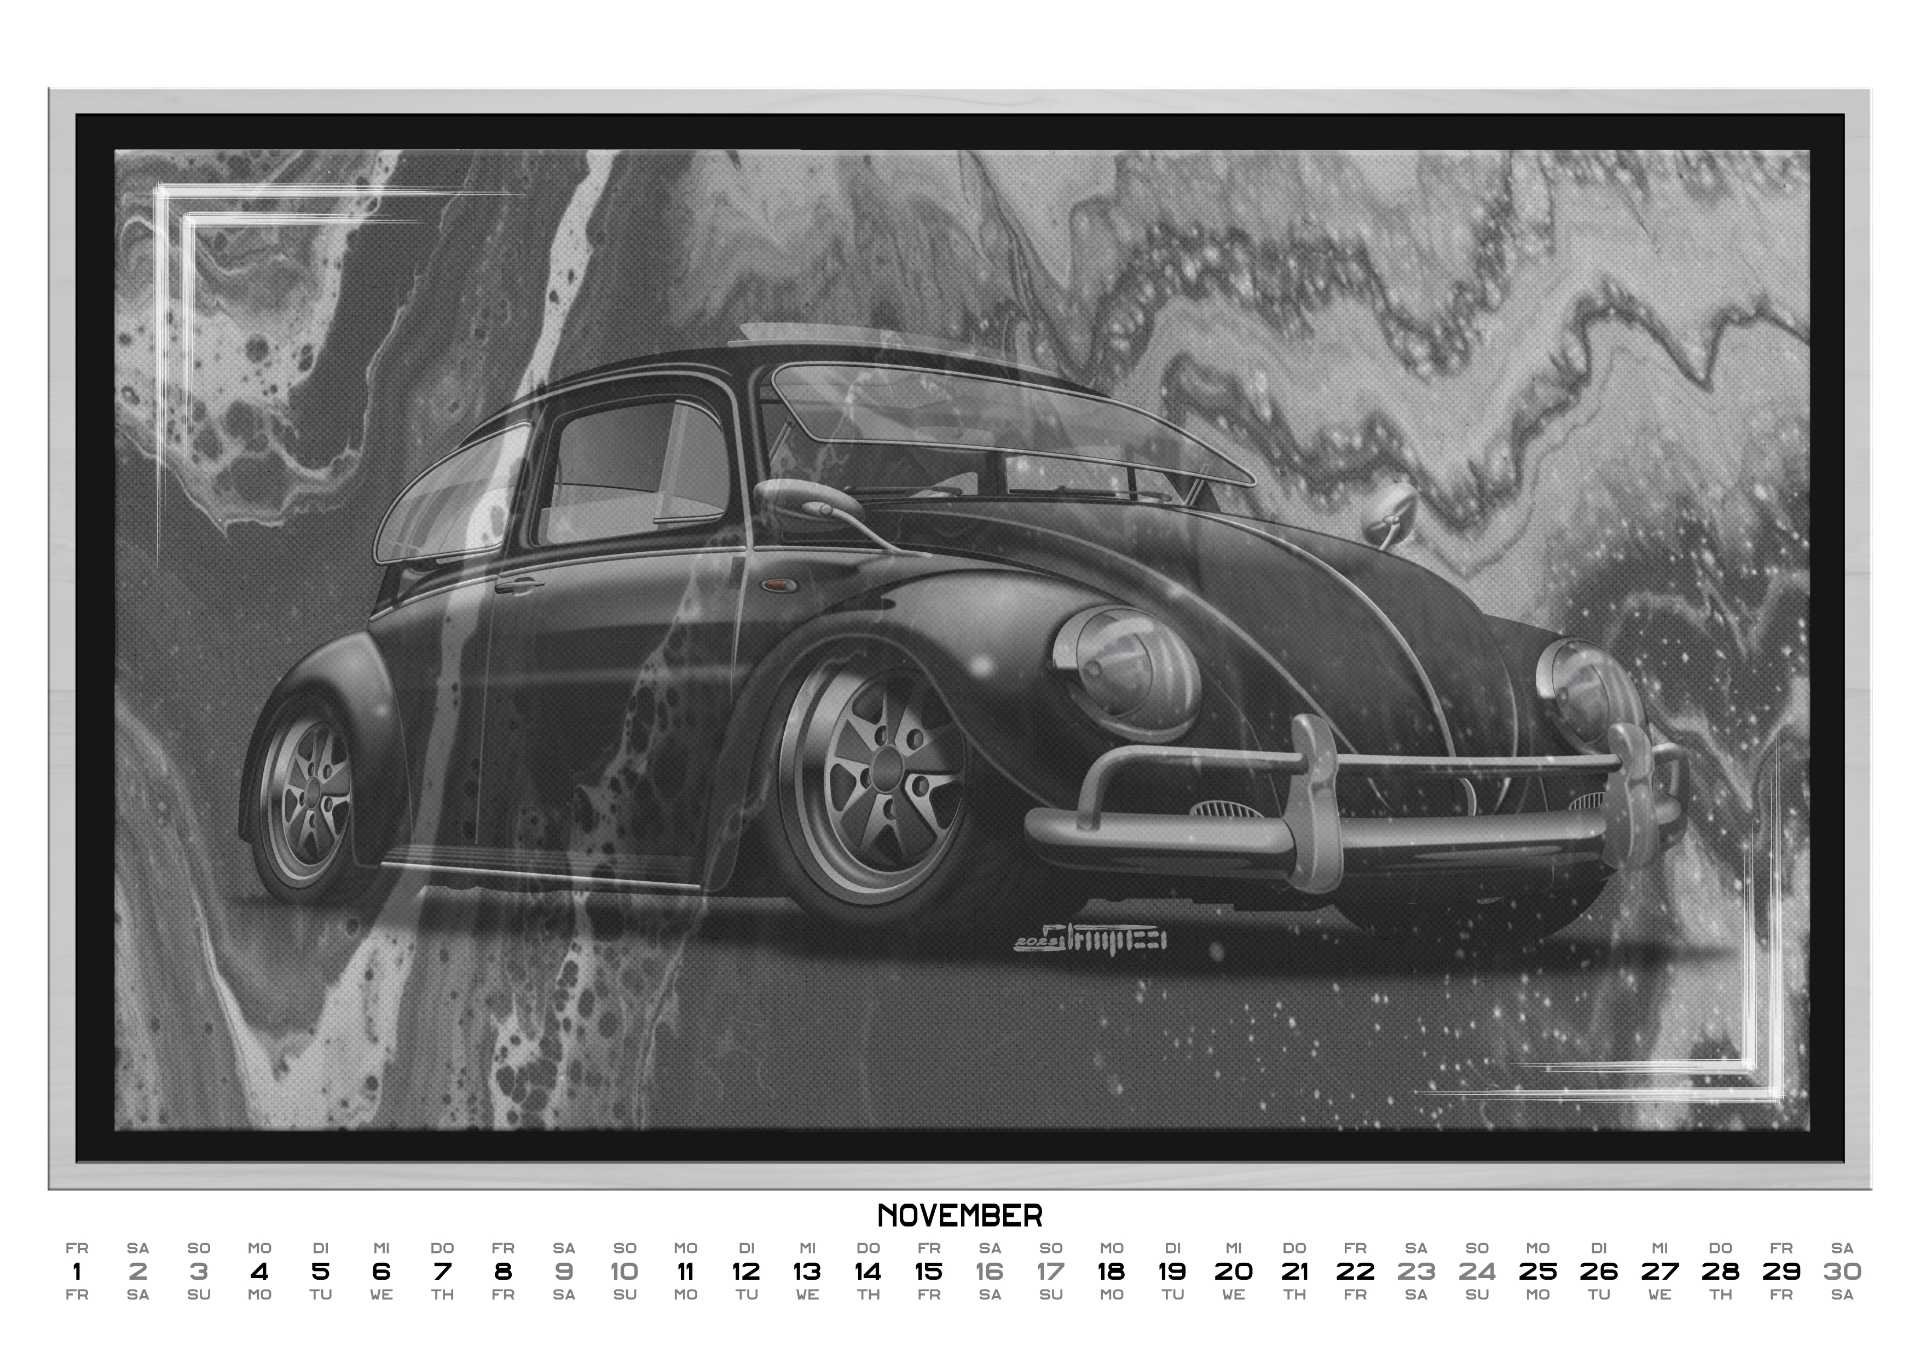
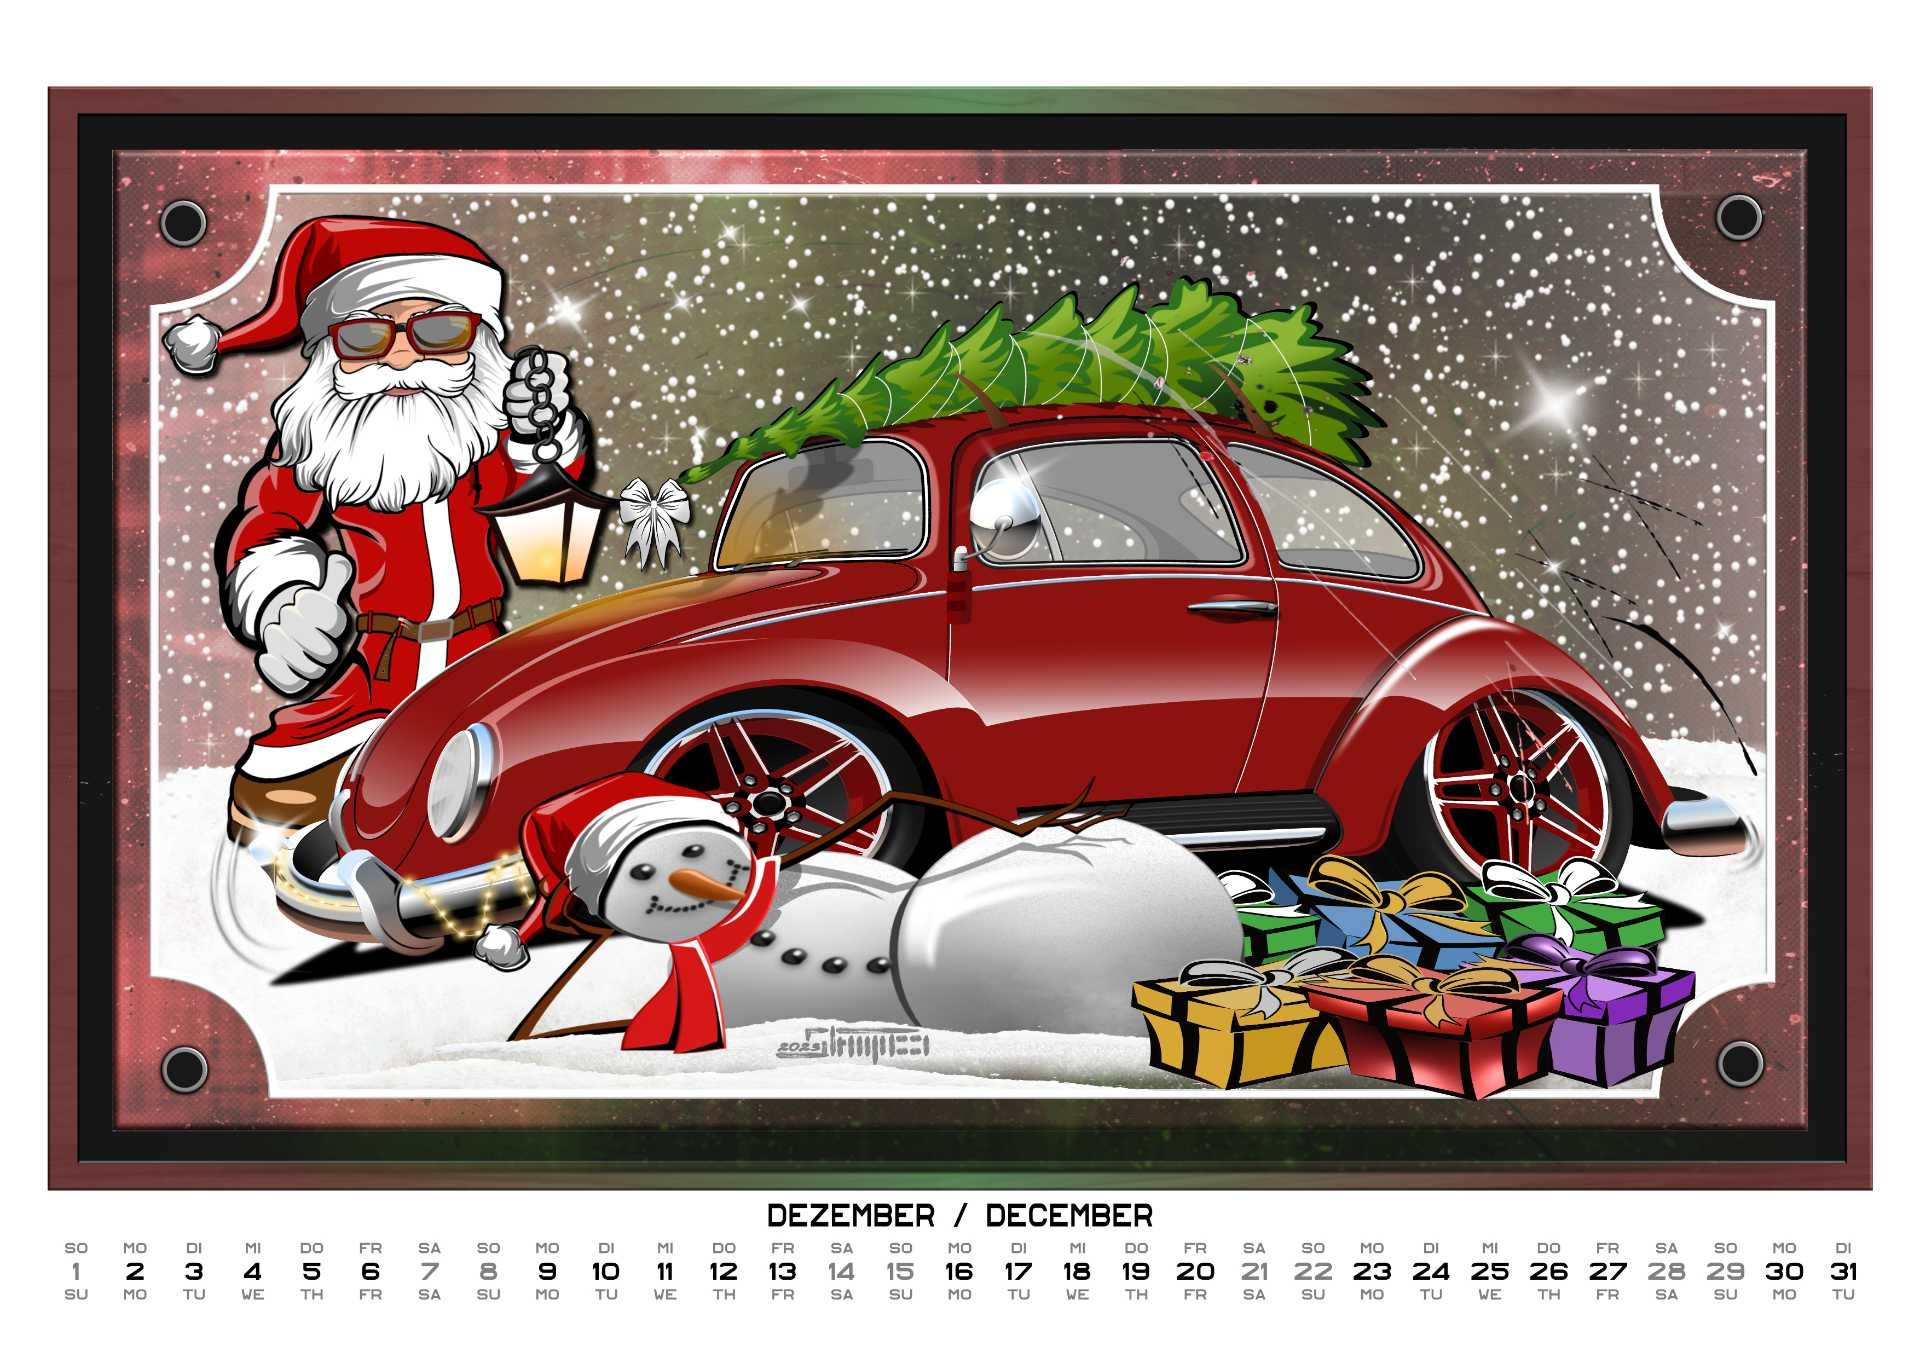
. . . just in time for the holiday season . . . finished version of the 2024 VW Beetle calendar . . . created with Affinity Designer 2.0

-
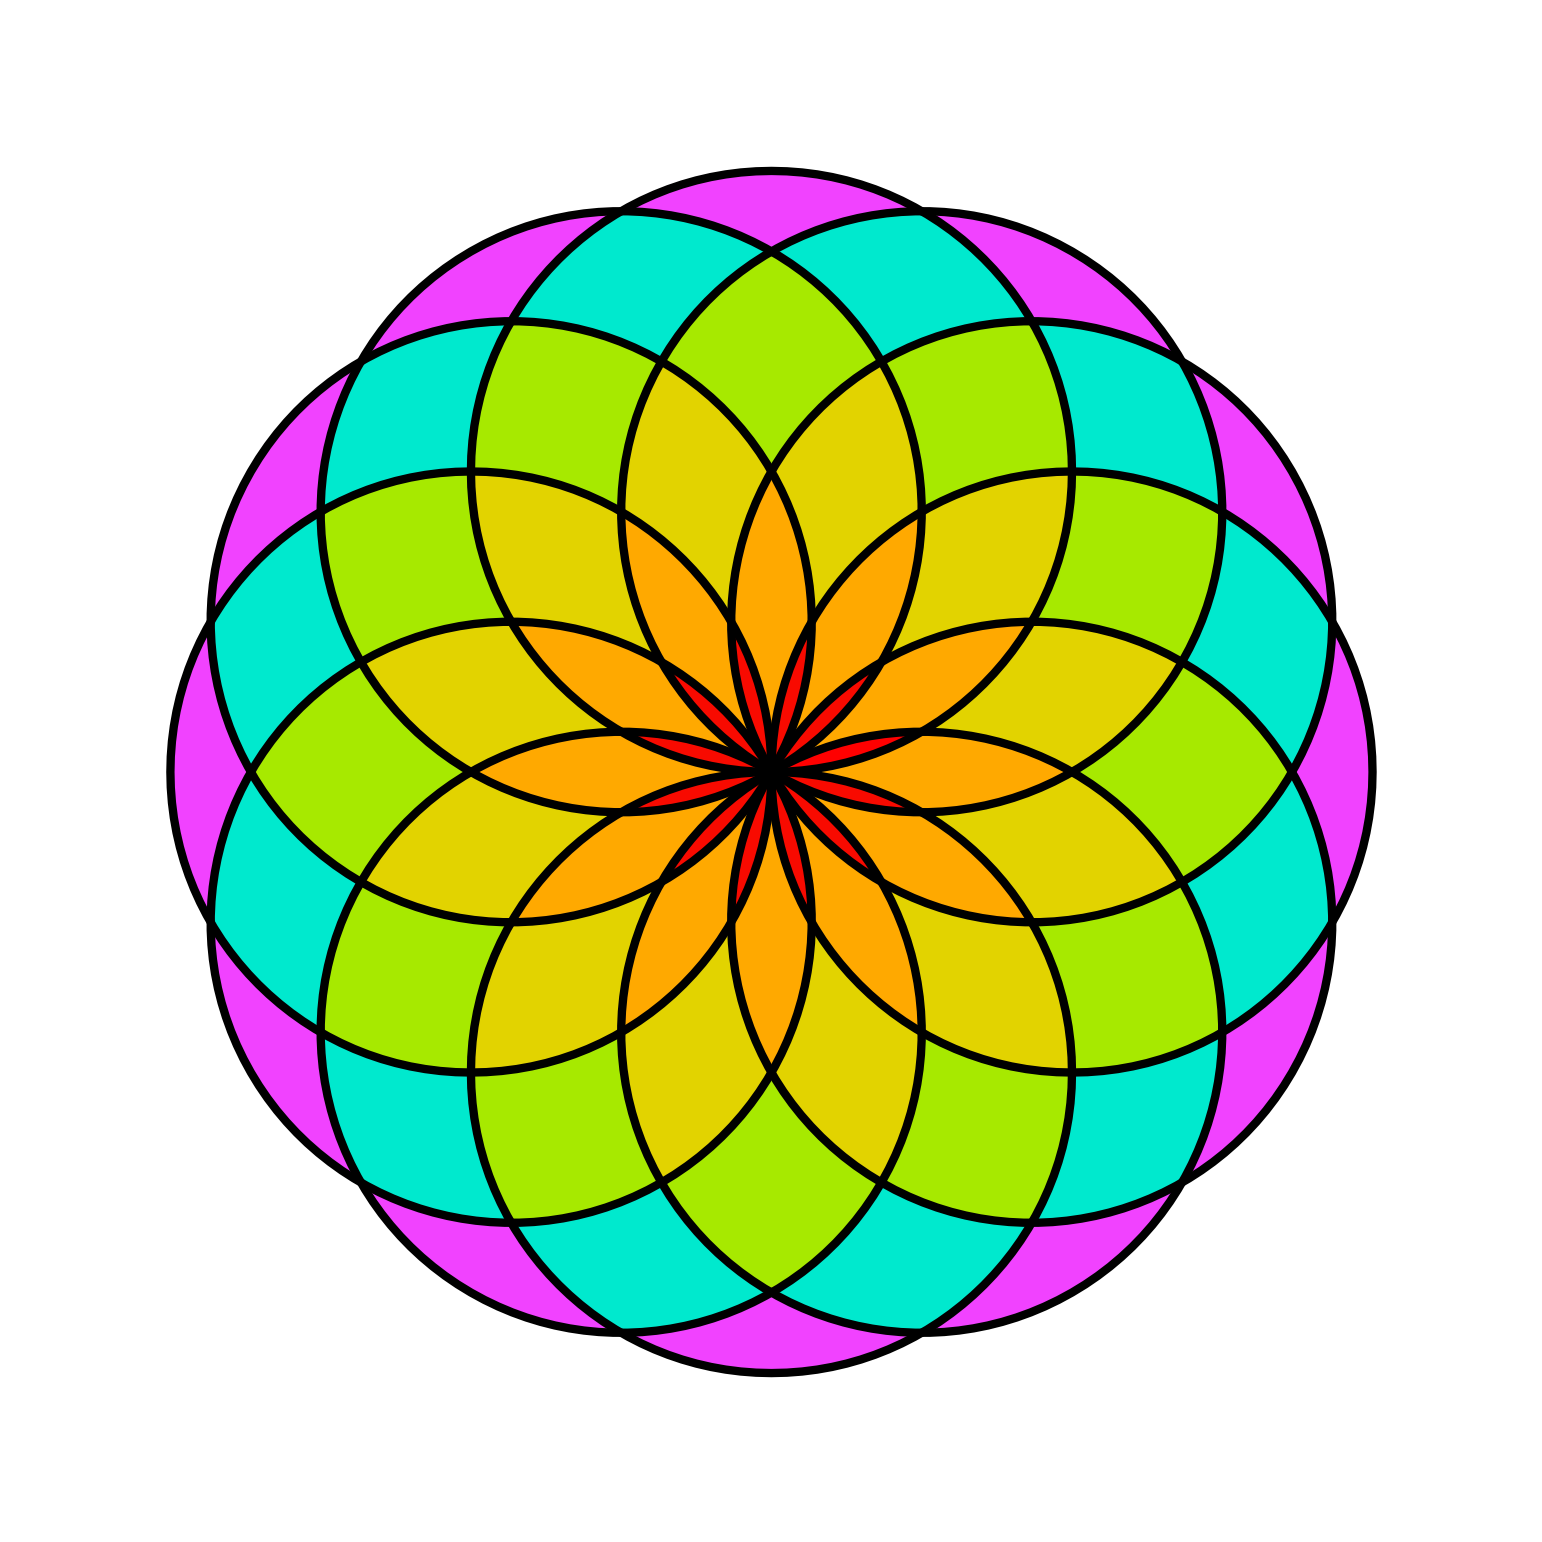
The Flower of Life, created with Affinity Designer.
-
 I love to work with artboards in Designer to create Flyers and other design elements all in one document. Designer also offers Bleed for artboards, which is great when creating PDFs for printing. One thing is a bit annoying though: Designer will not show the elements within the bleed area. It will indicate the bleed edges, but not show anything outside of the artboard but within the bleed area. This sometimes makes it hard to see how the final output will look like. Perhaps adding an option to the viewing settings to enable this? Thanks!
 -
 In AD 2.3.x the alignment of some tools does not work as expected. E.g. lines drawn by pen tool, or Serial Tool. Using e.g. the Heart Tool has no issues. No such problems in AD 1.x Please watch the video ➡️ Line and Brush alignment issues Alignment AD 1.x.afdesign Alignment AD 2.x.afdesign
 -
 I have been searching for a while now, but cant find any "select same colour" feature. All I can find is a feature request post from 4 years ago asking for this. Surely this rudimental feature has been implimented by now. Selecting and replacing a colour is one of the main benefits of vector work, to not have this seems crazy to me. I know the dev team is small and your product is so superior to Adobe is so many ways, but missing fundamental features like this makes it unusable for real world projects. I hope I am being a dullard and a select same colour feature is available. If not please add it to the top of the list of features in the next update.
- 54 replies
-
- 10
-

-

-
 there is no possiblity use swatches in gradients? and way when i change swatch also gradients change. Also gradient it seems cannot be global?
 -
Here is a series of macOS application icons. The idea is to redesign them as simply as possible, fitting them perfectly into the frame (grid template) defined by Apple, without embellishment and flatness. A simple graphic game for fun (you can exploit them as you wish)!... Voici une série de reprises d'icônes d'applications de macOS. L'idée est de les redesigner le plus simplement possible, en les calant parfaitement dans la frame (grid template) définie par Apple, sans fioriture et aplat. Un simple jeu graphique pour le fun (vous pouvez les exploiter comme bon vous semble) !... macOS Icon Grid Template 1024x1024px.afdesign
-
- 4
-
-
- affinity designer
- affinity publisher
- (and 3 more)
-
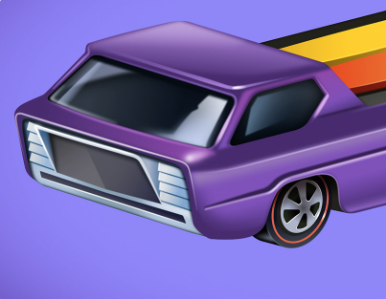
Here's a link to a recent series of fun and colourful retro inspired objects and toys. All done in vector using Affinity Designer. Designer is so great for this kind of work. Cheers Serif! https://www.behance.net/gallery/180858837/Retro-inspired-objects-and-toys-series
-

Vector Flood Fill tool missing from the toolbar
Ampersand posted a topic in V2 Bugs found on Windows
The Flood fill tool is missing from my toolbar. I am able to select the tool using the keyboard shortcut R As far as I can tell, my toolbar looks like it's still 2.0.0, although i'm using 2.3.0. I noticed this issue when I was looking for the Flood Fill tool a few weeks back, on 2.2, when I found a screenshot of the toolbar that looked different from mine In this post It also seems to me that the gradient and transparency tool are supposed to have been merged into a single toolbar item by now. The screenshot shows what my toolbar currently looks like. The issue is permanent, unrelated to files, present whenever Affinity Designer is open. I have tried restarting Designer but the issue persists. I have tried rebooting my computer but the issue persists. I have uninstalled and reinstalled 2.3.0 and the issue persists. I have also tried docking my toolbar to the side, but the issue persists. I'm using windows 10 hardware acceleration is on I'm using a Wacom 22 pen display
-
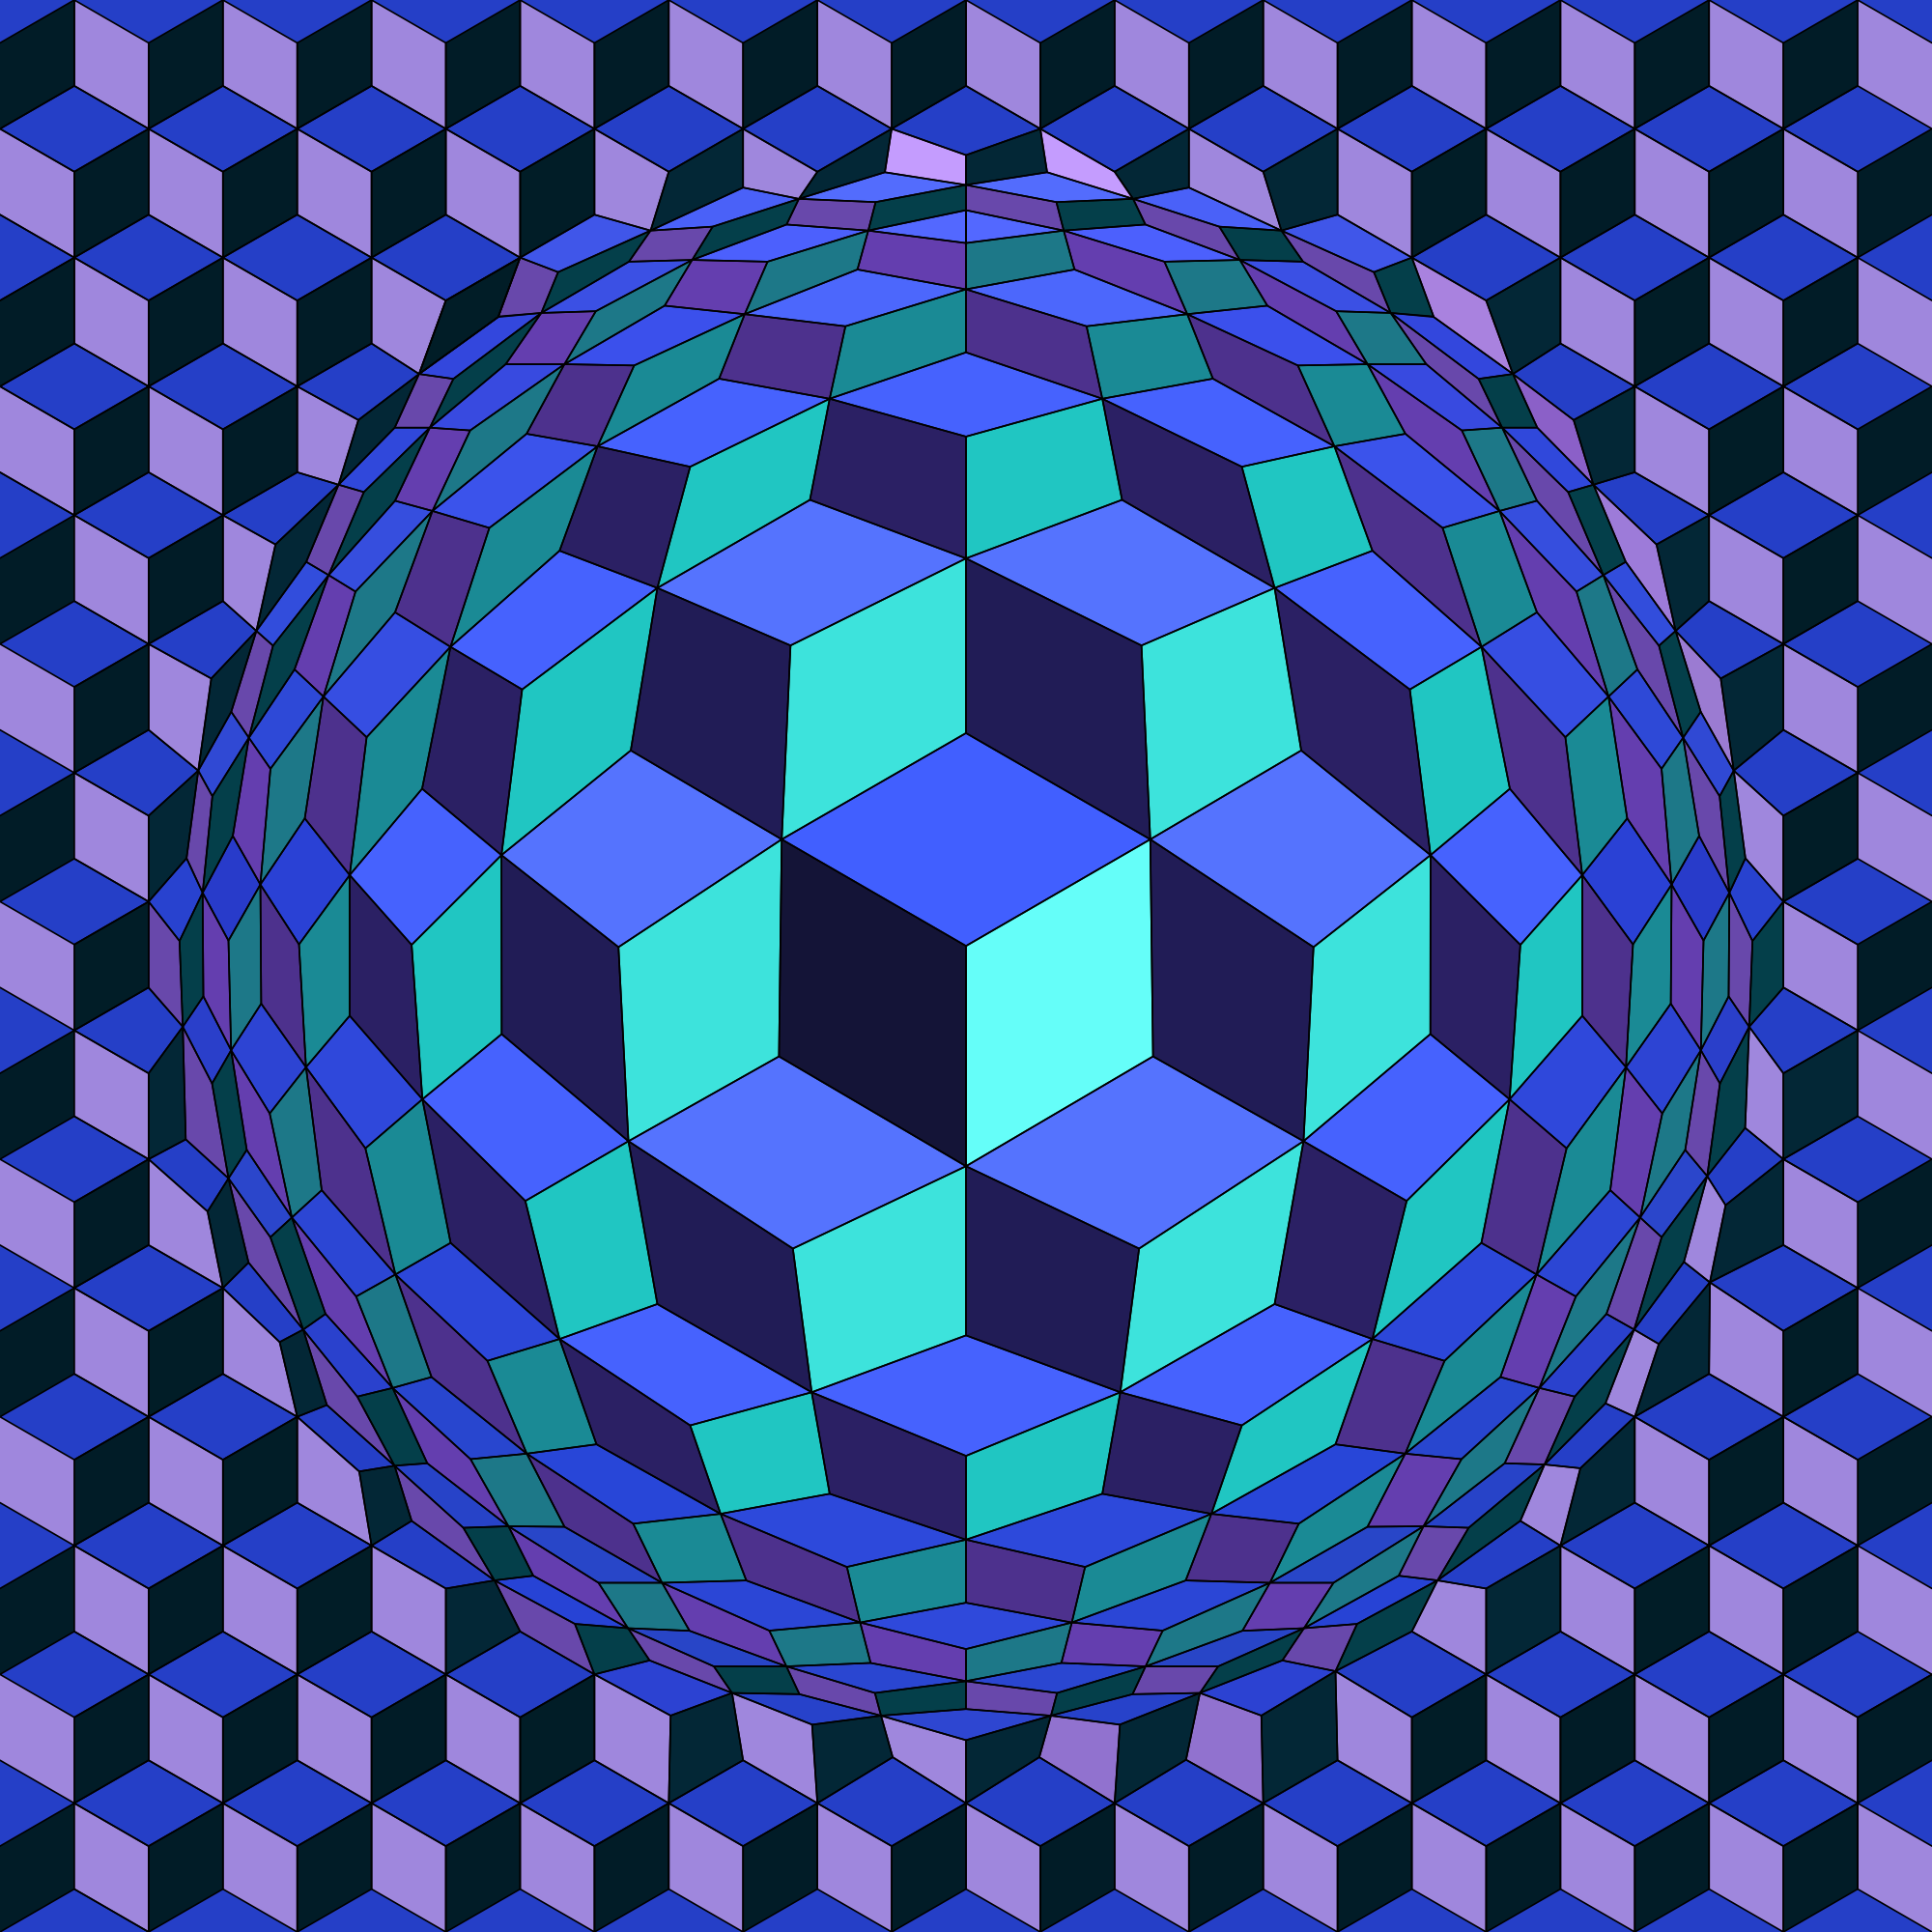
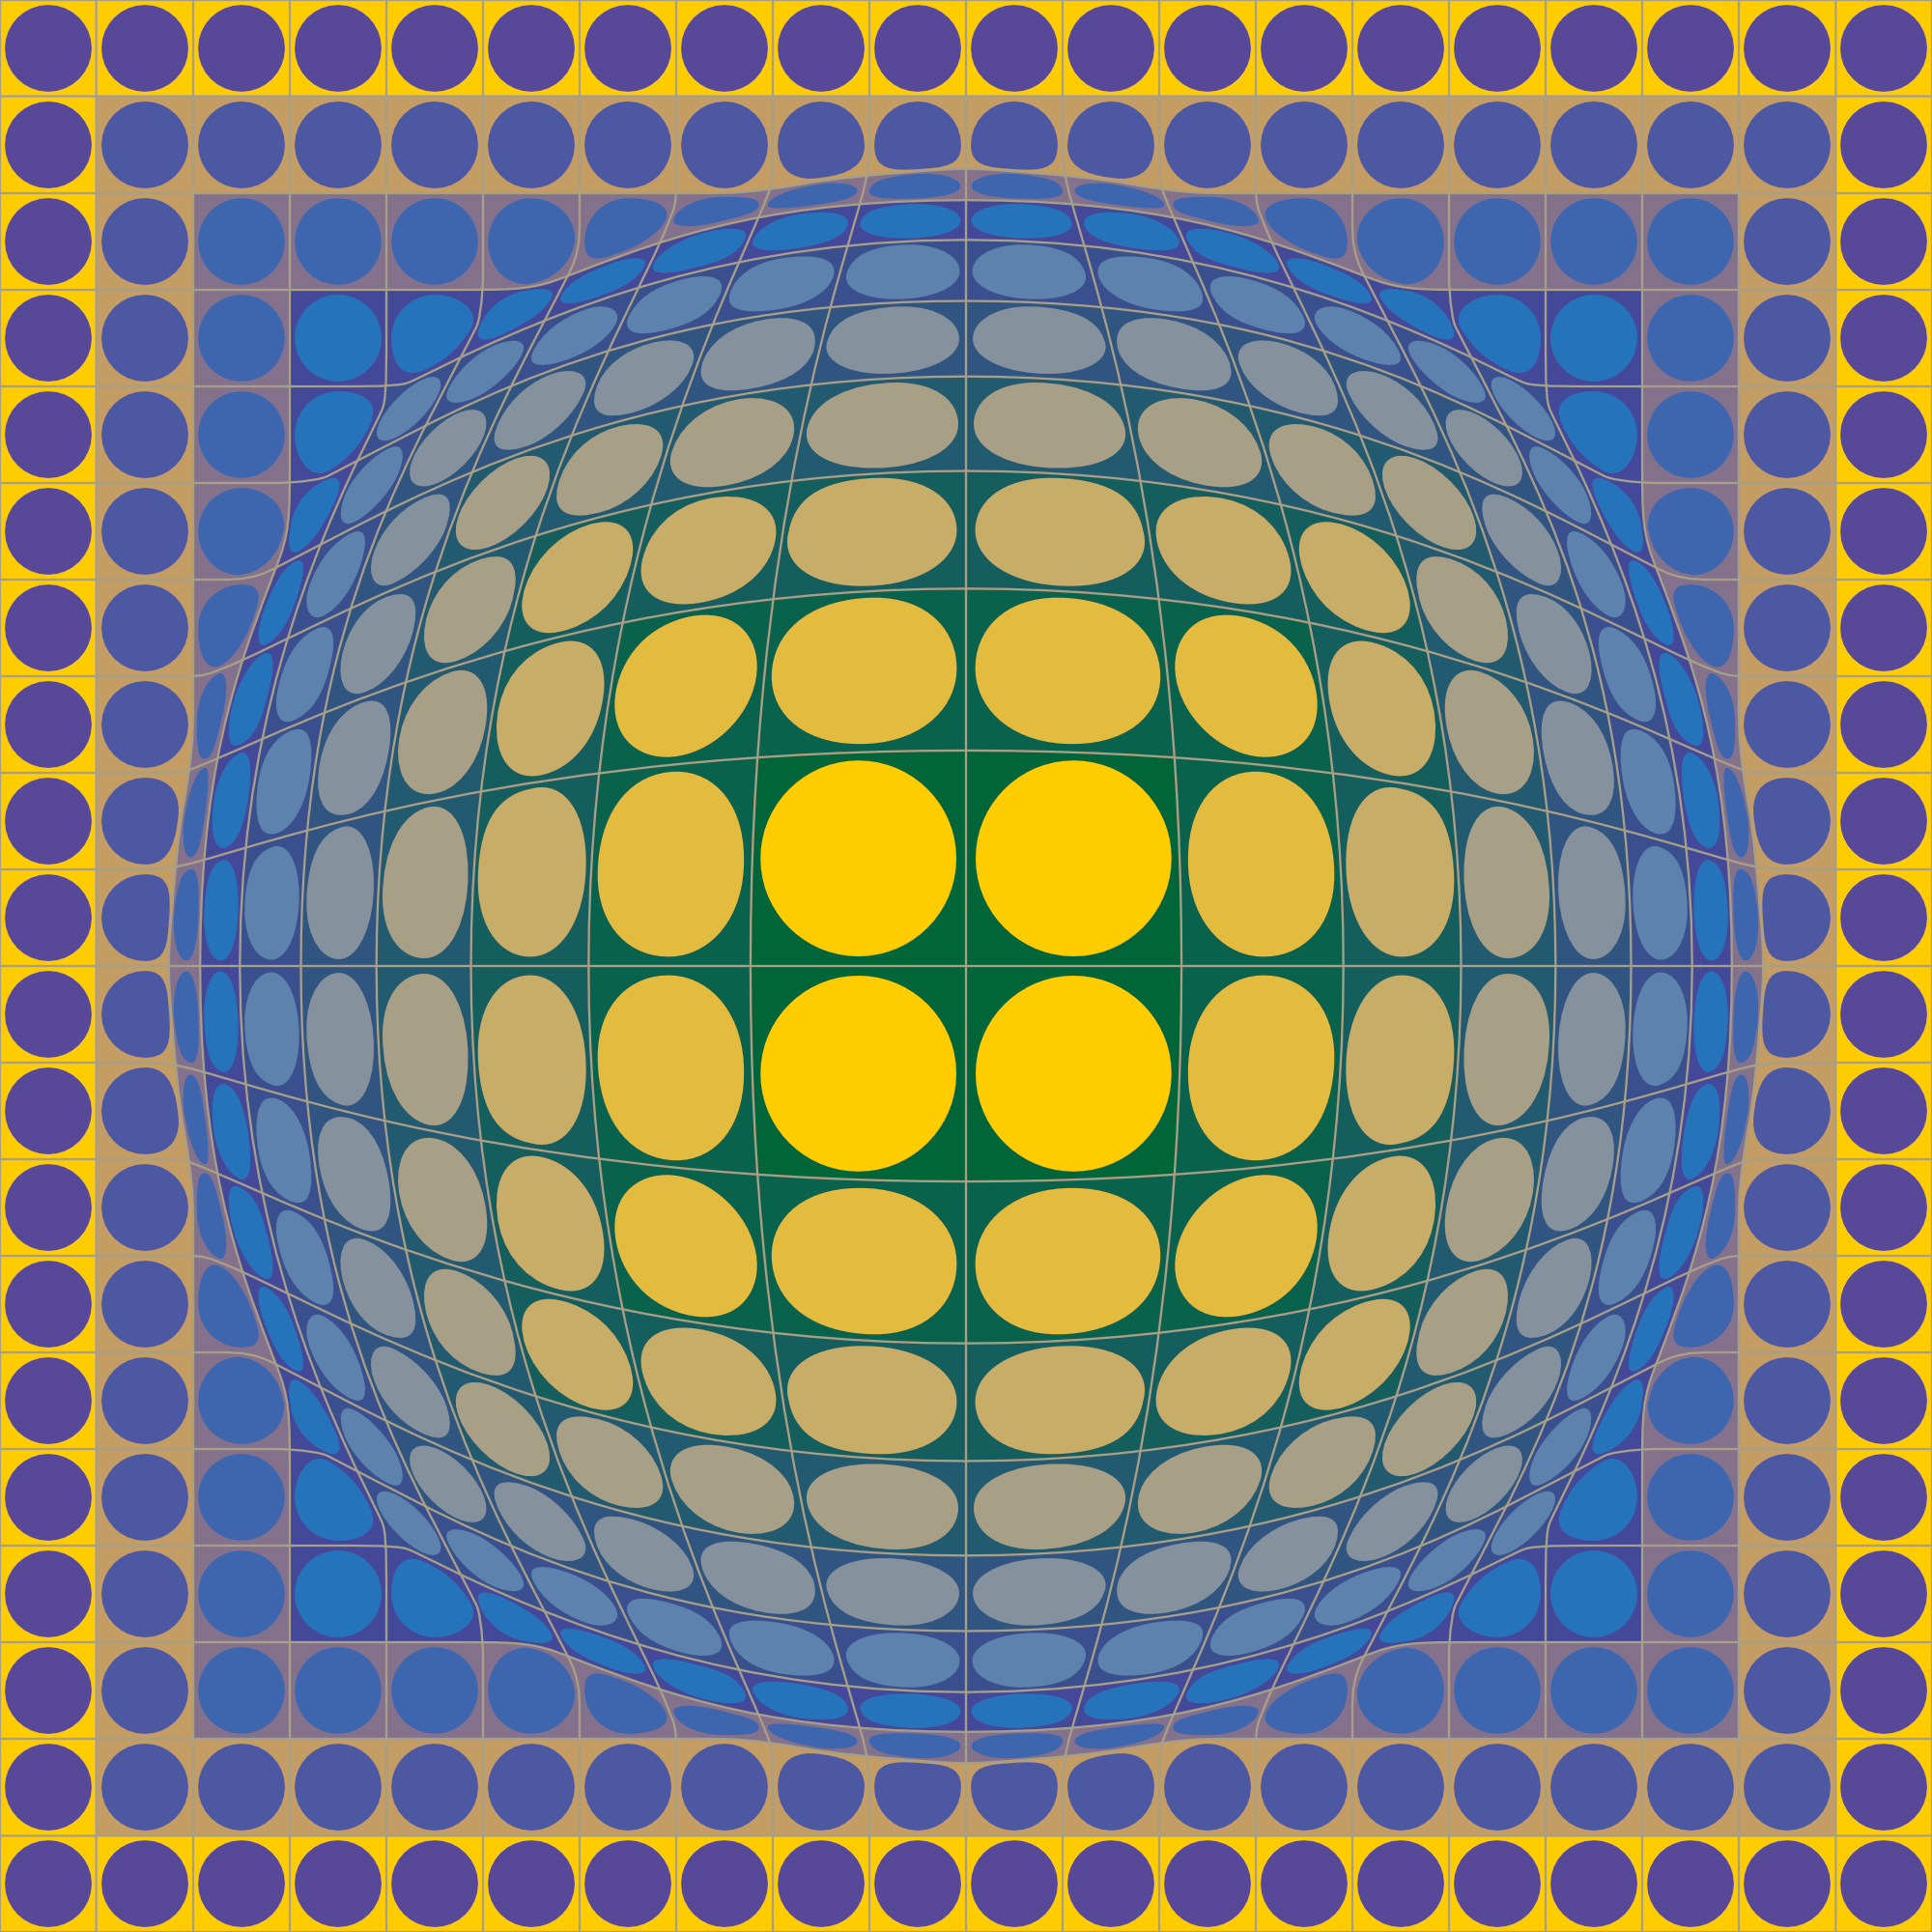
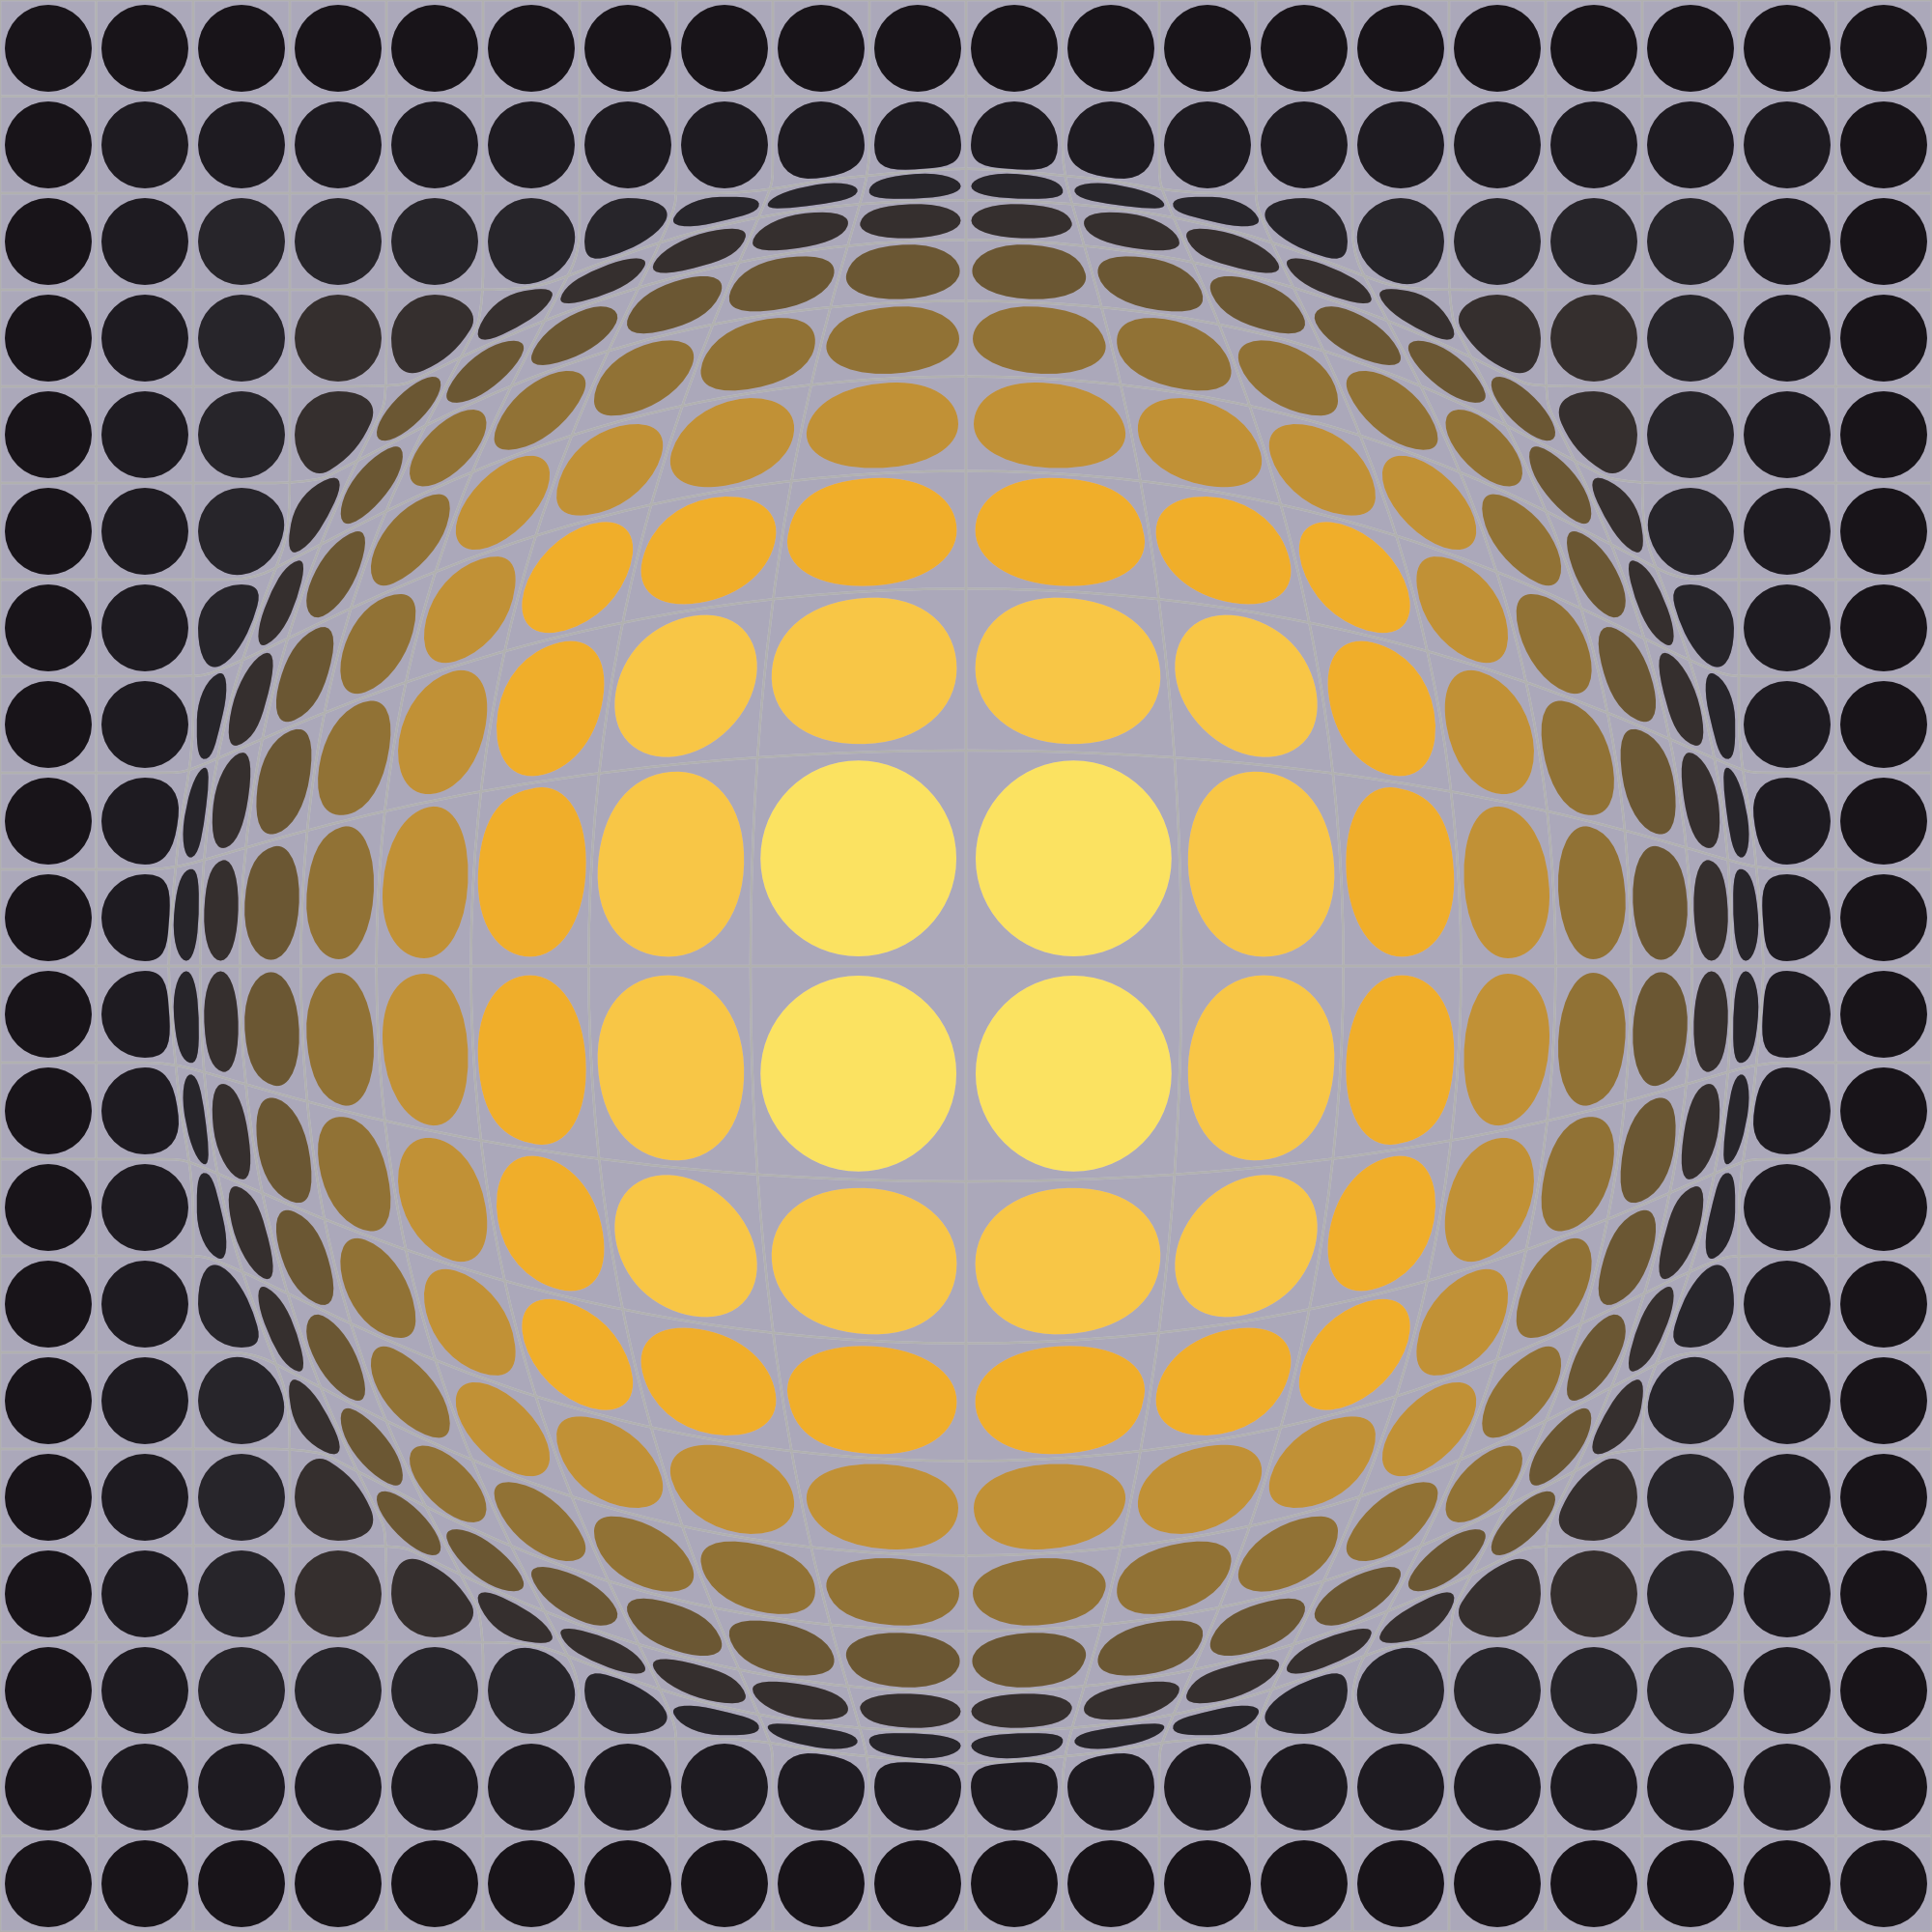
Some reproductions of works of art with the associated vector files: it's up to you to make them your own and recolor them to your liking (according to the color of your living room)... The new duplication functions in AD 2.2.1 were very effective!... Quelques reproductions d'œuvres d'art avec les fichiers vectoriels associés : à vous de les approprier et de les recoloriser à votre convenance (selon la couleur de votre salon)... Les nouvelles fonction de duplication d'AD 2.2.1 ont été très efficaces !... Jacqueline Schafer Hipster Nr3 I Love you (2015).afdesign Jean Allemand Composition bleue Lot 79.afdesign Liberté Égalité Fraternité Obey Shepard Fairey.afdesign Victor Vasarely Cheyt-Ond (1986).afdesign Victor Vasarely Domo (1989).afdesign Victor Vasarely LIKE_01.afdesign Victor Vasarely LIKE_02.afdesign Victor Vasarely LIKE_03.afdesign Victor Vasarely USA-EG (1986).afdesign Victor Vasarely Vega-WA I (1968).afdesign Yvaral (Jean-Pierre) Progression Plychrome (1971) Wallpaper.afdesign Yvaral (Jean-Pierre) Progression Plychrome (1971).afdesign Yvaral (Jean-Pierre) Structure Cubique B (1973).afdesign Yvaral (Jean-Pierre) Structure Cubique B (1974) Wallpaper.afdesign Yvaral (Jean-Pierre) Structure Cubique B (1974).afdesign
-
- 7
-
-
-
- affinity photo
- color
- (and 3 more)
-
 Any idea how to use fill color in grid area without make rectangle shape in each grid?
-
 I thought I'd try and do something with Inkscape now v1.3 is out. Cars are "easy" if long winded so I though that would be a good project to try it out on. Even installed Linux to give it the best chance but it's just too slow, clunky (like the coders don't actually use it, but they're doing it for free so not complaining too much) and a bit buggy. So I gave up after a couple of days and opened it in AD v2 then copied it in to AD v1 (as v1 wouldn't open it) and did it in there instead. Windows AD was grinding to a halt near the end, should just use my Mac.
-
 Hey everyone, Update: Okay, apparently I completely missed the introduction of Key Objects somehow. Thanks for telling me it’s already there! 🤯 Firstly, however, part of my original subject was that key objects should work for any alignment – this includes the spacing operations »Space Vertical« and »Space Horizontal«. They currently work for the general alignment options such as top/bottom, left/right. From my logic it could/should work like this: If NO key object is selected, the last set »Align To:« option works as intended and expected. However, if a key object IS selected, the »Align To:« option should react and prioritise it by changing the »Align To: Key Object«. As soon as there’s no Key Object selected, it switches back to the previous item in the list, like »Last/First Selected«. Without checking, I think this is how it works in Illustrator as well. And I mean, it's just logical (at least to me): If a user actively selects a Key Object (and for Designer this can't be accidental, since you have to hold down an extra key on your keyboard), the user most likely wants to use it as such. So the Key Object should always have the highest priority in the list of alignment candidates/options. Secondly: They also only work from the Context toolbar – when I work with the toolbar popup and want to align (top/bottom, left/right, ...) it prioritises the selected »Align to:« option from the drop down. I think there's an item missing from this list for key objects to work in the toolbar popup as well, and I think that's the culprit. It's not at all obvious that »First Selected« equals »Key Object« in the »Align To:« dropdown in the Toolbar (not Context Toolbar). ––– I very dearly miss the ability to click on one of multiple selected shapes (especially in Designer and Publisher) in order to define it as some sort of »pivot« object, so to speak, around which all other alignments will happen since day one switching to Designer almost ten years ago. (Wow, Designer really turns 10 next year!) The »First/Last Selected« options in the »Align to:« dropdown come close to what I mean, but are not as intuitive, nor do they work for all alignment operations such as »Space Horizontal/Vertical«. Illustrator has solved this more elegantly and functionally by allowing you to mark one of the already selected objects as the »centre« by clicking on it, around which all further alignment operations will take place. They call it »Align to Key Object«. Here's a short clip of how it works. Here’s a video that explains its differences a little bit better compared to other alignment options present in Designer. Please please pleeease Affinity, I need this QOL back in my process and would love to see it and in the Affinity Suite. 🥲 Cheers Dennis
- 20 replies
-
- 2
-
-
- affinity designer
- alignment
- (and 6 more)
-
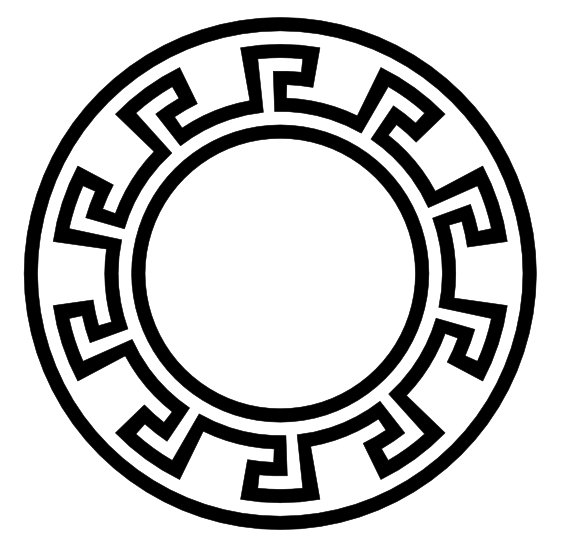
 In reaction to a recent question, I’ve attached a video showing one method you can use to create a vector ‘Greek-style’ border using various tools in Designer 2 (some of the tools used aren’t in Photo or Publisher, or earlier versions of Designer). Some of the functionalities/tools used are: Quick Grid (to get the initial grid of squares); Shape Builder Tool (to join the squares up, not actually necessary in this case); Geometry functionality (to tidy things up and make them easier to manipulate); Warp Group (to create the ‘bend’); Move Data Entry (to create multiple copies). If you need a different number of ‘repeats’, or differently-sized/spaced overall result, then you will need to calculate the Warp Value and Rotation differently, and maybe use a different height/width ratio for the initial design. I’ll leave it to you to experiment. 2023-11-28 12-29-33.mp4
-
 SAVE 50% ON UNIQUE AFFINITY DESIGNER TOOL KITS IN THE ARTIFEX FORGE BLACK FRIDAY SALE! To claim this massive discount head to artifexforge.com and use the discount code 'BLKFRI23' at checkout. Be quick! The sale must end 11.59pm on 1st December (GMT) See some of our best-sellers below or head to artifexforge.com now to see the full range! >>SAVE 50% ON THE LINOCUT LOVERS COMPANION NOW!<< >>SAVE 50% ON THE STAINED GLASS CREATOR NOW!<< >>SAVE 50% ON THE PATCH WORKS NOW!<< >>SAVE 50% ON THE SPIROGRAPH TOOL KIT NOW!<< >>SAVE 50% ON THE STAMP COLLECTION NOW!<< >>SAVE 50% ON THE MOSAIC MAKER NOW!<< >>SAVE 50% ON ESSENTIAL SHAPES NOW!<< >>SAVE 50% ON THE VINTAGE NAUTICAL MAP MAKER NOW!<< >>SAVE 50% ON THE PALS NOW!<< >>SAVE 50% ON THE ZEN FINE LINER & MANDALA CREATOR NOW!<<
-
 Hello all! Contrary to usual belief that only Adobe XD, Figma, Invision are great at UI design, I have a strong feeling that Affinity Designer has more scope to grow because it has a lot more to offer. Designer is intuitive, has WAY MORE control over curves than the popular UI design tools and is a complete design software while the others just barely are one. Affinity sure doesn't have prototyping, but otherwise it is a killer application for UI development, because I get to work with things as small as the pixel perfection of icons in the UI to something as broad as having symbols, constraints and even re-usable assets. According to me, Adobe XD, Figma, etc., are "Tools" but Affinity Designer feels like a (end-to-end) "Solution" to all UI design needs. But I believe there are two little things that Affinity Designer currently needs to do to make the life of a UI designer better: 1. Auto Layout: Affinity's Constraints feature is amazing. It is simple yet very effective when it comes to UI design in Affinity Designer. But it lacks when I add text, that will be changed at different instances, as an element inside constraint group. The text flows into the group and there is no option to set the basic padding beyond which the container resizes according to the height/width of the text that is set to auto layout. Same thing happens when I need any design element to resize according to the padding and not just as a relative size of the parent container. 2.Design System Library: This is a simple one. I'm not sure if this is very important but here I go. I know .afassets, .afpalatte & .afbrushes exist. But it will be awesome if we can combine those files and send it out as one file, a .aflibrary for example, that when loaded, loads up the .afassets, .afpalatte & more at once. This could also mean something to other designers as well. Say the designer develops a icon system, brush style, color palatte and a highlighting system (quotations and more) for a book, he/she, just has to send the ".aflibrary" file to a co-designer (or even if he/she sells that design system) that loads all the required assets into the respective panes at once. Hope this is a usefull suggestion. Have a great day everyone! EDIT: Also, it will be great if the above mentioned ".aflibrary" file also gets saved along with the normal affinity file unlike the other asset files like afassets afpalatte and so on. This saving together could be an option like saving history.
 -
Here is the Torus Yantra, a well-know sacred geometry figure, that I created in Affinity Designer, using the ellipse tool, and replicating the ellipse 12 times.
-
- 2
-
-
- sacred geometry
- torus
- (and 1 more)
-
I'm using AD for a while now and one of the major things I still struggle with is a Colour Chooser (both in a popup and Studio panel). It only supports HSL Color Box model (it is called “Hue” in AD). Most major apps right are using HSB Color box. It is more familiar and easier to use: if I need a pure bright color, I'd just move the dot to the top right corner and that's it. In HSL Box though, I'd have to try to aim the center of color box. It is frustrating. Please, add HSB Color Box to Affinity Designer. I understand, that this might be not the most important feature in your road map, but it will definitely make life easier for those who come to AD from Photoshop, Illustrator or Sketch (and especially for those who are constantly switching between these apps in the process) Thanks.
- 4 replies
-
- 2
-
-
- affinity designer
- color picker
- (and 1 more)
-
 Hi, On Designer for iPad, the cmd+D shortcut does not work with vector items, however it works just fine on the desktop version. I tried to change The keyboard shortcut to something else, but the function just doesn’t seem to work. Also a trackpad tap outside the selection does not work either. Is it possible to make these basic functions work on the iPad version? I know an iPad is an iPad for a reason, but I do not necessarily want to touch the screen just to deselect something. The function works just fine in the pixel persona btw.
 -
 Since updating to 2.1, whenever I create a new artboard in a linked (non-embedded) file, all linked items in my working file are broken with Designer: Instead of showing the linked artboard, I have the linked file preview for each linked item in my artboard file. (the linked file has multiple artboards). Appears each time I reopen the working file, not during the edit process. So the "working" solution for me is to open the document in Photo, manually update the linked file with the resource manager, save it and open it with Designer in order to get the correct rendering of each linked element. Looks like a bug with the Designer Resource Manager as it should update automatically if there are any changes.
 -
Hi Im new here but i wish to share my latest artwork and also I have a question about data entry, how to keep letters and numer horizontally around circle? Many thank
- 1 reply
-
- 9
-
-
-
I'm working up a historical starmap for a fan fiction project, with data adapted from Star Trek, and stylistic cues from the old Dent's Canadian/School Atlas' front half material, which was usually produced in black and white with usage of tones and/or spot colours. This is intended to be ink-usage-friendly for other fans' purposes. I expect to creative derivative works devoted to marking systems particularly notable for "key" resources specific to that mythology, and possibly other spin-offs as well. I'm working in Affinity Designer 1.10.6 because that's as far as my hardware and budget will currently allow. I guess I'm looking for additional "tone"/"Style" resources that may be particularly useful for this project. If you have any recommendations...?
-
A few days ago I made a rather silly picture I titled The perils of poorly-maintained Gents' lavatories (that's men's public restrooms in American). And then I thought I could animate this! There's nothing on view that actually requires censoring, I should point out. The moving parts are all on separate layers, so each one transfers to a layer in MoviePlus X6. (MoviePlus: still doing the business, and more intuitive to use than a lot of other video editors 🙂) I recorded the sound effects in the kitchen on my iPhone; the little bit of speech will be recognisable to Goon Show fans.
- 2 replies
-
- 4
-
-

-
- designer
- serif movieplus x6
- (and 1 more)
-
 Hi, I'm not exactly new to the software but I'm delving into some more complex topics as I keep using it for random stuff. For a simple illustration project, I'm trying to merge the shapes of a character's body while avoiding using destructive operations. What I'd love to achieve is to use a compound shape (made using Alt + boolean Add operation) as a clipping mask for some inner shapes. See the attached example for what I'm trying to achieve (with a very simplified character) and the tests I have made so far. From what I gather I have three options: Use a compound path. This will unfortunately break clipping functionality, and the clipped shapes will get lost inside the original containing shape (Body in teh example). If I move them to the root of the compound the simply become part of the compound itself. Make a compound path, group the inner shapes, then use a copy of the compound path as a compound mask for the grouped inner shapes. This works(ish) but messes with rendering and the inner shape with the gaussian blur FX will exhibit some color banding. Not sure it's noticeable in the example picture, but it definitely is there. This option is kind of a chore to maintain as well, as I'd have to make changes to both the compound path and the mask. It also makes a mess in the level hierarchy. (Note: the color banding seems to be caused by the pass-through rendering mode of the group. I could bypass this by not using a group, and just duplicate the compound yet again to make a mask for each inner shape, but that makes it even harder to maintain) Simply boolean add the shapes. This is visually what I'd like to achieve, but it's a destructive operation. I would need to keep a non-merged copy in case I need to move or redo the ears, for example. Maintaining both copies synced would be a major pain and simply not a good workflow. I'd like to just use the first option, since it's simple and non-destructive, to achieve the visual result of the third option, but I can't get it to work that way. Is it not possible for compound paths to act as clipping masks as well? What other options are there that I'm missing?


.png.ab52dfb24c1534b85a345e3d7a7018f9.png)


.png.b8dd39cf029168a38ea0cb2b5cfc46da.png)
.png.d6610b34b9b9b0458b6eaf1e355652ff.png)
.png.db856c8994f2bd34f14f99d753b6e6f7.png)
.png.0083b39c9620cc00925ce7b87a17db93.png)
ProgressionPlychrome(1971)Wallpaper.png.cba017084222a9a587fca300461a7329.png)
ProgressionPlychrome(1971).png.747fa08ba0e51da8937043ffaf15f824.png)
StructureCubiqueB(1973).png.35616df2668387e204192a08bd1cbcfc.png)
StructureCubiqueB(1974)Wallpaper.png.a9c6ce5815fa0ce3cc48c381d725b39c.png)
StructureCubiqueB(1974).png.8672a318a703b2bec7ab32afd3115040.png)