Search the Community
Showing results for tags 'afd-3759'.
Found 1 result
-
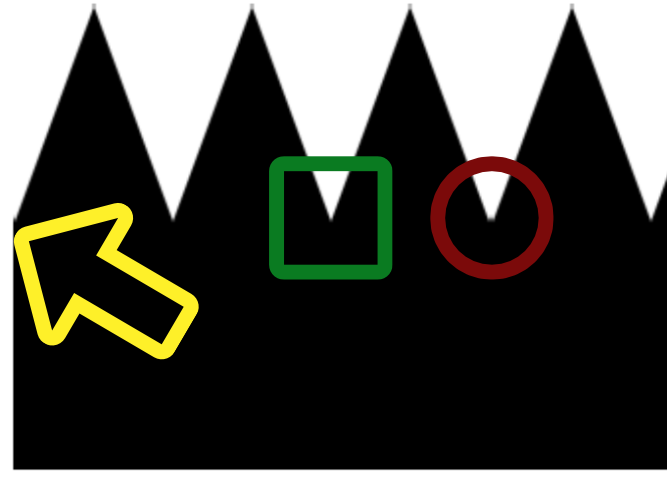
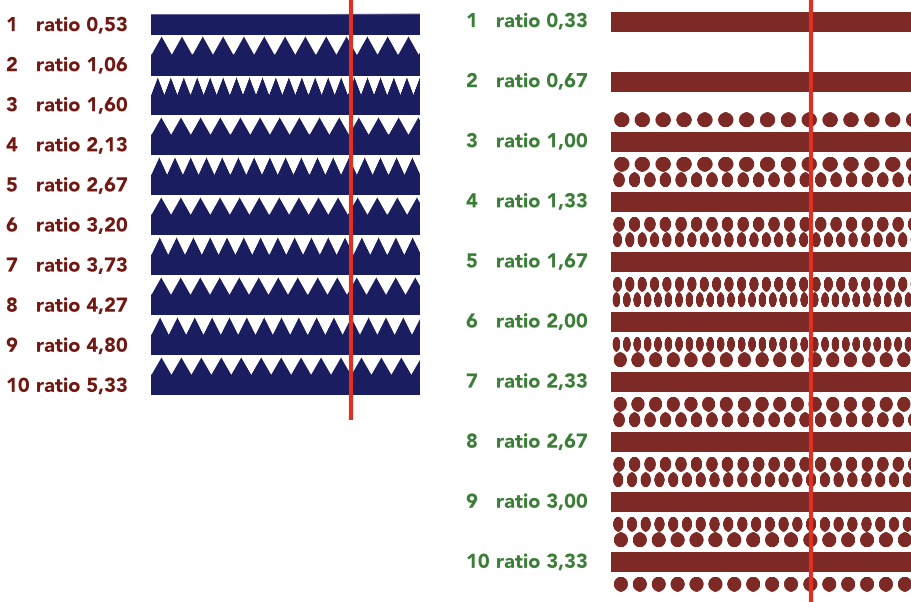
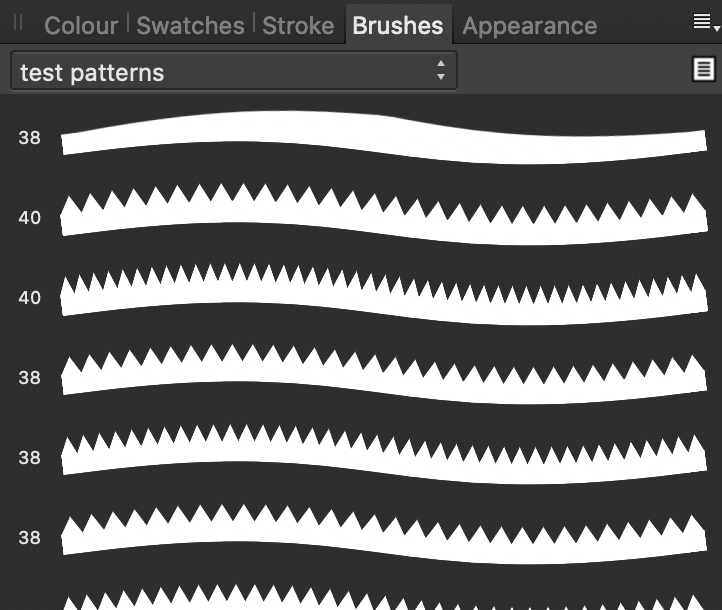
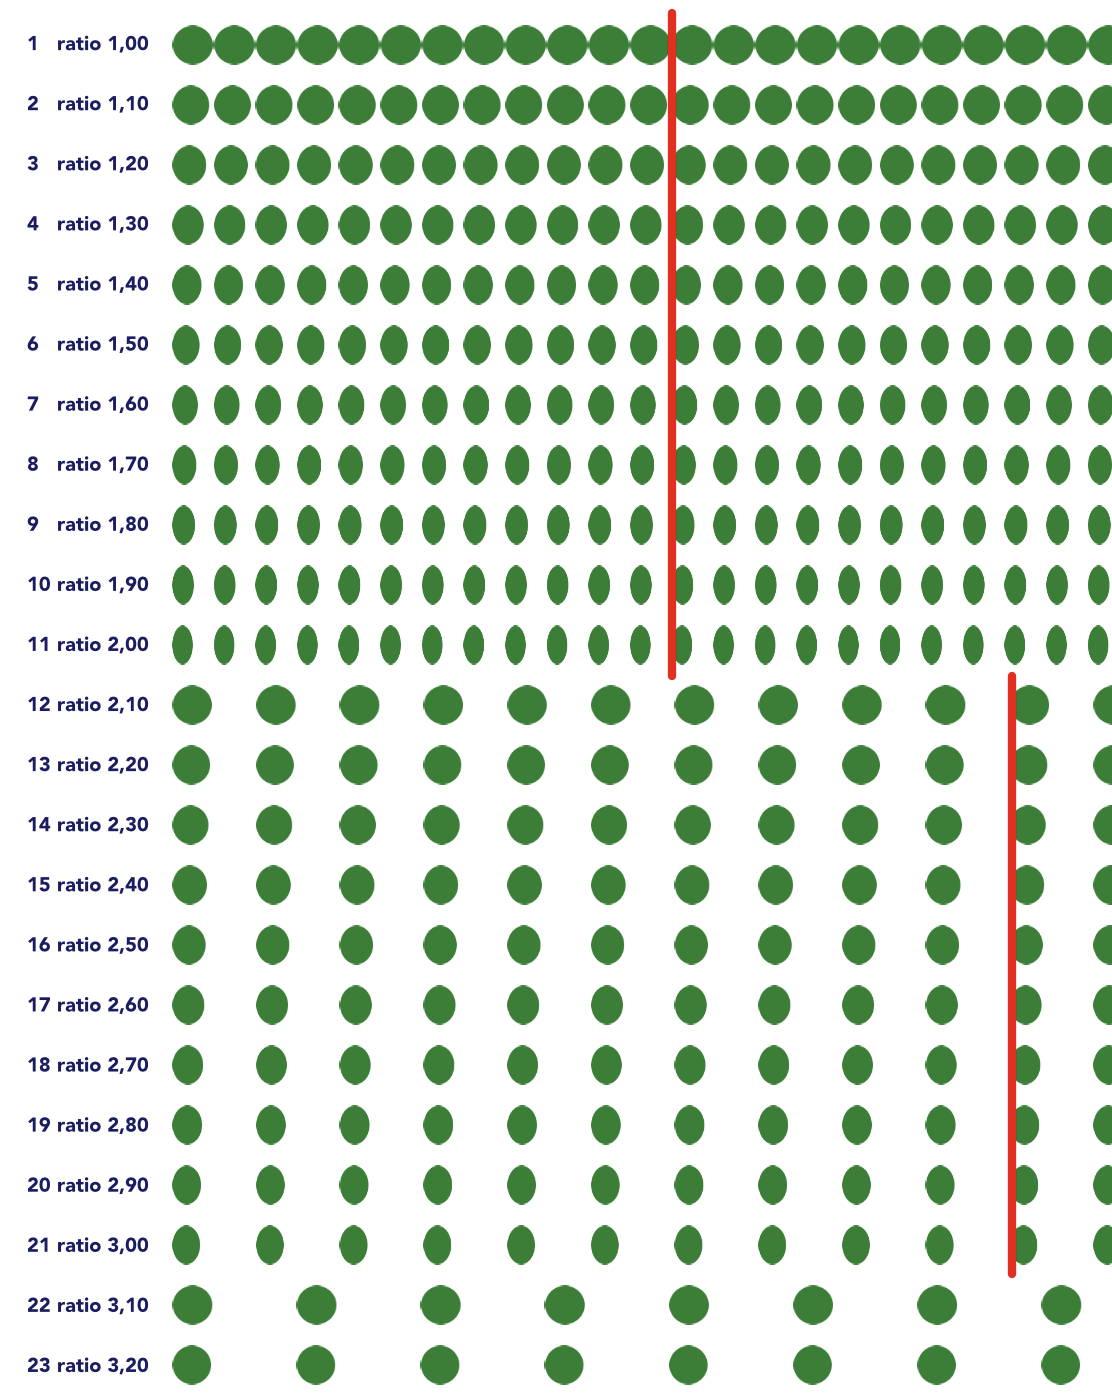
TL-DR: Textured Intensity Brushed act weird when using repeating patterns. There are work arounds. Do not create a source that is less wide than high, since it does not repeat. Mind the ratio beween width and height, because a lot of ratios cause deformation of the image used. Ratios that hardly show deformation are 1; 2,1; 3,1; 4,1; 5,1. Add black space above and under your pattern to get to a ‘safe’ ratio. I like working with custom made brushes. I love the Textured Intensity Brushes in Affinity Designer. Playing around with it I observed some unexpected behavior when using the Body: Repeat option. This setting is on the Brush panel that opens when you double click a Vector Brush in the Brushes Studio in the Vector Persona. I’ve seen a few other posts about problems with repeating patterns, mostly in the Questions section of the forum, so that’s why I put this here. But this is also a bug report. Now for the unexpected behavior. 1. Refusing to repeat If your source image's width is smaller than its height (e.g. W:120px; H:200px) the repeat fails, the pattern will be stretched, no matter what. From what I read in From what I read in https://forum.affinity.serif.com/index.php?/topic/62767-vector-brush-stretching-despite-choosing-repeat/ this problem has not yet been addressed. I tried working around it by repeating the pattern in the source image twice or more to make it wider that high. It works, but it brought to light other unexpected behavior (I’m fond of that term!). 2. Offset values don’t behave as expected Expected: when there’s no head or tail to the brush, offset values remain the default values as set by Affinity Designer on creation of the new brush. That is 0px for the Head Offset and the width of the source image for the Tail Offset. Observed: the repeated part has seams, like an extra column of pixels is added in between the occurrences of the pattern. I’ve marked the seam with a red circle. I’d expect it to look like what is shown in the green square. Work around: to have a pattern repeat pixel perfect, set the Head Offset to 1px and the Tail Offset to width-1pt (if the source image is 180px wide, set the Tail Offset to 179px). Trade off is that there is now an extra column of pixels at the start of the line, see where the yellow arrow points at. A better work around for sources with a relatively small width: have 3 repetitions in the source and define the first repetition as head and the last one as tail. So if the source image is 240px wide, set Head Offset to 80px and the Tail Offset to 160px. Now the numbers make sense. 3. Elements of the pattern get squished The first work around from problem 2 lead to experimenting with the ideal number of repetitions in the source image. I spend many lonely nights creating tests sets of patterns, counting repetitions on grids and creating spread sheets filled with the height width ratios of patterns. That sounds dramatic, but I was actually immensely enjoying myself. I like a good puzzle. I’m not the only one who noticed something was off. @LionelD started this thread: https://forum.affinity.serif.com/index.php?/topic/98456-textured-intensity-brushes-on-ad-ipad/. But it’s not about deformation to fit a curve. Of course you’d have deformation on a curve. But there’s also deformation of the pattern on a straight line. I observed that the amount of deformation varies with the ratio between width and height. Of course with a repeating body you’d always have to squish the repeating part a bit to fit it on a line that is not exactly a round number of times the length of the repeating part. But when a line is long enough, one might expect it to even out a bit. Well, it does not. I made test lines of 7200px and brush sources from 80px to 800px wide, incrementing in steps of 80px. The source format fits 90, 45, 30, 22,5, 18, 15, 12,86, 11,25, 10 and 9 times when applied to the line using the source file’s height as the Brush Width. Those are nice round numbers in 7 out of 10, but it does not help. It’s not the line length, it’s the width height ratio. By the way, the deformation and the refusal to repeat from problem 1 already reveals itself in the picture of the brush in the Brushes Studio. Now a ratio of 1 (same width and height) gives hardly any deformation: W:240px; H240px works and W: 427px; H:427px also works great. Another ratio that seems to work is W:800px; H:150px (ratio is 5,33). Other ratios I tried are off. They are off in varying degrees. Sometimes they are very off, 1,6 is a very bad one, as is 2,0. Next step was to observe what happens when the ratio is increased in small steps. I created a test source image of W:200px; H:200px and then 10 more, increasing the width in steps of 20px. So that is a series of ratios: 1,0; 1,1; 1,2 ... all the way to 2,0. I created 11 brushes. The 1,0 was looking very good. 1,1 a bit less and with each step the image got more squished. Actually, the sources all were squished into the same amount of space. Now there’s a pattern! The pattern of the W:400px; H:200px (ratio 2) brush got squished into a box of half its width! I had already tested ratios larger than 2, and at some point in the higher numbers found ratio’s that also looked pretty good, like 5,33. Another series 2,1; 2,2; 2,3 ... 3,0. Remember: 2,0 was squished to half its width. But 2,1 looks great! And from 2,2 it is getting worse and worse ... 3,0 looks the worst. Another series 3,1; 3,2; 3,3 ... 4,0. Now 3,1 looks great again! And 3,2 looks less great and ... well, it gets worse and worse going to 4,0. But 4,0 is less deformed than 3,0 and 3,0 has less deformation than 2,0. Conclusion: ratio 1 looks good, round numbers >1 go bad and a width just over the round number looks good. Next question: how much over the round number would work? Let’s see what happens if I create a pattern with a ratio 5,01, W: 1001px; H:200px. Hmmmm, interesting ... it’s a bit squished. Not very much, but notably. 5,1 is doing perfect, 5,0 is as much off as one would expect it to be off. So there seems to be a sweet spot near 0,1 past the whole number. By now I pretty sure what causes this problem. There’s a rounding error somewhere in the creation of the repetition. I’m not sure where exactly this happens, since I’m not familiar with the way this was programmed, but I know a rounding error when I see one (I’ve always wanted to say that!). Trust me, I’m a coder. I know how to err. For me I’m a near as I can get to creating patterns that look good in a Texture Intensity Brush. I’d advise the people at Serif to take a good hard look into the math used to create repetitions. I’ve added a brush file and a project file to this post. The work around This is how to create a repeating pattern with hardly any deformation: create something beautiful jot down width and height and calculate the ratio (width / height: e.g. 540/200=2,7) now find the previous value that fits to #,1 (so if your ratio is 2,7, go to 2,1) divide width by found value and you have a new, slightly higher height for the background (540/2,1=257) create a black rectangle (W:540; H:257) and put it behind the pattern, align the horizontal centers of the image and background select the background, export the selection with background to a png use the png to create the new brush set your offsets and such and set the Body value to Repeat When you look closely, you’ll quite often see that even the ‘good’ ratios (1; 2,1; 3,1; 4,1; 5,1 ...) deform a little bit. Just a few percent, but still ... But that’s normal. They have to fit a round number of times on the line. Now, there’s loose ends to this long story, for instance what happens in the ranges 2,0..2,1; 3,0..3,1 and so on? And why does sometimes the repetition on the screen shift on changing zoom levels? I spend some free time on this puzzle, over a period of weeks. Every week when I had diner with a friend of mine I updated her on my findings. She offered suggestions and we grumbled about the funny quirks of the applications we’re using. So now, if you ever see two middle aged, greying ladies talking over a meal: this is what we’re gossiping about. I use a MacBook Pro (13-inch, 2018, macOS) and Affinity Designer 1.7.3 test patterns repeating TIB.afbrushes test patterns repeating TIB.afdesign