Search the Community
Showing results for tags 'adjustments'.
-
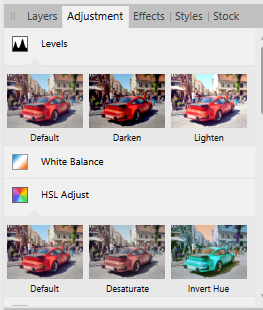
 Hi I am trying to use the adjustments in affinity photo for Windows 1.6 desktop. When I click on the adjustments I seem to get 3 options rather than the panel with the adjustments. For example when I click HSL adjustment I get default, desaturate and invert hue, but not the panel with the sliders. It is the same with Levels-instead of the sliders for levels I get default, darken or lighten. I can't see where to alter this setting. Any help much appreciated. Thanks in advance
-
 This has been an issue for a while now. The blur brush tool adjustments in the tool bar (opacity, hardness and flow) don't seem to be doing anything. I've been using affinity photo now for about 7 months now. This never used to be an issue - the opacity, hardness and flow sliders would all have an effect on the blur brush tool. However all of the sudden, one day they stopped working and the blur brush tool is stuck on max blur! Can anybody tell me why or how to fix this? Note: these adjustments work just fine on paint brushes, burn/dodge brush tools etc its only an issue with the blur tool.
 -
 Hey there community and Affinity devs, some time ago I asked the developers via Facebook if there's an option to keep the adjustment presets like gradient maps, imported and saved LUT files, levels, curves – pretty much everything in the "Adjustment"-palette/tab that you may have generated and saved there over time. Back then (August 2015) you would need to save them separately, because you'd loose them with the next update – at least that's what happened to me twice – after that I was more cautious about those files. Anyway, I got a pretty helpful response: I was told there's a file called adjustments.propcol in the directory /Users/<USERNAME>/Library/Containers/com.seriflabs.affinityphoto/Data/Library/Application Support/user/ and it would contain all of my adjustments – and it's true! You can save that file and put it back there after each update to preserve your custom presets. Tough I guess it's been solved since a few updated ago because I haven't done it after a couple of times. Last year I purchased the Win-version of Affinity Photo as well and just now I'm starting to wonder: How to transfer adjustment presets from one system (Mac) to another (Win) and is this possible in the first place? So if anyone knows the answer or a workaround that doesn't involve loading everything manually I'd be pretty thankful. Greetings Dennis
-
 I need the software merely to make text adjustments, not to create artwork. I followed the tutorial on Vimeo on how to change text in a pdf document, but unfortunatelly I was unable to get the text panel to display as shown in the video tutorial, and I was unable to figure out how to make the text changes. The video mentioned that there are other ways if this does not work, but where are the other ways? How can I make text changes of pdf files? Which tutorial covers this? Or was there a bug in the newly downloaded test version of Affinity Designer because it did not give me access to the panel displayed in the tutorial video.
 -
Create Macro to Export photos Ctrl-Click on any adjustment takes it back to zero Tools should not change when you use a shortcut to call them. Example: I use the brush tool, then switch to another tool, then press B to bring back the Brush tool, but now I find it being changed to the Color Replacement tool. I would like the adjustment size of the brush tool to be in exact increments of 5, not 5.1, etc Make the default setting of the Sharpen Brush to Unsharp Mask instead of Clarity Support for ProPhoto RGB
-
 When the raw output format is set to 32-bit (HDR) format in the Assistant dialog, are there any differences in making image adjustments (exposure, brightness, colors, white balance, shadow, highlight, ... etc ..., except noise reduction) within the Develop Persona compared to Photo Persona? In other words, what are the advantages in adjusting image parameters in Develop Persona? If there is no difference, wouldn't this method be partial workaround to the histogram bug in Develop Persona?
 -
 I know that you can attach Curves and Levels adjustments to masks and set their target channel to Alpha instead of Master. This is great feature that allows us to change a mask non-destructively, but we should be able to attach all adjustments and filters to a mask as if the mask was a regular grayscale pixel layer. Also currently in order to attach Curves or Level adjustments to a mask you have to create it and attach it manually to the mask. Would be nice to be able to select the the mask - add the adjustment layer (or live filter) and have it link automatically to the mask. Hope all this makes sense. Cheers!
-
- 1
-

-
- adjustments
- filters
- (and 1 more)
-
The current Gradient Map feature is quite basic like the one in Photoshop, but in many ways, it could be a much more useful tool with the following additions: HSL Mode: Instead of going based only on Luminance, this would use the input hue or saturation as the lookup index. In combination with HSL blend modes, this would allow for some fantastic workflows like basically warping the color wheel to taste, similar to the "HSL Wheels" feature in Magic Bullet Colorista (Note: don't be fooled by the name of the feature, this is NOT referring to the three-way color corrector). Just use a gradient of the HSL spectrum and drag or re-define stops, set the result to "Hue" blend mode, and you have an extremely powerful color correction tool that gives you results that would be difficult to achieve in any other way. Circular Editor Option: Like the Colorama filter built-into in After Effects, this makes it easy to work on maps that are supposed to start and end with the same color. In combination with an input for a number of revolutions (cycles) to use, this would also make it easy to create gradient effects where a few stops are repeated multiple times across the spectrum (like, say, alternating black-white-black-white). This would also massively improve usability in conjunction with the HSL mode option suggested above. Access to swatches: This would make it easy to re-use gradients by defining them or recalling them from swatches as an alternative to using Adjustment Presets. Interpolation control: Sometimes the transition from one color to the next needs fine-tuning – this is something that Affinity's gradient editor already supports, but not in the Gradient Map dialog. A Constant Interpolation setting where the color would just be constant up until the next stop would also be useful since it would eliminate the need for duplicate stops in the same position, which are really hard to select. Possibly, the curve editor could also be re-used to define falloff using a Bézier or Catmull-Rom-Spline. Duplicate Stop option: Often, it is necessary to use the same color multiple times in a gradient. Adding a button for this and/or enabling Option+Drag to duplicate would be useful. Photoshop aggravatingly always inserts new stops with the same color instead of the color that is already there at that position in the gradient, but the (better) implementation of this in Affinity had the side effect that duplicating stops became harder. On-image sampling: While the dialog box is open, it would be useful to highlight the value under the mouse pointer in the gradient display to be able to place a stop exactly at the desired position. Clicking in the image would insert a stop. On-image highlighting: Conversely, when editing/dragging a stop in the gradient editor, an option to highlight the affected pixels in the image would be helpful. The options could be:off (nothing) all pixels that have exactly the value represented by the position of the stop (similar to focus peaking) the zone that will be affected in the image. The overlay would start at 100% intensity at the value represented by the stop and fall off to 0% on each side until the position of the next stop respectively, taking the falloff into account (see "Interpolation Control" above). Optionally, two different colors could be used to represent each side of the stop. Resizable dialog box for more precision: When editing 16-bit images or editing falloff from one stop to the next or when placing stops very close to each other, it would be useful to have more room to work with. Making gradient editor dialog boxes in the application resizable would alleviate this problem. Snap to Luminosity button: Sometimes, it is useful to place stops exactly at the point in the gradient that corresponds to their luminosity, especially when they are defined by selecting swatches from a color palette. Adding a button that moves all selected stops to that position would make this really quick. For instance, tinting an image with two tones while keeping black and white intact could be achieved very quickly by selecting a black-to-white preset, then adding two stop, selecting a color from the document color palette for each, and clicking that "Snap Selected Stops to Luminosity" button. Ability to move start and end stops. The values before the first stop and after the last one would simply use constant extrapolation. This would eliminate the need for duplicate stops, which take longer to create and are harder to edit since all operations need to be performed twice.
- 3 replies
-
- 7
-
-
- Gradient Map
- Adjustments
- (and 2 more)
-
 I bought Affinity photo to use on my (MAC) laptop to adjust series' of product type photos. I need to copy the adjustment layers into many images to keep the white point etc consistent. In Pshop you can just group and drag them into the next window. Affinity seems to have no way of even letting you see other windows in the background of the one you are working on, let alone being able to drag the group or individual layers across. This is a real game changer for me!! Why is there no option to change the layout from tabs to separate windows for a start? This is basic mac stuff, drag and drop. . . I'm gutted. If I have to manually redo each of up to five adjustment layers in each image, to match I might as well not bother and go back to the ancient CS4 on my desktop machine. Otherwise Affinity is great for adjusting single images.
 -
Fairly self-explanatory: filters and adjustments could both benefit from a "favourites" feature, either automatically based on use, or manually set up by user.
-
- 2
-
-
- filters
- adjustments
- (and 2 more)
-
 Sup people! I've been checking out this application and I'm really impressed with what it can do. I've been porting over my Photoshop work flows, and it has handled every task I've thrown at it. And like everyone else, I'm just looking for a little help. I've been trying to figure out the layers/channels tools in Affinity, and how to use them. I'm an environment artist and this is specific to my terrain workflow. During the production process, I've always taken my textures for a few passes through Photoshop. As part of my editing, I would use masks that I've created to edit specific areas of my diffuse texture. Example: Copy my masks into the alpha channel and start working with "Adjustments", "Layer Effects", etc. Thing is, I can't seem to get Affinity to perform the same tasks. I've checked a few of the Channels/Masks tutorials, but I just can't seem to find what I'm looking for. Either that, or I'm missing something. I have provided a screenshot of the WIP terrain, as well as the diffuse texture and masks. Any help would be appreciated.
 -
 Hi new to forum can i do vertical adjustments to correct leaning buildings+horizontal and distortion is this all in lens corrections or is there a free trial of affinity for me to try
 -
 I started using Affinity a couple of weeks ago and in general this is great to work with (I do not do many things with it) - but today I am struggling with a probably very simple problem. I just want to convert a picture into B&W by using the small adjustment button on the right and it always opens a new empty "black and white adjustment" layer - which seems to be empty and with which I just can't do anything. What is wrong with my approach? Any settings wrong? thx for help in advance
-
 When I, for example select an HSL adjustment from the bottom of the layers panel there used to be preset options show up but now they don't. Any ideas how I can get those preset examples to show again?
 -
When I add a HSL adjustment layer, everey now and then the live preview freezes. Need to close and reopen the settings window to get the live preview working agian.
- 1 reply
-
- 1
-
-
- adjustments
- refresh
- (and 1 more)
-
 This has probably been asked for a few times, I did a search but didn't see anything... would love a preview toggle tick box for filters and adjustment layers in AP. Something similar to the toggle tick boxes in the effects panel. It's a bit of a pain to have to add the layer to the stack to toggle it's effect on and off to see if you really want to commit to it. Kind of surprised this isn't part of the initial popup panel. Maybe I'm not seeing it anywhere and there already is one...? Looks like we have merge, delete and reset. Can we add preview to this please? As a side note, I've been starting to dig into the myriad of layer effects, adjustments, filters etc... and am really excited to start employing them into my workflow. Great job guys!
 -
While using various adjustment panels I noticed that the histogram is not responding in real time. There is a significant delay between movement of a slider and the corresponding change on the histogram. In fact, I have to stop movement of the slider to allow the histogram to catch up. Is this a bug? I'm pretty sure it is not my system that is slowing it down. Is there a way to adjust the response time in preferences, or in some other manner? I'm running AP beta 1.5.2. Please let me know if there is a more recent version available. Thanks.
-
HI I've been working at replicating photoshop workflow in affinity photo with great results..... The title says goodbye photoshop and I've never used photoshop but I've tried to do the same steps retouchers do in youtube for processing a photo, I never liked photoshop for its price and when I discovered affinity photo I got very excited because its great price and I wondered if I could do the same that people do in photoshop with this software. After one or two months, I think, yes I can do everything or almost....... Here one of my tests followed step by step..... https://www.youtube.com/watch?v=6QBPZ8rjQhE (Photoshop video that was being 'followed' in Affinity Photo) and the result:
- 1 reply
-
- 2
-
-
- composition
- adjustments
- (and 1 more)
-
 Is it possible to apply an adjustment to a layer without having the adjustment apply to the layers beneath? For instance I often create cutouts as part of my composite images and want to adjust their hue, contrast, etc., but I don't want the adjustments applied to the background below. In Photoshop this is the standard behaviour. How can I achieve this in Photo?
 -
 Is there a possibility to delete points on adjustment curve? I can't do that or simply don't know how.
 -
While I'm just getting to grips with Affinity, and this may already exist, the biggest stumbling block I've hit is not being able to select the white or black levels from the image itself as you can in Photoshop - as in, being able to hit that furtherest white option, and then flicking on the part of the image you want to be 'pure' white. Not being able to instantly select the background as white when what I'm mostly doing is making the background of an image white for product photography is really jarring. It's not enough to turn me away from the product, entirely because I can't afford any Adobe products, but it's definitely turned me away from using Affinity Photo for any photo I have with a white background at the moment. I would definitely rather see the final product with that level of precision in the levels adjustment layer than without it.
-
 Hello everyone, I've got a quite big file (many small objects: Spritesheets). Until yesterday everything worked fine. I multiply some sprites to tint them or make some adjustments via the adjustments symbol in the bottom of the layers palette. Since yesterday it just stopped working: If I click on a layer (vector) or group and then click "adjustments / HSL " - the window pops out. But the changes / settings I am making are not visible. They are not visible if I wait for some time. I tried to restart affinity designer / my machine - nothing works. A video showing the issue is attached. I use the latest Affinity Designer version on Mac 10.12. - I am thankful for any solutions. kind regards, Sam < edit > sorry - hopefully shows up this time: < /edit > adjustmentsAffinityDesignerNotWorking.mov
 -
 Hi guys, I am a mechanical engineer specialist in gear design, and until recently never used any graphic design or image processing software. But since I started my own company and changed my career, I did a lot of research and decided to go with Affinity. It obviously is a very steep learning curve for me, but for the most part I am making progress, even though I have a long way to go. I decided to sign up for this forum, since sometimes I just can't find what I am looking for. So here is my first post, apologies for using the wrong terms, description etc. Problem: I need to send a company who makes our shipping boxes our logo. I have the logo as a vector graphic and in color. I like to convert it to grey scale/bw. So I added an black & white adjustment. I noticed that this resulted in the logo being rasterized during export. I read in one of the forums on here that adjustments should not have this impact as long as I choose "Postscript Level 3" during export, which I did. But for some reason this does not work for me. Hopefully someone can help me and point me in the right direction. Thanks for the support and help! Oliver HappyGrun_Color.afdesign HappyGrun_Final_ShortForm.eps HappyGrun_BW.eps
 -
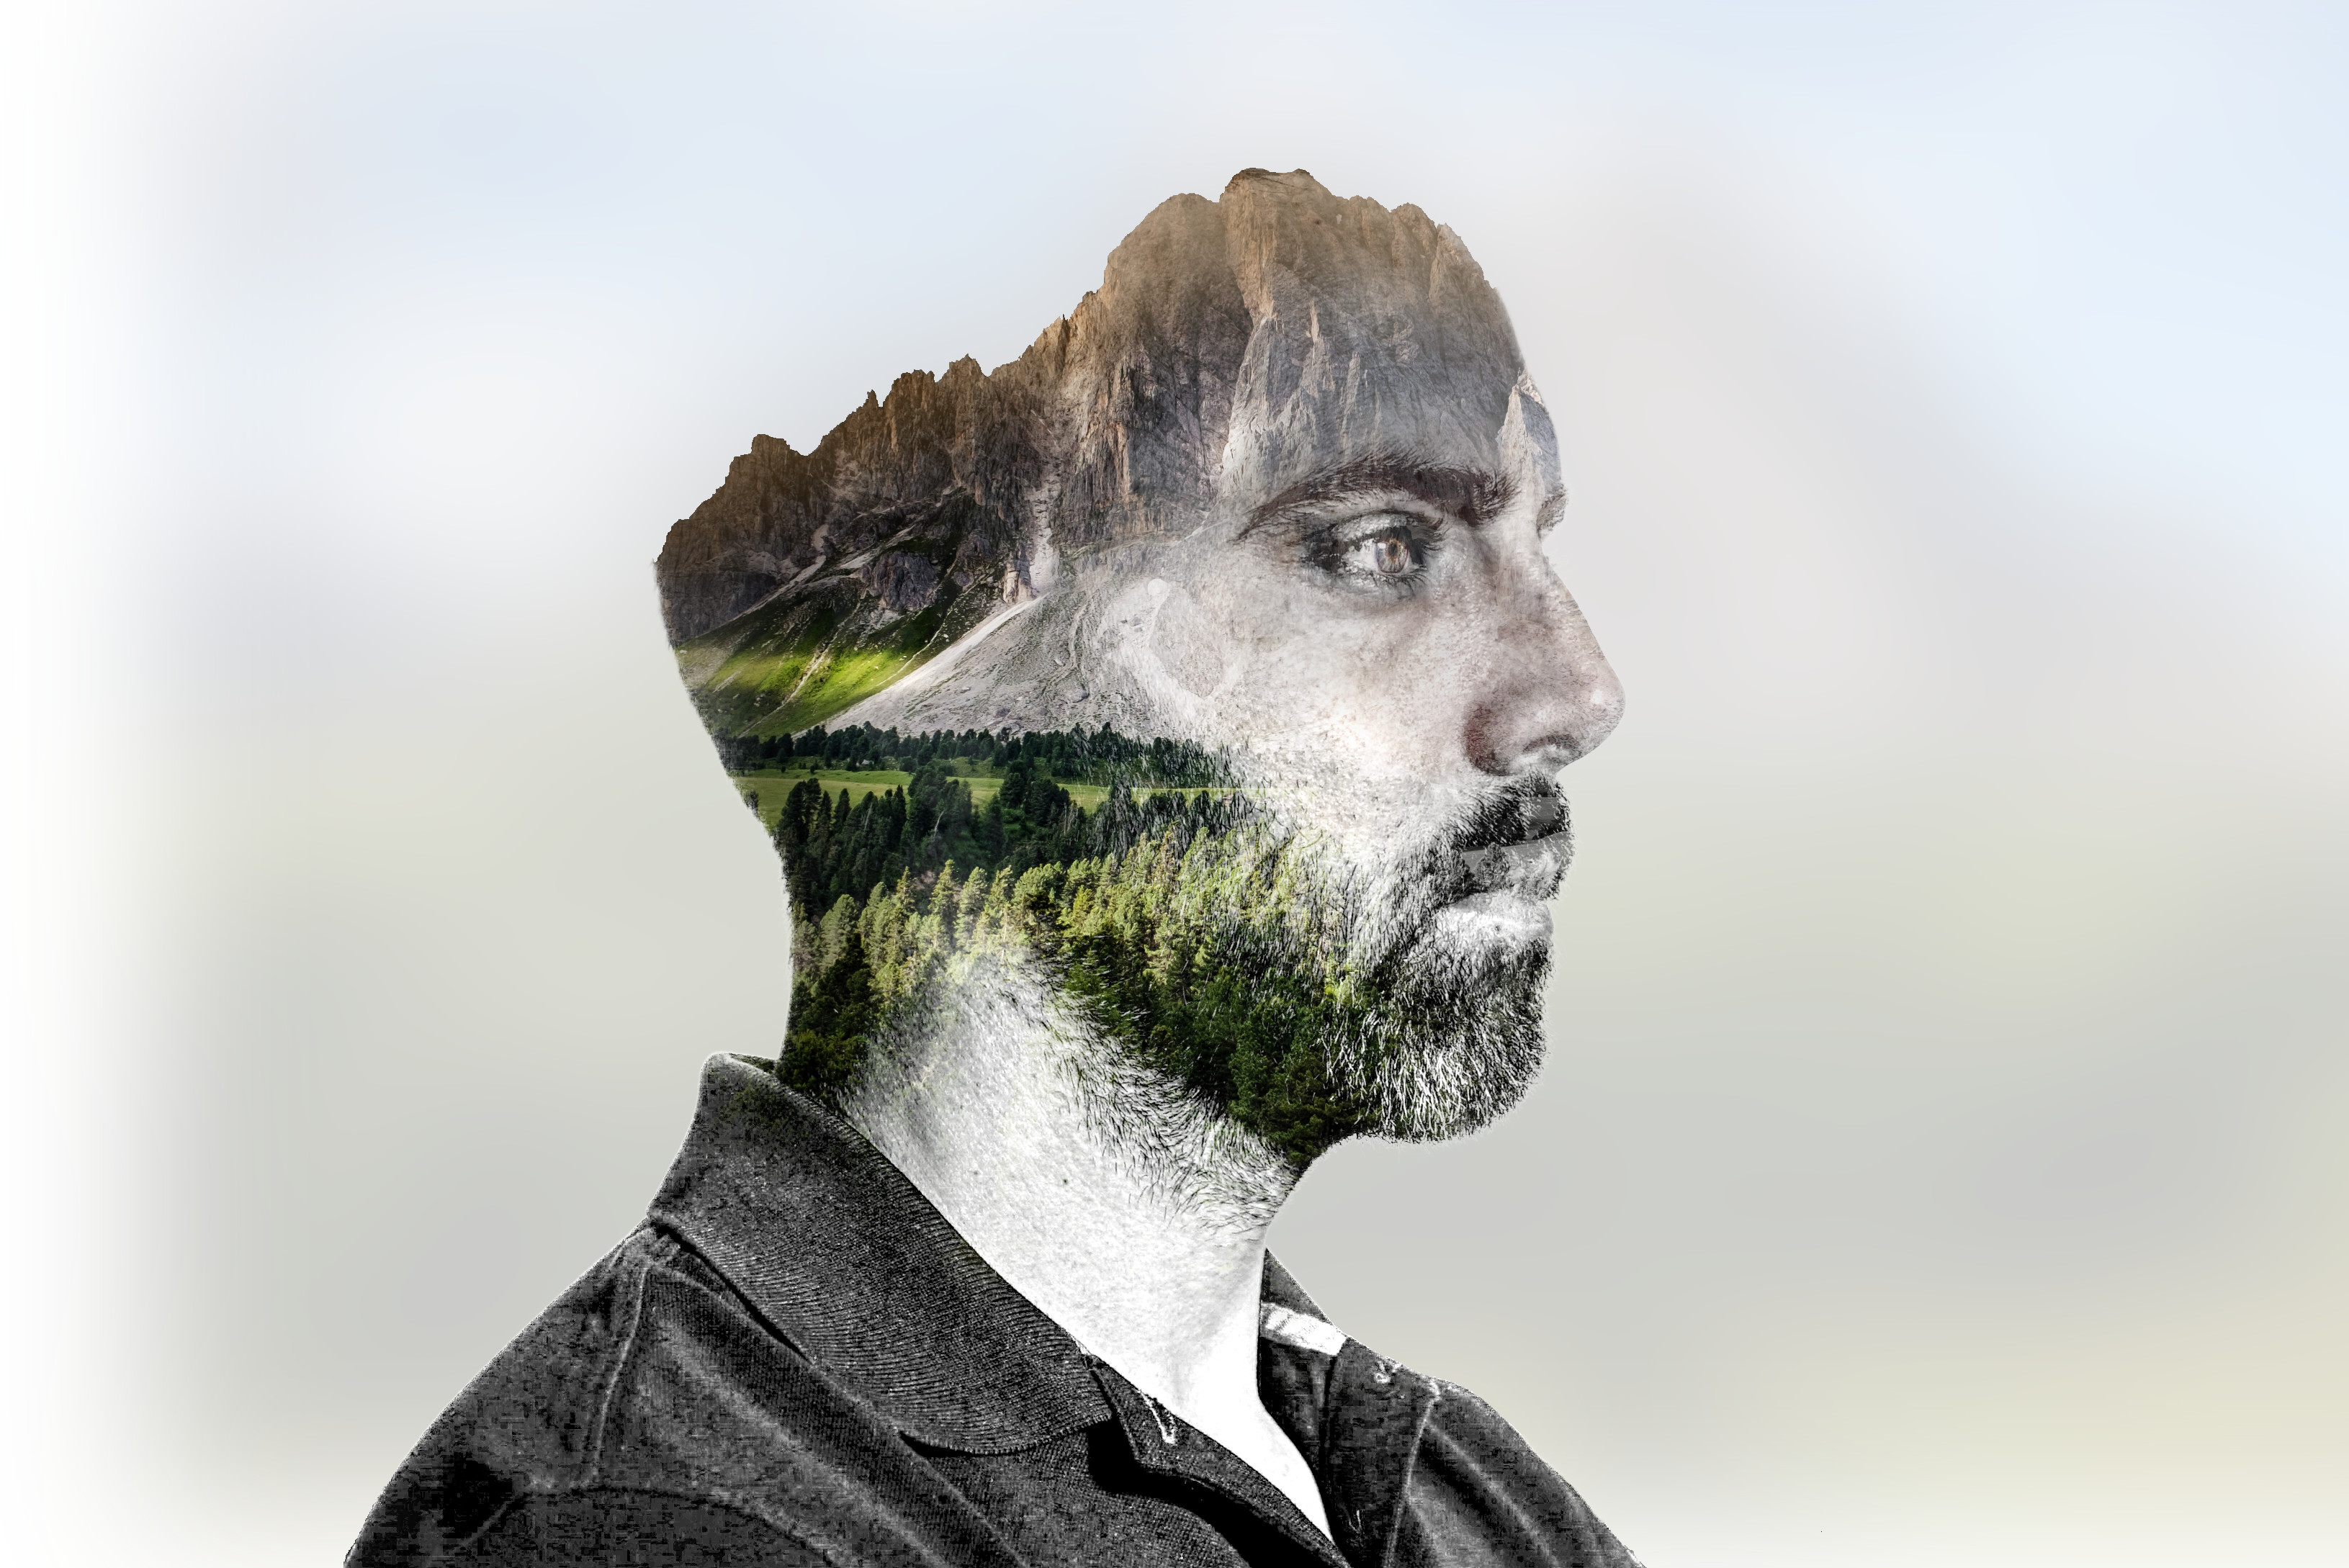
 I'm trying to create a portrait with other images showing through the image (Double Exposure Effect?) I seem to be struggling with the layer mask side of things adding in multiple textures to achieve the effect. Please can anyone assist me? Any help would be much appreciated. Thanks PP
-
You guys should create a tutorial on how to match the color and tone of any photo because I am completely lost on how to do this on affinity. I can only find videos on how to do this for photoshop which aren't much help. Thanks!