Search the Community
Showing results for tags 'Workflow'.
-
 Hello Affinity Users Group - When making a panorama, is it better to start with raw files, or tiff files converted from raw? One of the reasons I ask is that, if you make a panorama from raw files, when you click Apply to get out of the panorama pseudo-persona, it kicks you out into the Photo persona, not the Develop persona, so you don't get the chance to even use the tools in the Develop persona. So it's not clear to me what has been done to the individual raw files, and if there was even any advantage to starting with raw files in the first place. On a related note --- if you open a raw file in the Develop persona and click Develop without making any adjustments, what specifically has been done to the raw file? Thank you.
 -
Hello Affinity User Group - I repeated the making of a panorama in Affinity Photo with the same image data but with two different image formats. The first time I started with raw files, and the second time with tiff files that were converted from raw to tiff using the Sony software "Imaging Edge." My camera is a Sony a6300. The panorama made from tiff files was noticeably brighter than the panorama made from raw files. Here are the questions that I have: 1. Why does this happen? 2. Is the histogram the only difference between the two panoramas? 3. Is one way better than the other; i.e., when making a panorama, is it better to start with raw images or tiff images?
-

Live filters and smart objects
Mustardly posted a topic in Feedback for Affinity Photo V1 on Desktop
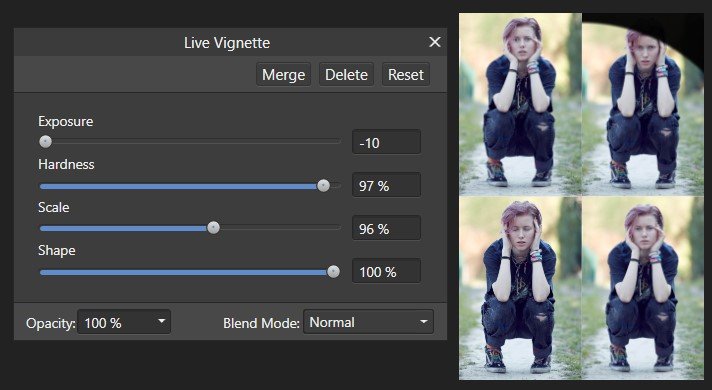
When trying to make a 4 photo collage, I wanted to find an easy way to feather the edges of the photos together, without having to start drawing shapes and be precise (to speed up workflow). I did find a work-around for it, though not very practical or speedy. But, in searching, I stumbled upon something that could be improved. When using the Live filter: vignette, the effect still applies to the whole document, even when the filter is linked to only one of the layers, as you can see in the screenshot. What are your thoughts? Have I maybe skipped a step somewhere? Also, does anyone know a good way to quickly feather edges of a layer? Only the edges I choose though. If I did not skip a step: I suggest, to improve workflow and practicallity: A dropdown menu when applying a Filter where you can choose between "Full document" or "Selected layers", so you can choose to have it logically affect only the layers/area you need. Using my own document as an example, to only vignet the top right object/layer. As an extra suggestion: the option to quickly select a layer, to convert it to a smart object that you can edit in its own document. Perhaps an extra option in the Layers menu and when Right Clicking a layer to "Edit in seperate document" Which will automatically convert the layer to a smart object, create a new seperate document and allow you to edit seperately with no extra steps in-between. Live editing of the seperate document, where the adjustments directly transfer to the main project, would be a nice added feature, so you don't need to constantly close and reopen the smart object. Though, I see how that could be more difficult to implement. I've already run into the issue several times that I need the ability to edit a smart object seperately and have read of several others that have too, so I do see a need here that could be filled, at least in a more practical/intuitive way.
-
IT seems like even basic design rules - already established by Microsoft 25 years ago - seems to be trashed by serif development ... Let's have a look at the dialog "Refine Selection". One starts to change the parameter "Border Width" ... entering a new percentage. As one would expect now the TAB key or a mouse click will bring you to the next entry field ( as defined by MS App design guide) ... maybe with every other APP following the MS Design Guide but not Affinity. Of course AP pretends to switch to the next edit field "smooth" ... until you press the next number key (expecting to change the value for "smooth") ... suddenly the layer opacity changes to whatever number you typed. Brainy AP took the focus away from the entry field to "live" update the latest setting changes - without giving it back to the field. So keypad now defines the layer opacity instead of changing the edit field values. You manually have to click in the entry field (again!) to change the "smooth" value ... and you have to repeat this really annoying procedure with every setting within the dialog field. To trick users the edit box for values even pretends to be active ... but of course isn't. So you end up in a mouse clicking marathon to change 3 edit box values. Seeing that even after 4 years of development Affinity hasn't managed to save dialog box values and setting as set the last time used (REALLY??) you have to start this procedure over and over again with every selection that needs to be refined. To be very clear: I like the idea of life updates when you change parameters but don't sacrifice essential workflow behaviour for it! And regretfully this is only one small example for a screwed up workflow ... I'm really happy to support you improving your workflow. Just don't keep ignoring it as you did in the past ... Cheers, Timo BTW: https://docs.microsoft.com/en-us/windows/uwp/design/
-
Hi. I'm using Affinity Designer for all my identity design and as I have a lot of iterations of artboards in every document, I always need to number manually each artboard which is very time consuming. It's even more complicated to update all those numbers when you delete/add artboards to that same document. An option for an automatic numbering would be awesome. I'm always ordering my layers so that my PDF export is correct, so if I wouldn't have to rename all the artboards, wow, would be great. N.
-
 I think the biggest issue I'm having with the Affinity Suite is workflow. I've seen a number of reviews and tutes on individual programs but not many of either on how to integrate them into your workflow. The integration between the three apps are their strongest feature at this point, but changing a decades long workflow from distinct programs that work together to what is essentially one program with three (mostly) separate modules is something else. In addition some of the in-house decisions as to what features are present or missing from each app is a source of frustration for me. Case in point: I'm creating single page document with a pixel image, some text and some vector based graphic elements. I started the graphic in Photo, works great. I love the way it handles text and vector elements. Then I wanted to add a stroke to the text. There's no Stroke panel. I can add an outline color to the text but I can't adjust it's width even though I can make those adjustments to a vector object. So I sent the file to Designer just to adjust the stroke. Yes I know I can add an Outline in the effect panel but I wanted an outline and a stroke. A technique I use a lot. Now I have two programs open just to adjust a stroke. Did I miss something? I like the update for PSD smart objects in Photo. I mostly use smart objects to add non destructive Topaz effects to an image though. I still can't do that in Photo. So I thought to myself "what if I linked the PSD file in Photo or Designer?" Then I can go back to Photoshop and adjust the effects if necessary without reimporting like they did in the olden days. But no, neither app supports linked files, only embedded or pixel images. So I sent the file to Publisher, linked the file, and opened it back up in Photo. It appears as a link file and now I have three programs open though the technique appears to work. Did I miss something? I like to make iterations of a layout so I can try different things and still be able to go back to where I was. I like Designer art boards for that. They act like objects that can accept effects, are easily resized and can be sliced and exported for different purposes. The art boards show up as expected in Photo but sending the file to Publisher results in both the boards being on a single page. Hmmn. Something to keep in mind. And let's not even get started on the lack of auto-hyphenation in Designer. I think I understand Serif's challenges with this suite. This modular software approach is unique, in the graphic design space at least, and they're trying to sell single apps while still keeping incentives to buy the other packages. I believe they could easily cram every feature from each program into one huge and complicated app if they chose to. I don't think anyone would want that. So they're picking and choosing which features to add or subtract from each program. I many times disagree with their choices but understand that they're blazing a new trail. Unfortunately I end up with all three apps open and they all look the same and it can get confusing as to which simple feature is in each app or present in Designer's pixel persona or present in Studio Link when using Publisher. I just had to shut it down and walk away for a moment. So I'll end where I started with a suggestion to Serif as well as tutorial creators to try and help us better understand a workflow where the apps can work together and for Serif itself to pay close attention to how artists want to work and their suggestions in that regard. Sorry for the long post. Peace.
 -
 Many printers/publishers provide downloadable PDF export settings in Acrobat’s joboptions format. My wish: make Publisher (or the whole suite, respectively) able to either import these, or export their own export settings file.
 -
 Affinity is a good photo editing program but it does not include any functionality for organizing, tagging, or easily re-titling images. That's OK, it is a specialized program for editing, not organizing. I was wondering if any Affinity users have recommendations for photo organization programs. Bonus points if they are free or lo-cost. I used to use Google's old program Picassa, which I liked a lot, but I have a new laptop and it is no longer supported. I take a lot of nature photos and I like to be able to record things such as what species I observed, where it was, what it was doing, and other notes along with my images. I don't know if this is an appropriate forum for this question, but I figured it was worth a shot! Thanks, Alexis
 -
 How can I display thumbnails in the bottom of the works space so I do not have to open and close each file? Opening and closing each file takes way to much time when editing hundreds of images from a photo shoot. I do not see any indication of this ability in the help area. RJ
 -
 HI, I'd like to better understand how to best implement an ACES workflow in Photo for 3D still EXR renders. My goal is to be able to work in the expanded colorspace that ACES provides for editing and be able to export my images for print (with an AdobeRGB profile) and web (sRGB). I'm currently using Octane as my render engine which at this time will only render to the sRGB primaries in linear EXR format. ACES is planned for the upcoming release however so I'd like clarification on 2 scenarios. If anyone has deeper insight into this I'd really appreciate the feedback. I watched the Affinity Photo OpenColorIO video (https://affinity.serif.com/en-gb/tutorials/photo/desktop/video/329071149), but trying to apply this process with ACES just added more confusion. @jamesritson this would be a great topic for another video! (also thanks for creating all of the tutorial videos, they're well done and very helpful!) Scenario 1: Converting a linear (sRGB) EXR render to ACEScg for editing and then exporting either an sRGB for screen or an AdobeRGB image for print As far as I understand it, there are three components to this process: Setting your color preferences OCIO config file to the ACES config (I'm using the latest 1.0.3) The 32-bit Preview panel Display Transform The OCIO Adjustment layers For the 32-bit Display Transform, what do I need to set it to in this scenario? With ICC it looks exactly as it did in my IPR in Octane. Following along with the video this would seem to be the right approach, but in the video he's using Filimc Blender which I behaves differently from ACES and I'm wondering in this case if this same approach (ICC display) works properly when converting and editing in ACES. With the 32-bit Preview OCIO Display Transform set to sRGB (view transform) and ACES (device transform) it looks darker and more green. (my screen is calibrated to sRGB), though the exposure adjustment behaves completely differently for OCIO / ACES and is much smoother as I would expect than when the DT is set to ICC. I'm assuming that the green tint is due to the fact that I hadn't added an OCIO adjustment layer. When I add an OCIO Adjustment as Source: lin_srgb, Destination: acescg the tone balances out, but the overall image is darker. I'm assuming that this is the look of the ACES transform on a linear sRGB image, but I'm not certain I'm setting this up correctly. For the OCIO Adjustment layers what would be the correct setup? From what I understand I need one OCIO layer to specify the input source type and destination type which I set as lin_srgb and acescg respectively. Then for the output I would create another OCIO layer and set it to the reverse?.. Source: acescg, Destination: lin_srgb? How would I export to AdobeRGB or another space like ROMM in this scenario? Scenario 2: Opening a linear EXR ACEScg render for editing and then exporting either an sRGB for screen or an AdobeRGB image for print I'm just future proofing here and bloating this post, but assuming that Octane updates this year with an ACEScg render option would I just append an 'acescg' siffix (my_render-acescg.exr) to the file and open it in Photo? Do I need to add an import transform OCIO layer to specify that it's ACEScg or do I just create an out transform layer? Finally 2 last questions: I'm assuming that all of my image adjustment edits will be done between the input transform OCIO layer and the output OCIO layer, please correct me if I'm wrong.. If I open a multi-layer EXR with multiple render passes, do I need to create an OCIO Adjustment layer for each pass layer or will one at the top be enough? Thanks for bearing with the 1000 questions here and I greatly appreciate any insight I can get on setting this all up correctly!
 -

iPad workflow advice please
Topcat374 posted a topic in Pre-V2 Archive of Affinity on iPad Questions
Hi, Apologies if this has been covered elsewhere but am struggling to piece together a solution for my circumstances so any advice would be appreciated: I’m trying to move most of my editing workflow to my iPad (6th Gen). I haven’t used Affinity before (just PS Elements) but it seems like the best app for iOS. The difficulty I have is that I can’t store any of my images locally on the device (it’s a work iPad) so need a purely cloud based workflow. The images will be captured mainly on a Nikon D7000 and will be a mixture of JPEG and RAW (mainly JPEG). From what I’ve read, a mixture of Affinity for iPad and Dropbox seem to be the best solution for this, opening photos for editing rather than downloading them...is that right? Many thanks. -
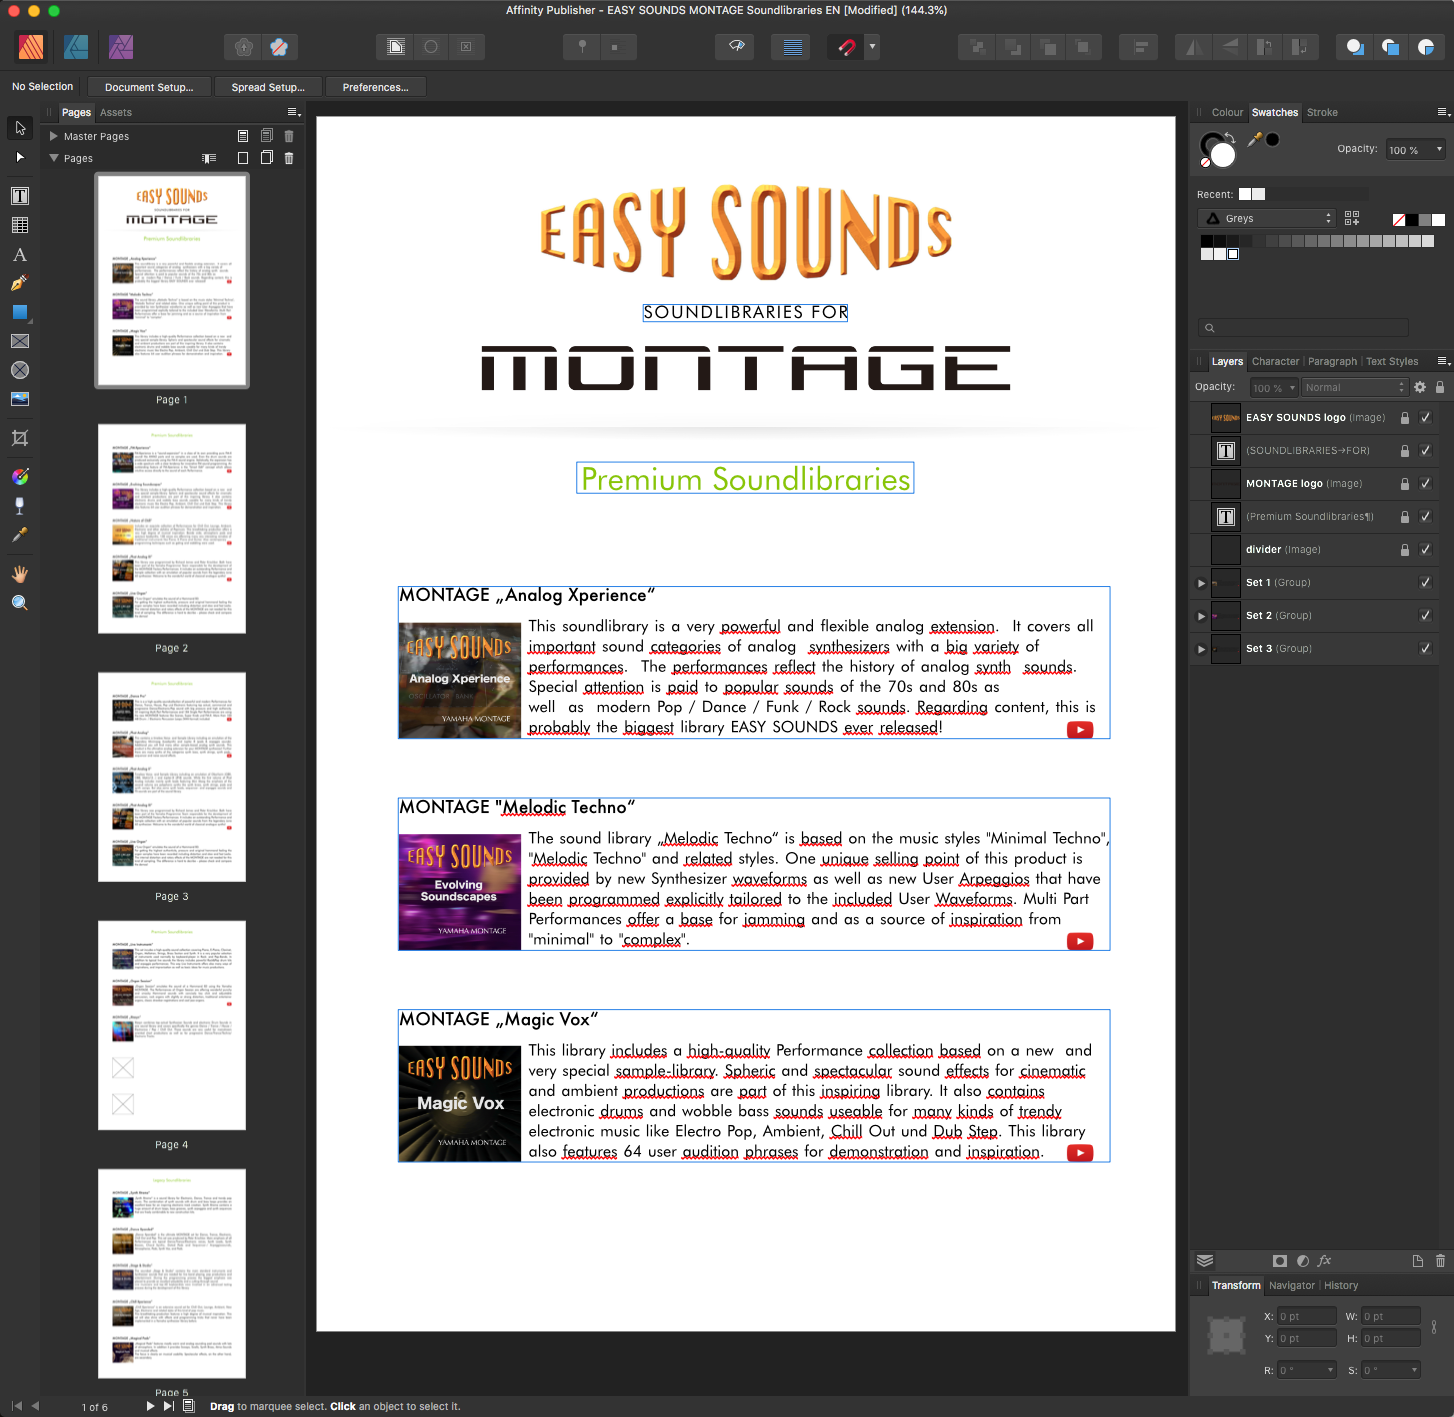
 Hey all, I wonder if there is a way to move content over different sites. I created a document with an overview about products. Each of this sections (groups) on the page contains text as well as two images. When a new product has to be added it should be on position 1. This means I ideally like to move all other products over all pages one step down and insert the new one on top of the document. Of course the movement has to be precise so that the relative positions of the products over all pages stays the same. A screenshot is attached, which hopefully helps to make clear what my goal is. Is there a way to realize it without the need to move each and every of the sections manually? Thanks!
-
 Hi! I'm struggling to to do this – https://www.dropbox.com/s/npwdnrt7meqdax3/AFT_ScreenRecording - 20190702_1935.mov?dl=0 – in any of Affinity software. Am I missing something? Lack of a solid transform tool feels to me like a deal breaker. Best regards P.
 -
A very plain wish: When the focus is on the "Pages" panes ... it would feel natural to me to scroll through the pages with the cursor keys ... but by the looks of it there is absolutely no way to use keys to proceed to the next or previous page. Even enabling the "End" and "Pos1" key would be nice. Maybe this functionality could even be active if the the main window is active, you have the "Move" tool selected and there is no frame selected ?! Aside that I find it very hard to recognize what is the currently active page. This thin frame marking it is hardly visible - even harder, when the content of various pages is layoutwise pretty similar. So it always takes this extra-extra effort to find out on what page you are on in the page panel. Cheers, Timo
- 8 replies
-
- 1
-

-
- pages panel
- workflow
- (and 1 more)
-
Hey there, I am coming from softwaredev and really would love to see a fuzzy finder in Affinity where I can find all the tools by using just one single shortcut which opens the search bar. As a ref I just put in the fuzzy finder gif from GitKraken, also a very cool piece of software.
-
 A couple days ago I asked about the value of pdfTool in a Quark forum. One comment was unexpected in that they pointed out that the tool is especially good for adding to a Publisher workflow in that it hasn't been around as long and may need a little more help than mature products like Quark and InDesign. That one perspective alone almost justified it's $500+ price tag. I wanted to know have other people found that those two products work really well together? Publisher is the only tool in the suite I haven't explored extremely in depth and I haven't even installed pdfToolbox yet. I like how Serif keeps the price low which allows for workflows like installing it on non-designers computers as I mentioned a couple days ago. Since the work in my company needs to pass by me the more expensive product (pdfToolbox) only needs to be installed on my machine. At first I didn't understand the very low pricing that Serif was doing but now it makes sense. I have even grown to like the name in that it may confuse some Microsoft Publisher users to accidentally start using Serif Publisher.
 -
I was having this discussion with Mike Wenzloff in a Quark forum yesterday which was a great help to where I may go with this workflow. I wanted to ask the same question here to see if there is any serious pitfall I am not seeing among other Affinity users. I work for a company that does a lot of basic layouts; brochures, badges, mailers. I would like to buy Publisher for their machines so that I could just send them a Publisher file in Dropbox and they could change any text right from the program. They currently do this with MS Office files so it seems like moving to this workflow with our advertising would make as much sense. I'm on Mac they are on Windows and some also use iPads if Publisher comes to iPad at some point. Is anyone else doing something similar to this? Having that low price opens up workflows that I haven't tried before. I am also planning on incorporating other tools like Slack and Dropbox in this workflow.
-
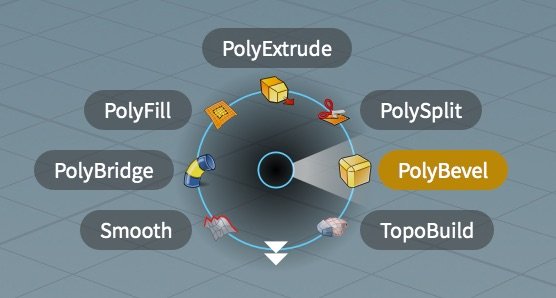
 Hi guys, I want to bring a really nice suggestion that can be really time saver while dealing with "switching things" or anything like that, we can bring the most favorite brushes/tools in our right click, like a radial or square menu, I think this gonna save a lot of time for us that work professionally, please just let me know if this can be possible to have on future versions coming soon I'm glad to know that I'm almost 100% working with Affinity Designer , I want to quit from adobe monopoly asap regards, Jhonatan
-
 Todays: Workflow and WINDOWS (putting all my critics in one thread seems to overtax you - since 90% gets lost) - if you resize (zoom in/zoom out) the content of an undocked window can you please resize the window accordingly. (if the resulting content is smaller than the workspace of the screen, adapt the window accordingly, if the content is larger, maximize the window frame with scrollbars) - If you zoom a view too 100% the position of the content seems to be "random". Please instead center the content and resize the window accordingly! (I know you can do it since you do it with the "fit window" view as well) - having all windows floating a new document should start in floating mode as well - when selecting "float all" the content of all windows should be centered and not randomly put somewhere over the screen - (one is happy to find the content at all). Window size should be adapted to content. - One should be able to drag and drop a layer from one document into another document (not just with CTRL+c CTRL+v). Additionally: when trying to drag and drop the user gets the impression It would work based on the way the cursor changes when you drag a layer into another document - but in fact nothing happens. - ESC still does not cancel essential operation e.g. cropping Most of these bullet points have been mentioned many years ago even though they are absolutely crucial workflow topics. And we are not talking complicated additional features and rocket science - we are talking absolutely BASICS! You just simply ignore them. People that seriously try to work with the software are not of interest for you guys - what upsets me. I keep bringing them up every 6 month what seems to be a complete waste of time. I would roughly guess that AP takes up 30%-40% additional mouse-movements, keystrokes and actions to get to the same results as PS does JUST and purely due to your extremely poor workflow and handling issues. And we all know that time is money. Cheers, Timo
 -
 I hope the devs take a look at this issue. With the new gradient tool apparently the last point of the gradient prompts the tool to bring up the colour wheel but this tool has many other aspects such as opacity, accumulation, distance sliders, placement on continuum, all of these are important to gradients. In order to have all of this to work with one needs to take the extra step to click on the layer to bring up the window that contains all the above including the ability to choose whichever colour scheme one desires to work with. Personally this is an extremely annoying issue and a step backwards. This tool should not dictate the workflow.
 -
 I'm trying to speed up my workflow, I know in other applications you can copy/paste/sync adjustment settings in RAW to another image, is this possible in Affinity please and if so how/where do I find the option. Thanks in advance.
 -
 Hey, I was wondering if anyone had figured out a way to use a mask, or a z-depth image to blur an image? In Photoshop you can use a black and white image to partially blur an image, to get a narrow depth-of-field effect: I've already tried to use a full-image blur with a mask, but that gives 80s-esque halo effects. The halo is there because the whole image (BG+dress) is blurred, while the dress should not be taken in to consideration for the BG-blur. It is quite noticable around the dress here: Anyone have a usable method for this effect in Affinity?
-
Hi, I write few pages about L*a*b* worflow for trying promote this space about decoupling Color & Lightness in L*a*b* here Lab.pdf this macros is on 1.7 version , not compatible with 1.6 Lab.afmacros Just read this answer Nothing new reinvent the wheel... But perhaps, some one, may have better understanding of this color space and more easy color apprehension, more easy color manipulation Sorry for my bad english, not my maternel language Have fun
-
Publisher beta V1.7.249, I have just re-set a 200 page illustrated book I did a few years ago using Indesign. Typesetting requirements were about as demanding as it gets and Publisher passed with flying colours. Just a few refinements and Publisher would become my default pre-press system… 1. Scroll bars: Both Publisher and Photo: Yes, keeping down visual clutter is so important but depending on the view often these bars are almost impossible to see, appearing almost the same color as the background. I find I have to stop work to go hunting for them. 2. Guide Manager: I don’t like filled in columns as guides because it changes how images display. Unfortunately, the option to display guide outlines only works for the current session, upon reboot tit defaults to the filled option. 3. Resource Manager: If I remove images from a document and linked folder Resource Manager thinks they’re still there. Every time I boot it tells me they’re missing and asks if I want to locate them. 4. Move Tool: Shortcut ‘V’ will not work if I want to switch from Frame Text Tool mode, I must manually select it…slowing workflow.
-
 Hello how do I set up an extension so th I can open Affinity directly from Apple Photos on my iPad, make edits, and save right back to my Apple Photo Library? For example, PS express and other apps work seamlessly like this. Thanks. Dan