Search the Community
Showing results for tags 'Vignette'.
Found 18 results
-
 Do you want to move beyond the confines of the built-in vignette in Affinty Photo for iPad with all of its limitations? In this video, I show you how you can easily create a fully-customizable vignette. You can also download the macro version of this vignette for free.
-
- 1
-

-
- affinity photo
- ipad
- (and 2 more)
-

Live filters and smart objects
Mustardly posted a topic in Feedback for Affinity Photo V1 on Desktop
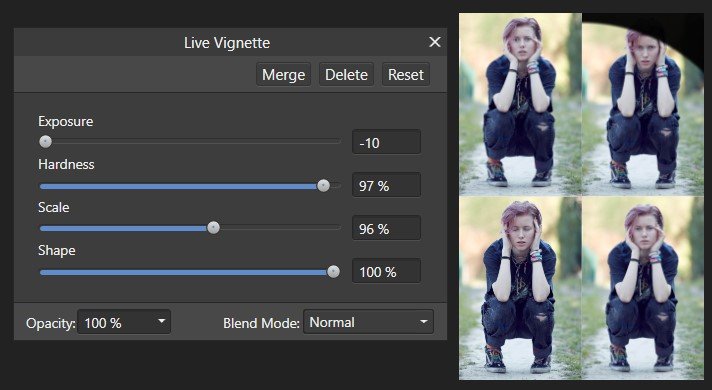
When trying to make a 4 photo collage, I wanted to find an easy way to feather the edges of the photos together, without having to start drawing shapes and be precise (to speed up workflow). I did find a work-around for it, though not very practical or speedy. But, in searching, I stumbled upon something that could be improved. When using the Live filter: vignette, the effect still applies to the whole document, even when the filter is linked to only one of the layers, as you can see in the screenshot. What are your thoughts? Have I maybe skipped a step somewhere? Also, does anyone know a good way to quickly feather edges of a layer? Only the edges I choose though. If I did not skip a step: I suggest, to improve workflow and practicallity: A dropdown menu when applying a Filter where you can choose between "Full document" or "Selected layers", so you can choose to have it logically affect only the layers/area you need. Using my own document as an example, to only vignet the top right object/layer. As an extra suggestion: the option to quickly select a layer, to convert it to a smart object that you can edit in its own document. Perhaps an extra option in the Layers menu and when Right Clicking a layer to "Edit in seperate document" Which will automatically convert the layer to a smart object, create a new seperate document and allow you to edit seperately with no extra steps in-between. Live editing of the seperate document, where the adjustments directly transfer to the main project, would be a nice added feature, so you don't need to constantly close and reopen the smart object. Though, I see how that could be more difficult to implement. I've already run into the issue several times that I need the ability to edit a smart object seperately and have read of several others that have too, so I do see a need here that could be filled, at least in a more practical/intuitive way.
-
For your pleasure...I have been busy working this vignette thing again, and I think, this is getting somewhere. Completely different approach to achieve a more controllable experience in every way to the gradient macro workaround, and well, much, much, more. First, this macro/procedural texture is set up for a round gradient. Like the original, it applies perfectly to vertical and square images. To center the gradient on a horizontal image(should not be off by much), double click the procedural texture layer and use the crosshair over image to drag and reposition. The controls will allow the complete control over shape(horiz, vertical), size, gradient, etc. If you want an old fashioned mask layer, set blend mode to normal and opacity to 100 percent, merge visible, turn off procedural texture layer, invert merged layer, reset new blend mode to multiply, set new opacity to taste. Of course, that is just for the black gradient vignette...the possibilities are in the experimenting... Red, green, blue (0,1) controls the entire image the same as normal R,G,B sliders to mix color. Red, green, blue (-1,1) controls radiate from the gradient center. Layer opacity 50% blend mode subtract. (R255,G0,B0) (R0,G255,B0) (R0,G0,B255) (R,G,B=255) (R,G,B=0) size 5 red 100,0,0 redt shift more redt shift intensity 2 ring 3 shift +redt shift +grnt shift 25% trans 50% soft light 50% vivid light 50% soft light T V - VIGNETTE PT R,G,B V2.afmacros T V - VIGNETTE PT R,G,B V2.1.afmacros T V - VIGNETTE PT R,G,B V2.2.afmacros T V - VIGNETTE PT R,G,B V2.3.afmacros *** V2.1 Adds three (R) ring progression controls (over the 10/10/10 fixed spacing to g(R)/h(R)/I(R)) (these could be enhanced in two ways; adding a scale factor control to each of these (R), and or add controls gr(0,1)/gg(0,1)/gb(0,1), etc. to create some enhanced color variations. *****V2.2 Reorganizes, relabels, restructures formula. Added ring scale (R) controls. Macro setup for center horizontal photo, slightly offset in vertical. *******V2.3 Corrects black gradient with invert. ++> future needs for this is a control to rotate. - Ultimately, a way to control color choice, order, midpoint, etc.... V3.0 New formula, more with less...radial, linear, R,G,B offsets, etc. While getting this together this AM, practicing the new fad of social distancing, TV on, and a nugget pops up with Joan Jett +3 in different locations, jamming a song called 'New Light of Day'. Starts off kinda slow and wonky...gets going and wow, grooving on an inner plane, I am feeling energized. Nice start to the day, so, here you go, another round of jamming... Macro is set for normal vignette start. These are additional examples of new effects... elliptical radial offset radial offset horiz linear vert linear vert linear ofstxy(-250,0,250) xy(0,500,1000) radial horiz linear radial elliptical 1 elliptical 2 vert linear -1 -2 T V - VIGNETTE PT R,G,B V3.0.afmacros T V - VIGNETTE PT R,G,B V3.1.afmacros T V - VIGNETTE PT R,G,B V3.2.afmacros V3.0 notes to do... 1) Control for Sin/Cos factors. (This would control gradient and size...) (getting addressed by differing formula with contrast controls) 2) Rotation...have found h/v shift / skew formulas...( /w turn this 45degrees) 3) Offset scale factor control( +50px, +100px, (?))(done) 4) Contrast-luminosity-brightness/hue-saturation-intensity controls(?) (This would control gradient and size...) 5) Create variables for functions...(simplification of repeatable formulas, offset scale factor control...) ***V3.1 Creates variables, adds hss(R) horiz shift scale and vss(R) vert shift scale (offset scale factor +50px) *****V3.2 Created vsb(R) vert shift blue and hsb(R) horiz shift blue to move it from a fixed position. >Thinking out loud - Of course, this is a work in progress and I have no idea what I am doing, just following this down the rabbit hole...This is about procedural texture right now. When its done, it will be all about Blend Modes...more coming... Enjoy and Experiment, - T V (this is really a toast to 3 individuals for sharing procedural texture videos for affinity photo...I could use some help there if someone wants to demo this...) Please feel free to comment, as this will also help others expand their comfort zone! A mind is a terrible thing to taste...😉 If you want more... go see Graphicxtras.com on YouTube! I am on a new formula, starting from Linear gradients, that is looking promising as an upgrade. I have some shifts/skews to add, and we will just have to see... Hope someone out there finds this entertaining at least. When I am moving the dials one click at time, the new possibilities just keep going...why this gradient thing? Never thought I would still be diving deeper into this, but, here I am...MORE PROCEDURAL TEXTURE PLEASE! Yes I am going to have to make a macro to generate examples for posting...
-
 Like the title say it is simple. I applied a vignette live filter and started to erase excess using brush tool with black color but APhoto crashed, it did happened twice on a normal JPEG file. Maybe it is a known bug for this beta, would be great to have it fixed. Blessings
 -
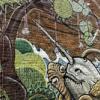
 If the photo has all four corners bright, and the vignetting becomes evenly dimmed, the automatic correction is successful. However, if some corners are dark, the automatic correction is unsuccessful - it causes unnatural lightening of the dark corners, and must be turned off. Like this Therefore, it would be advisable to allow adjustment of the correction intensity in individual corners.
 -
 I am trying to add a vignette to a png. I can make it black and white but however I apply the vignette nothing happens to the image. Is it because its a png?
 -
 Just as an exercise, I decided to explore ways to create vignettes with Affinity Photo. I stopped after identifying 20 methods. Attached are my notes for your pleasure. Affinity photo Vignette V1.pdf
 -
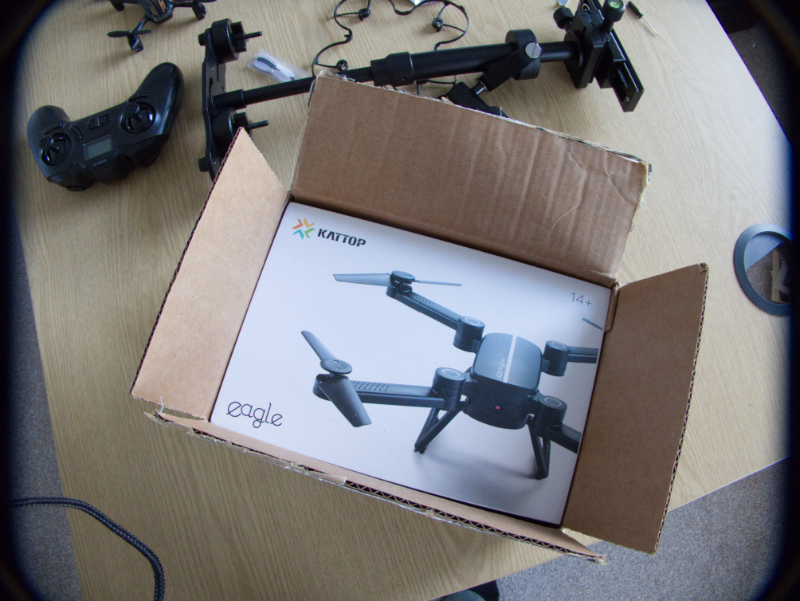
 Just got AP and first impressions are v good (previously years of Photoshop use). Tried processing my first raw file however and the image has a dark vignette at the corners. Never had this problem in Photoshop so am initially surprised and at a loss as to what is causing it. Previews ok on my mac. Any help would be greatly appreciated. Apologies if this is posted in wrong section - am first time poster. Also am I correct in assuming there's no direct support, as I just got directed to the forums when I clicked on the support tab? I've attached a small jpeg of the file in question.
-
I have returned to trying Affinity after quite a while as when I first tried it I just could not work it out, (guess the learning curve was too steep for me back then) but now I am determined to conquer it as I refuse to pay Adobe any more. Bearing this in mind please treat me as a newbie! I lke to apply a vignette to most of my photographs and in Lightroom I had a preset of -11 to do it with a click of a button but I am bewildered how to do this in Affinity, I can’t even find a vignetting tool! Also can anyone point me to where I can learn about presets in Affinity please? Many thanksl for any help. Cheers.
-
 Affinity Photo on Windows v 1.5.0.45 I'm attempting to apply a vignette to an image which has been cropped off-center, but when I apply the vignette it is centered on the original photo's center, not on the cropped image's center. See the attached image for details. (The vignette has been exaggerated to highlight the problem.) Am I doing something wrong or have I discovered a bug?
-
 hi I'm new to this and would like some help, I can't get vignette to work on any picture that i import. I've tried putting the live layer above, on and under the background and other layers, nut its just not happening. love some help on this cheers
 -
 I can do 'Post Crop Vignette' but how do I place it where I want?? Göran Sweden
 -
 I am getting banding when creating a vignette with a stacked image. I am unclear what to do based on what I have been able to find in help or online.
-
Would love to be able to adjust where to place the center of my vignette, using the Live Vignette filter. Often the area to emphasized is not in the center of the image.
-
 Hallo, in diesem Affinity Photo Tutorial zeige ich wie man eine Vignette erstellt. Zu den Bildkorrekturen im Vorspann: Wie das geht habe ich im gesonderten Tutorial „Belichtung & Tonwertkorrektur“ gezeigt. In this Affinity Photo Tutorial, I show you how to create a vignette. And the previous photo corrections: I did a separate video „Belichtung & Tonwertkorrektur“ (aperture & curves). Ciao Jack www.youtube.com/watch?v=SPQVQ0UyfFA www.youtube.com/watch?v=SPQVQ0UyfFA
- 5 replies
-
- 3
-
-
- Affinity Photo
- Tutorial
- (and 6 more)
-
 Hi, I've been using Aperture for several years, but need to replace it with a new photo editor. I downloaded the trial of Affinity and wanted to try out the program before buying it. I'm watching the For Beginners video on Vimeo and trying to duplicate the actions on my own photo. I got to the Inpainting Brush and Vignette, but nothing happens when I try to apply them to the photo. I was able to use the other adjustments mentioned before this on the video. What happened?
 -
 This is a way to do a little more creative vignette effect. You get lots of control over how and where you want the effect. If you've made it on one picture you can simply copy it to other images. Cheers :)
 -
 I've been playing around with the vignette filter in AP and am wondering if it is possible to move the clear part of the vignette to somewhere other than the center of the image. Is there some kind of work-around that I can use? Thanks