Search the Community
Showing results for tags 'Vector'.
-
In order to get ready and prepared for Xmas, I share this time one of my XMas card & envelope vector designs for the Affinity forum community. The Xmas envelope which already contains a mounted in Xmas card design looks like this ... The Xmas card design used looks like this ... You can of course customize these to your own individual needs. You will find a bunch of Xmas related assets to place onto Xmas cards and the envelope for example under some of my other resources contributions, see therefor: Retrospective of resources contributions Here are the Affinity Designer related files for download (which can also be (re)used in the other Affinity apps): xmas_envelope_card_merry_christmas.afdesign xmas_greeting_card.afdesign Have a good time over Xmas!

-
 I never noticed this before and I wonder if this is a design decision ... Is there any good reason why the Stock panel browsing pixabay in Affinity Photo has no vector checkbox? Edit in AP from within AD is an additional step, so ...
 -
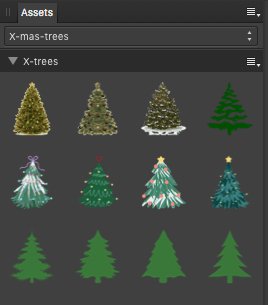
Some this year (2022 and again last minute) Affinity Designer v.1.10.5 based Xmas trees as vector assets. The assets file: x-mas-trees.afassets You will find a bunch of other Xmas related things under some of my other resources contributions, see therefor: Retrospective of resources contributions Have a contemplative and peaceful Xmas time!
- 1 reply
-
- 7
-

-

-
- xmas trees
- vector
- (and 2 more)
-
 Hey guys! I'd like to share a Special Christmas tutorial for beginners that wants to learn more about Affinity Designer 2.0 and also my workflow. In this episode, you will learn Sketch techniques Values for shadows Blockout freehand vector Basic Coloring If want to learn Affinity and Illustation, This tutorial will be a very great addition to your skillset
-
- 1
-
-
- affinity designer
- tutorial
- (and 1 more)
-
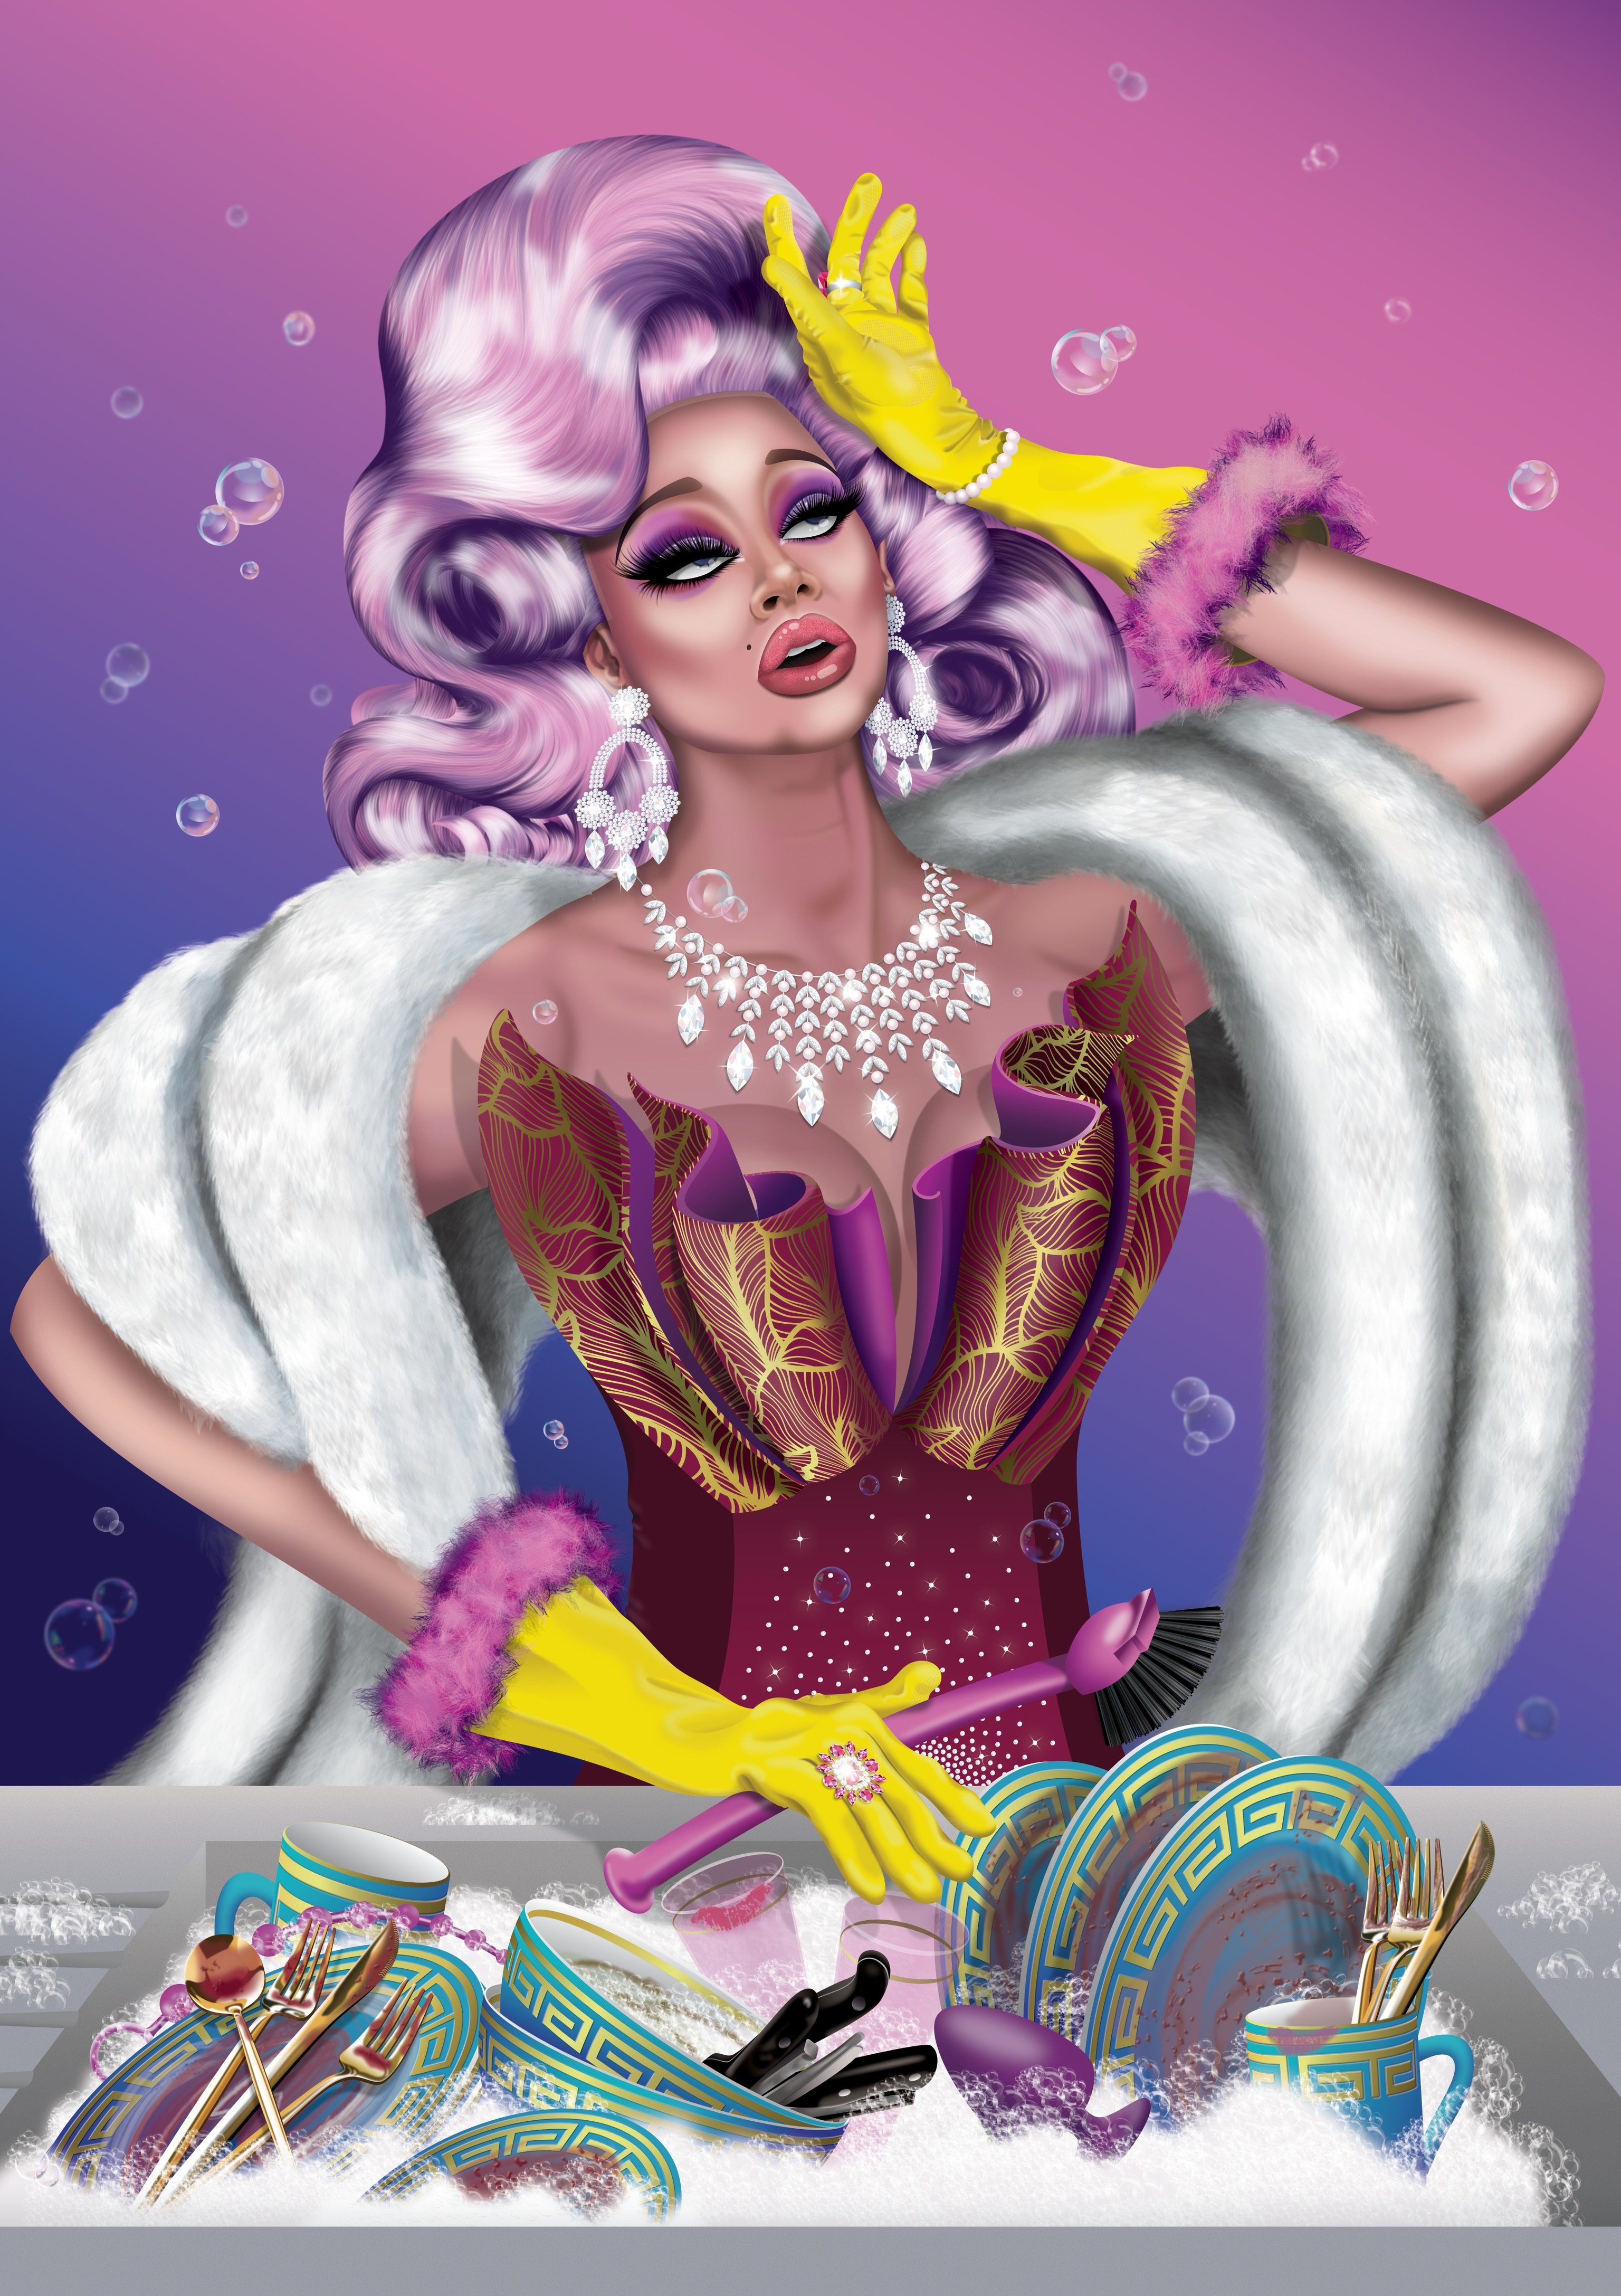
 I’ve been working on a series of pieces featuring ludicrously over-dressed drag queens doing the housework (my “Domestic Goddesses” series). Here’s the first: Debbie Does Dishes. Hope you like her! (Created on Affinity Designer iPad versions 1 & 2)
-
 Hi everyone, I have looked in the forum for a trace of this, and couldn't find it in the functionalities in the App, but it is such a sadly missing function of Illustrator that it is, for me, entirely necessary to add it to Affinity Designer to make it THE Adobe killer. Some of you might have used Inkscape in the past, I discovered it very recently, being a mac user (and it is far from user friendly on a Mac...): The Spiro Spline, or automatic smooth curves, swirls and swooshes. For both typography and ornaments, 2 "hot topics" nowadays, this tool is just fantastic. There are 2 elements that are genius about it: - First, it calculates automatically the "smallest curve value" between two points or a specific node, transforming any rough angle into smooth curves to create spirographic-style designs so easily it made my jaw drop when I discovered it (it is a nightmare in Illustrator). - Second, and that's the most powerful, is the ability to edit "live and dynamically" the shape used as the fill of the stroke. Meaning you can easily conver a simple curve into a gorgeous "fat to slim" swirl and create highly editable ornaments on the go, using triangles and other shapes. For those who never heard of it, check those two links, you will just be... wowed. A simple tutorial to show your the "spiro magic" http://verysimpledesigns.com/vectors/inkscape-tutorial-spiro-swirls.html And this one to show you how powerful it is, especially for Typography design: Inkscape + Spiro (sorry it's in Spanish–which I'm not, and it goes fast, but it's quite straightforward). This, combined to the user-friendliness of Affinity Designer, would make me put the premium for it right away. Hope you enjoy it guys! Boris
 -
 Is there a way to flatten transparency from within Designer? I know you can do this on export, but what about modifying your current document? E: For the feature request refer to:
 -
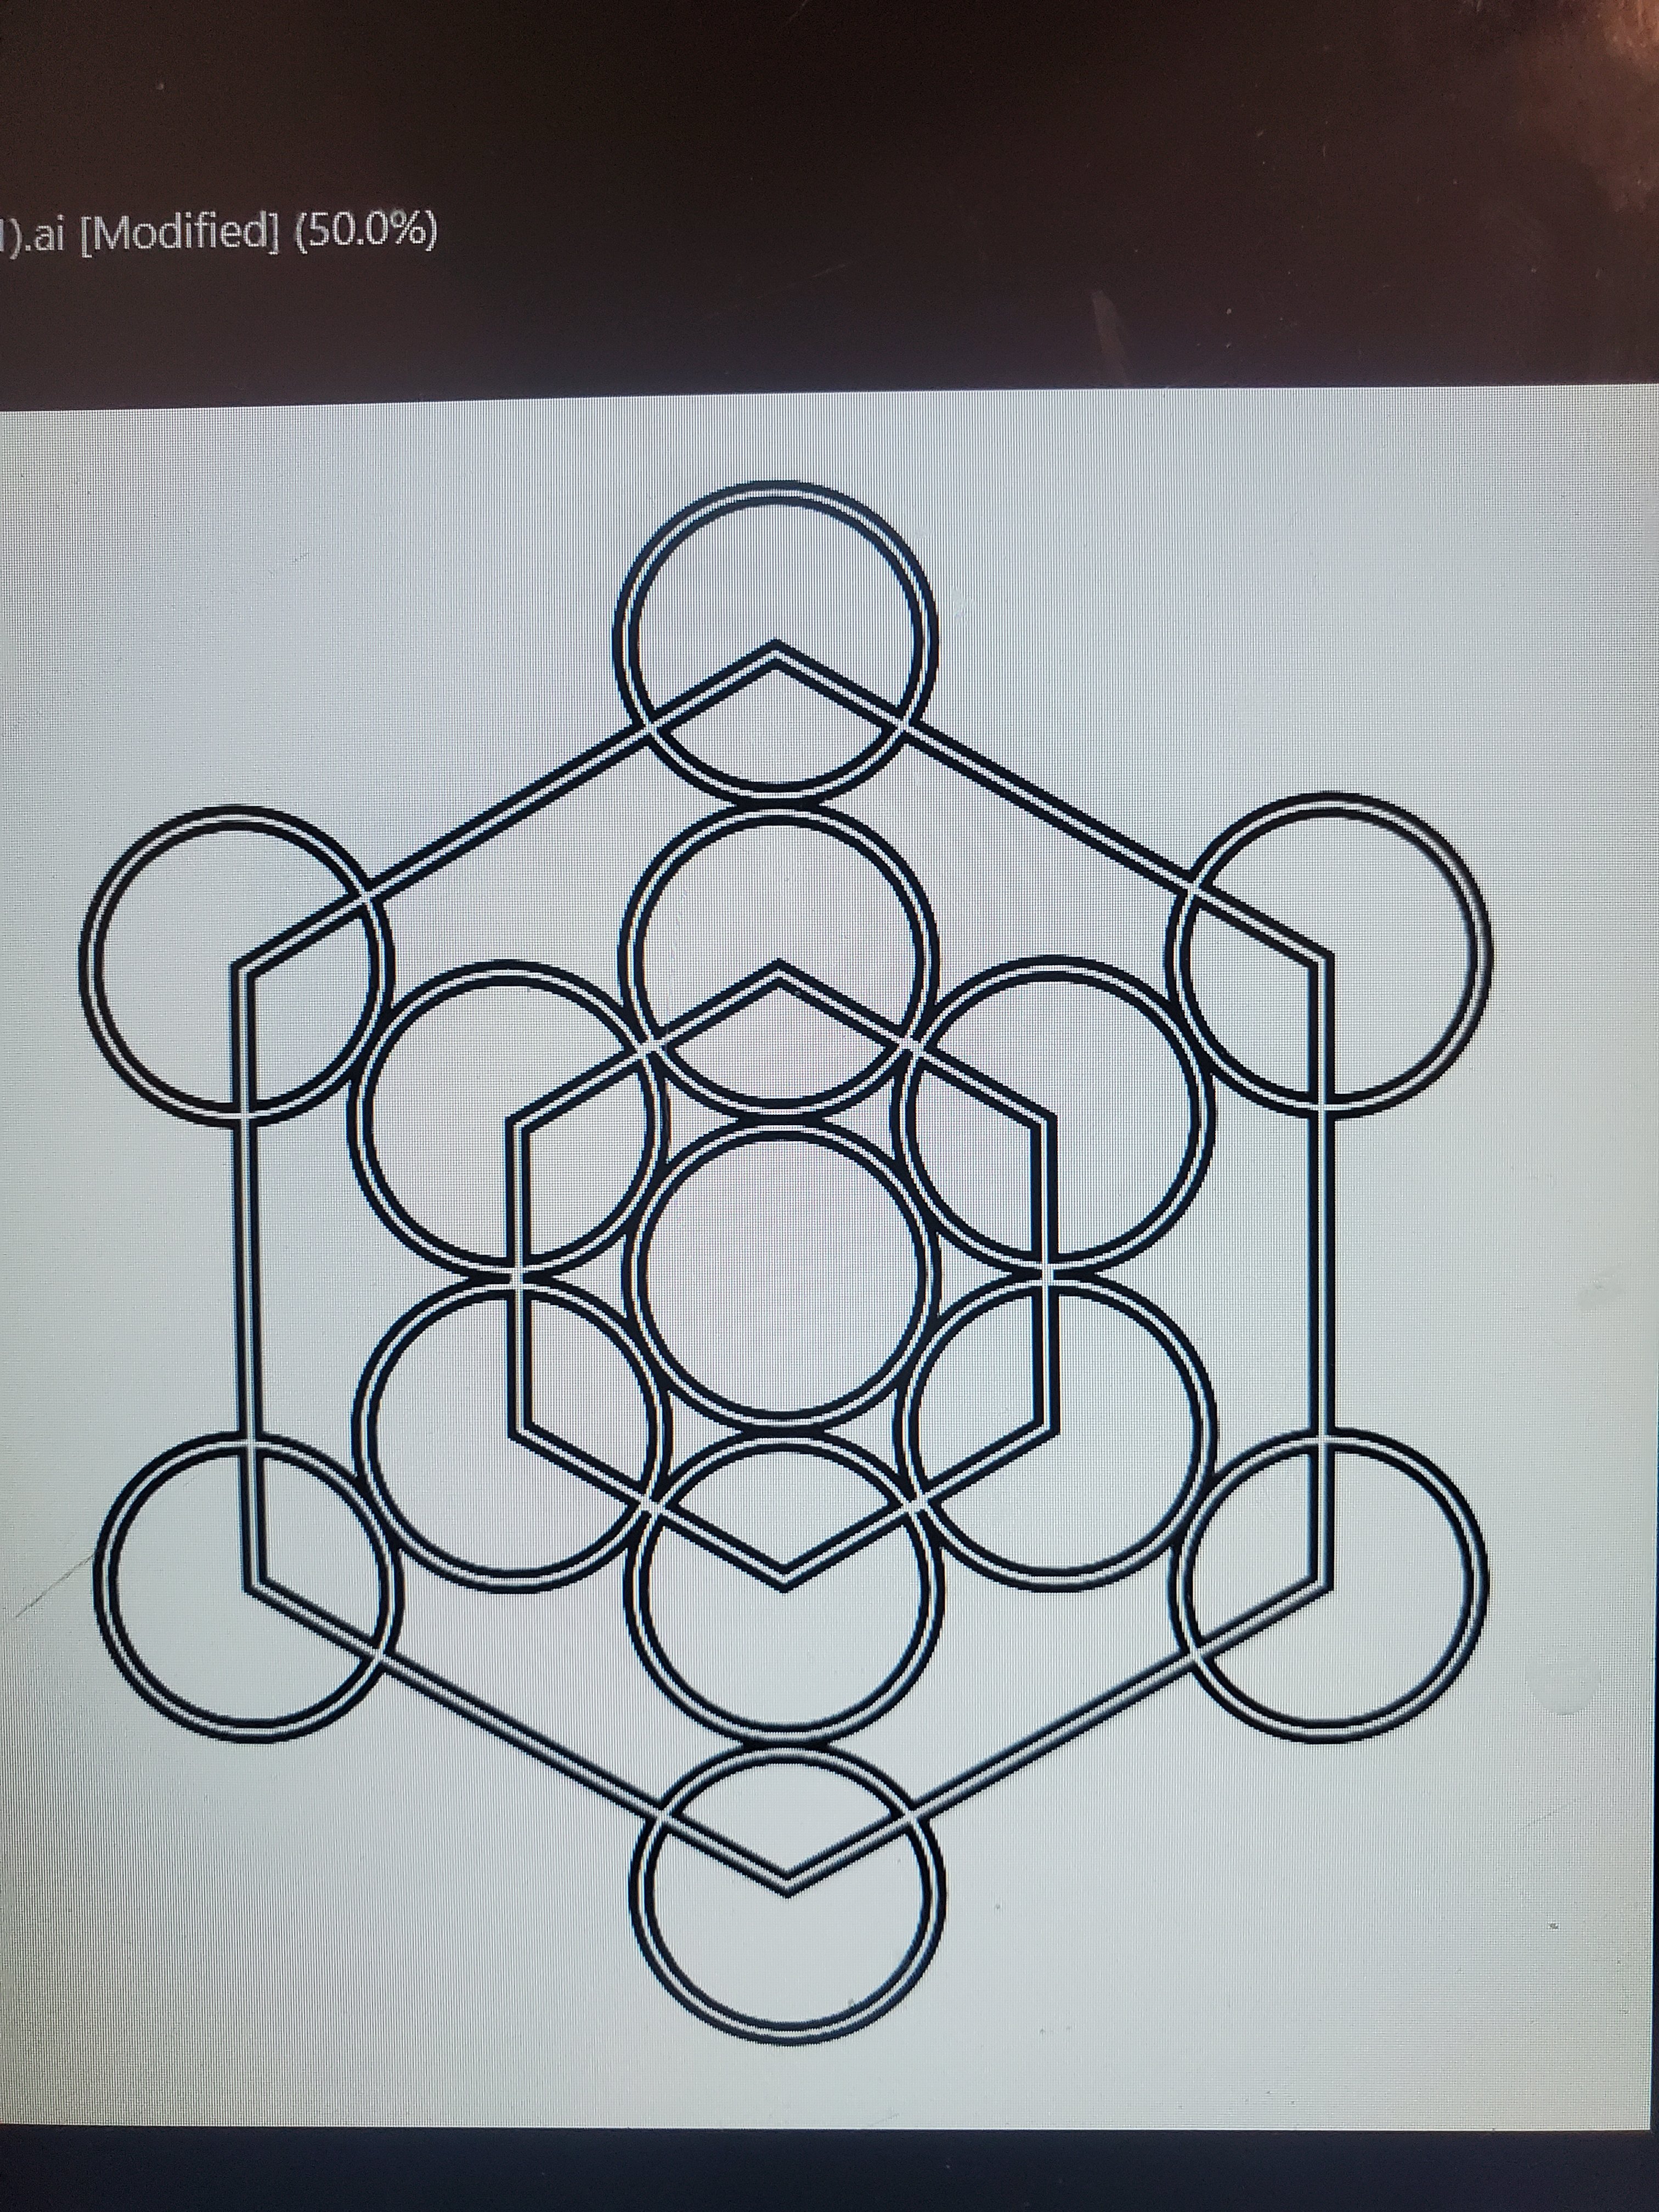
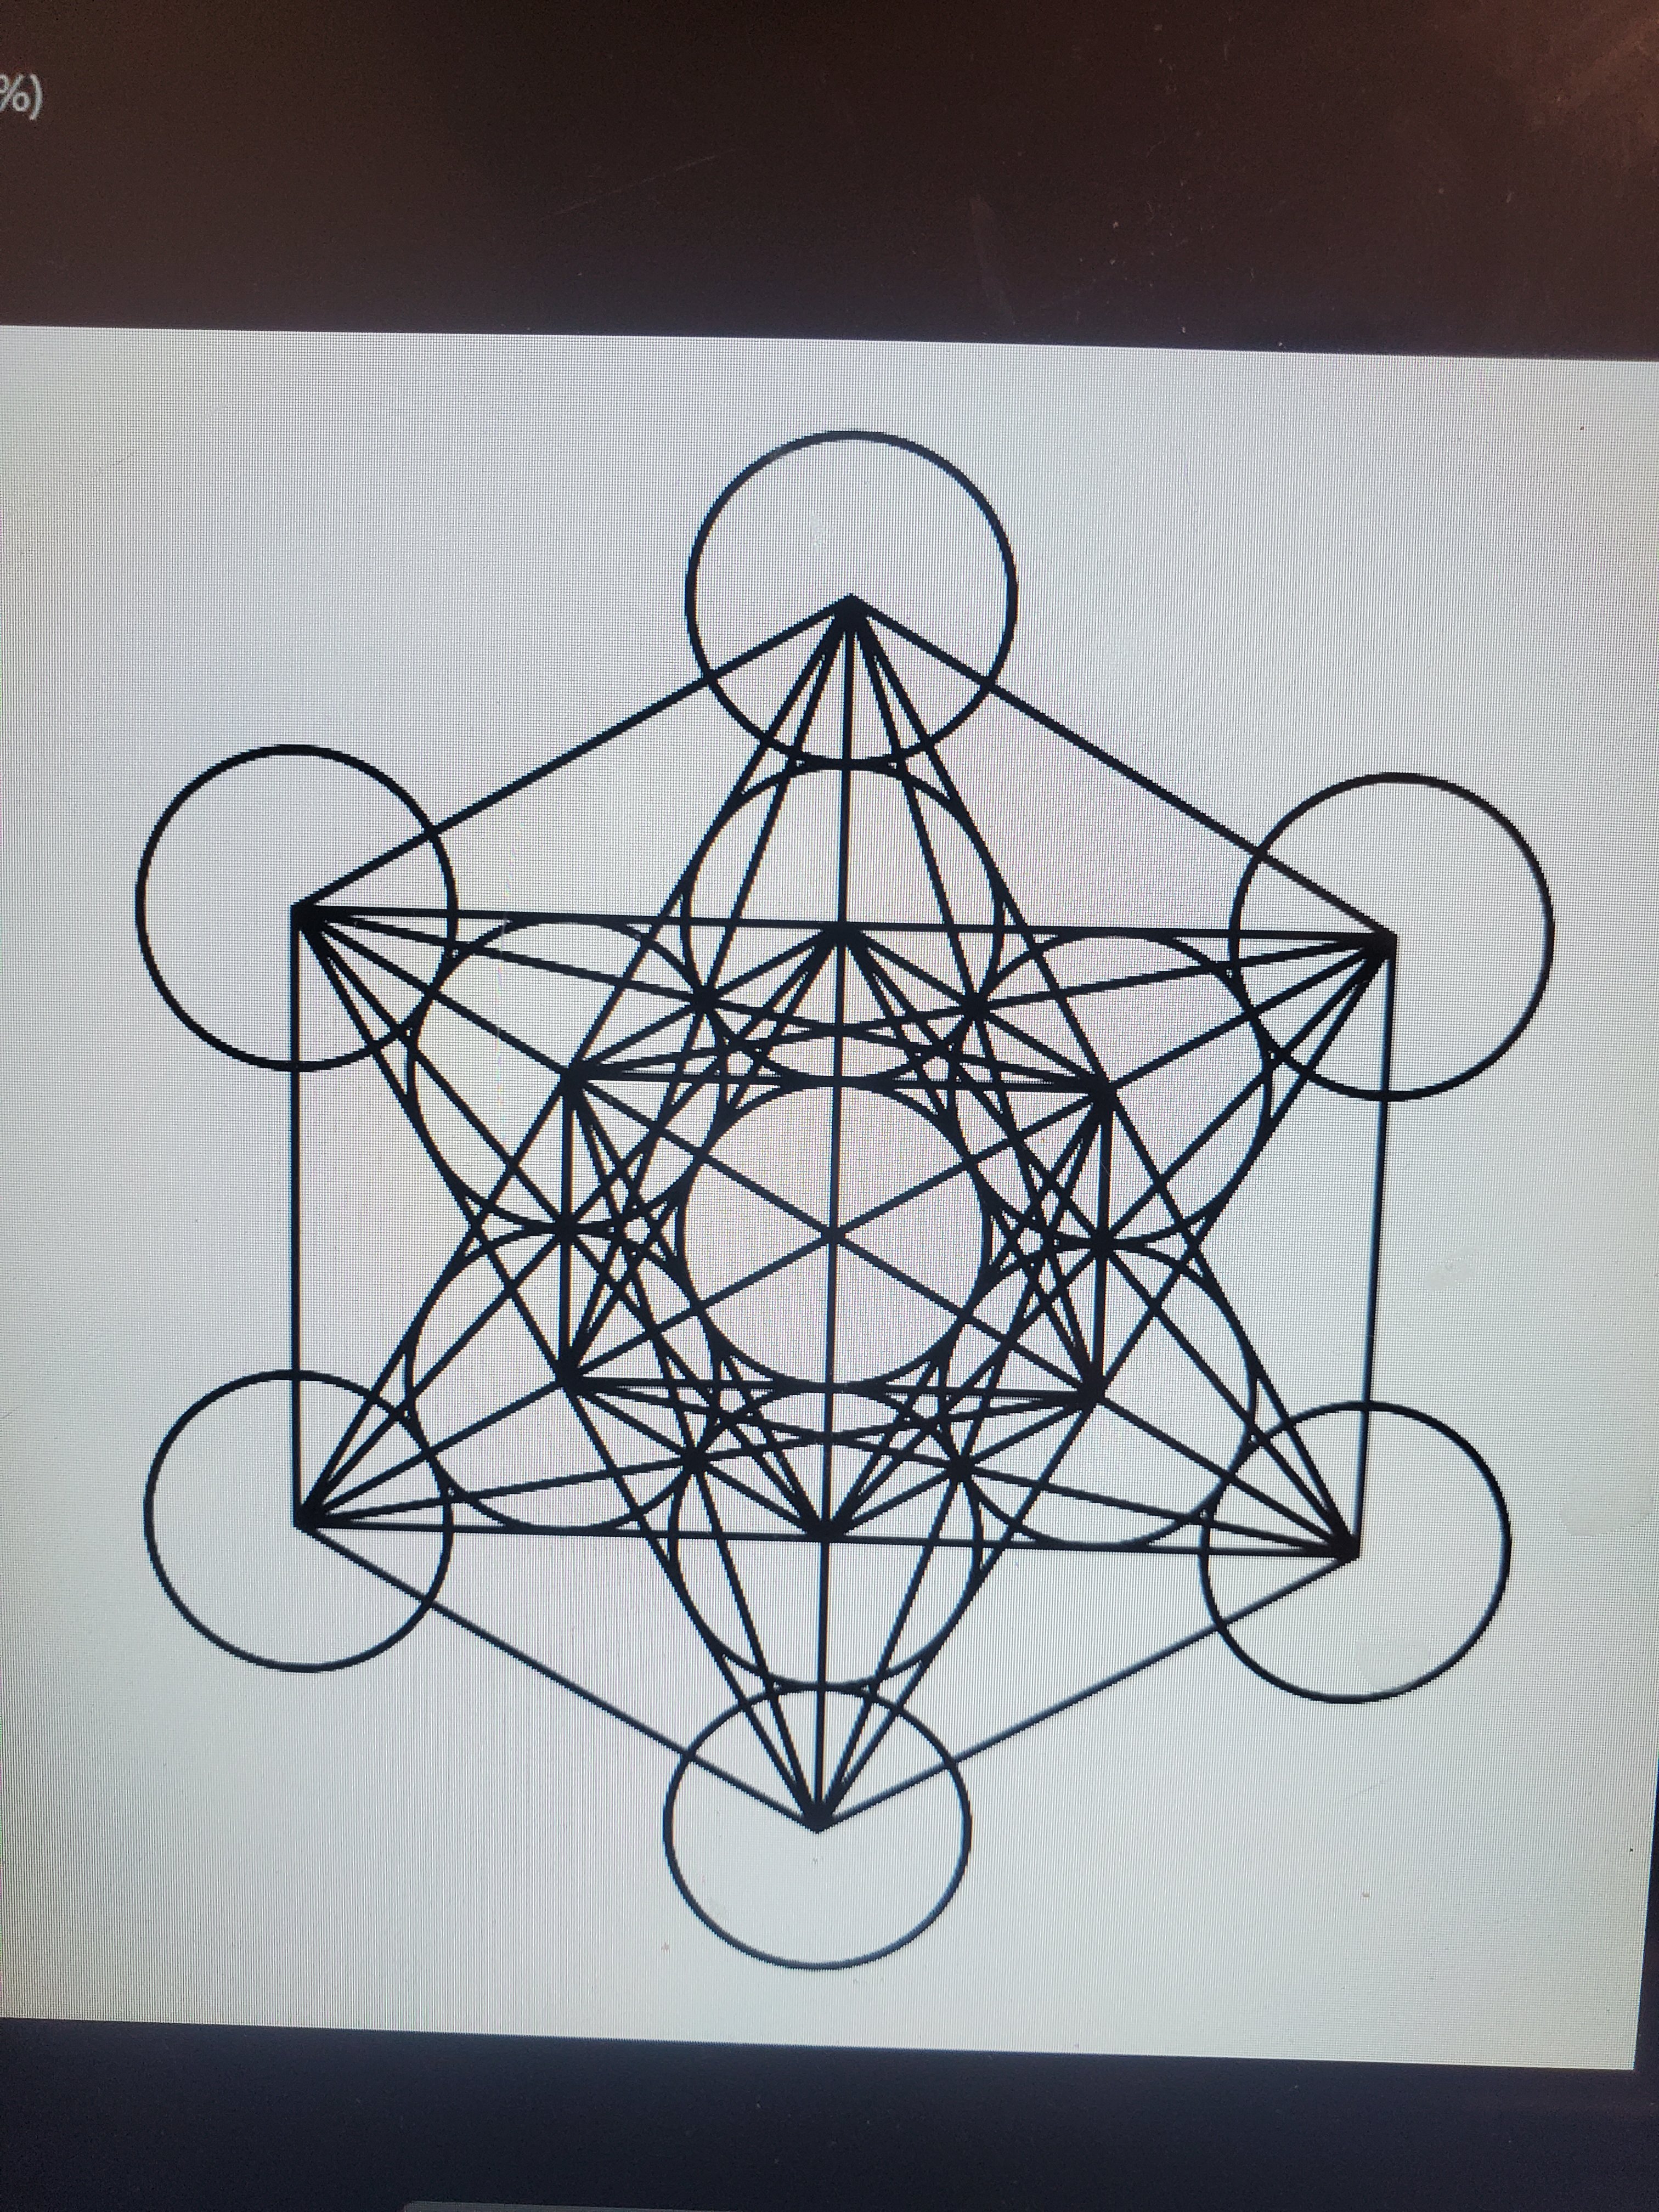
 Good day, so im working with a complex shape in afinity designer that I'm going to be sending off to a 3rd party company to have cut out onto copper sheets. The shape is called metatron's cube. (See attached image.) It has lines all over the design and the company isn't able to work with this file because it doesnt contain auctual shaped geometry. I played around with it myself ( See attached image) and I was able to get it close to how they would need it for their machine, but the part im now stuck at is getting the rest of the lines to look like the image I made. What I was able to do on my own is select every circle and turn them into a donut shape then make the hole 90%. I then duplicated the smaller hexagon in the center and shrunk it then subtracted it from the bigger hexagon. I did that to both the center and outer hexagons in the image and then I Sellected everything and hit the add button in the top right corner so that it created the shape in the image. Here are my questions I currently have. How to I make the distance between the hexagons the same distance as the circle that has a dognut hole of 90% I need to make sure that when their machine cuts it all out that all the line thickness is exactly the same. My next question is how do I make the rest of the lines look how I made this shape so far? I know I'm making progress, but I've hit a brick wall. Thanks in advance, Randallrbaker
-
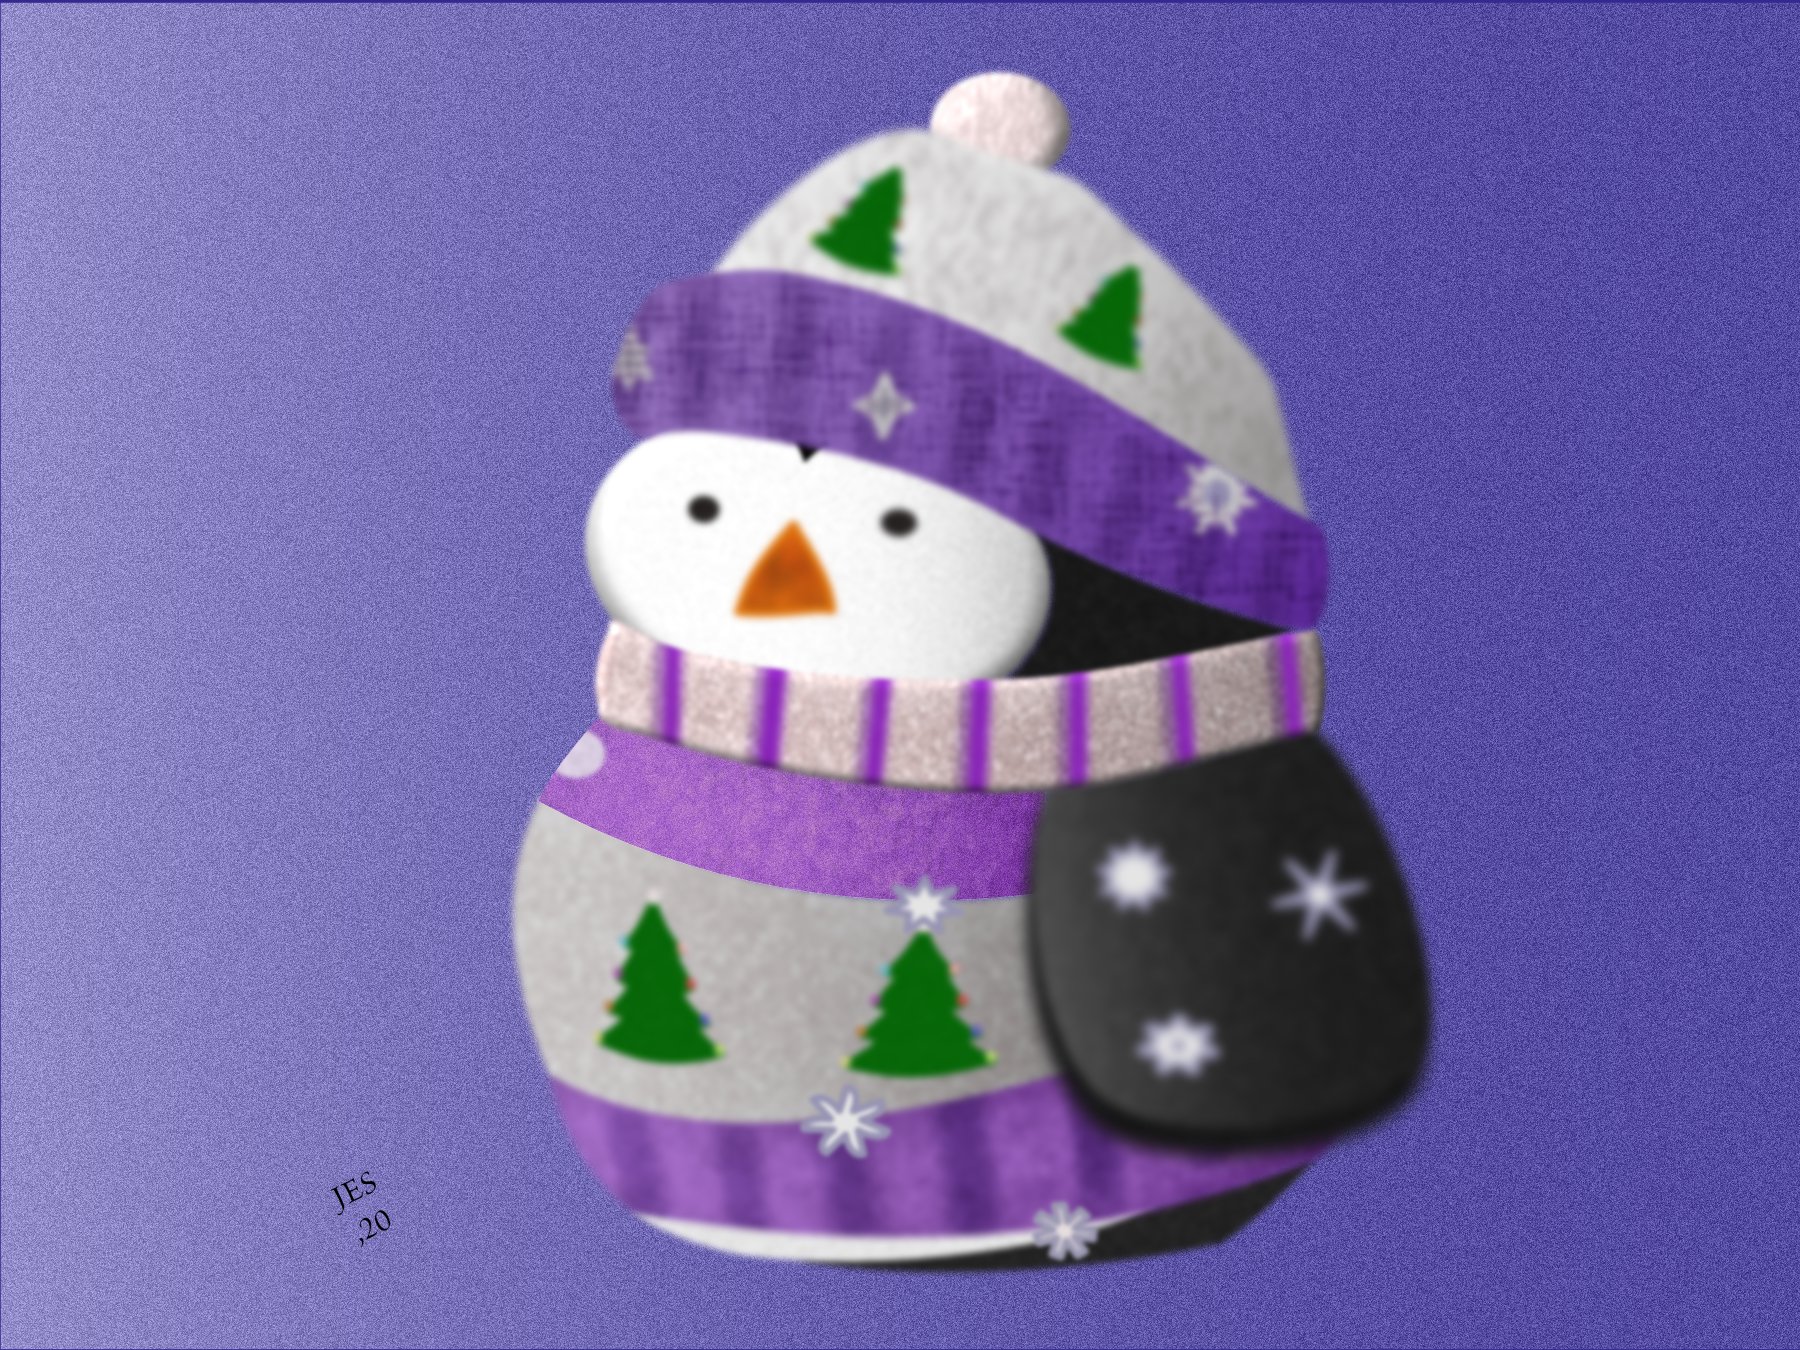
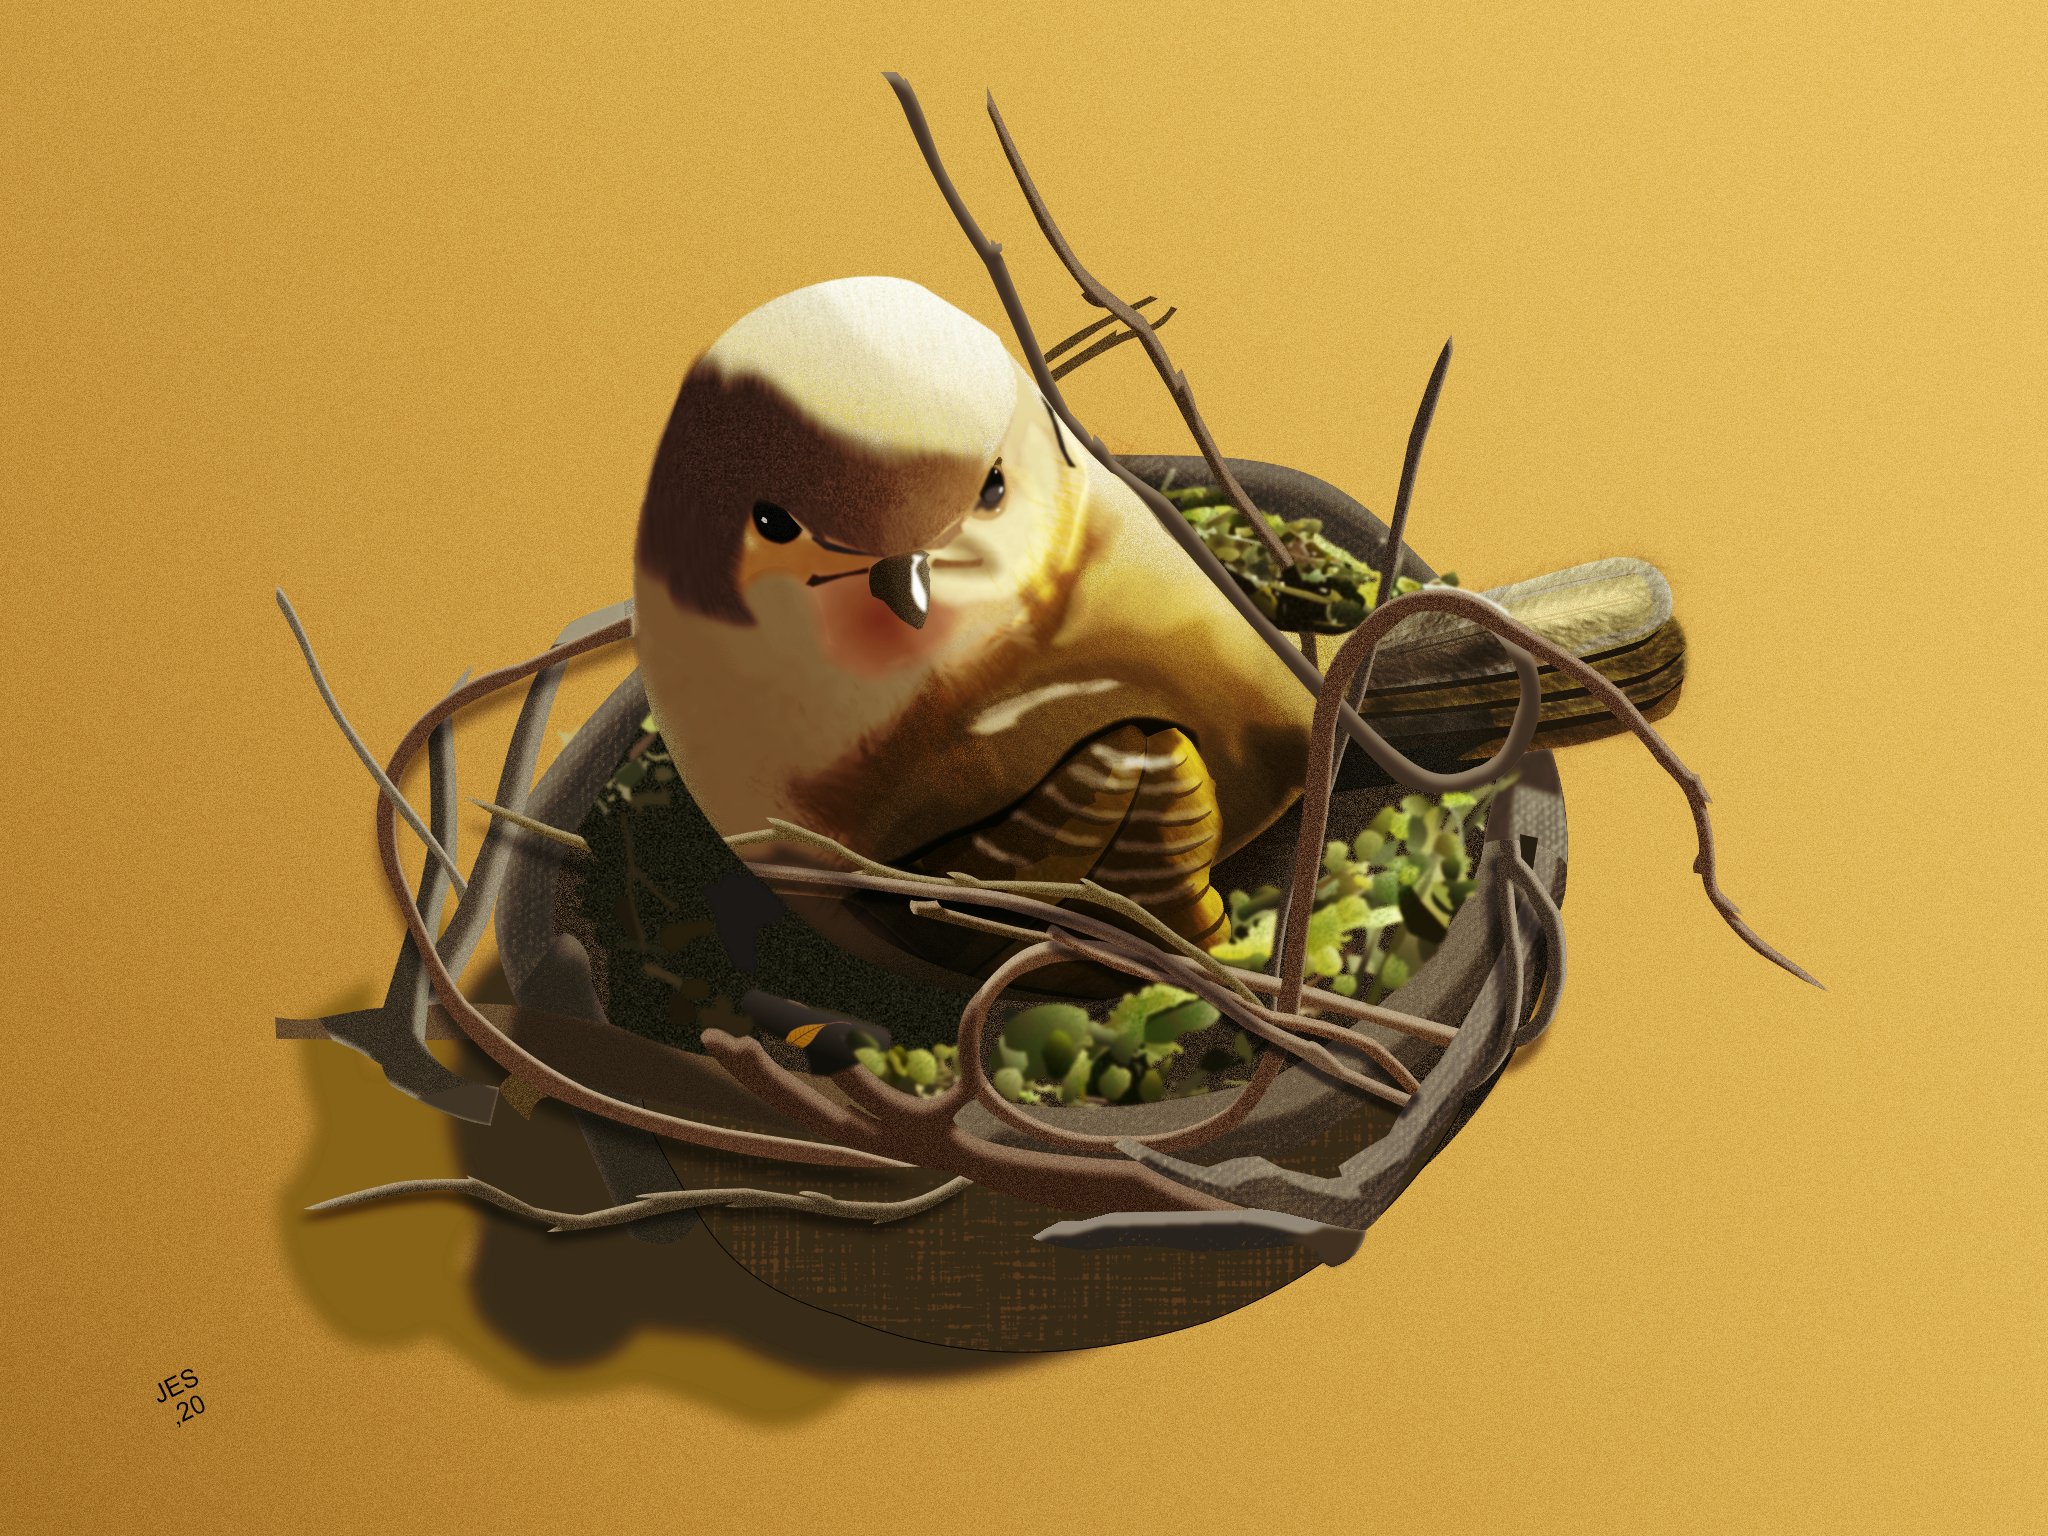
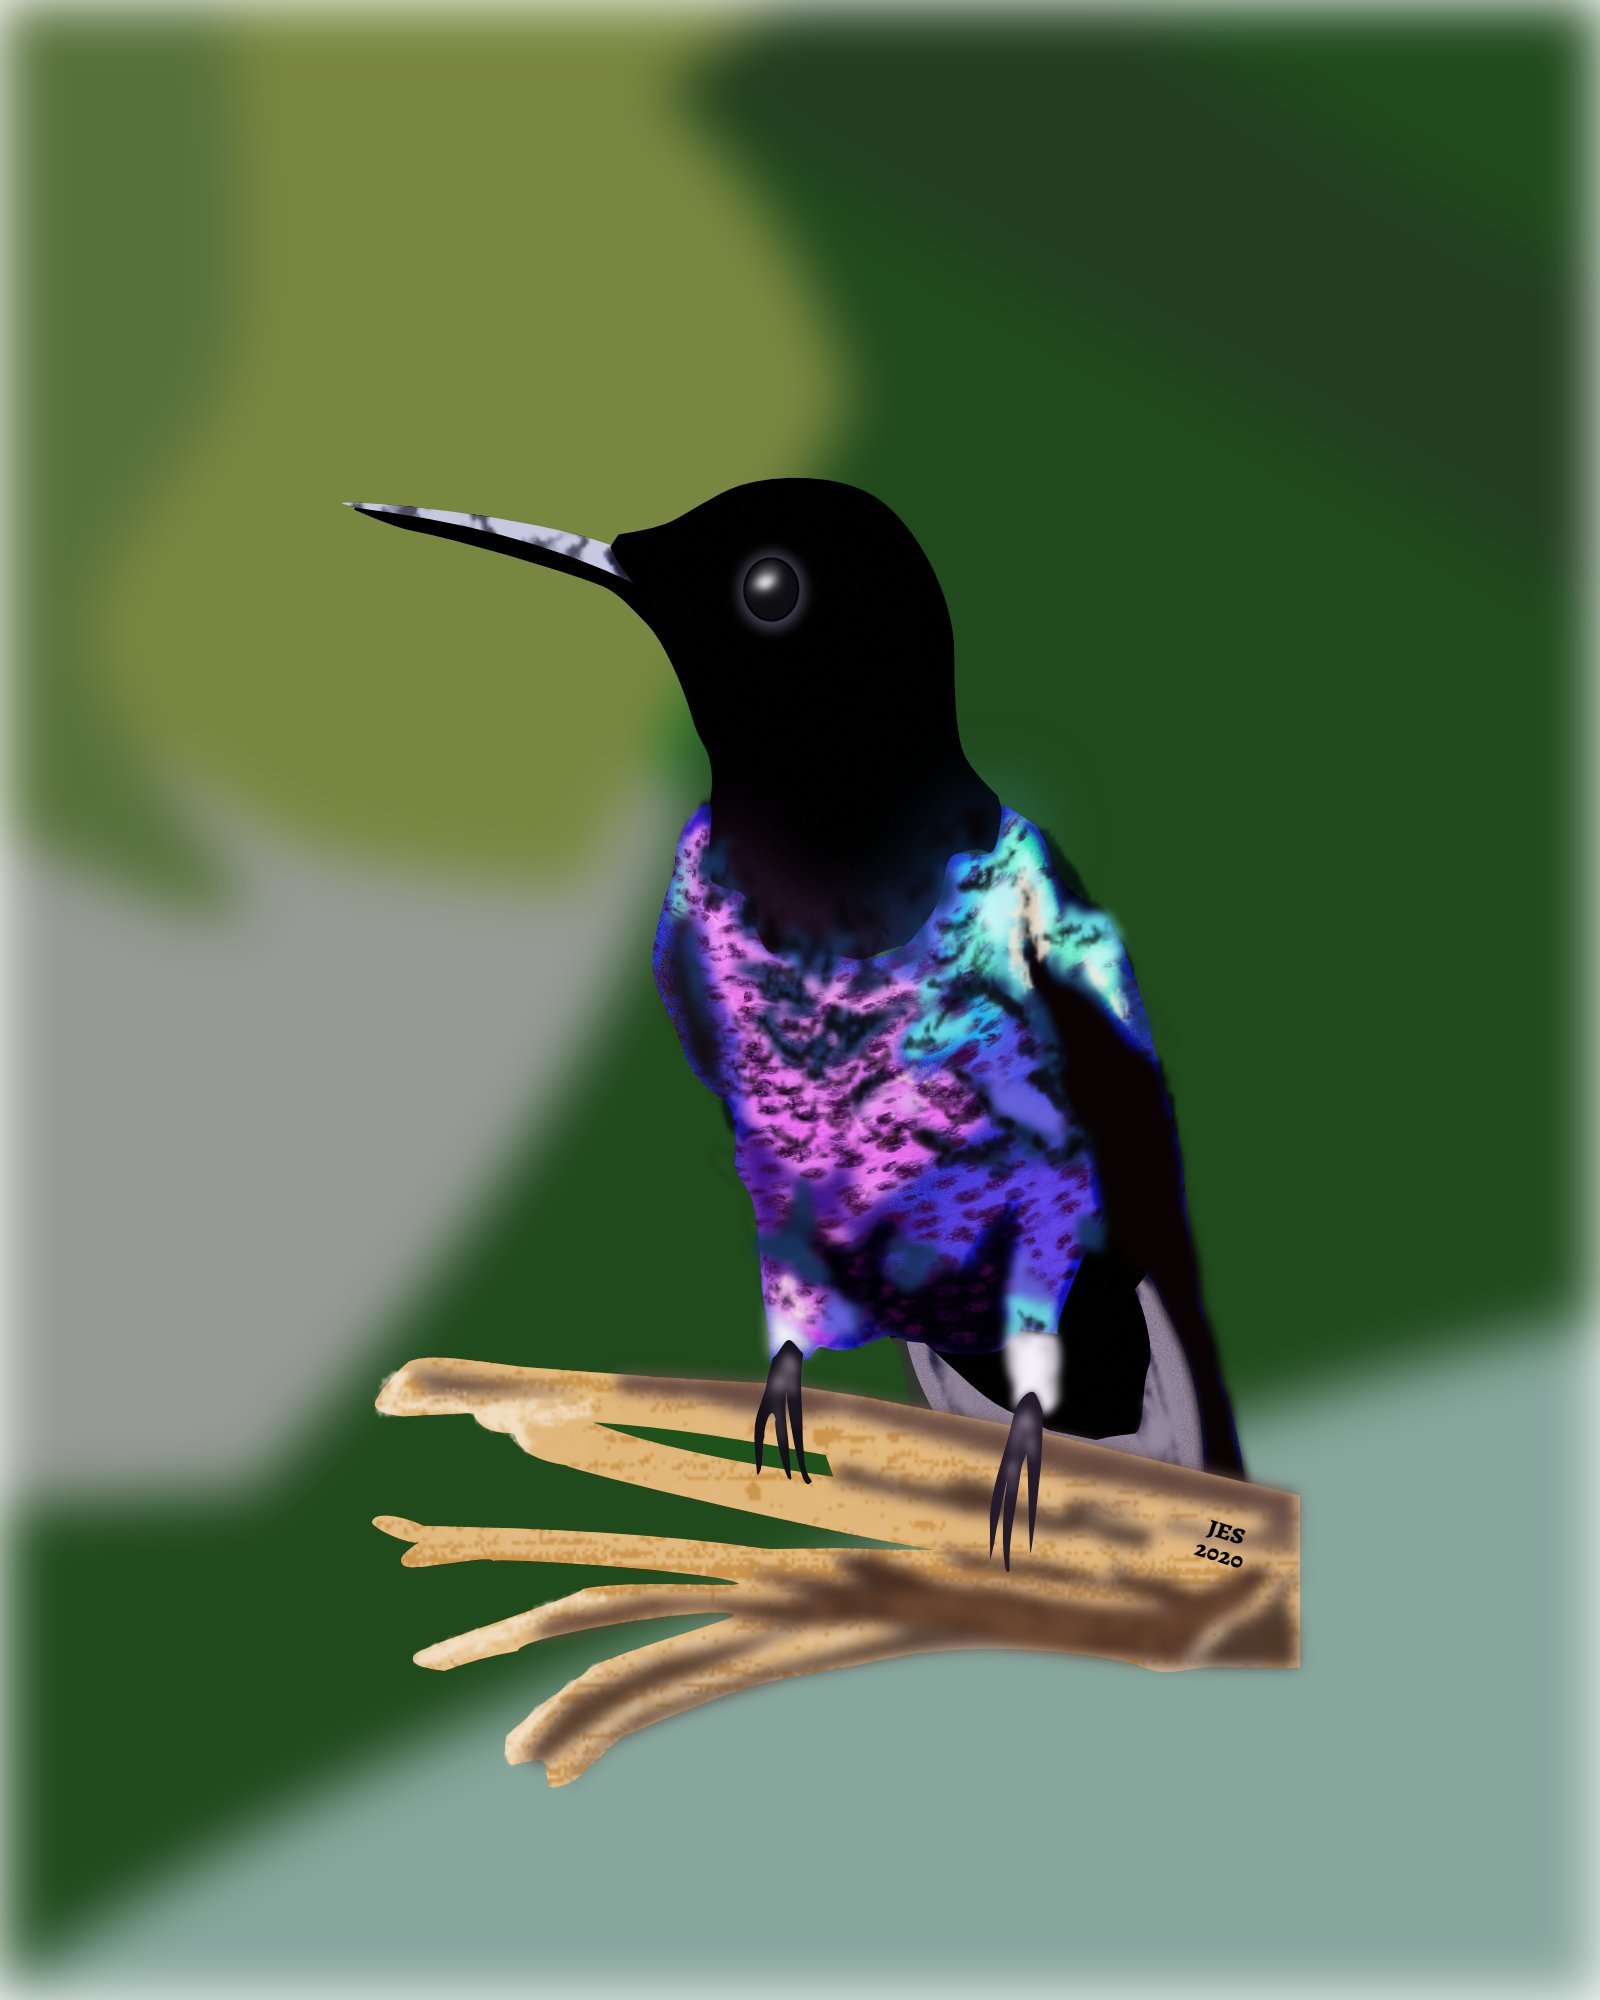
Here are a few vector images I did with Designer. The penguin I did based on a ceramic penguin light we have. The yellowish bird was something my mom asked me to do that replicated a ceramic bird she has. My tea mug. A hummingbird I saw a picture of for reference. A medicine bottle with spray hose in it.
-
 Hey! In Affinity 1 I used to be able to select multiple vector points of a shape by dragging them, but I can not do that in Affinity 2 (have to select them all by clicking). Is there an option that I have to turn on?
 -
 Graphic design is not my area of expertise. But Affinity Designer v2 is so good that I can't stop drawing something. 😊 Here is the avatar I drew for my little boy:
-
 I took a photo of this particular homestead in Cades Cove at Great Smoky Mountains National Park in Tennessee, USA. My photo looked very dark and dull as it was quite foggy and misty. I created this scene as a vector drawing, then added brush work in Pixel layers. I took a couple of liberties to make it brighter and less foggy. My wife wanted smoke from chimney of building on far right and so I added some. These homesteads here are not active and would not have any smoke.
-
affinity designer Diner logo and wall jukebox, designer vector
stojames posted a topic in Share your work
Wife and I went to a 50’s style diner (Bel Air) and they had a wall jukebox (brought back old memories of playing music on jukeboxes) at our booth. I took a photo of it and their logo signs. I thought I would try creating vector images of their logo and the wall jukebox. I put all the song text inside the jukebox. The letter and number keys really were not perfectly the same. The cards inside the jukebox with the song titles were in rough shape (I didn’t try to duplicate that). I then created a counter with stools and root beer floats and a neon style Diner sign to add something extra. Hope somebody likes it.
-
 Affinity Designer V2 does not currently have bitmap tracing, sorry.
-
- 10
-

-
- bitmap trace
- vector
- (and 1 more)
-
-
Hello Affinity fam! I would like to start using these forums more often and share with you the pieces I'm creating. Here is my latest completed piece. I leave you the information of the piece below. Greetings and thank you so much! https://i.imgur.com/d52WZnm.jpg
-
 I really need something similar to Illustrator's "Blend" tool where you can have 2 vector options, make a blend, and they set the number of steps and some other properties used to create the individual steps in-between. I don't see anything like this in Affinity Designer, am I just missing something? Thanks.
- 78 replies
-
- 10
-
-
 Hi, I am totally new to graphic design, so my apologies if I need dumb-proof step by step. I have downloaded a number of vector patterns which I need to recolour. I have managed to input a set of global colours, which I would like to be my "Brand palette". I need to separate each individual elements in order to recolour them separately, ideally using my brand colour as main colour setting. I can't "ungroup" the pattern and do not seem to be able to recolour as fill. Also, I thought you could recolour the similar shapes at once. Could somebody be kind enough to give me step by step from start to finish? Thanking you in advance...
-
 Look up for vector flat tip brush for calligraphy and font creation.
 -
 Hello. I'm attempting to upload art made in Affinity Designer to Teespring. I export as a PNG, Resample: Bilinear and don't resize the image larger when creating my listing. After creating the listing, the preview looks pixelated. Other shops don't have this pixelation problem on their product pages. I'm concerned about the quality of the shirt. Their design tips say to turn off anti-aliasing in Illustrator. Can I achieve a similar result in Designer to prevent pixilation of a printed product? I see an export option for nearest neighbor but I don't fully understand this or if it will allow my design to be printed with high quality. The artwork are vectors and they are only pixelated when uploaded to the shop. What would you suggest?
-
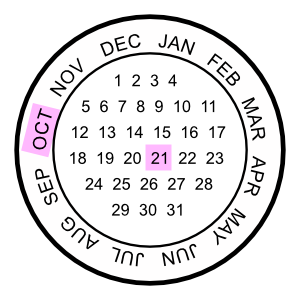
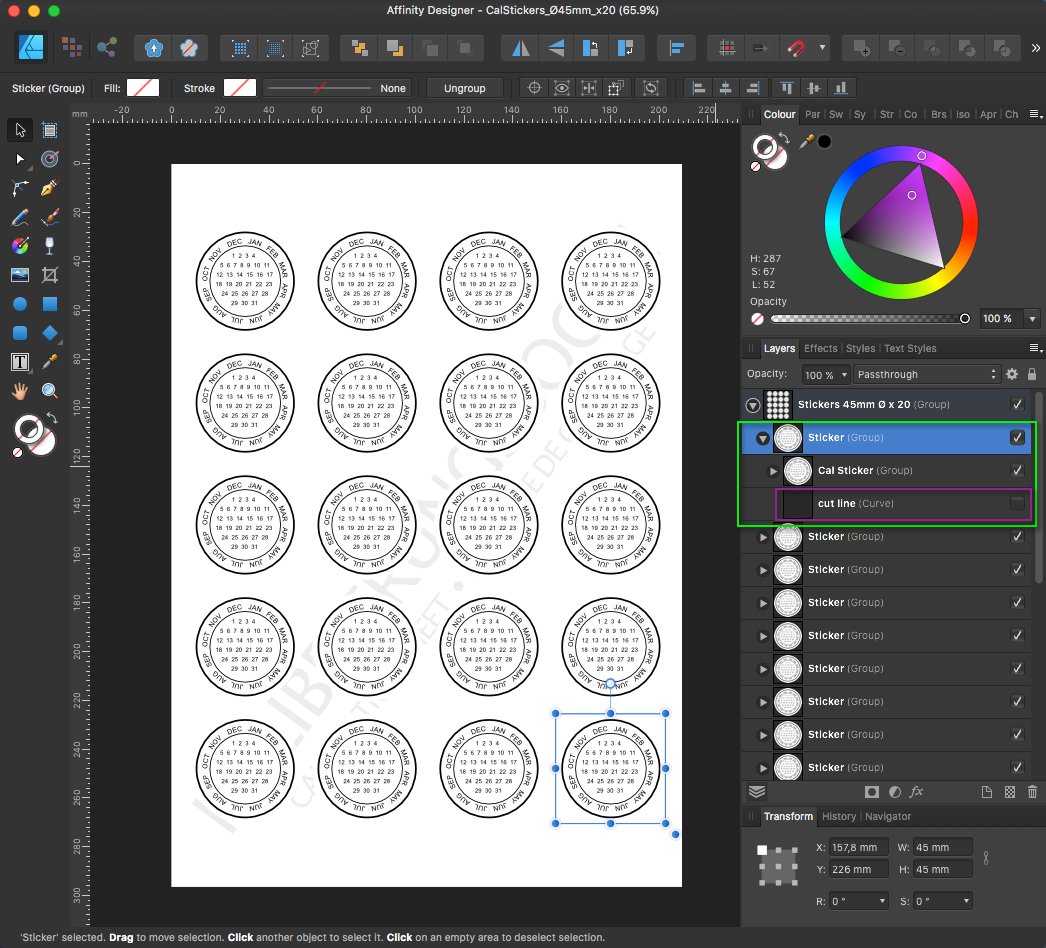
Here are some calendar based round reminder stickers, which can be used to place/glue on important dated things not to forget. Like for example " ...don't forget to sending the damned package until a specific date to someone..." and the like. The initial Sticker created here is a Ø45 mm one (...but can of course on demand be also scalled up to other sizes since it's vectors...) ... Personally I tend to print such reminder Stickers out on matching rounded Avery label sheets (in this case on Avery sheets of Ø45 mm x 20 round labels) ... ... here each of the same 20x Ø45 mm Stickers is in it's own Sticker-group, which in turn has a hidden cut line curve, since the later (a cut line) is not needed when printing onto Avery round label sheets. The sheets background text layer can be hidden or deleted before printing! - If needed you can of course adapt these Calendar-Stickers to other Ø-round sizes, since there are a bunch of different size Avery label sheets available! Hint/Tip: Before I forget, I mostly mark the reminder dates afterwards manually by hand, but you can also mark those directly inside ADe etc. if needed. For some marker colors see for example this Touch Twin Markers Palette and the like under the forums Resources section! Here are the corresponding Affinity Designer template files: Sticker-1x-Ø45mm.afdesign (1x Sticker Ø45 mm on white background) Sticker-1x-Ø45mm-transp.afdesign (1x Sticker Ø45 mm on transparent background) CalStickers_Ø45mm_x20.afdesign (20x Sticker Ø45 mm for Avery round labels sheet) - Have fun!
- 3 replies
-
- 7
-
-
-
- affinity designer
- vector
- (and 5 more)
-
Submission for Affinitober
- 1 reply
-
- 4
-
-
- affinitober
- vector
- (and 1 more)
-
Hello everybody! Just want to let you know that our FREE Welcome Pack has been updated (actually entirely redone), with new objects, more colors and more (much more) details. So... you can take a look at it down here. You can download the pack in the link at the end of the post. PS.: Next week, we'll be posting a mini-course on how you can use this pack to create several sexy sci-fi backgrounds :D If you are a Frankentoon subscriber, you should have this pack in your inbox already ;) GET YOUR FREE PACK HERE! Note: In order to download your free pack, you'll need to subscribe to our mailing list, in return you'll get a NEW FREE Vector Pack every 6 weeks (next one will be delivered the third week of june), so it is a great deal anyway ... by the way, we'll NEVER EVER send 'penis enlargement' o 'get viagra' BS, we now you don't need any of those things ;)
-
Finished vector work + original sketch. Enjoy!
-
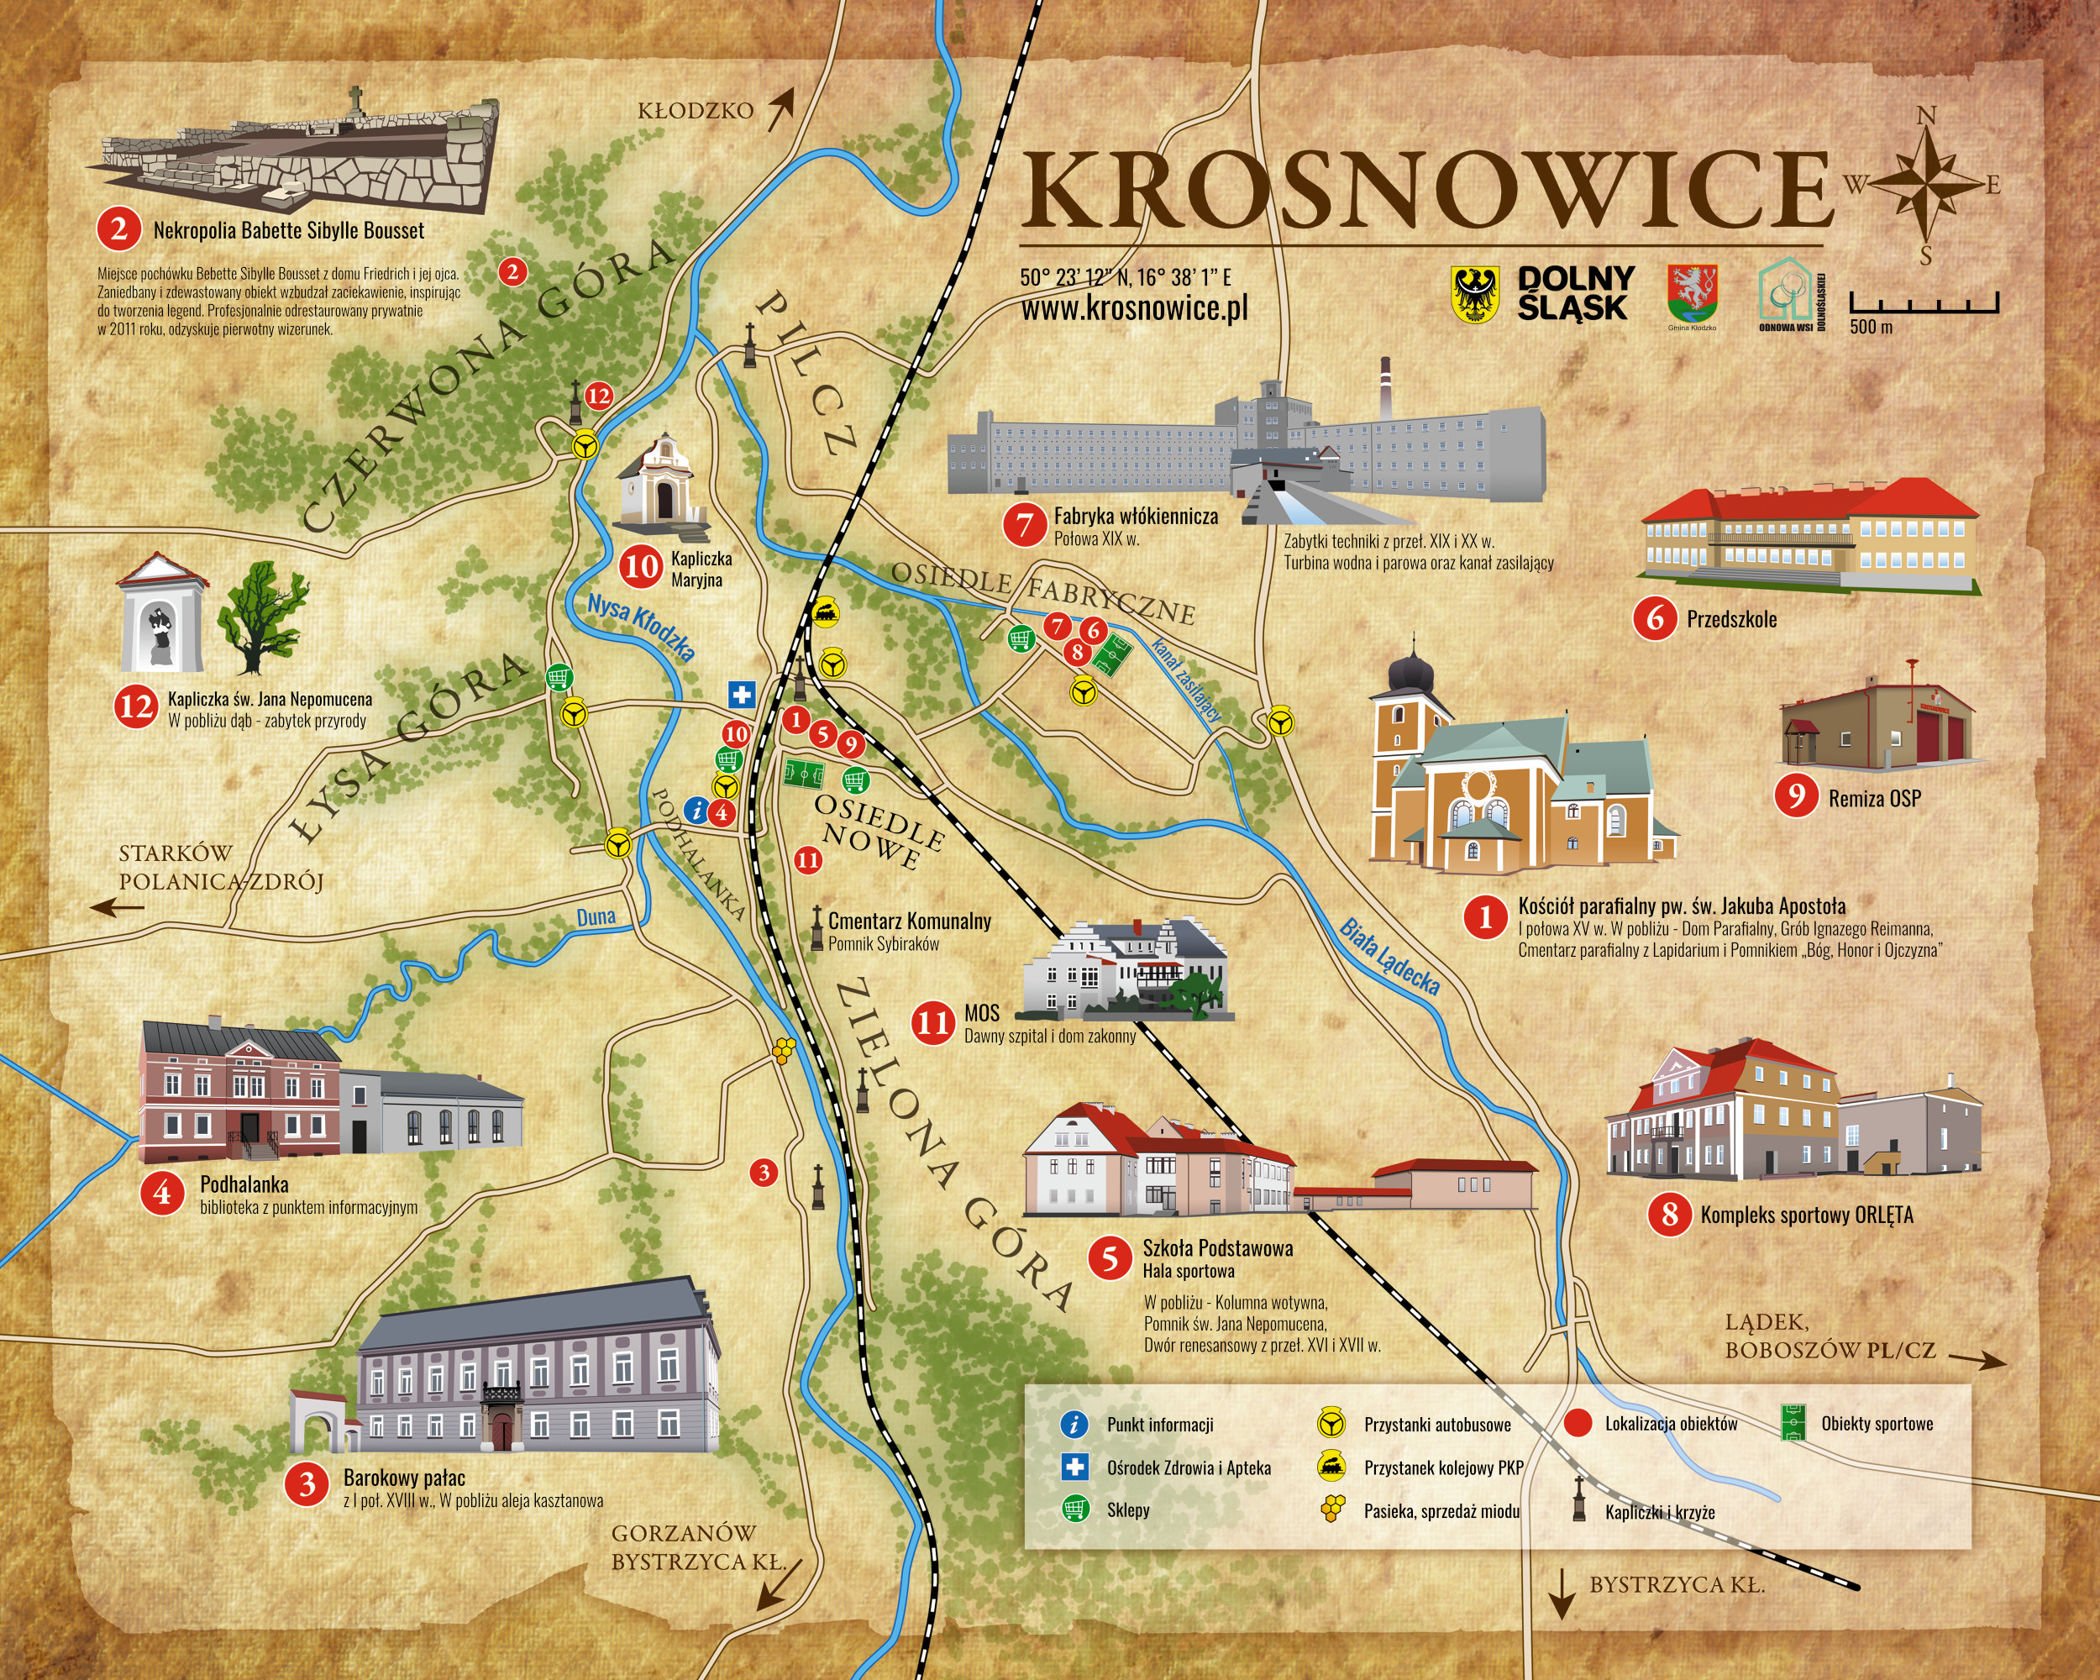
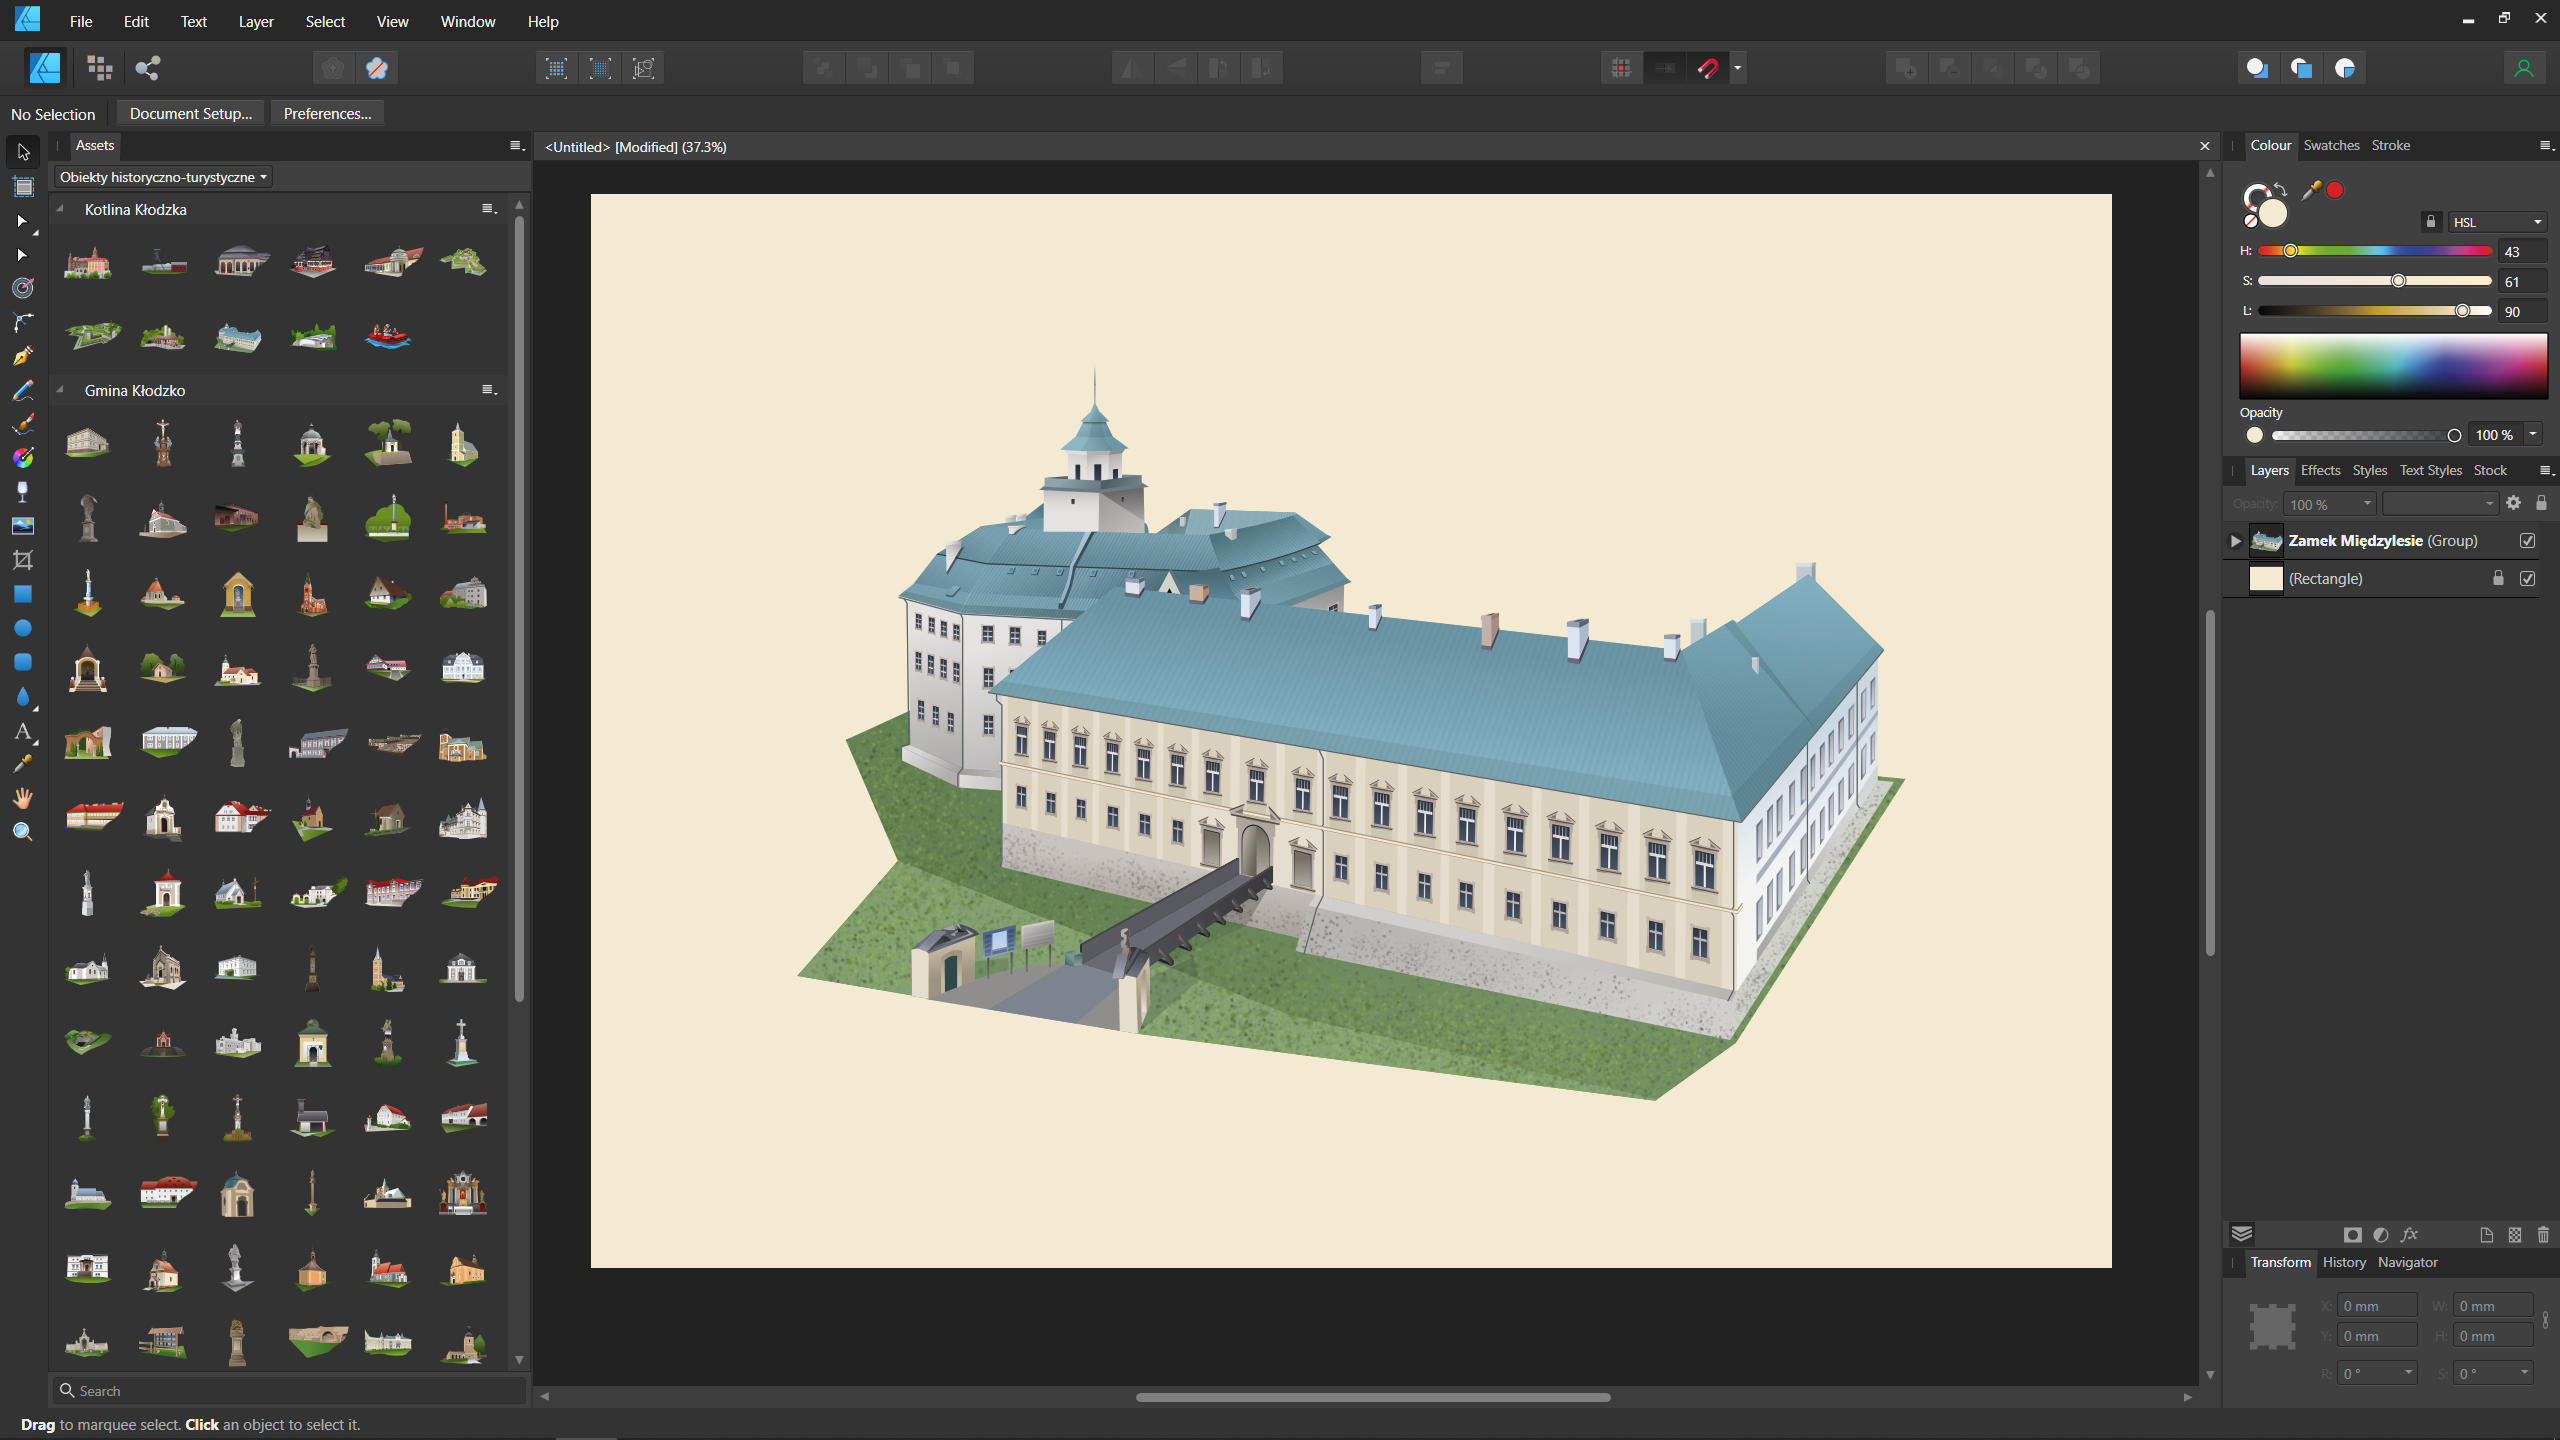
Illustrated maps for village promotion and tourist places. Created in Affinity Designer using vector technique combined with bitmap using Concept Master Vol.1: Nature Brush Pack brushes and those created by myself. So far, for several maps, I have drawn about 200 objects with varying degrees of accuracy.
- 12 replies
-
- 29
-
-