Search the Community
Showing results for tags 'Tutorial'.
-
 Hey there! I just want to bring here to your inbox a new awesome tutorial This is a tutorial about a method to create Stylized Texts! A very easy step-by-step to guide you in getting better at using Affinity Designer 2! You will learn this: ✅ How to Insert Text ✅ Creating a Symbol ✅ Generating a Seamlessly Pattern ✅ Texturing ✅ Export PNG ✅ Duplicate Text ✅ Import BITMAP on Text ✅ Text Layer Effects Overlay You can watch here below Many awesome methods in a quick tutorial, See you there, enjoy!
- 1 reply
-
- 2
-

-
- affinity designer
- tutorial
- (and 1 more)
-
 Hi, in this Affinity Photo Tutorial I will introduce you to the RAW engine, the so-called Develop Persona. I would like to encourage you to shoot in RAW format, which is even possible with the iPhone. With overlays you can then create layers and masks and thus limit the processing to certain areas. Have fun Ciao Jack
 -
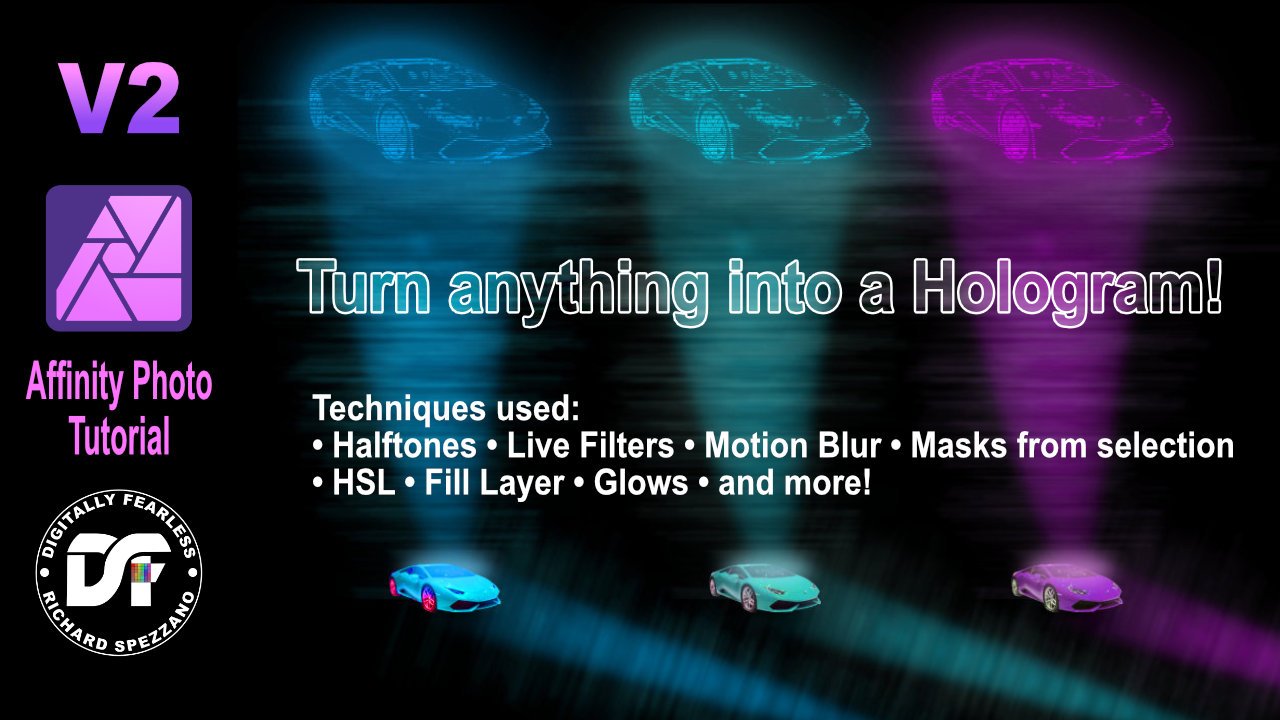
 In this Affinity Photo 2 tutorial for the desktop, I show one way to make holograms using live filters, halftones, different types of blurs, masks from selections,HSL filters, glow FX and more. I also did this tutorial for the iPad. Check out my YouTube channel for that version. https://youtu.be/ENdlHsLpGZY
-
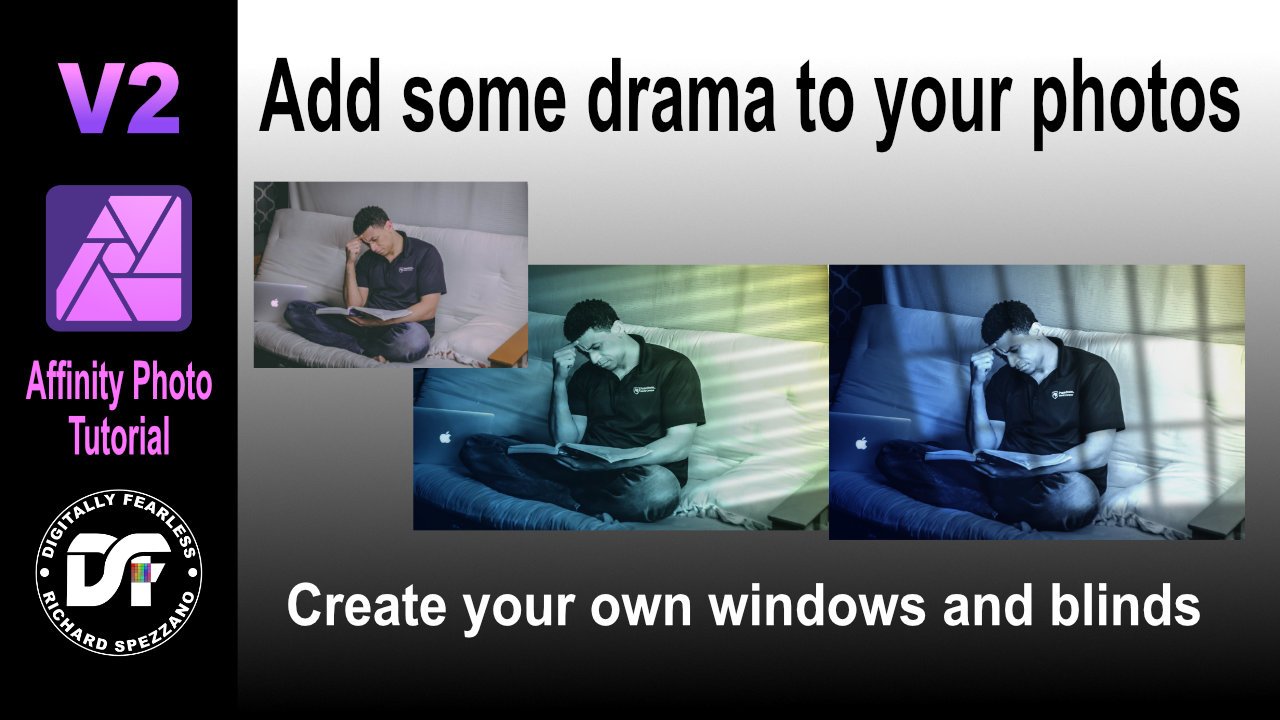
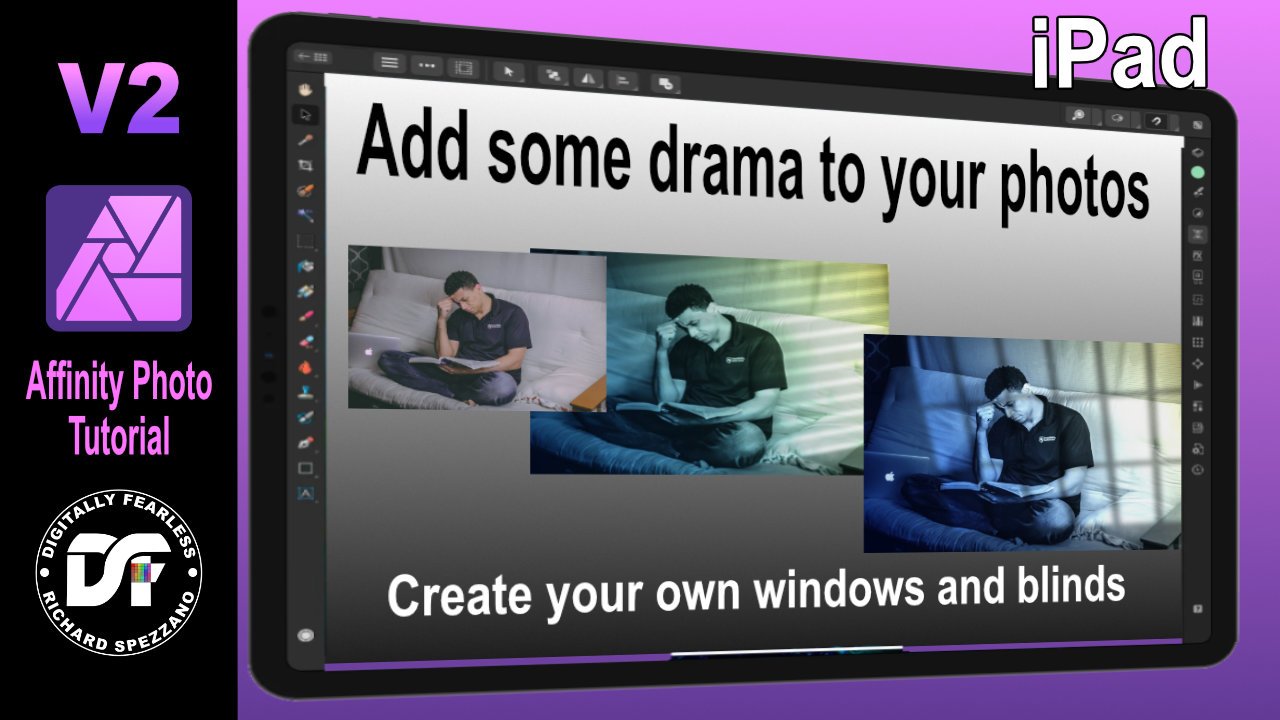
In this tutorial I show you how to create windows or blinds from scratch and use them to create a more dramatic photo. I use shadows, shapes, blur, blend modes, gradients, perspective and more. I originally saw this done in photoshop, but they were selling the shadows, while I am showing you how to make them yourself. https://youtu.be/ceUU7V6lIfY I also did an iPad version. the link is in the desktop video.
-
- 1
-
-
- affinity photo
- photo manipultion
- (and 6 more)
-
Hi, this my first tutorial with the new Affinity Photo V2. A rather bland photo is edited. I remove the haze and realistically enhance colors and contrast. In doing so, I will go into the new features of Affinity Photo V2. I wish you fun. Ciao Jack
- 2 replies
-
- 1
-
-
- affinity photo v2
- tutorial
- (and 5 more)
-
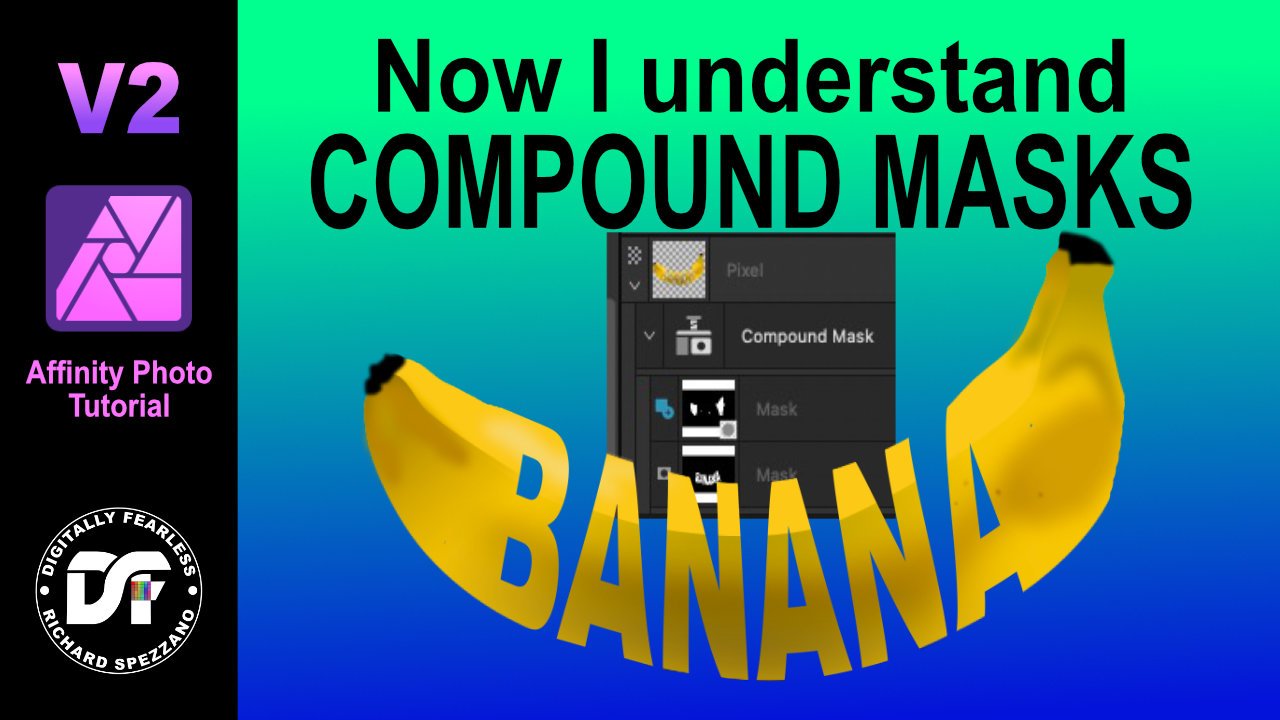
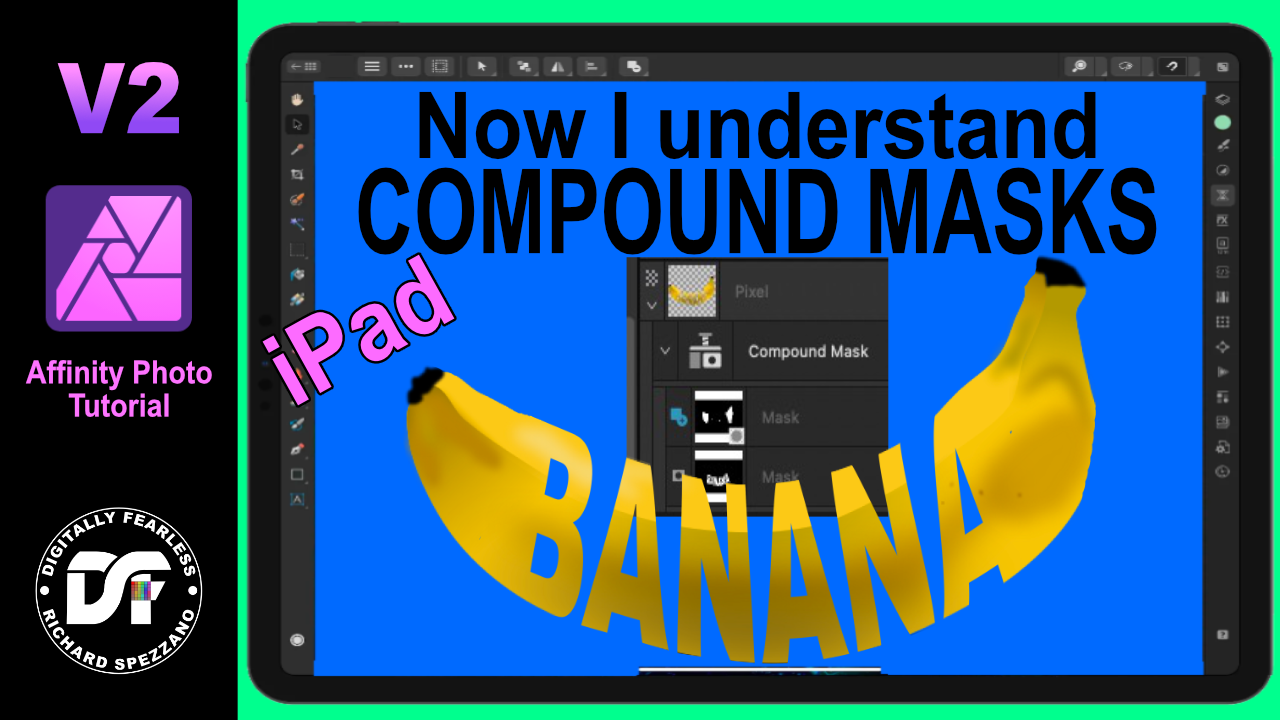
In this Affinity Photo v2 tutorial I show how compound masks can be so useful in your workflow. I saw this tutorial done on Photoshop by Mood on YouTube, but without compound masks and thought about how much better compound masks makes it in Affinity. https://youtu.be/vuRlbRMUA8k Note I also have an iPad version of this tutorial on y channel
-
- 3
-
-
- affinity photo
- v2
- (and 4 more)
-
Hi, In this Affinity Photo tutorial I show how to remove haze while preserving the fog and getting the colors back. The haze filter got over the years a new and improved engine and adjustments. I wish you fun and inspiration. Ciao Jack
- 2 replies
-
- 6
-
-
- affinity photo
- tutorial
- (and 6 more)
-
 Hey guys! I'd like to share a Special Christmas tutorial for beginners that wants to learn more about Affinity Designer 2.0 and also my workflow. In this episode, you will learn Sketch techniques Values for shadows Blockout freehand vector Basic Coloring If want to learn Affinity and Illustation, This tutorial will be a very great addition to your skillset
-
- 1
-

-
- affinity designer
- tutorial
- (and 1 more)
-
 Hi everyone, I've just released a new 5 hour course at Udemy called Affinity Photo: Modern Special Effects and for an introductory offer you can use this coupon - ESPECIALFX to get the course for $9.99 instead of the full price of $59.99. Here's the link for it - Affinity Photo: Modern Special Effects In a series of tutorials, I'll show you how to combine the various Affinity Photo tools to recreate the most popular photo effects you can see today, and maybe come up with your own signature look. I'll show you the right way to use the tools along with any potential problems and things to watch for when you create a series of stunning effects. But flexibility is key here, so I'll also show you several ways to adapt your new recipes to meet the needs of different images. I'll make recommendations about which images are suitable for which special effect, and I'll be giving you exercises to practice what you have learned. I assume a basic knowledge of Affinity Photo. But, because we will be using some of the more professional grade tools, I provide some reference videos which isolate and explain how to use them. But here's the especially nice bit. I often do these kind of courses because I love learning new things but also because I think it's important that I go through the same process you do when you learn from one of my courses. I find the single biggest problem is taking notes. It's the single biggest thing that slows me down, sometimes by a factor of 4 or 5. So I've made the notes for you. You will find a 50 page .pdf waiting for you to download from Lecture 2. It contains extensive notes on the methods and processes I describe along with many screenshots. So much better than a load of scribbled notes that took you ages to write down... It's so easy when you create an effect to get the feeling that the software is doing the talking for you. Well, we'll change that. I'll go into enough detail about how to use the tools and the right workflow to use that you will gain a deeper understanding of the entire process. You'll be creating stunning, flexible effects. You'll be making your photos shine! Thanks for your time, Simon ... If you use Affinity Photo solely on the iPad you may want to wait for the version of this course that's especially for the iPad. I'm working on it now...
- 5 replies
-
- 1
-
-
- affinity photo tutorial
- effects
- (and 1 more)
-
Hi, in this tutorial, I show you to solve a typical problem in autumn: You see beautiful autumn colors but the sun is extremely bright, and therefore the colors seemed to burn out, meanwhile the shadows are too dark. I show how to fix this situation. I wish you fun with the video. Ciao Jack
-
- 1
-
-
- affinity photo
- tutorial
- (and 7 more)
-
 Hallo zusammen in meinem neuen YouTube Video zeige ich wie ich ein Logo auf dem iPad erstelle. Schaut gerne mal rein. Auf meinem Kanal findet hier hilfreiche Videos zu Affinity Designer.
 -
Hi, I visited a guided Lost Place Tour and took a shoot of an old ballroom of a hotel. One of the difficulty ist the light, because there is no electricity. In this tutorial, I show how to edit such a photo. I wish you fun. Ciao Jack
-
- 2
-
-
- affinity photo
- tutorial
- (and 5 more)
-
Hi, I shoot a scene of a creek with mossy stones, but ... We had a very hot and dry summer. So there was hardly water in the creek. I took care, that you don't recognize this in the photo. I wish you fun with the tutorial on YouTube. Ciao Jack
-
This is a process breakdown video to show what method I use to colour and finish a character concept in Affinity Designer on iPad. I’ll start with the main outline, adding extra line details, and then filling in colour using gradients (no brushes) IMG_2546.MOV
-
 Hi, I would like to ask when you will be producing non-subtitled multilingual tutotials. I ask because ersonally with regret I immediately decided to give up trying to understand how to use Affinity Photo and Desiner, so I abandoned these two licenses purchased in 2019. I made this choice because to be able to read the subtitles, but above all to reflect on the translations and at the same time also look at the pointer to understand what is taught in the tutorial, on average I should reduce the scrolling speed of the video to 0.50 or 0.25. This change would make them very long and stressful to consult.
 -
Hello, here I enhanced a shot of the medieval old town of San Gimignano in Tuscany/Italy. I took this photo with a tripod and a 13 second exposure. With Affinity Photo, I worked on the light conditions to achieve a dramatic and romantic atmosphere, like it was. I wish you fun with the video. Ciao Jack
-
- 2
-
-
-
- affinity photo
- tutorial
- (and 3 more)
-
I was asked about making a Rivet Brush, but I think it can be done with Stroke and Effects... so I made a video https://youtu.be/zAPtNUijwxM
-
 Hi, I'm Nekodificador, visual artist and content creator from Spain. I have a Youtube channel where I show my workflows, secrets and teach retouching and compositing throught tutorials. I fell in love with Affinity Photo but when I wanted to change from Photoshop it took me a while to learn it, so I did a video where I show how to do a few things in Photoshop and how to "translate" them into Affinity Photo. It is in spanish, but I hope it will be useful for everyone. Btw, it seem like we have new brothers in our community after this video. Oops hahah
- 10 replies
-
- 3
-
-
-
- youtube
- affinity photo
- (and 3 more)
-
Hi, some years ago, I made already a video to this topic. Meanwhile the former method doesn't work with the updates/upgrades. But there is another method. 😊 And in this video, I show this. Ciao Jack
-
- 1
-
-
- affinity photo
- tutorial
- (and 5 more)
-
 So I was searching around for any and every video on YouTube to give me a better understanding of how to use the pen/node tool. I stumbled across a video on YT: "AFFINITY DESIGNER CURVES FROM SINGLE STROKE. This tutorial helped me solve one issue (finding the easiest way to trace an image with a lot of curvy lines BUT with each curve flowing smoothly together from one to the next). I had created a logo (i can't show the whole logo) but as you can see some of the curves i created originally APPEARED smooth when i zoomed in close but some noticeable errors when i zoomed out/away from it. Once I zoomed out the logo had these subtle curves that made the logo look like it was starting to form corners. As I followed the tutorial, I got to where I was only using the SMART MODE tool, with these options selected: - ALIGN TO NODES OF SELECTED CURVES - SNAP TO GEOMETRY OF SELECTED CURVES - ALIGN HANDLE POSITIONS USING SNAPPING OPTIONS - MOVE BY WHOLE PIXELS - SNAPPING while I was working through, I was going by what I would always hear from the pros and amateurs "move the node handles around until you get as close as you can to the images/shapes. so that's what I did! Still wasn't perfect though. A-HA!!! THERES A PATTERN ("not sure if I'm just late to the party lol") Once you put your first node, you get the CURVE option after putting the second node which is your first line. You then go and make that line fit as perfect to the curve as you can which is the easy part. Then comes the hard part as soon as you add a 3rd node and however many more you want, trying to make that second curve fit PERFECTLY with the first curve usually doesn't match the way you want it to because at the same time you're also trying to make it fit with the 4th node. It then becomes this tug of war between the nodes LOL. node A. node B. = line/curve a-b node B. node C. = line/curve b-c node C. node D. = line/curve c-d node D. node E. = line/curve d-e **USING THE SHIFT KEY EVERYTIME (USUALLY)** **USING THE SHIFT KEY EVERYTIME (USUALLY)** **USING THE SHIFT KEY EVERYTIME (USUALLY)** Once you have the first curve (line/curve a-b) set to your liking , before adjusting the second curve (line/curve b-c) YOU WANT TO SELECT THE NODE (node C.) AND USE THE HANDLES ON IT TO START BUILDING THE END OF THE SECOND CURVE (line/curve b-c)...…..THENNNNNNN...…GO BACK TO THE PREVIOUS NODE (node B.) AND ADJUST THAT ONE TO MAKE THE SECOND CURVE (line/curve b-c) FIT and FLOW SMOOTHLY WITH THE FIRST CURVE (line/curve a-b). so therefore once you move onto the third curve (line/curve c-d) start by adjusting the handles of node D. FIRST then jump back to ex. node A. node B. node C. node D. node E. etc. line/curve a-b, line/curve b-c, line/curve c-d, line/curve d-e after the curve between node A. & node B. has been made (line/curve a-b), jump to node C. and using the handles to adjust the curve (line/curve b-c) to your liking THEN start adjusting the handles on node B. creating line/curve b-c which flows perfectly with the previous curve line/curve a-b AFD - nodes.mp4 HOPEFULLY I HELPED SOMEONE!
-
Hello, I used an ordinary photo of a car. In this speed art, I show how to improve and personalize the car. A method, which works also with your car: Erasing unwanted background, change the color, lower the car, widen the track, darken the windows, improve the chrome ... I hope, you enjoy the idea. Ciao Jack
-
- 2
-
-
- affinity photo
- tutorial
- (and 2 more)
-
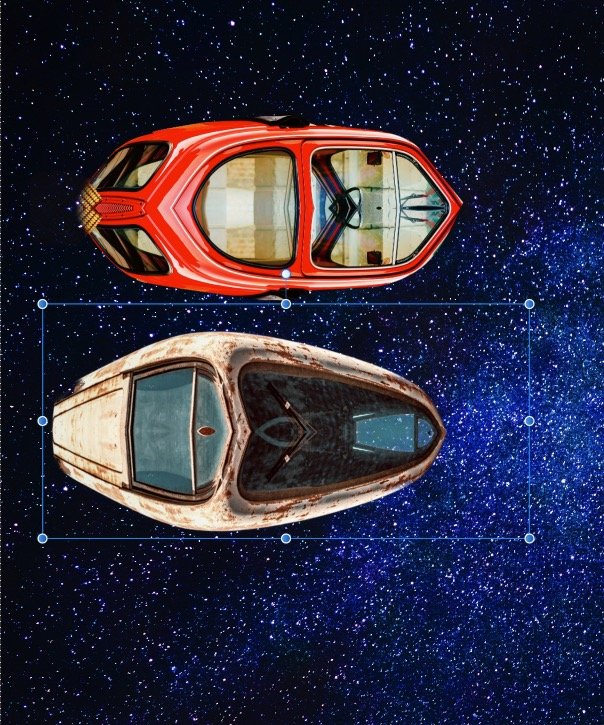
Create three spaceships in 60 seconds. Affinity photo tutorial. You can later add a background, mask and special effects. #Shorts #mirror #spaceship #madeinaffinity #affinityphoto #affinityserif #tutorial #photomanipulation #graphicdesign #affinity #digitallyfearless #affinityguides https://youtu.be/JuAGLBKBX5U
-


.jpg.7691567c4f251b5af498d40143519916.jpg)