Search the Community
Showing results for tags 'Transparency'.
-
 Strange transparency rendering behaviour when adding transparency to individual lines created with arrowheads. This has probably been a forever thing, but have just bumped into it again when fading parts of a flow build. If you create a single line with an arrowhead (curve layer) and change the layer transparency, designer renders the line and arrowhead as individual objects, which given that they are overlayed to prevent gapping creates a more dense area where the line meets the arrowhead. Work around is to group the object… which seems like an odd thing to need to do for a curve line that should behave as a single object. I can't think of an application where I would want/expect the current standard behaviour.
- 3 replies
-
- 1
-

-
- arrowhead
- transparency
- (and 3 more)
-
 Learn how to create the transparent glass effect in Affinity Photo. This effect is very easy to recreate, perfect for beginners:
- 3 replies
-
- 9
-
-

-
- glass/transparency effect
- glass effect
- (and 1 more)
-
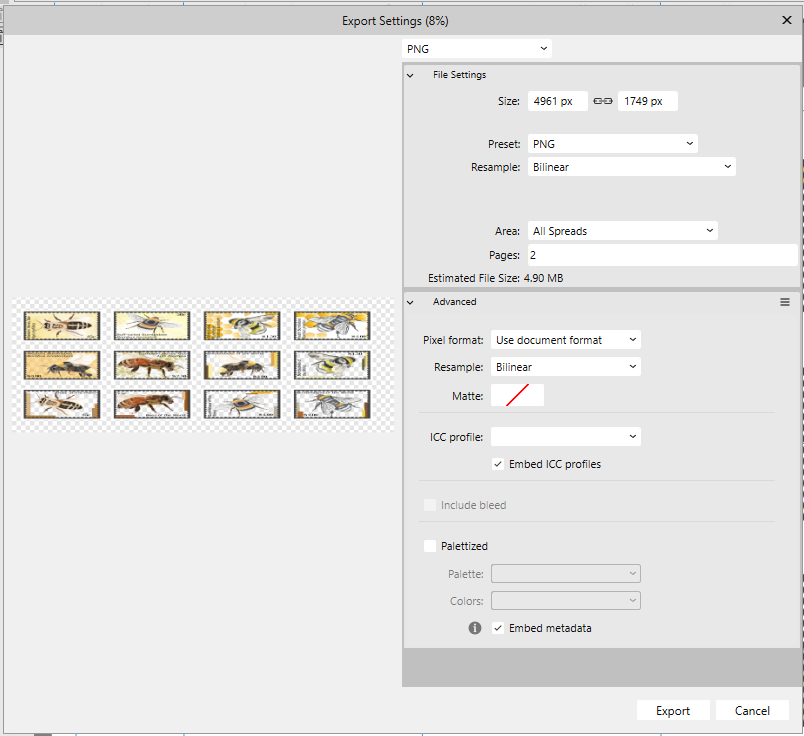
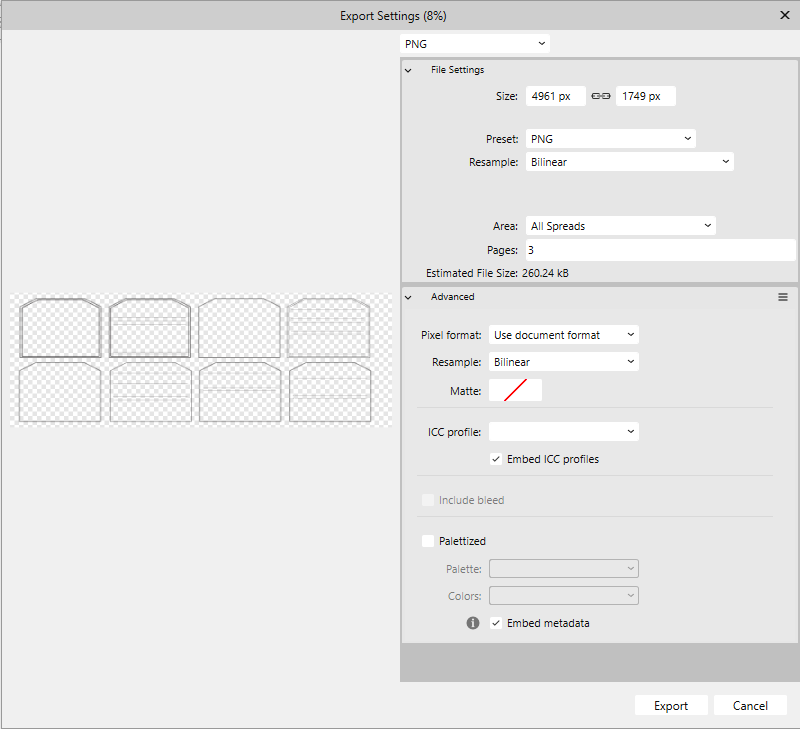
 I have looked and found no other info regarding my problem. I am creating a six page document of A5 size. I am placing (on separate layers) text, images, background and borders (for printing). The first page has no issues and works when exporting to png. The second and third appear squashed and the background is not visible. I am unsure what I am doing wrong as none of the page settings have changed from the first page. I saved & exited. The second page worked, I did a little extra on page 3, came back to 2 and it was squashed again. I figure it surely cannot be something I am doing wrong (I hope) since it worked once then reverted back again. I don't know where to start to try and fix and issue that isn't consistent.
-
Hello, Using Publisher V2.1.1, I have encountered multiple transparency glitches that are only apparent after exporting to PDF. The two attached instances involve an FX drop shadow. My first three or so exports were fine. Then "first page glitch" happened. I added the workaround you can see in "second page glitch" and the export was fine a few times. (Client revisions: RIP). Then "second page glitch" appeared, so I added the same type of workaround for it. The longer I edited and exported the file within Publisher, the more glitches developed on export. (There was another somewhat different glitch later, but my workaround proved better than my initial technique, so I didn't bother saving that glitched version.) I've attached the working files and their corresponding PDFs. "Second page glitch" is the original file that was created in AD and then opened in AP early on. I wondered if the app switch was part of the issue (even though the glitches appeared after several successful exports in AP), so I saved a version of the file in AP. Then I undid my workaround (box of the same size with Gaussian blur applied) and reapplied the desired drop shadow FX with the same glitched result. (The client picked the colors.... </3) OS: macOS Ventura 13.5 and 13.5.1 (Updated after glitches occurred, hoping that would solve it. It did not.) hardware acceleration: on Thanks! first page glitch.afpub first page glitch.pdf second page glitch.afdesign second page glitch.pdf
-
 Hey @Ash getting some additional transparency tool presets or the ability to add our own presets would greatly enhance my workflow. I find I am recreating the same setup all the time and the ability to either have or create and save a preset would be awesome. Currently I have created assets of the few I use often but the ability to create and save a preset to have it in the context toolbar would be nice. Examples would be linear with transparent ends with a solid centre or elliptical with solid edges and a transparent centre... or linear dashed, eg solid, transparent, solid, transparent.
 -
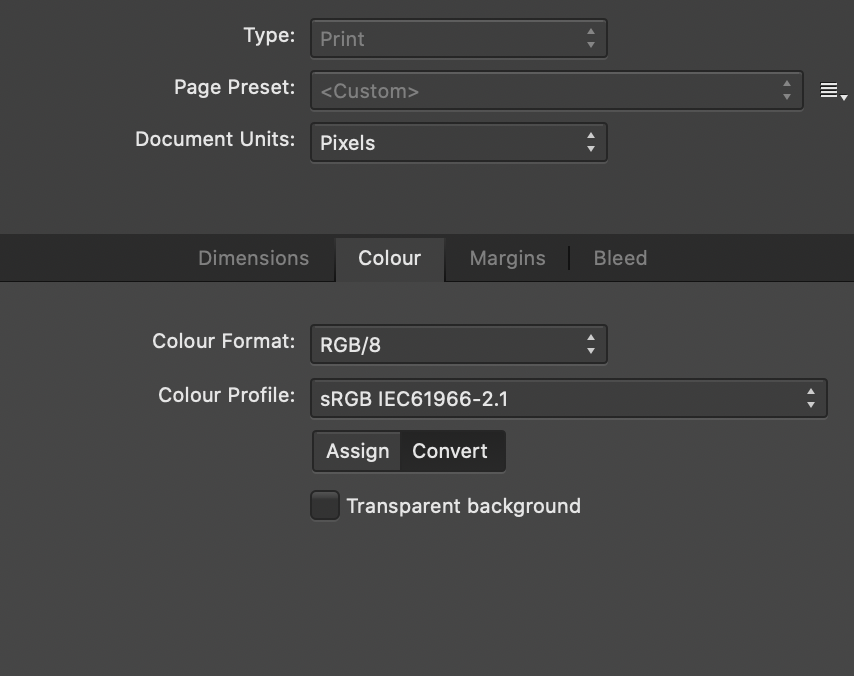
 Since the last days I am losing all my printing (directly to my L14150 EPSON printer or "Windows Print to PDF"). All imagens with transparence backgraound started to lose the transparence or bright changing, as shown below: There is no filter, transformation, FX, mask (...) applied. Just a PNG over other image. Everything was working fine untill few days ago. What is happening? If I do the same art using Corel, the correct result os obtained: I am using Affinity V 2.0.4 and tryed to chance de color profile several times. Its an Affinity bug, definitely. Is anyone having the same bug?
-
 Is there a way to flatten transparency from within Designer? I know you can do this on export, but what about modifying your current document? E: For the feature request refer to:
 -
Hi! Just to remind, there are 4 ways of getting transparency (at least that I know, I am newbie here): At object level: fills and strokes At layer level: Opacity settings At Layer Effects level: Fill opacity At Tool level: Transparency Tool It looks like some options of "Select Object" and "Select Same" are not working properly. I attach a file and write the following tests: Deselect all objects and layers, then Select->Select object->Transparent Objects: It selects ALL objects (and text layers), regardless if they are transparent or not, and regardless of the type of transparency applied. Select one of the objects with transparency via Colour panel: Select->Select Same->Transparency: selects ALL objects, same as before. Select one of the objects with transparency via Layer panel: Select->Select Same->Transparency: selects NOTHING, not even the object in the third column, which has the same properties. Select one of the objects with transparency via Layer Effects: Select->Select Same->Transparency: selects ALL objects, EXCEPT the ones with transparency in Layer Panel. Select one of the objects with transparency via Transparency Tool: Works correctly. Also: Could it be great if we can have a little hint (icon) in Layers panel to show which objects have the Transparency Tool applied. Thank you! transparencies.afdesign
-
 Hi there! I am new to Affinity but haven't found this question searching in the forum. I attach the illustrator file so you can try. Just import it to Affinity Designer (settings in the image file). It seems that the layers of the big logo (the small one is just the original, for comparations) keep the aspect as in illustrator, I mean they have some degree of transparency, but the Fill opacity values in Affinity layers are 100%. How to fix this without using the "Revert Defaults" which causes loosing the amount of transparency? Also, another question: In the Illustrator file I have another grey square out of the document space (to the left) but it is not kept in Affinity. How can I keep it? Thank you! prueba.ai
-
 I converted a photo with a pure white background to PNG and tried three different ways to to make the background transparent (1. DOCUMENT: transparent, 2. FILTER, COLORS: remove white matter, 3. FILTER, COLORS: erase white paper). The last option was only partly effective: whitish bits of the image were also erased. What am I doing wrong? Original: Public Domain photo from Pixabay
 -
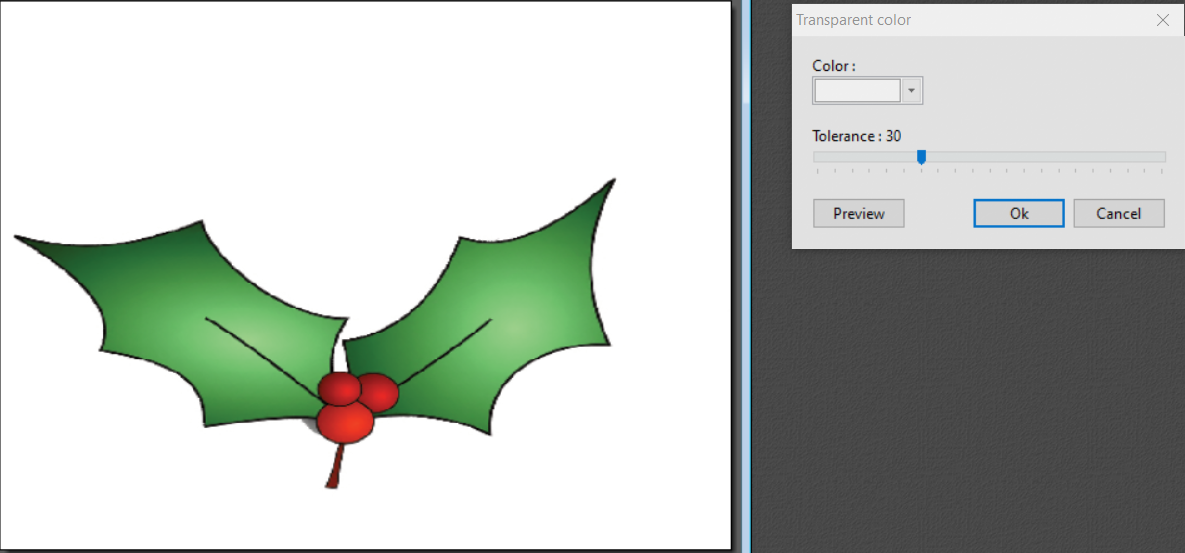
 Is there an easy way to turn the background of a graphic transparent. I have been using photofiltre a free app and I set out below the procedure. Select the graphic, choose the colour to be made transparent, preview it, and confirm, If the graphic has matching colours in it, you can fill the background with a different colour and make that transparent. Now how do I do it in affinity
-
 For a few applications, e.g. with shapes with the 3d effect, it's important to be able to visually "cut" a hole in the shape without actually altering the original shape. It's also useful in general to be able to remove a shape's area from a drawing without having to mess around with subtracting the shape or shapes from (especially since the order of the layers sometimes gets messed up if you don't subtract the shape from each shape individually, which means a lot of copy-pasting). So I'm asking if it's possible to set a shape to act as a visual "removal" effect. If it's not clear what I mean, I mean that, if a shape is set like this, the area where the cutting-out shape is should show the background, visually overriding layers below it that might otherwise be visible there. EDIT: Turns out the Erase blendmode is what I'm looking for.
 -
 Hello, I bought a bundle of brushes (https://gumroad.com/chuvabak?sort=page_layout#euNx) for my board game prototype but I ran into a problem: the ABR brushes seem to be semi-transparent once imported to Affinity and thus instead of being able to stack the ship parts under or on each other, they blend, which does not work at all (see the screenshot). Is there some way to prevent that? (Blending options did not help at all). If not, is there some workaround? (I tried to apply selection to the object, then invert the selection, so that the new object would only appear "outside" of the previous one, but it does not work well, since there are always some white spots between the objects when used in this way.) Thank you for the answer!
-
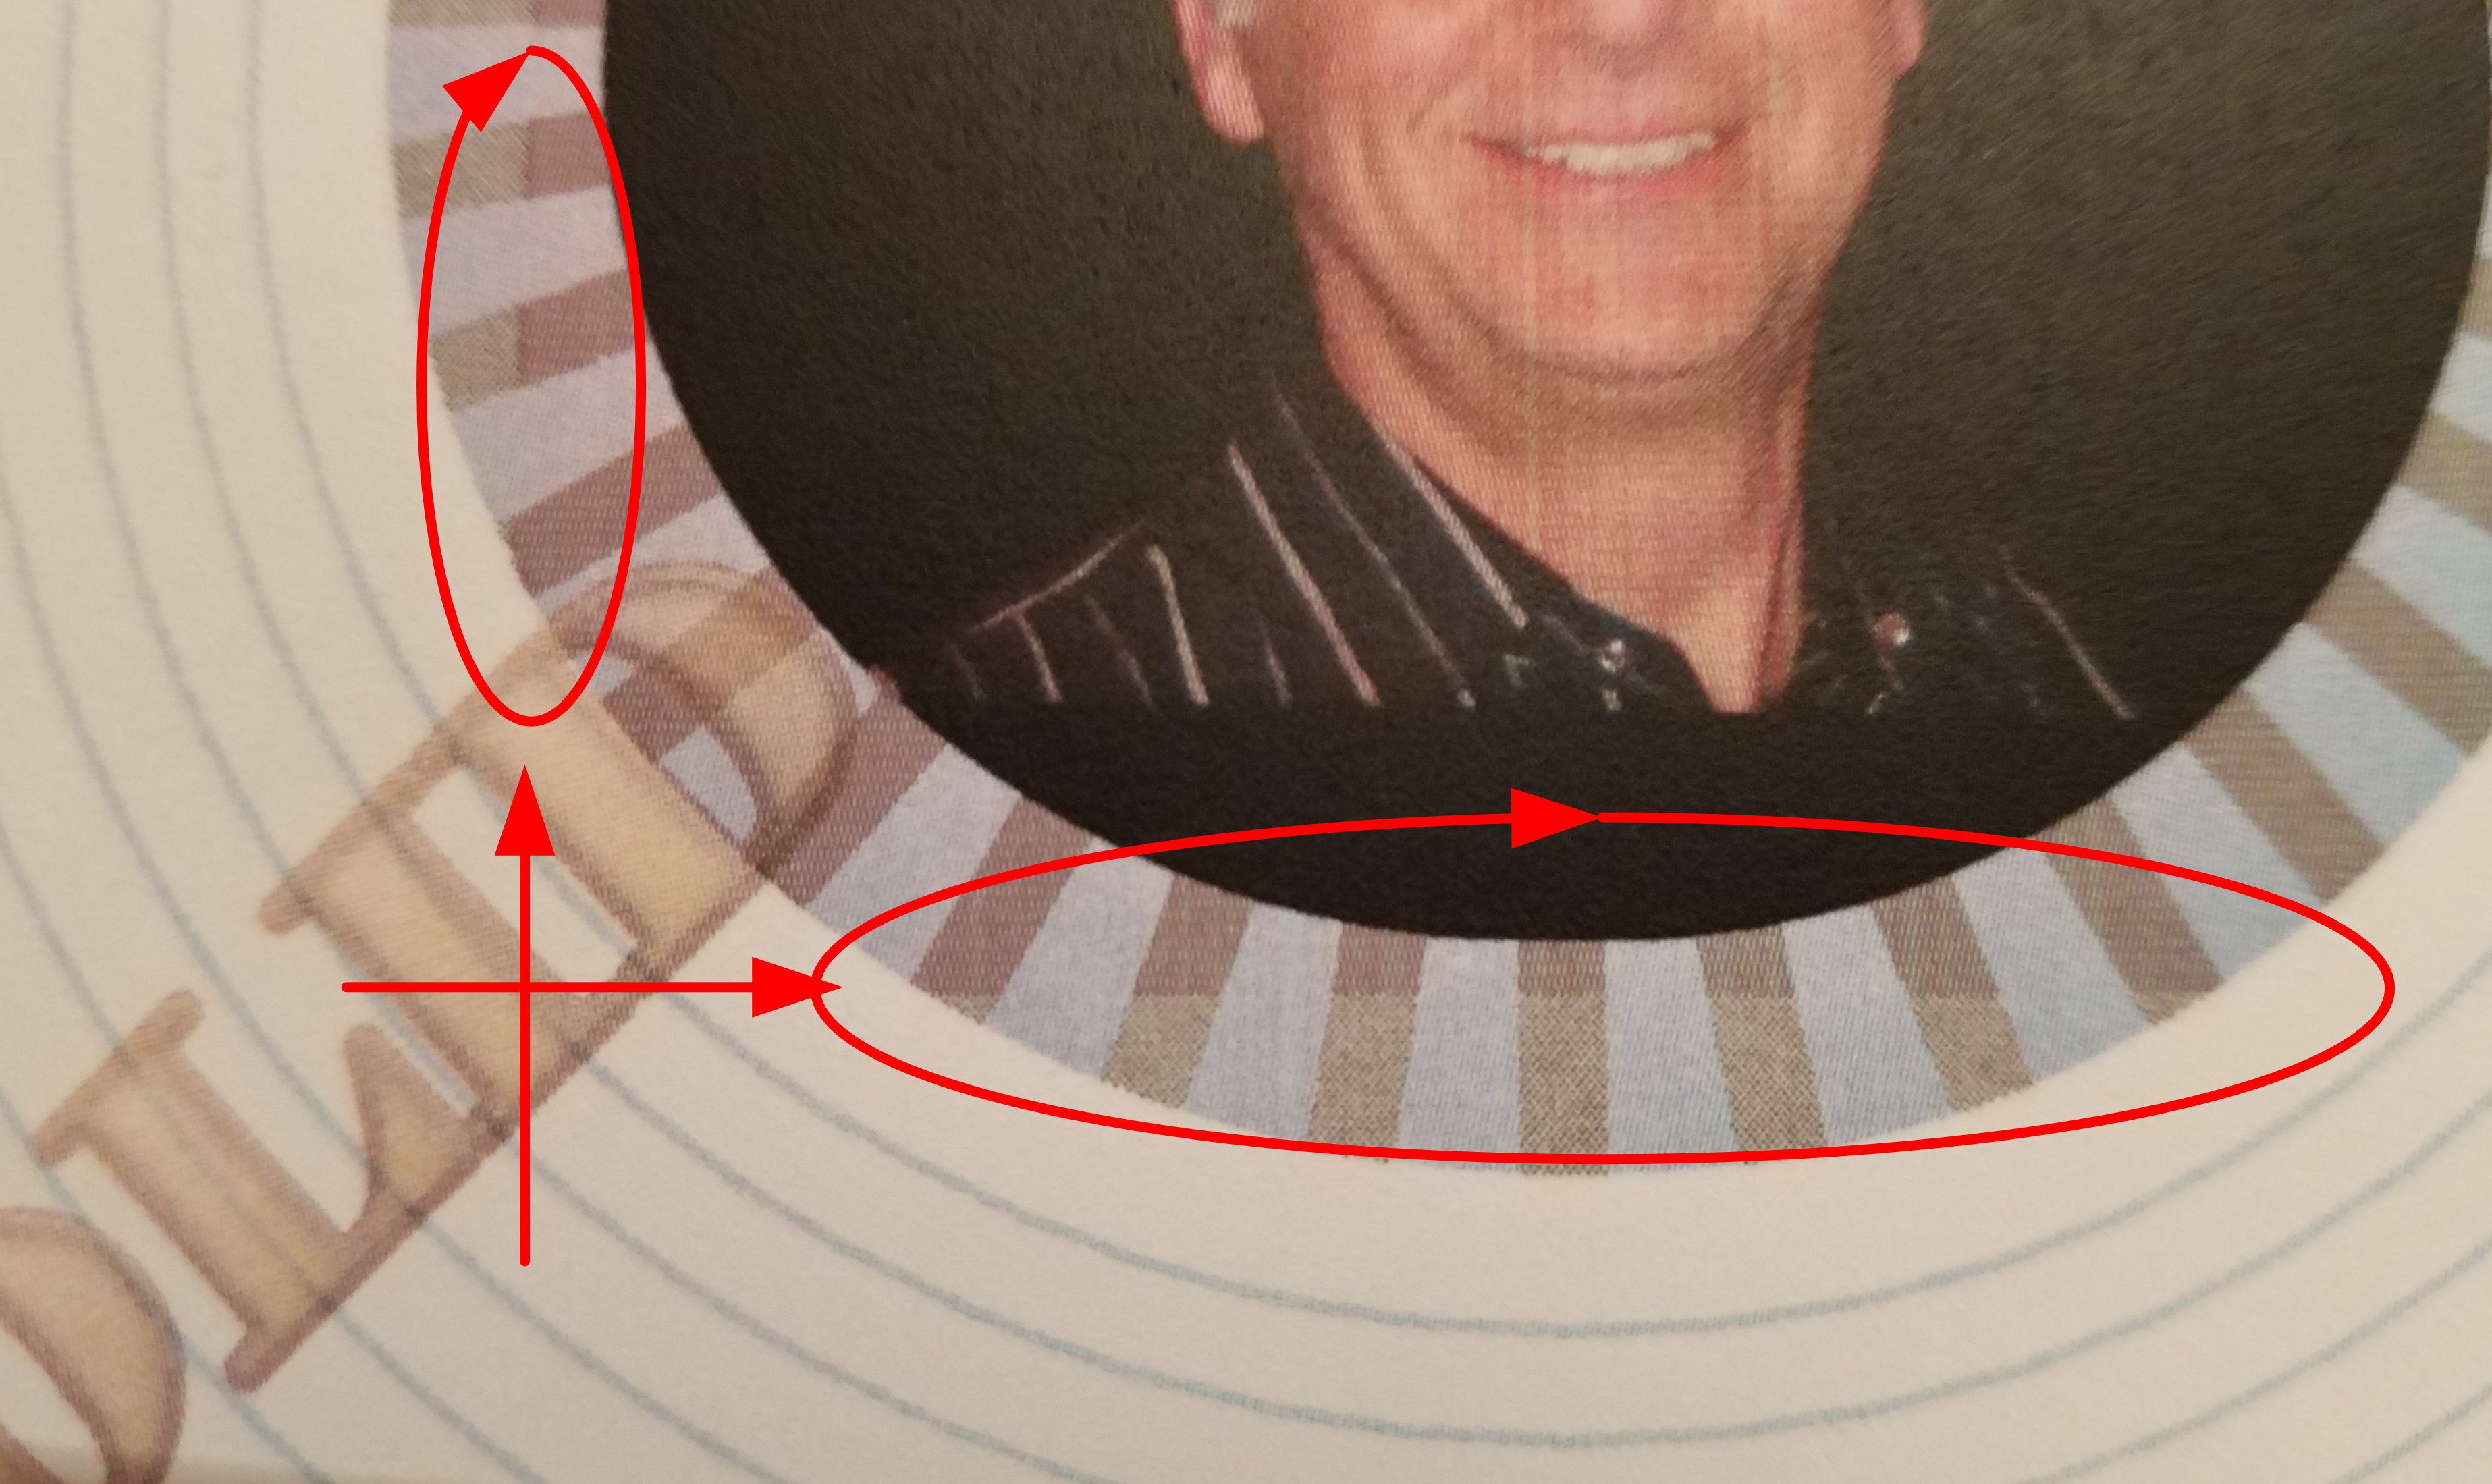
 On a printout from a PDF created in Designer, the art graphics are more clear and have deeper color where a .PNG image with transparency is than other areas beyond the edge of the .PNG image. In the .afphoto file, line art is in a layer below the .PNG image. I have version 1.9.1 on PC desktop running Win 10 and printing with an HP Laser Jet Pro. I've attached a detail image taken of the printout. What's going on? Is this a bug? Roger
-
 Hi there, I was trying to batch process my blender rendered .exr files to png and even though the exr files are saved in RGBA, I cannot get them into png format with a transparent background. Regardless what I do, the backgorund is alsways black as one or more of the render layers in the exr shows a black background. I would only want the top view (RGBA) layer with the transparent background. How can I do that? Thanks so much for your help! Best, Hidari
 -
 This is sort of a follow-up to some of my posts (ff.) in the "Can anyone recommend an acrobat pro alternative" thread. I have now made a few apples-to-apples comparison tests on how exactly Affinity (Designer 1.9.1, but it affects all three apps) handles PDF/X-3 and X-4 export when it contains vector objects and text with transparency or transparent gradients. Then I have used exactly the same vector and text objects with exactly the same values in Illustrator CS5 and exported ("saved as", in fact) as PDF/X-3 and X-4 as well. In both cases I was using strictly the default export presets. To sum up in advance: PDF/X-3 export from Affinity under these given conditions is absolutely pathetic. Sigh… Original files: Exhibit 1: transptest19f27.afdesign.zip Exhibit 2: transptest19f27.ai.zip Both CMYK with Fogra27 profile for consistency. Note that the AI gradient algorithm doesn't exactly match Affinity's – don't know why, I'm not a mathematician – so the appearance is slightly different but that's beside the point here. For illustration, here's how the documents looks like: PDF/X-3 export: Exhibit 3: transptest19f27-x3-ade.pdf = PDF/X-3 export from ADe Exhibit 4: transptest19f27-x3-ai.pdf = PDF/X-3 export from AI CS5 The difference how each app handles transparencies is striking: Affinity rasterizes everything underneath a transparency to a flat pixel layer. Only in some instances it at least tries to do the right thing, i.e. converts e.g. text to curves and uses those as a vector clipping mask for a pixel rectangle instead of attempting to anti-alias everything as a plain image: But the other image layers usually look like a screenshot, only worse, because screenshots are usually losslessly compressed whereas Affinity's default PDF/X-3 preset "allows JPEG compression" with "quality 98" – which sounds like a lot, but it will introduce JPEG artifacts when applied to vector objects. And not to stop there, if there's a transparent gradient involved, it "forgets" to apply anti-aliasing to the text with transparency underneath: And as if not enough, even though black is set to overprint in the PDF/X-3 preset, the part under the transparent gradient does not respect it and partially knocks out CMY which means the colors of the "overpri" part are incorrect: Illustrator is smart enough to dissect (boolean divide, I guess) each object underneath a transparency into common "denominators". Where possible, it will retain every single piece as a vector object, thus retaining full scalability without artifacts or anti-aliasing. Where not possible or too complex, it will create simple bitmap image rectangles using the exact gradient involved in that area, then use the original vector curves (or text converted to curves) as a clipping mask. (There are multiple nested clipping curve instances "just in case" or something.) No jagged or antialiased edges whatsoever. Black text overprint consequently respected, even in those clipped parts with pixel gradients. Here the PDF/X-3 as exported from AI CS5 and reimported into ADe for inspection, where I have disabled some of the clipping paths for demonstration how the pixel gradient rectangle looks like: Frankly, the "Affinity way" frustrates me. PDF/X-4 export: On the positive side, in my very example the PDF/X-4 export looks pretty good. Exhibit 5: transptest19f27-x4-ade.pdf Exhibit 6: transptest19f27-x4-ai.pdf Conclusion: Sadly, for proper PDF/X-3 export when transparencies are involved, InDesign or Illustrator will have to remain part of my workflow for the time being, for as long as I haven't moved to MacOS Catalina and beyond: design/layout in Affinity export PDF/X-4 place in InDesign or Illustrator export PDF/X-3 ~~~ Serif, please fix it! thanks
- 1 reply
-
- 4
-
-
- pdf/x-3
- transparency
- (and 1 more)
-
 Greetings! I'm here to propose the addition of an Affinity version of the Illustrator option called "Knockout Group" that prevents elements in a group from showing through each other, so that, even if two circles are transparent, if I put one at the top of the other, the one at the top will be at the top hiding what's beneath, like this: Even though both circles are transparent, the green is still at the top and doesn't show the purple line that should be beneath. With that option I can achieve this! The clock at the top is not showing what's beneath, instead, it's showing the background (which is transparent but this image shows a white color). Thanks! If there's an option like this already, please tell me! I've been searching this with no luck, so I guessed that it's not actually on Affinity Designer!
-
 In designer 1.9, when you group a text frame and a form with transparency gradient, the final text size is larger than the original if the text frame has been resized previously. Steps to reproduce result: Create a text frame and write some text Enlarge the text frame dragging the resize handler (The one that enlarges both frame and text) Create a form and apply a transparency gradient to it Group the text frame and the form. Text gets enlarged in the same proportion that it was enlarged before. Note that this only happens when grouping (with menu, contextual menu or command+G), but it does not happen if you manually place the text frame into the group moving its layer, so the error is in the group action itself and the resize being reapplied to the text..
- 2 replies
-
- 1
-
-
- transparency
- text
- (and 1 more)
-
When I create a afpub-file with transparencies and I want to export as pdf x4 the following occurs: in the x4-settings I choose rasterizing nothing. I place a pdf-vector-logo (the blue star on the upper right side) and transparence it. Exporting result: the transparency vanishes. I place the same vector logo as a afdesign-file. Result the transparency vanishes I open the pdf-file in afpub and copy it in my file then a make the transparency: same result I copy the afdesign-file and paste it in my afpub-file, then I transparence it. Result: everything is just as I want it. The preset of the x4-Pdf-setting is rasterizing the not supported parts. When I do not force to rasterizing nothing, the vector-transparencies are always rasterized. My printing-house says this not ok for x4-pdfs. I tested exactly the same in Indesign with placed pdf: In Indesign x4 pdfs are not rasterized, just as the printing-house wants it. in Afpub after weeks I found the resolution with the copied and pasted Afdesign-file, but this is a crazy workaround. I cannot convert all my vector-PDFs to Afdesign-files. Could you please change this behaviour. All vector-pdfs with transparency should normally not be rasterized while exporting to x4-pdfs.. RB-titel090121-2mitafdes.pdf RB-titel090121mitpdf.pdf RB-titel090121sternafdesreinkopiert.afpub
-
 Hello, what would be the best way to remove alpha channel pixels from a layer or make them fully opaque? In case I'm not making sense, here's an example: I add some red background and make a stroke with the brush over it with a green color, there's going to be red pixels of the background, green pixels of the brush and pixels that are green with alpha channel - how could I remove those with alpha channel or make them fully opaque? Both GIMP and Photoshop have ways of doing this for whole document, layer or selection, I'm curious how one would do this in Affinity Photo, or even Affinity Designer. I could provide an example if needed. Thanks!
 -
 Hello All, I have a very large image with lots of large layers, (over 100), they were all rendered in my CGI application to a standard scale, as 32 bit PNG, regardless of the size actually occupied by the subject. I'm now combining them into one image, and lining them up. In many cases the layers are 90% or more 100% transparent. But to select with a click and drag, I have to go around all the blank bits I cannot see, which is messy and prone to errors. Can anyone please tell me of a quick way to crop down to the part in a layer that actually has useful non-blank pixels in it? I suspect that this would also release a LOT of memory, and make working with this image more pleasant in general! Thank You, Nick
 -
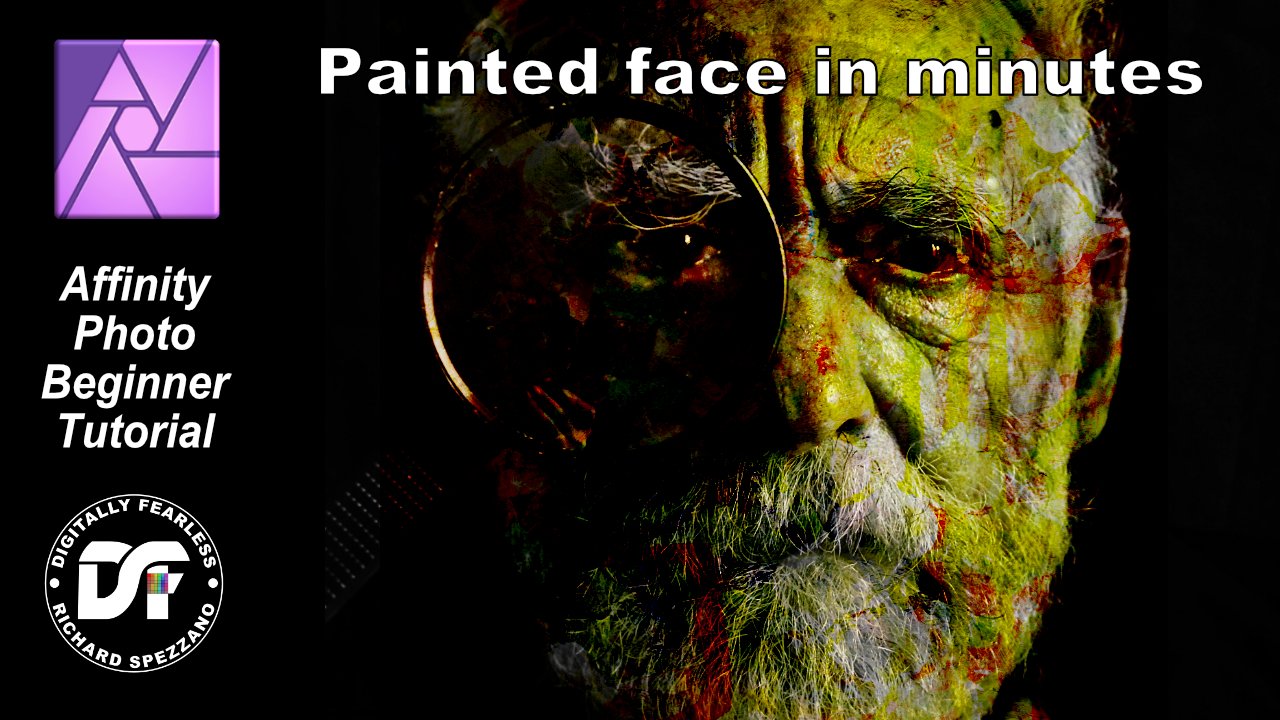
 Painted Face in Minutes! Affinity Photo beginner tutorial on how to give a face a painted look in just minutes. The tutorial uses black and white photos and a black background to manipulate the photo. https://youtu.be/lhoqEDRjELQ
-
- 1
-
-
- photo manipulation
- affinity photo
- (and 8 more)
-
 Hi, I'm using 1.8.3. When I export my slices and select PNG, no matter if in Document Setup I unchecked the transparent background, I still get Transparent backgrounds both in the Sections preview panel, both as a result. I want my slices to have a white background.
-
 Hi Affinity Community, after trying several different methods to reach my goal, I sadly have to resort to bother you guys. What I want to do I want to create a cheatsheet for a game I'm playing and for that I want to extract different symbols used in the game from screenshots (particularly the one attached). While the symbols are white in color, the background has different shades of blue, making the masking more difficult (for me). What I tried Created new Affinity Designer File. Designer Persona Created new artboard for the screenshot itself and for every symbol I want to extract. (see attachment) Used the "Placing content" tool to insert the Screenshot into the designated artboard (and matched their sizes). Rasterized the Layer. Pixel Persona Added a "Brightness/Contrast adjustment" (with contrast set to 100%) to the screenshot in the hope to easier select the wanted pixels. Added a "Mask Layer" to the screenshot. Used "Select -> Select Sampled Color" (model: "intensity") and picked the blue/black surroundings. With the selection I clicked the masking layer and pressed "del" to hide everything but the symbols and lettering. (or rather paint the mask black by doing so) Designer Persona Used the "Placing content" tool again on each artboard for the symbols and choose the file itself and from that the artboard with the screenshot. (Sadly I only get the tool to embed the file itself, but don't get it to just link to itself. This results in it not updating automatically. Is there a way to do that? I found a support page for Affinity Publisher, but I'm not really familiar with that part of the program suit...) I then positioned the embedded artboards so that only the desired symbol is seen in each smaller artboard. Export Persona Each artboard is a slice and is exported as PNG for further use in Visio or again Affinity Designer. After importing my exports into Visio I realised the background is not completely transparent. (see attachment) In short Is there a way in Affinity Designer (or Publisher) to link to a file of itself to make use of automatically updating several artboards? (This only works in Publisher?) How do I make sure, that selected pixels are completely set to transparent and don't have some color left? Would you recommend another workflow to approach the problem? Thank You! This is my first post in the forum and I'm quite new to the Affinity Suit, thank you for taking your time answering. 🙂 (Hopefully I didn't ask questions that are actually quite easy to solve, if I had googled the right terms...) TenTo
-
 I watched this video - how is she getting the transparency on top level objects? She seems to add an object as a solid colour on top of another solid colour but then does something that makes the top object show the grid underneath it. How are is she doing that? She never seems to touch the opacity slider for example, she seems to do something quickly that makes a top object show the grid underneath.