Search the Community
Showing results for tags 'Transform'.
-
 Hi @all I think i found a bug in publisher while transforming and duplicating a layer and it looks like the transformation was miscalculated. There are 2 Videos. The first shows how Designer works (that shows what it should be like) and for comparsion the second Video shows the same steps in Publisher with the wrong calculation. it seems that the rotating at the end of the video, where the layers with the transformation are duplicated, will be wrong calculated. The Steps in Designer: Designer.mp4 Same Steps in Publisher. Look at the difference in transforming please. Publisher.mp4 And in the Publisher Video you also can see two issues i reported to you. - Snapping of the rotaion centre to Guidelines doesn´t work (same snapping settings as in designer) - Roation Centre and ohter guides will be hidden if moving guidelines. This is very impractical. Many greetings Uwe
 -
 Two problems that, for use of Affinity Designer in technical illustration, I would like to see resolved: 1) What is the best way to scale (resize) an object, say up or down a certain percentage? Do you have to do the math and enter new values in the width/height edit boxes in the Transform studio panel? 2) What is the best way to move an object a certain distance in a certain direction? Again, do you need to do the addition/subtraction and enter the calculated values in the X/Y boxes of the Transform panel? Thanks for assistance!!
 -
 Hi, I often need to build a new picture from several others and I did that in photoshop by "transforming" the layers ("cmd t" keyboard shortcut). Isn't there anything like that possible in Affinity Photos for Desktop Mac? I couldn't find it at least.
 -
 Is there a way to change the default position of the transform anchor point in Designer and Photo to not be at the top left but rather in the center?
 -
 Hello. How can I scale/transform an image layer in Affinity Photo (iPad)? I'm trying to get to grips with the Affinity suite on the iPad (Photo and Designer) and cannot seem to find anything related to a relatively basic feature such as transforming an image layer on iPad. Found something for the desktop version but it does not seem to apply to the iPad interface.
 -
 Hi there! I'm astonished with Affinity Designer for ipad! I'm almost completely transitioned from my PC to iPad, just need a few more options. Suggestion #1: Select BY SAME FILL COLOR This is very important for professional work :) For example, if a group of objects (or shapes) are overlapping, what we need to do is to select them all, and divide them. After they are divided, we need to click on "Add" to merge the shapes together, and that's fine. But if we have a LARGE number of SMALL shapes, merging one by one can take forever.So, option "Select by (the same) Color" is very important and time saving for us designers. How I think it should be done: Solution 1. Click and hold the color (from toolbox) with pencil, or with finger, and while holding it select (with your left hand) three dots icon "..." and then choose "Select all" Solution 2. Add a new icon named "Select Same Color", or similar. Suggestion #2: SHAPE EFFECTS For me, as a Vintage illustrations and Logo designs fan, I would like to have a ARC LOWER, ARC UPPER, AND (possible) ARC tools. For example: Netflix logo. How I think it should be done: 1. After typing "Netflix" for example, convert curves, and than click on new icon set named "shape effects", than click on "Lower arc", or "Upper Arc". OK, that's for now, If I missed these options, if they already exist in same/similar form, please let me know.
 -
 Hello, I would like to ask - Is there any resizing of pixels during tranformation of object? I remember that Photoshop automatically depixelate your selection to size of canvas... Is this function in Affinity photo too? Thx! Lukas
 -
 try it on these logos - whether grouped or as a multiple selection, the type is not sizing with the rest of the elements coco logo variations 1a.afdesign
 -
Hello! after Adobe pulled another stunt (with Lightroom this time) I'm preparing for an Adobe Free Future™! I've come back to Designer (ßeta 1.6/12) — and what I saw made me very, very happy. Cannot wait till I see what you guys do with Publisher! As you have guessed I'm still missing some features before I can ditch Illustrator all together: selecting objects by type/look (see screenshots with Graffix Select Menu) lockable guides and the making guides from objects. Also: split in to grid. overprint on a per object (fill/stroke) base (not only in the swatches). ability to choose a font (and other things) from the contextual menu. Despite its name, it's not very contextual right now. plugins/scripting would make Designer much more powerful of course. See for example what you can do with Python in DrawBot of Nodebox offset path (could be scripted?) more transform options like "transform each", which is very, very handy in Illustrator … Anyway, can't stress enough that you guys already did a fantastic job, making such a powerful app from zero. …without the income of subscription-model ;-). Keep up the good work! — Benjamin

-
 When I take an SVG and scale it down, the exported resulting SVG seems to still use the original path, but applies a transform to scale the path down. Is there a way to cause the path itself to change to the new scaled-down dimension and NOT apply a transform? In other words, I want a new path scaled to the new dimensions, not the original path transformed to the new dimensions. Thanks.
 -
 I'm about halfway through my Designer Beta and while I've generally been absolutely in love with it, whipping vague whims up into actual designs with astonishing efficiency, I recently ran into a glaring omission—the ability to perspective-transform shapes without rasterizing them (and even that would appear to require a copy of Photo, which I haven't yet explored). And not in a skew-to-the-side way (which does seem to be readily available in Designer), but in a vanishing point fashion, like the text in the picture below. In what I've googled of the issue, I've seen it spoken of as an established, known limitation, but also didn't see it on MEB's most-requested feature list, so... here I am officially requesting it. My wheelhouse is... abrasive, hard-sell punky type designs, the ability to project shapes towards the viewer is something I frequently employ. I'm not going so far as to call its absence a dealbreaker when my trial expires, but I will say it's looking like it'll be a persisting nuisance having to find workarounds.
-
When i want to swap object position, i need to open notepad, copy the x y coordinate, twice. It would be elpful if i can just select 2 object, RMB, and there is a button that let me swap them easily.
-
Hello, I am new to Affinity for the iPad and I am stumped when trying to place an image that is larger than my created document. In Photoshop I used the ‘free transfom’ option to reduce the size of the photo by dragging the handles. Is there a way to do this in Affinity? I just cannot see it. Any help would be appreciated. Thanks. Steve
-
 I enjoy using Affinity Photo on a Mac (OS X 10.12.6). I frequently need to resize a folder of images and run a small macro to place my studio logo on these lower-resolution images for use by the client, post them to social media, etc. I downloaded the update for Affinity Photo v1.6.7, and it's great. But is there still no way to run a batch job on a folder containing both landscape and portrait orientation images and end up with all of them properly resized to the same pixel dimensions without distortion? I saw a discussion about a complex macro for this purpose in another thread. However, this essential function should be included as a basic part of Affinity Photo's capabilities, yes? Has anyone had success with this sort of operation? I really love Affinity Photo and tell all of my pro colleagues about it as a potential replacement for Photoshop, but this simple issue could hold many pros back. Thanks very much for any insight that you developers and experienced users might have.
 -
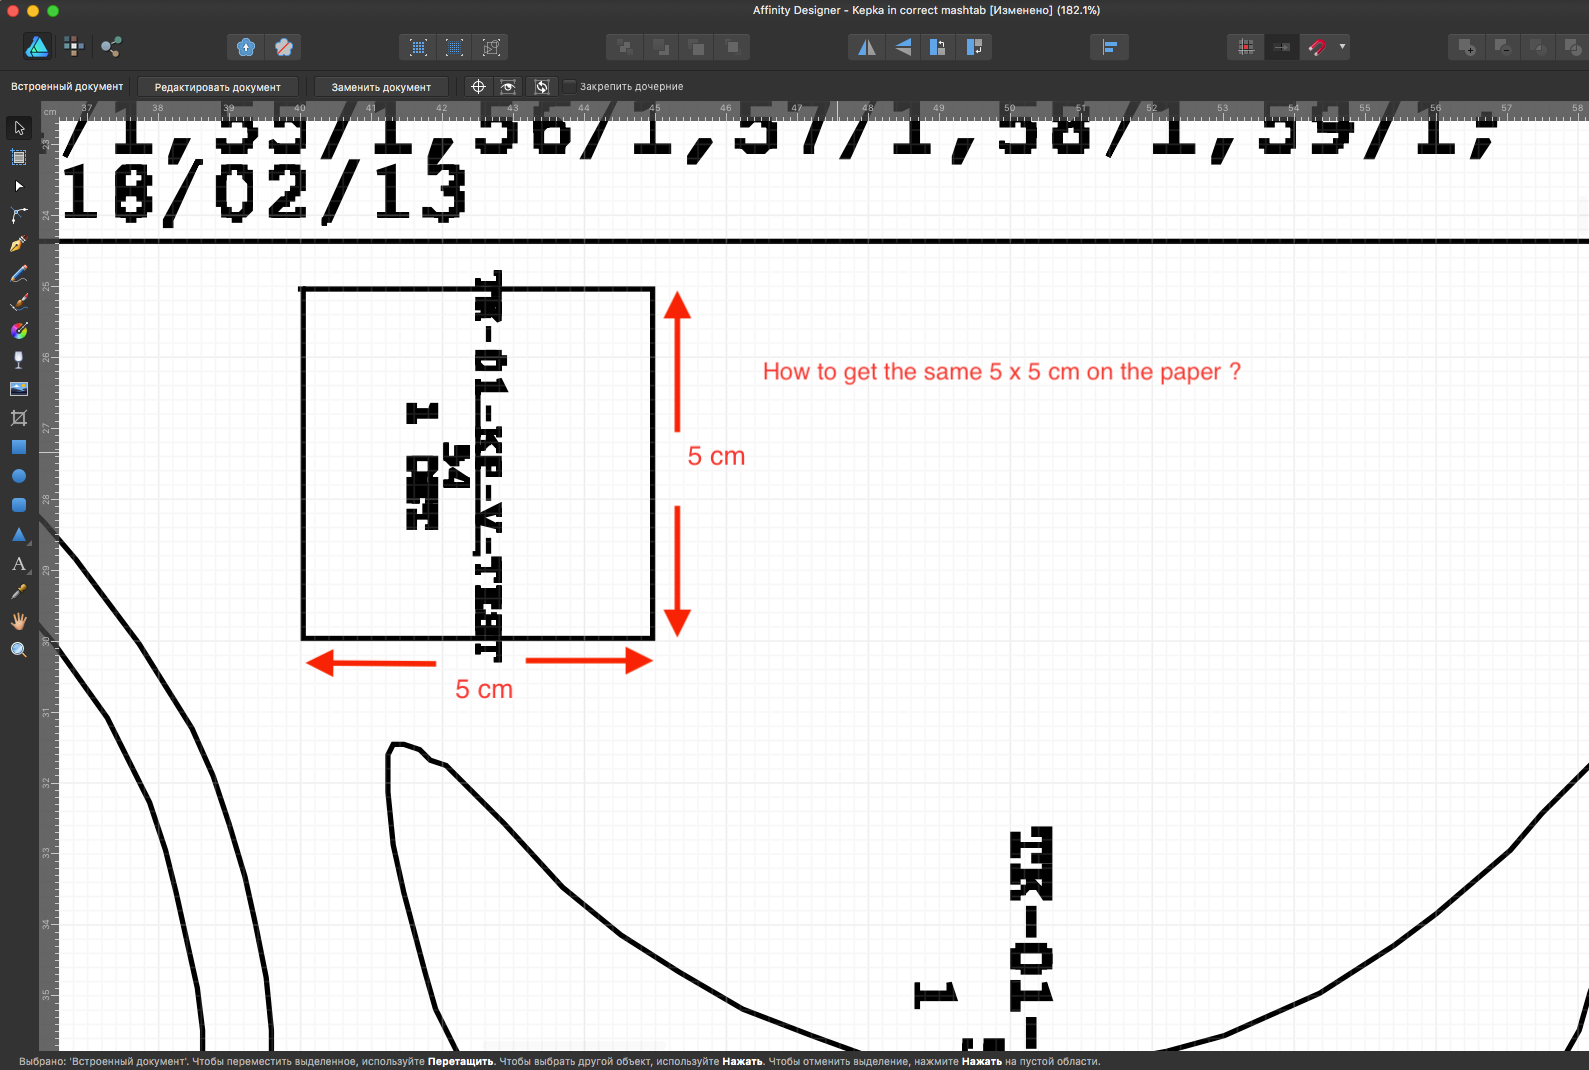
 Hello, I have .pdf file (which was converted from HP plotter's .plt format ) with one big vector image. I need to print this drawing to A4 papers and I need to get exact the same size. PDF-file is relatively big (about 150 x 200 mm) and probably it will takes about 15-20 pages in A4 format.. I've created empty Affinity Designer's file (150 x 200 mm) and dragged pdf to Affinity's window. Then, I've turned the Grid on and resized the image to get the size what I need. I have one test-square (5 x 5 cm) on the image which helped me to get the correct size in Affinity. Now I need to print it but I have 2 problems. 1. How to print this file with correct sizes, in order to get the same 5 x 5 cm square on the paper? (when I try to print I can see only one page which hold she whole document) 2. How to split this document into several pages and re-save it to multipage .pdf where each page will be the part of an original image but in A4 format page? Many thanks. Probably Affinity Designer is not the best solution for this purpose but it was the only software which I have where I was able to resize the image properly.
-
 I'm creating banners and have a very narrow banner (1350 X 348). I pop in the picture and transform the image to where I think I want it. However, after some editing, I want to move the image around a bit, but I'm only working with what I've already transformed the image as. Is there a way to get back the full-sized image or re-transform the image to where I want without losing what I've done (I can go back in the history and readjust, but it seems to lose my future edits)? I'm sure this is quite simple but I'm hoping you can help a newbie out. Checked the videos/tutorials and no answer yet.
 -
 Thanks to the Affinity team for having very clean and configurable SVG export! One thing I noticed when not flattening transforms is that some very near zero values are exported inside affine transformation matrices which are no doubt just rounding errors in computations of positions. I've attached an SVG file that shows these, an example of which is: <g transform="matrix(1,-1.22465e-16,-1.22465e-16,-1,288,228)"> I was wondering if an option could be added to clamp these values to zero? Any value below the clamp value forces the value to zero, for example a clamp value of 2e-16 on the above would produce this output: <g transform="matrix(1,0,0,-1,288,228)"> If the rounding error is not from computing the SVG export then another option that could work would be to add a cleanup option that would clamp values in the internal representation Affinity is using. scream-schematic.svg
 -
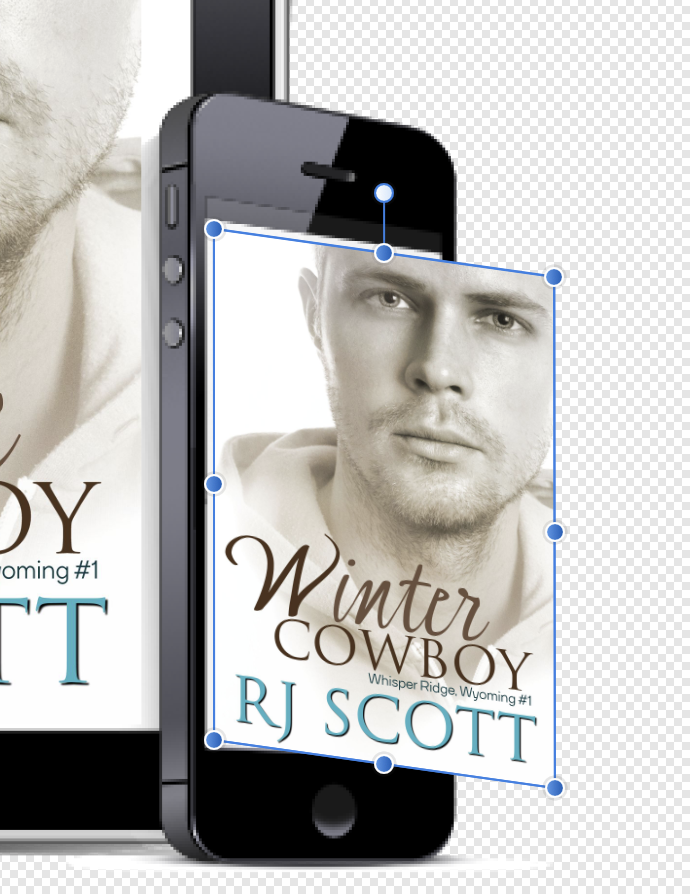
 Hi guys, last question. I need to *skew a shape* to fit it on an image of an iPhone that has perspective. (BTW, this is not the same as using the two arrows, which I found - nor a problem with the concept of shear vs skew). This is the image I am working on. I need to pull the top right corner of the cover image to go on the iPhone down, and the bottom right corner of the cover image up so you have proper perspective. I've searched help, and checked out a lot of videos. If you can help then this is cool. RJ
-
Hello! I'm Affinity iPad newbie and I have a problem with quality during the transformation. After Rasterise ▸ Rasterise my image lost quality after each move. If I want to cut the selection and transform it, it becomes blurred after one move. What can I do to save quality? I have already posted this question on another topic but received no answer. Sorry if I did something wrong but I can't use the app because of this problem.
-
 I have a pixel image, and I have used the Transform tool to reduce the size to 800px high. The visible image is indeed re-sized, but within the original canvas. The remains of the canvas are transparent, and of the original document size. The Transform tool gives the re-sized dimensions. I am trying this out with the aim of writing a macro involving re-sizing the entire image using a formula. How can I resize the canvas as well as the image using a formula?
 -
Hi there Transforming a selection chosen through the polygonal selection tool works for me up to a point although exceedingly difficult to find (via quick mask mode?!). Once the object to transform is selected with the node points available to move, the button in the context toolbar to convert the node to angular des not work! Pulling in the handles to to the nodes is practically impossible. Could you please advise me on this as it is critical for my work. Still, fully appreciative of Affinity's products to date, using Design, and photo for both my Mac and iPad Pro. Geoff
-
 I created a shape (first a circle then I tried a square with same results) then clicked on transform to manually set the size. Once the measurements box opens I lose control of the main panels and am unable to close the measurements box. Had to reset the ipad both times. ipad pro 2017 fully updated ios 11 affinity beta
 -
 Hi again, here another Question has come up about a affinity Photo feature... in Photoshop by scaling or moving objects , i can scall objects by using % ore move them relatively or absolutely. Now how do i do this in the transform area ? Did i miss anything ? Can i transform a rectangular object for example relativeley to its positoin and also absolutely on the document, can i type in i want my rectangular get scalled up 150% ? and if so where do i find theses settings ? greetings, Tom
 -
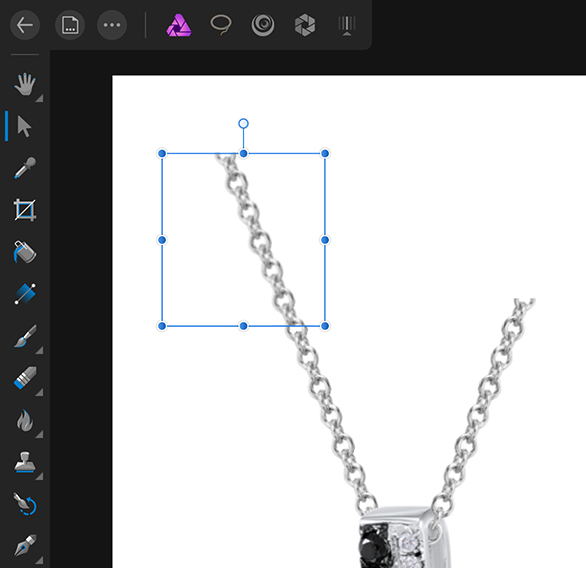
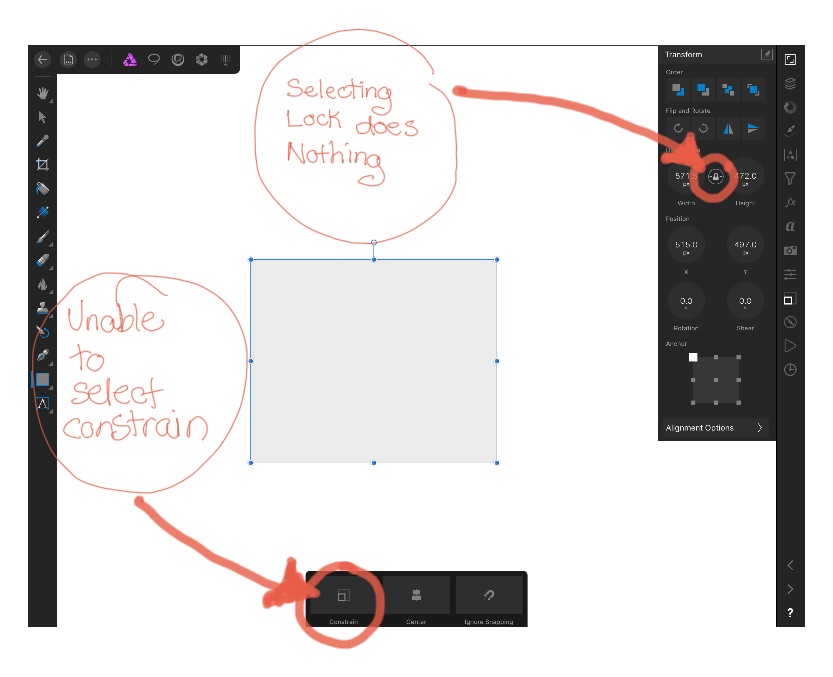
I have searched this site and read guide in app. I cannot get the lock aspect ratio to work. When I select the lock icon in Transform Studio the shape still free transforms (aspect ratio is not locked). I cannot select "constrain" in the shape menu. Touching screen with finger while dragging shape with pencil does not lock aspect ratio either. I am using an iPad Pro 1 with Apple Pencil, (IOS 10.3.3, Affinity version 1.6.4). Please help
-
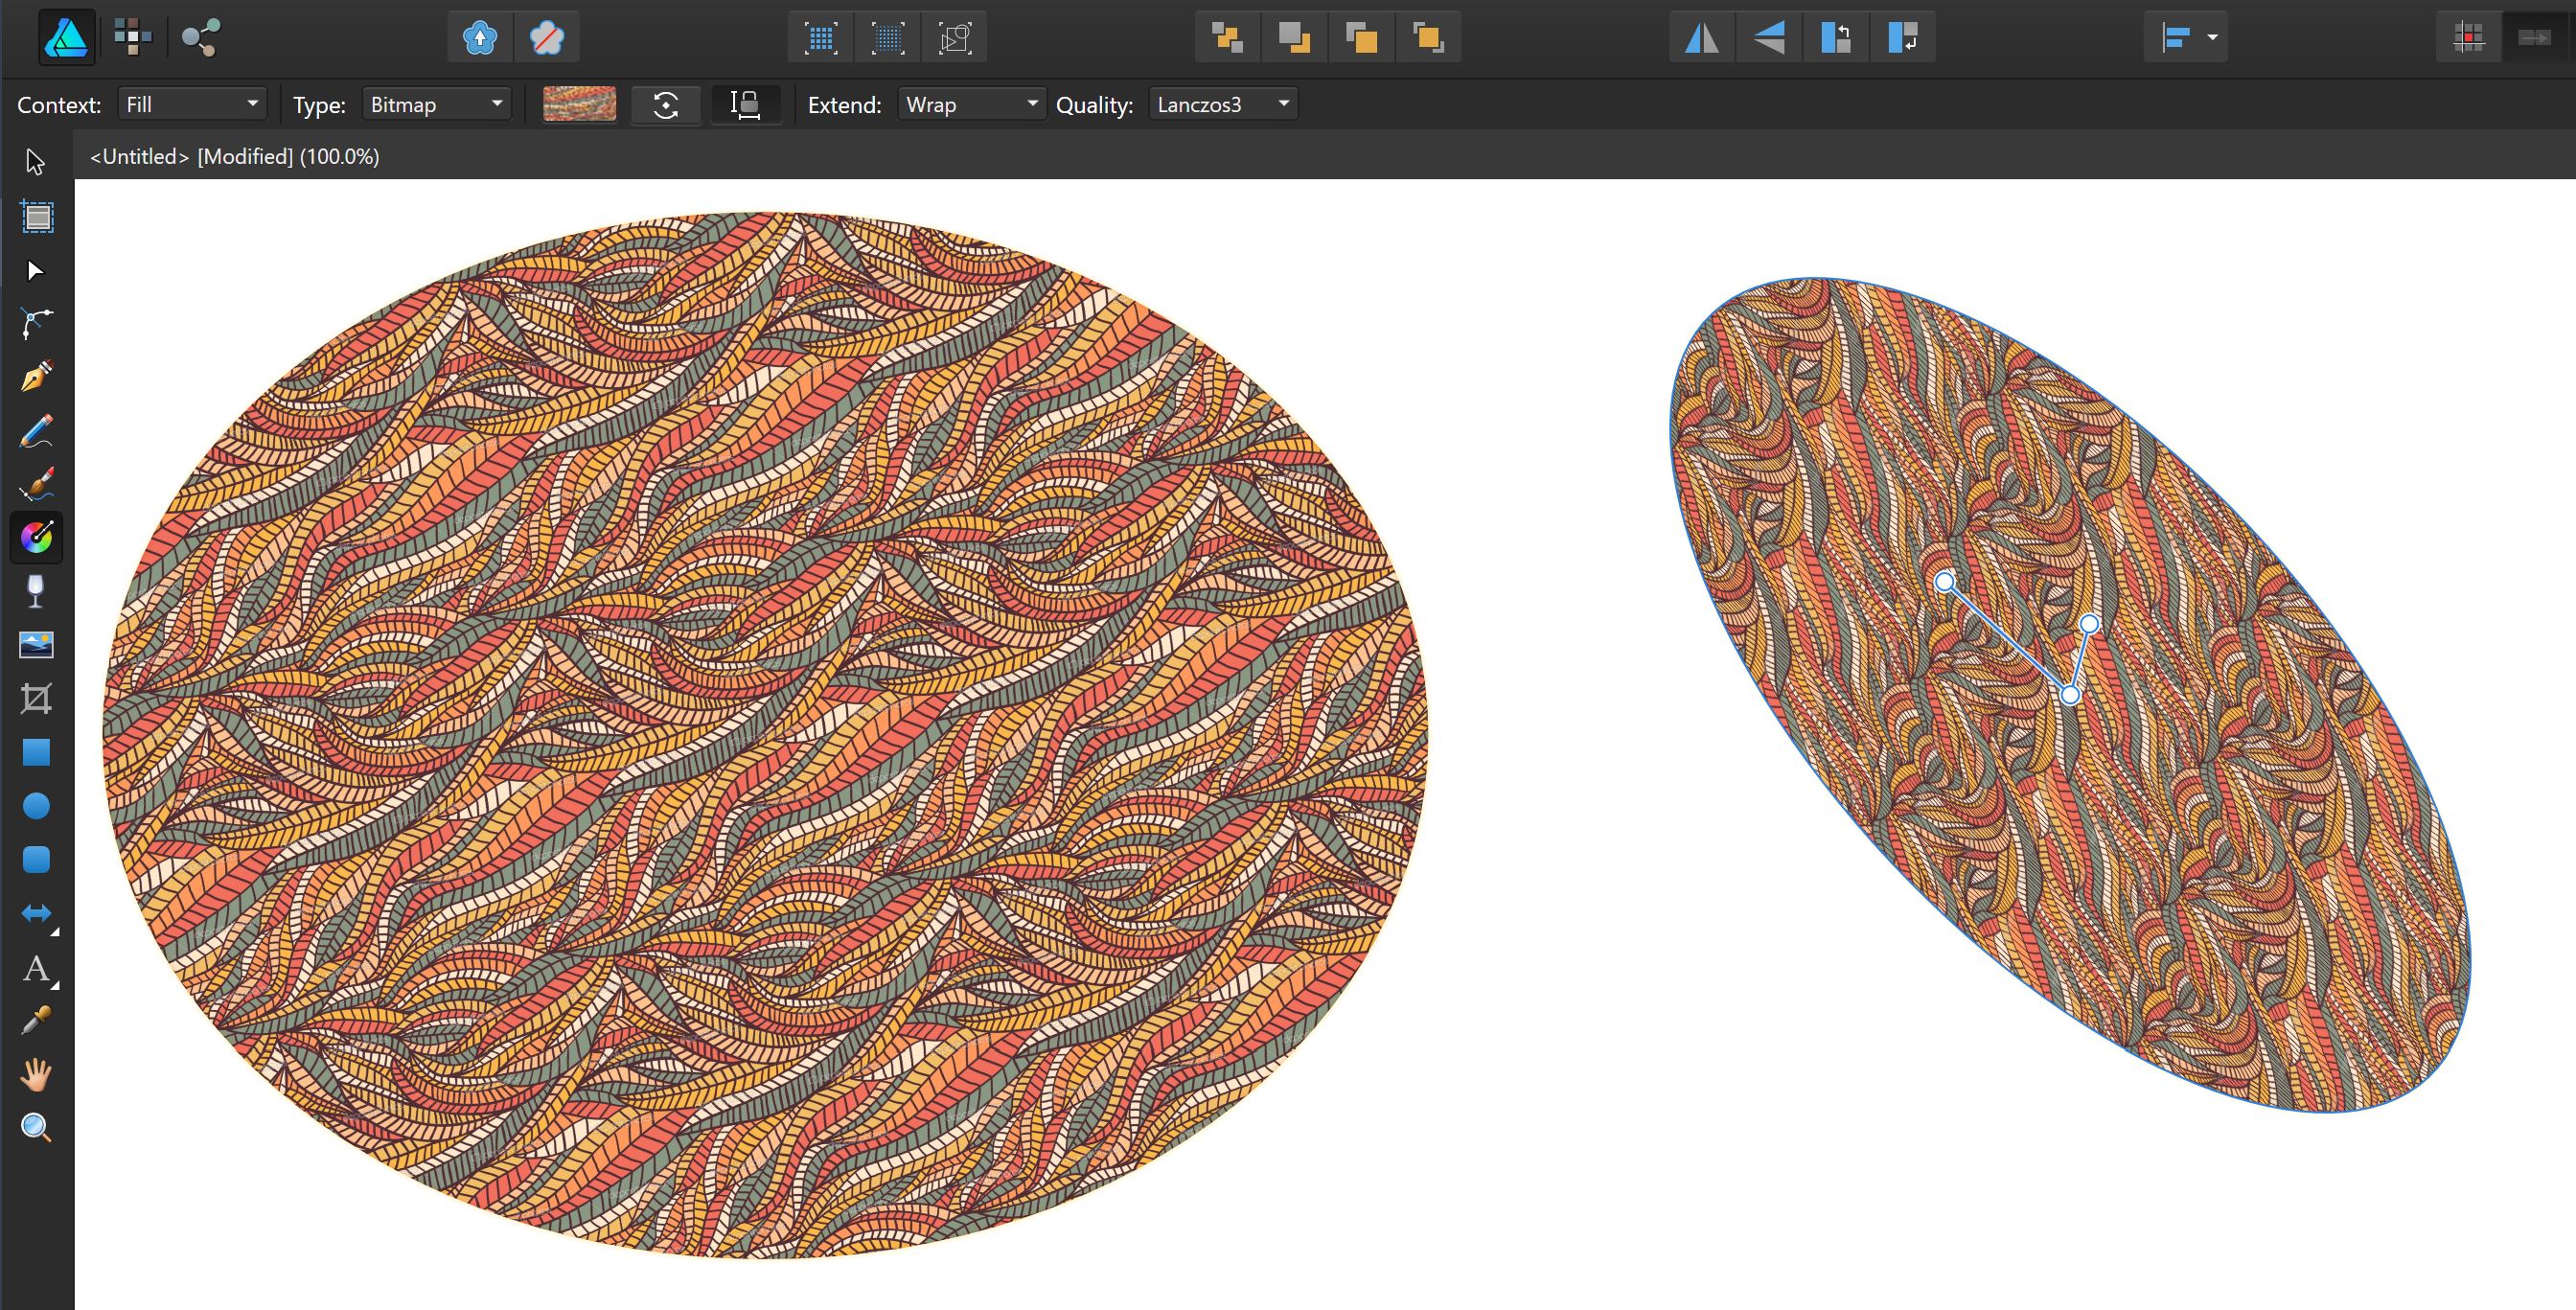
 Hey everyone, I'm quite new to Affinity Designer and have come across the following issue: I'm trying to fill different shapes with patterns. Since I haven't been able to find any preset geometric fill patterns that ship with Affinity, nor a pattern fill feature, I've resorted to: 1. Select the shape 2. Activate the Fill Tool 3. Change Fill Type to Bitmap 4. Use an image texture to fill the shape However, when I CTRL + C on one shape and then CTRL + SHIFT + V on another shape in order to copy that fill, with the same orientation and scale, it seems like the bitmap/texture then gets transformed to the orientation/size of the target shape. I attached a screenshot to demonstrate what happens when I copy the fill from the left shape to the right. How can I get the behaviour that I want, i.e. have the fill get transferred from shape A to shape B without changing the orientation/scale/shear of the fill texture? Also, is there a vector pattern fill in Affinity Designer that I may simply have overlooked? Thanks a lot


.thumb.jpg.724bd0535cc61df496b45d26e99d94e3.jpg)