Search the Community
Showing results for tags 'Tools'.
-
 Windows 10 Home 1809, Designer 1.7.0.231. I've noticed some very strange/unexpected behaviour when using the Customise Tools function (this happens in Publisher too). See first attached GIF where dragging a tool can cause it to sometimes: * snap back to where it was; * snap to a weird position nowhere near where I dropped it; * snap to the bottom of the tools. See second attached GIF where dragging a separator can cause all kinds of weird issues such as: * other separators going missing; * the tools 'avoid' the dragged tool in unexpected ways; * basically all kinds of weirdness that's difficult to describe, just watch the GIF and see how many issues you can spot (it gets a little bit more controllable by the end).
-
 Hello Peoples ! Coming again here but with few questions that you may like or not but i believe it is quite useful to ask. All my questions here are based on Beta version of Affinity Photo not on the stable version and they're intended for understanding and helping to improve what already exist and not to raise comparatives between Apples and Oranges. ---------------------------------------------------------------------- Object: The Ring Function! I've been using it (not that much) since it was added to HSL Adjustment; well i really enjoy it and found it very useful when it comes to narrow and make precise color selection ...but i only see it in few of the adjustment layer that aims to work on colors. Q: Don't you think Recolor adjustment needs it to ? --------------------------------------------------------------------- Object: I've seen that there is the gear icon on the bottom right of adjustment layer when we have them opened but for unknown reason it does nothing when i click on it. Q: What it is intended to do or achieve ? --------------------------------------------------------------------- Object: As we all know that there is not enough online tutorial talking about really crazy tricks with Affinity Photo, i usually watch PS tutos and work on applying them in my AP workflow and they just work but ... for some reason i get lost when it come to do the Blend if thing. Q: Can you please point to a tutorial talking about that in details or simply share here how you do Blend if with Affinity Photo ? --------------------------------------------------------------------- Object: i often use the blend ranges function and just found it not working even if you click a million times on that gear. Q: Bug or me missing something ? Possible to fix it ? --------------------------------------------------------------------- Object: Let say i select a red color and want to add more to already selected using the same method, well ! on other software such as PS i would simply sample more color selection color by clicking Shift + Click and drag or click to add to already selected color. Q: How to that with Affinity Photo ? --------------------------------------------------------------------- Object: It is really useful to save selection made on a Photo or any other pixel related stuff but in the same time i personally found it to be quite hidden, burried into menues. Q: Possible to create a button on related tools (Sel. Brush - Flood Sel. etc.) next to the refine tool that allows that to be done without trying to find it in the menu ? -------------------------------------------------------------------- Object: in this last one, i will come to something i already asked about but i see no change until now. Let's talk about Masks (also i target adjustment layer because i love using their masking functionality). Okay ! Let's create a mask and press cmd/ctrl+i to invert it ... it stays the same i mean pure white when it should turn black (actually dark grey) when inverted and even when i paint with the brush tool on the mask it shows after i do another action such as cmd/ctrl+s or switch to another and start using it. Quite bad hein ! Q1: it is possible to fix this and make work as it should ? Q2: Possible to make the painting on mask more live and less delayed ? Okay ! Here i'm done with this. few here you will understand are bugs that need to be corrected and few other are kind of request but i count them as things that needs to be corrected at this level of development of Affinity Photo and what i point to here should also be checked and if possible get applied to Affinity Designer and Affinity Publisher because all 3 are based on the same principle and should not grow independently one another when it comes to these basic stuffs. Blessing to Y'all and don't forget it is not to raise a troll but to help improve the software.
 -
 Hello, I apologize if this has been asked before, In affinity designer when I'm using the brush tool it always creates a new layer when i release the mouse key which is a bit of an annoyance. I wanted to ask if theres any way to change this so its always on the same layer similar to Illustrator.
 -
 I'm trialing Affinity Photo, and so far it is looking good. (Don't want the Adobe rental model if I can help it). However - the tools section is currently driving me mad. If I inadvertently hit the brush tool more than once, it cycles through the other brush options. Likewise with other multiple-option tools. I can't find a way of turning this auto toggling off, (like I can in preferences with Photoshop). And being someone who uses shortcuts extensively and has the tools bar on a second screen (as with many of the other panels), you can imagine the frustration this causes. I've searched on Google and find no solution - but I do find a lot of requests one the last couple of years. I can't believe there isn't a way to switch off auto toggling of the tools... that would be crazy. So am I missing something, or is it off to Adobe, because this would be impossible to live with? (Hope there is a way because I'm quite liking Affinity). Thanks
 -
Well, I have not a lot to say, the title says it all. Affinity line of products have great tools and impressive functions but I strongly and deeply believe it is time for the thing to get an Ai. There are great benefits from implementing Ai with deep learning. Resize, crop, selection, tone map, snap, resources management to only list these can get great benefits from it. Even most common tools such as pen tool, fill tool, transparency tool, defringe, haze removal, live perspective, blend/replica tool etc can benefit from it to. Devs should think about and put something on the rails, please don't the 100% ready route implement step by step, tools by tools and have us to work with it and revert telling how it is doing so you can better it and deliver a top notch or next plus ultra software line of products. Blessings !
-
Hey everyone! It would be great if there was a way to rearrange the UI (tools and icons like layers or symbols). Also, including tools like gaussian blur, that can be added as optional tools on desktop, would be great. Best wishes, Shu
-
I haven't this been suggested before. I think it would be pretty useful to have pie menus for quick tool switching. I haven't seen this in image editors, but I think it's pretty common for 3d modeling: In this app, for example, you can customize them to have multiple levels, you can have quick color selections, etc. I think it allows for very a very quick access to common options.
-
Hello Everyone, I'm happy to share this with all of You today. Well i'm really sorry for sending this so late but i wasn't sure i could share it here but i hope you will take 4min to watch as our 1st video demo there was done with Affinity Designer MacOs. Your comments will be of great help to me making the Chan better, there is still more to come and be published but let's first see how to make this one even better. https://goo.gl/wrJFn3 Blessings.
-
 i'm trying to use the program but learning to know it, i have done something and toolbar has disappeared ! thanks for help
 -
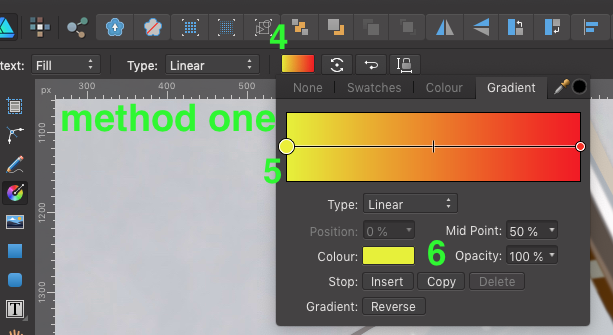
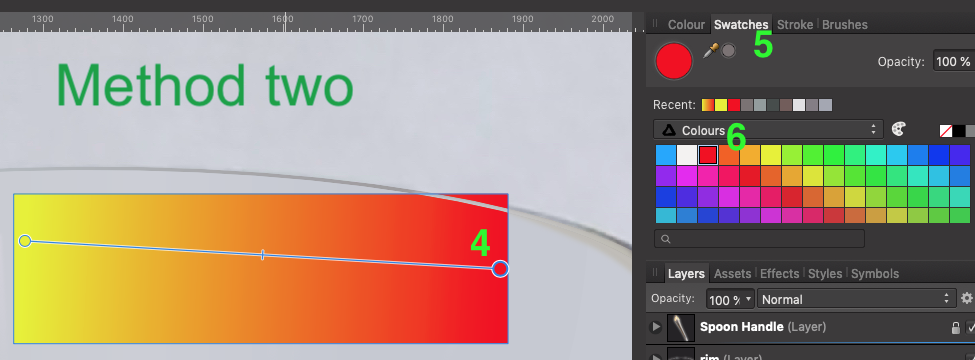
 I struggle to create gradient fills easily and efficiently. Here are the two methods that I use, and perhaps the only way. I'd be curious if someone out there has another method. Method one: Create object select "G" on the keyboard draw gradient Select the Gradient color box at the top toolbar make active a node on the gradient line select color from colour box Repeat steps 6 -7 for each node in the gradient line. Method two: Create object select "G" on the keyboard draw gradient Select the node in gradient bar Select Swatches tab in the docker on the right Select color in the Swatches pallet. Repeat steps 5 -6 for each node in the gradient line. Suggested Improvements: A) What I would like to see is the ability to double click on the color node on the object itself, not the node from the methods above, and by double click the node a swatches pallet opens for you to make your color selection. B) Another option would be to select color node, select the eyedropper in the tool bar and while holding the Shift key down select the color you want applied to that node. This method is great for sampling color from other drawings or reference images. I appoligize if there is another method alreay in place, I just haven't come across it yet. Thanks in advance. -Bill
-
 I have the bug in publisher where I have two tool windows next to eachother, the character panel docking to the left, then for instance the glyph browser next to it. However, this causes problems when picking fonts, as the fonts dropdown menu goes behind the glyph browser window. see screenshot.
-
 I am an InDesign (user look to switch) working in the Publisher beta for the first time and I'm enjoying getting the hang of the processes. How can i show the content boxes around each individual asset; whether it is a text box, an image, or a shape? I am used to this in my work flow from InDesign and it would be nice if there was a way to turn this visual on. Let me know if you have any info on this! Thanks.
 -
 As a publishing tool, the text tool is too far low down the toolbox considering it's primarily a text manipulation software. Needs to be nearer the top of the toolbox.
-
As it seems at this point there is no geometry tools (boolean) in publisher. Is this a possibility in future versions? I find it very useful for modeling image containers, shapes , etc… and is a tool I use a lot on InDesign. I hope this could be easy to implement, as the tool already exist on Designer and shouldn't be very different on Publisher (happy hope)
-
Hello, I am having trouble with the Marquee tool. When I make a circle holding shift to make it perfect it wont stay in the corner I click and becomes offset as I drag outward. If it stayed at the point of click and dragged out I could match it perfectly with the circle I am trying to protect and erase around. Since the entire position of the circle moves around for some reason instead of having a stationary anchor point I have to resize it (common scene, please fix and make points anchor to were they are actually clicked.). But when I resize the circle the whole background image resizes, but this is the opposite of what I want, I want to perimeter the circle over top and match the circumference. I unchecked the boxes, put marquee on its own layer, I've tried work around still not working and frustrated... All I want to do is make a marquee circle and resize JUST THE MARQUEE CIRCLE not the selection, background or anything, don't want to add subtract or anything fancy...Just resize...this should be so straight forward and simple, and yet.....*sigh* I should have just got Photoshop... Why this this not straight forward and simple? Why can't i just use the pointer tool to resize the Marquee to th size I want without affecting the original picture. Please make it so that the marquee circle (and squares and yes all the marquees.....) stays in its anchor where clicked and drags from there. This would save so much frustration and resizing issues. Affinity Photo is great but designer is a far ways from any kind of workable program, Im very disappointed in how buggy the designer is compared to the photo. Default black for text and outlines are brown and not black.....Gotta change them every time......Come on guys pick up those boot straps and make designer as good as photo because the way designer stands.......its....well kinda garbage and lacks a lot of common scene elements and features. Come on guys please do better make designer as good as photo.
-
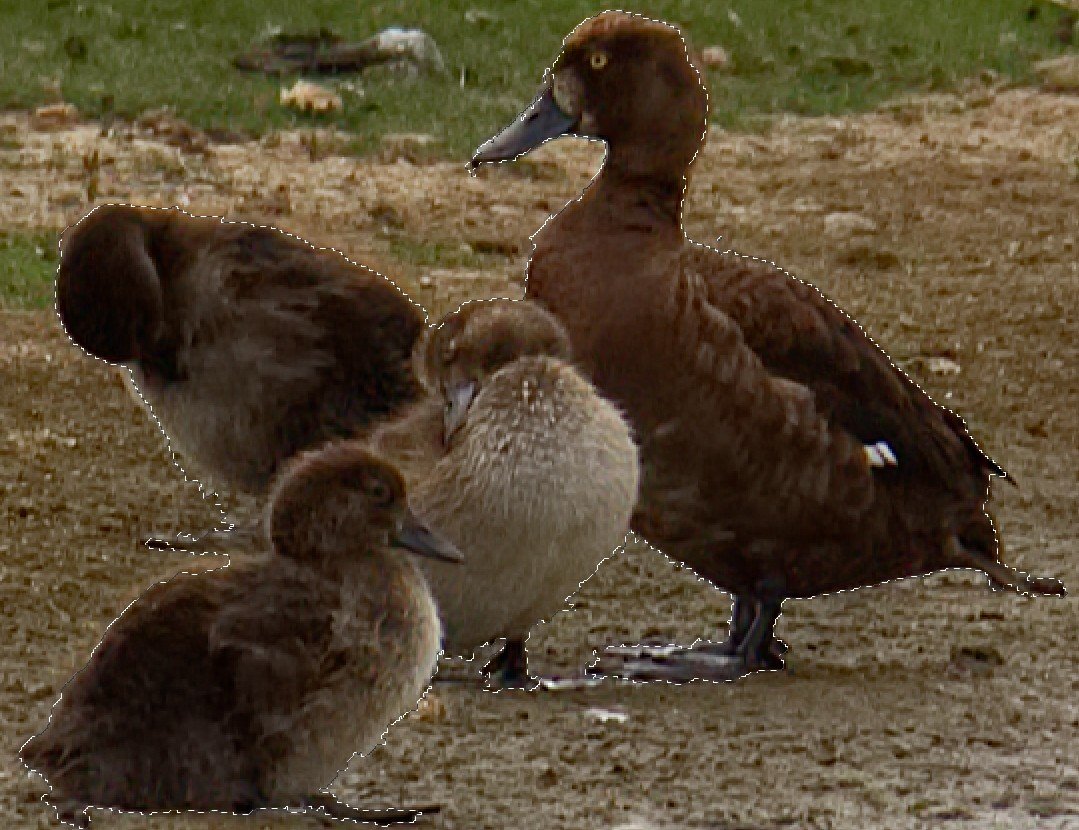
I have only been using Photo on Windows 7 Ultimate for about a week. Thus far I have been quite impressed, though there are clearly some problems in these early stages. The problem I have just encountered involves the use of the Selection Brush Tool. Thus far I had found this tool to be much better to use than in Photoshop where I have much more experience - that is until just now! I was trying to select the ducks in the picture so that I could use the Levels tool on just them to increase the contrast with the rest of the image. The selection went relatively well as you can see from this image: The problem occurred when I used the Refine tool to ensure a smooth transition between the selection and the rest of the image. When I did this I was left with the following as the selection: It is easy to see that the selection is now very different and not at all what was required. The program had clearly altered my selection and had made it impossible to achieve the affect I was aiming for. I tried doing the same process 3 times with exactly the same result. The Snap to edges was turned off each time and there appears to be no way that is immediately recognisable of avoiding this problem. Any ideas and comments would be most welcome For information the screen shots were taken at 200%, so the original is much sharper and the ducks form a much smaller part of the image. PS Again for information; I was able to perform the operation I required using my very old version of Photoshop in less than 5 minutes. Not at all what I had expected.
-
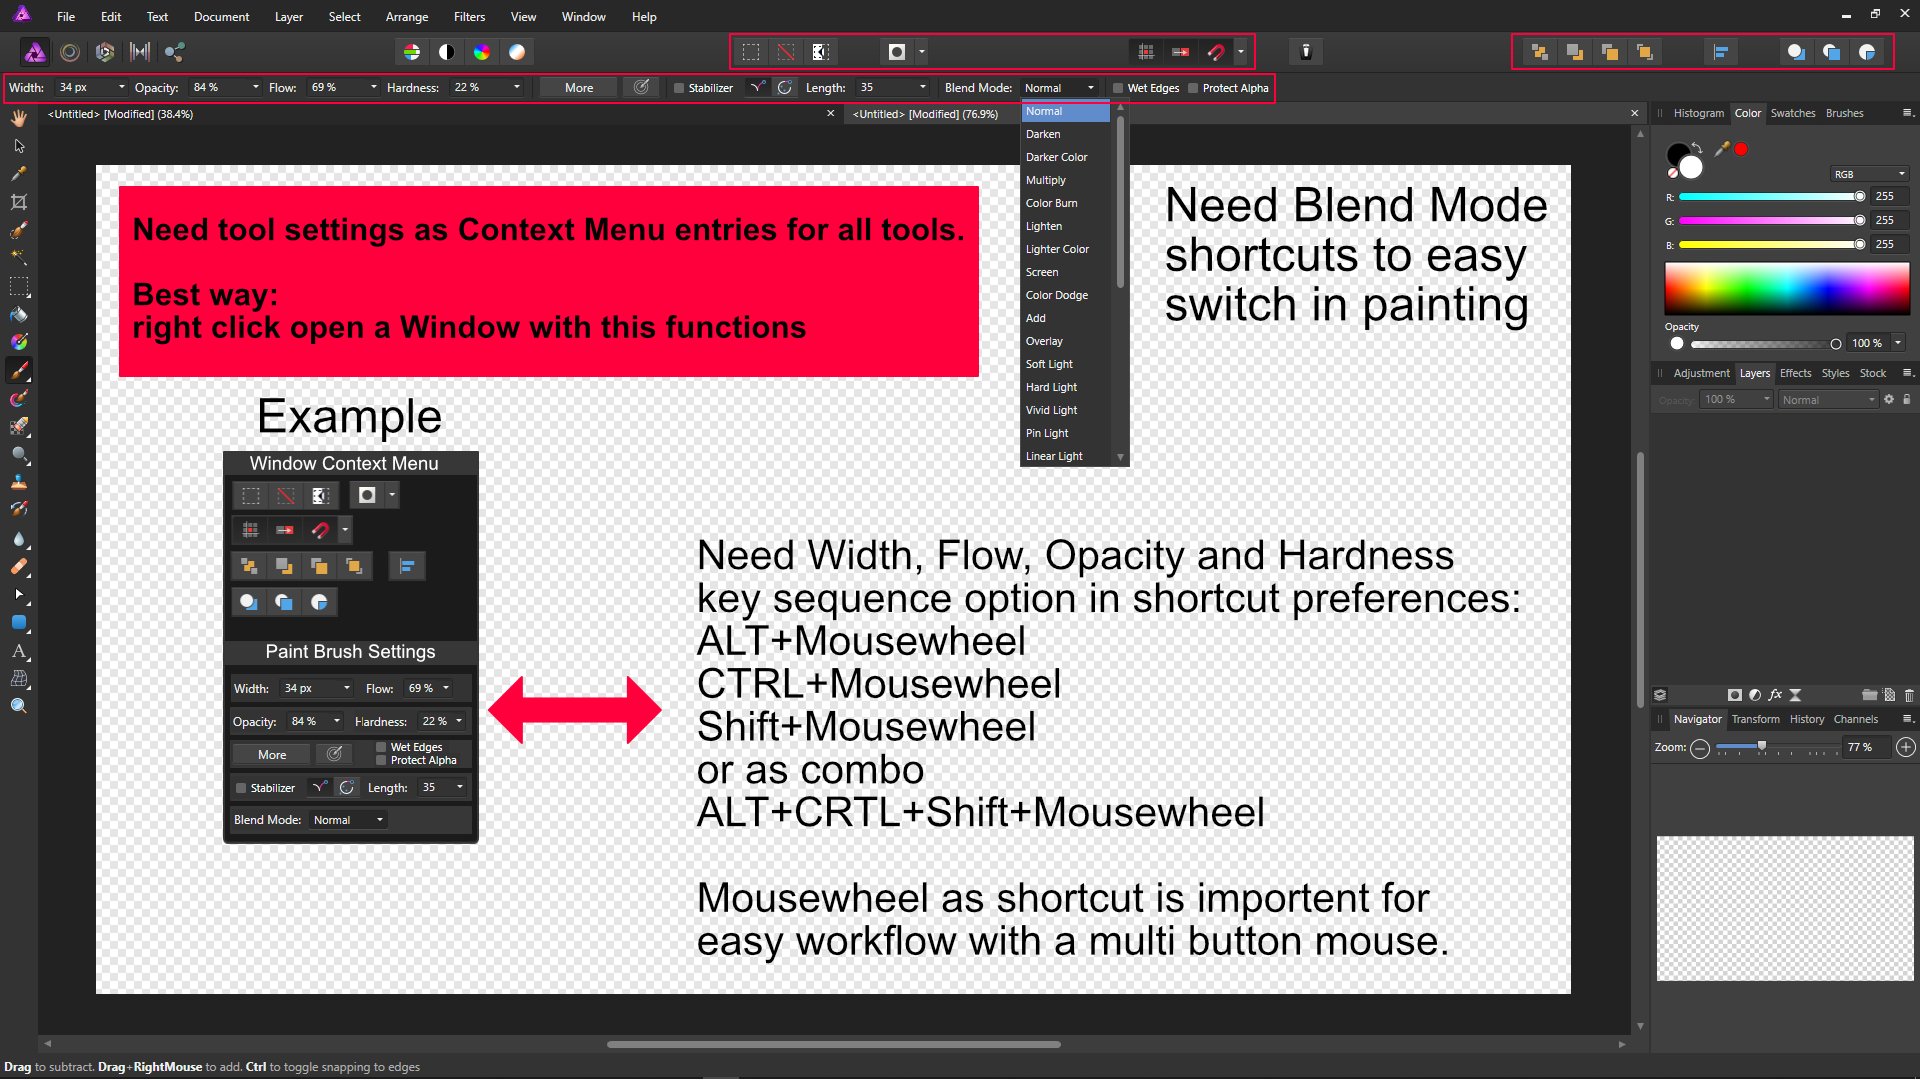
 more specific context menu entries for each tools and an option to customize the context menu in settings.
-
Hello i would like to make suggestions for next release of Affinity Designer. Please forgive if what i ask is already sorted and operational at this stage, be kind to point to where i can be instructed about it please Requests: a- Make more Export profile available. i.e: Export for Web b- Please improve or standardize your SVG output, because those created with ADesigner are black or black when they are opened on other software. c- 3D fx/Emboss fx should be improved too, they are great but they often requires a lot of attention and tuning before it's okay, some standard 3D/Emboss profile/Preset would be of great help for those who like Auto things and the others will keep their By Hand stuffs. d- Clipping mask should be less hard to find or to do but more accessible, adding a button in the bar can be of great help. e- Please improve fonts loading on software start (we are not all using 37 fonts only ). f- the Place tool should be improved, it sometime loose the ration (even shift key pressed doesn't help to maintain it). g- Make it possible for noise to be added into a simple single color, it works on gradient but ... it should also be available for simple color. h- Accessiblity to Compound Path function need to be improved here too, a button in bar when 2 objects are selected should help. i- Artboard tool must show more options and sizes than what we currently have. j- the Pop-Up system used to display the name of a tool or a functionality should be improved to also show a quick description of what the selected tool can do. k- we should be able to round a sharp corners using the corner radius both in/out, sometime it's hard to get the correct curve because the tool make it possible in or out only, both sides should be great. l- Please make the bleed visible (red line or yellow doesn't matter) for with/without Artboard created. m- Color Picker tool should be able to pick gradient too and not just a single color, here couples of small buttons should be added in the bar and displayed when we select the color picker tool, enabling us to select gradient ON/OFF single Color ON/OFF. Well a long list but i've put everything here, those who know how to achieve this or that are welcome. @MEB you know Affinity far better than most of us here, your inputs are welcomed. To all, point me to where solution was brought and i will kindly jump there. Blessings.
- 13 replies
-
- 1
-

-
- affinity designer
- tools
- (and 5 more)
-
Hello! Im having a hard time with some things. 1. Can I turn off the nodes when using the pencil? Id like to draw and they are distracting. 2. Why does the pencil setting reset when i start a new document? Can I save a custom pencil? 3. How can i draw a shape with the vector brush tool without a stroke? Every time i draw with the vector brush tool, theres always a stroke When I complete a closed shape with the vector brush, can I get the shape to auto fill in? The pencil tool is the same way. Both wont fill on closed path.
-
 Hi there! I'm astonished with Affinity Designer for ipad! I'm almost completely transitioned from my PC to iPad, just need a few more options. Suggestion #1: Select BY SAME FILL COLOR This is very important for professional work :) For example, if a group of objects (or shapes) are overlapping, what we need to do is to select them all, and divide them. After they are divided, we need to click on "Add" to merge the shapes together, and that's fine. But if we have a LARGE number of SMALL shapes, merging one by one can take forever.So, option "Select by (the same) Color" is very important and time saving for us designers. How I think it should be done: Solution 1. Click and hold the color (from toolbox) with pencil, or with finger, and while holding it select (with your left hand) three dots icon "..." and then choose "Select all" Solution 2. Add a new icon named "Select Same Color", or similar. Suggestion #2: SHAPE EFFECTS For me, as a Vintage illustrations and Logo designs fan, I would like to have a ARC LOWER, ARC UPPER, AND (possible) ARC tools. For example: Netflix logo. How I think it should be done: 1. After typing "Netflix" for example, convert curves, and than click on new icon set named "shape effects", than click on "Lower arc", or "Upper Arc". OK, that's for now, If I missed these options, if they already exist in same/similar form, please let me know.
 -
 So I'm using a school Mac laptop for Affinity Pro, and the screen is small so a few of the tools won't show up on the left hand side, including the one that I need to use right now which is text. All of the other bars on the screen can scroll, the picture, the tools on the right side, but the tools on the left hand side won't scroll. I can't drag it down any further and it's actually starting to piss me off. Any help from someone would be really appreciated, thanks.
 -
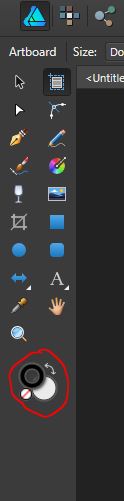
 Working 8 hours a day on Designer for making illustrations last weeks, I noticed a thing I run into a lot of times which is disturbing the workflow a bit and seems easy to fix. I've setup Designer and Photo to have a 2-column toolspanel (look at attachment). That way I'm having the fill- and border-color-circles visible inside the toolbar at all times to quickly change colors, like I was used to in Adobe software. So I click on a fill- or border-circle to bring it to the actual color selection or doubleclick on it to change its color. Very handy and used a lot. But if I work fast making illustrations in Designer all day long, a lot of times it happens that I accidentely doubleclick just outside these small color-circle-rings. Normally that wouldn't be a problem, but in Designer and Photo doubleclicking just outside these circles (or a tool) is causing the toolspanel to undock/float or dock again everytime this happens, 'cause the doubleclick-handler is set to the full toolspanel. So I have to re-dock the panel a lot of times during the day which is distracting and gets really annoying after a while. I think the solution wouldn't be that hard to implement and would make Desiger and Photo an even better product: solution 1 Add an option to lock the docking of the toolspanel. When this setting is set to locked the panel cannot be undocked. I'd say the the 'Customize Tools'-panel would be a nice place for this setting. solution 2 No doubleclick at all. Adding the same way of undocking to the toolspanel like being used inside other panels: drag and drop the toolspanels titlebar outside of its dockregion. solution 3 (my choice) Adding a 'Tools'-titlebar to the toolspanel (like it is visible already when undocked) and move the doubleclick-handler of the full toolspanel to this titlebar instead. That way the intended behaviour remains but now the toolspanel only toggles docking/undocking when a user doubleclicks on the titlebar. And that only happens when a user really wants it. In my opinion that would be an intuitive place to doubleclick. Thanks!
-
- 1
-
-
- designer
- toolspanel
- (and 2 more)
-
As in topic Ability to drag new guide with any tool selected. Now it only works with select tool (black arrow). Best Regards!
-
 Hello, Sry, i agree i'm a bit LAZY and not go thru thoroughly through the ocean of the forum, but still searching in a zippy i didn't found my answers, hence writing this ticket. 1. if Team-A wanna fix some error in their Adobe creation by forwarding the project to Team-B with all legal acceptance (via their Affinity product), do team-B need to start over from "Zero" as no support for Adobe's working file extensions? 2. Any Error Fixing/Analysing tools to compete with Adobe's PREFLIGHT, COMPARE(Check out 4th compare tool of Power Styles from Blatner for eg.), Etc. 3. Any Support for third party XML(obviously with DTD), Python, XSLT, Java Scripts. i know i shd. not ask for the product still not in market(ie.. Publisher), but 1st the feature is helpful in all 3-in-1 Package UNITs, & 2nd.ly it really matters. Sry. for the casual english. Thank You, Anant Singh(anant.anant@gmail.com) End Note : Watching Tutorials, but Subtitles as well as an e-book as ref. Requested.
 -
 Some of my selection tools are not working. I have relaunched the Affinity Photo software, I have rebooted my laptop, MANY times - but some of the selection tools will work. If I activate (for example) the selection Brush tool, it APPEARS to be working - i.e. the mouse turns into the round selection brush but when I click / drag, nothing is selected. The same thing happens if I try to use the rectangular or spherical selection tool - it looks like it SHOULD work, but when I click and drag - nothing happens - the selection pen tool does work, but is not always the best option. I thought it might be my mouse, but the mouse works well enough for painting, erasing etc. Is there something I am doing wrong? I am not new to photo editing software and the selection tools did work up until a couple weeks ago . . . I have not changed any settings or preferences but not having the use of all of the select tools is a real drag!! Any help would be appreciated!