Search the Community
Showing results for tags 'Tool'.
-
 Screen Recording 2024-03-10 at 14.49.02.mov Same for cog tool and probably others. V 2.4.
 -
 I am making some pattern that will be cut with a laser. This means that I have to plan the paths for the cuts by using vectors. I need to cut the whole edge of a piece (curvy) on a zig zag so the curves keep some stability once cut, but I can't finde a way to turn my smooth lines into zig zag ones.
 -
A lot of websites have the "control+K" shortcut to open a search box that will search and show anything related. As a beginner in AP, I know what I want but have no idea where it is. It could search on the name and descriptions of the tools and then even show a shortcut, if available. Would also be nice to save the last used ones (launched from there), so next time you want to search, you might already have it ready to use even if it doesn't have a shortcut. I tried finding if it was already asked for, but search, tools, find, are generic enough that it shows anything but that if there's already a suggestion. TBH, I would expect it to already have it.
-
- 1
-

-
- search box
- search
- (and 4 more)
-
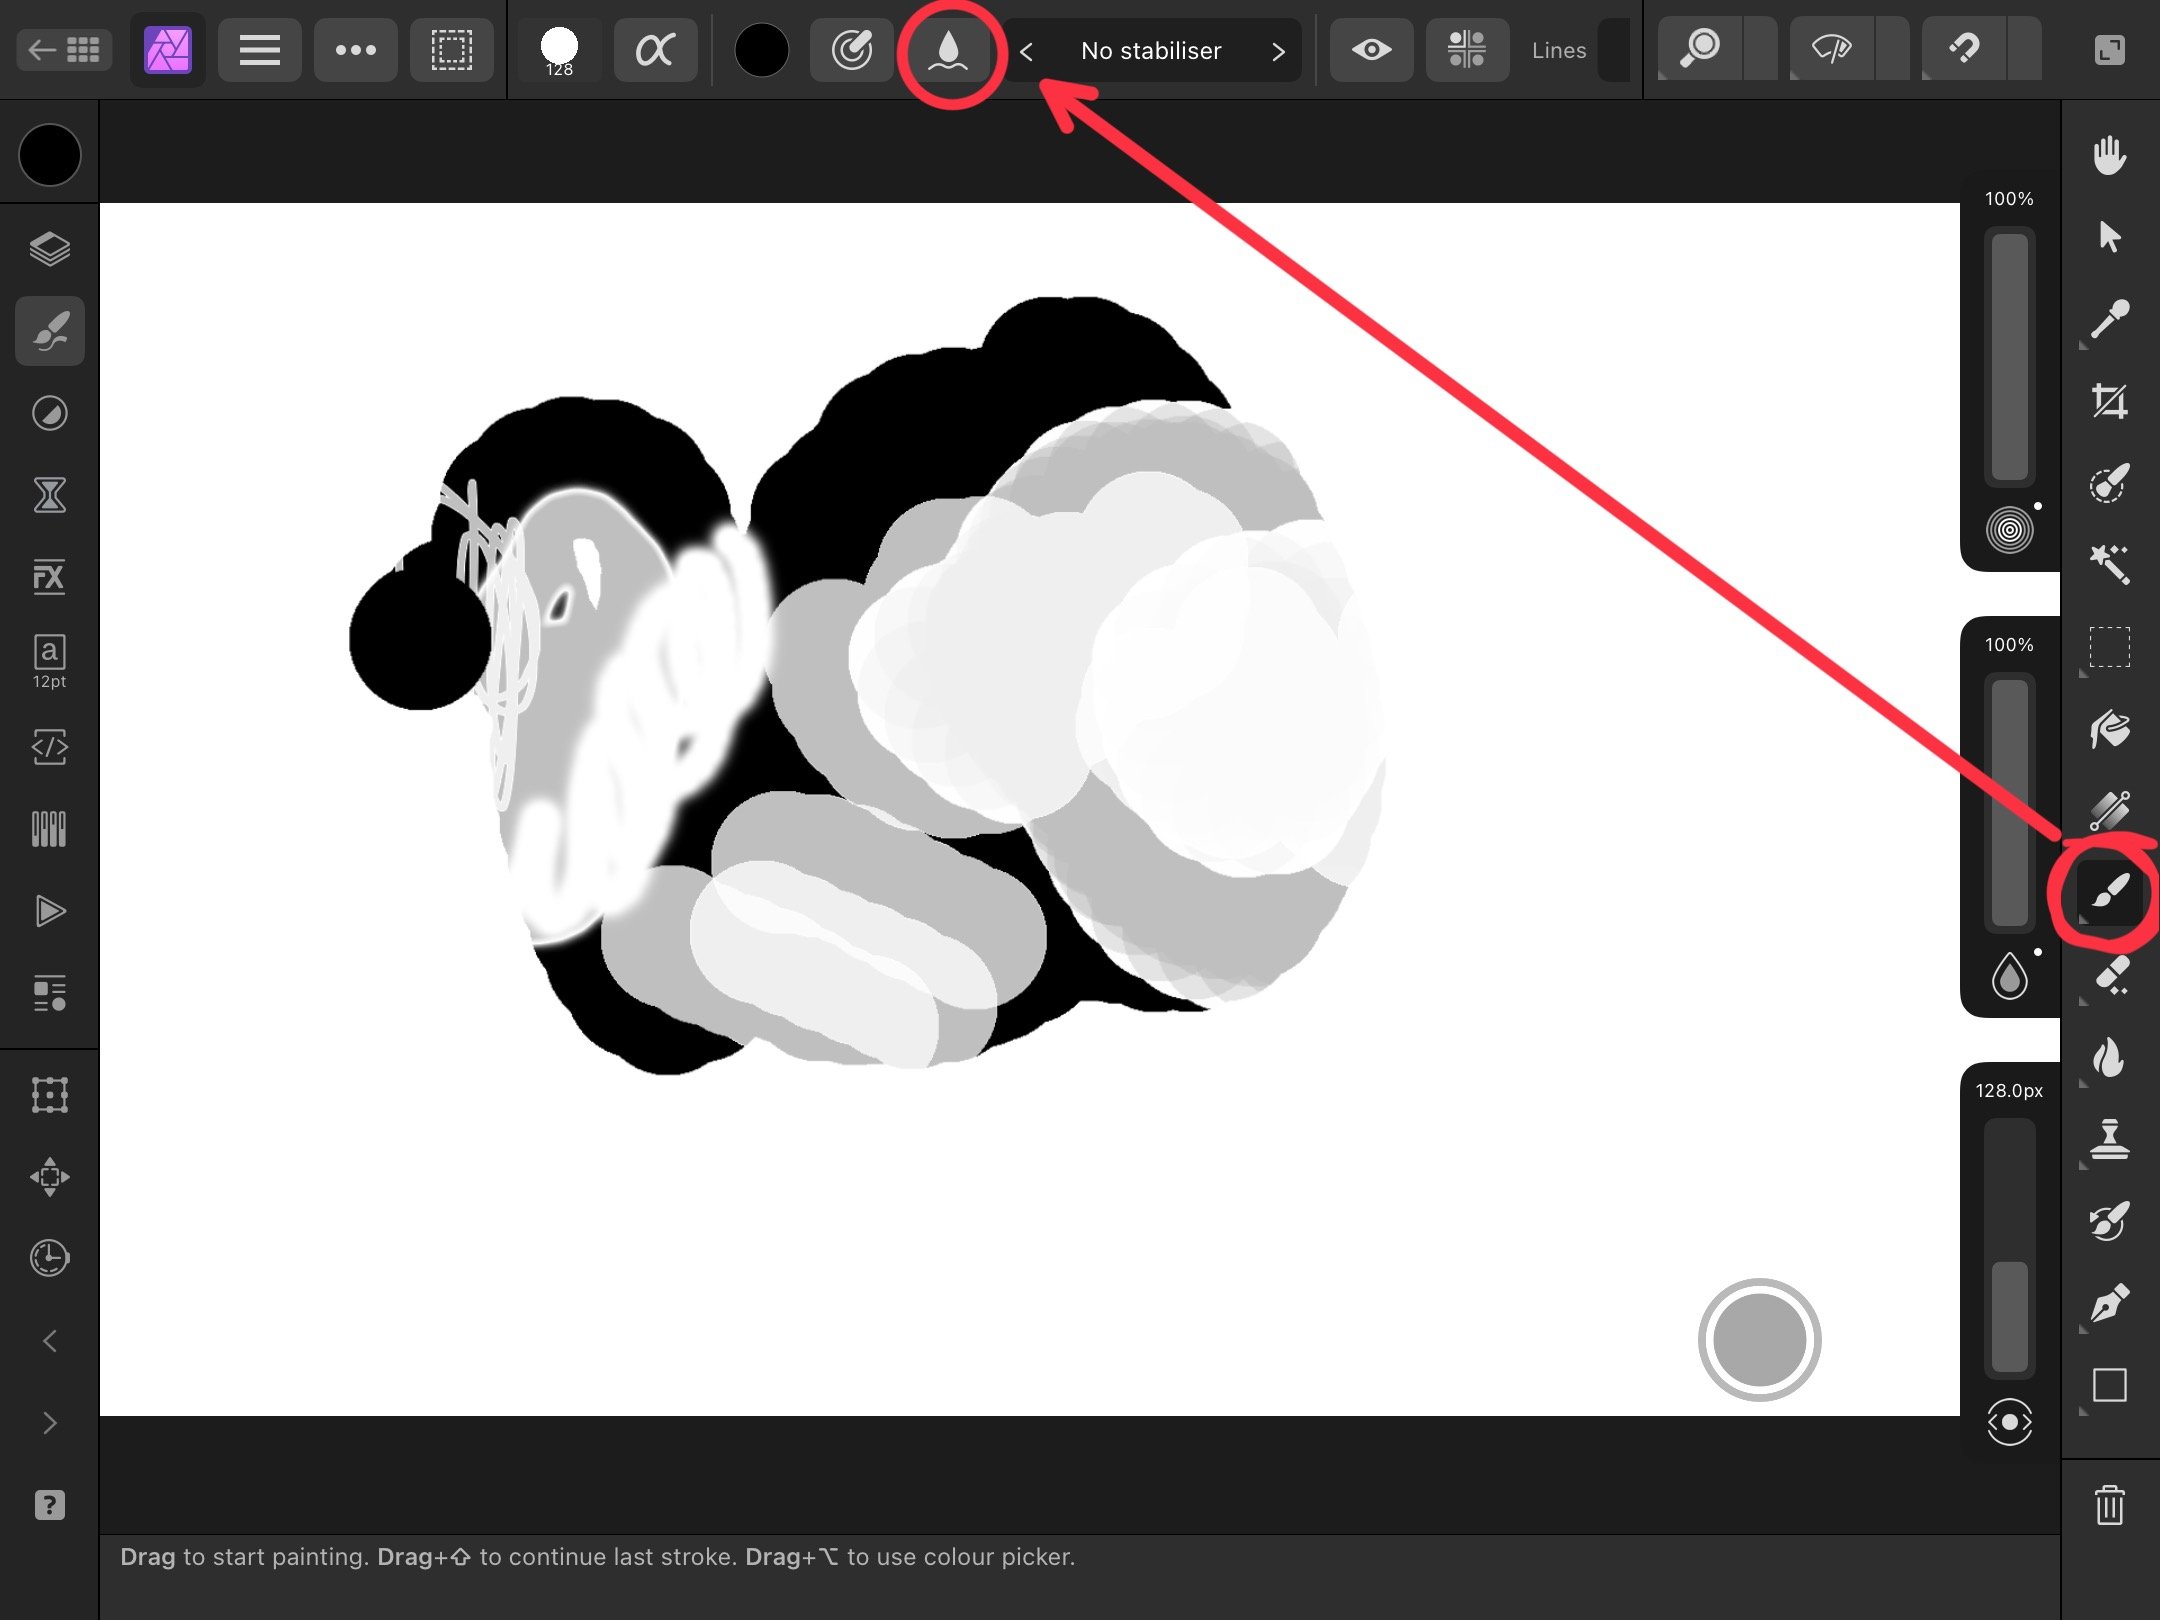
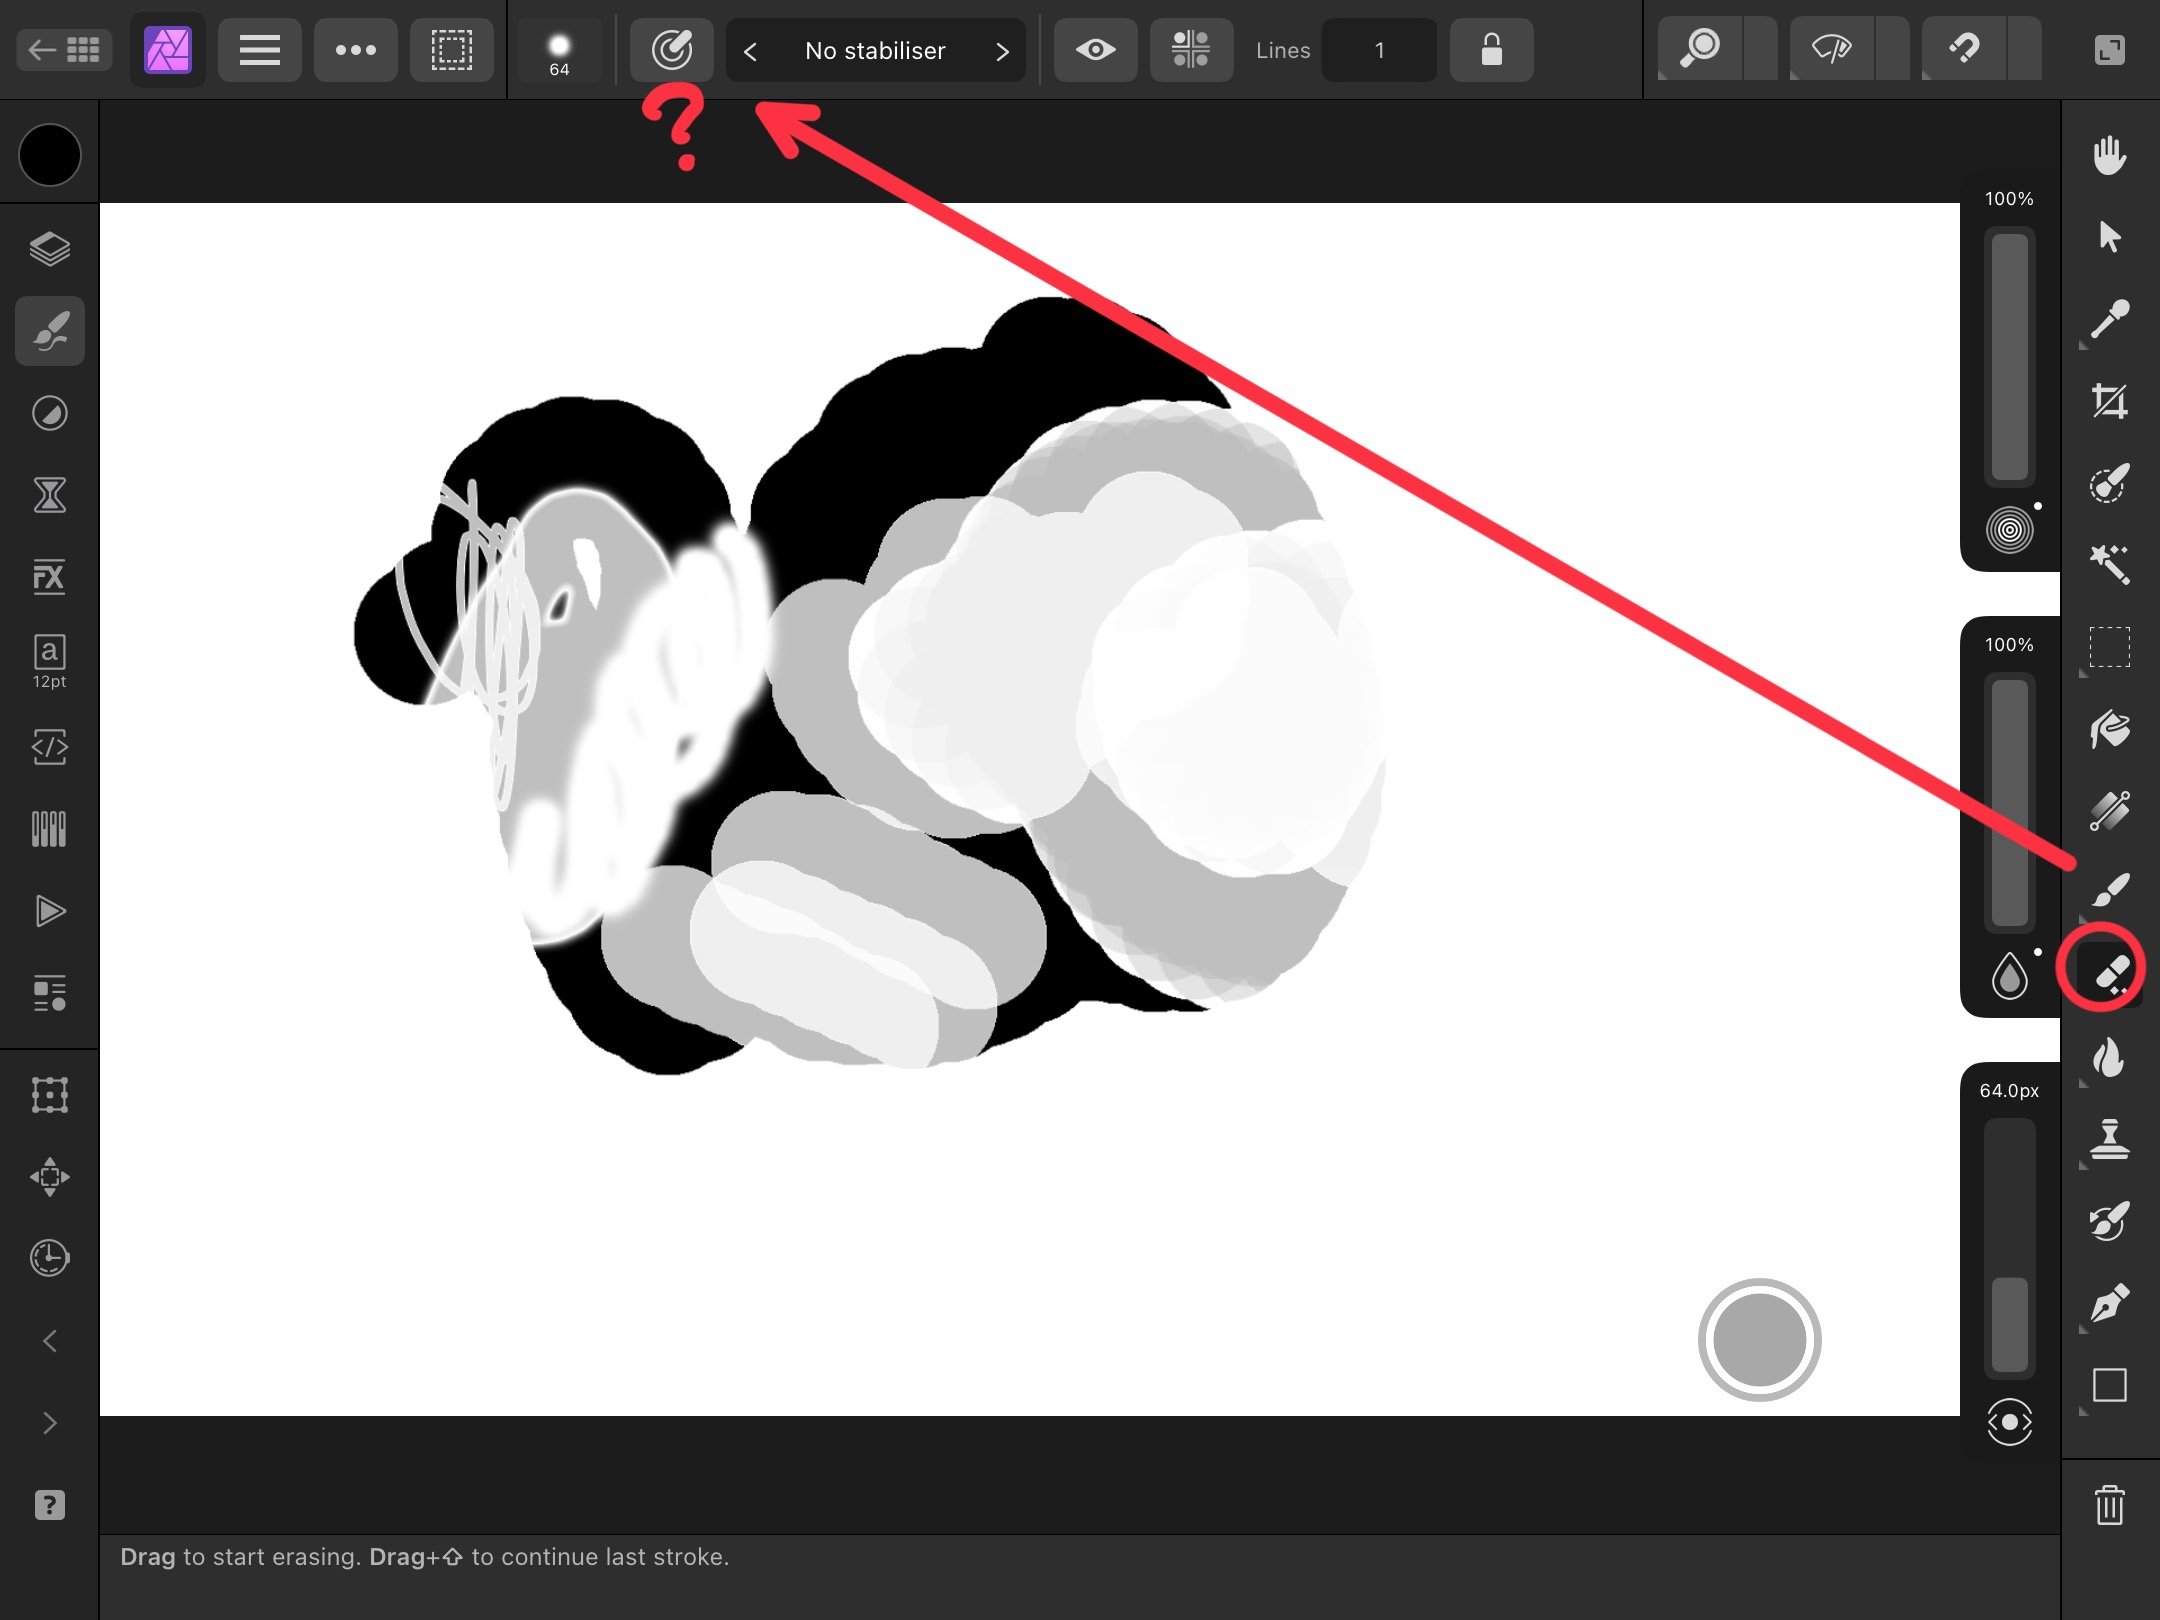
Hey everyone! For some reason, every brush I'm using is set to »wet edges« when I select the eraser tool, and I can't find the option to disable it globally for this tool. I don't plan on setting each individual brush to »wet edges off,« as that's super impractical and bothersome. There's a dedicated button in the toolbar for the brush painting tool: But it's missing for the eraser tool, and according to its behaviour it must have turned on somehow at some point: Does anyone have any idea? Am I missing something? Greetings Dennis

-
 This is especially problematic in Publisher, but probably makes sense for all apps: When I draw a text box or edit its contents, the text box tool remains active. I want it to return to a selection arrow so I can pick the next thing I'm going to manipulate or edit. I realize that having a persistently active tool is good in many situations, especially at the beginning of a project. However, in a project with a large mix of graphics and some text, this is a real obstruction when editing. In trying to get rid of the text tool, I constantly leave the letter "V" in text that was just edited, because simply pressing "V" won't switch to the Move tool. What we need is a preferences toggle that controls whether tools are persistent or simply return to the Move arrow if you either press [Esc] or click in an empty area. This is the standard for all other graphic software I've used, and it's very intuitive.
 -
 It might be helpful to have a small canvas area in the Brush Editor that allowed a user to paint a stroke on it with the current brush settings. Each stroke would be erased on any subsequent stroke, and they would not be saved if the brush editor window is closed. This could be in addition to the brush preview that already exists at the top of the editor, or it could grouped with it (in perhaps a 'tab' UI component), or the current preview could be the "initial" stroke/live preview until you click on it, at which point it is a test canvas-- then, making any changes to the sliders or other options would reset it to the preview, ready for the next test stroke. For me, this would save me from filling a layer up on my canvas with test strokes before deleting the layer each time it fills up. I could work on brush editing in a single screen, rather than in the editor dialog and on the main canvas.
 -
 Hi, I would like to suggest adding a Path Width Tool for easier and more precise stroke adjustments. This tool would allow users to thicken the outline at specific points by simply clicking and dragging with the mouse. Other software like Adobe Illustrator and Amadine have a stroke width tool. The current method, using the Pressure chart in the Stroke panel, is not as user-friendly or accurate as it could be. Current method: Suggested (like Amadine or Adobe Illustrator):
- 9 replies
-
- 12
-
-
- suggestion
- tool
- (and 4 more)
-
 Back in 2020 I suggested having more than one column of palettes either side of the main work area on Mac and was wondering if this is something which is coming to v2? One of the replies showed that this is available, but only on Windows. Is there a reason its available on Windows but not Mac? With an external 27" monitor connected to my Macbook and any Affinity app full screen, I have more than enough space for working, but my palettes are all crammed together because I also need to use it on my Macbook. I prefer having my palettes a click away rather than floating. I know my work area will be reduced on the Macbook, but I can hide/tab my palettes when working so I don't see it being that much of an issue. This feature is available on Adobe apps, and its the only thing I think really needs adding to make workflow even better. Any sign from the devs of this being added?
 -
 The following thinapp.py Python 3 script can be used on macOS systems to thin the multi-architecture Affinity apps (the FAT binaries, containing "x86_64" and "arm64" architectures) to the one only specific architecture just required by the particular Mac platform ("x86_64" or "arm64"). This will reclaim some disk space. Important prerequisites in order to make use of the thinapp.py Python script: Python 3 is installed on your MacOS system MacOS lipo from the Xcode development CLI tools is installed and can be find under /usr/bin/lipo ...or... an alternative GO based lipo from https://github.com/konoui/lipo/ A working file command is available and can be find under /usr/bin/file In order to check for the needed prerequisites, you can perform a corresponding which command execution in Terminal.app: > which python3 /Library/Frameworks/Python.framework/Versions/3.10/bin/python3 > which lipo /usr/bin/lipo > which file /usr/bin/file If all of the above prerequisites are met, you can execute the thinapp.py Python 3 script in Terminal.app like this to get a short help overview... If you apply execution rights to the thinapp.py Python 3 script, via "chmod +x thinapp.py" in Terminal.app, then you can also execute the script via it's filename directly just by calling it, aka thinapp.py or thinapp.py -h . For the -arch option argument supported architectures are x86_64 or arm64, in order to thin an app to an just Intel or Arm platform specific app only here! Now in order to thin let's say Affinity Designer.app to contain just the Intel "x86_64" architecture and thus to strip out the "arm64" architecture from it's FAT binary app, you would call thinapp.py this way ... ... which in turn would then create a duplicate copy of "Affinity Designer.app" under the by the -o option as argument given file path "/Users/<yourusername>/tmp" and then process to thin it there under the "/Users/<yourusername>/tmp/Affinity Designer.app" file path. The as -arch option given x86_64 argument tells thinapp.py to keep just that x86_64 architecture, meaning that the arm64 architecture will be stripped out of the FAT binary app. After the script has finished it's work, you can compare the ADe sizes under "/Applications/Affinity Designer.app" and "/Users/<yourusername>/tmp/Affinity Designer.app" in order to see how much space has been reclaimed due to the architecture thinning process. Next you can start the thinned app from "/Users/<yourusername>/tmp/Affinity Designer.app" in order to see if it operates well. - If all is fine, you can remove the initial "/Applications/Affinity Designer.app" and replace it with the thinned one from "/Users/<yourusername>/tmp/Affinity Designer.app" (... so exchanging the initial with the thinned app). What you can expect from thinning the V1 apps of ADe, APh and APub size wise is ... ADe v1 = initially ~2.59 GB after thinning to x86_64 it has then ~1.69 GB APh v1 = initially ~2.65 GB after thinning to x86_64 it has then ~1.71 GB APub v1 = initially ~2.60 GB after thinning to x86_64 it has then ~1.65 GB Here's the thinapp.py Python 3 script: thinapp.py <-- has been updated! And as always, have fun!
- 4 replies
-
- 3
-
-

-
- macos
- affinity apps
- (and 7 more)
-
Shift+O doesn’t cycle orientation (does nothing) and O doesn’t cycle overlay (selects Burn Brush instead). I’m using an iPad Pro 12.9” 4th Gen. with the Logitech Combo Touch. Latest Affinity Photo 2 and iOS version.
-
 Hello guys. When I use Inpainting Brush Tool it does literally nothing. Is it a bug or am I doing something wrong? I haven't changed anything in the tool's options. At least intentionally.
 -
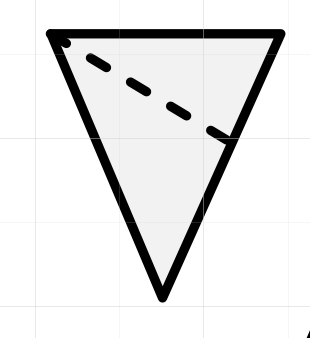
 Hello People!!, I´m just starting in Affinity Designer. I hope you can help me. Is there a tool to calculate the bisector of an angle in a triangle? Thanks!!
-
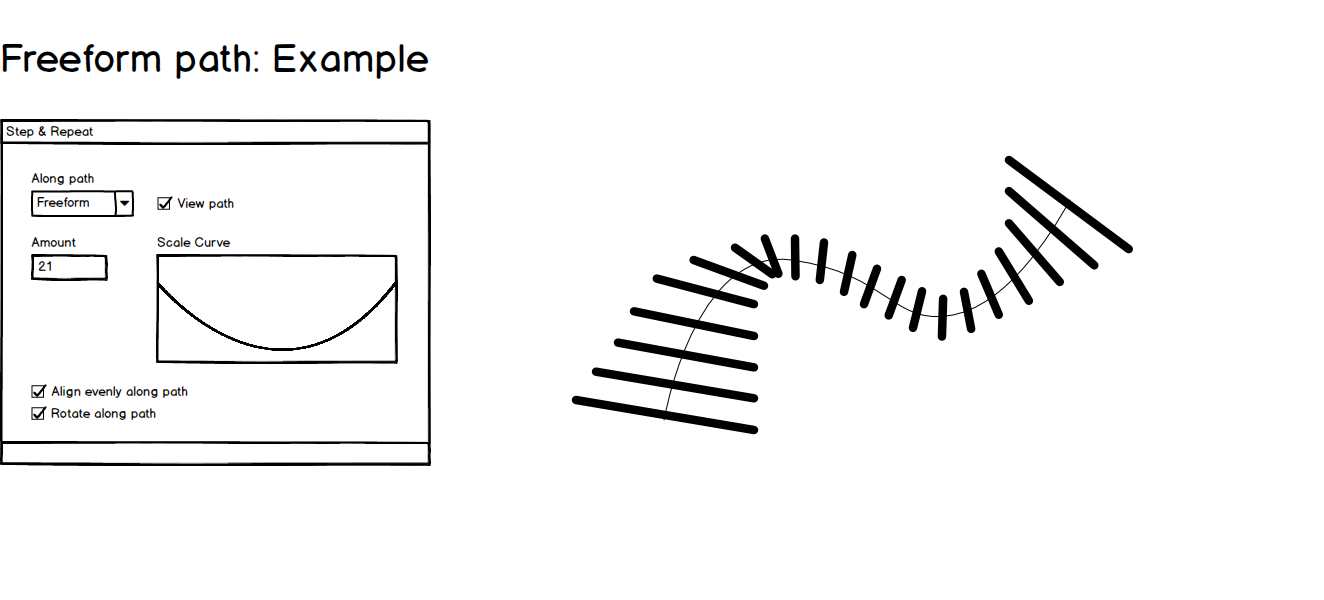
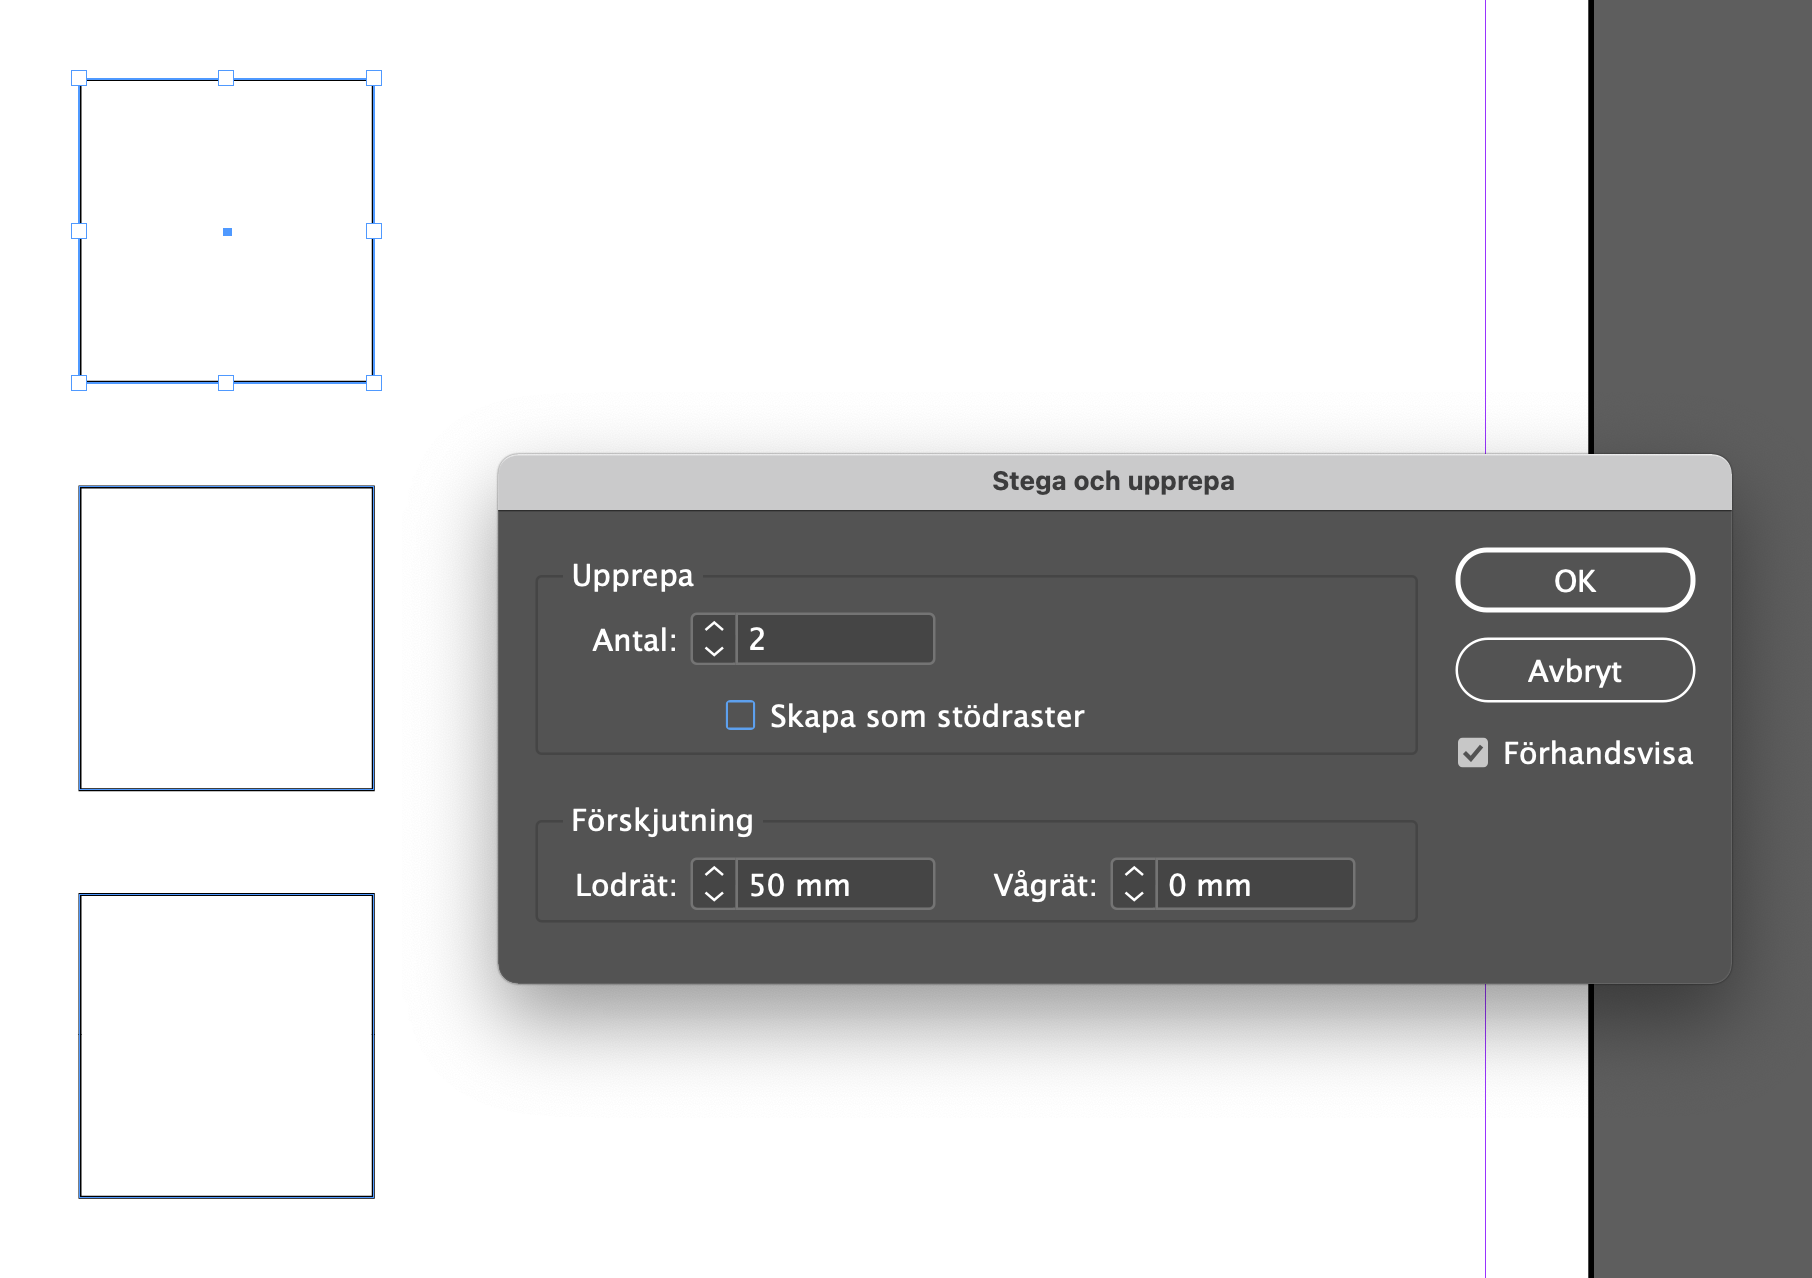
 I see in different topics here the demand for the Step and Repeat tool found in InDesign. Glad to see there are others than me that misses this terrific tool. Replies refer to the duplicate tool and the alignment tool but even though they sort of can do what the step and repeat tools does, I just cant see them as handy. They need several steps, copying layers, clicking ctrl-x for each copy needed an so fourth. And maybe the biggest disadvantage: What if you want to adjust the spacing between your items. Then you have to undo all steps and start from the beginning. With the Step and repeat tool, you just change the spacing value and everything re-renders. You can easily experiment with different values until you are satisfied. Current Step and Repeat tool That brings me to my Feature request. To add the Step and repeat tool into Affinity Software would be nice but why not expand the tool while your at it. The Step and repeat tool in InDesign offers a way to repeat an item as many times you want horizontally or vertically or both. You set the step value for the x- and y-axis and it renders out your items. Nice and easy. If you change the step values, it renders your items again. A perfect way to experiment with different values. New feature Request: Step and repeat along path What if it also was possible to align your items along a circle. You add number of copies and chose circle and set the radius value of the circle. An option here could also be "distrubute evenly along path" so that it automatically set the right spacing between items for a full circle. An other option could be to set the rotation value 0-360 if you dont want a full circle. With this tool it would be easy to for instance make an analog clocks minute och 5-minute marks. If you add an option to make your items rotate along path it would be perfect for the clocks minute lines so the lines also correctly angles along the path as expected. While where at it, why don't we make it poosible to align items along any path. Square, triangle of freeform or whatever. You can do it with text today, why not make it possible to do with other objects as well. More options There are many more transform options that could be added here. I thought of a few. One is a scale curve where the items scales accordingly to the scale curve as they are added. Another transform option would be color change after preset colors or a color gradient. Finally i have added a few sketches to illustrate examples of how this tool could be used. If you like my idea, please comment.
-
 There os a selection to Vector tool yet in the newest Affinity Designer for mac os?
 -
 Attempting to crop a photo this evening when I found that it wouldn't work. The double-headed arrow appeared and could be moved about but it didn't move the grid and wouldn't allow a crop. My husband had exactly the same issue with a different photo about an hour earlier. He has a Mac and I am using Windows 10. We were both using graphics tablets. Closing the photo down and reopening allowed the crop. But then it happened a couple more times with other photos. Prior to that I had no problems with cropping. I have just tried cropping again and now it is working. Baffled. I saw a previous post on the same issue and tried Reset-ing the crop tool but that made no difference. Any ideas? Thanks
 -
 Crop many digitized photos for playback on TV. Format 16: 9 instead of unrestricted desired as a default setting at start. what to do? Please help.
 -
Bug in Affinity Photo 1.10.4? In Affinity photo I want to add the unsharp mask tool to the toolsbox. I do this according to the instruction and the new tool is placed between the other tools. After using and saving the photo I open a new raw file, edit this and come back into persona and notice that the added tool is no longer visible between the available tools! What's going wrong? regards Cees
-
 I found a YouTube tutorial using the Contour Tool on text. When they use it, there's a smooth transition around all the letters. When I apply it, the outline distorts. I can fix it by either changing the view or select Bake Appearance. Is there a preference setting I'm missing?
-
 I apologize if this topic has already been raised, but I have no idea what terminology to search on, other than "ruler tool tracking." Some of the tools in Affinity Photo track on the rulers so I can see what coordinates I'm at in real time as I move the tool on the image area. Magnifier, mesh warp, rectangle tool, pen, etc., all track on the rulers, which is great. But knowing the position of the eraser, paint brush, burn brush, and other brush tools is very important too, yet none of these tools track on the rulers. It would greatly speed up some actions if I knew precisely where my brush tools are positioned at any point as I move them on the image. Is there a reason the center point of brush tool coordinates aren't shown on the rulers? Is it possible to have their coordinates appear on the rulers? Have I overlooked an option that will turn on brush tracking in the rulers?
 -
 Wouldn't it better to use the same name for both the Gradient tool(in Photo) and the Fill tool(in Designer)? They are the same tool yet they have different name. I feel it's confusing.
 -
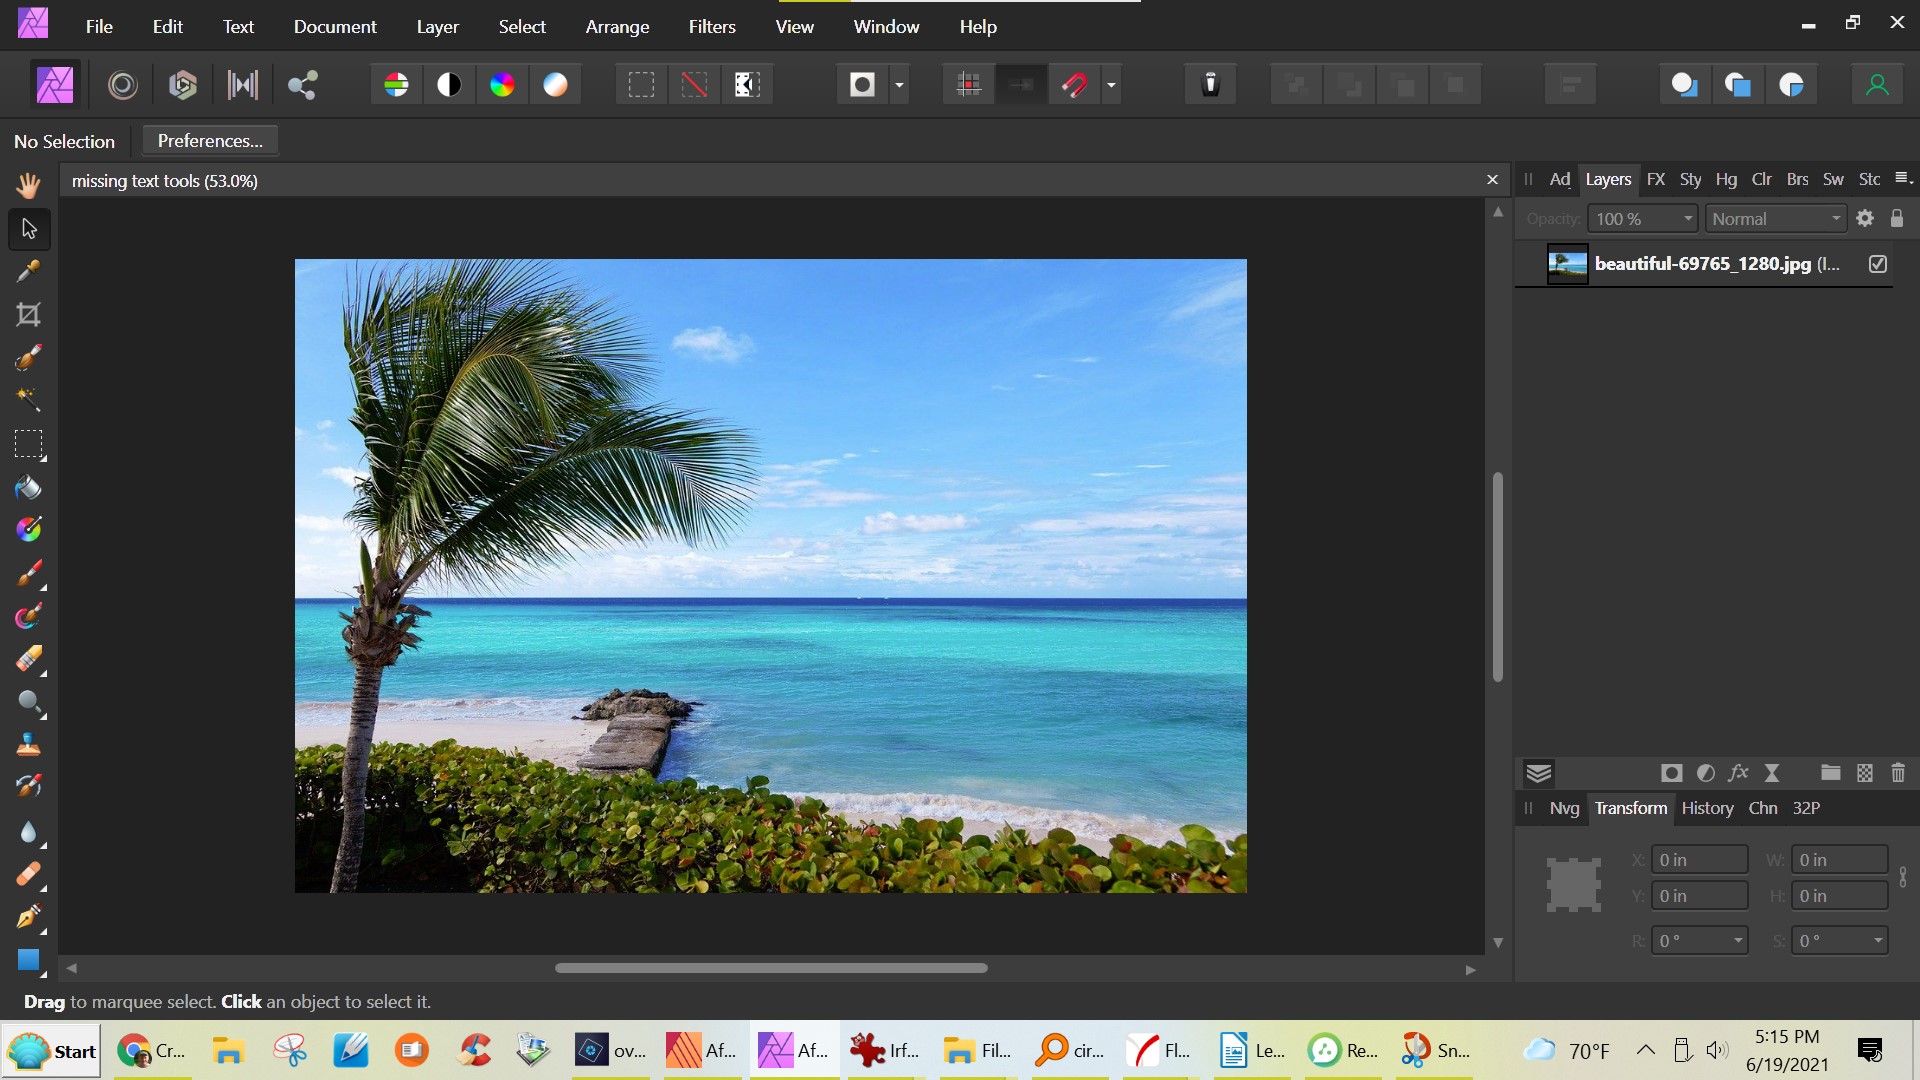
 I'm a new user, I just purchased Publisher, Photo, and Designer. I've looked through many tutorials, asked the web, and still can't find an answer to my problem. Where is my text tool? I think it's supposed to be at the bottom of my Toolbar (vertical bar on far left). But it (they, both text took and artistic text tool) aren't there. I'm in Photo. O, for a manual.
-
Would be nice if the color selector was shown on the 1 column tool pallet also. Currently it's shown only on the 2 column tool pallet.
-
I will be happy if you could add the "Shape Builder" tool to Affinity Designer like in Adobe illustrator it will be very helpful. This feature will go with Affinity Designer to the next level. I hope that you will take my request into consideration. Thank you
- 17 replies
-
- 13
-
-
- shape builder
- tool
- (and 5 more)
-
 Is there a way to use the Pencil Tool in Designer without it automatically 'selecting' the stroke straight after you've drawn it? Perhaps an option or preference that I can disable that leaves all the strokes unselected until I choose to use the Node or Move Tool myself in case I want to edit it? It's quite difficult to see what you're drawing in a complicated illustration when the line you've just drawn is automatically selected and shows all the nodes.
 -
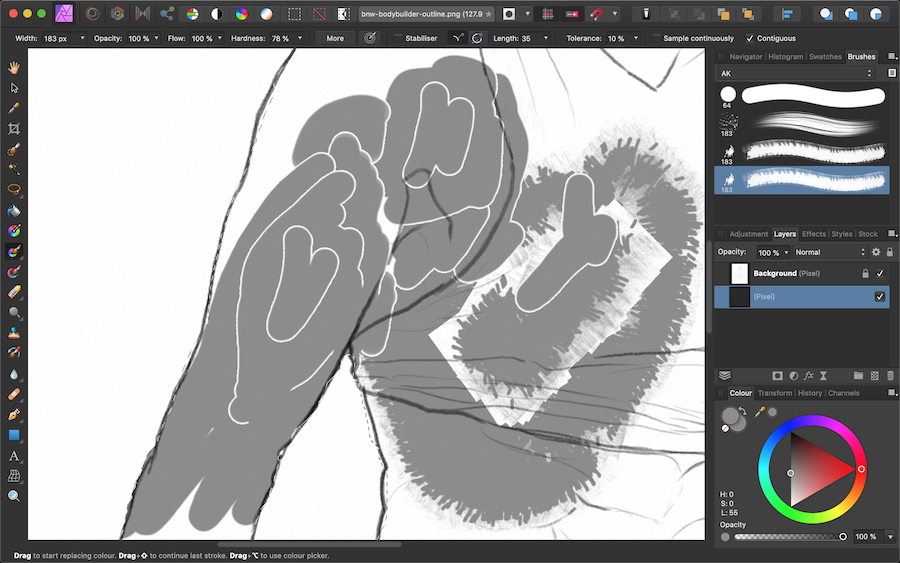
 Hi! Every brush stroke I make over a previous brush stroke, a gap appears around the past brush strokes. :(' This was even happening yesterday and then I factory reset Affinity and the problem went away, but today the problem appeared again. If I close affinity and open a fresh copy of a document or of the image and start painting, everything is back to normal. It may be happening after I make a selection using the selection brush and then, when I start painting inside, this problem occurs. Whether it be my own brushes or the default affinity brushes, once the problem occurs, it doesn't seem to go away. As you can see in the image, the selection is still active within the confines of the female figure. I just bought affinity a few days ago so I am very new to it. Please help. - Arjun