Search the Community
Showing results for tags 'Size'.
-
 Hey! So I had this specific issue where I want to fast and easy change brush size without accidentally affecting brush hardness while using the shortcut alt+R click+L click. Right now this command both affects brush size and brush hardness depending on if you move the mouse/tablet pen horizontally (size) or vertically (hardness). I would like to be able to disable just the vertical command so I can keep the brush hardness the way I originally customized when creating them while keeping the horizontal functionality. Is this possible to do, or is this option not available as of now? Edit: On another note, is there a fast way to switch from brush to brush in the form of a quick pop-up brush toolbox like how you do it in Photoshop when right clicking? If not, are there other shortcuts available in Affinity Photo? Thanks.
 -
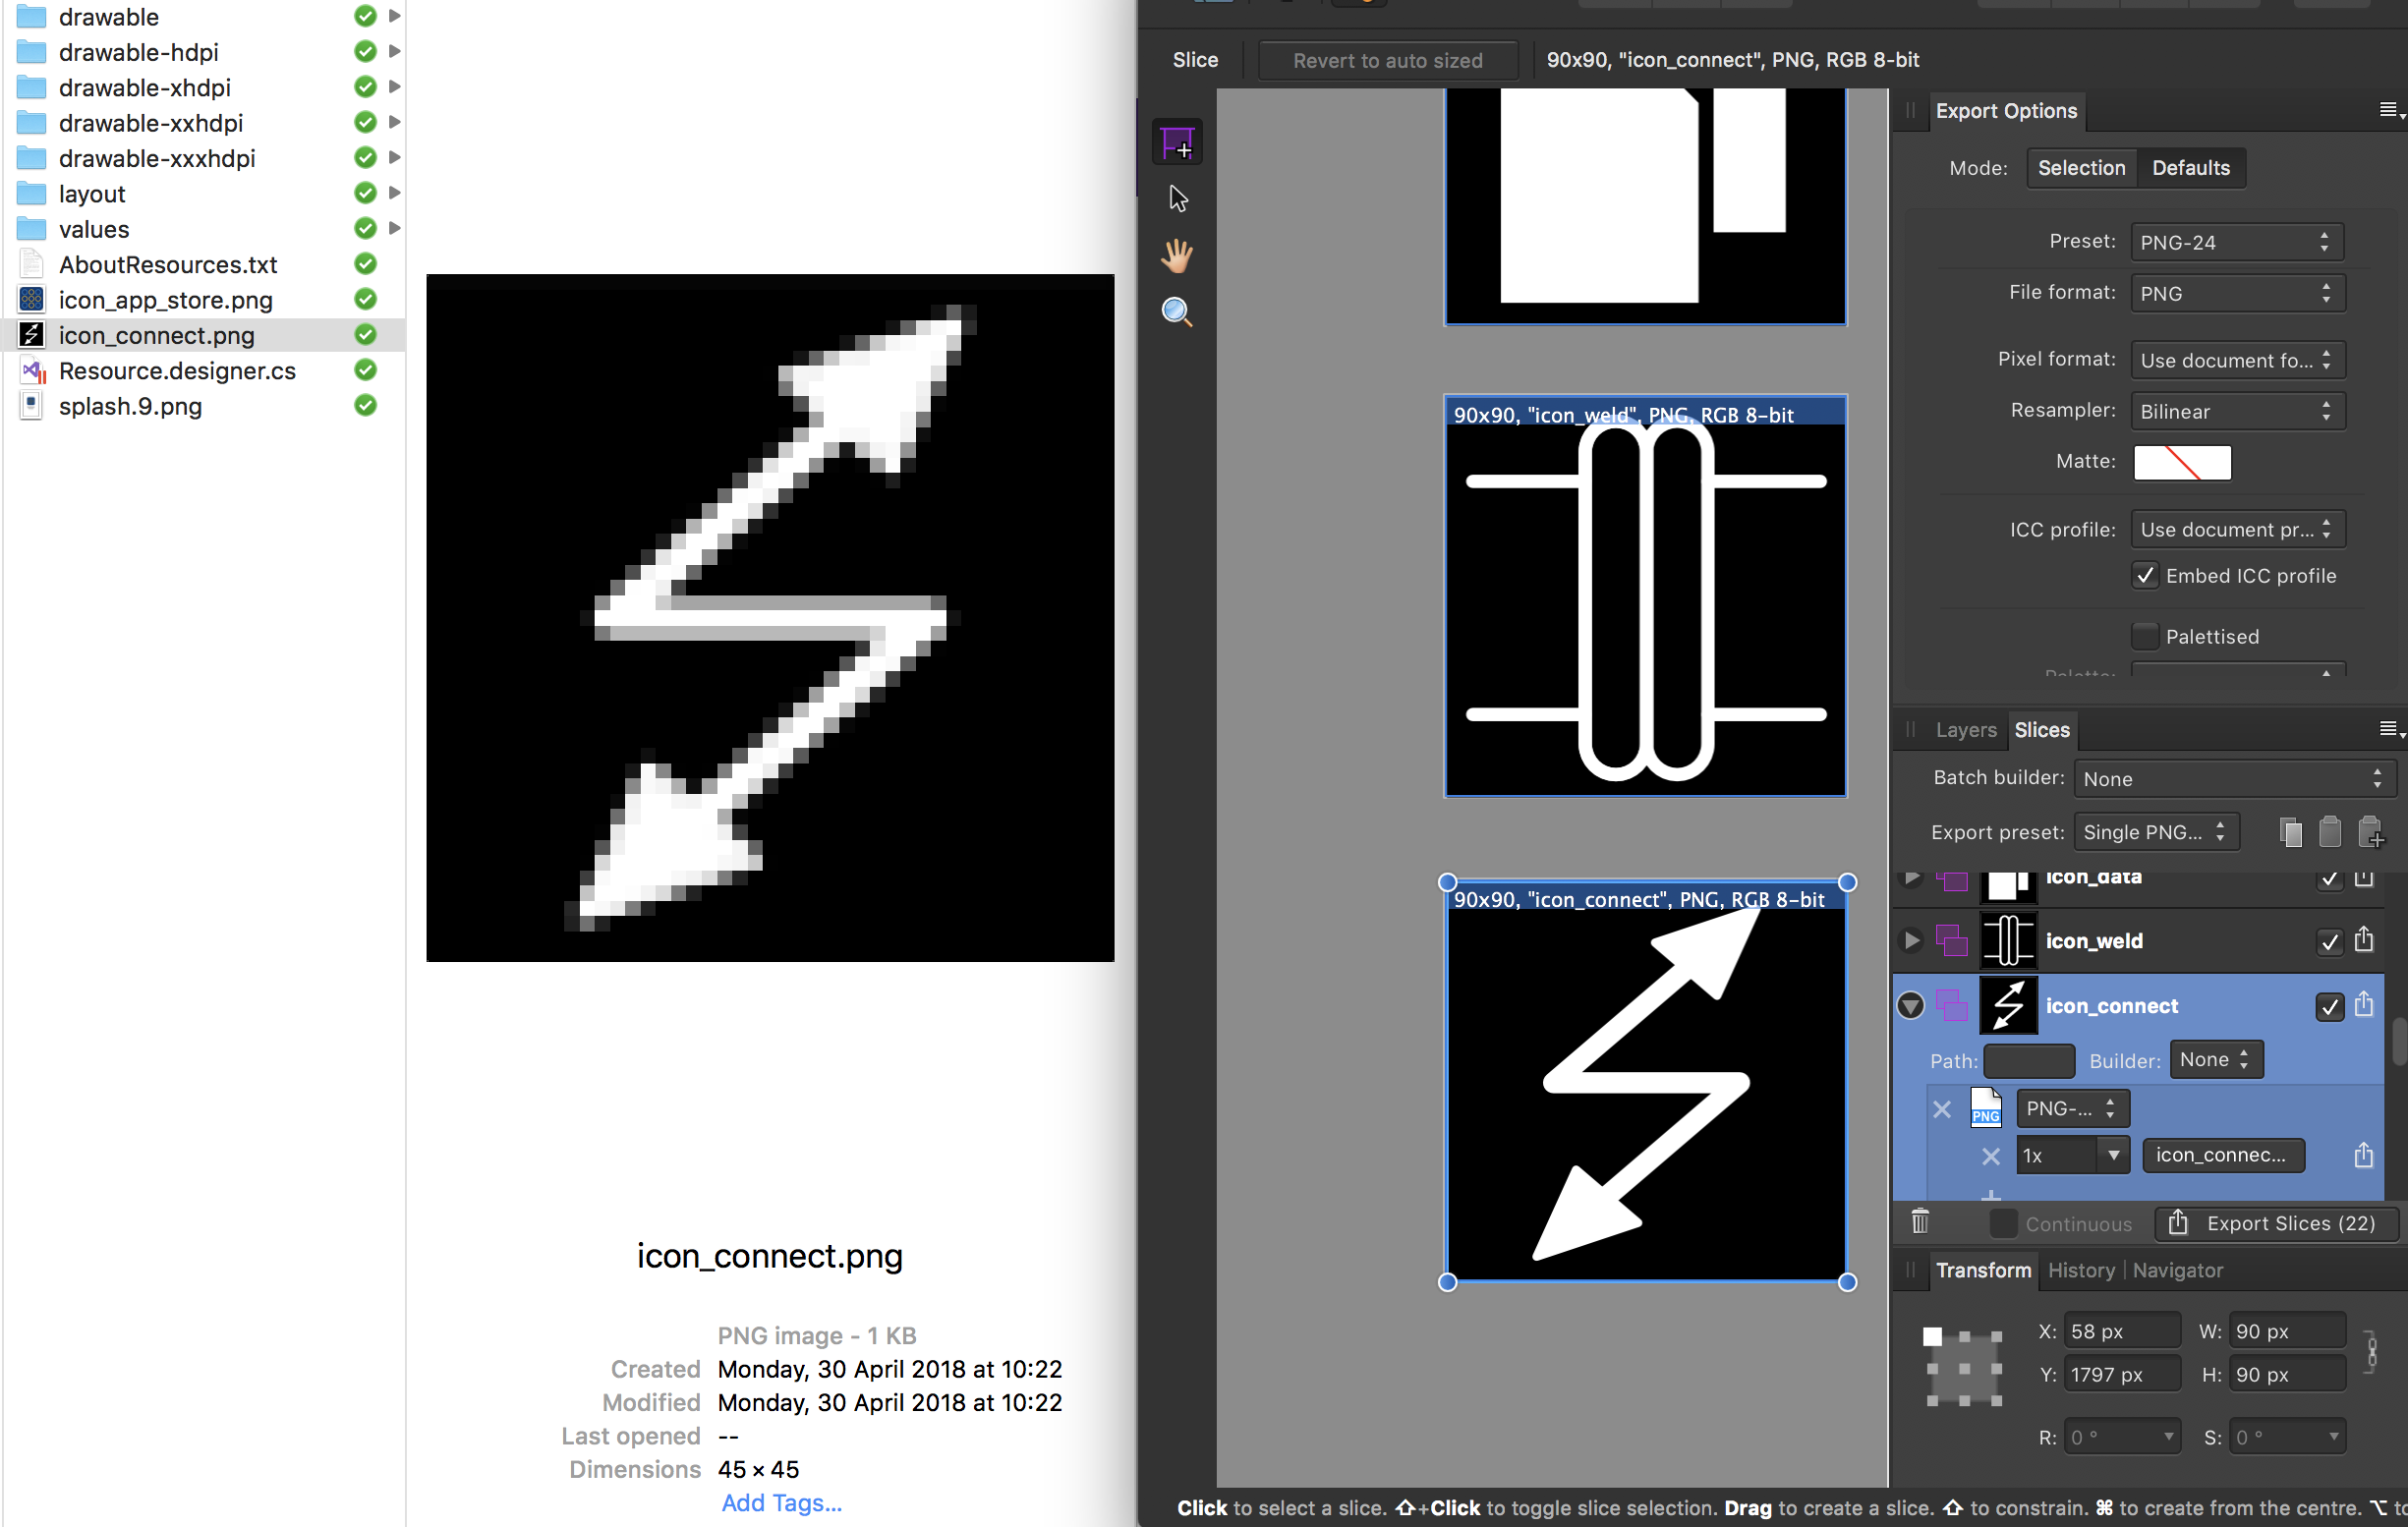
 Exporting sections results in incorrect pixel size. Please see image below where the document is set up in pixels, icon_connect is sized in the document (draw persona) to be 90 x 90 pixels. Export persona export slice also is set up to be 90 x 90 pixels, but the resulting file is 45 x 45 pixels after export. I can't find any scaling options in settings. How do I get the export to actually size the output correctly (I don't just want to use @2x because I actually want to output multiple sizes (e.g. x1, x2, x3, x4).
-
 I've been trying to get to grips with the basics of Affinity Designer. One thing I can't find - (does it exist?) - is the ability to replicate an object one or more times to form a spaced out sequence separated by a fixed distance. For example, I might want to create a square 1 cm wide and then copy it and move the copy to the right 1.5 cm to leave a 0.5 cm gap between the two squares. Then I might want to repeat this process in the horizontal direction to produce 10 squares in a row. After that I might want to replicate the whole row of squares and copy it down 2.5 cm and shift it 0.2 cm to the right. Finally I might want to replicate the two lines of squares multiple times down the work space. I have used other graphic or drawing tools which allow this, and make it very quick and easy to produce such organised structures of objects, but so far after watching several beginner level tutorials and looking in the AD book I've not found a feature like this in AD. If it's possible I'd like to know how to do it, and if it's not possible (yet) I'd like to suggest this as a feature request. What would also be very nice would be the ability to lay out the objects in a pattern as I've suggested, but then to be able to change the base object, So one could then obtain a pattern of circles, a pattern of gingerbread men etc. Maybe that's going too far, but it's just a suggestion. In programming terms it would be like using a higher order function fo space out the objects, and then being able to specify the object to be worked on by the higher order function.
 -
 Hallo, I am new - unfortunately, I am not so well into English language. The text was translated by programme.Ich hope he is clear. I try to cut out desperately the possibility something in a firm aim size. This very simply goes to photo shop element. Problem description: I have a big picture. I have a firm aim format of 768 * 512 pixels with 72 dpi. Now I want to draw up a frame which has exactly this side relation. I would like to position this frame arbitrarily in the picture, or also, propertional increase / reduce around the desired picture area to select and if I these activate then exactly one picture should be also stored away in the size 768 * 512 pixels. With photo shop goes in such a way: Cutting-Tool - input wide in Pixel input height in Pixel- According to frame move - activate - store away - ready. Here with Affiniti photo I have all possible one, however, the desired result does not try done - nevertheless, surely quite simply goes!
 -
 So after another day, another found bug have two same artboards 85x55, one for CMYK, one for UV. sadly, they are not same size in PDF. and, the font is aswell a bit different on both artboards, even when both on same spot, same attributes. alt - dragged UV artboard from the CMYK artboard and changed all to one color for UV printing. when i tryed to find out whats happening, i tryed to open both pages in illustrator and putted them over. detail result is seen on PNG - gray is UV artboard, black is CMYK artboard - as left side was perfectly aligned, right side of the UV artboard was exactly 1crop mark width wider. There is something not nice going on using production / beta 104 bug.afdesign bug.pdf
-
 So I've been using Affinity Designer now for about six months and just on this last artboard group that I've been working on I noticed that my artistic text tool is wonky. When I select the tool then move the cursor to create the size of text to start with, the text is much higher above my cursor and when I type, I am unable to get the cursor to select the bottom most row of text without using the keypad. It's like the box thinks my text is all much higher than it really is. Help! I am not loving the keystrokes to have to change my text.
 -
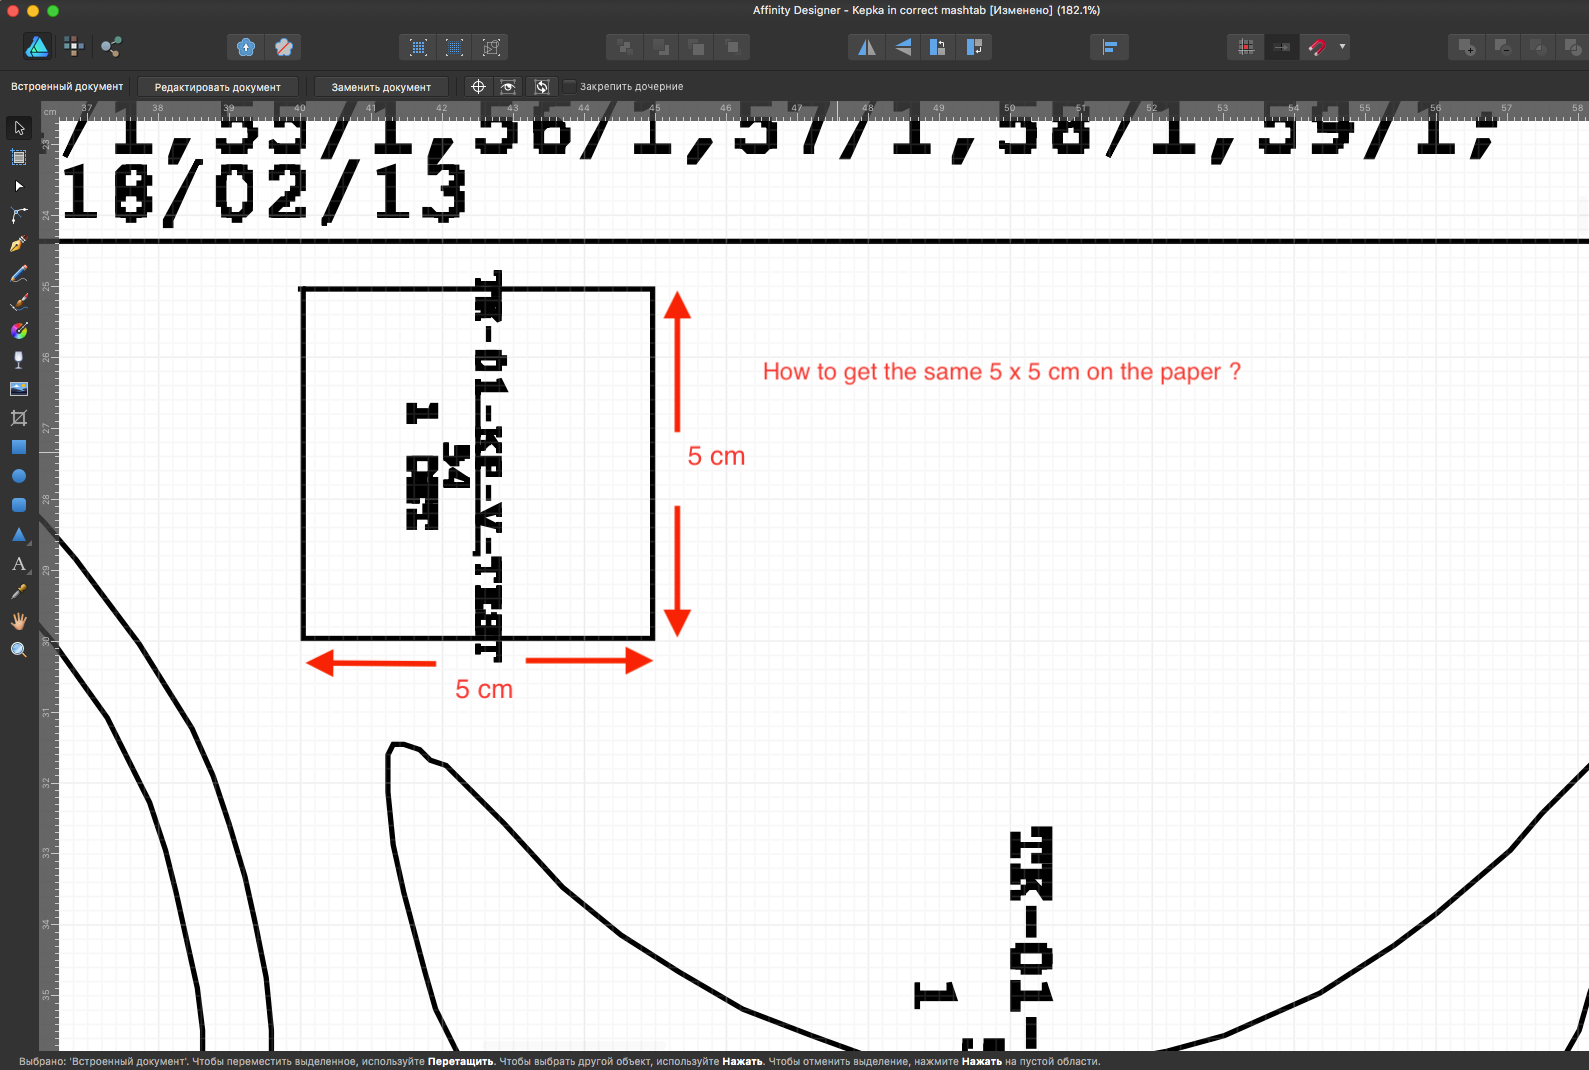
 Hello, I have .pdf file (which was converted from HP plotter's .plt format ) with one big vector image. I need to print this drawing to A4 papers and I need to get exact the same size. PDF-file is relatively big (about 150 x 200 mm) and probably it will takes about 15-20 pages in A4 format.. I've created empty Affinity Designer's file (150 x 200 mm) and dragged pdf to Affinity's window. Then, I've turned the Grid on and resized the image to get the size what I need. I have one test-square (5 x 5 cm) on the image which helped me to get the correct size in Affinity. Now I need to print it but I have 2 problems. 1. How to print this file with correct sizes, in order to get the same 5 x 5 cm square on the paper? (when I try to print I can see only one page which hold she whole document) 2. How to split this document into several pages and re-save it to multipage .pdf where each page will be the part of an original image but in A4 format page? Many thanks. Probably Affinity Designer is not the best solution for this purpose but it was the only software which I have where I was able to resize the image properly.
-
 Howdy. I'm working on graphics for an Antique Dollhouse that need to be printed full size. I'm using an outside printing service for my color graphics and have exported the files in PDF and JPEG format, for ease of transportation. Unfortunately, in doing so, the actual size of the images reduces, the length by about 1/8 inche and the width by about 1/16 inch. Since the printing service does not have Affinity Design, I have to export to something that they can print from. Anybody else notice the reduction when exporting and fix the problem? Thanks, Keith
 -
 Hi, I have a PDF logo in Affinity Designer on a large art board and created a slice in the export persona. How can I change the size of the slice? When I change the size down under in the transform panel the logo stays the same size! Regards & Thanks, David
 -
 Today I learned that pasting elements between Designer documents with different resolution results on different object size. This is a normal behavior on bitmap software, like Photo or Photoshop, because they work with pure pixels and must adapt to the number of pixels the pasted image has upon the resolution, but is a complete hassle on vector apps like Designer, where the key is that you usually design on physical objet size, independently of resolution. This is specially hard when you are working with exact measures, like packaging or any technical illustration. I suggest three possible solutions A: Document or application setting to allow users to select their preference on copy pasting. B: Let the app auto select the pasting behavior based on the measure unit for the documents. (Preference to resolution if pixels unit, or preference to real size if a measure unit is selected) C: Special paste command for "paste preserving size" Hope I'm not the only one finding this important on his workflow. cheers!
 -
 Hello I just noticed that I copy something from document A to B and this something change size when I paste it. Both documents are of the same size. Am I doing something wrong? Some option that I need to change or something? Thanks (affinity windows)
 -
 It would be wonderful if you could pre-define a set of document sizes that you use a lot. For instance, I frequently need to make a document of 940x788, 96dpi and would like to have the "create artboard" option checked. Love to be able to give this a name and have it appear in the dropdown option list
 -
 WIN 7, a{ V. 1.6.2.97 In an Affinity Photo Tutorial on Lynda.com, in the section on refining a selection using the quick mask, "If we hold the kControl ad Otion keys together, we can drag up and down on the tool to make it harder and softe, and wwe can drag left and right to make it smaller and larger." What I get is circle with color values e.g. white = R 255 G 255 B 255, in fact that happens as soon as I use the Option key. This same tutorial says to Zoom with Cmd/Ctrl + Spacebar/--doesn't happen. In my version, when selecting, I have tool bar choices of New, Add, Subtract, Intersect and the online tutorial doesn't--I don't think the shortcut keys in the tutorial work the same way. I would really like to have a current tutorial that works. I'm very frustrated. I have AP on an iPad 2 and haven't noticed these problems. I'm not getting any work done because I'm struggling adapt from PS and not only is the app slow but fighting me every step of the way.
 -
 Hi, I've just upgraded to a larger resolution monitor (2560x1440), which is great, but one issue with Affinity Photo is that there is no obvious way to enlarge the Layer thumbnail size like you would in Photoshop, or other image editing software. On a high resolution monitor the thumbnails are so small, they are pretty pointless. You just can't see what you're working on. Am I missing something, or is has it not been implemented yet? The screenshot I've included is scaled down for a 1080 Full HD display so you can see the problem if you have a smaller monitor resolution. Thanks, Jay.
-
 Hello, There is one fabulously useful (and little known) keyboard shortcut in Photoshop to adjust brush size and hardness: you press Alt (on PCs), right-click your mouse, and drag the mouse left to right to increase/decrease brush size, and up and down to increase/decrease hardness. I use it all the time. This shortcut does not seem to exist in Photo 1.6, and I cannot seem to find a way to replicate it. Any ideas how to implement it, or should we suggest it for a future version? Thanks very much. EDIT: this shortcut applies regardless of the tool you use, as long as it is brush-based, e.g. it works with the Dodge tool as well as with the Paintbrush.
 -
 is there a way to set the ratio/dimensions for the marquee tool?
 -
 When I export Artboards as PDFs their size (and ratio) isn't matching what I've set in Affinity Designer when I open them in other programs (eg. Adobe Reader). For example, exporting a series of Artboards that are 8.5" x 11" appear to be closer to 11.5" x 14.5" when viewed at 100% in Adobe. I've tried exporting a single layer document with the above dimensions and get the same issue. Am I missing a setting somewhere??
 -
 [new user] What is the best/easiest to specify the print size and margins? I'm used to a print dialog that lets me specify the size and each margin. For instance, I want to print my image 4"x5" with 1/2" border top and left on letter size paper. Later I'll print the same image with other dimensions. Thanks,
 -
 Hey folks, quick querstion: i build a graphic in AD and want to increase the size. is it possible to increase the line-thikness proportional to the size of its container? Know what i mean? You have a box (40x40px) with a border (5px) and want to scale it on 400x400px. But the bordersize shall increase proportional. is that possible?
 -
 Good day to you, I have a short question. I don't have a graphic tablet and I have to admit that the workflow is hardly slowed be the fact that I have to reselect the brush size in the upper left corner by clicking on it. In Photoshop is a very convinient option by choosing the size of the brush with keyboard+mouse-commands. Is it planned to inplement a similar feature in the upcomming releases? I have to be true Affinity Photo is cool but this point is the reason which slowes my workflow extremely and I really have to think about using Photoshop instead of a really great product.
 -
 Hi I have just noticed when I drag a PDF from the Finder and into an open document the PDF doesn't respect the actual size of the PDF it opens at a smaller size. If I use the Place option then the size is correct. Also if I open the PDF then select the PDF and Copy and then paste it into another open document the size is again smaller than the original size. This happens with the Mac App store version and the latest beta version. Any idea why this happens? and can a fix be found? EDIT.. Attached a video of what happens it also happens with .afdesign file too. AD_Placed_Image_Problem.mov
 -
 I'm a brand new potential user who's currently trialling Affinity Photo. I like a lot of what I see, but have two key features I am looking for. I've done some online research, but cannot find clear answers. Is there any way to have a layer mask displayed as an overlay (e.g. semi-transparent red). I know I can use the quick mask feature, but would love to be able to just paint directly onto a blank layer mask and then check for missed patches using a red overlay. Can this be done? I have seen some references to brush size and hardness being adjustable using CTRL+ALT and then dragging the mouse, but I can't replicate this with either left click (goes to colour picker) or right click (does nothing). I know I can adjust the brush size with [ and ], but really like the size and hardness adjustment to be in the same motion. Is this possible? I'm really hoping to move from Photoshop to Affinity Photo, but would need to find a good workaround for the above to not have it significantly affect my efficiency.
 -
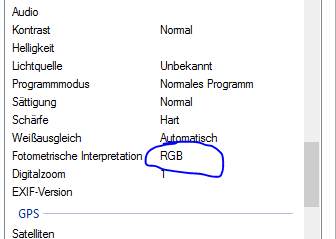
When I open a NIKON NEF raw picture in Affinity photo the color space and the dimensions are wrong. Affinity shows sRGB instead of RGB / 3900x2613px instead of 3872x2592px / see attached screenshots
-
 I am using the pen tool in Affinity Designer to create shapes, and the default stroke weight is 0.2 pt. However, I primarily use the stroke weight of 5 pt. Can I change the default to 5 pt?
 -
When i run out of disk space in affinity, could i just like in PHotoshop get a warning and than befor my program would run out of space, turn on additional disk space for example on another hardwar disk ? is this possible , ore nessesair maybe ? thanks for your ideas and thoughts