Search the Community
Showing results for tags 'Shape'.
-
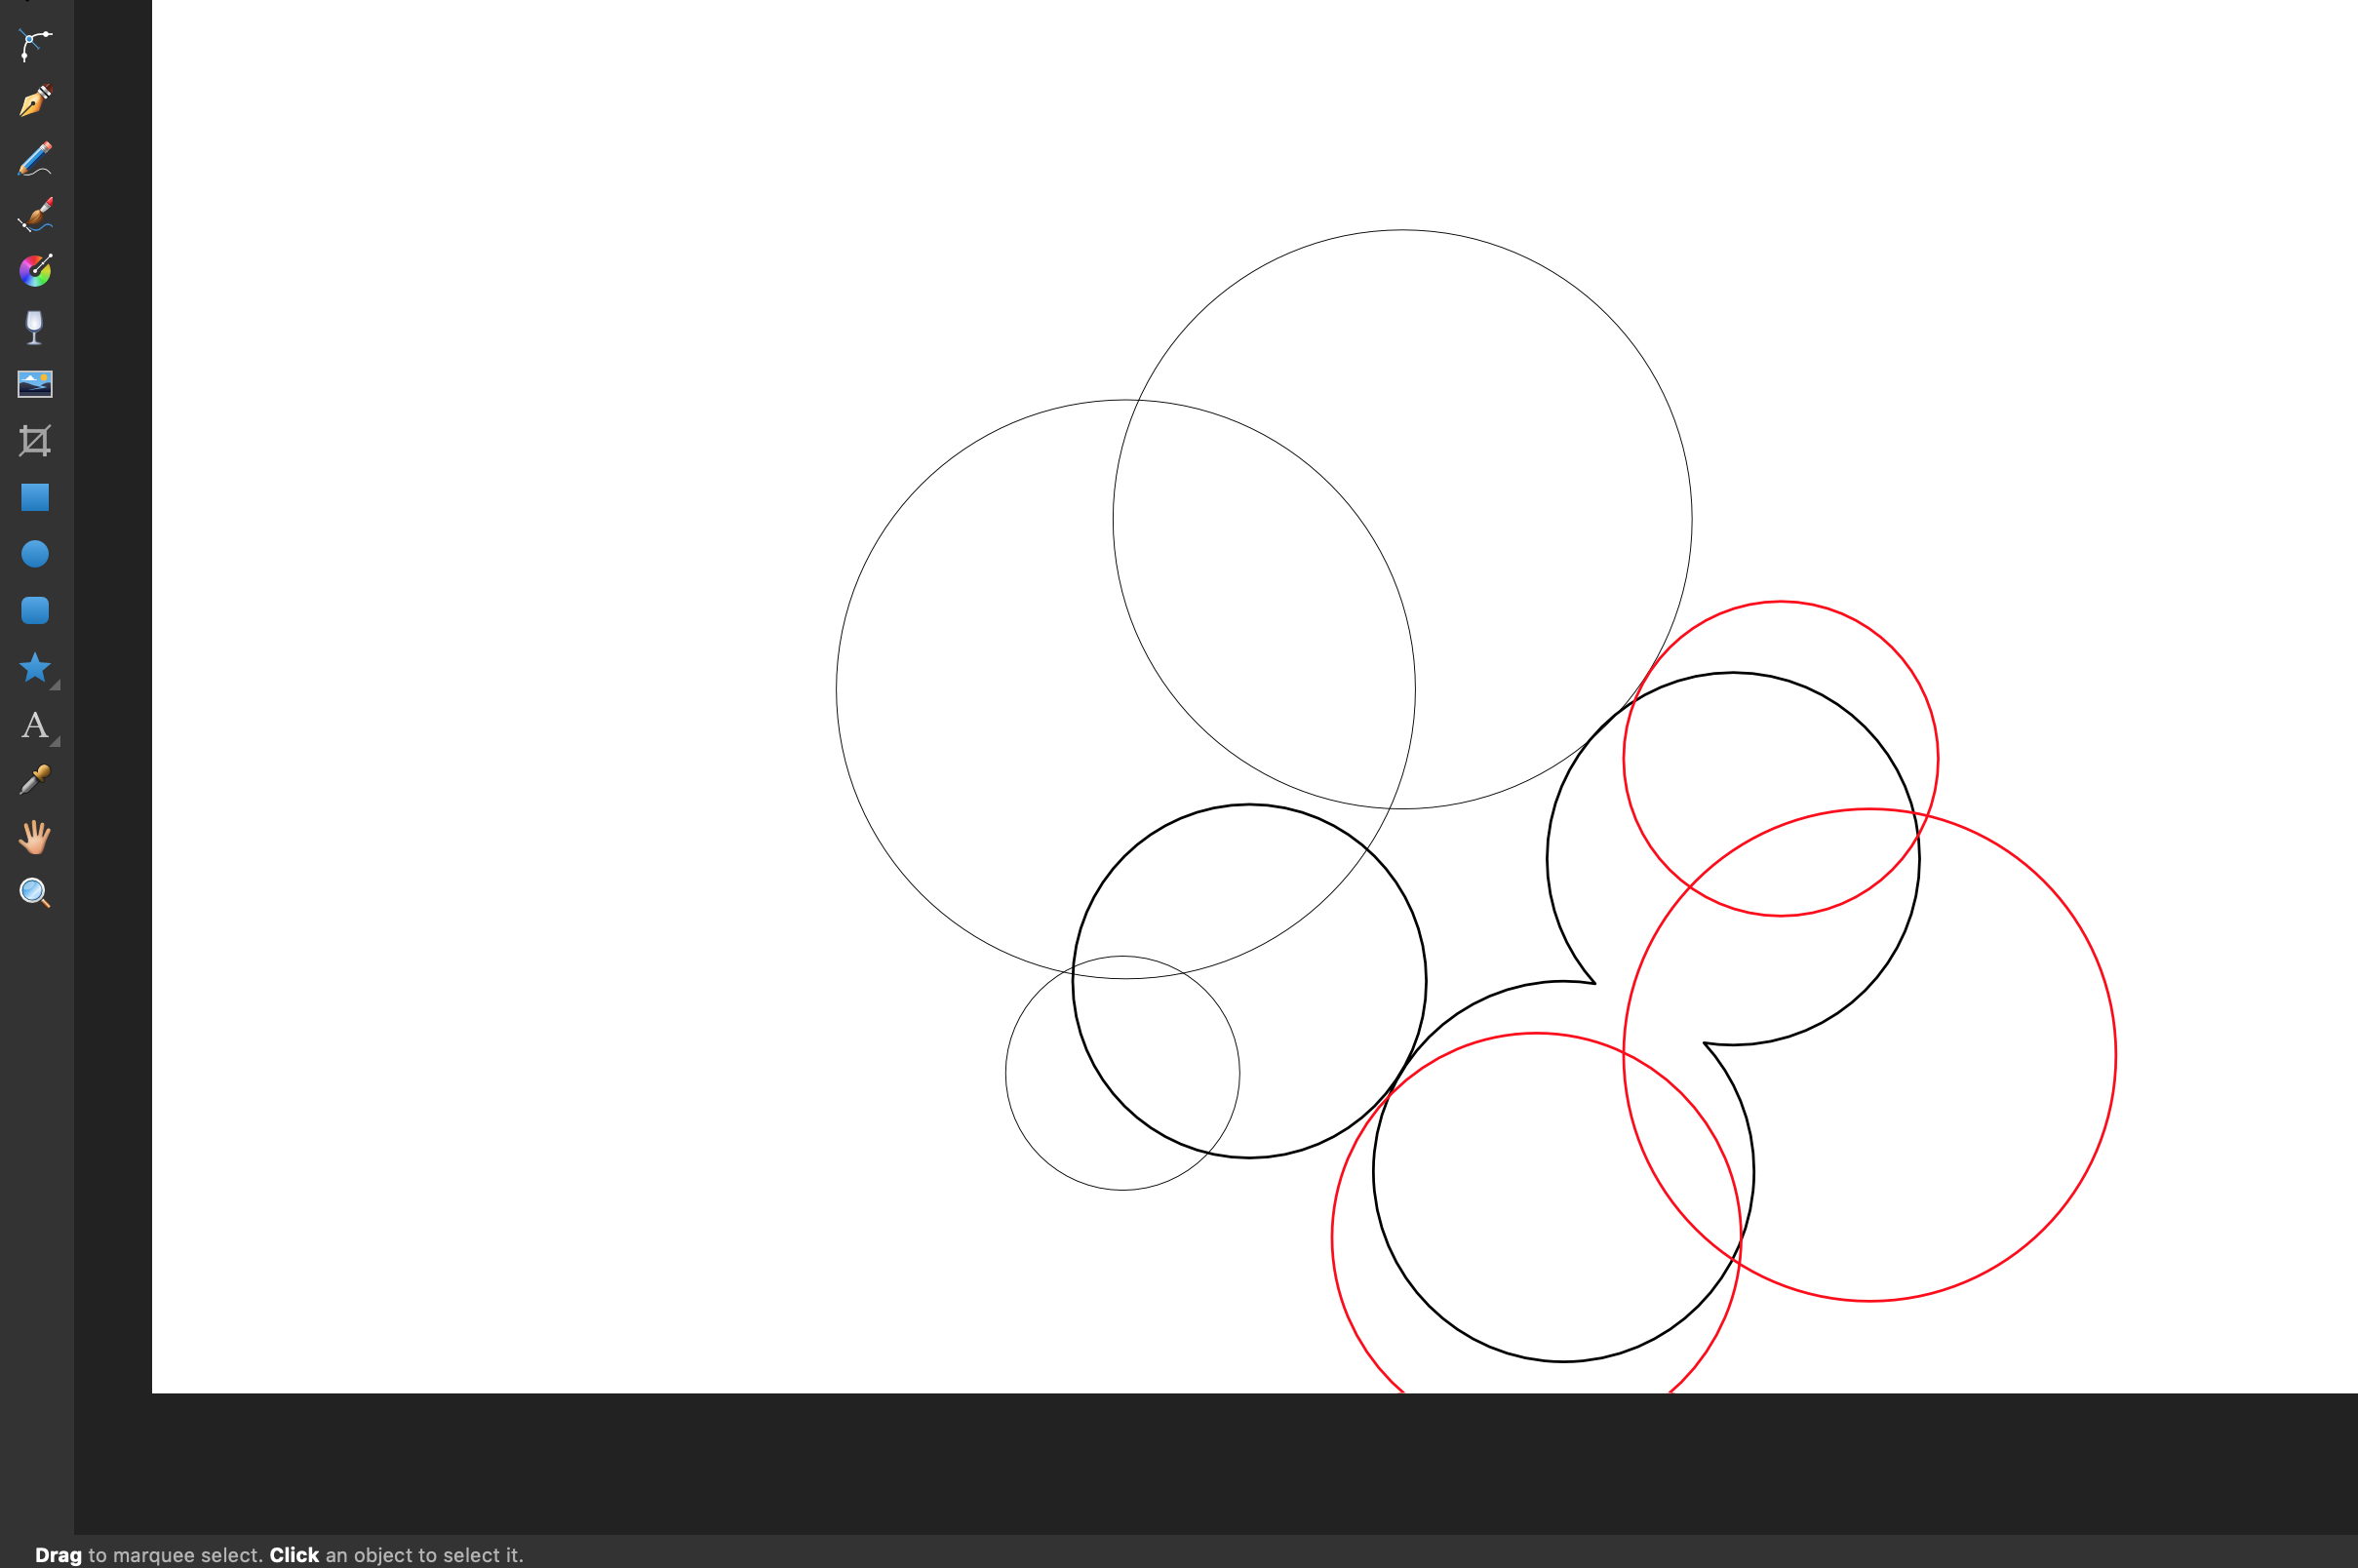
 I've looked through the forums for existing questions on the shape builder tool and it seem like it's yet to be implemented. I'm stuck on building something and I'll like a help with the best approach to go about it in affinity designer. The red circles in the attached image indicate parts that I want to subtract from the thick black circles. But unlike regular subtraction, I don't want those ends taking the shape of the subtracted shape. I want something like the behavior of shape builder where I completely erase those red circle areas
-
 Hey everyone! When adding to selection, Designer for iPad does not take group levels into account. For example, when trying to select "Shape 1" and "Shape 3" from the following tree: Group 1 Shape 1 Shape 2 Group 2 Shape 3 Shape 4 , Designer for macOS would select exactly those. Designer for iPad, however, selects "Shape 1" and "Group 2". Also, there seems to be no "Add to selection" for Photo for iPad at all. Would be great if you could add that at some point. Best wishes, Shu
 -
 Hi, I'm sure this has been asked many times, but I can't find the right answer anywhere. In Designer, I want to keep only what's inside the circle area, independent of layers. These are all shapes created in the Draw persona, and were not converted to curves. I tried to duplicate the circle or draw a new one and apply a layer mask to it, to later invert it. I moved this new layer (circle w/layer mask) in about every order and level. Still, nothing. So... what am I doing wrong? Affinity Designer for Mac (desktop) MBP mid-2015
-
 When drawing a star and snap to a squared document for some reason the star is having some padding and therefor not snapping to the document bounds. I don't see any reason why the star would not stretch up to the document bounds. I don't get it. Am I missing something here? star-size-and-position.mp4
 -
Is it possible, either in desktop (Mac) or iPad versions of Affinity Design, to constrain text to a shape as in the attach picture? many thanks
-
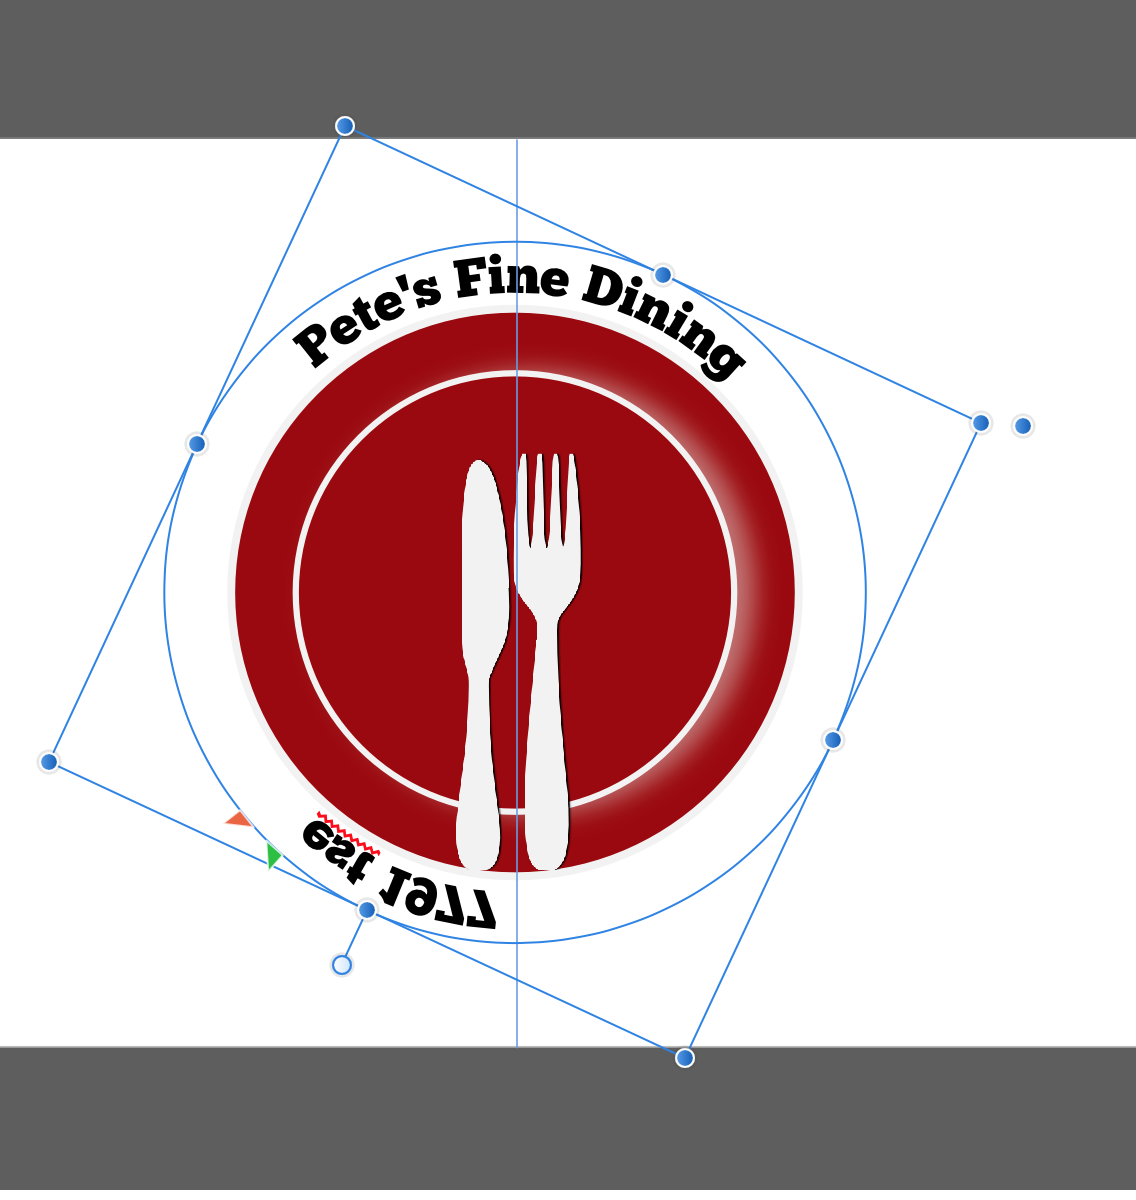
 The text on the bottom half on a circle is always upside down and is unreadable and stupid. I'VE RESEARCHED FOR TWO HOURS and can't find a solution. Flipping doesn''t help, baseline doesn't help, nothing helps. Take a look at the file. ANY HELP WOULD BE NICE. FYI Type on a path is the only reason I use affinity designer.
-
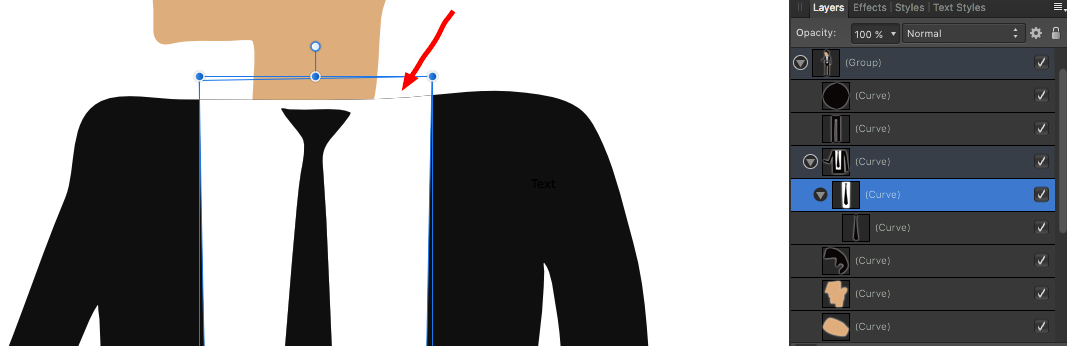
 Hey Affinity Experts, I have been trying to erase a top border on two combined custom shapes. One shape is dark suit jacket while the other shape is a white shirt shape on top of black suit jacket shape. My problem is that when I layer the shapes a very thin black outline remains from black shape. See example. How can I remove this black top outline? Do I have to erase it or is there a way to layer the shapes that causes the black border line to disappear at overlap. Thanks!
-
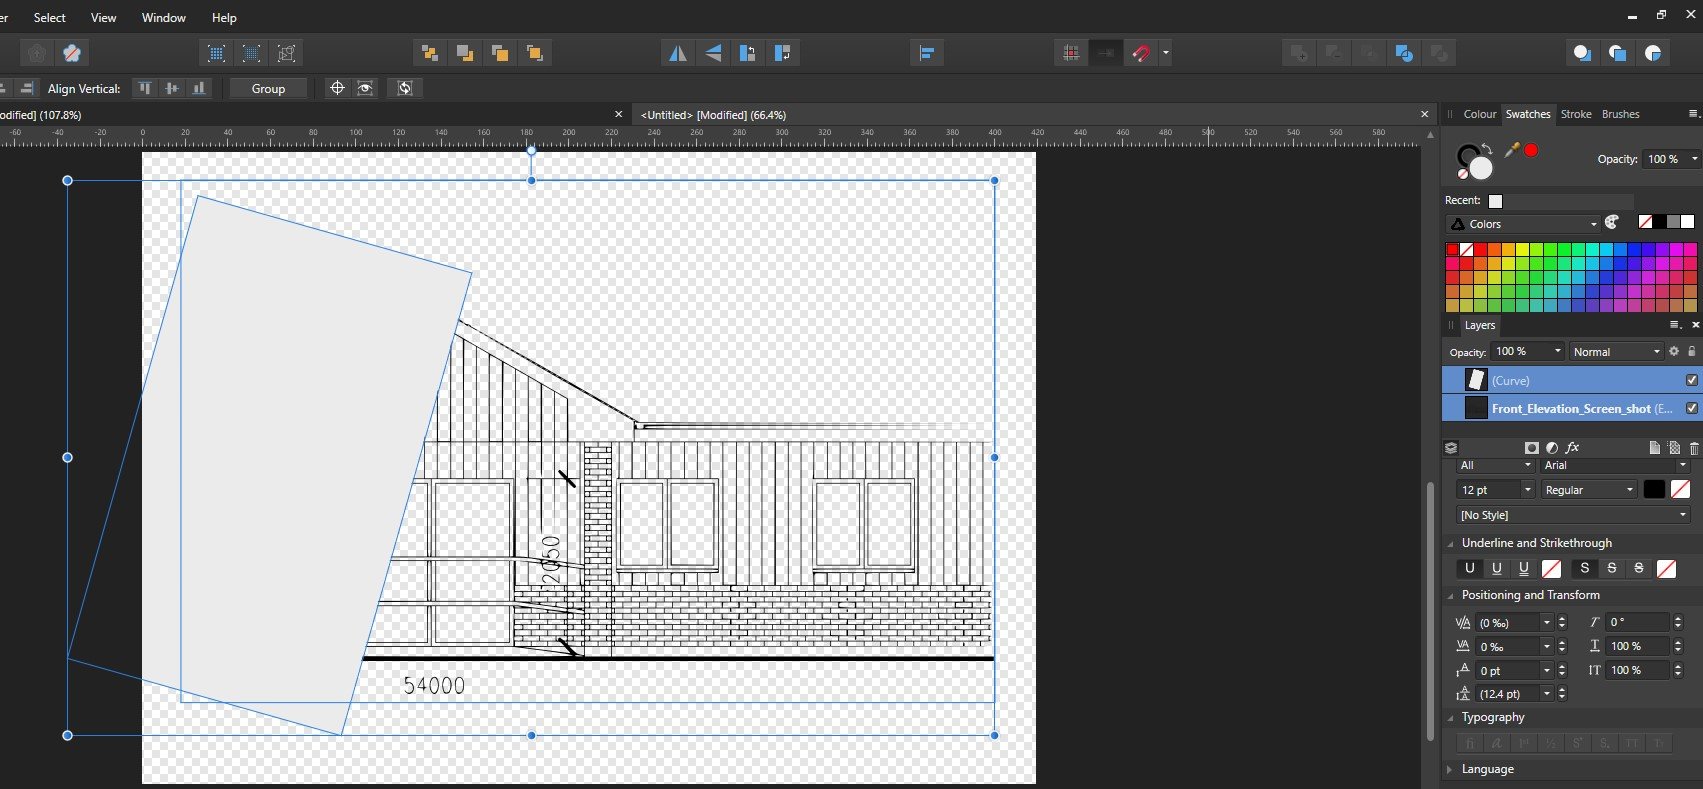
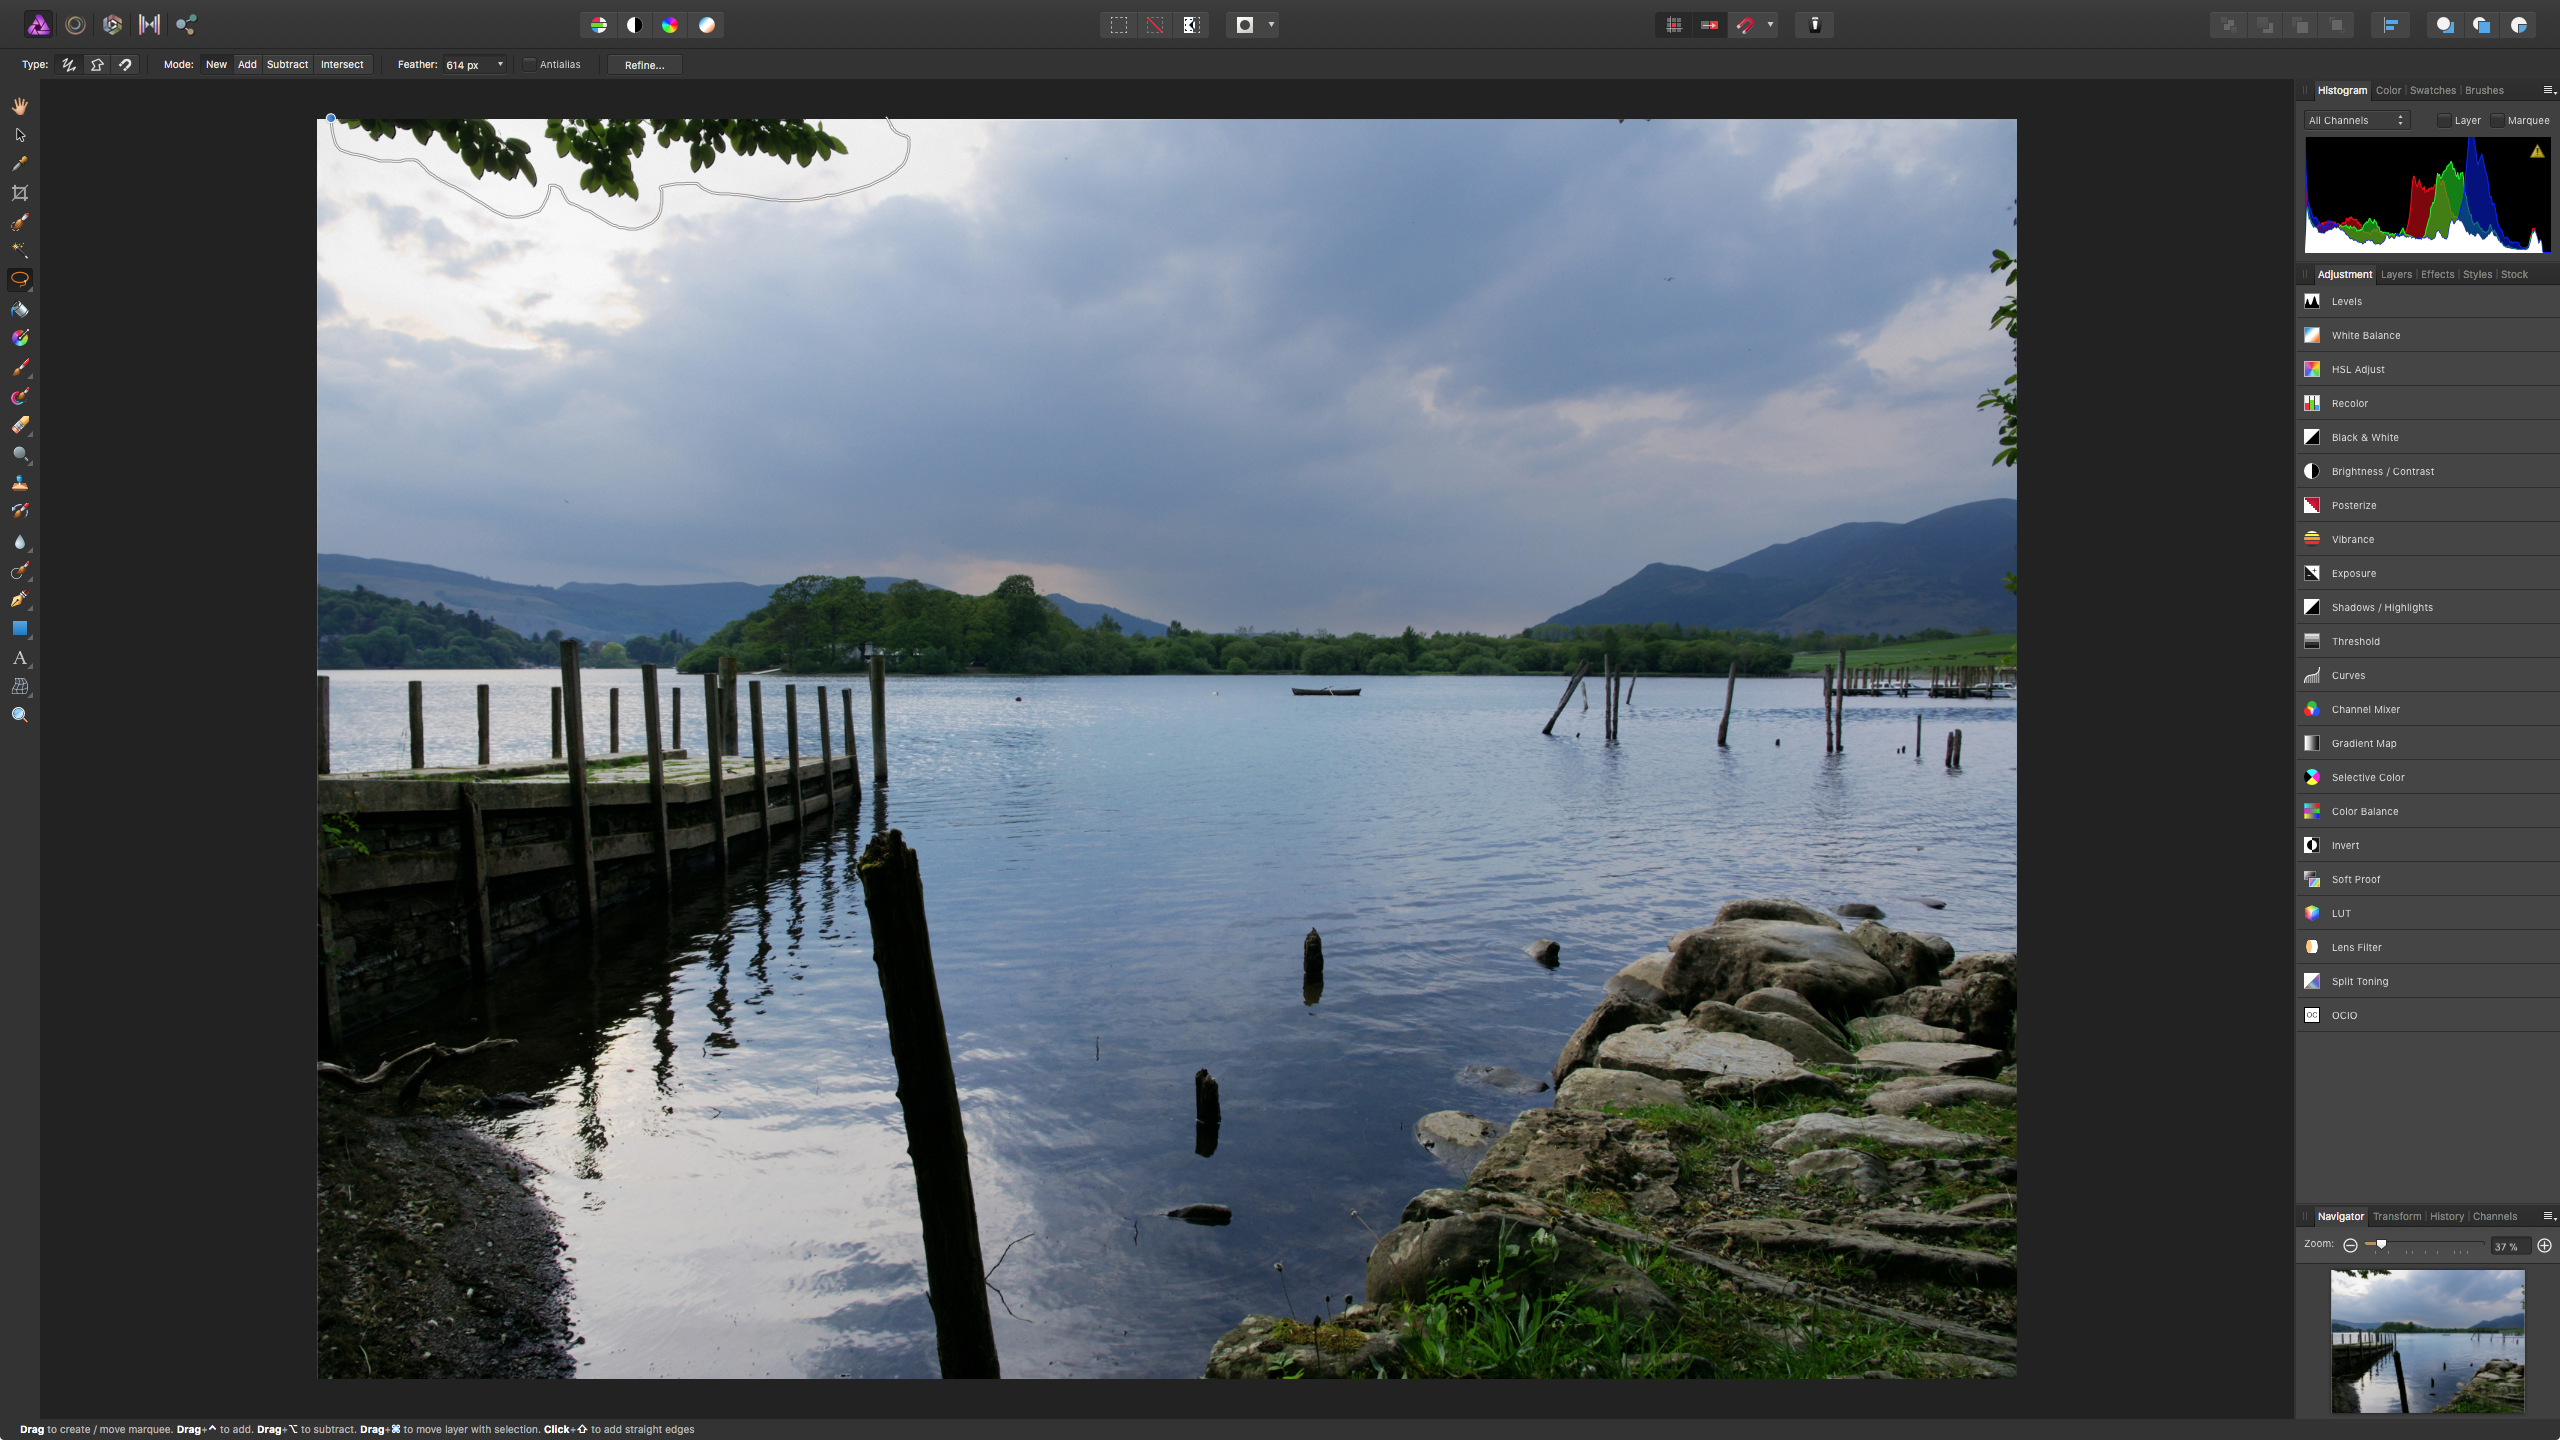
 I seem to be going round in circles in trying to resolve this issue, so please help me if you can. I have an image that I want to crop at a diagonal (see attached image). It would seem that the Add/Subtract/etc. functions only work when it is two shapes that are being worked on, not a shape and an image - at least, when I try to do this, they are all greyed-out except for the Divide function (which doesn't appear to do anything). I have tried using a jpeg image, but have also converted that image to an eps and an svg, all with no luck. Am I doing something wrong, or asking AD to do something it can't - and, if that is the case, what can I do as an alternative? Is there a function in AP that would allow me to do this? I want to overlay the resulting, cropped, image onto an artist's impression. Any input would be much appreciated. Shape from image.afdesign
-
 In various other graphics editors it is possible to blend to shapes. For example you want to blend a red circle with a blue rectangle. I imagine this function would look like this in this imaginary function in Affinity Designer: You place the red circle and the blue rectangle on opposite sides of the document. You want the blend to rotate 360° and you want the blend to arc through a specific point on the document. You select the red circle and blue rectangle. You drag the "rotation center" to the side were you want the blend to arc. You type in 360 degrees in the blend tool dialogue box. You type in number of iterations, let's say 20. Then you hit the "Blend" button. Between the red circle and the blue rectangle there are now 20 shapes arcing between the two original shapes. Each shape - moving from the circle to the rectangle - becomes more like a rectangle, and vice versa. The color changes with each shape in the entire spectrum between red and blue, and the shapes in the arc rotates from the circle to the rectangle 360 degrees (negative values would rotate the shapes the opposite way). Maybe it would also be possible to outdo the competition by making it possible to do more color combination along the arc/path. Maybe it would also be possible to place more "rotation centers" - points through which the blending would take place.
 -
 How do you set text to run around a photograph
 -
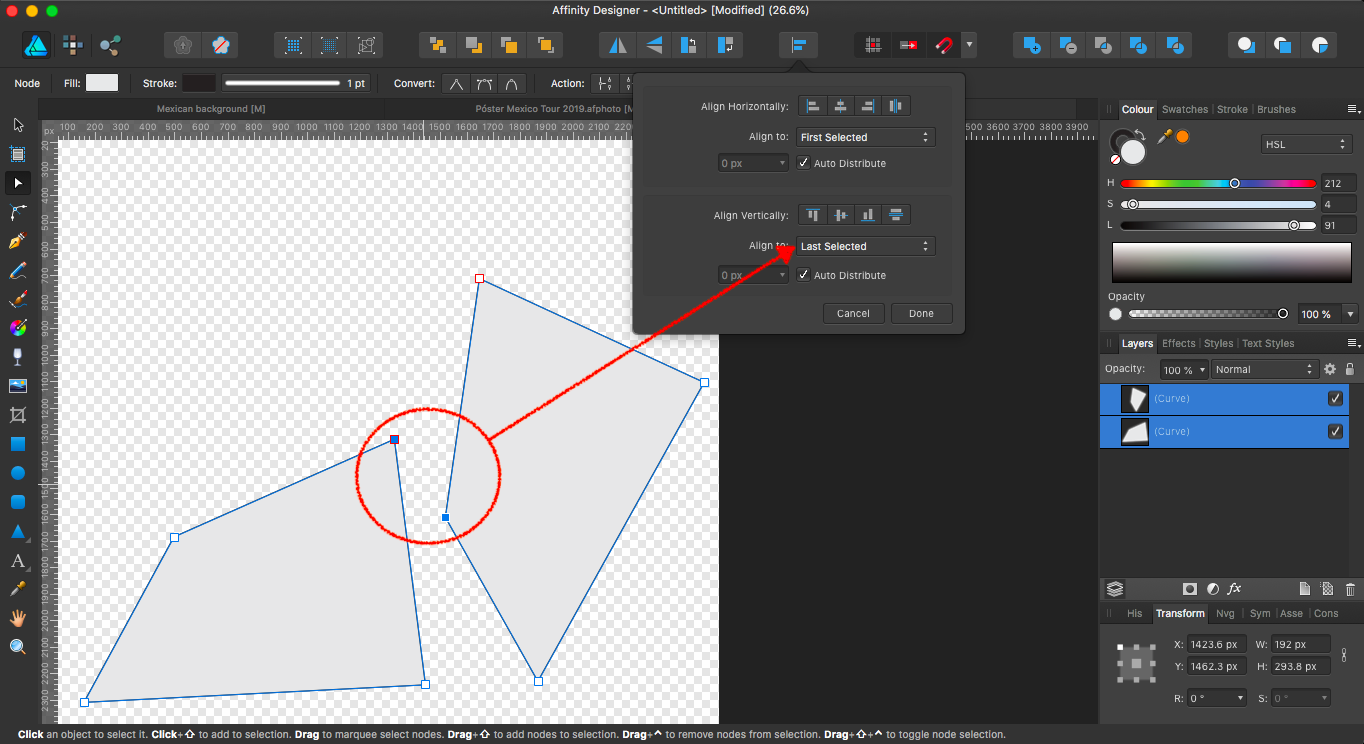
Sometimes you require to align the nodes of shapes which it's nodes are not in the corner of the shape (see image 1), and it will be great if this can be done without modifying the shape to be align. I imagine that in the future this could be done in a new node option, in the alignment button (Image 1 and 2). If this can be already done, I would be more than happy to learn that. Thank you again for this amazing software!
-
 Hi There, I'm tryin to fill a curves shape so it has a black outline and a white fill. This file though has curves and a fill already, so I'm not able to fill it any further. Changing the outline to be black by changing the fill is no problem. How should I go about doing this...? Lily.afdesign
 -
 Hello, I am looking for a function to create a shape with muliple outlines(see attachment). Does AD has got a tool for this or do I have to do it manualy? Thanks in advance nod
-
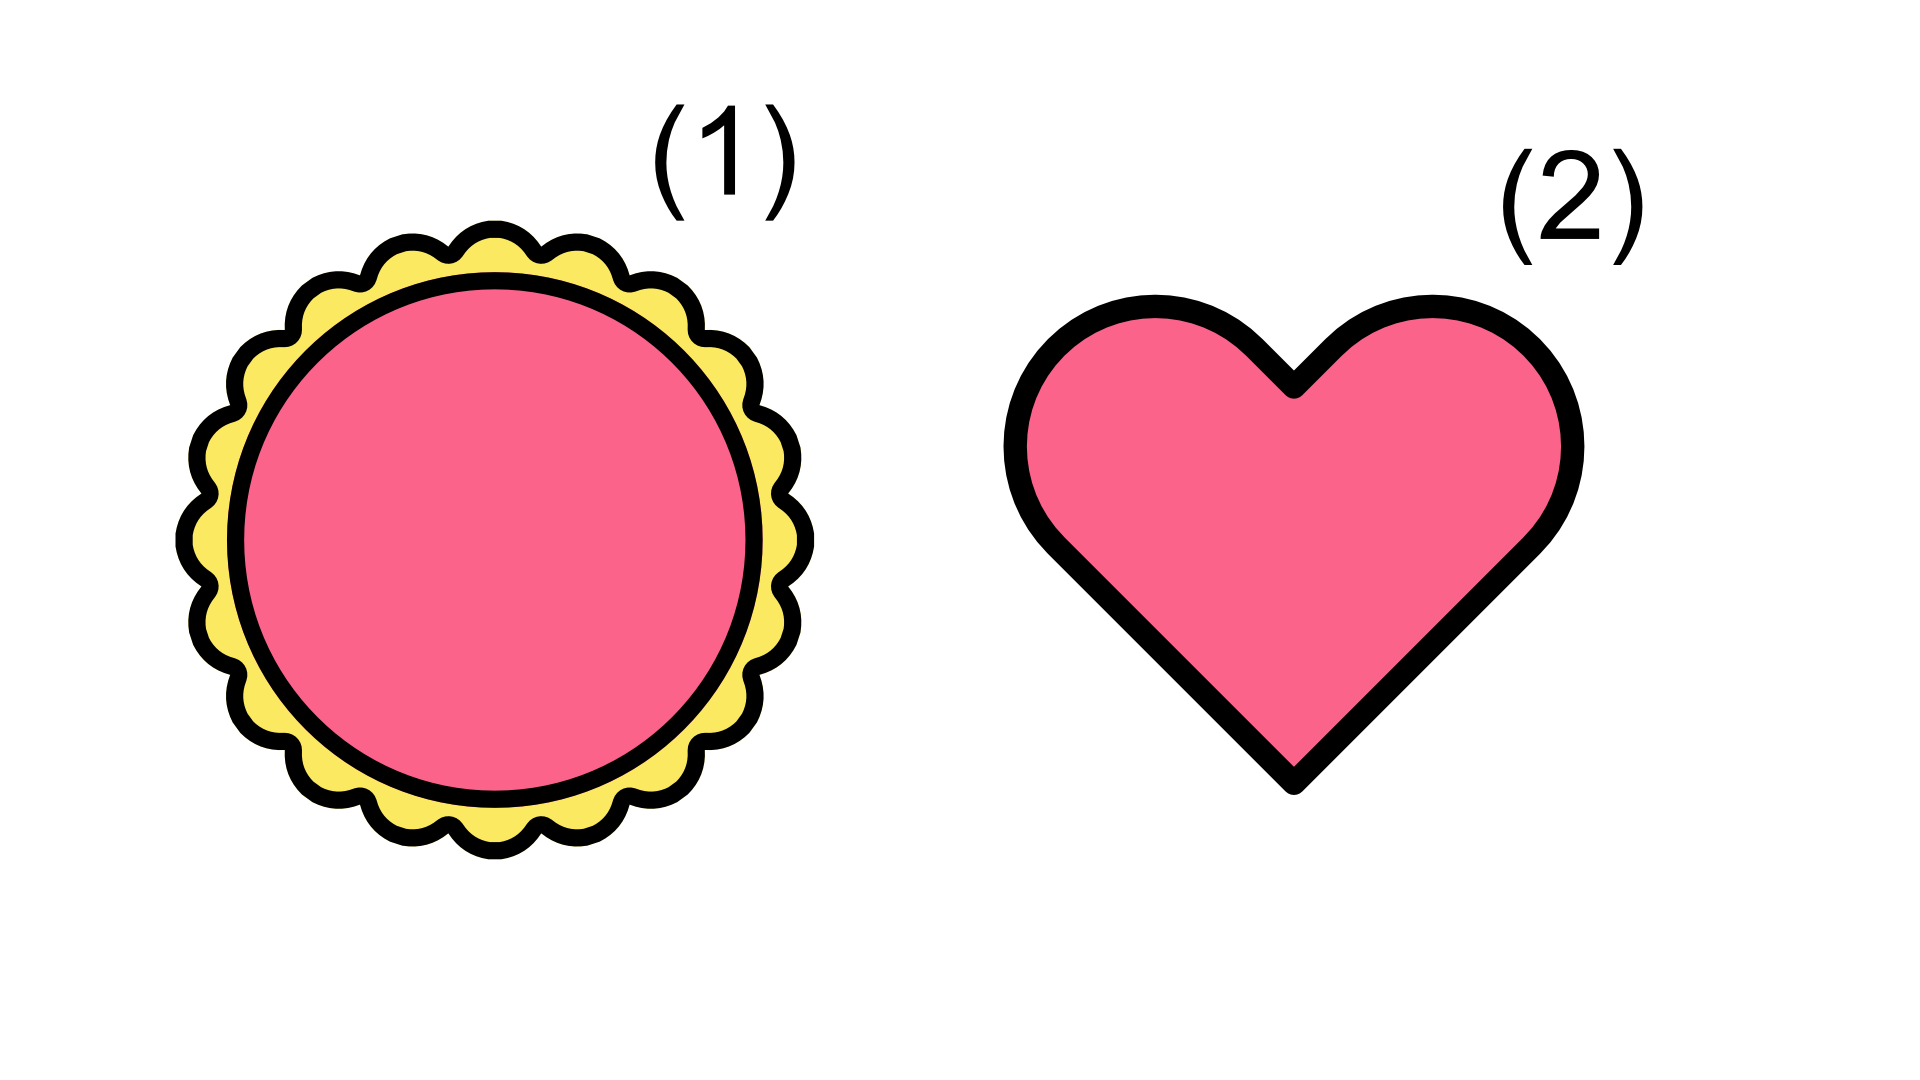
 I am currently trying to create a 'heart shaped tart'. I have made a circular version (1), but am unsure on how to create the same effect with the heart (2) let alone any other shape than a circle. The circular version (1) used a circle on top of a gear shape. Any help welcome, thanks!
-
 Hey guys, I'm trying to divide (or something) the shapes in the attached example. Basically I wanna cut the dark red shape from the black shape, so that the black shape will have an empty circle where the dark red circle is. How do I do that? I tried divide, but that only works the way I want it to only if the shapes don't overlap completely. Thanks divide-test.afdesign
 -
Hi guys, I am trying to get the text into a path, for example a circle. I can see how to to put the ON a path, but I can't figur our how to put it INSIDE it (in the most non-sexual way possible ) I attached a screenshot of what I'm trying to achieve, made with Fireworks. Thank you kindly
-
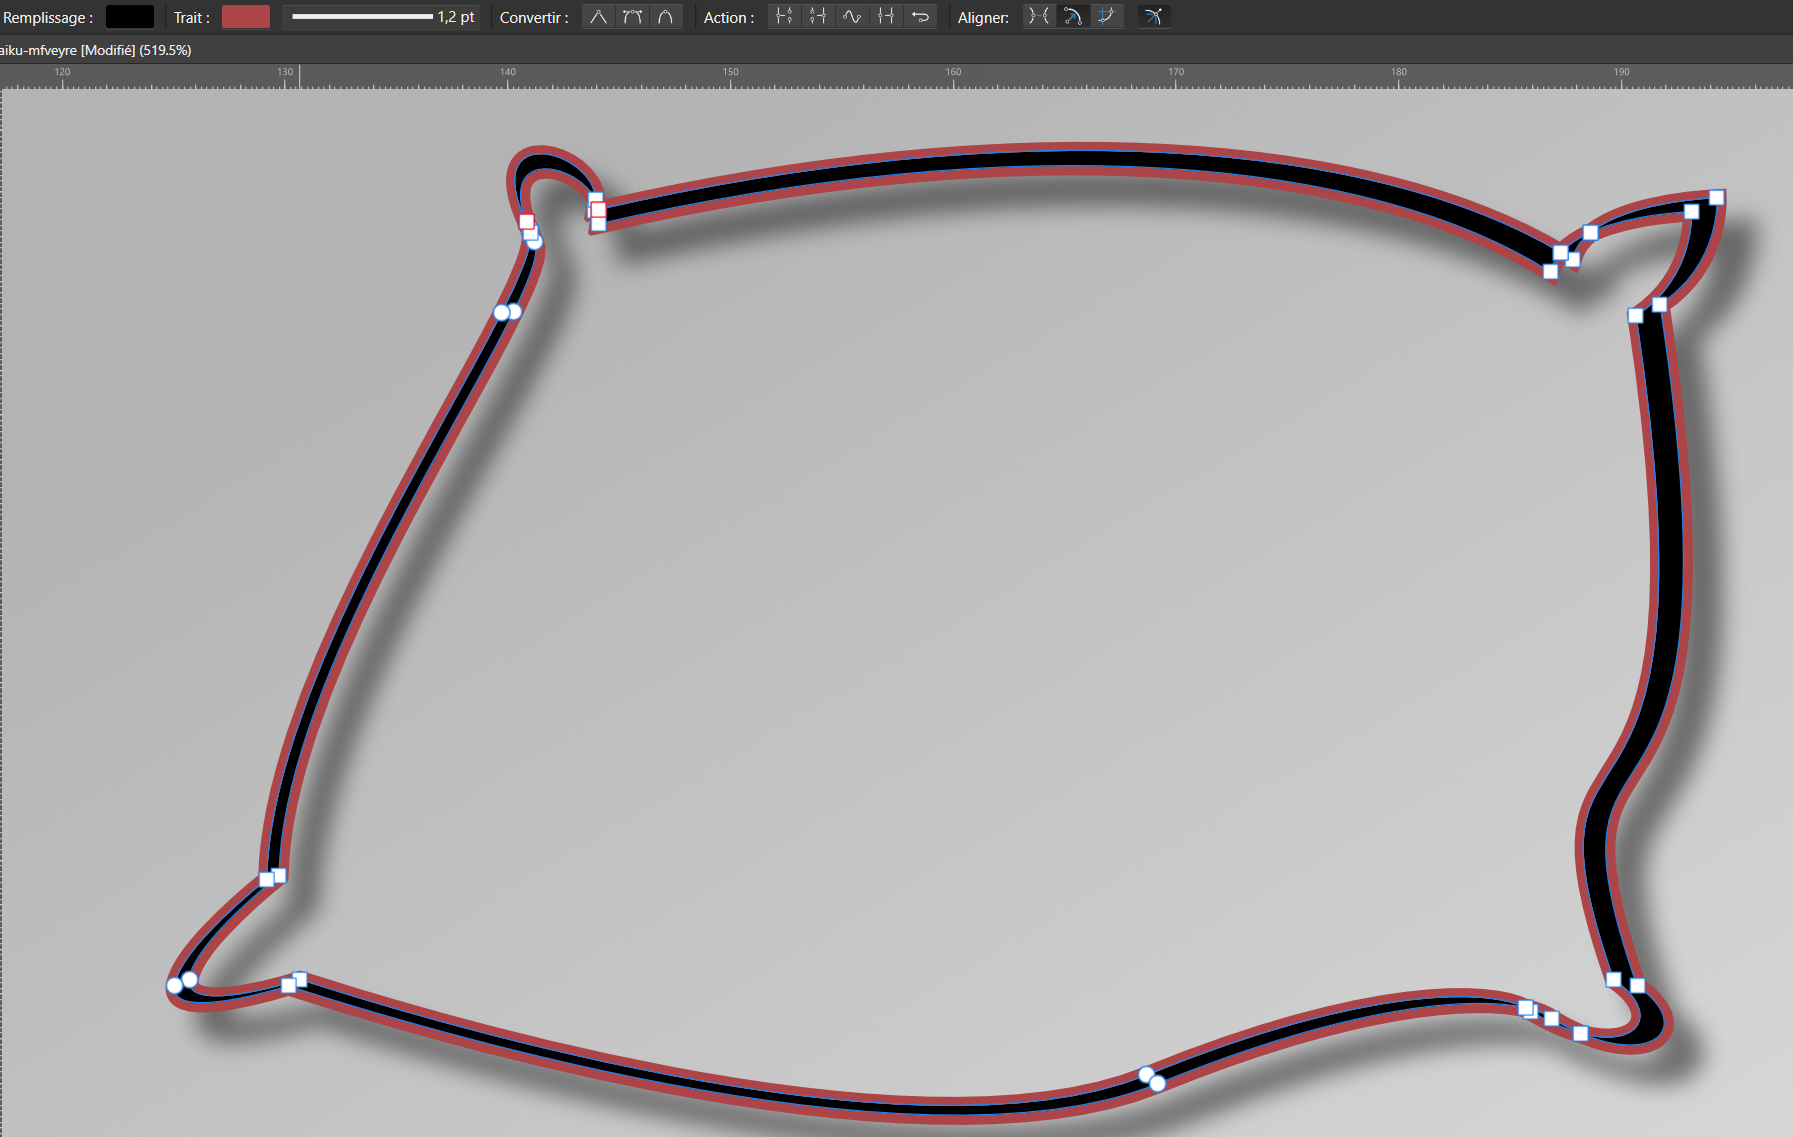
 Hi, I have a shape that is closed and contains a hole. On the picture joined : - This shape is a result of a boolean combination of 2 identical shapes slightly shifted. - The stroke is red - The fill is black. I want to fill the hole in the center of this shape. 1 - I tried all the boolean operations (including divide) with no success, it doesn't "restore" the 2 original shapes as some vertices have been merged. 2 - I tried removing vertices to restore a "filled" shape, but it is too hard as some vertices are overlapping other ones (is there a way to "hide" vertices like in Blender ?) 3 - I could redraw a shape on top of the original, but It's too hard because of the complexity of the bezier curves. 4 - I tried to make a square nested in this shape's layer, but it make the square appears only in the "fill" part of this shape (the black part). How can I fill the center of this shape ? Thank you, Cédric.
-
 Hello, I'm using Affinity Designer. I would like to create a vector brush that is an eclipse shape. I followed the tutorial for creating a vector brush except I used the eclipse vector shape instead of a brush. I saved it as a png and then uploaded it as a new textured intensity brush. Unfortunately, when I draw with it, the edges are blurry and jagged. Are there any tips on how I can make this better?
-
.thumb.jpg.906d0128edf7eab95162b8f71c9e34a8.jpg) In Affinity Design for Windows I created a shape and gave it an outline. I then I messed around and put text on its path. It changed it so that now - there is no colored stroke/no line and I cannot re-add a stroke or fill it. What am I doing wrong? Windows 10 Latest Design update 3/2018
In Affinity Design for Windows I created a shape and gave it an outline. I then I messed around and put text on its path. It changed it so that now - there is no colored stroke/no line and I cannot re-add a stroke or fill it. What am I doing wrong? Windows 10 Latest Design update 3/2018 -
 Is it possible to create a shape from an outline in Affinity Designer? For example if I have a straight line with a set stroke width of 12px which isn't a "closed shape" like it's needed for certain printing techniques: is there some way to create a closed shape from a line with stroke, in this simple case 2 points (line from A to B), to have a shape without outline, with 4 points and a width of 12px? Without doing that completely manually? Edit: Ok, forget it. Found the option in the layer settings via the upper menu. At first I looked in the context menu of the layer, which didn't help much.
 -
 Hi, I'm new with Vector drawing and rather new to AD. What I'm trying to achieve: (https://www.vecteezy.com/vector-art/95407-white-abstract-geometric-vector) What would be the best way to draw these triangles? Steps and Problems encountered when drawing triangles with the pen tool in Polygon mode: After each closed polygon a new curve layer is created, which makes it impossible to reuse a nodes and edges as part of another triangle To use a triangle that is created through creating surrounding triangles, a polygon has to be drawn explicitely where each node is on top of others To move nodes, all layers have to be selected and before moving a node I have to select join curves. This however is forgotten as soon as I select another layer I've also tried using the triangle tool, but this doesn't make it easier, as I'll have to move more nodes around afterwards. Maybe this is the way one has to deal with it, but I was hoping, someone could recommend a better workflow. Thanks in advance.
-
 Hey Everyone, I'm using the projects in the workbook. I was learning the freehand tool and it is not working properly. When I try to use it, I draw the selection you can see in the "desired" pic below. However, when I release, I end up with a semi-circle which does not look like what I drew. It also doesn't match what's in the book. Has anyone had this problem? Am I doing something incorrectly? Please help! I'm using the most current updated Mac OS X. I've tried closing other programs, reinstalling affinity, and all the other usual solutions.
-
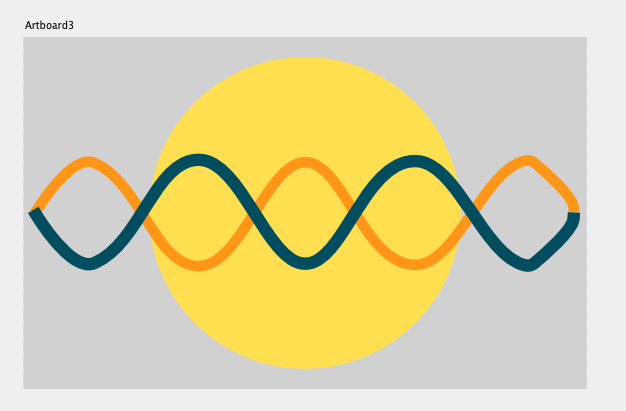
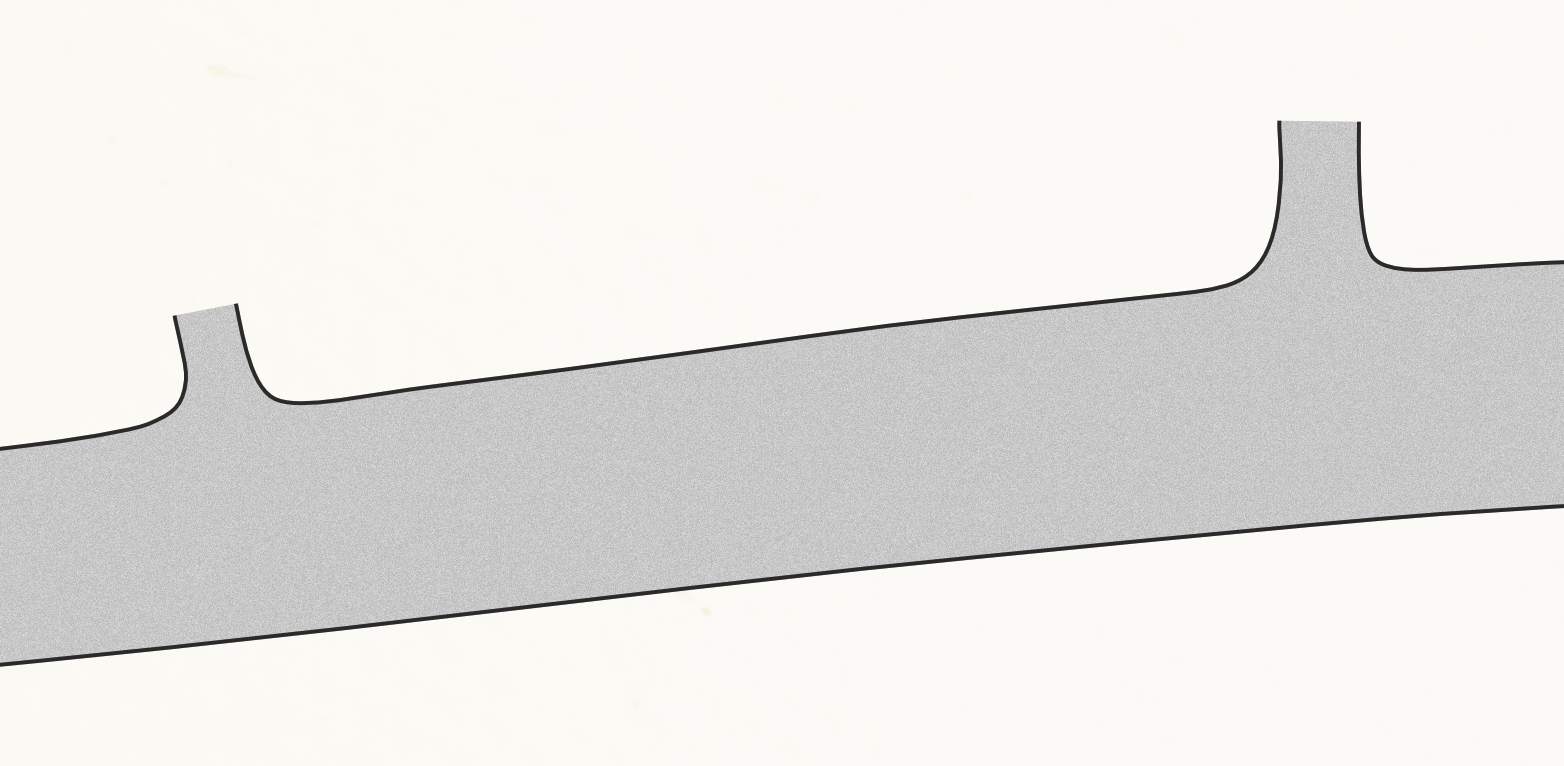
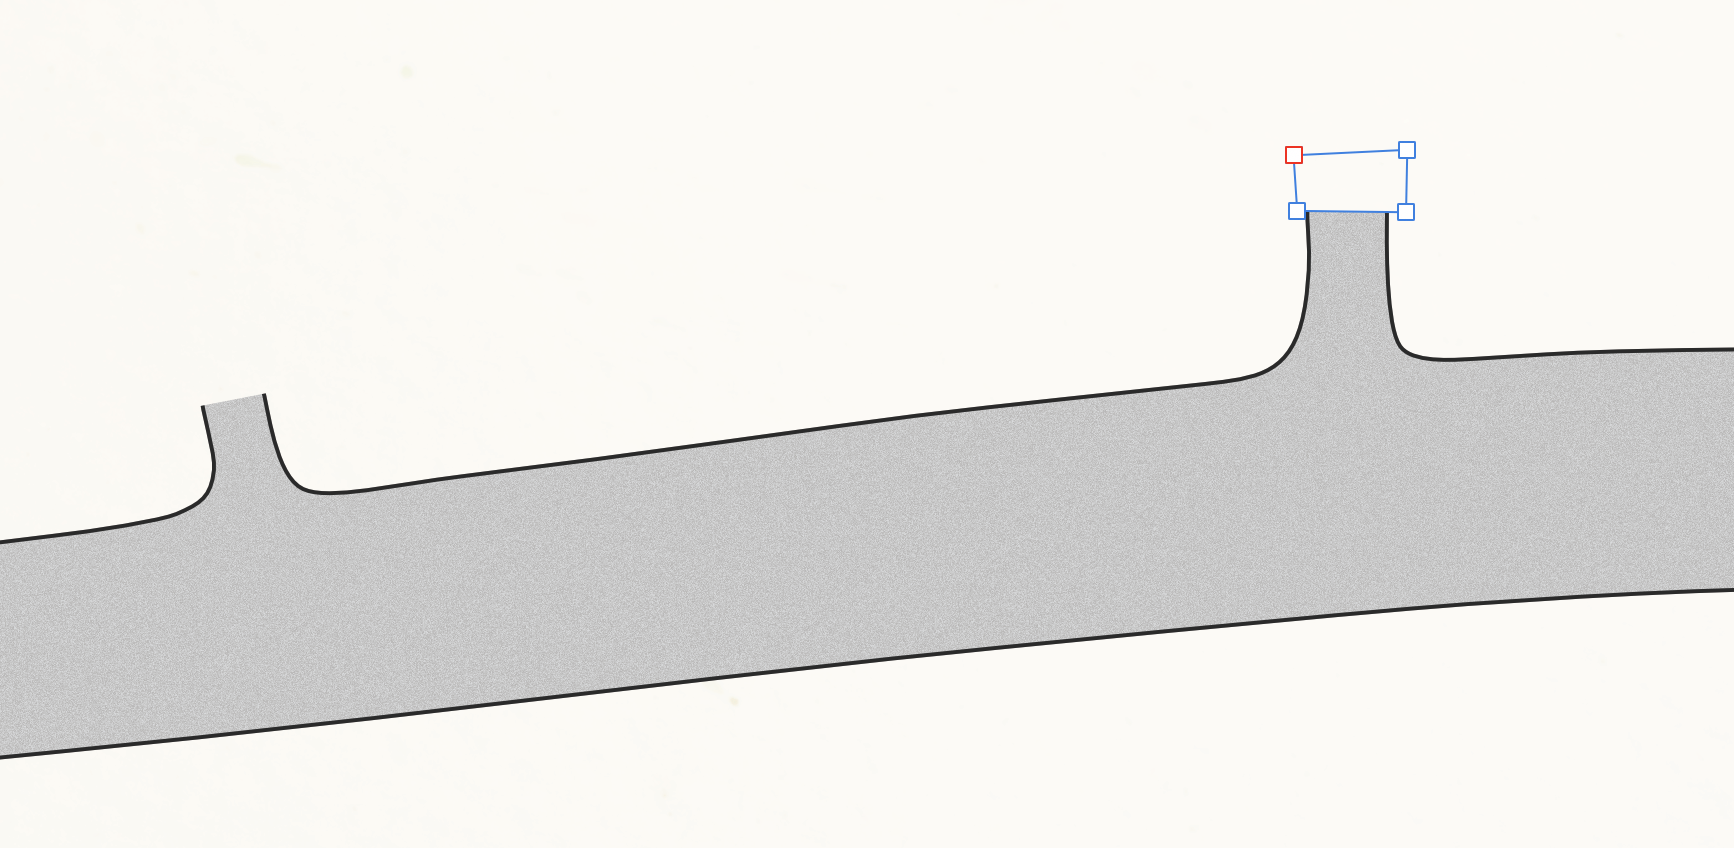
 I want to draw a shape like you can see in the first image. The black stroke should go around the shape but interrupt at multiple points. The filling should be everywhere within that shape. I use shapes with the same background color which cover the stroke part (second image) but that does not always work. Is there a better way to do this? I know I can use the "erase" blend mode but I think this causes rasterization on export. If anyone knows how to draw a shape like in the first image please let me know... I dont want to draw a separate curve and place it on top the grey shape. It has to be one shape for easy editing.
-
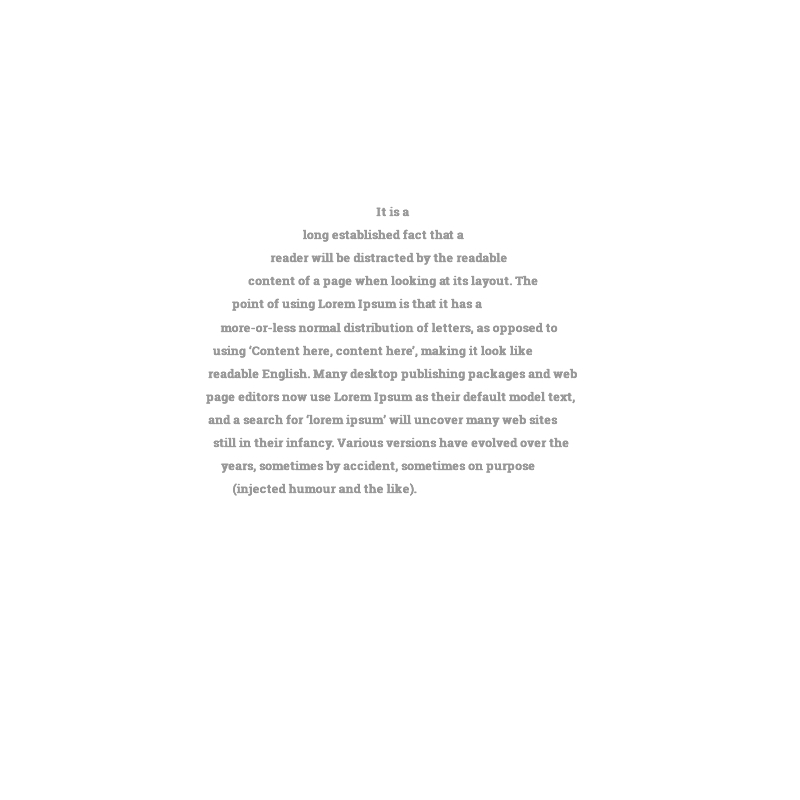
Hi I started working with Affinity a while ago and have to admit I am not a professional designer. But in my Spare time I like being creative. Though I'm trying to fit Text into a shape. But I do not want to have it aligned or set on the outline. I would like to fill the whole shape with a word. In Corel I did this with the Envelope tool but I just can not figure out how to do this in Affinity. I could have sworn I have seen this once in a tutorial and it was just a basic function but maybe I'M mistaken. The picture below shows the basic idea I really would appreciate the help
-
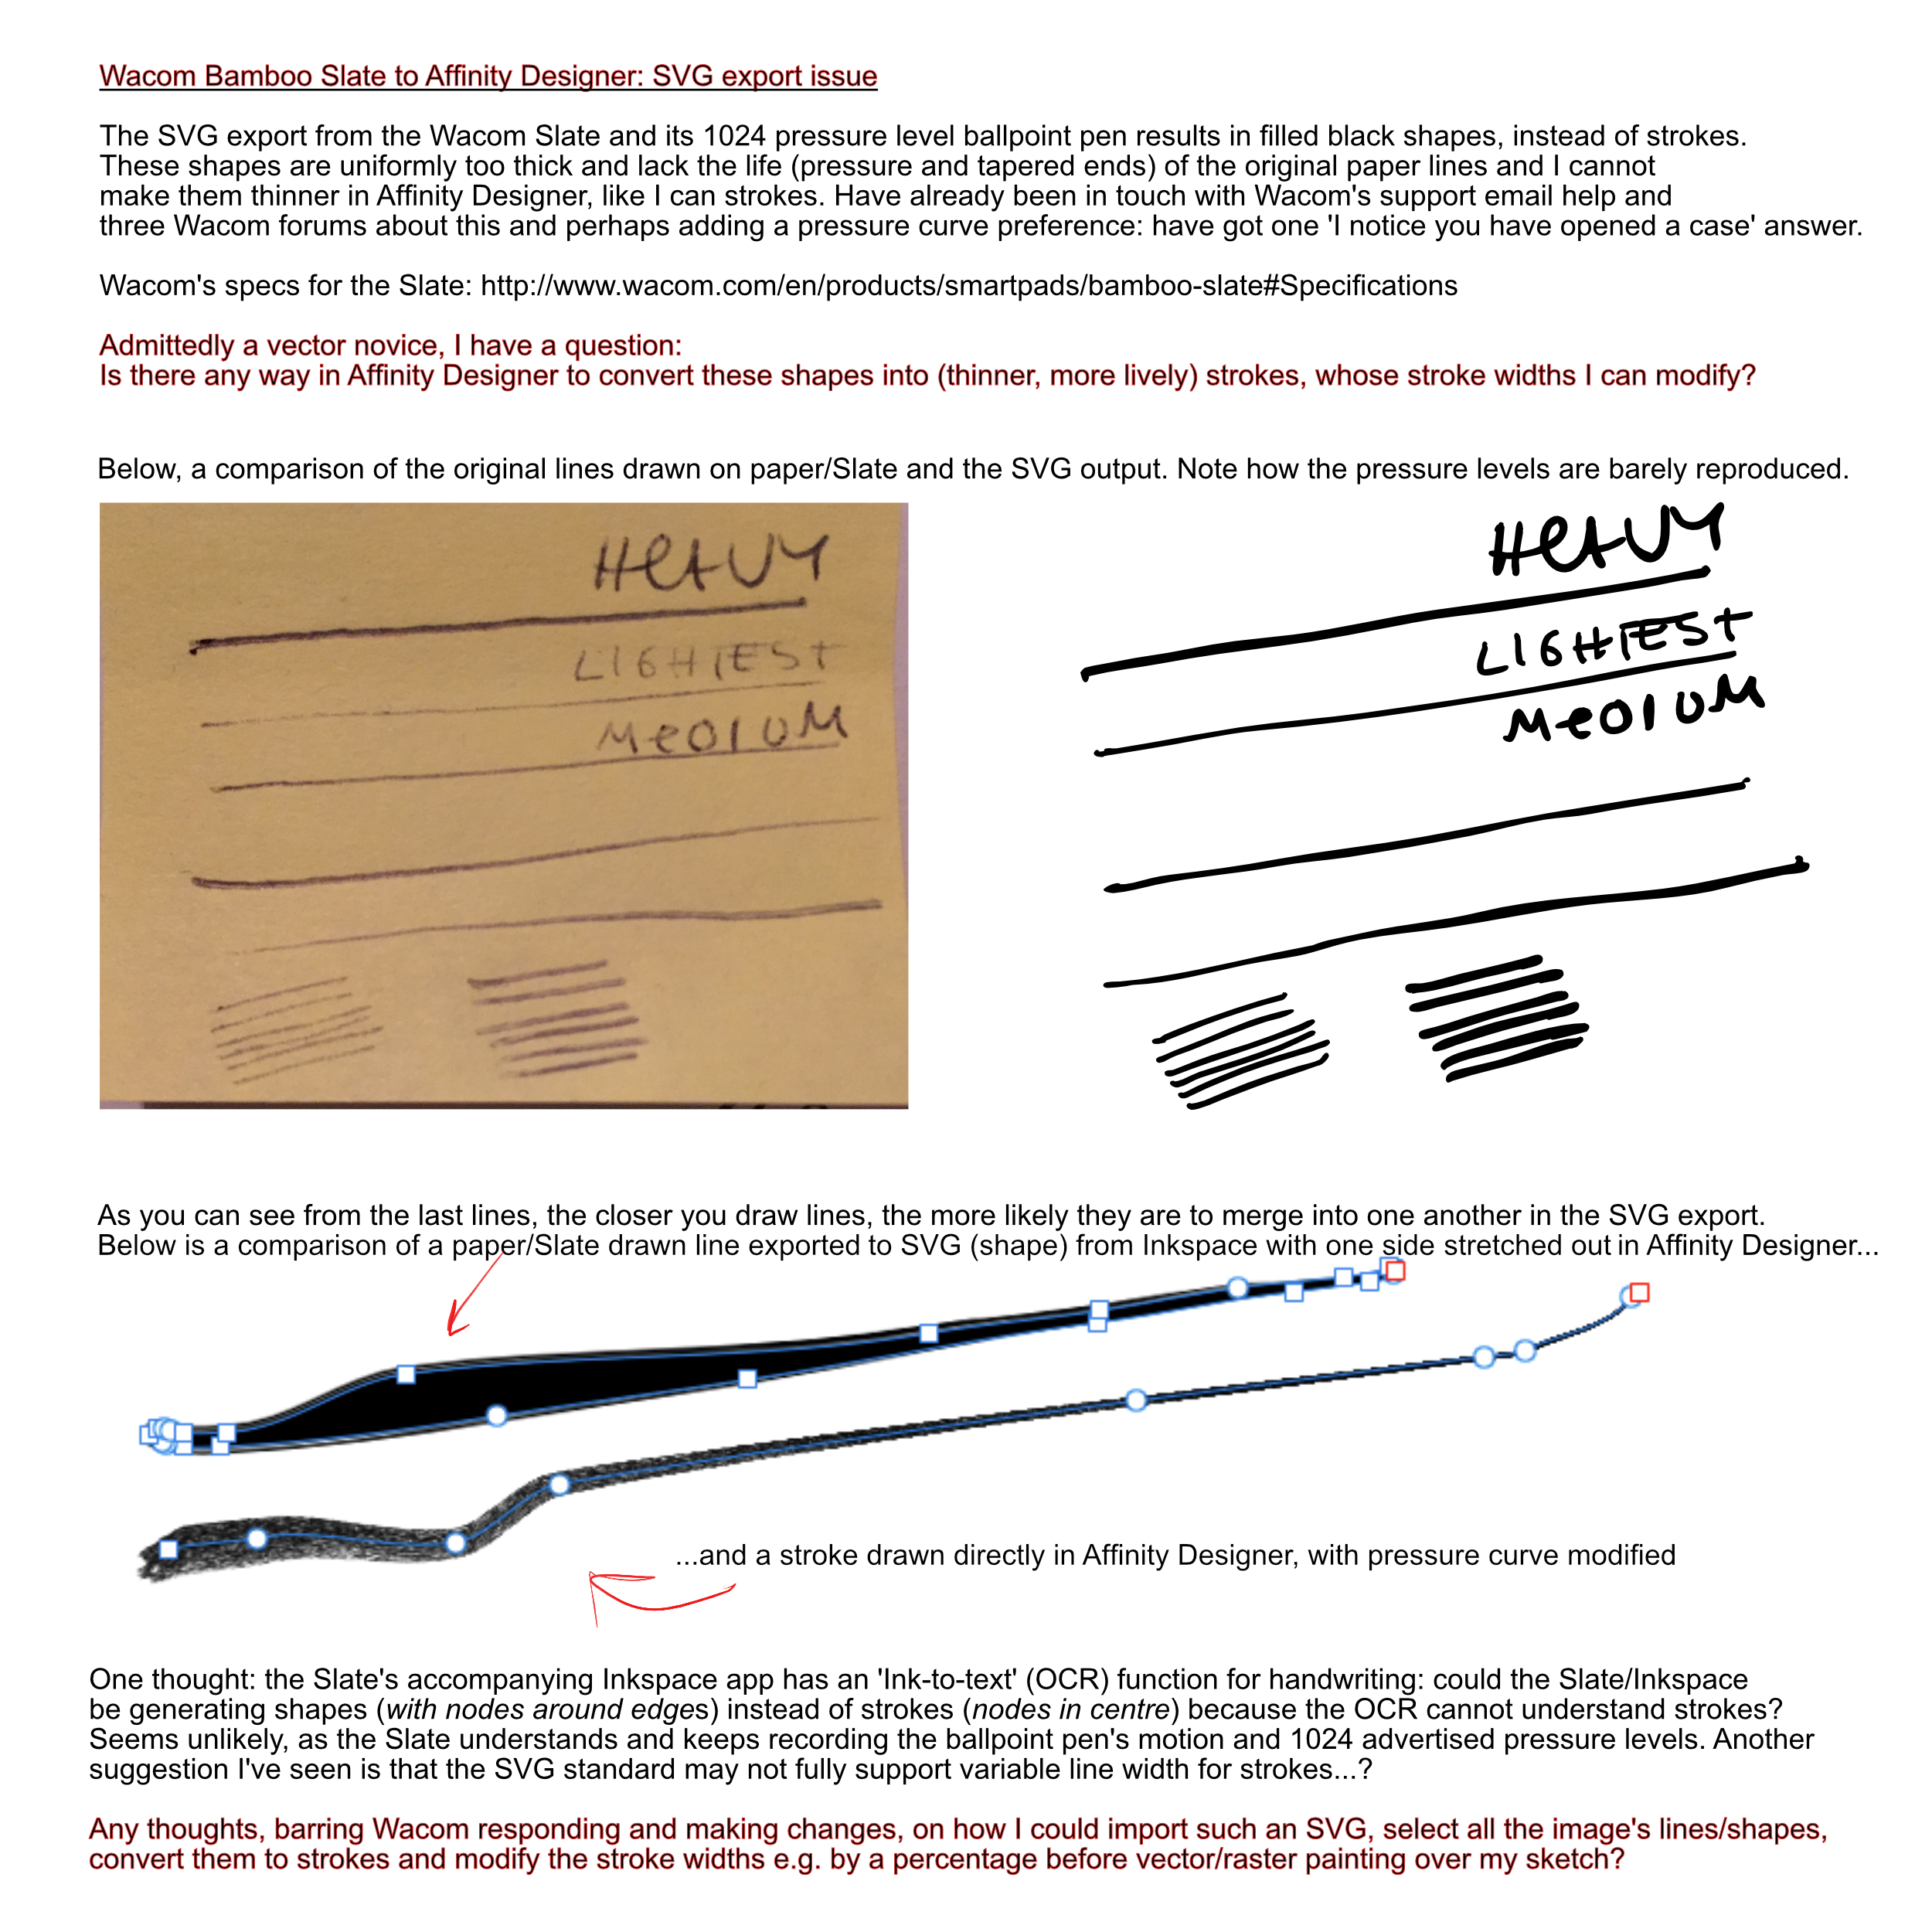
 Hello there, I am drawing on a Wacom Bamboo Slate, which can export your drawings (and writing via a kind of OCR) to text, image formats and SVG. Here's Wacom's specs for the Slate: http://www.wacom.com/en/products/smartpads/bamboo-slate#Specifications The Slate's ballpoint pen is marketed as having 1024 levels of pressure which in theory seems a bit much for a ballpoint pen, but would be nice if it could reproduce the light and heavy strokes you have made on paper. My problem is that the SVG files exported from Wacom's Inkspace app are filled black shapes instead of strokes. The shapes are thicker than the original paper lines, losing most of the line width variance, and I cannot find a way to reduce the width as you would with a stroke. I am attaching an image to illustrate my problem. Any thoughts on how to convert these shapes into strokes so that I could make them thinner? Many thanks in advance! PS there may be an answer in the thread below ('line width is not yet fully supported in the SVG standard'), but I'd like to confirm if something can be done about this using Affinity Designer? https://forum.affinity.serif.com/index.php?/topic/45452-how-do-i-import-paths-they-keep-turning-into-shapes/#comment-227169
- 35 replies
-
- 1
-

-
- wacom will
- affinity designer
- (and 8 more)