Search the Community
Showing results for tags 'Selection'.
-
 Hi, good day everyone. I'm wondering is there a way to convert pixel layer to image layer or shape because I can't find the option or button, and is there a way to create a path from selection? Thank you.
 -
When selecting for example by dragging a rectangular, I do not see the current dimentions of the rectangular. Also I am unable to set a preferred fixed size for my selection e.g. 1024x300px.
-
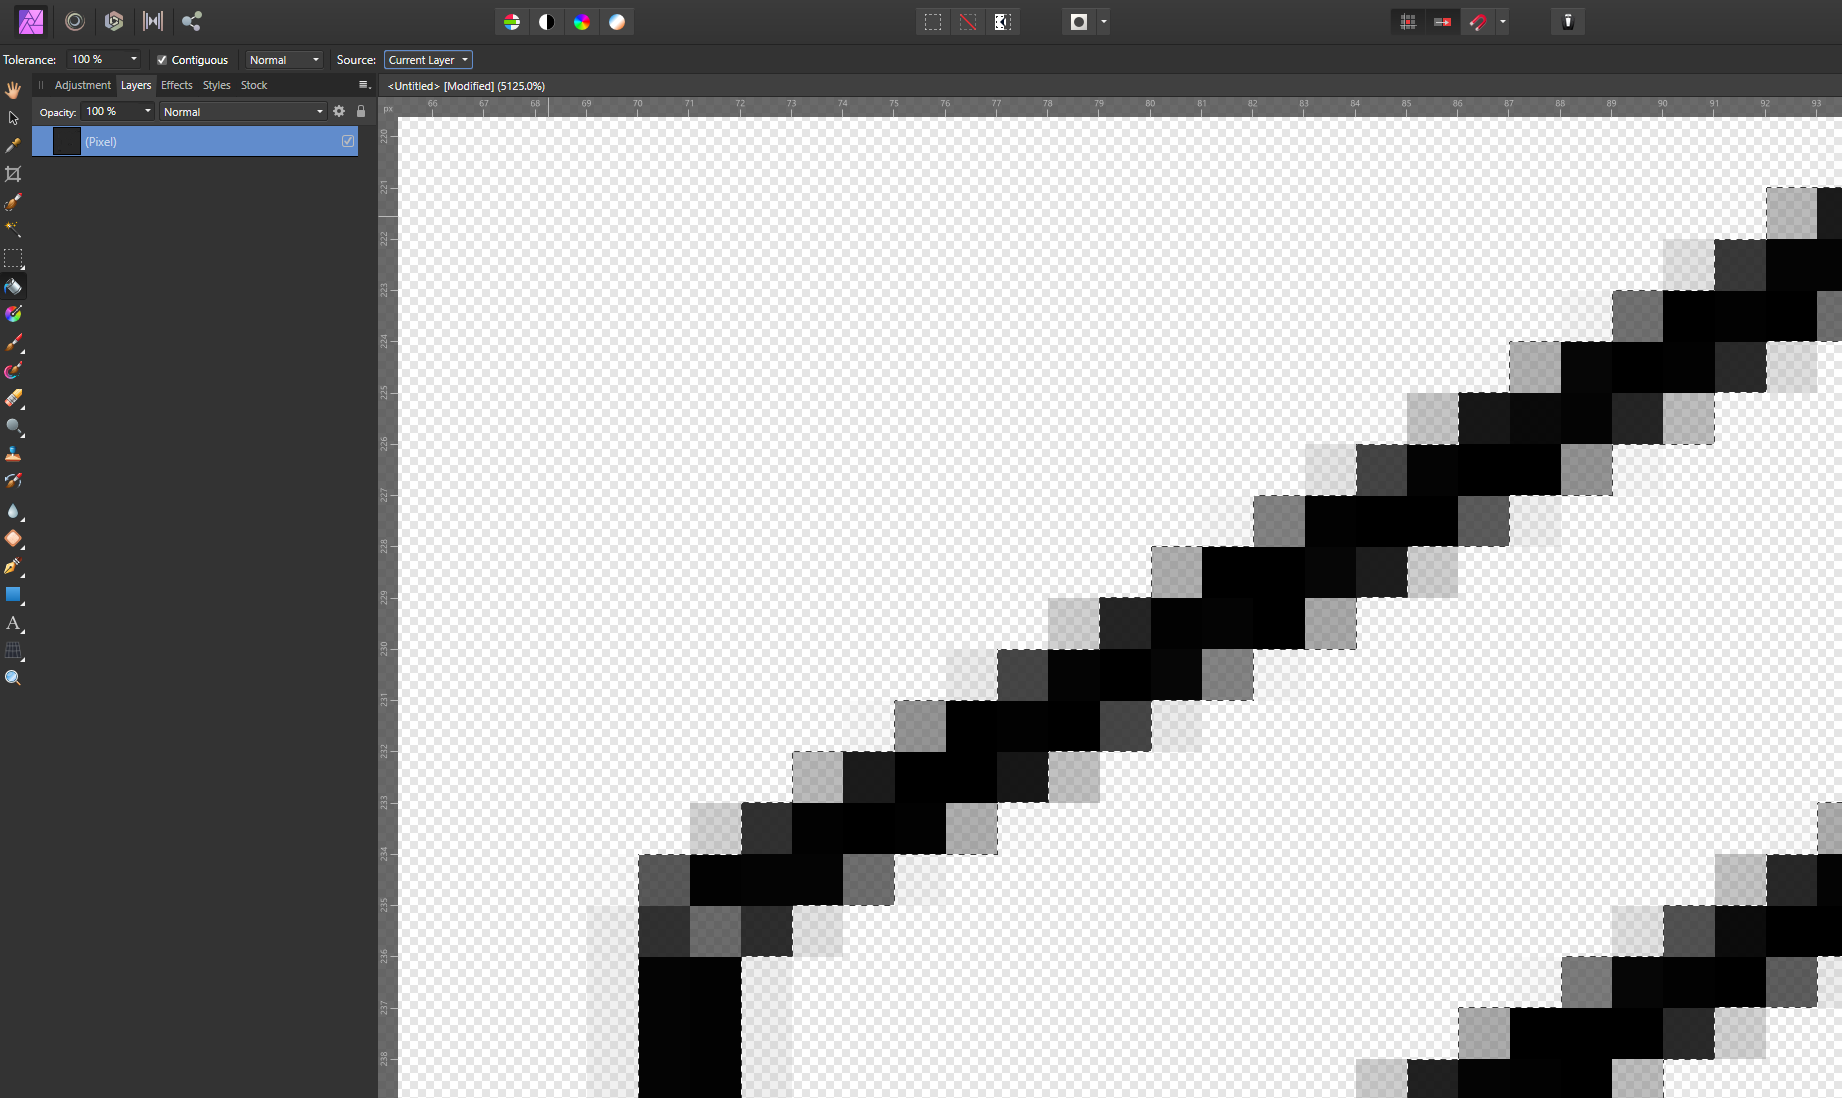
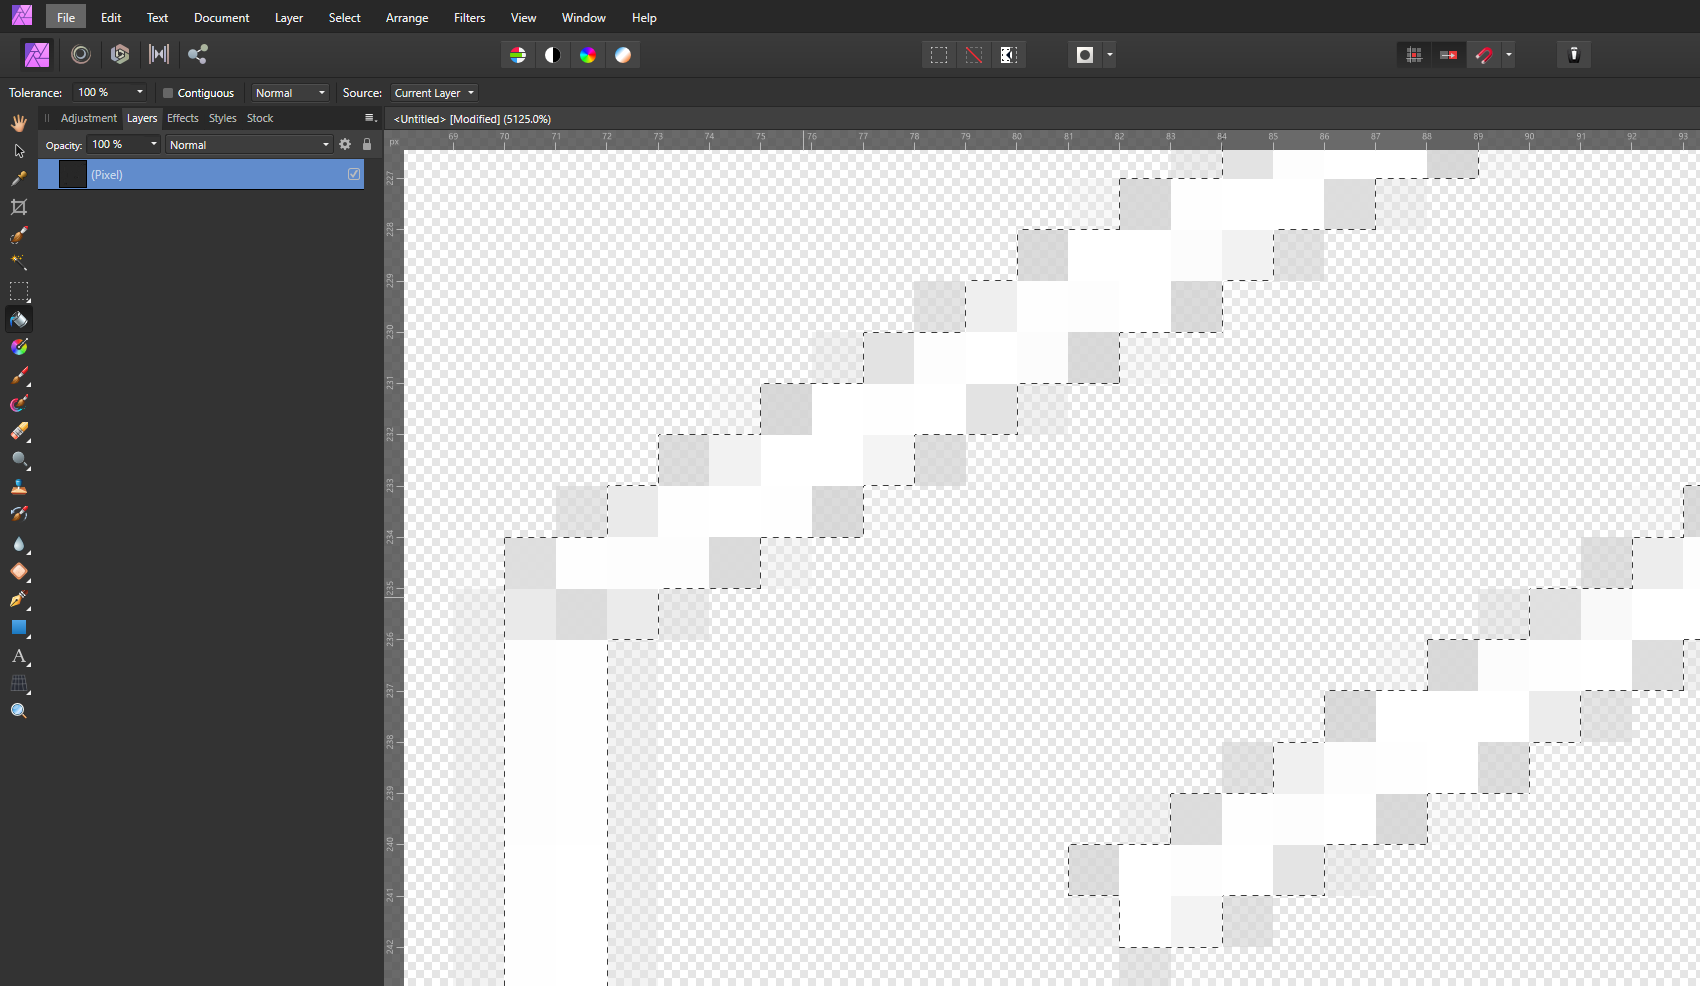
Hi, there is also another bug, this time with selection marquee. When the layer has applied some live filters or for example some crop mask, selecting it by intersecting with the marquee is unfortunately not stable. The behaviour is shown in my video. Selection.mov
-
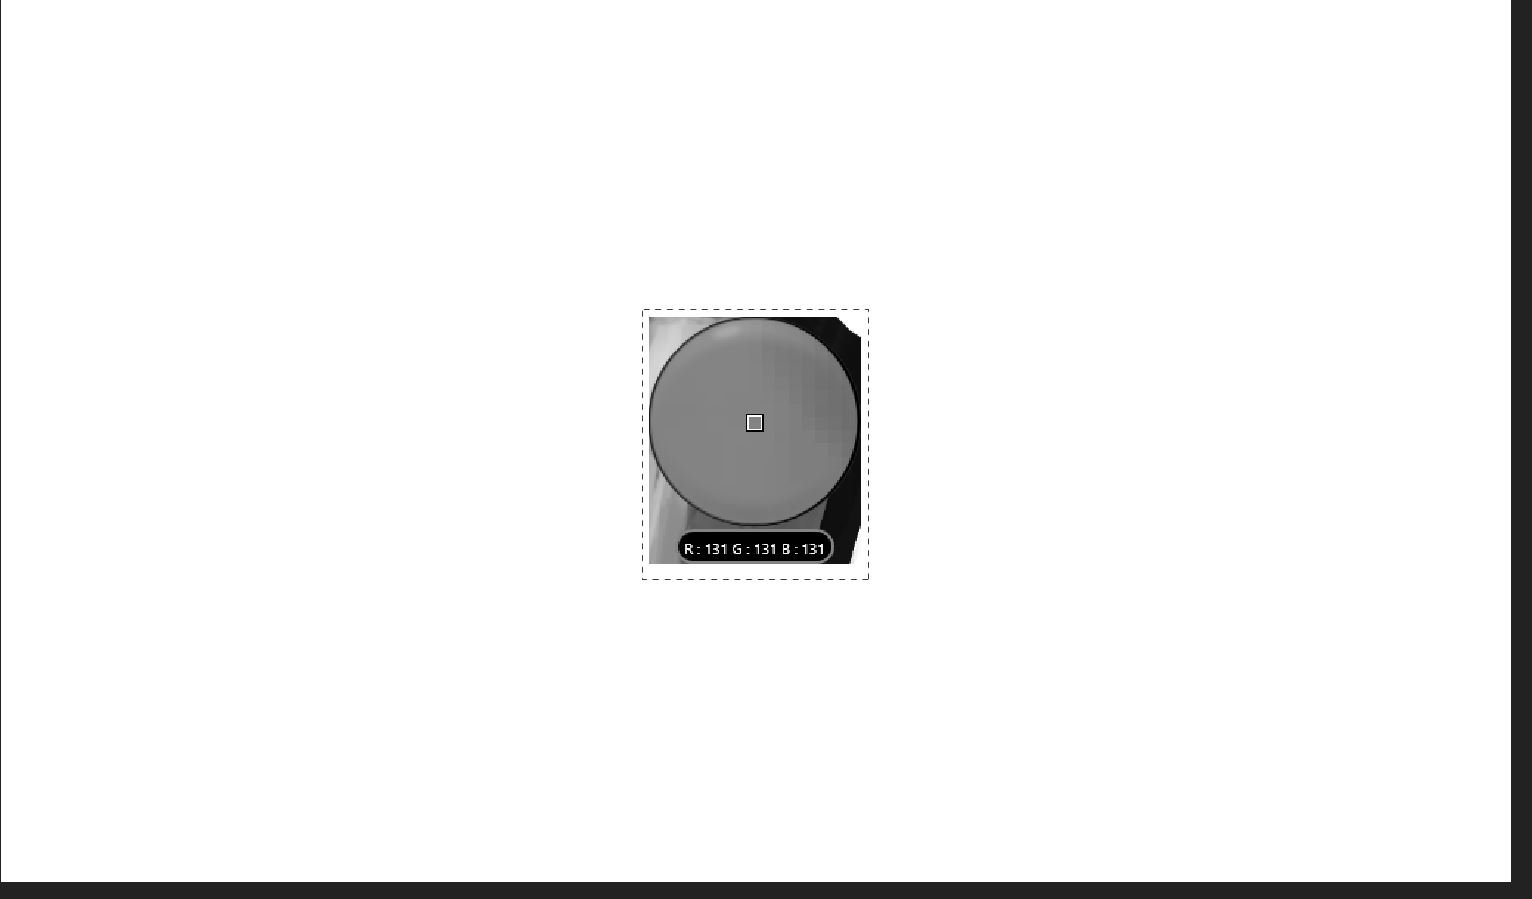
 Hello, I want a selection that I made to be filled simply completely with one color. I used the fill tool and changed tolerance to 100%. However, some dark pixels have alpha in them and they are not being overwritten. How can I simply make every pixel of the selection white, with no alpha?
-
 Hey! i tried to select the hedgehog clipart to change the background. The smart select tool is really uncomfortable for this issue. I tried alsoon the ipad as the touch display makes it easier but this was also very hard to solve. I was only able to manage to select the complete white parts of the hedgehog as you see below. in the end i found a KI tool which helped me (hedgehog black outline, white inside and green background), but I am sure that some of the experience users here might have a good tip for me how to solve this challange with affinity photo as well!
-
Whats going on here?!?!?! Just having a mess around with Beta 1.9.2.1014 to test if it's yet possible to use for vector sketching without freezing (No not yet) and come across this bizarre selection behaviour, where you click on a stroke and it selects completely different stroke, but outline mode works as expected - see grab Bug? Screen_Grab_2021-03-24_at_09_23_58.mov
-
 Having issues when trying to paste. I first make a marquee selection in a photo, long tap with one finger, select copy, long tap with one finger, select paste, and it pastes the whole image in another layer. It does not paste what I had selected. Even if I take that same selection and inverse it and select cut, it cuts the whole picture. It’s as if it doesn’t know I have a selection. I’ve been trying to figure this out for a long, long time and now I’ve just given up. Please help.
 -
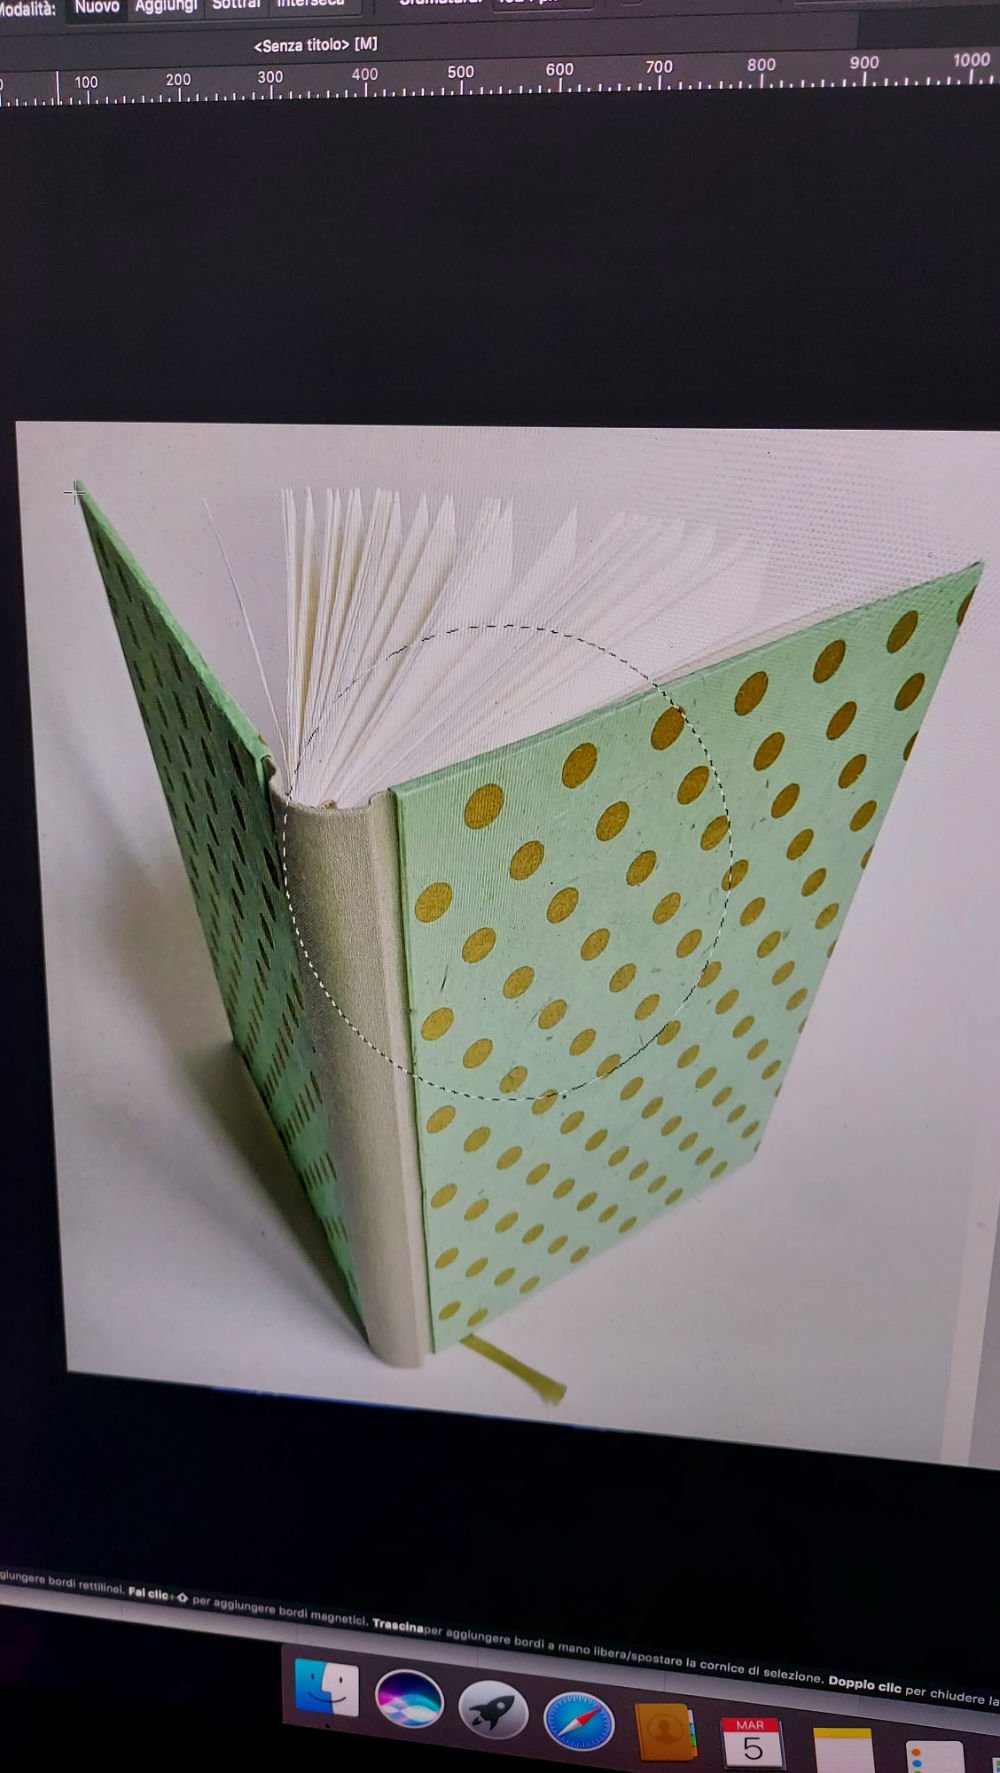
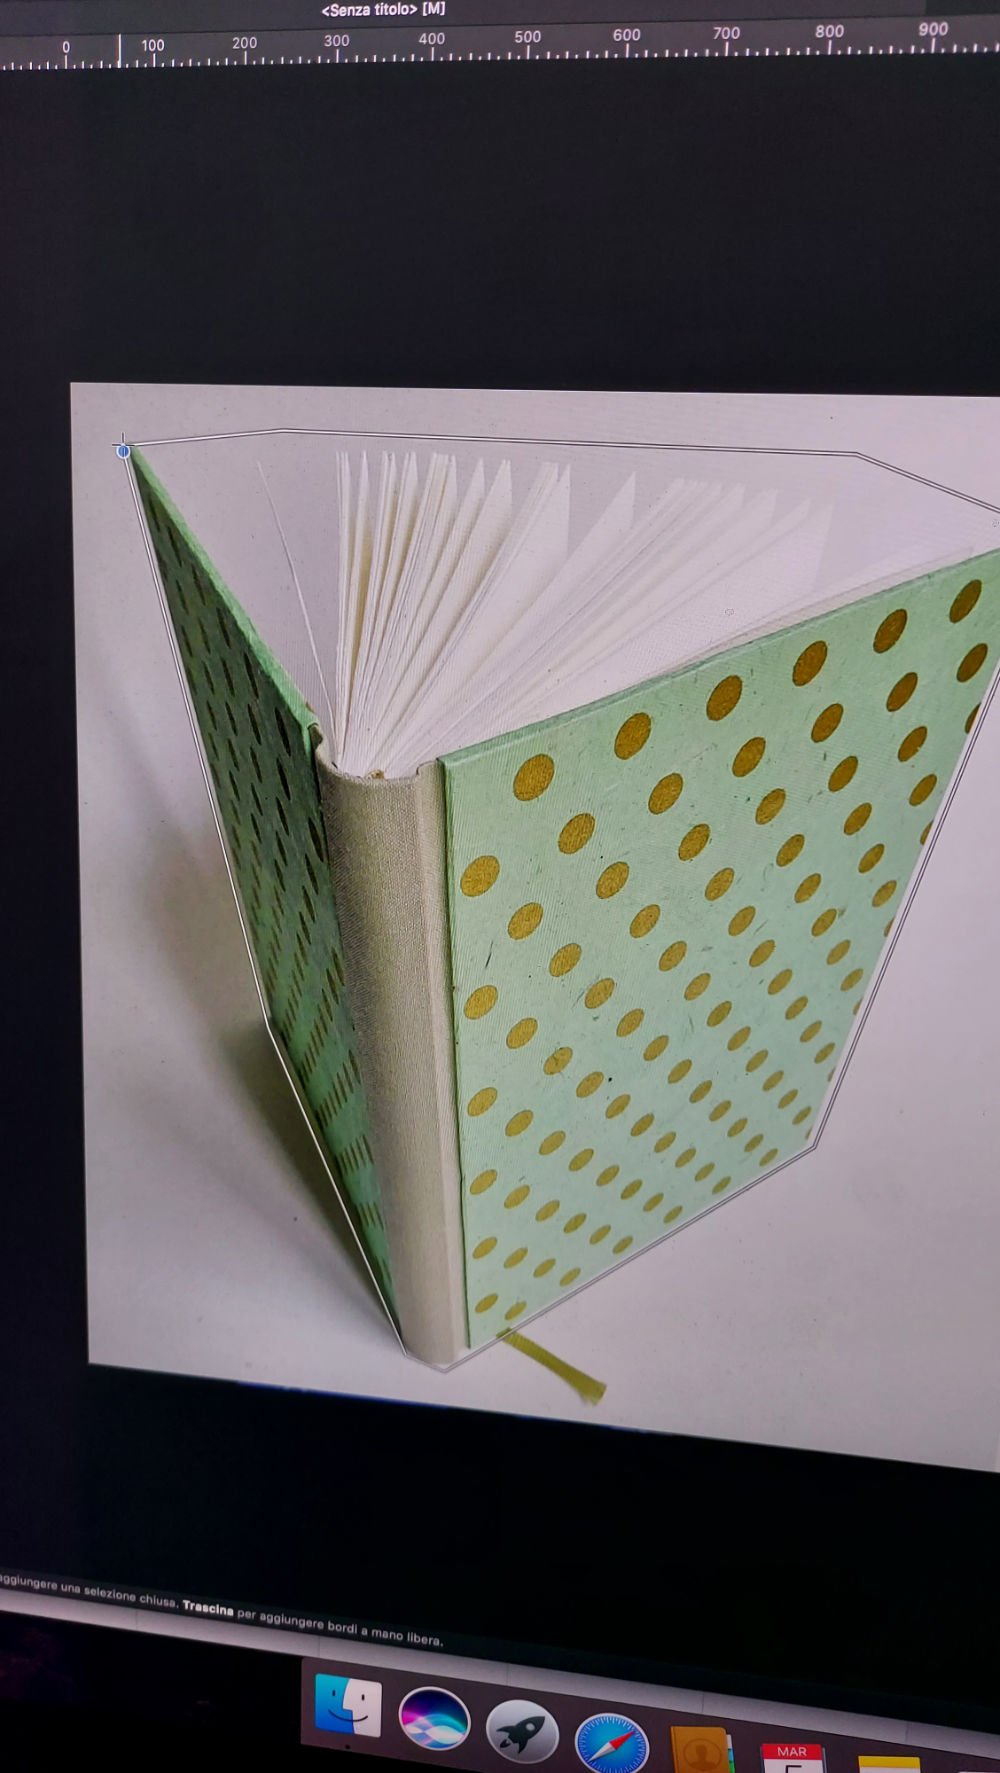
 Hello, so i use the freehand selection tool i choose polygonal and start to trace the selection! like you can se on eh first photo. when i arrive to the first point to close the selection, the selection will be modified like the second photo! and this happen in all kind of photo with the same tool, sometime became a circle sometime change shape but still isnt the shape that i trace. someone had the same my problem? there is a solution?
-
 Hello, A very frustrating phenomenon keeps occurring while trying to select parts of a picture in Affinity Photo for iPad. Even though anti-alias is turned off and feather is set to 0, the edge of the selection i still blurred and I’ve found no setting to fix this. Am I missing something here? All I want is to have a nice, crisp edge on my selections but it doesn’t seem work. Anyone having the same problem?
 -
 If you have some connected textboxes, allocated over some pages and you mark text by using Command+PageDown, only text on the last page is visible selected/covered (see screenshot). Same behavior if you use the mouse. Its "only a cosmetical" problem, but it makes some unconfident feeling in the workflow.
-
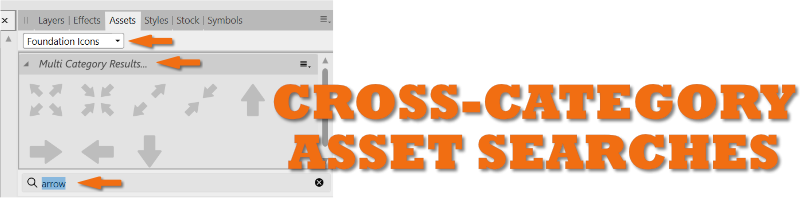
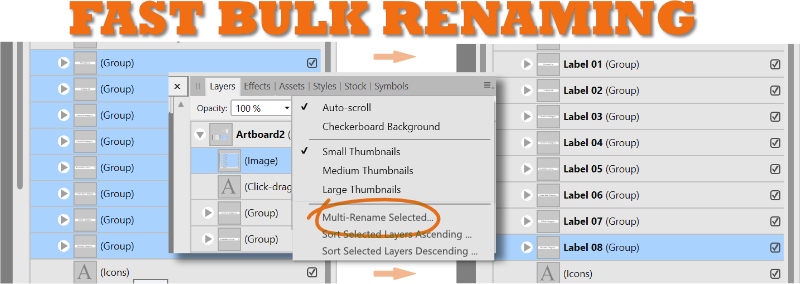
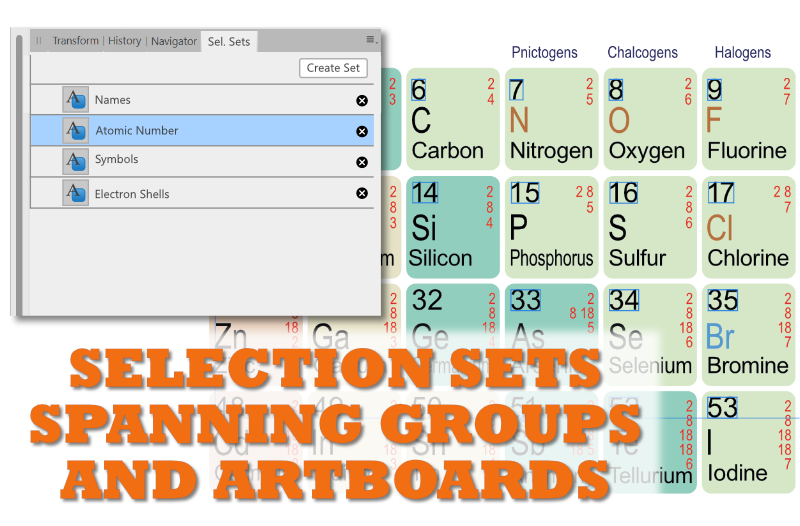
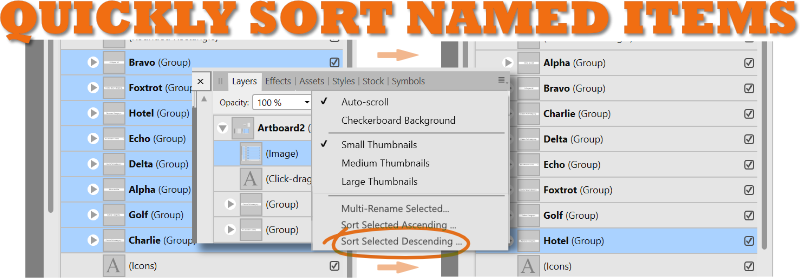
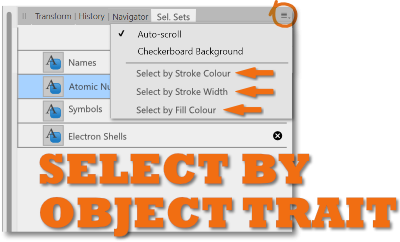
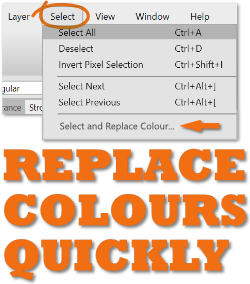
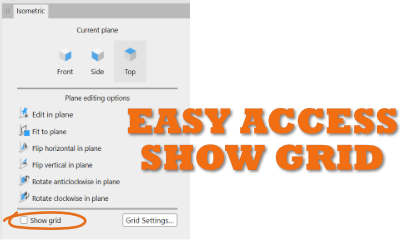
 I wanted to thank the Serif team for adding what I called "Select Object by Trait..." (listed as #6 in last year's post) to Affinity Designer 1.9. It definitely helps speed up the workflow. I certainly appreciate the added functionality; great job!!! Hopefully we can see a few more of these remaining 8 features. I listed them here again and would love to hear people's thoughts on them. Most of these suggestions can span all the affinity desktop products, but some are Designer specific: 1. Organize Assets, Swatches, Brushes, Style Libraries with an edit mode, using an interface like the the "Presets Manager" in Shapes, to allow for re-arranging, renaming, moving between categories. 2. Stoke Pressure Profiles can be saved on an application level. Organize and manage, with an interface like the "Presets Manager" in Shapes. It’s all about efficiency, and not having to reinvent the wheel (stroke!) every time. 3. Layers Panel – Select objects and groups and rename them with a multi-rename tool. Instantly get organized so you and even other people can understand the layer groups and objects in your Affinity document. Interface would allow the user to add a numerical counter as a prefix or suffix when renaming. Handy before using Export Persona to create some basic naming conventions. 4. Sort Layer Groups or artboards in the Layers Panel alphabetically, ascending, descending. Yes, it will change the arrangement order, but properly organized groups can make complex file layers much easier to navigate. Handy for PDF Exporting where the order of pages depends upon the artboard order. 5. Save selection sets that can select items spanning multiple artboards and also within groups. Often similar objects need to be adjusted or moved, but they are on multiple artboards or nested in other functional groups. This can quickly solve that problem. 6. Select by object trait (stroke color, stroke thickness, fill colour). A handy way to quickly select and adjust objects with similar properties. Otherwise selecting these can be a nightmare in complicated projects. YAY! THANKS FOR ADDING THIS AND MORE! 7. Select and replace non global identical colours. Does your client want all the red elements blue? What would they look like in teal or taupe? Play rapidly to your heart’s content. 8. Search Assets Panel ACROSS BOTH categories and subcategories, results displayed as filtered choices. Do you have multiple categories/libraries and need to find the right icon fast? This can save you time. Currently a search has to be made within each asset category, which can take some time if you have multiple asset categories. 9. Handy Show Grid checkbox in Isometric Studio Panel. True, you can use a keyboard shortcut, but it would be nice if this button was upfront. Handy when you are working in Isometric view you have to turn on and off the grid to see the artwork uncluttered. Chances are you have the panel open to constantly switch planes anyways… I hope this helps to add votes for the unsexy underdog features. 😊
-
 I have 2 colors black and yellow. I want to select only yellow area and delete it. Thank you.
-
 I just have two questions (and probably more later) 1. how do you temporarily hide selections? in Photoshop, you can do this by pressing Ctrl+H. I often use this feature when i'm painting and prefer not to constantly ticking boxes or selecting something. its much faster if I can just assign a key to it so I can use it on my drawing tablet's express key. 2. when using the color picker, a big sphere/circle will appear in order for me to get a good view of what the color i'm selecting. is there a way to disable this sphere/circle? or atleast maybe reduce it size? cause unfortunately its too distracting as it blocks a large portion of whatever drawing/image is behind it.
-
 Text frame tool buggy behaviour Affinity Designer v1.8.6, macos Catalina 10.15.7. Reproduce: Set cell stroke > 0 on a tab " " or a space " ". After doing that you can visualize the bug by moving the cursor around the text frame. The cursor will change into an editing caret even if you're far outside the text frame. Also if you click with the selection tool somewhere above and well outside the text frame; it will still be selected. Select the text frame and export "Selection without background". Expected result: a pdf showing only the text in the selected text frame. Actual result: the pdf displays white areas to the top and left of the text frame extending all the way to the top and left edge of the page as it was appearing in Designer. See below for a better explanation:
 -
Hello! I've been trying to use Affinity Photo for a while (trying to switch from Photoshop I've been using for many years), and I noticed that there are some features missing. But I will only ask you to add this one, since not having it in the editor is terribly annoying. Please add the ability to align objects/layers to Selection Frame. Like so: In this example, the objects are aligned to the center of Selection Frame. Having this feature (aligning to Selection Frame) would help a lot! This is how "align to selection" works in Photoshop, and sadly doesn't in Affinity.
-
 When using the refine feature with selection and applying a mask the resulting mask is grayscaled. This might be nice for most cases, bot not in mine. Is there an option so the selection is 100% just the pixels which are shown in the UI? Best case would be an option to remove the Alpha of the selection or whatever causes this. Or can I maybe apply a treshold to the mask layer? Regards
 -
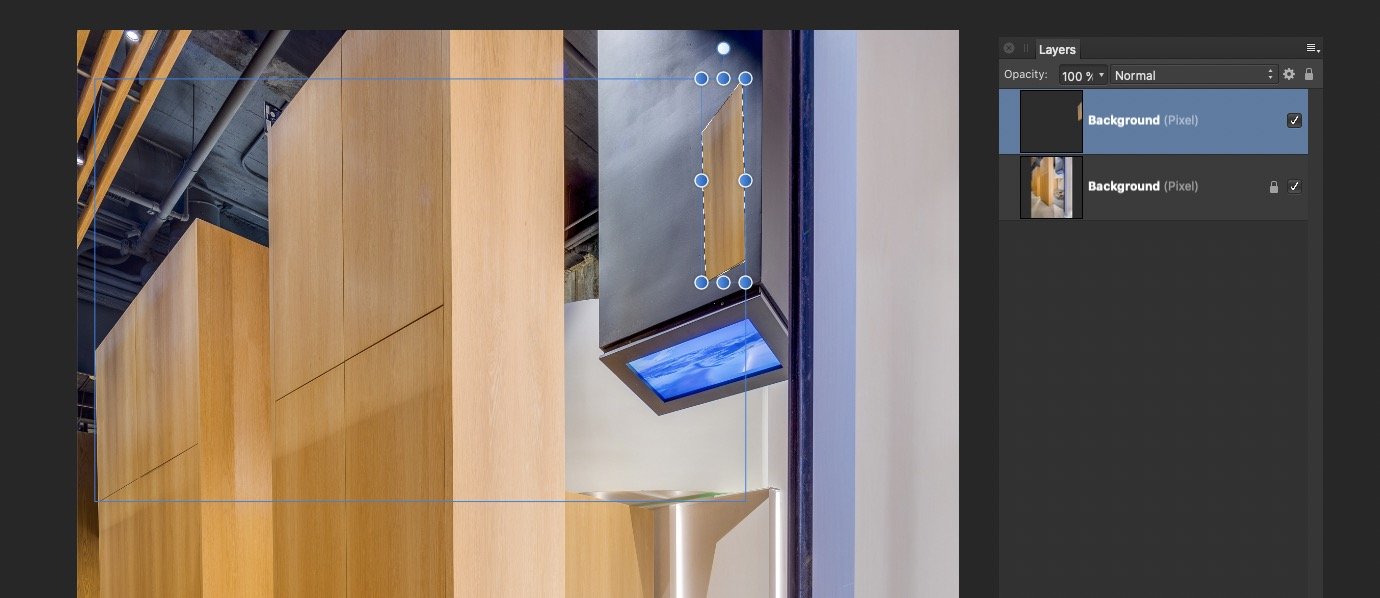
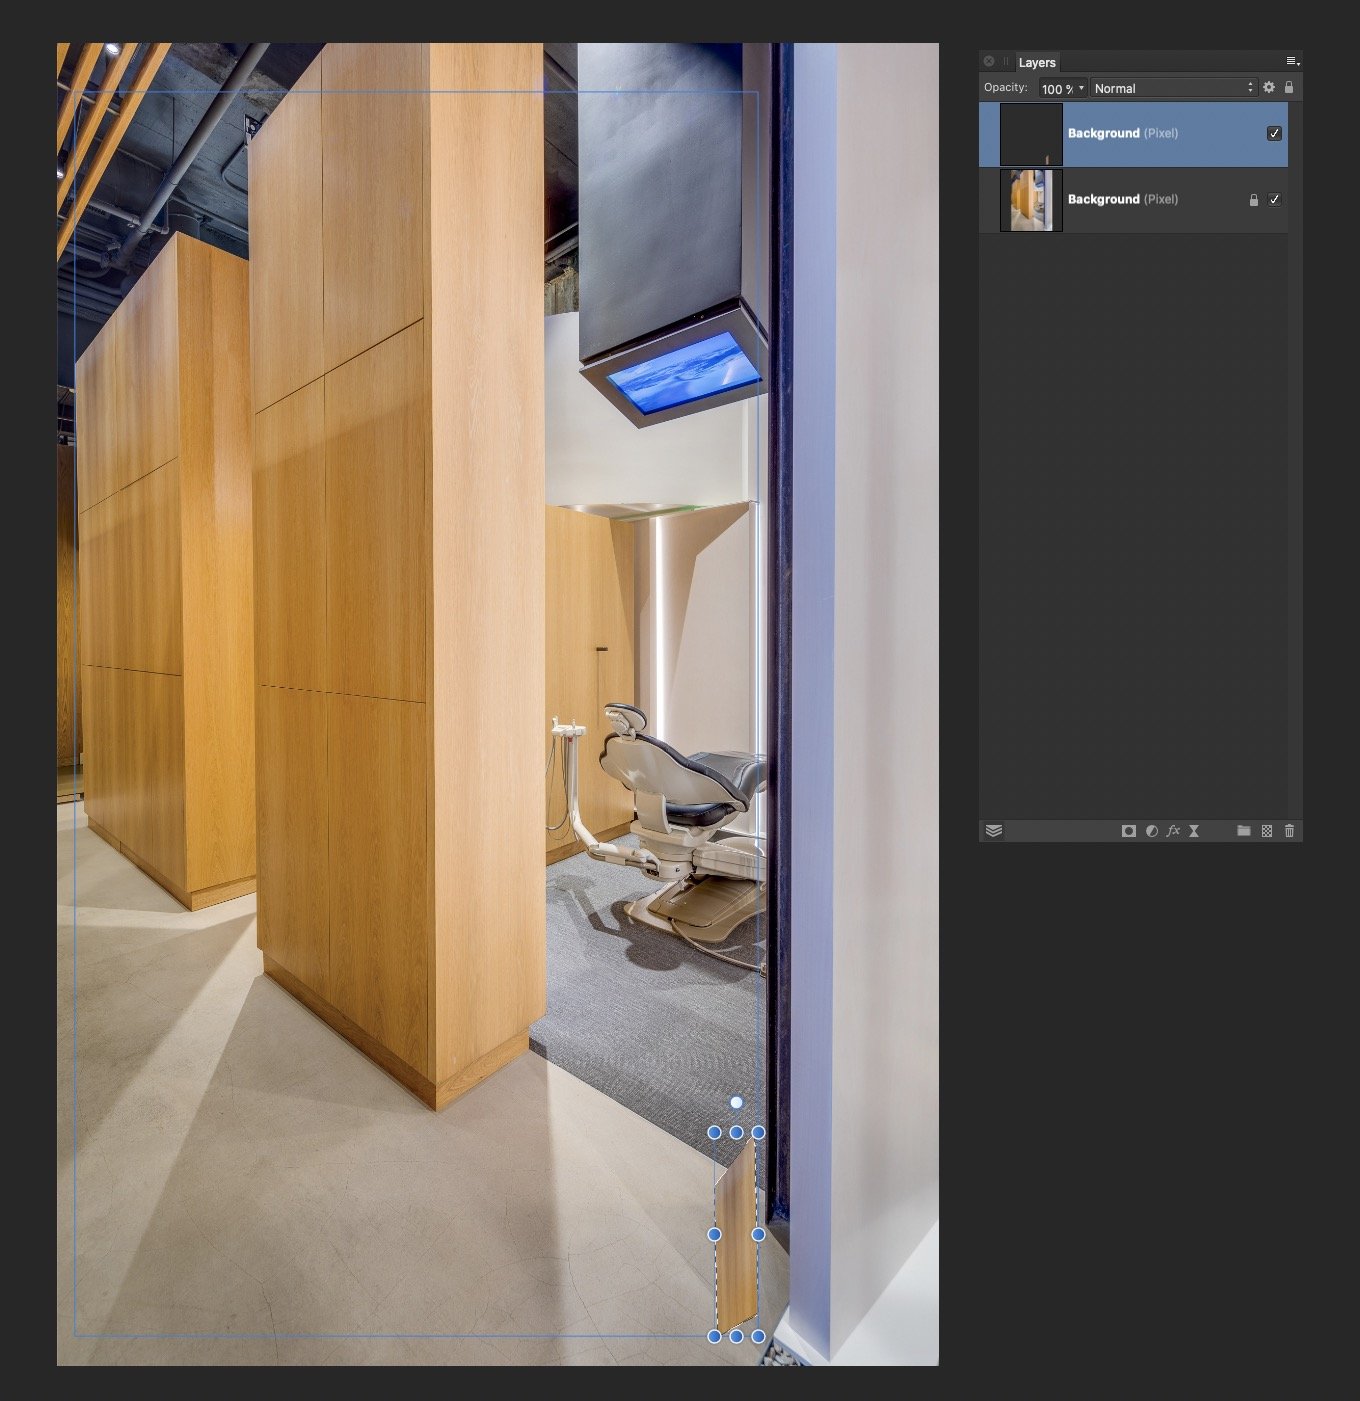
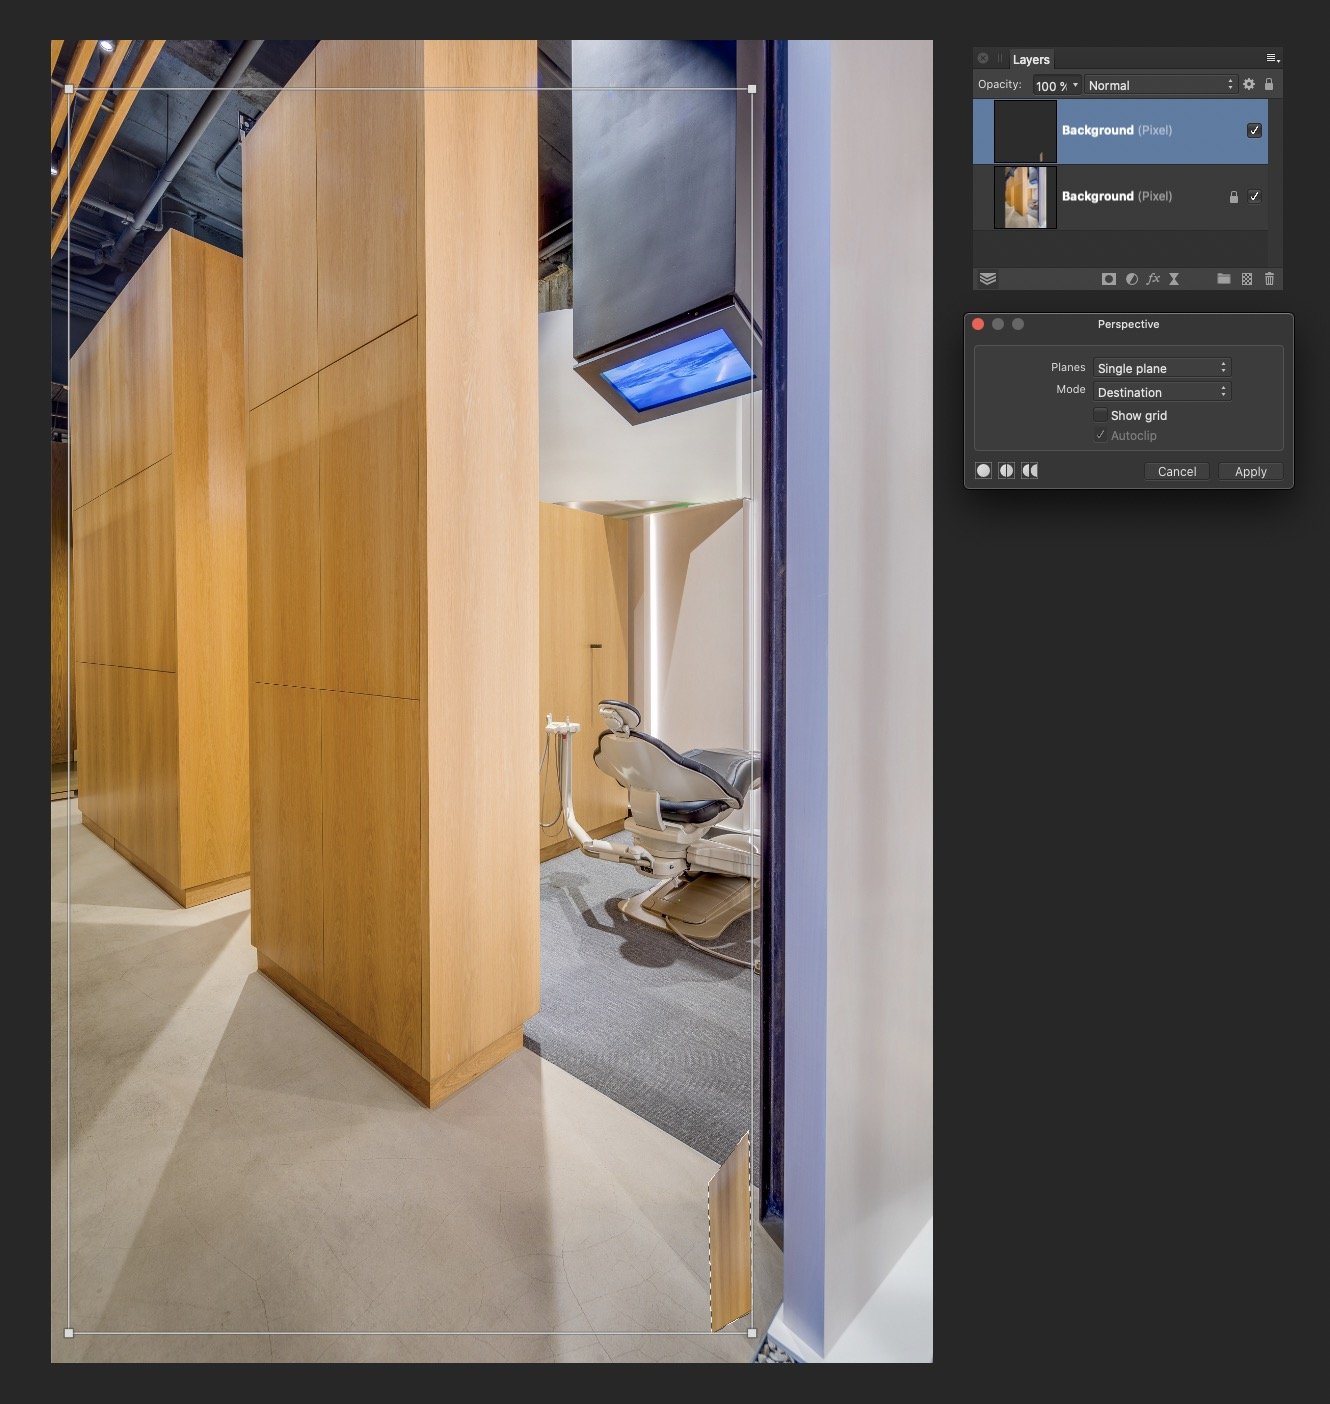
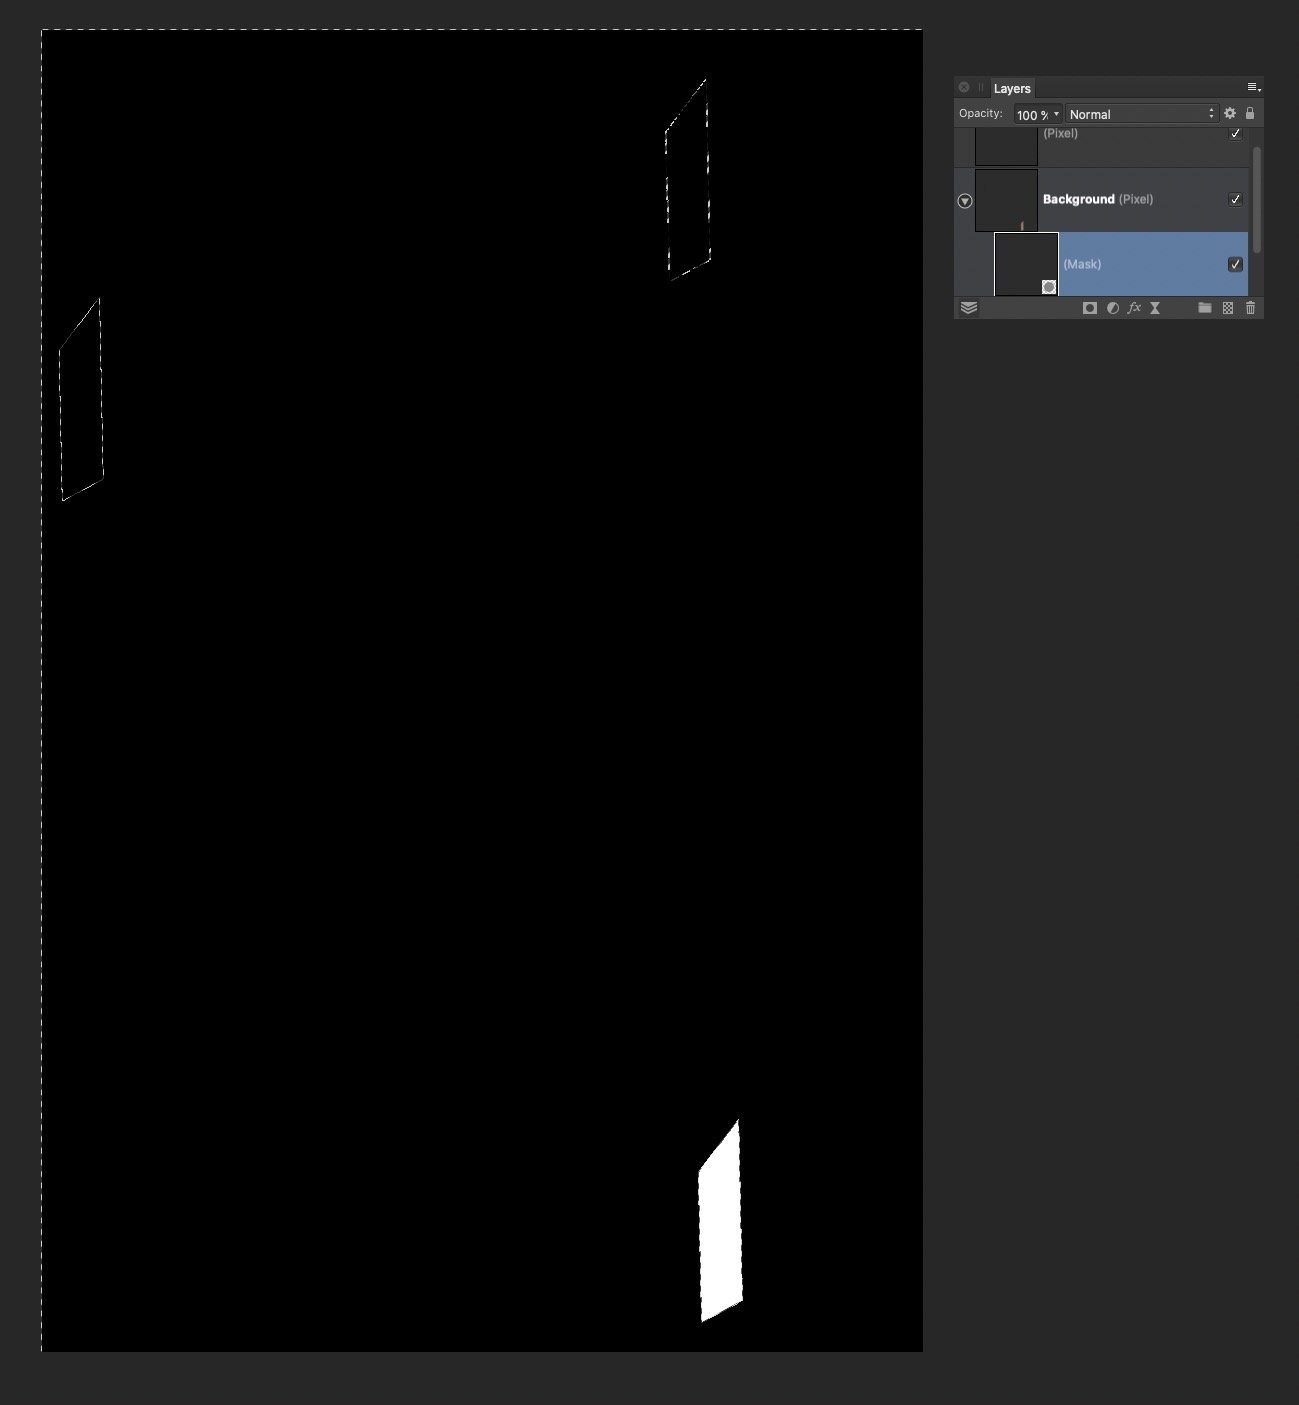
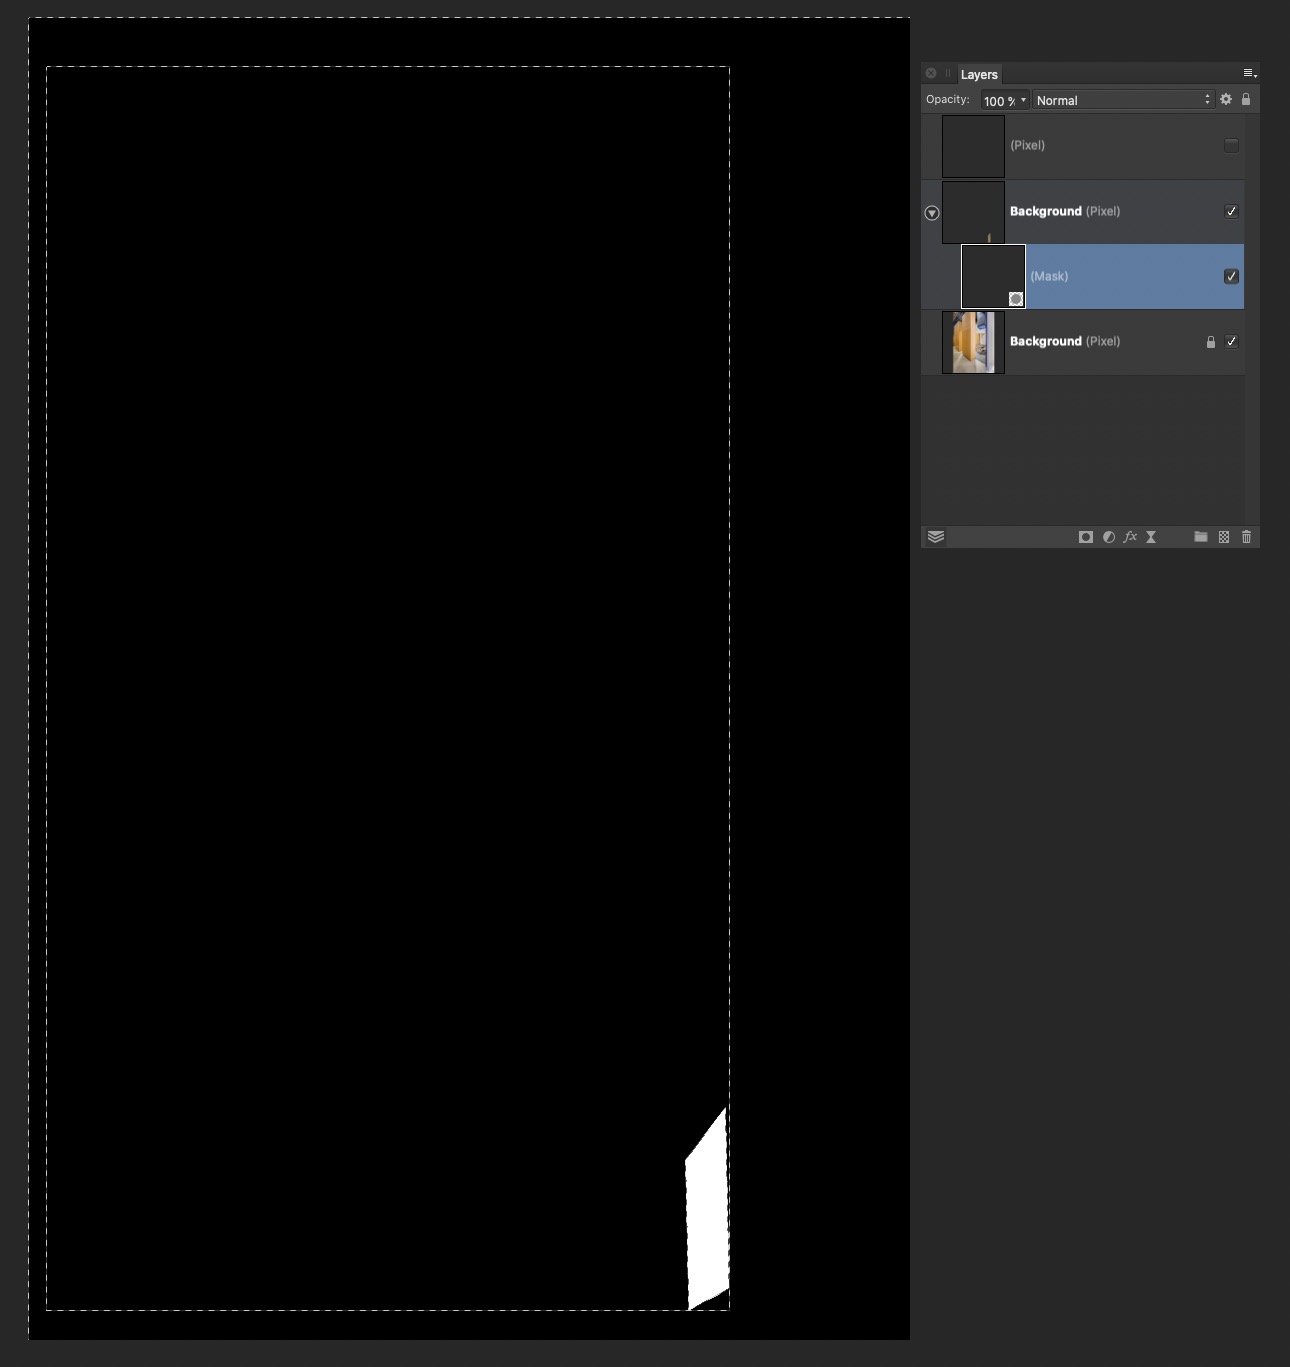
 I have a substantial issue I am hoping to resolve. I do a lot of architectural retouching, and I often copy-paste small elements all over an image, often from one side to another. I always have to distort/perspective/warp these objects to make them match up. Every time I move or distort an object on a layer, the layer increases in size by the amount of change. So if I copy/paste a region of pixels, then move it across the image to the other side, Affinity thinks the now transparent pixels somehow still have content, and increases the layer size accordingly. If I Command-Click the layer, the selection edges include the now empty pixels. Also if I try to use a distort filter, the handles encompass the entire expanded layer. This makes it nearly impossible to do accurate distortion. I have tried and tried to isolate just the actual pixel content, up to and including selecting the non-transparent pixels and creating a new document. Affinity refuses to accept that the transparent pixels are empty, and includes them in the entire operation. So if I move a 100x100 pixel selection across the image by 4000 pixels, I now have a 4000 pixel layer, that Affinity refuses to trim or crop. Even after I carefully select everything in the mask layer except the white, hit delete, and Command-click the layer again, it still shows the selection bounds including every other location where I moved the content.
-
 In my workflow, I often have to take an image that I've created in another program (a 3D program). I set the background color there to be distinct from the object I want so that I can select it and make it transparent. In AD, the process (the best one I could find) is the switch to Pixel, Rasterize, then Select -> Select Sampled Colors. When I select the background color, the marquee does indeed seem to properly select the object. Unfortunately, it doesn't really work this way. If I cut (intending to cut out the background) color is lost from the object as well. If I invert selection and cut (intending to cut the object for use elsewhere in AD) some of the background comes as if some of its color were still present. I want the marquee to represent a clean separation between object and background so I can place my images with other layers in a final graphic file. Essentially, I'm trying to treat "Select Sampled Colors" like magic wand. Is there a way to do this? The invert selection option seems to work better except that I still get a grayish, partially transparent box background instead of a fully transparent background.
 -
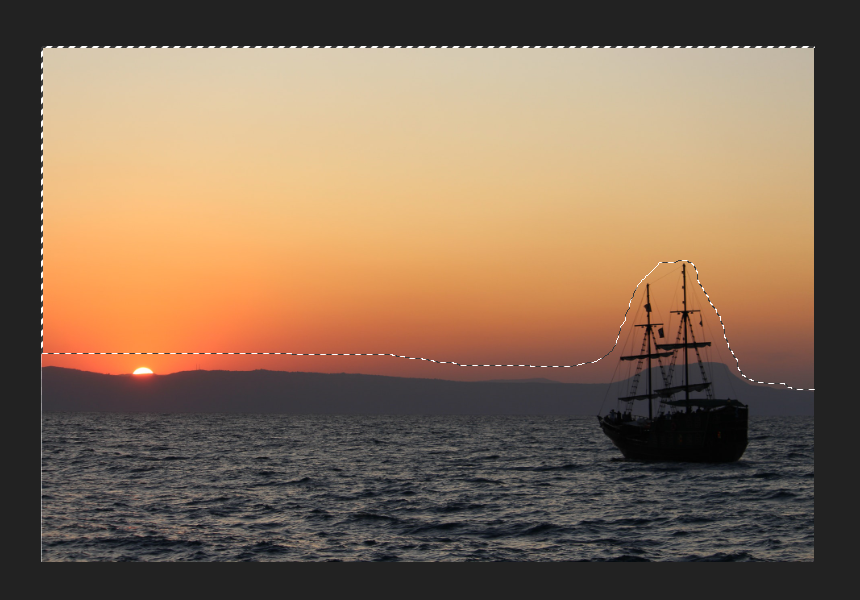
 I've been trying to find out how I can fill in/place an image within the selection areas I picked out via selection tool. See below. I am trying to put a low opacity flag in that selected area where the sunset skies are. Make sense? Any help is appreciated. Thank you!
-
 Hi, I'm just switching from PS and I cant find couple of tools for work. 1) Perspective tool. Is there any perspetctive tool what work like perspettive in photoshop raw? Somethink what is in this video (old version of PS). I realy like how easy and well this tool work, and I can't find any tool what works that well. Clasic perspective tool is not that good for me becouse it fill the whole canvas, thats wrong... The tool on PS just aligns angles to 90° and its fine. Another tools for perspetion are realy slow and not so accurate (for example this) 2) Quick selection by one click. Is there any option to select an object (from example on white or one-color background) by one clic? Something like this . I realy miss this tool, when a have to select a lot of object (product's) and i have to do it manualy by pen or selection brush tool (even with refine) it is realy boring and time consuming. In PS i liked how easy it is - I just click and most of selection is done. Thank very much!
 -
 Hello, I'm just playing around with Affinity Photo and I was wondering if there is a way to convert a selection to a path? I know that it's easy to generate a selection from a path but can you go the other way? cheers, -tomek
 -
A "Select Same" option (as in Adobe Illustrator) would be incredibly useful in Designer to select objects that share the same appearance. That way a user could select, say, all vector objects that have the same stroke weight, or colour fill, or colour stroke, etc. This would make editing and recolouring complex vector files a lot less taxing and time consuming, and a lot more streamlined.
-
 As a long time vector graphics user, the one main issue I have with Designer is the selection/bounding/transformation box. For me, it is the most obtrusive aspect of Designer, and causes the most frustrations. When trying to make multiple selections, the bounding box makes it extremely difficult to select surrounding objects up to almost 1-2 pixels. The bounding box also becomes extremely difficult when dealing with text; try double clicking text at anything at, or below, a 24pt font and you'll start to understand the issues. When working on designs, I want to see the design as much as possible with less obstructions, especially when tweaking. I want to hide that bounding box altogether and focus on the design of whatever I'm doing. This is a simplified example, but which do you feel allows you to focus on the design rather than the UI? Please allow us to just show the outline of selections then hotkey Option (or something easy) for rotation and Alt for scale. This would solve a lot of issues of selecting other objects nearby without the problems of getting transformation queues from the bounding box. This is the one feature, above anything else, that would make Designer hands down the most enjoyable for me.
 -
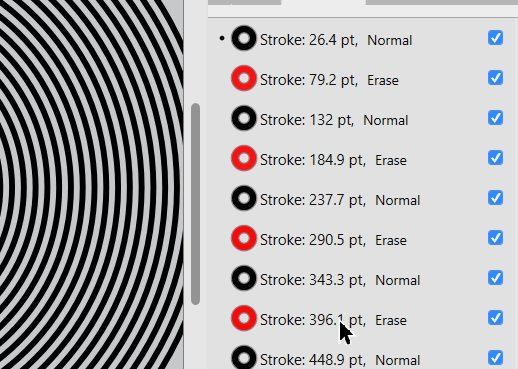
 The appearance panel is great! I love the trick of alternating strokes to get a multi-stroke effect. See attached for example. I have been stress testing this use case and I have some serious frustration points : I have to edit each stroke one at a time. I kinda want to select multiple, duplicate settings across many, such as 'scale with object' or round/square etc. Once I have all the strokes set up how I like, copying the style to other elements is very unpredictable. The last selected stroke in the list *Only* will have a scaling applied (I assume based on its 'scale with object' toggle). Attached is a screenshot. See how after the copy/paste, one of the strokes (the selected one, indicated by the dot in the appearance panel) has received the 'scale with object' transform while the others have not. Now, lets go to the Style panel to save the effect, the same problem will occur when reapplying the style- only one of the strokes last selected will be unpredictably scaled. In theory my solution is that All strokes scale uniformly when applying to new objects, and I can easily disable this by selecting all the strokes in the appearance panel and unchecking 'scale with object'.
-
- 1
-

-
- appearance panel
- strokes
- (and 1 more)
-
 How can I turn my curve into a selection so that I can continue working with it? Or is this function not yet available?