Search the Community
Showing results for tags 'Selection'.
-
 I want to remove the white from this image, I've adjusted the Levels so the whites are completely white & blacks are completely black. I've gone to the selection tab & tried the 'Select sample colour' but i can't find a way to make it work. I've spent the last 3 hours looking at youtube tutorials, FAQ's & forums yet i have no idea what i'm doing right or wrong, please help.
-
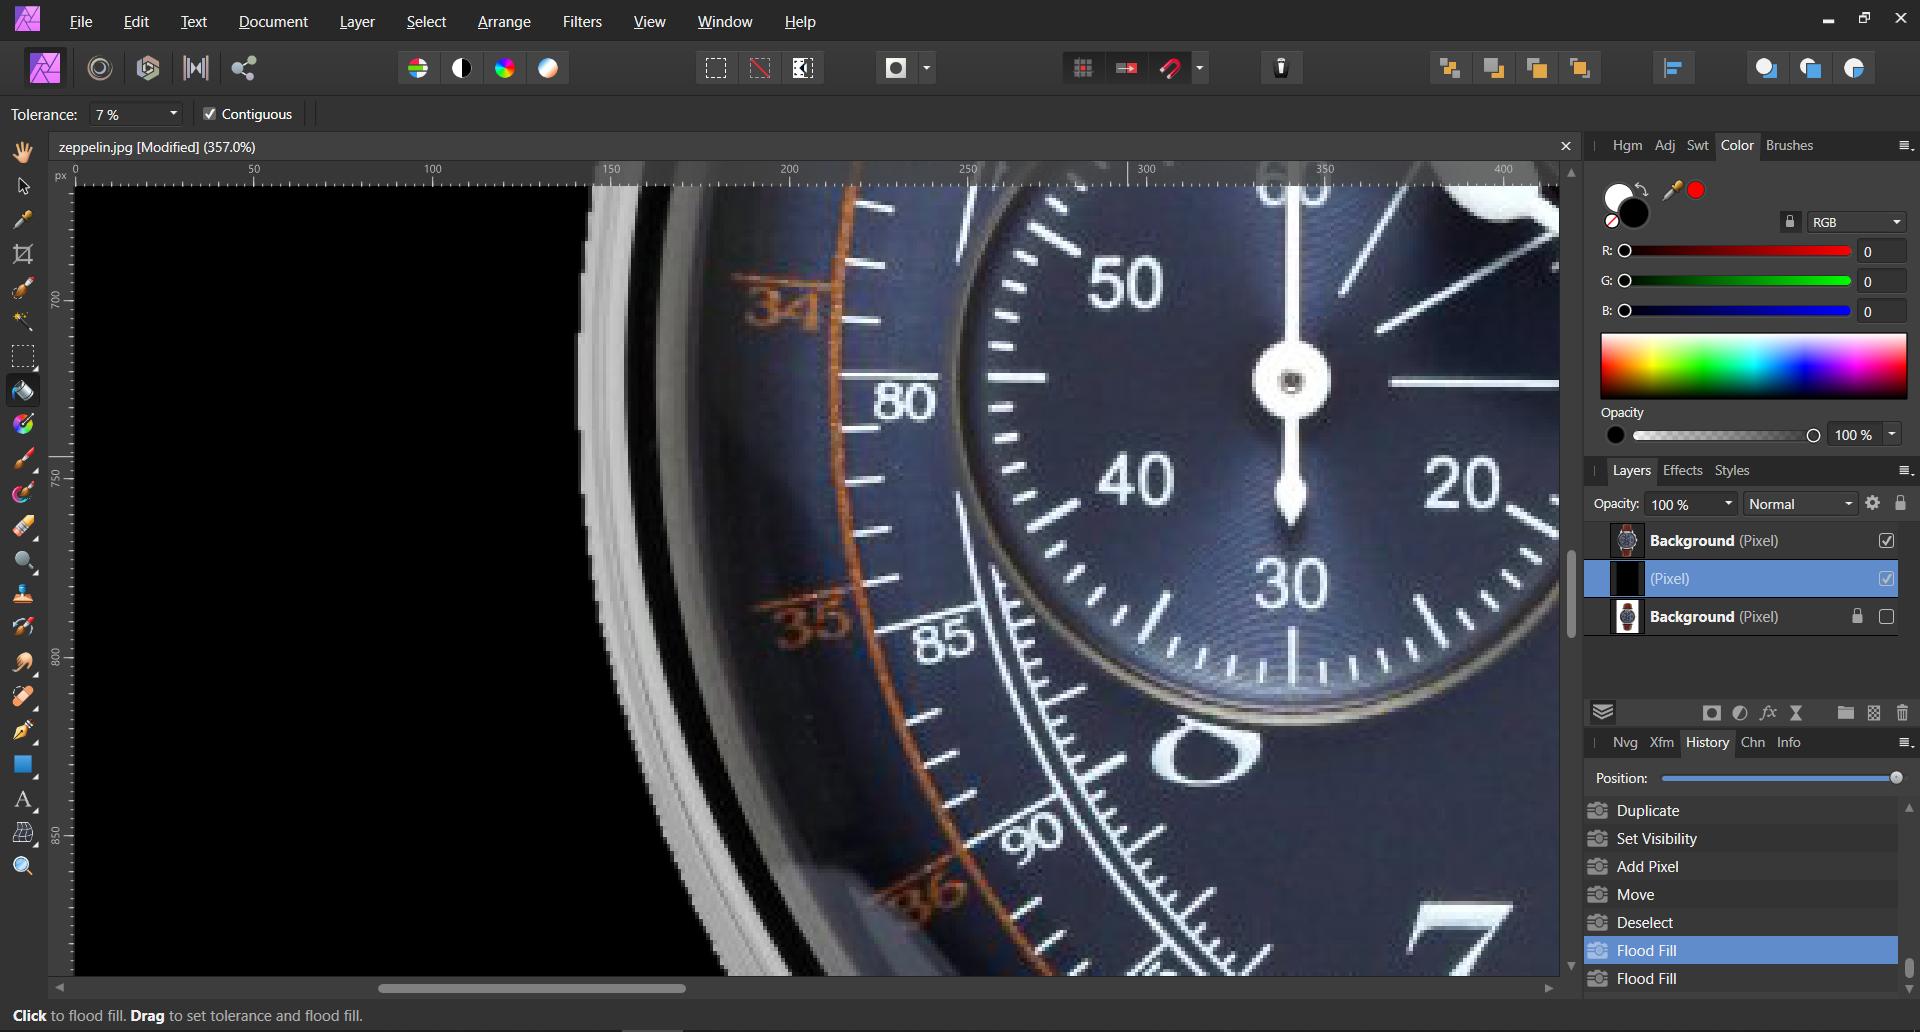
 I have been playing with Affinity Photo that I bought yesterday, and produced a mask of the foreground of an image but wanted to be able to refine it more, so I saved the selection to a channel (whatever that means). I reversed the selection, deleted the background, added a layer below the image and flooded it with a color. Instantly I noticed there were a few leaks, so I clicked on the selection menu but saw no option to load the selection from whatever the channel it was saved to before. So, how do I load a selection from a channel? I should add that I was able to get back with a bunch of Ctrl-Z presses and then saved the selection to a file. But if I had not, I would be very frustrated right now, so I would like to know how to load it from a channel for future reference.
 -
 Observation In Affinity Designer there are multiple input options using the modifier key for shapes, these include: Holding shift to constrain to proportions (square, circle) Holding ctrl to scale the shape from the centre out Hold alt to ignore snapping Hold spacebar to move the shape (this is not in the tool description at the bottom of the window though). Shape and selection feature parity.mp4 Expectation However, in Designer, I may expect this to work for selection tools as well, whereas it currently does not. As you can see from the video, while using the same sequence of actions, there are things I expect to be able to do from using the shapes tool, that I cannot replicate with selection tools. Proposal My proposal for how it ought to behave is listed in italics below the observation of actual behaviour. Shift does constrain proportions (square, circle) This decision means you cannot use shift to add to a selection. In Photoshop, holding shift allows you to do both, first you hold shift to add to a selection (mitigating the need to reach to the toolbar for this) and after the initial click, you can release or press shift again to constrain the shape if needed. Shift constrain selection.mp4 Ctrl does not scale from the centre > it moves the selection with ctrl + LMB However, upon the initial creation of the selection window, with the selection drawn out, I don't see a reason why holding ctrl afterwards would not constrain the selection to be created from the centre. Alt does not ignore snapping > it subtracts from the selection (which is perfectly fine the way it is) Spacebar does not move the selection that is currently created This should be added to make more refined selections possible and to ensure continuity between the tools.
 -
 Hello commmunity! How do I delete the selected area in Affinity Photo for iPad - like pressing the del key (since two-Finger-tap is undo)? Unfortunately I cant find any Option to manage this. many thanks for your help!
 -
 Although I find the Smart Selection brush quite useful, it doesn’t always get the job done, so here’s an alternative method for separating elements with fine detail in a photo. 1). Don’t forget to rasterise the imported image. 2). Duplicate it. One version will be be converted to a high contrast black & white image, while the other remains the same. 3). Take one of the copies, and in Adjustments Studio in the sidebar, scroll down to Vibrance in order to dial down the Saturation, creating a ‘greyscale’ image. 4). While still in Adjustments Studio, scroll up to Levels, increase the % of Black and decrease the % of White, in order to create a high contrast image. 5). Use a Black brush to fill in any White areas you DON’T want to become part of the selection. 6). Next, access the Channels Studio in the sidebar, click on the three dots next to composite Blue (or either of the other colours), and choose the option: Load to Pixel Selection. This will select all the white parts of the image. 7). Switch to Selections Persona, and with the Move Tool, click & hold on the Canvas to call up a dialogue box, and finally choose Invert Selection. 8). Switch back to Photo Persona, and with the Move Tool selected copy & paste from the original colour image to a new layer. You’ll be left with the desired portion of the photo. Notes: I’ll sometimes duplicate this new isolated image, in order to add a Multiply effect under Layer Options. This can help the image to blend better with the background if placed beneath the unadjusted layer. Also, when using Channels Studio to make a selection, you can save a copy of it by clicking on the three dots next to one of the colour composites and choosing Create Spare Channel. You will then be able to return to the Spare in order to make another selection. I hope this is helpful, let me know if there are any questions. FullSizeRender.mov
-
- 2
-

-
- selection
- remove background
- (and 5 more)
-
 Good morning, I have a suggestion which I would love to see in the app: multiple selection of project/photos to quickly eliminate/move them. I’m working with a lot of photos (100-200 every time) and I have to do pretty much the same things with everyone of them and, after exportation, I don’t need them anymore. So, every time I finish that specific work I need to eliminate every single photo (also to save space in my iPad) and it takes to much time to eliminate them singularly. So I wold like to see a tool, similar to drag and drop (that permit me to import a lot of photos very quickly), that help us to better manage our photos/project and mainly to eliminate them in a faster way. thanks davide
 -
 Hello, is there any shortcut to use will have a selection tool to change between add and subtract instantly? Like in PS? This will make my life waaaay easier. thank you!
 -
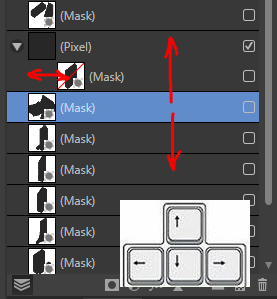
 Hello! The arrow keys and page up/down could be put to better use in the Layer Studio (or am I missing something?). 1 - When you hover the cursor over the layer studio, arrows and page up/down could select the next/previous item in the list. Left/right arrow keys could move up/down a hierarchy. 2 - Holding some modifier key (SHIFT etc.) while pressing up/down arrows could MOVE the selected element(s) in the list (as opposed to SELECTING next/previous). For both, it should not be necessary to click-set focus on the layer studio. Just hovering should do. Thanks! Best regards
-
 I have only been using Designer for about 2 weeks. There is an issue that I can't figure out. In almost every art program I've ever used there is a way to hide a selection, aka marching ants. Is there a way to do this in Designer? The visible selection can be very distracting. Thanks.
 -
 While I am using Affinity Designer I wanted to try photo manipulation I said may be it will work perfectly. But when I started working on it I noticed three main features that are missing and they are easy to implement in Affinity Designer pixel persona. Those features are "Merging selected layers", "Pentool" and " invert mask". For merging selected layers it seems complicated you have to groupe the layers that you want to merge then rasterize them and that's is a waste of time you can replace just with one click making a "Merging selected layers" button. For the pentool I don't know why you excluded it from pixel persona even it is the important tool there especially in perfect selection in photos. I hope you can fix that or if you have a solution for this issue please refer us to it. Finally, for the "invert mask" feature I don't know why it is missing in Affinity Designer ?! People suffer when they apply an adjustment layer to a photo especialy if it is very detailed it will be harder and waste of time to erase the maske in all the photo wherase if you apply "invert mask" you will easily get rid of this issue. I hope that you got my point considering "invert mask". Finally, I hope that you will take my suggestions and notes into consideration because they will make Affinity Designer more suitable and likable for the Affinity community. Thank you in advance.
 -
 Publisher 1.10.0, from Serif App Store Mac mini, M1 processor macOS Big Sur, 11.5.1 Same problem on Publisher 1.8.4 (Serif App Store) on Intel MacBook Pro (Catalina, macOS 10.15.7). Same problem on Publisher 1.9.2.1035 (trial version) on Windows 10 Pro (OS build 19041.1165) Steps To Recreate Create a table. Type in some text. Select some of the text. Drag and drop the selection to another location within the table. Expected behaviour: the selection drops into the table cell indicated by the insertion point that follows the mouse/trackpad pointer. Reality 1: drag horizontally left or to any higher cell (left or right) and it works as expected. Reality 2: drag horizontally right or to any lower cell and the selection flies off unpredictably into a random cell. The screen-recording shows both realities: dragndroperror6fps.mp4 Try to guess where your selection will end up! Minutes of fun for all the family! 😀 Points may be awarded for correct guesses…
 -
 when i make a selection in image and duplicate selection, does work. The complete imagen in the layer is duplicated, not the selection. In osx, ver 1.10.00
 -
 In both AP and AD, I have created a reference layer (1), placed a photo on it, and lock that layer. Another layer (2) was created and is being used to hold elements traced from the locked layer. The problem, I cannot box-select the elements on the second layer if the box begins over the photo on the locked layer. Even though layer one is locked it get selected. I can also just click on the background image on that locked layer and select it, of course, I can't do anything with it once selected...because it is locked. The question: Is there a setting I am missing that prevents the object on the locked layer (or locked object) from being selected? Seems to me that if something is truly locked I should not be able to select it. Thank -Bill
 -
 I have to close the window and open again to move.
-
When using the rectangular marquee tool, sometimes I know the exact pixel dimensions that I need to be selecting. I would like to have the ability to specify a selection box size and/or ratio, rather than simply dragging an area.
-
 Please add the "Selection From Layer" command to Designer as well. Requires the keyboard is pain. https://affinity.help/photoipad/en-US.lproj/contents.xml?page=pages/Selections/selections_fromlayers.html?title=Pixel selections from layers
 -
 hello, can i adjust the "magic wand" in Affinity Photo to stop at transparent pixels? Or more general, can i set conditions for properties values to be taken into account when magic wand chooses or ignores a pixel? Best Regards, Lars
 -
 After making a selection, I lose all graphical histogram representation in the curves tool. To recreate issue: Open file Make adjustment using Curves (histogram is shown) Create a selection (histogram disappears in Curves adjustment tool. Delete selection and problem still exists Delete previous Curves adjustment and problem still exists. Nothing I do, will bring back the original graphical representation on the Curves tool. This is happening on the current release (1.9.2.1035) as well as the beta (1.9.4.1065) OS Name Microsoft Windows 10 Home Version 10.0.19042 Build 19042 System Manufacturer LENOVO System Model 81Y6 System Type x64-based PC System SKU LENOVO_MT_81Y6_BU_idea_FM_Legion 5 15IMH05H Processor Intel(R) Core(TM) i7-10750H CPU @ 2.60GHz, 2592 Mhz, 6 Core(s), 12 Logical Processor(s) BIOS Version/Date LENOVO EFCN46WW, 12/4/2020 Installed Physical Memory (RAM) 16.0 GB Total Physical Memory 15.9 GB Available Physical Memory 9.47 GB Total Virtual Memory 21.4 GB DirectX version: 12.0 GPU processor: NVIDIA GeForce GTX 1660 Ti Driver version: 466.11 Driver Type: DCH Direct3D feature level: 12_1 CUDA Cores: 1536 Core clock: 1590 MHz Memory data rate: 12.00 Gbps Memory interface: 192-bit Memory bandwidth: 288.05 GB/s Total available graphics memory: 14269 MB Dedicated video memory: 6144 MB GDDR6 System video memory: 0 MB Shared system memory: 8125 MB Video BIOS version: 90.16.4A.00.78 Affinity Photo - Curves Bug.mp4
 -
 Hi everyone! How can I lock layer's selection so if i click outside of the layer, It wouldn't be deselected? It's useful mostly in moving layers and working with vectors.
 -
 Hello all... I am trying out the iPad version of Photo and really loving it. I have all the photoshop shortcuts down from years of use and spending some time figuring out the transitions needed. Prblem I am having is in two ares... 1 - When I make a selection in the selection persona and make my adjustments in the photo persona I can’t find the way to then deselect the marching ants! Why is there not (unless I am just missing it) a “deselect” or “hide” command? 2 - Why can’t I just paint a mask to do my adjustments with? One would think having a paintbrush to quickly paint over an area to do burn/dodge or the like would be a no brainer. THis is the only reason I use photoshop fix, it is soooooo simple to make these adjustments. Again, I may just be missing it so please help me out. Thanks! Bruce
 -
 I recently switched from Photoshop and I somewhat have a problem with the selection tools. When I use the tools like freehand selection for example, I don't get a sharp edge. When I want to refine it I can change the sharpness of the edge, but that makes the edge more fuzzy. I am sure selecting with sharp edges must be possible - but somehow I don't find out how... ...does anyone have any suggestions? Thank you.
 -
Has hiding the selection line been asked about before? I used this a lot in PS and it was very helpful when tweaking/aligning the image portion to see behind the marching ants. Also, even though I'm impressed with the image adjustment tools, some buttons for moving a single pixel at a time would be useful as well. Thanks
- 6 replies
-
- 1
-
-
- marching ants
- selection
- (and 3 more)
-
 Hi! I found that cutting backgrounds in product photos I've have to work on is somewhat tricky in Affinity Photo. I try to switch from PS to AP, but similar functions in both programs gives different effects. See attachments and you see squared edges in AP, and smooth (no feather etc.) edge in PS. Any suggestions?
-
 When using the Grow/Shrink selection the active layer is changed. I think this might occur with some other tools too but I need to pay more attention to it. It's annoying because more than once I've continued working in the wrong layer.
 -
 Please excuse me if this is already on the roadmap: Zoom to selection is great as it is, except for the shortcut; it's a two handed shortcut. The 0 is all the way over there... needing the right hand to come off the mouse to get at. That's pretty ridiculous when you consider that zooming to selection is for the process of immediate editing, which is done by the mouse. So the shortcut for this must be an entirely left handed "ninja fingers" move so the user can continue working at a rapid, immediate pace without having to remind their mouse or stylus. Which brings into question the rest of the view shortcuts, and how they could be better, to the point of being the best in the world of vector design. One of the joys of using the Mac is that there's no Windows key to jar you out of context of your existing app, and the [Alt] key doesn't throw you into a different mode of operation. So the side of the thumb can easily be used to operate a pair of modifier keys without any risks to the user experience. The two easiest two operate concurrently are the [Command+Option]. Just move your left thumb to the left of the space bar, roll it onto its side, and press them both down, concurrently, with ease. The real joy of this is that it leaves your other fingers forcefully hovering over the tilde, 1, 2 and 3 keys. The 4 is a little bit more of a stretch, but still reachable, and the Tab, Q, W and E buttons are unreasonably placed for immediate access, too. So that's 6 or 8 or 10 really good shortcuts, depending on your considerations of the Tab and tilde and the stretch to the right for 4 and R. What's the most important view zooms and changes that could be here? I propose that since Command + 1,2,3,4 is view level zooms pertinent to the current centre point of the screen, that [Option+Command + 1,2,3,4] should be those same zoom levels based on the position of the currently selected object, rather than the current centre of the screen. Or vice versa. --------------------- And I'd strongly suggest a "centre the current page and zoom to actual pixels" be given a top level shortcut that's a switch, back and forth from the current view position and zoom. I suggest the tilde key, without the need for a modifier key, be this. How this works: Regardless of my current zoom and position on the page, tapping and holding the tilde key brings me to actual pixels, centred on the current "page" so that I can see the project in its current state after my most recent modification that I'm currently editing. Regardless of what I'm editing (with the obvious exception of entering text) this should hide all selection brackets, guides and other visual clutter that's not content so it's an absolute preview of the work, and be in pixel mode. Releasing the tilde key should then bring me straight back to the current tool, intact, ready to continue editing at the previous view position and zoom level. [Option + Command + Tilde] should do the same zoom to actual size, but around the current selection instead of the current document centre. Sound at all sensible and useful? Or am I stark, raving mad? // btw, change this forum subsection to "Feature Suggestions" instead of Feature Requests. It's an important difference in mindset, I think. We don't really have the right to request features, but we do have the innate right to make suggestions. And this makes it a lot clearer that the processes of designing, designing an incorporation, designing interface access and then the subsequent development considerations of any feature is fucking staggeringly involved work. And ever more so within the framework of an existing product. You're not starting from scratch, and it's not easy to even consider a new feature, let alone implement it in anyway that doesn't impact other things.