Search the Community
Showing results for tags 'Select'.
-
 I create maps in QGIS (an open source GIS mapping program on PC and Mac). QGIS can export as PDF and SVG, but the best way is PDF. The problem with PDF's is that all the lines come in as individual layers (objects) while in SVG'sthey are at least grouped as sublayers. To get around this in Illustrator, I can use the Select>Same>Stroke Color and then move all the selected features to a new single layer group. Designer could use an expanded selection ability like Illustrator's. As far as selecting goes, there's a plugin for Illustrator called Select by rj-graffix.com which adds many selection abilities (but right now it doesn't appear that Designer supports plugins). Freehand used to have really robust selection abilities via a dialog box, and this included text attributes. Illustrator has never come close. Thanks.
 -
A few tips on this highlighting the shortcuts available in particular when using marquee select:
-
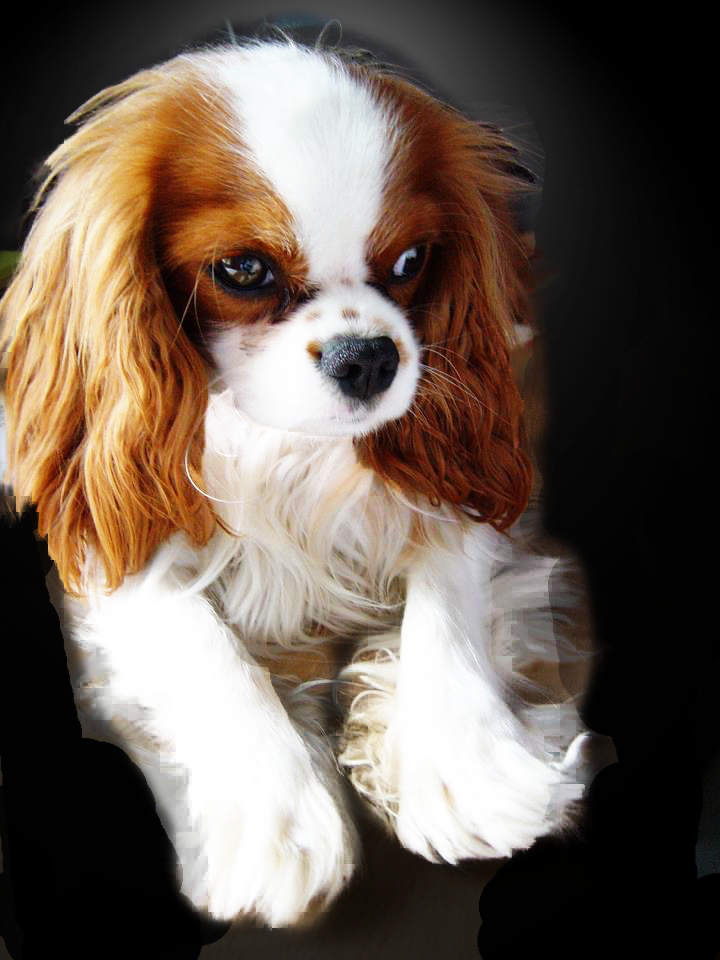
 HI, I am a newbie and am gradually working my way through all the tutorials. I have watched the one on refining, however, I struggle to create a good 'fur edge' with my hairy cavalier! I seem to end up with block feet, please could you advise on a process for me to get a better result. I am pretty rubbish at this!!! Many thanks B
-
 AD fam, On many of the AD tutorials I see a click/drag operation used to select an item you want to isolate for copy/paste purposes. My question, is the click/drag done while holding down a keyboard key (i.e., the 'alt' or 'command' key)? When I click/drag over a given area that I'm trying to cut out, I see the light blue square/rectangle cover said area...but when I release my finger from the mouse it seems I'm unable to 'capture' (copy) the selection. I know I'm missing something simple - please have mercy on me. Thanks in advance. -Christo
 -
 Is there a way to adjust a selection? For instance, I may try to draw a circle around an image of a circle, but not get it quite right, only to find that I can't adjust it after the selection is drawn...causing me to have to keep trying to draw it perfectly and wasting a ton of time.
 -
 What is the equivalent of photoshop's "select" then "color range"? it is easy to clean up an image by removing for instance back ground color by selecting a color then there is a slider to choose how much "fuzziness" it's called. I cannot find this in affinity.. I'd appreciate instruction. Andrea
 -
 I tried to select an area of a layer using the marquee tool. Then I copied it and pasted it, but what ended up getting pasted was the whole layer, rather than just the selection. How do I get this to work properly?
 -
I've already gotten past this problem in InkScape, but wanted to know how one goes about doing a selection by color (E.g. say you have an image with a white background) and making an image that has a blend of colors and gradient transparency be a solid color, while retaining the transparency. MY PROCESS: I had a heck of a time trying to figure out how to do this in both Affinity Designer and Photo, so that implies to me it could be more intuitive. In Photoshop, I simply go to the menu and select by color, but instead of being limited to RGB (as in Affinity), or tonal selections, I could use a color picker to choose what I wanted on the image. This would then select all of that color in the image and I could either mask or delete that. I found the Transparency tool, but couldn't get it to work on the image and tried tonal selection which worked in general, but was much more difficult to figure out than simply picking the color I wanted (white). I know part of this is simply figuring it out the first time, as I would make quicker work of that process the next time, but it's not always that easy messing with various settings instead of having a color picker. THE POINT: So, while a color picker on the selection menu would be a feature request, my question goes back to, OK, so I've selected the color I wanted as described above and now want to mask that. I clicked on a mask layer and it worked, but now I want to invert the part of the layer that's not masked...which happened to be a blend of colors and transparency. It was at this point I got stuck, as I couldn't figure out how to recolor the rest of the image to be one color, but still retain the gradient transparency it had.
-
 When you hold ctrl and select an object that's grouped together with another object, you select that object instead of the group. This is a great feature, and I use it a lot. When you hold ctrl and drag, you copy and drag the selected object. This feature is also available when you hold alt + drag. Is there a way to disable the ctrl + drag and only use alt + drag? Because I can't seem to stop making copies when I try to select a grouped object.
 -
 Hi all On a high res image, there's constantly some kind of delay between selecting one part of an image, moving it, and selecting a new part. Also, when you want 1 part to snap to the other, then both need to be in the view when you start to move, otherwise the snap gets confused
 -
 Please forgive if I'm jumping any guns here, but I'd like to share my thoughts with you. I'm sick of the Adobe subscription model; I've jumped ship back to Quark, and wish to use Designer instead of Illustrator. However... 1) I suspect I'm not alone in using Autotrace nearly daily. This omission in Designer is a serious brake on my adopting it wholeheartedly. I've tried separate programmes, and they range from awful to ludicrously expensive. 2) When you are churning out production graphics daily, having simple commands for Select>Same Fill, and Select>Same Stroke etc. are massive timesavers. Not having these means I spend extra time clicking and grouping to get the same result. It's obvious from your latest book (superb, by the way) that you are looking at some pretty clever stuff, and Designer does it well. However, we daily Joes need the basics to be there, fast, and reliable. I'd appreciate your comments. (Not trying to be contentious, honestly!) Keep up the good work. N (Ooops, just spotted typo...!)
- 4 replies
-
- 1
-

-
- Illustrator
- select
- (and 1 more)
-
 Hello, AD started showing a selection box around previously selected objects and it doesn't go away - I have to close and reopen the document to clear the selection boxes (please see attachment). It gets visually annoying, how can I clear this? Thanks
 -
 Hello, It would be really nice to be able to see a live preview when selecting a sampled colour in Pixel Persona as an overlay or black and white mask. Currently it shows an approximate result while dragging a slider ( dashed lines ). Extracting clour range ( sampled colour ) and using it as a layer mask or fx layer is a common practice in compositing. Architectural visualizations for example. I can select a sampled colour and click Refine to check if what i did was ok, but it is always a guess. Designer is a GREAT program, but I really miss this feature. I am testing Affinity Photo Beta for Windows and I can't see this kind of tool as well. ( Pixelmator has it BTW ;D ). I know it is a beta so maybe it is a good time to point it out. Performance-wise, maybe taking a screenshot and previewing selection mask on a low-res image is a good idea? Best Regards, Marcin Mirkowicz.
 -
 Sometimes as I am working with various objects in the same layer my Move Tool or Node Tool no longer selects an objects from the layer list , although I have just selected other object in the same layer. The top layer and all of the layer objects are open. I sometimes can then click on the object itself (on the map on which I am working) and it is selected, and it shows then appears highlighted in the layer list. This may be a memory problem, especially since earlier I moved layers around in in the layer palette. When I save and close the doc and then exit AD and bring AD and the doc up again, everything works fine, i.e., I can select all of the objects from the layer list. Is this a memory problem, perhaps connected with the fact that my current doc may be dependent upon an earlier version of the same doc, as discussed in an earlier post (https://forum.affinity.serif.com/index.php?/topic/3649-file-size-changes/?hl=file+size)?
 -
 Hey, When I want to change the background color of my document canvas I make a vector square sized of the background, choose a color and set it to be locked. I don't like that after this it is not possible to select other objects on that locked background by dragging selecting. It just selects the background. If I start my drag outside the canvas then I can select the object. Is there a way to completely put a locked object locked? So that it will not be selected. Thanks!
 -
Would be very beneficial to have more granularity in the Select All command. Perhaps the command can have 3 options: 1. Select All Objects on Current Artboard (Cmd + A) 2. Select All Objects on All Artboards (Cmd + Shift + A) 3. Select All Objects on Pasteboard / not on any Artboard (Cmd + Optn + A)
-
Is there a way of selecting the same fill colour in affinity designer? Thanks for your assistance in advance sarah
-
 I have a MacBookPro 9,2 with El Capitan, 16GB RAM and 32 GB of free space. I purchased Affinity Photo two days ago. I have opened a JPG photo but am unable to do anything with it, as I cannot select any of the tools. The hand (top tool) seems to be permanently selected. Clicking on any of the other tools does nothing. I have followed the instructions in various tutorial videos without any luck. Help! How can I select tools, such as the eraser? This is very frustrating. Thanks - Stan Gould.
 -
 I want to take a photo of three people, take out the cluttered background, and make it look as if they are in front of a seamless background or blank wall. What is the best way to do this? How do I find the colors for the solid seamless?
 -
 I know there's got to be a quick keyboard shortcut to activate the Select tool from a Zoom state, but I cannot make any of the shortcuts I'm seeing work. When I zoom up close, then click on the item in the layers list, the selection tool displays on the list; but when I go back to my workspace and click (which is intuitive behavior for me because I feel like I've selected already), I zoom in another level, which I never want. (I'm usually custom-kerning type when I do this.) I have to remember to click the layer, mouse to/select the Selection tool, and then click on the workspace. I'm wasting an awful lot of time having to do this and, when I forget, to undo the extra zoom level, then click through everything again. The screenshots I've attached don't show the relevant cursors, but in the smaller image, I'm clicking on the layer TITLE in the layers list and I've got a selection-tool cursor. When I go back to the workspace, the cursor shows the zoom-plus tool, and if I click on it I get zooming, which I don't want. Ideally, I wish I could change the behavior so when I click on the layer TITLE, it switches me into selection mode in the workspace by default. What am I doing wrong? Or what is the quickest way to accomplish what I'm trying to do? TIA. Diane
-
 Hi. I hope you dont mind me asking this question but I have got Photo not Designer and before this I was using PS to create line art from my drawings so I could digitally colour create them. I tried to use the process that I used before in Photo but I could not recreate some of the steps. I realise that things work differently but hoping that there is still a better way to do it then I ended up making. The process I used to use is below. The problem I have is that I cannot find a way to do the steps that I have marked in red. I ended up using the magic tool to select the white areas but it kept missing bits and was not a good solution for me and took very long and my selection was quite shabby and pixelated once I had finished. Can you advise what sort of process (if any) i can use in Photo to recreate this please. I dont want to have to buy Designer yet while I am still a beginner and learning the ropes in Photo. Creating Line art from Scans * Open scanned image in Photoshop * Make a copy of original layer and rename for easier finding * Adjustment layer – Black & White * Option box - check all options are in the middle default position of scale. If any altered bring back to middle. * Adjustment layer – Levels * Adjust as required to create more contrast and get rid of any unused white areas * Adjustment layer – Curves * Create S shape to enhance image * Go back to Copy layer and zoom into 100% and then go to Unsharp Mask * Big radius – 120 – 150% * Amount – 60 -90% * Threshold – low – 12 - 14% Touching up image to remove blemishes * Go to Brush and choose a standard brush using the black and white colours to remove any blemishes on image so image is clean * Then delete original layer Define line art * Select – Colour Range – options box – Select sampled colours/selection Preview-Grayscale/Invert/Image * Then use colour picker and click on white area within image – OK * This then creates marching ants around the line art with only the black lines selected * Select/Modify/Smooth – 2 pixels * Optional: Select/Modify/Contract – 1 pixel * Then fill the selection with black. Make sure foreground colour is black and then ALT+backspace to fill with black. * Invert selection again so white selected * Then hit Delete and white background removed so line art is now on transparent background. * Deselect with Control + D * Save this as a PS layer file for future use
 -
 Do you have a plan to make this for multiple selecting shapes? It will make AD more powerful :).
-
 Hi, I cannot seem to edit my text layers. When I select them (on the right panel) and double-click on the text (on the main design), it jumps the focus to the background layer (all the way to the button). Im I doing something wrong?
 -
Hey guys, I know you are super swamped with getting APub out. I just wanted to share a request which I think would be VERY useful. It's an enhancement for Move/Node tools which I think would benefit all users and enhance productivity. It might have been discussed in the past, if my memory serves me right... I'm talking about enhancing the behavior of the selection function while using the Move and/or Node tools. What this is based on is a selection technique from SketchUp. Here is a video explaining how it works in that app. Notice how the selection marquee changes from solid to dotted line / marching ants, based on the direction the user drags, to visualize the alternate behavior activated. I think this would be TREMENDOUSLY useful for selecting and editing object in groups, and perhaps can be applied to inter-node segments as well... Thanks for your consideration.
-
Hello, I miss the functionality for organizing groups without touching the mouse. If I had a shortcut for renaming a group or an element or could select one or more elements/groups with the keyboard, it would be a lot more comfortable. There are already the standard shortcuts for cut, copy, paste, etc, but it seems to me like they have not much value as long as I had to use the mouse. What do you think? Best regards Leon