Search the Community
Showing results for tags 'Printing'.
-
 I'm not looking to print borderless I (I understand this can't be done on a laser printer) however my layout from Affinity Designer is not printing to full scale on my HP CM1415fnw laser printer. It seems the HP has a border preset that causes my printouts of a trifold to come out about 97% of the actual size... and we all know how that will screw up a perfectly decent looking trifold!!! HP is not much help on this, and the manuals are not much good either. I printed from a pdf to a colour copier via thumb drive at a local Staples store here and it came out fine... but I'm trying to save our photo club the 88¢ per copy that would run by printing on my business laser. Blacks are better although the photos are coming out somewhat darker. Is there a setting that I haven't found yet in AD that I can use to bypass the limitations of the HP?
 -
 I need to print a variety of cards – greeting cards, for example, photo cards, postcards, etc. I'm really struggling to get decent results with Photoshop. There simply aren't enough printing options. Placement becomes guesswork. Printing from PDFs in Preview also isn't working well. I'm exploring different options. I'm considering buying Affinity Designer in hopes that it will make this job simpler – and not just for printing, but also fill in the areas where I need Illustrator but resort to PS. Sadly I let my Designer trial lapse before investigating this myself. Presuming that my trial can't be extended for a day or two, can users please share screenshots and other information on the type of layout and printing options I would get with Affinity? Is it a good option for me? Do you have other recommendations? I'm on a mac running latest OS. Many thanks!
 -
 I cannot find an answer to this in the documentation. I have been using Affinity Photo as a replacement for Photoshop and am pleased with the performance. I have a question about printing and whether I can print profile targets with no color management. Photoshop CS6 does not allow this (there is a 'null transform' work around) and Adobe suggests using the Adobe Color Print Utility (ACPU) for this purpose. Unfortunately with WindowsOS, patch sizes are reduced by 4% using ACPU. Adobe is aware of this issue but shows no signs of wanting to fix it. I would like to be able to use Affinity photo to print ArgyllCMS generated profile targets with no color management if possible so that target size is retained.
 -
 I have an issue with color management printing from AD where the printed color is not what I would expect: The document is set to AdobeRGB, there are some red shapes (RGB 255;0;0) and a small image - printing to an HP CLJ M452. Color management is turned off in the printer driver. In the print dialog under color management, I´ve chosen "Color Handling: Performed by App" and my ICC profile for the paper type in question. The resulting print is shifted to orange instead of the pure red defined in the document. When I print the document by letting the printer driver manage color (and selecting AdobeRGB in the print driver), the result is as expected. I would have do some more tests but from what I see with this document, there seems to be something fishy about the color management handling in AD. The ICC profile is OK - I use it successfully in various other apps (Indesign, Lightroom, Photoshop). Any ideas?
 -
 Hello first let me congratulate you for the amazing ipad app, just loving it...fantastic work...I am running the Beta I am running into an issue though with exporting my tiff files for printing. I export them as 16 bit tiffs in the adobe RGB space because there is no Prophoto option ( where is it?) and adobe RGB seems to be the next best choice ... correct? the export files opens perfect in AP desktop but wether I try to print the file from the IPAD or export in Prophoto from AP desktop they do not print properly but look like closups of very heavy noise artifacts.... I am printing from COLORBURST OVERDRIVE that reads the file and shows a normal preview. Never had a problem with COLORBURST and AP desktop files What do you reckon and suggest??. I think it could be interesting to put together a tutorial about preferences both for AP desktop and AP Ipad
 -
 I know there is a feature on adobe illustrator were it will package all your files together (vectors, fonts, backgrounds, etc) into one file so it is easier to give to your printer. Is there a similar feature in Affinity Designer that I am over looking?
 -
 I have found this question marked as dead, but is not dead for me (and anyone trying to use AD for press) Exporting single artboard with bleed works. But in tutorials of AD is suggested to create a design using multiple artboards, like the tri-fold leaflet. (the "Artboards: Exporting and Printing" tutorial, Bookcover tutorial) By tutorial, I should group them and the make a slice for the group and then export it as single page. But I am not be able to include a bleed at all, whatever I try. (and I was hoping for other benefits of this attitude as between artboards cropmarks to mark folding etc. :-/) Is there any workaround? Is there any way to export multiple artboards as a single page and keep the bleed? Or the autor of tutorial… maybe… never actually print anything :-) ? In that case I suggest to remake those tutorials or delete them as they may be quite missleading. Any suggestions would be very, vere, very much appreciated, thank you.
 -
 Hello, i have a little problem. I came here from adobe illustrator and I have the problem with export for printing. I wanna have pdf with print marks and graphic fill all the paper, not just resize by print marks.
 -
 I am presently trying to make the switch to Affinity. After twenty years of working with the competitor's products, I am finding this a little difficult. Please forgive me if I'm putting too many questions under one topic. I am starting to embrace the differences, as much as possible. However, the export function does not appear to be my friend. I am starting to get the gist of it, but I am confused as to why my images dimensions get resized when working with jpegs and tiffs when I export. With the jpegs it appears that no matter what size I am working, it defaults back to 72 dpi and changes the dimensions accordingly. My cmyk tiffs appear to be changing the dpi to 180 with the dimensions shifting as well. Is it supposed to work like that? Also, how is it best to work between Photo and Designer for printing? Do I need to export a tiff or eps to place in Designer or just use the native file? I initially had some trouble with parts of the images going grey when I tried to print a Designer layout with a Photo image. Does this have something to do with the embedded profile? I would really appreciate a video, or some sort of instructions, on best practices to place an image from Photo to add to a Designer layout for printing purposes. Lastly, I am struggling with the gradient tool. Is there anyway to go from a solid color to transparent? I just can't figure that one out. Thank you.
 -
 affinity photo 1.5.1.54, regulary installed OS win10pro 64bit After working on a photo (many time), I am not able to print it. The following message appears at the desktop similar as: "a not managed exception is occurred. The program must be stopped; after restart, a dialog box will appear. Code 0xC000005" Where is th problem ? Thansk for reply
-
Looking for the Canon IPF 8300 + Printer Plug in. Currently found in the PS file>export menu ... it's the perfect way to print to Canon large format printer. Right now Affinity Photo is perfect for me with this one exception ... I can't switch until this feature is available. I'm certain everyone with a Canon printer must be in the same boat.
-
 Has anyone still got X5?? ever since I change my printer to Wi-Fi Wireless I cannot print anything I have done in this program, any idea why??? thanks for any help
 -
 We achieved accurate colors in offset (Ryobi 522) with ISO Coated v2 (ECI) color profile. How I can use it in Affinity?
 -
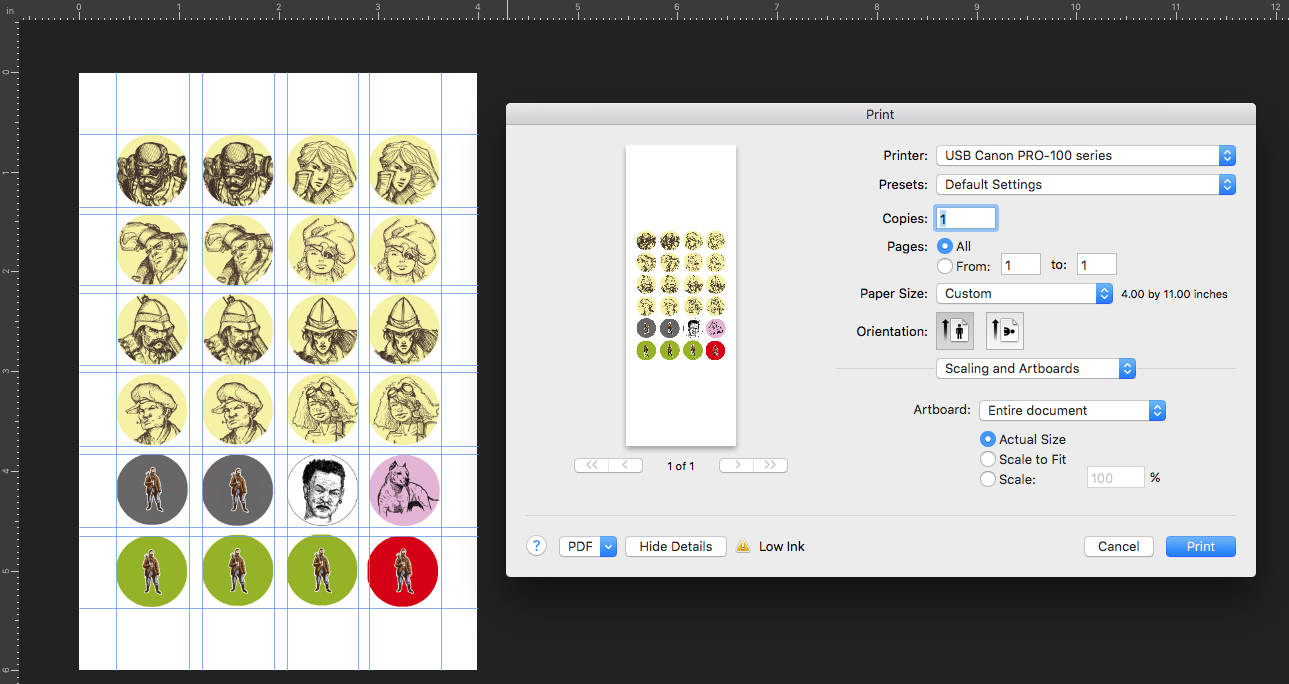
 Hi. I've attached a screenshot which shows the problem I'm having with Affinity Designer 1.5.4 (purchased from Apple App Store). I'm trying to print onto Avery Labels #5408, which are 4"x6" sheets, to my Canon Pixma Pro 100. I have sized the document correctly, and it appears correct on-screen, but when I go to print it out, the print dialog shows it as 4"x11" with the on-screen content centered vertically on that page. If I click print, only the top of my on-screen content comes through, at the bottom of the 4"x6" page. Is there some setting I'm missing? Please advise, otherwise very happy with the product, but unless resolved, this is a pretty much a showstopper. fwiw, Omnigraffle Pro printed the sizing correctly, but their cropping tools are terrible, hence trying Affinity Designer. Thanks in advance for any assistance, -neil
-
 Am I correct in thinking that there is no easy way to print using specific margins to an existing image, as you can in Lightroom etc (attached screen shot). I have read the suggestions about canvas resize but this is an over complicated method for what should be an easy task
-
 Hi there, I'm quit a newbee with Afiinity Designer. I love the software program and how easier it is compared to Adobe Illustrator. I have a question. I made a business card for myself that i want to be printed out in CMYK or PMS colors. I have included an example how it will be. 1) The color in picture A is a bright neon color, this is how i love it to be in a printed form. But this was made in RGB/8 . I know if you want something to be printed professionally that it has to be made in CMYK. 2) The color in picture B is the same design, but with the colors converted to CMYK. It hasn't the same effect as the one in RGB. Less brighter. How can i have the same bright color from the RGB version in a CMYK or Pantone version so that i can be send to a professional printing office. Could you please show me in a few simple steps how i can achieve this? :) Thank you in advance. Visitekaartjes Four Four RGB - front 2017.afdesign Visitekaartjes Four Four CMYK - front 2017.afdesign
 -
 I'm using Affinity for Windows, 1.5.0.45 and a Canon iP8750 printer. I'm having two problems in printing which I hope someone might help with. 1. When printing less than A4 (as a proof before committing to a large print) I find it prints off-centre. So if I print an image on A3 or A4 and it comes out as expected mainly filling the paper, and then print it on half a sheet of A4 and tell the printer that the paper is 7"x5", half of the print is off the paper. (It can miss the paper completely if I print even smaller using my Canon MG5450.) I could not use the paper guides which guide and centralise the paper I guess, but it shouldn't do this. This also happened with the betas I tried, which I reported, maybe it's a bug and the fix is still in the pipeline? 2. When printing a particular image, I'm getting one or more very fine black lines on the print when printing the afphoto file. These do not appear in the image on the screen. They are vertical and horizontal only, usually 2 or 3, extending most of the width or height of the paper, always in the same place on the image irrespective of what size I have printed it. The image is a composite of a background layer and a couple of added pixel layers; these layers are irregular and have no straight edges in them, and they are the same size as the background layer. When I switched the layers off, the lines disappeared on the print. Then with the layers back on again, the lines printed again, but when I exported as a jpg and opened that, it printed without a problem. Is this sort of problem usual when printing afphoto files directly? Thanks.
 -
Can I post a request for a video tutorial on getting correctly printed colours? My monitor has been calibrated and images displayed on it look exactly they way I want them to be printed. However without correction my prints are usually too dark and sometimes have colour shade errors. I use the same printers all the time but a variety of papers. I'm bodging the faulty ones by adding layers to correct the errors, but I'm sure there must be better ways of doing this. Thanks
-
 I have been doing some testing of color printing using Affinity Photo. I am using an IMac, OS El Capitan and an Epson 2400 printer. I am not getting colors that are completely accurate. I just used the Mac's calibration program to calibrate my monitor. I printed all the images on plain copy paper. For 2 below, I had set the RGB Color Profile, in the Preferences settings, to sRGB 61966-2.1. For the other 3 tests, I changed it to Adobe RGB (1998) after doing some reading on color management. In this example, the color profile of the image I was trying to print was sRGB 61966-2.1 I believe this profile came from the camera from which the picture was taken. When I printed the image I tried a few different settings: 1.Color Sync (which lets Affinity manage the printing), using the Adobe RGB (1998) color profile, with the Plain Paper setting. I disabled the settings in the printer dialog box so that Affinity Photo, not the printer was controlling the settings. This gave me the best print, although the skin tones in the photo were too orangey red compared to how the picture looked on the monitor. 2. Color Sync using the same color profile on the printer, sRGB 6 1966-2.1, as was used in the document. Again, I used the plain paper setting and disabled the printer controlling the settings. This print was worse than the first, with the skin tones even more orangey and the blue objects in the image tending toward turquoise rather than deep blue. 3. Color Sync as in #2 except that I chose the Enhanced Matte setting. This gave me the worst colors, in terms of both the skin tones and the blues. 4. Epson controls the colors. This defaulted to a printer profile of SP2200 Standard PK, with plain paper settings, something I was not able to change. The colors I got were similar to the colors in #2 and not as bad as in #3. Based on this experiment, I'm wondering if there is anything else that I should change either in my preferences or other settings. #1 is acceptable but not great. I don't want to use up all my expensive ink trying every combination of preference settings and color profile settings so I'm wondering if there is some rule of thumb that I should be following.
 -
 I have just installed Affinity Photo 1.5.0 on my Mac with OS X 10.12.1 (Sierra). I use an Epson printer. I am entirely new to Affinity Photo, so please forgive me if the answer to this is obvious. In Photoshop there is the option to let the printer's own colour controls manage the printed colours or to disable these and let PS manage the colours; I usually opt for the latter. I could not find an equivalent place in AP where I could make this choice, and when I printed a photo the print that resulted was grotesquely too dark and with bad colour balance. I should be very grateful for information about this. I am aware that back in 2015 there was much discussion about the limited nature of the AP printing interface, but I hope that in the major upgrade to v. 1.5.0 this has been resolved.
 -
 In Lightroom I had the ability to print two images on one A4 page and create as many pages as I liked - is this feature available in Afinity Photo? If it is it's well hidden - I cant see any flexibility either in the print menu or the Export Persona. They do give you the ability to change the size of the document, but that seems to be it. If its not there could we please have it as soon as possible? Or have I missed something simple again!
 -
 Hi gang, I'm a very happy user of Affinity Designer and Photo on Mac and Designer on Windows. I have recently started using these products exclusively for document preparation for printing. I have no problems setting the export features, but am wondering why we cannot see the bleed line from inside the Designer persona ? It is present in Illustrator and helps locating color boxes, photo placement to ensure proper cuts at the printers. Is this a deliberate omission or is there a setting that is hidden that I have not found ? Another thing is the dissapearance of items when half on the artboard and half off. Could you not perhaps provide a subdued silhouette of the whole item instead of not showing it at all, sometimes the items are only very slightly on the artboard and you loose sight of them. Just my $0.02 here, but definitely the bleed cut line is a MUST in the designer persona. Christian Gatineau, Quebec CANADA
 -
 Your video tutorials are very good and helpful, ditto a forum such as this but they are very time wasteful when one is trying to find answers to a specific question. Is it possible to convert images from RGB to CMYK and if yes, is there a way of choosing the required CMYK profile?
 -
 Hello. I would love to see this feature in Designer: When printing or exporting - ability to set up N copies to print/export on a page. For example: I prepare a business card. I would like to print 15 business cards / A4 page. So I set up 5 rows and 3 columns, select whether business cards will resize, define gaps, cutting marks... I used Corel Draw years ago and it is a feature I LOVED. Very simple and automatic. When I change the design, it is so simply to print it again! With Designer, I must mess with artboards, multiple copies, arrange... And when I change anything, I must copy again... Thanks, Tomas
 -
 Is there a way in Affinity Designer to print a canvas that is larger than the paper it is being printed on? For example, if I have a 16"x20" canvas, I want to print it across 4 sheets of 8.5"x11" paper. This is something I do all the time in Illustrator, and need to be able to do it in Affinity Designer for it to be a viable replacement for Illustrator.