Search the Community
Showing results for tags 'Printing'.
-
 Hello, i'm having an issue exporting a PDF for a print job. I have different layers for the artwork, the guide and the notes. When i export the file it is just a flat PDF with a white background, as apposed to a PDF that opens with the layers. How do i export with the option to show hide layers in other software, or even with a blank background? At the moment the white artwork just gets flattened into a white background and i'm just exporting a blank image. Thanks.
 -
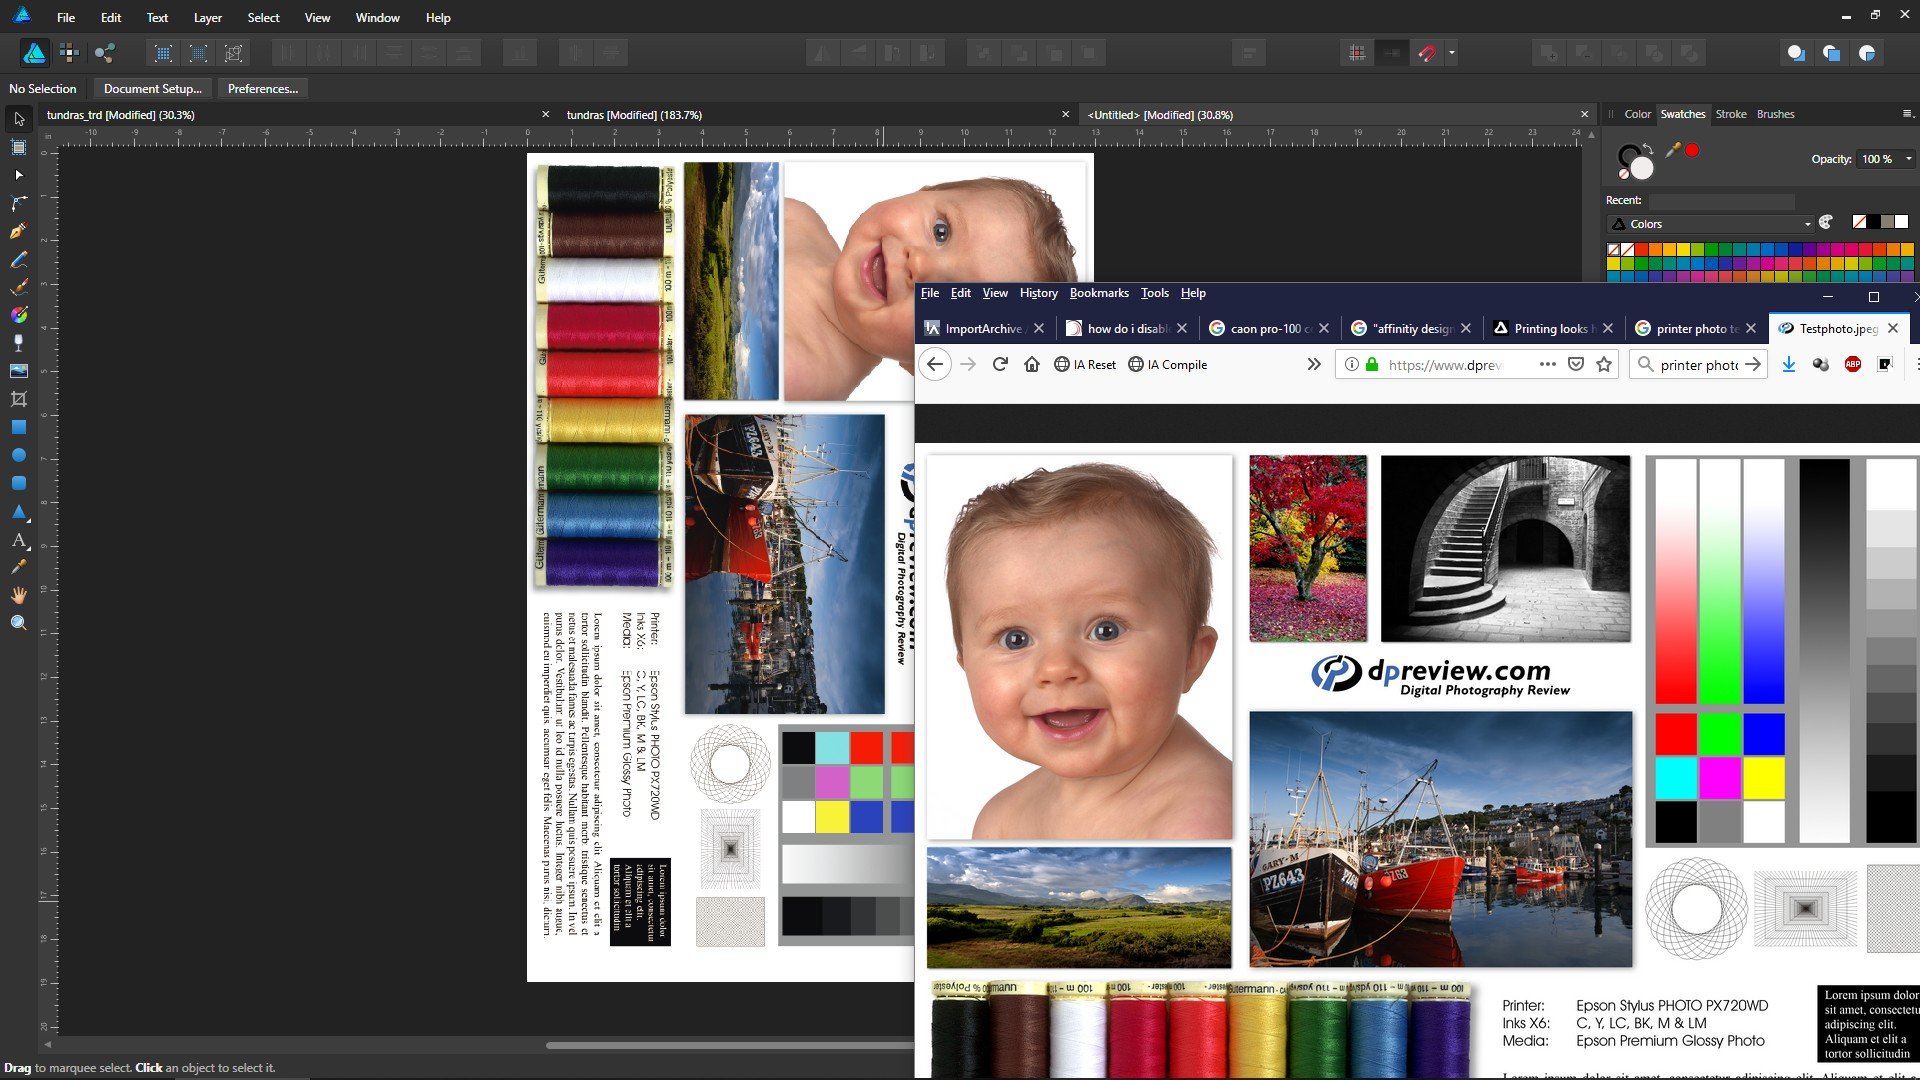
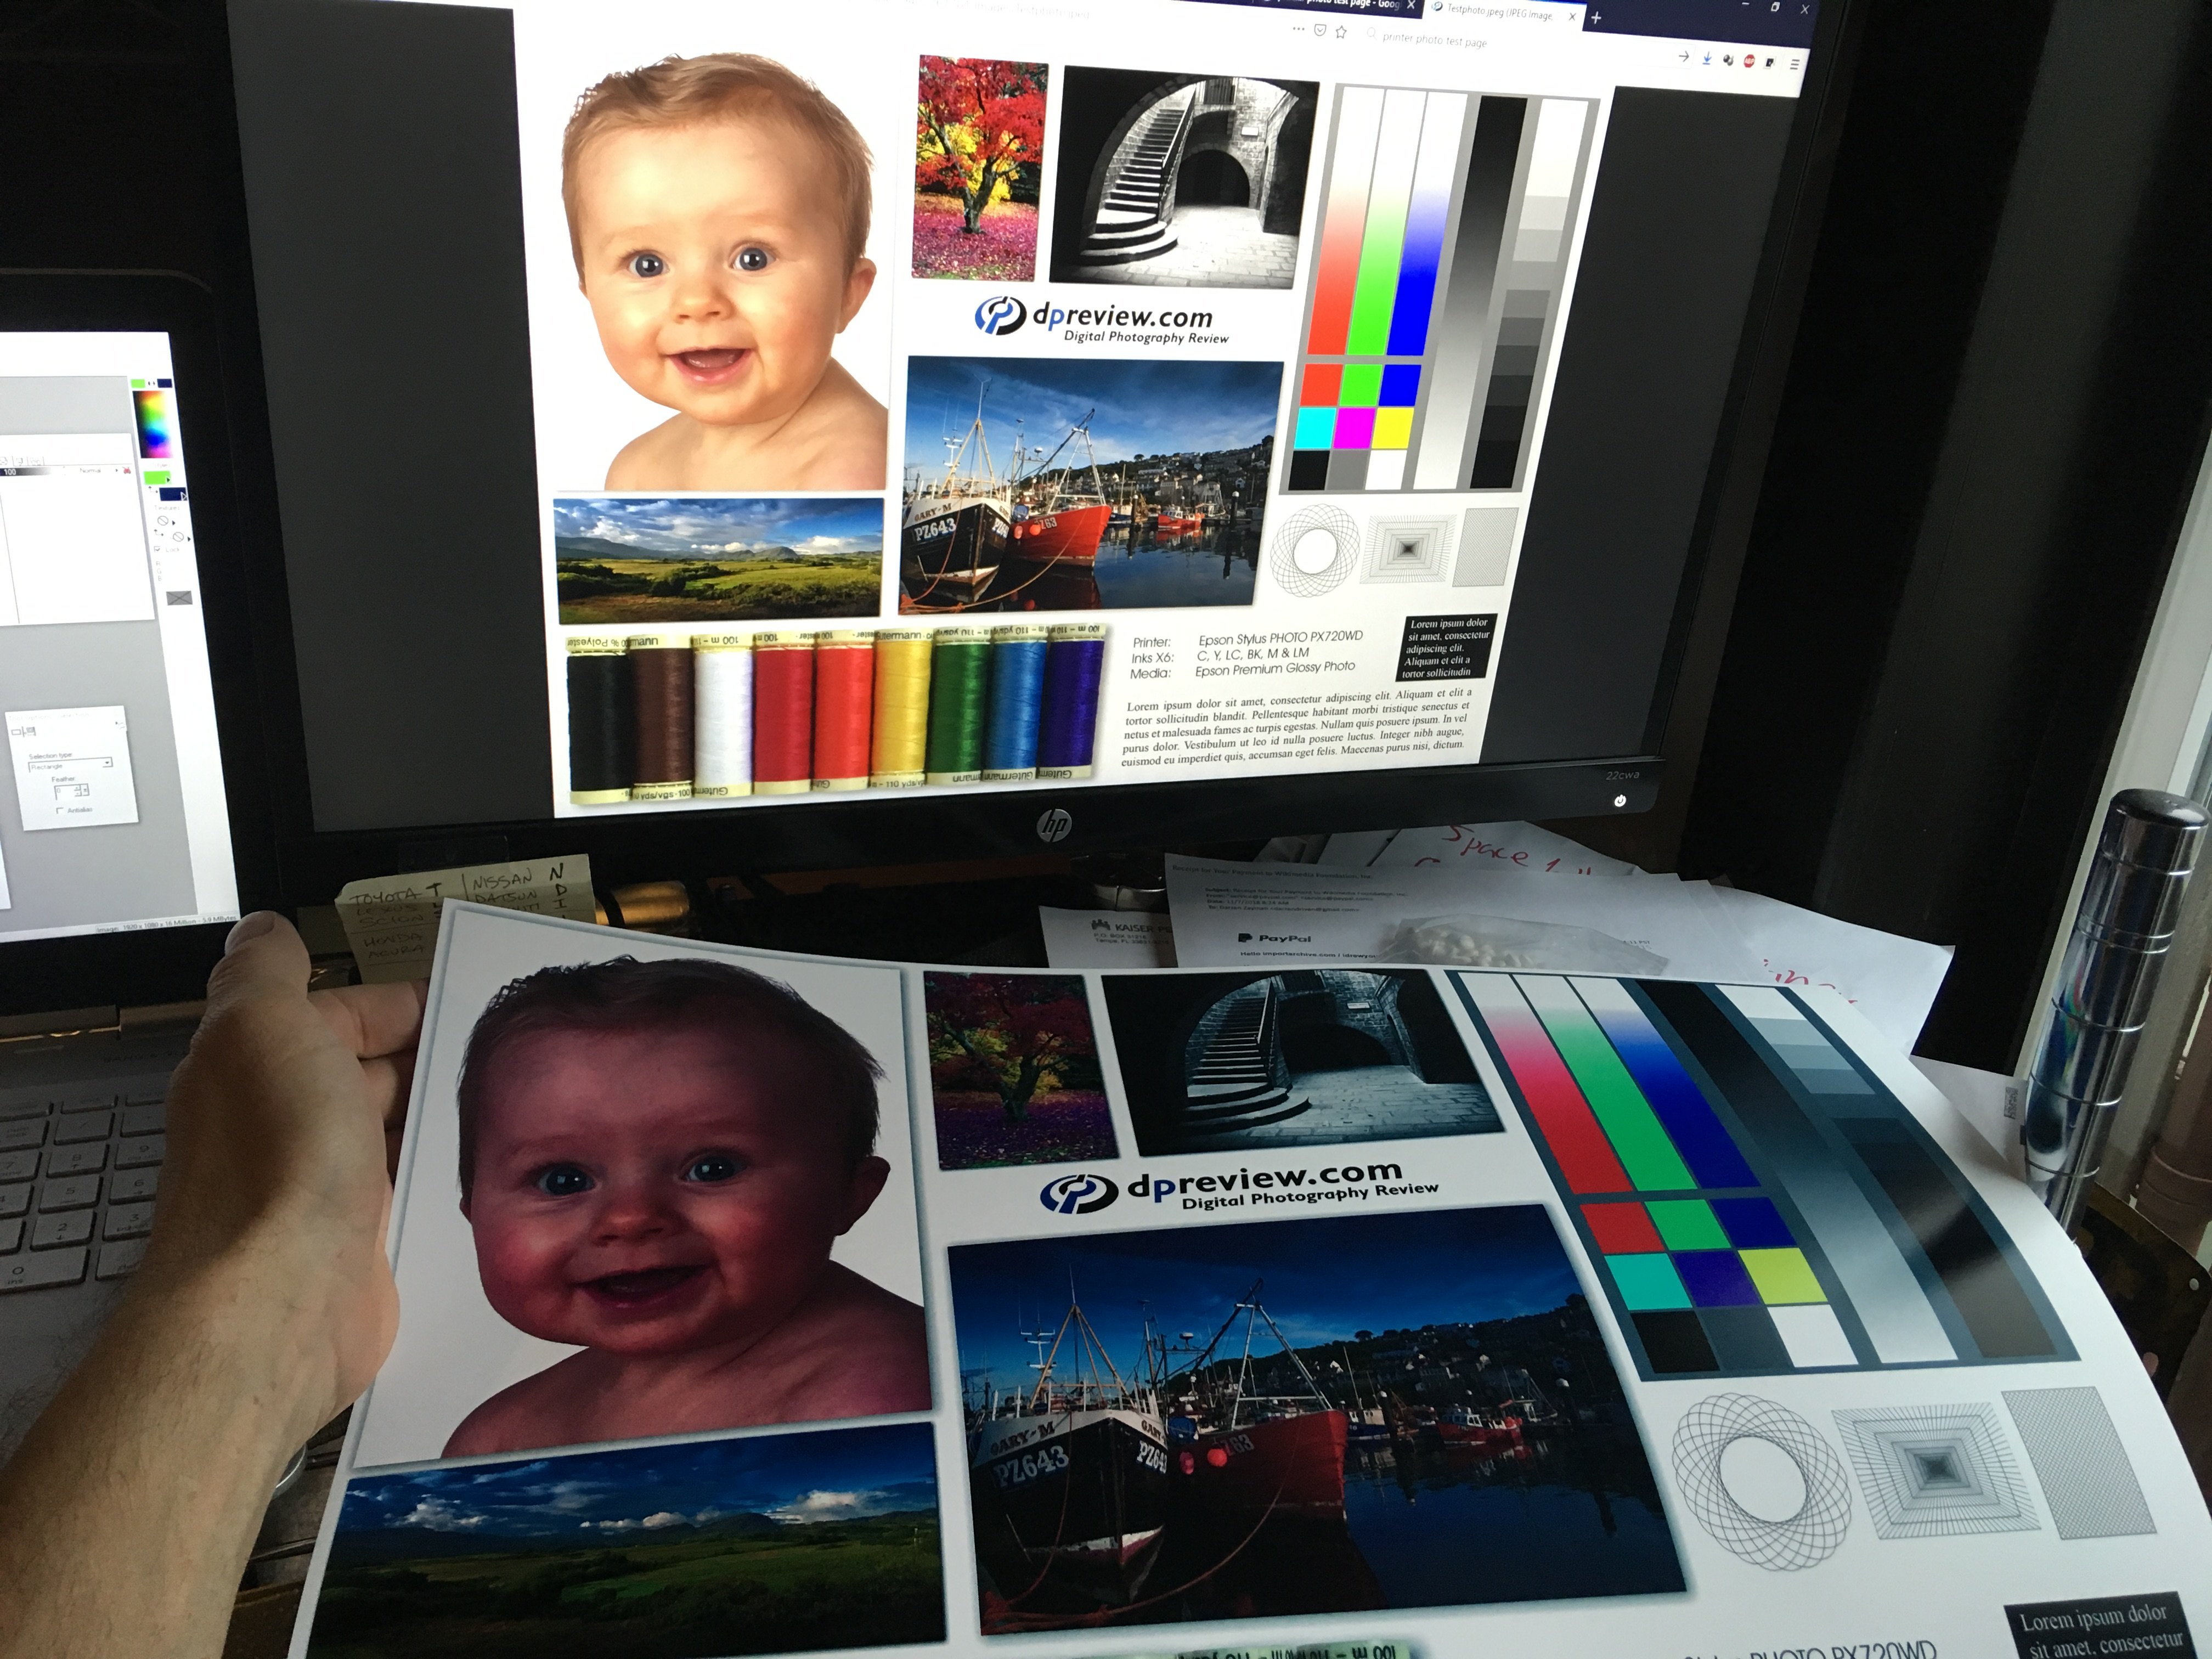
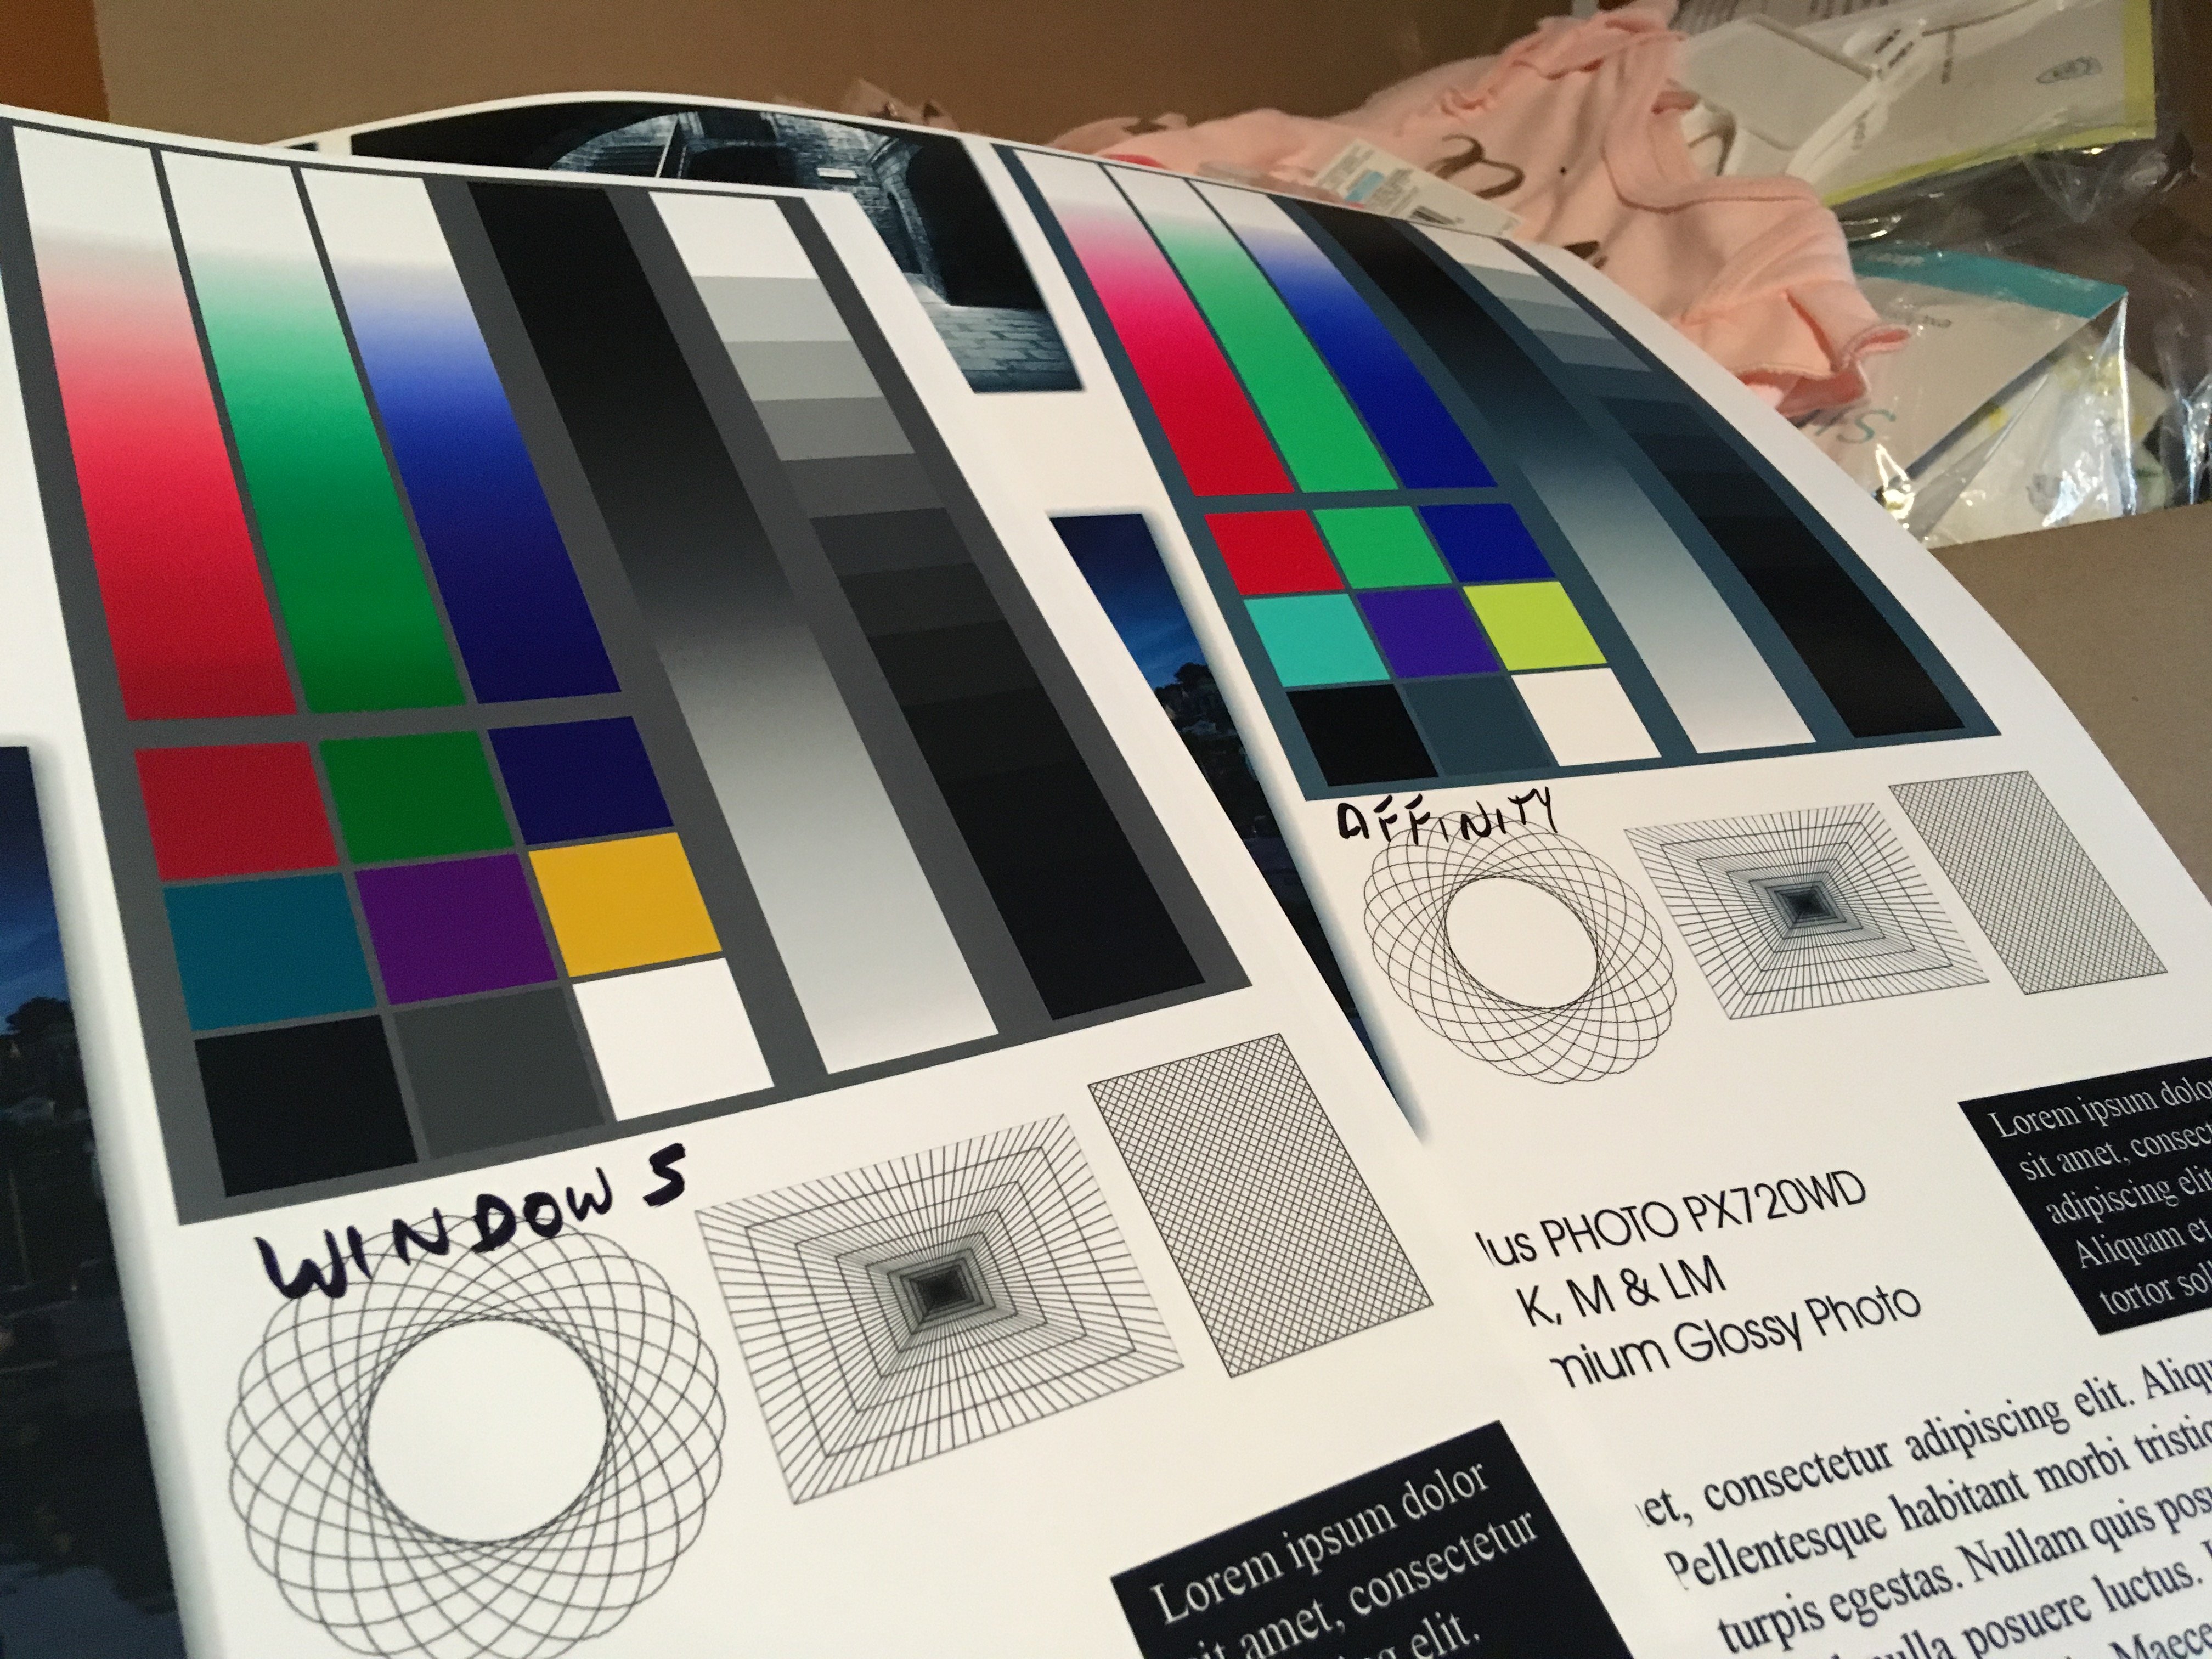
 Months ago I bought a Canon Pixma Pro-100 and started using Affinity Designer. My artwork came off the printer looking nearly identical to what I saw on the screen. I was very, very excited. Now I don't know what has happened, but everything that comes off the printer looks like crap. The colors are WAY off. Basics: - Affinity Designer on HP Envy x360 m6 laptop running Windows 10 Home (using laptop monitor and 2nd aux monitor) - Canon Pixma Pro-100 using Canon Semi-Gloss paper The default color profile that was being used was sRGB IEC1966-2.1. I don't know much about color profiles and that was the selection that showed up when I started digging. I have switched my document AND printer profiles to Canon PRO-100 <SG> 1/2 Photo Paper Plus Semi and Adobe RGB (1988) with zero changes in print output results. Everything I have read talks about calibrating monitors... I admit that I have not done this, however I am not printing photos but creating artwork in Adobe Animate using the standard color palette. I feel that no matter how my monitor calibration is set when I select red #FF0000 (255/0/0) that it should still print red, right? So here is the strangest part of this. I downloaded a test image to print. On my monitor the red looks red, green looks green, etc. When I imported the jpeg into Affinity Designer to print I immediately saw that the colors were different. The red appears more pale, the bright green looks like a pastel, etc. Here is a screen shot... pay special attention to the green in the 9-box just to the right of the ship photo. ...so I printed the sample graphic using Affinity Designer and the Canon Semi-Gloss color profile and ended up with this ugly POS: Granted, the light in my office isn't great, but the baby's face looks almost purple and not skin-tone like on the monitor. Hmmm.... WTF? Had a thought... hey, what if I print this using Windows instead of Affinity Designer? Right clicked the jpeg on my desktop and let Windows do it's thing and ended up with this... The color of the baby is VERY close to what I see on the monitor when I printed from Windows. The colors in the 9-box are DRASTICALLY different Windows vs Affinity Designer. So I thought that I could output my designs to a PNG and just let Windows print it... but I tried it with my own artwork and the results came out identical to every other attempt. (scratching head) Hoping someone can help. I'm overwhelmed by Google results on this topic.
-
 I have noticed a sizeable difference in color quality when printing the same photo using Affinity Photo vs. Photoshop, on the same printer, with the same settings. The colors I get from printing from Photoshop are truer to the original photos than the colors I get when printing from Affinity Photo. This is especially true of the blues. PS prints a wider range of blues than does AP. I recently printed a photo that had a lot of dark blue gray in it, and the print from AP was almost complete gray with little blue. Part of the issue seems to be there there are more color settings available in PS than in AP. In PS, you can indicate a rendering intent and check black point compensation. As far as I could tell, these settings were not available in AP. At the moment, I have both programs on my desktop computer but only AP on my laptop. At some point, I will no longer have PS available to me as it won't be compatible with further Mac OS upgrades. At that point, if I wanted to use PS for printing, I would have to purchase a subscription to PS which is something I don't want to do and the reason that I purchased AP. So, my questions are: 1. Does AP have any plans to improve its color management tool to get better color output? 2. Are there already color management tools in AP that allow for more fine tuning of color output, tools that I'm missing or unaware of? 3. Has anyone else noticed these differences and found a way to compensate for them, such as increasing the amount of blue in a photo with an HSL adjustment layer? This seems like a very hit or miss strategy, however. Thanks
- 14 replies
-
- 1
-

-
- printing
- affinity photo
- (and 1 more)
-
 Is anyone else experiencing printing errors with Affinity Photo and Mac Monterey? I am printing with a Canon Pixma Pro 1 on a Mac M1 Desktop with OS 12.01. For no reason that was apparent to me, I got this error "The media type and paper size are not set correctly." This occurred after printing 20 pages successfully, with no changes to the printer settings. Canon haven't yet provided an updated printer driver for Monterey but using the Big Sur driver was working perfectly well. I found the only way to clear this error was to quit and restart Affinity Photo which leads me to believe that the problem may be with the latest version. The problem is, the printer will only print one copy, so in order to continue I have to quit and restart Affinity Photo after each page. I am printing a 72 page photo book so you can understand my frustration. Any help or suggestions will be appreciated.
 -
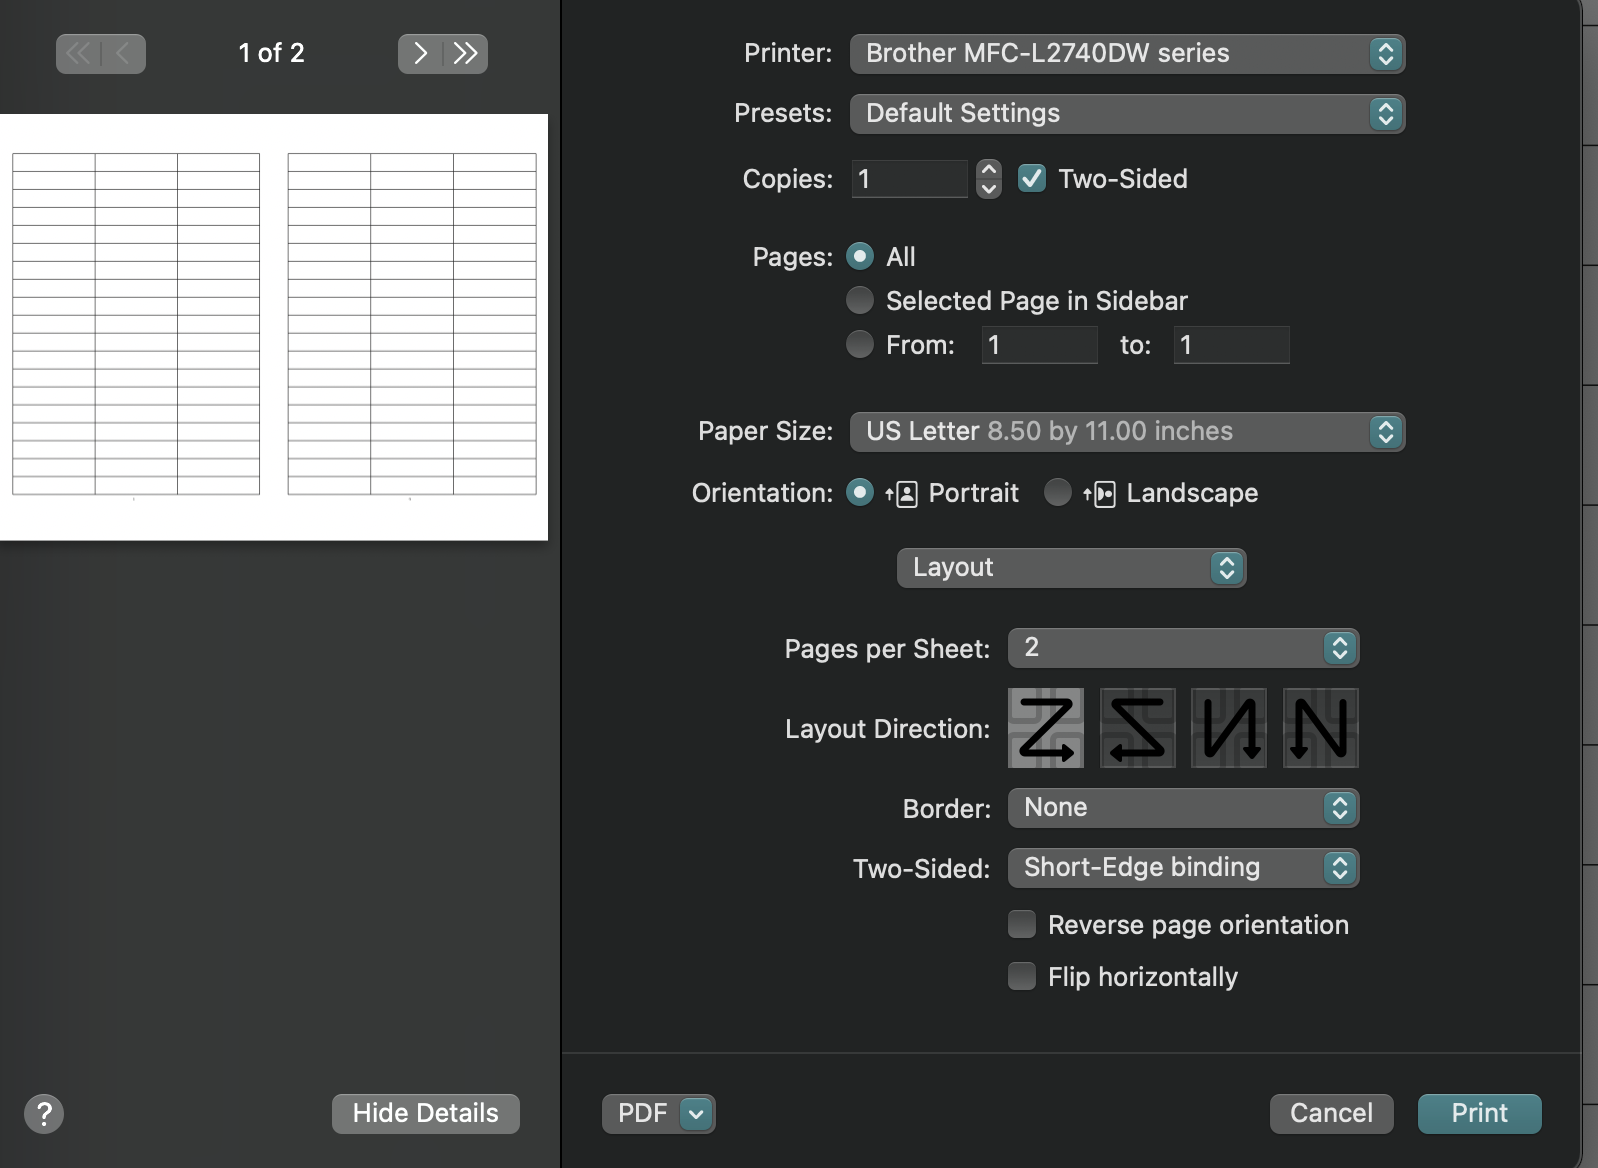
 Hi- I've searched and didn't find a question similar to this, I'm hoping someone can help I'm trying to format pages for a mini-binder (which is just an 8" x 11" cut in half) I need the printed pages to be: two pages on each 8" x 11" paper double-sided & printed without the standard size of page borders When I print from Affinity, or when exporting to a PDF- there is thankfully no issue printing single pages without a border- ...but once the dual-layout option is selected, suddenly large borders are included, and I haven't found a way of disabling them I'm attaching two images, the first is the regular-sized which works great; The second is the 2-page layout, where the pages shrink ( I've considered resizing the pages in affinity publisher, and rearranging/reformatting each pair - but realistically with 100+ pages, that would take a long time to do manually. I bought Affinity Publisher literally for this purpose, so I'm seriously hoping there's a solution, any help is appreciated! ) also: I love the ease of the typography window! The tables I'm working with have a lot of fractions - (the computer only recognizes the "regular" fractions, like 1/2, 3/4, etc. however; When I try to use the fractions checkbox on a two-digit denominator, it no longer recognizes it as a fraction (example being 1/16 won't turn into a fraction - the program also won't allow me to use superscript / subscript to create the fraction myself - really hoping this is possible with affinity since it's crucial to what I'll be publishing)
-
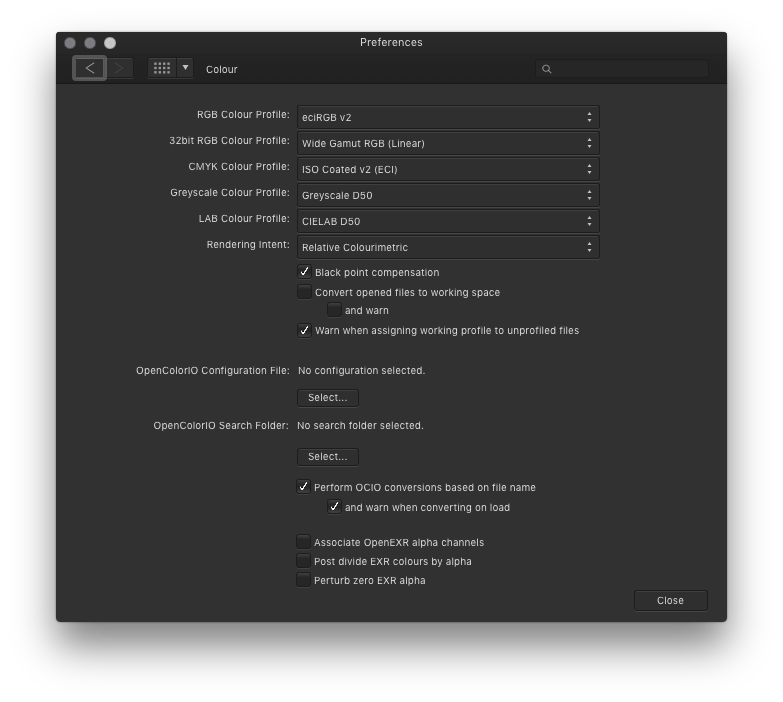
 I'm new to Affinity products and having a difficult time understanding how to assign a printer output profile within any of the Affinity apps. I want the Affinity app to perform the color conversion when printing, not the print driver. Coming from the world of Adobe, where this process is pretty straight forward, I cannot find a similar methodology in Designer, Publisher, or Photo. Can anyone please explain to me how to tell an Affinity app that I want it to handle the color conversion, and to assign an output profile for my printer and paper, rendering intents, etc.? Typically, I use AdobeRGB as my working space. I do not want to have to do a manual conversion (menu: Document/Convert Format / ICC Profile...) from the working space to the printer color space before printing. I want the print process to handle the conversion on the fly. I'm on v1.8.3 on all apps, MacOS v10.15.5 Thanks!
 -
 Affinity Designer Printing Bug After updating Affinity Designer from 1.9.1 yesterday to 1.9.2.1035 I noticed a major print scaling bug in the program. On print preview within Designer no red lines showed any overprinting errors. Long story short, items in Designer print out larger than set and thus get cropped out of print range on the right and lower edges. To be specific, I created a Letter document and populated it with an array of equally sized blocks for printing. Upon printing I noticed the right and bottom of the print were cutoff. After checking the document size settings, scaling, and any other print setting affecting items printing larger than specified, everything was at nominal values used in prior versions not suffering this bug. Workaround The workaround involved exporting the project as a PDF and print via Adobe Acrobat. Downgrading? I just tried to install the 1.9.1 version over the 1.9.2 and I get a "Setup failed" error. Is there any other way to downgrade other than uninstalling, reinstalling 1.9.1, and re-entering the registration keys? Is this bug known and being fixed? I couldn't find a similar bug for 1.9.2 on the forums so my guess is it's not been spotted yet. If the Affinity team is onto fixing this in the next day, then I may wait for the update while hobbling along on PDF exports for printing. Notes I've posted this on the 1.9.2 release thread (duplicate), but had second thoughts on the critical importance of this bug being overlooked there, so I created this topic in hopes to avoid this being overlooked.
 -
 I don't know if it's a question or feedback. For the past 5+ hours I've been trying to make sense of how to check how my work will look like when printed, and here's what I found. What I need I need a quick way to check whether my colors are within the printable gamut range and also to see the out-of-gamut colors. They keyword here is quick. What I get The Soft Proof layer works not like that. Suppose I am in the sRGB color space. It seems like it takes the RGB coordinates of current image of the sRGB space and simply applies them to the Proof Profile that I select (without conversion). But that's not what I want, this naturally gives the wrong results. What happens is that once I apply soft proof with the "U.S. Web Coated (SWOP) v2" profile I suddenly get a brighter image, as if it tells me that this is how it will be printed. And if I click the "Gamut Check" button most of image becomes grey. But it's not the case, it's not how it will be printed. In fact, all the original colors will be printed (in my particular case). The step that this Soft Proof feature misses is the conversion of Color Spaces for this "check". If instead of applying the Soft Proof layer I convert the color space (Document > Convert ICC Profile...) and select CMYK/8 + "U.S. Web Coated (SWOP) v2" then the image will remain exactly as is, it will not become brighter. Furthermore, if I now apply the Soft Proof layer and select "U.S. Web Coated (SWOP) v2" then the image will stay exactly the same, and if I click "Check Gamut" then no area will be grey. Because all colors are within the color space range. Bottom line It's very misleading what the Soft Proof shows if you don't convert your profile first. But if you have to convert your image profile to check the gamut then it makes the "Soft Proof" feature not helpful. I am attaching an image, just for reference, which I used to play around with this. Can you please help sort this out, why does it work like that and has that been done intentionally.
- 18 replies
-
- 1
-

-
- affinity photo
- soft proof
- (and 4 more)
-
 Greyscale become multicoloured when printing from Affinity Designer. Obviously a conversion to/from color profiles happens inside Designer. How can I prevent this from happening? (This happens to all colours. It is just shown best with greyscale.) My printer expects data in the same colour profile as my AD files working profile. (ISO coated v2 (eci)) When exporting a PDF/X1a and printing with Adobe Acrobat everything is OK.
-
The attached document prints kind of borders on a few of the vector based elements (not all of them and even not all of the same paw pattern) if you do not flatten the image before printing. The attached photo shows a flattened print (left) and a buggy one (right). There are no artifacts visible on screen at any zoom level. System: Win10 Pro 21H1, Ryzen 5 1600X, 24Gb, GTX1050Ti, HP Deskjet 5520, Affinity Photo 1.10.1.1142 szepes_plakat.afphoto
-
 Hello, New user here to Affinity Photo. I opened and edited 10 jpegs and want to send them to a new folder with the edits I made. I don't see a way to export more than one photo at a time. Am Im missing something? Thanks, Stan.
 -
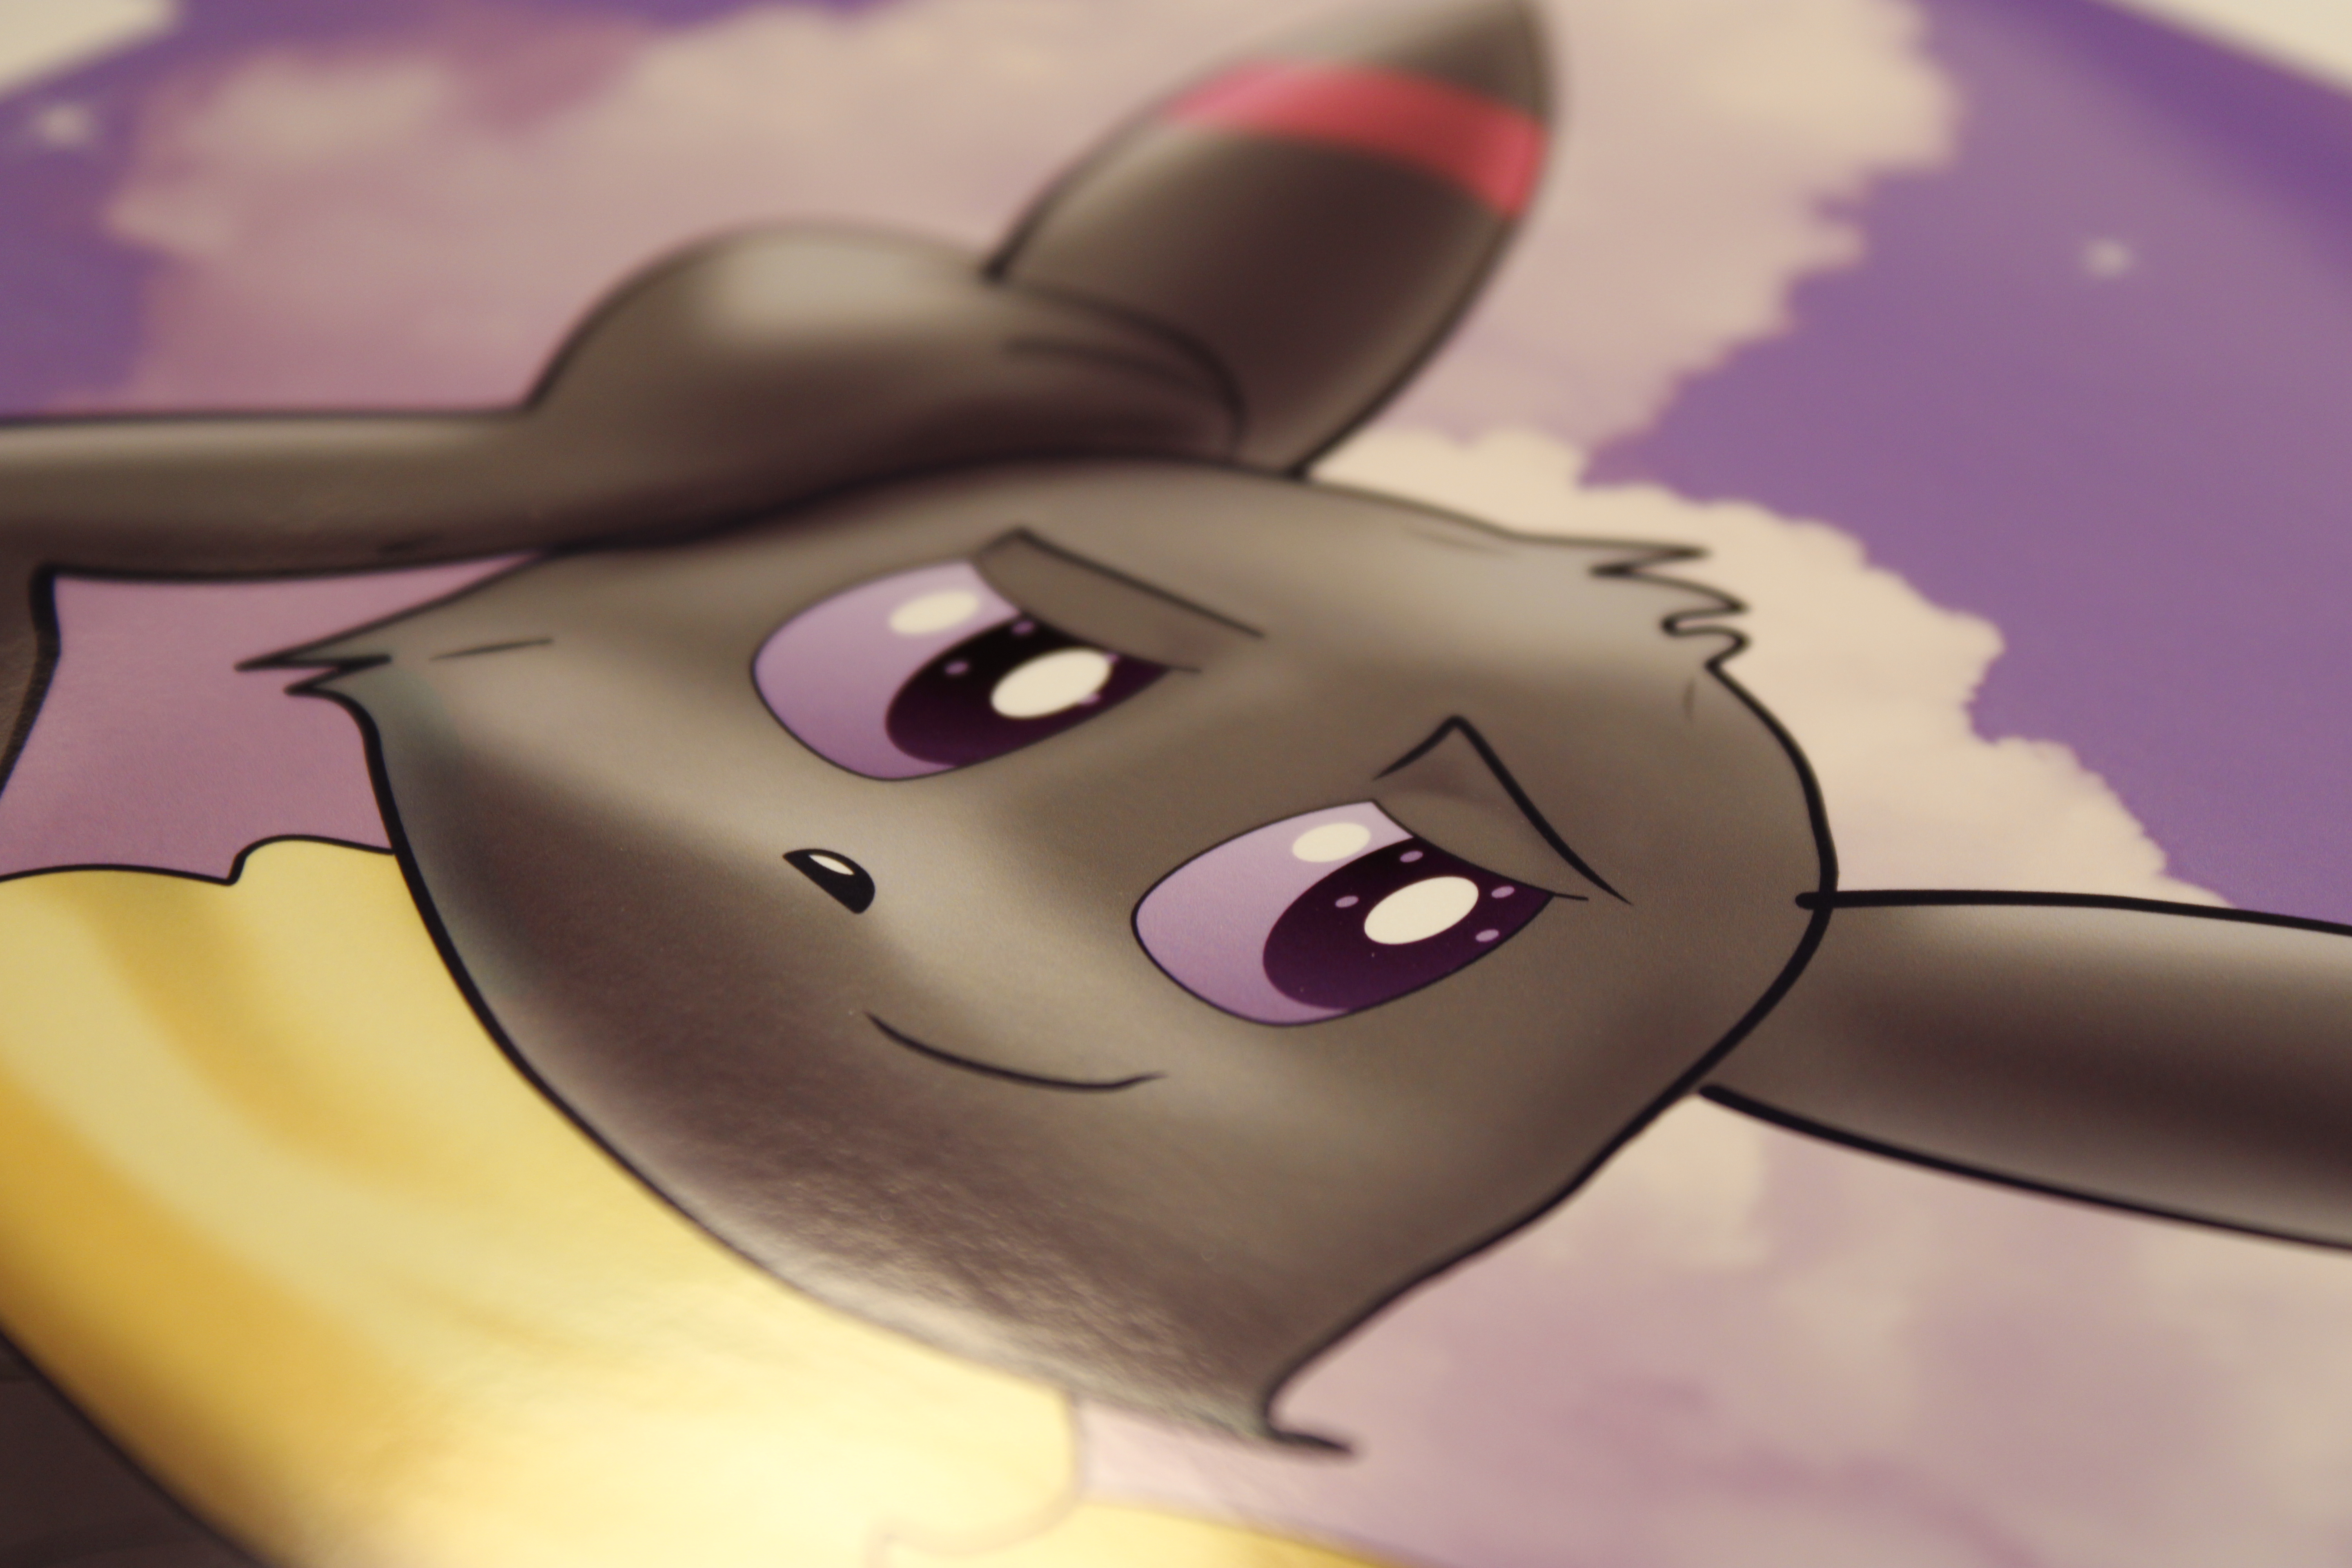
I made a commission for someone and it looked fine on multiple monitors. But going to print, the colors changed a lot. The eyes suddenly became purple. I narrowed this particular issue down to the way color overlays are handled. I feel rasterizing the document will fix this, but this is a serious problem. I disabled color management in printer and chose software handling, with the color profile loaded from the manufacturer. Relative colometric. The deep purple was made a lot lighter, but then the totally colorless gray eyes were turned purple. I also had issues making prints on other printers. Can anyone tell me what's going on? EDIT - This is happening in Designer, not Publisher. Can this be moved?
-
 I have both Affinity Photo and Affinity Publisher. The printing I do will go either on a mug, t-shirt, or harder substrate all of which will be printed with sublimation. Affinity Photo, it was suggested is a very fine software offering quality prints, thus my reasoning for having it. I also print on an Epson WF7720 Printer. My question is using Affinity Photo, what are the procedures/steps for printing no border of any kind when printing the picture etc.❓ I am only interested in seeing the finished picture with subject, background, and or text no frame. Is this possible to do this, and if so please how is it done❓ Thank You, Dick
 -
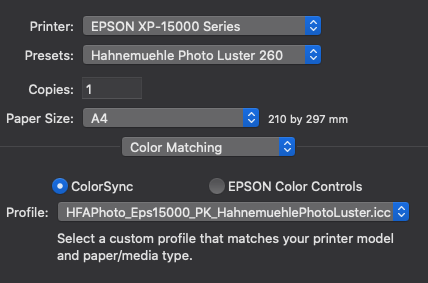
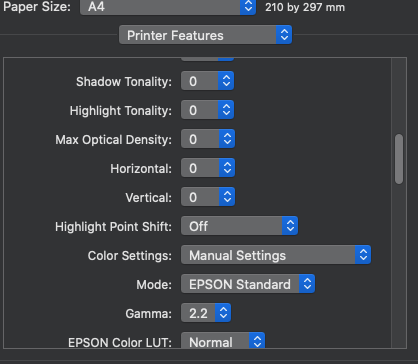
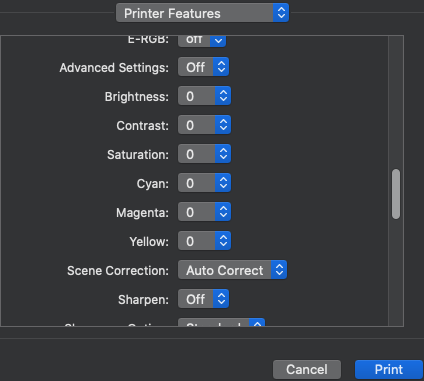
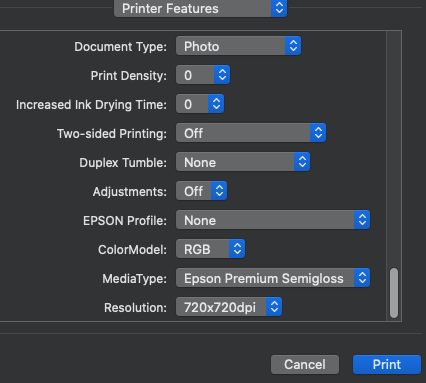
 Hello everyone, I bought an Epson XP-15000 and I'm trying to print from affinity photo on MacOs. I've done the soft proof correctly and now I'm in Print menu but I have some doubt. About color matching I set up this: But here in printer features there are a large number of parameters. How can I set them, please?
-
 Hi. I bought Affinity Photo to make CMYK book covers for printing presses. They need me to provide a PDF complete with crop marks (and spine marks). They need these crop marks to reach the edge of the document like this: But when I export my file (whether I choose to "include bleed" or not) It always inserts extra whitespace between the image and the crop marks like this (where the yellow is the book cover's color): But I know that it's possible to get the lines flush with the image because I saw a video where a guy does it like this: So what am I doing wrong? I'm not using margins at all (and when I do it doesn't change anything). The bleed and trim are all incorporated within the document. I just want to export a PDF with crop marks touching the very edge! Please help! And thanks for reading. EDIT: Also, if anybody knows how to include "Spine Marks" then that would be great too!
-
 When you are printing an image of say 8x10 to a smaller format, say 7 1/2 x 9 1/2, do you desaturate the original image? And, if so, by how much? I am printing on a Canon Pro 300 and find that reducing the size of the image tends to oversaturate the colours. There must be some kind of formula for this.
 -
 Hi Guys, Im currently working on a name badges template for a company. The size in Affinity designer is 74mm x 24mm When I export to pdf and print it they are 70mm x 23. This is also when "fit" is turned off. Is there anything I need to change when exporting to pdf? could DPI have anything to do with it? srry Im a web guy and not a print guy :P Hope you can help.
 -
 I have replaced my monitor and calibrated it. The Epson SC P600 printer drivers are good enough for most prints direct from the computer and if not Adobe RGB from Photoshop CS5 is also very accurate. I have noticed a darker green when printing from Affinity Photo, presumably because it does not convert from sRGB to Adobe RGB as does my CS5. Any ideas please for the best way to print to Epson Premium Glossy using Affinity Photo?
 -
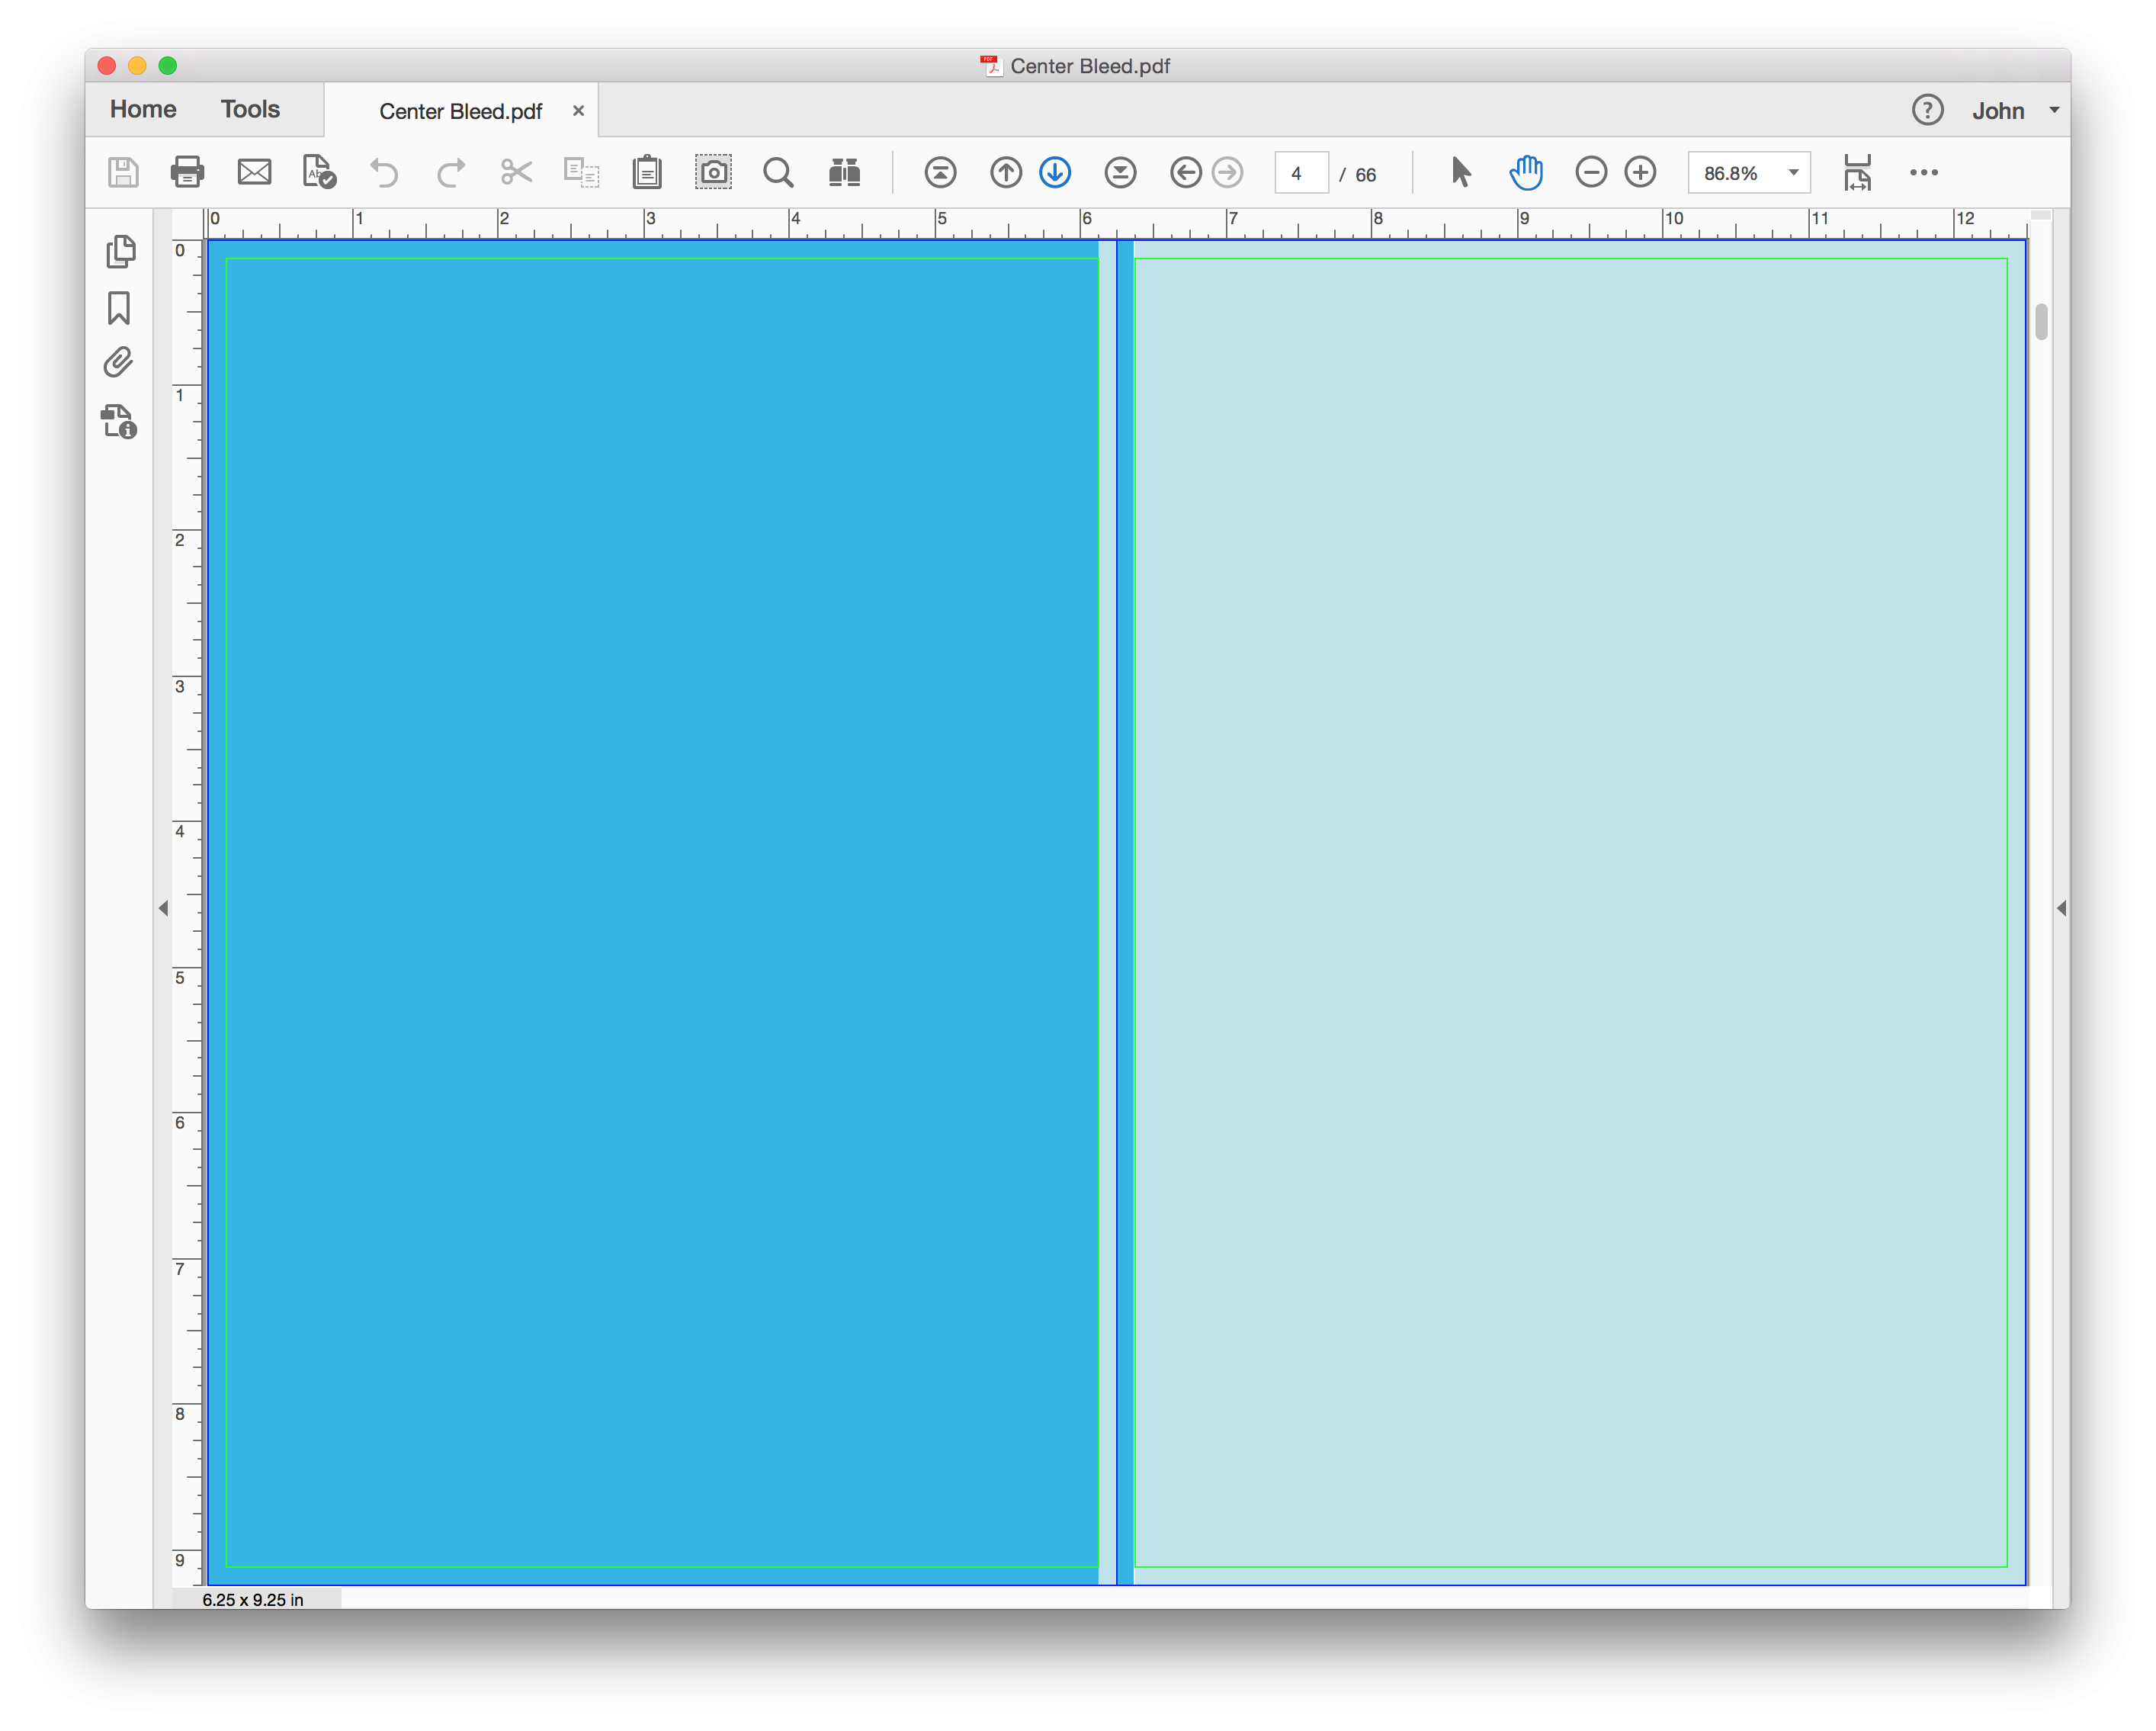
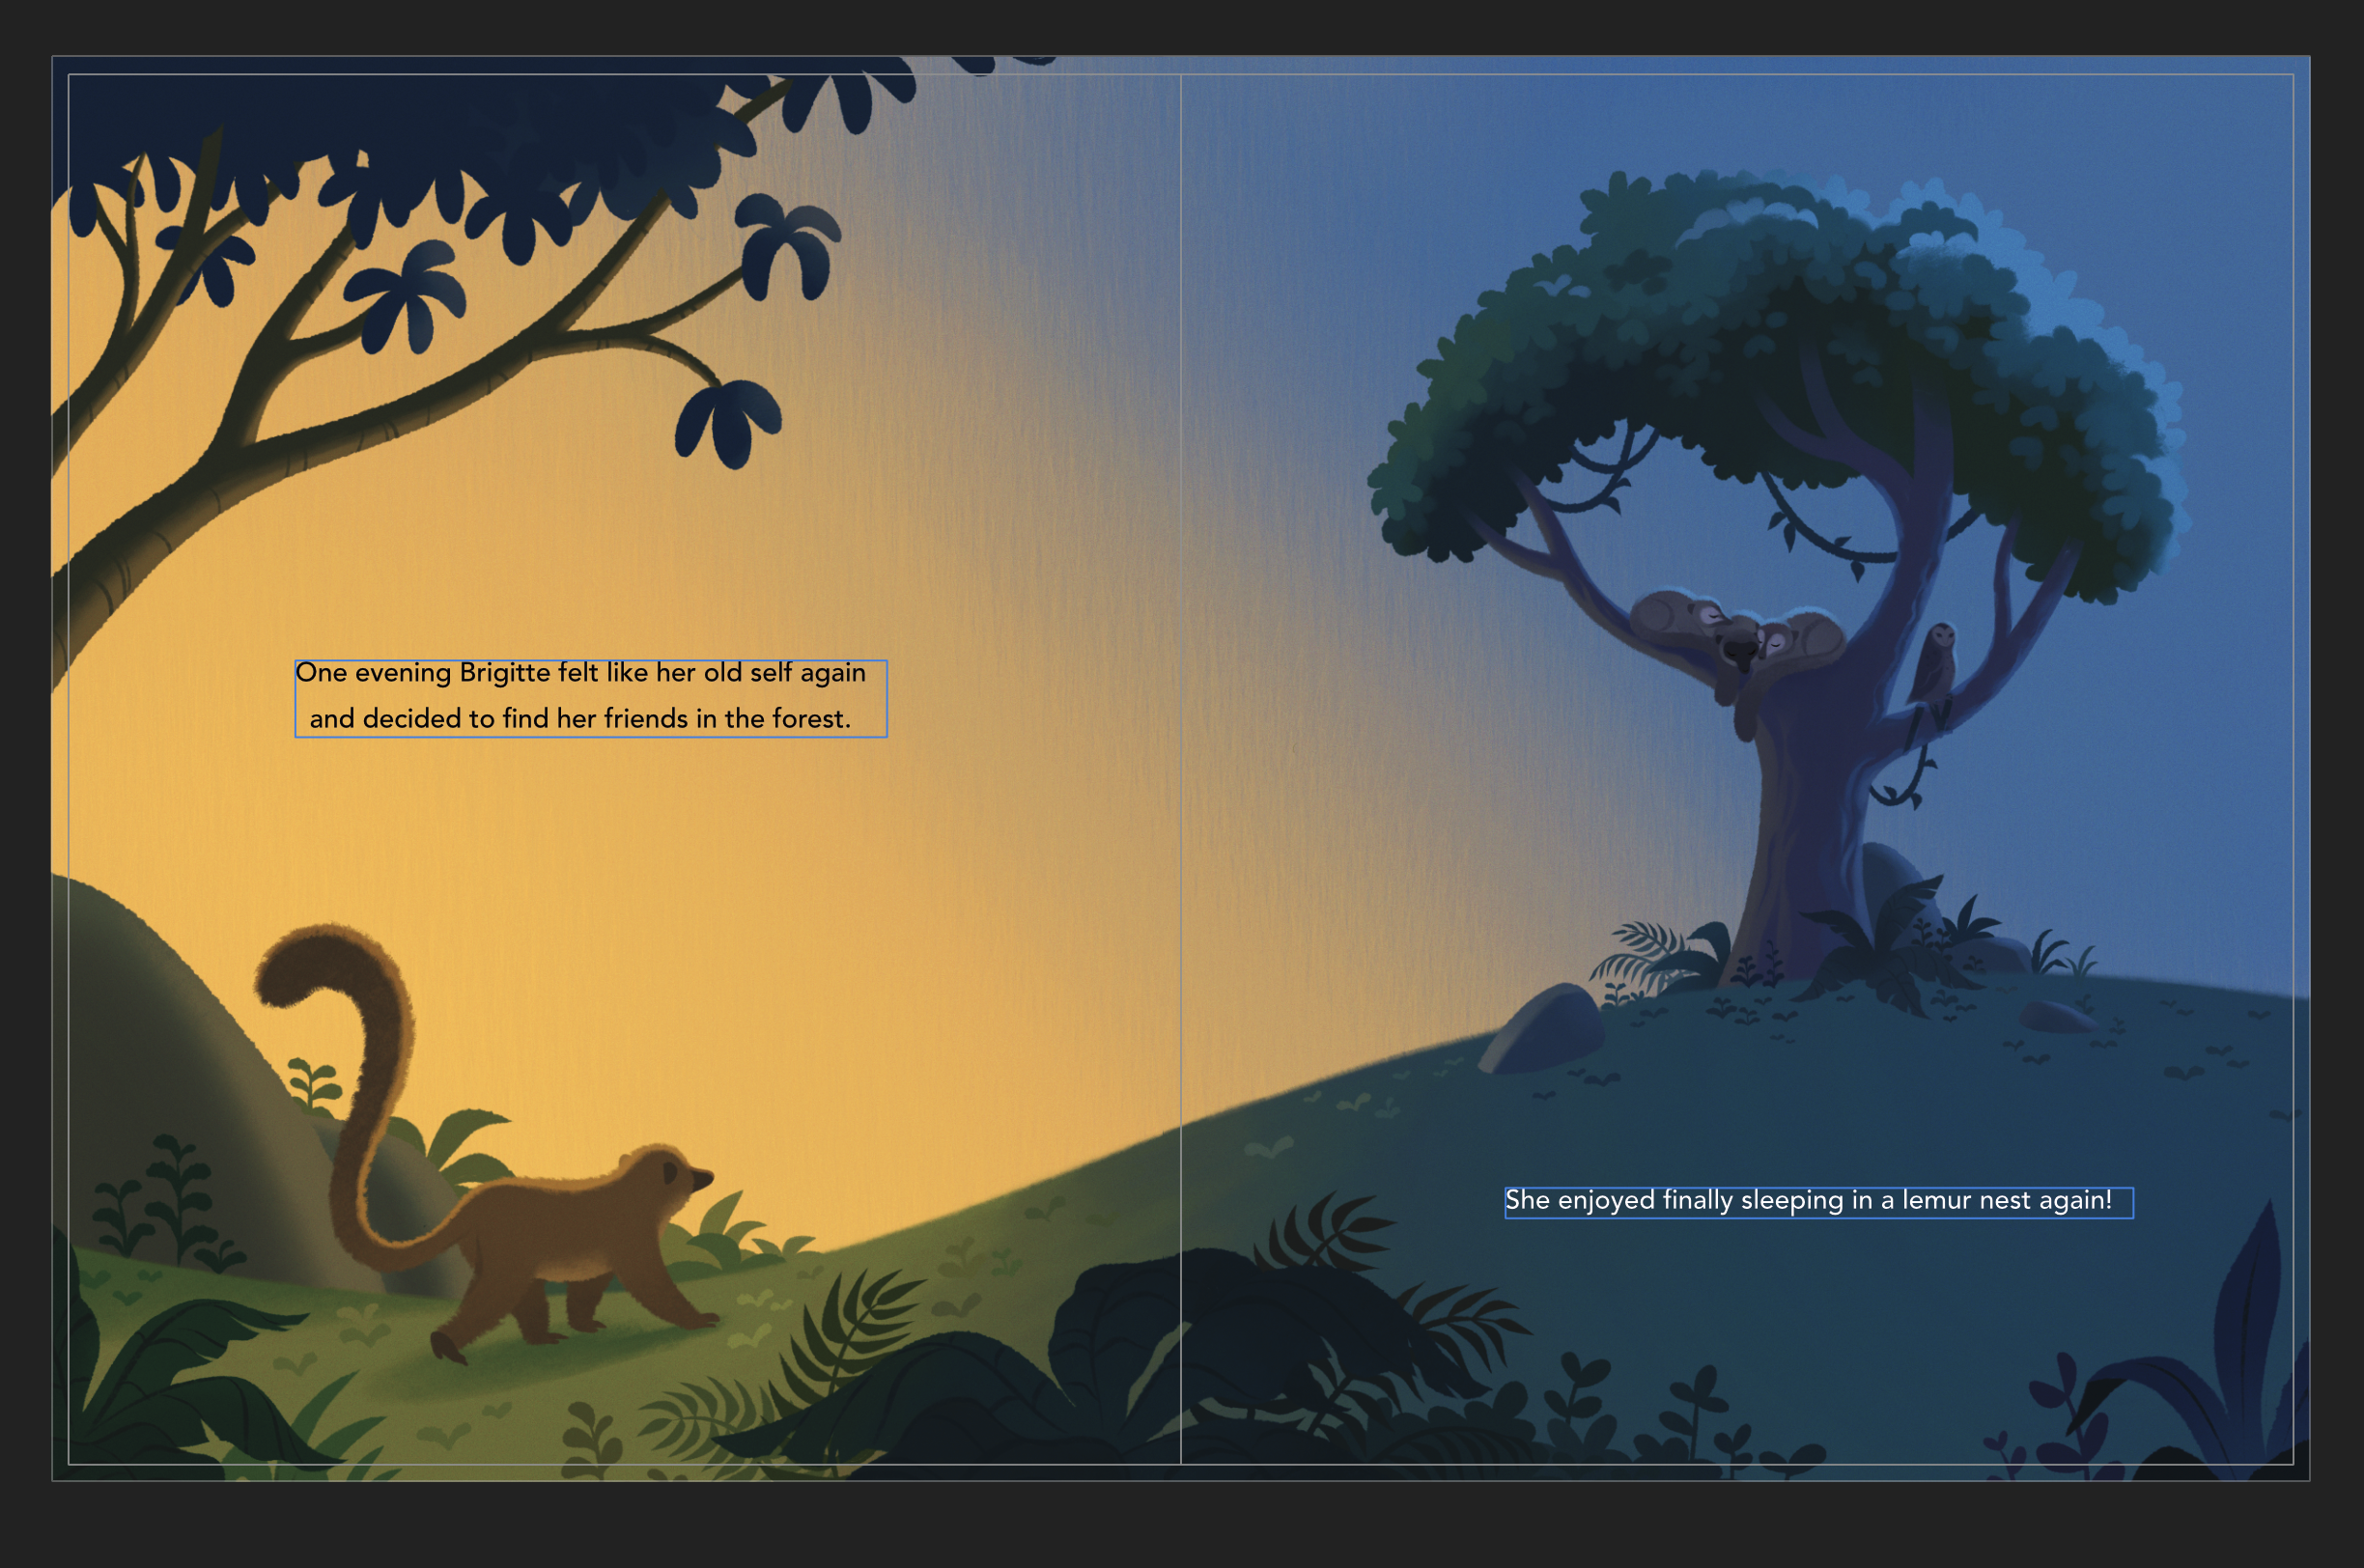
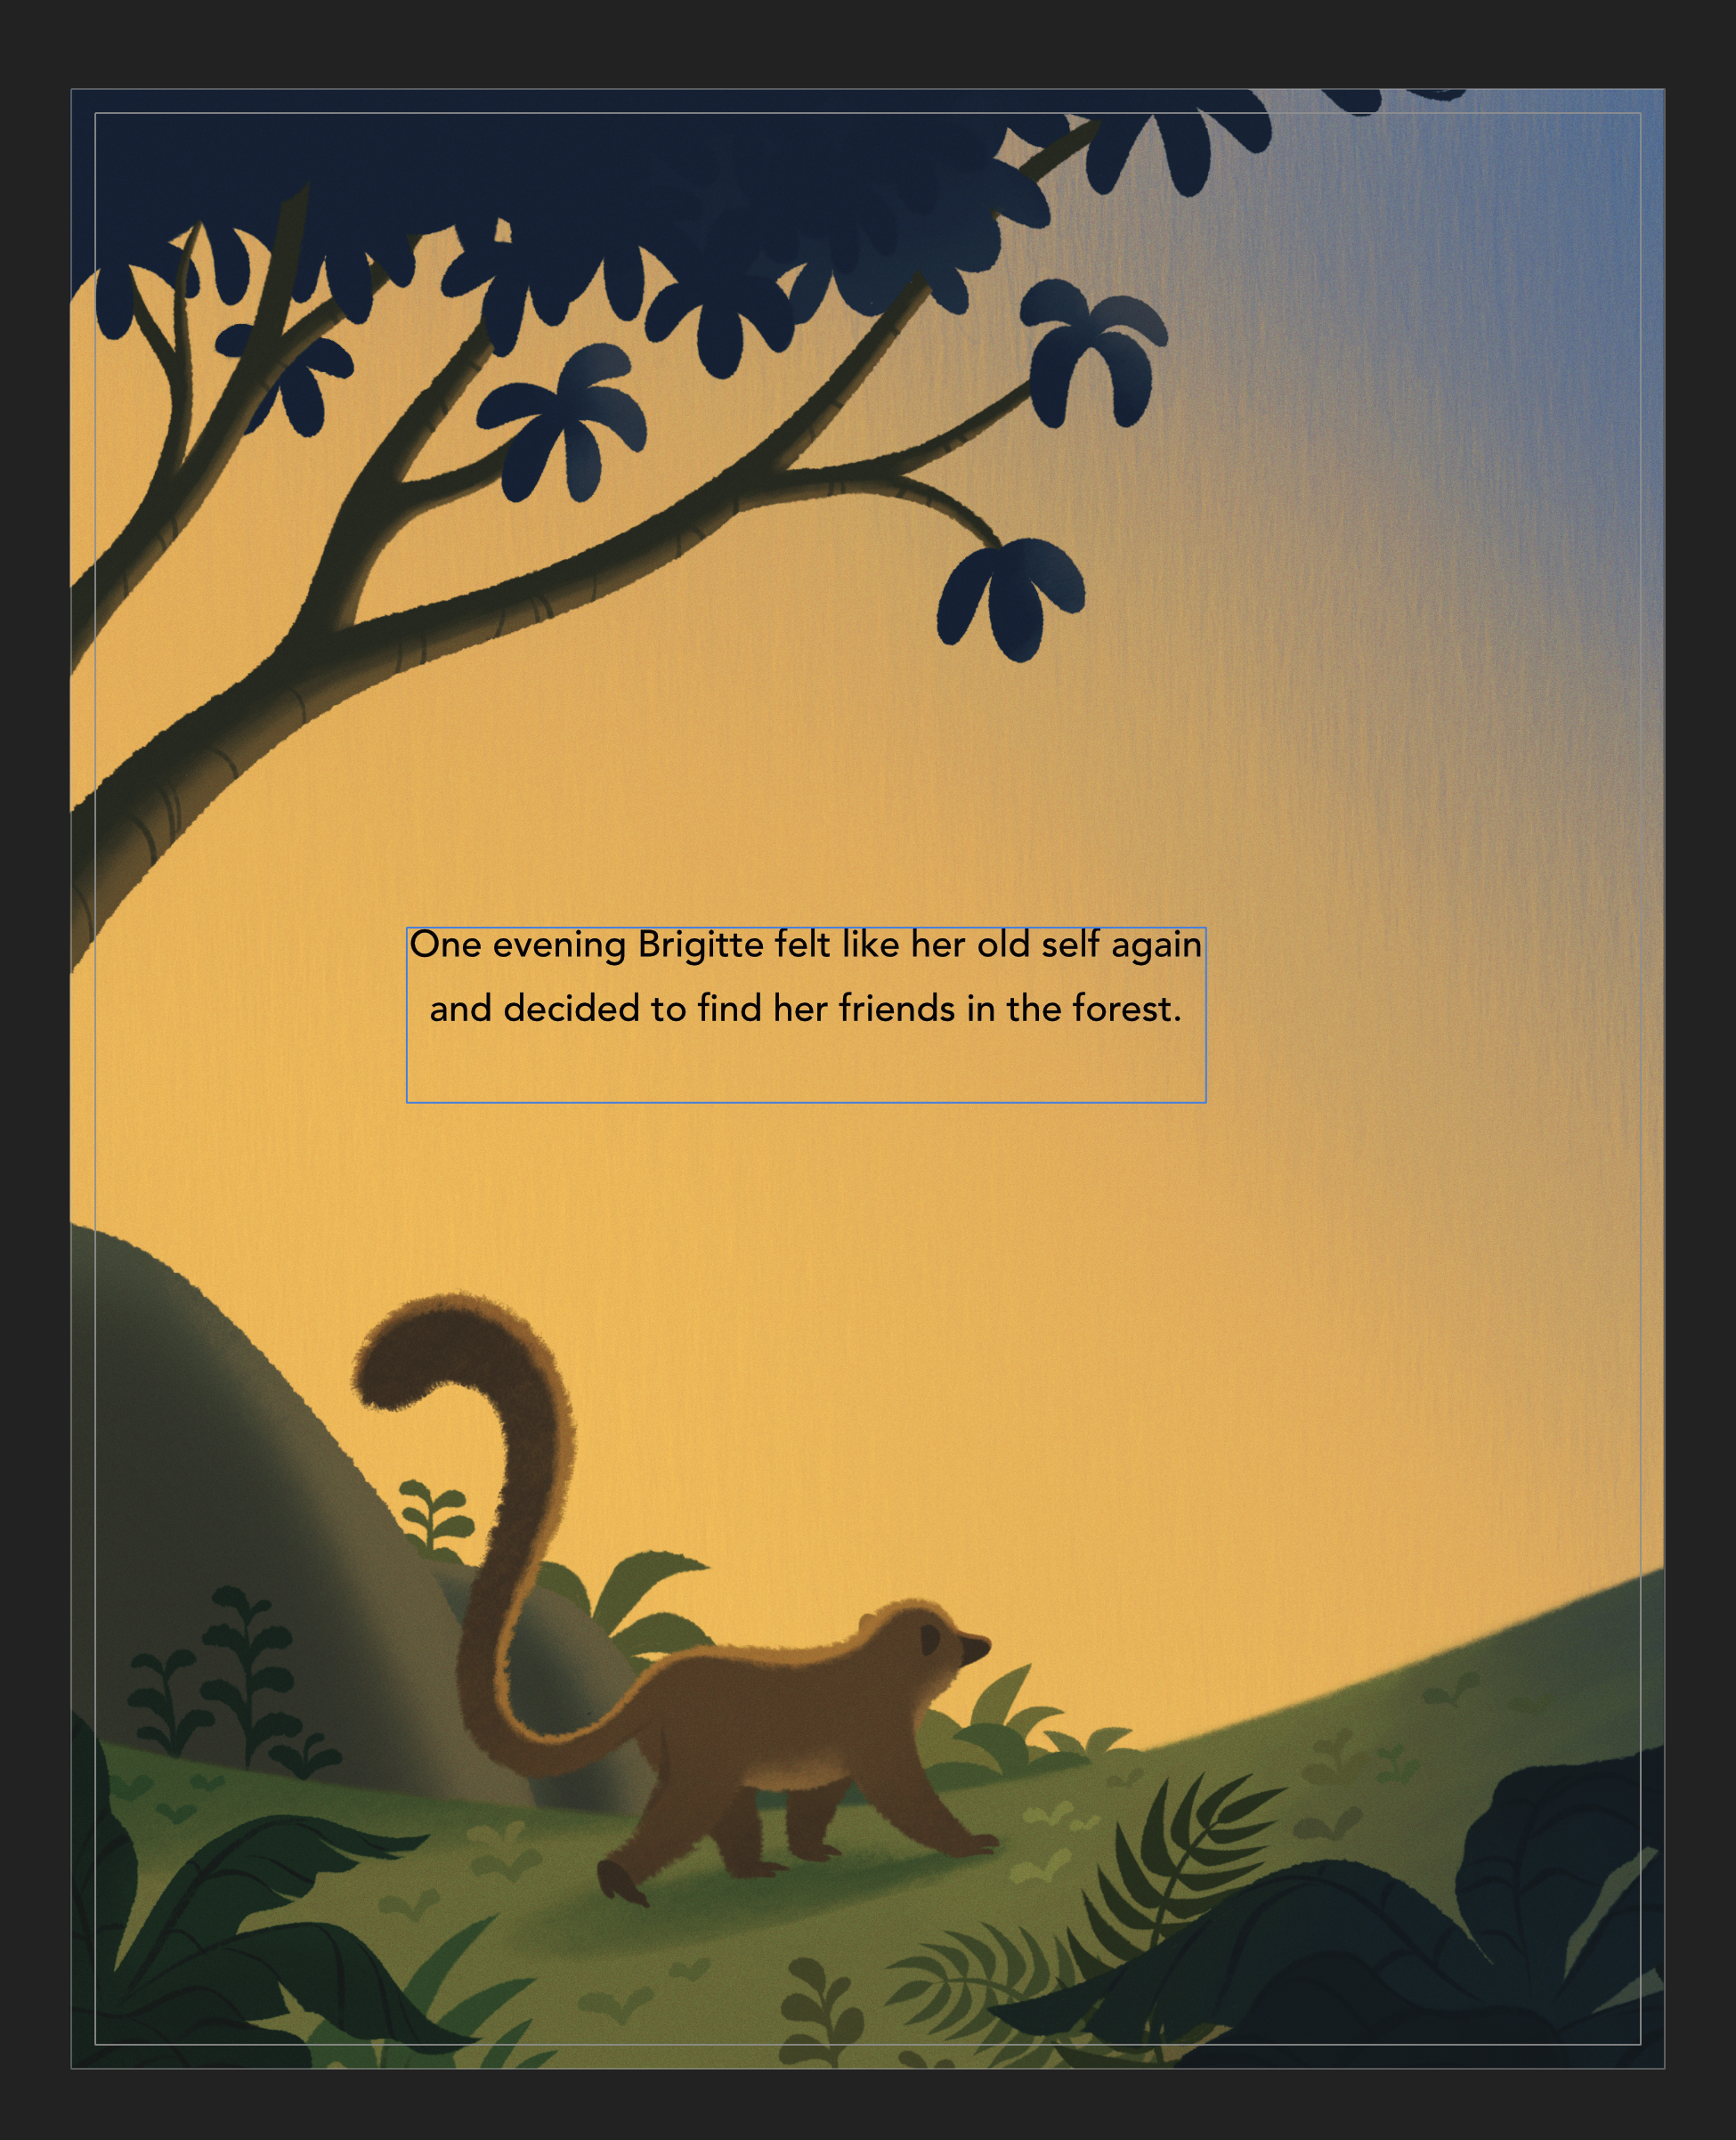
 I'm designing a children's book for a client and have run into a problem with our printing company. The first physical copy of the book we ordered had full page spreads that were not lined up properly in the center. I contacted them about this issue and they said it was due to the bleeds being incorrectly set up. I put the book together as spreads, and then un-checked "facing pages" so I can manually adjust the inner bleed for my full-page spreads on each individual page. When I put facing pages back on to see how it looks, the spread illustration flows across the page just fine. However, my printer wants to see the inner bleed for the corresponding pages to "cross over" so the bleeds appear on the opposite inner edge of the page. I've seen other posts on this forum where people have seen the inner bleed "crossover" as a problem, but my file doesn't do this. How can I set this up in Affinity Publisher? I've attached an example of what they want me to do from their site as well as screenshots of what my spread currently looks like (as facing pages and as individual pages).
-
When I try to use the print function from menu or from shortcut cmd+p, I first noticed this when, I open a pdf file, and then try to print it, publisher 1.8.3 crashes. Even after saving as a publisher type file *.afpub, crashes after the file is saved as publisher type. I have noticed this is now happening with all documents, even those created in publisher. The work around, I have been using is to export as a pdf, and then open in another PDF reader like Preview or Acrobat, from which I can print. I'd be happy to test any patches or fixes. d System iMac13,1 i7, 3.09 16 GB 500GB Samsung MacOS 10.13.6 (17G4015) Publisher 1.8.3
-
 I am fairly regularly seeing a problem with printing from Affinity Publisher on my Canon printer. The document mostly prints OK but certain images - possibly rotated ones, overlapping ones and/or transparent-backgrounded ones - have strange omitted portions on the resultant print. It's definitely a Publisher issue, because when I export to PDF and print exactly the same document from Acrobat, the issues are not present. I have known this to happen across several versions of Publisher over a fairly long period (possibly as long as Publisher has been around) but not got around to logging it as a bug until now (sorry!). I've attached some images of it happening on a recent print-out. All three of the rectangular images (which are non-transparent PNG files placed into the document and then rotated to various angles into a sort of collage of overlapping images) should be whole rectangles but two have corners cut off and one has a very weird triangular omission which I've not seen before. Is there anything further I can share by way of assisting with investigating and resolving this bug? Thanks!
-
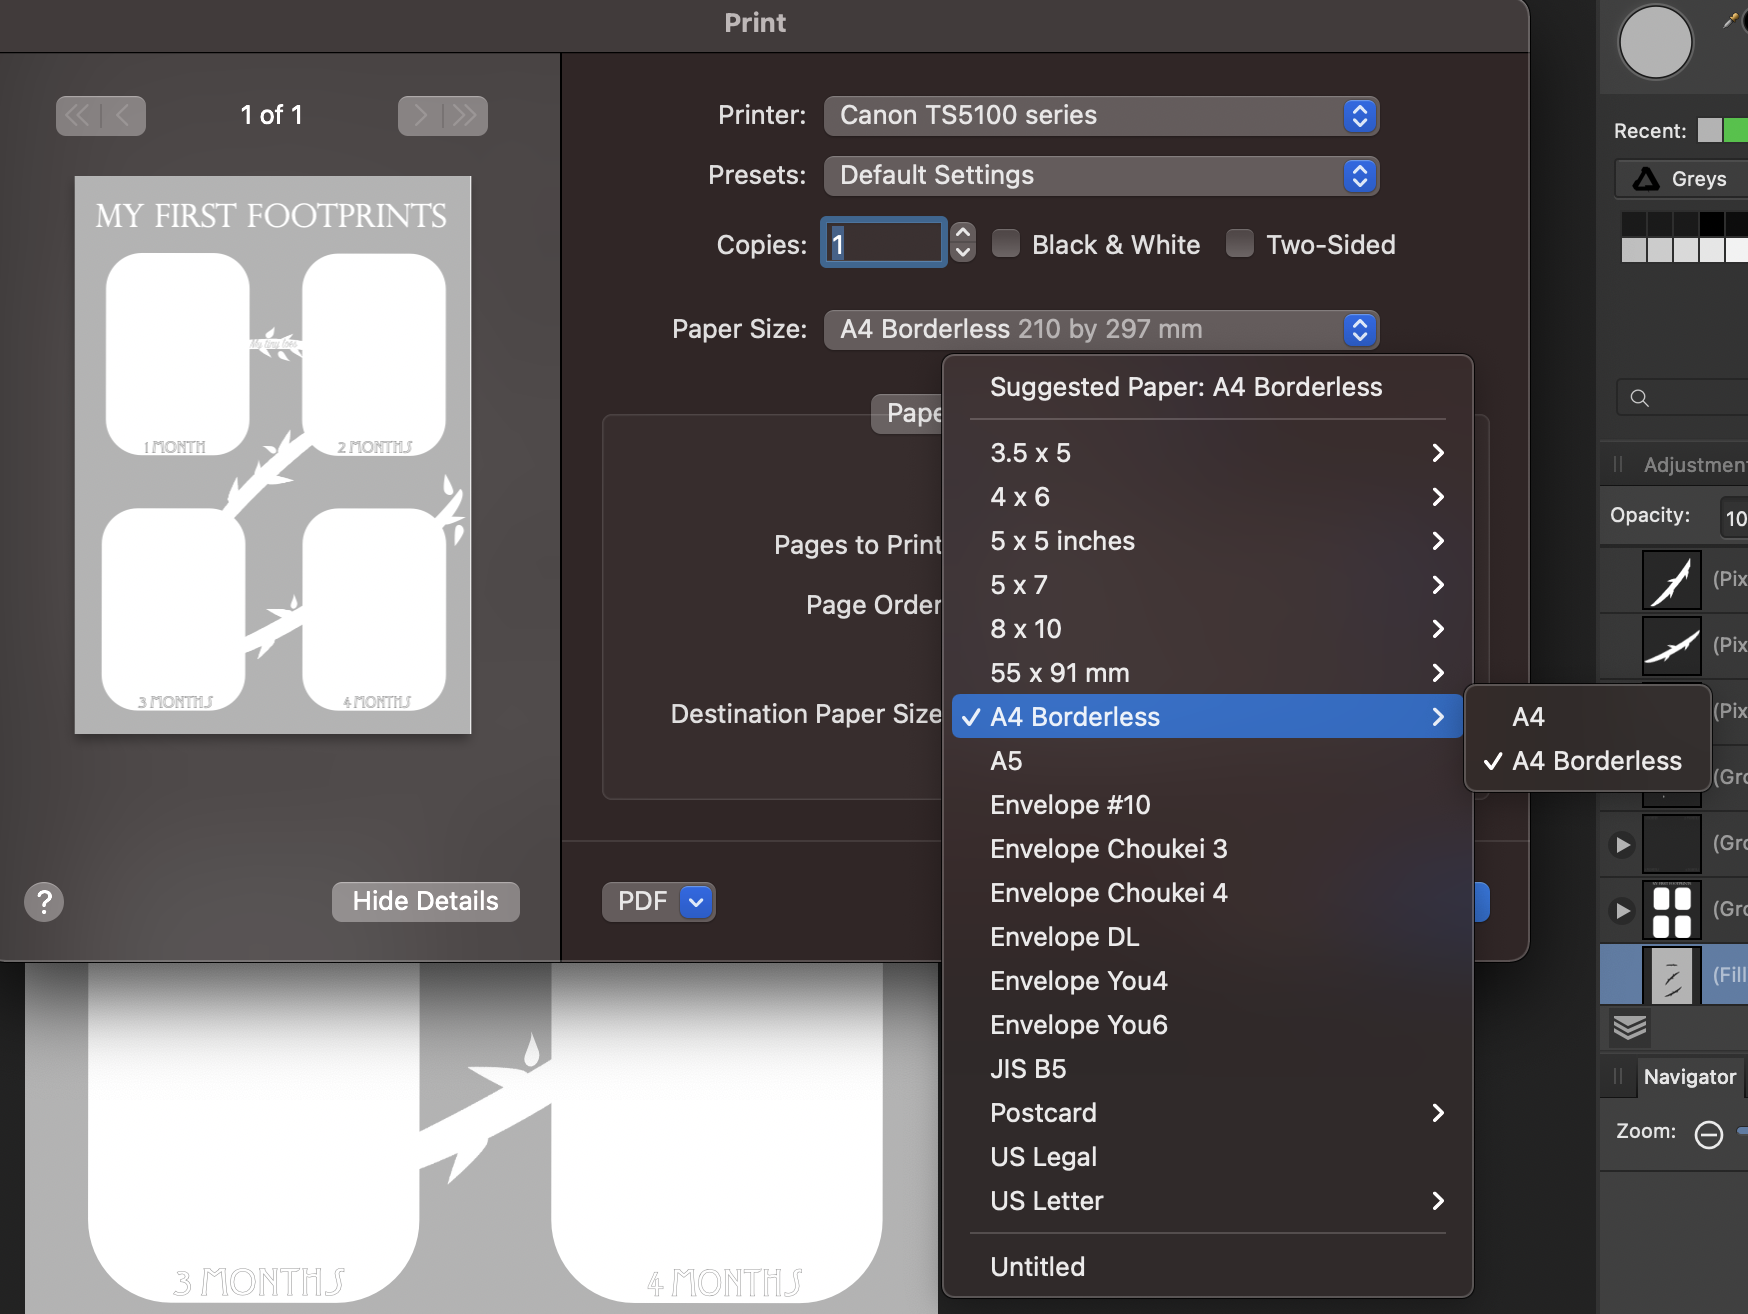
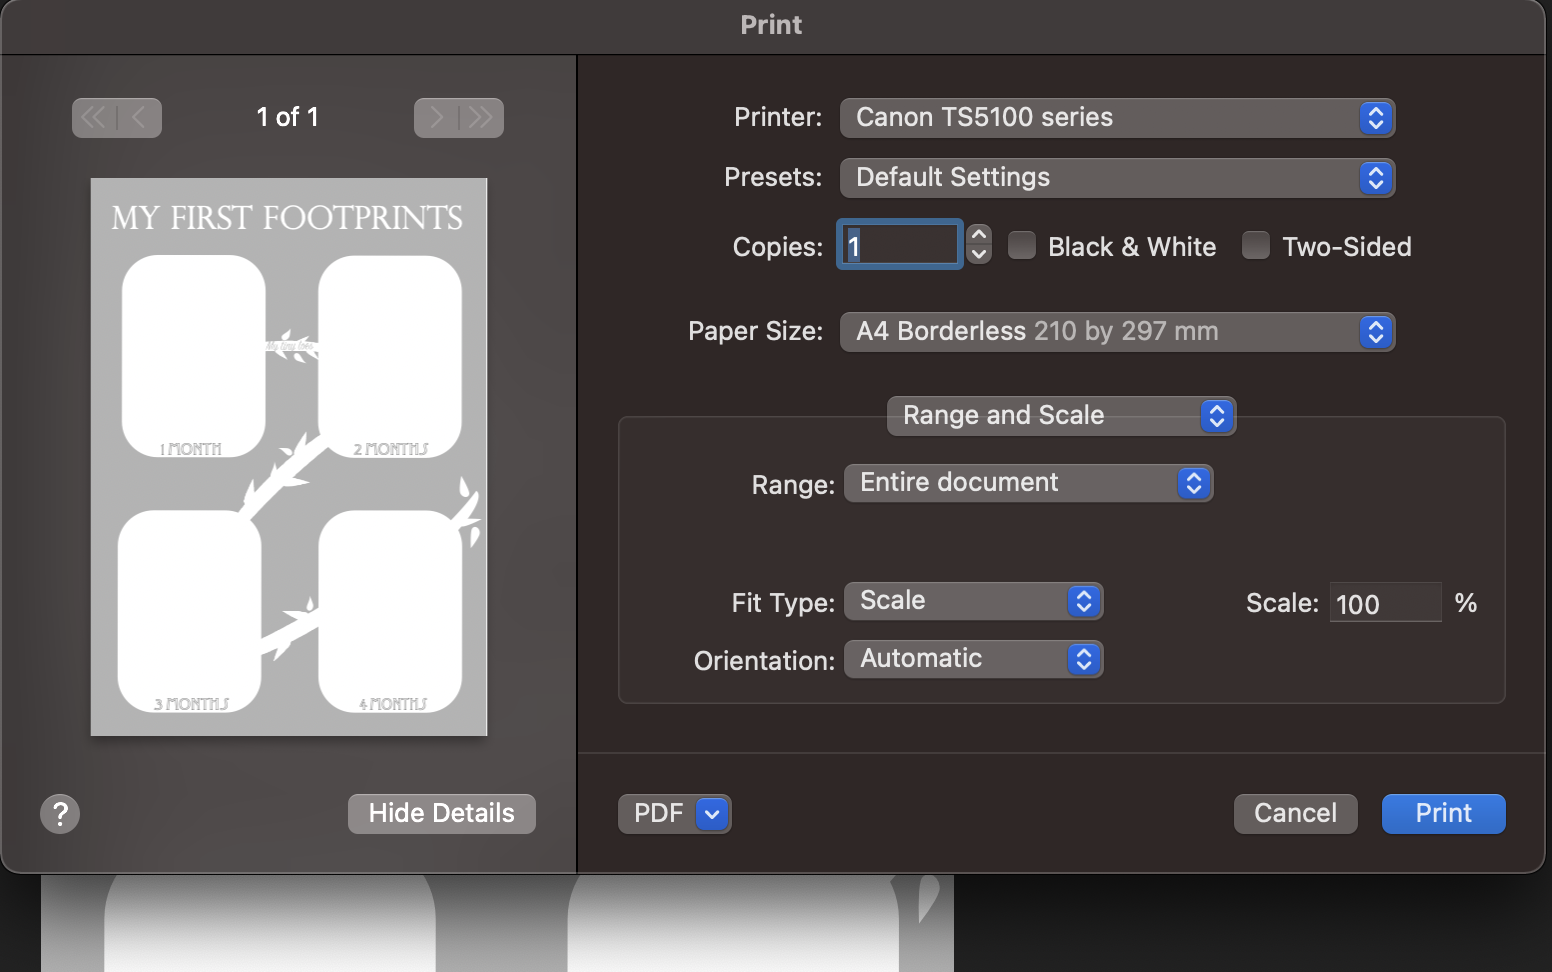
 I'm having serious issues printing borderless, and I don't know if it's my printer (canon 5150) or affinity. I've tried both photo and designer. I feel like i've tried all settings and it keeps coming out with a white border. I've tried scaling up, and the border stays the same. It worked once, without me changing any settings. I also had this issue a month ago, and it just fixed itself. When i first created this item it printed with no problems. The colours are also coming out 2 shades lighter. I urgently need this sorting, it's for a paid job, (I'm a small business artist) and it's needs going in the post within the next day or 2 min. Can anyone help please? Am i doing something wrong? EDIT - it's just started working despite not changing the settings again. I've saved these as presets, hopefully it works next time. Still looking for help on whether this could be an affinity issue, or maybe my printer?
-
 When selecting a page size under the print menu there are about 100 randomly ordered options. Many of these I will never use, and some of those that I do (17x22) are difficult to find. It would be great (if it does not already exist) to have a way to edit and order this list.
 -
 Hi, I'd have one feature request: it would be great if in the Publisher print dialogue, the print profile feature would not only save settings made directly in the Publisher print dialogue, but also those of the printer driver (e.g. paper type). Other programs (e.g. Adobe Lightroom) do that, so it should be technically feasible. Regards, Robert
 -
 I'm new to this software and still trialing but falling at first hurdle. When I am adding an image to a letter it shows correctly until I print - then it misaligns. Can someone help me please? I've attached image to show my issues. Thanks