Search the Community
Showing results for tags 'Printing'.
-
 Hi One very useful feature on Photo Plus was the ability to print multiple / different images at set sizes on various paper sizes. I can't find this feature on Affinity. Would really appreciate this to be added Thanks
 -
I purchased Affinity designer last year and had no problems with it. I am now having massive problems in so fact that I cannot print it only prints the top half the top line of any sentences and then throws the paper out as if it has completed. I am using windows 10 with all the upgrades. I have a HP envoy wireless printer. This problem is really frustrating me as I use it to print information on posters. Can you please help. Thanks Eryl.
-
 Hi I hope someone can help me. I have a windows 10 desktop computer using wireless to a HP envoy printer. When I try to print from affinity programme I get the printer starting then as it prints a line it stops and rejects the paper as if it has been completed. I am fully updated with all the windows 10 upgrades. This used to print fine but for some reason has started to do this which is very frustrating. Any advice will be gratefully received. I do not have any printing problems on other programmes.
 -
 I know that similar subjects were posted on this forum before in different places, but now when time to public beta of Publisher is near, I think it's good to remind this. To unleash the whole power of Affinity Range, we need proper pro printing tools, like good preflight, good colour management, ink coverage measurement... Simply, all what is industry standard for this kind of work. I think that all these tools should be quite similiar (at least at some major points) to Adobe products. (For now, people designing for example in AD, must also use Adobe Acrobat Pro, pdfToolbox or other software if they want to print something at pro standard - and to avoid money loss because of wrong printing results) And a quick question, because I saw in some general topics, that such tools, maybe will be introduced in Publisher, and then maybe will be transferred in future to AD and maybe Photo too. But I wanted to create recent, separate topic for this, because this is quite important. So.... maybe my feature request is now ready in some shape (in APub?) or at least You can say something more about this? I have seen video sneak previews for AD 1.7 and all features are awesome and I'm waiting for an update. Also I have of course seen APub short video preview but...it was short and there was nothing about printing features, but I think that this is very important for many of us here. To be honest, already I'm waiting with some shopping and other business decisions to see what you guys have prepared for us and I think that I'm not alone And after AD and APhoto I believe in you guys.
-
- 2
-

-
- magazines
- advertisement
- (and 6 more)
-
 I have tried many combinations of parameters, but I cannot get an 8x10 photo printed at the right size on letter paper when the photos have a narrow outline created by Layer Effects. Parts of the border are not printed. For Example: I have a flat photo resized to 10"x8" inch at 300dpi. I use layer effects to add a narrow inner outline. I print on a Canon pixma MG7720. Parts of the outline are not printed. I use these parameters: Check Borderless printing (does not seem to affect outcome) In AP paper size is set to custom(8x10) Pixma page setup tab: Page size custom(8x10). Printer page size "letter" Page layout: Scaled (100%)
 -
 I'm building a replacement website for my 7-year-old outdated site and need to edit my photos for this new platform. 1. For a photography site that retains large files for automatically sending to the print lab and as the file can be printed at varying sizes (on paper, canvas, etc.), should I save a file at it's original size but at a 300DPI? As these are photos taken over many years with different types of cameras, some images may be 72DPI, others higher, also many are from film cameras. 2. If all need to be saved as 300DPI for optimal printing, then what is the best way to save the file without resizing the original file? (I'm new to AP.) (My site displays optimised file sizes for website speed, so don't need duplicated files.) Many thanks
 -
 Hi, I'm using Affinity Designer and Affinity Photo at my MacBook. I want to print a detail section of my paper in Affinity Designer. I noticed, that my origin print menu ist missing! As I open: "Menu" - "Print", then open up my Mac only grey simple print options of Mac to choose printer, paper size, paper orientation and so on. There is no longer the black menu for detailed print options of Affinity Designer with adjustments of "Full Paper" or "Section of paper" or "print without backgound" or "resolution" and so on. (sorry to my bad translation, I don't no the english words. hope you know what I mean.) Recently, I updated to High Sierra. Is there any correlation? Can you help me how to get the black detailed print options of Affinity Desiger back? RegardsAnit
 -
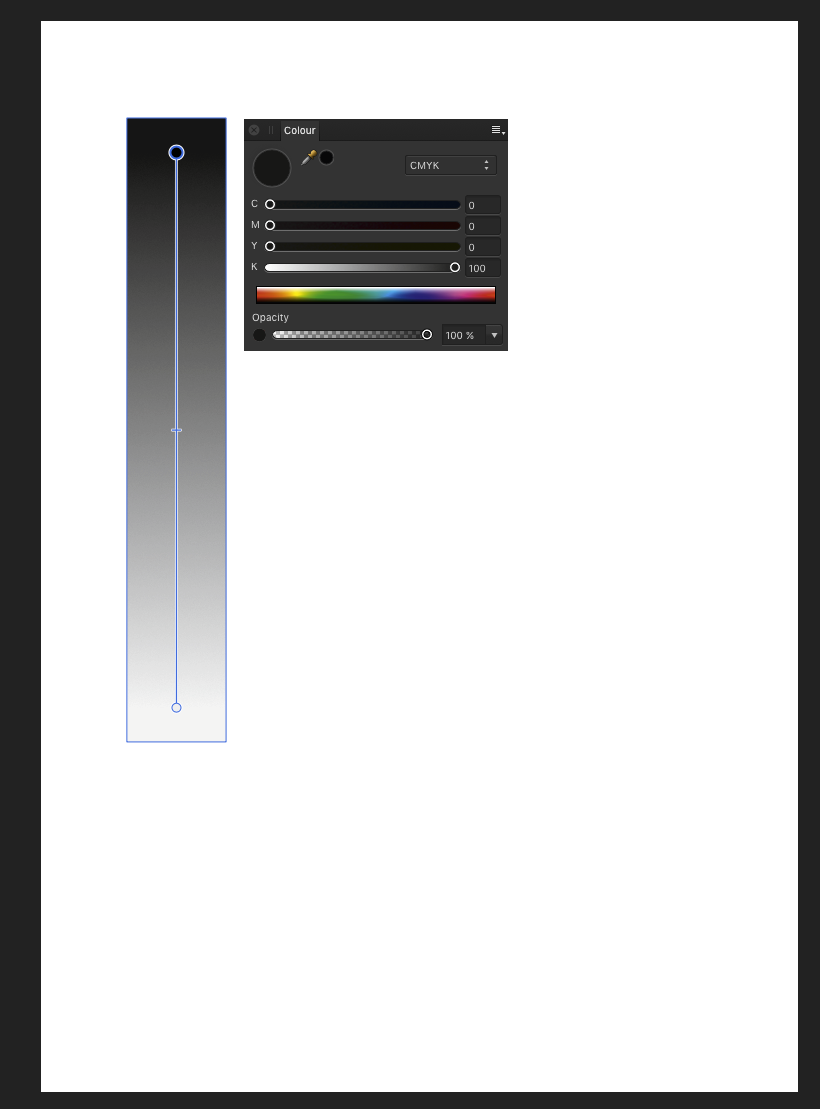
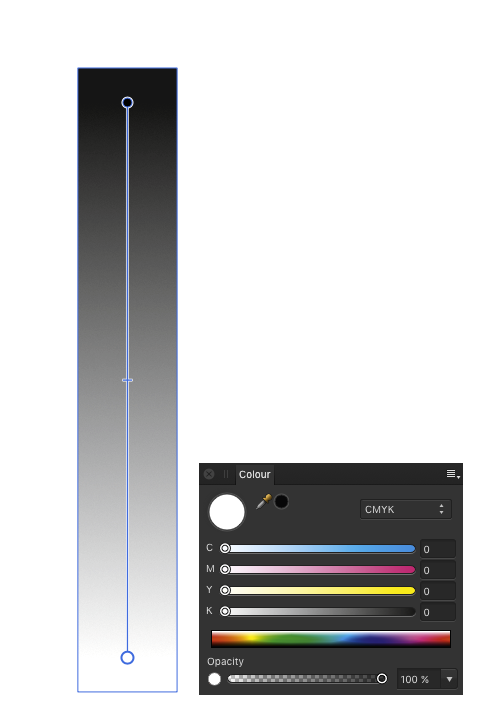
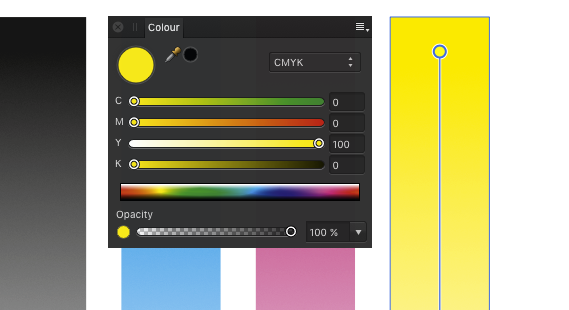
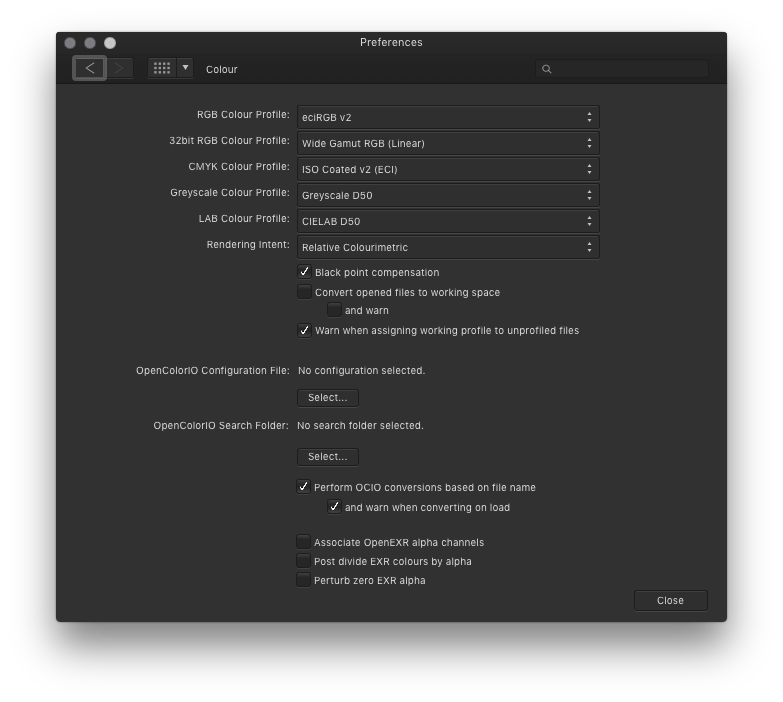
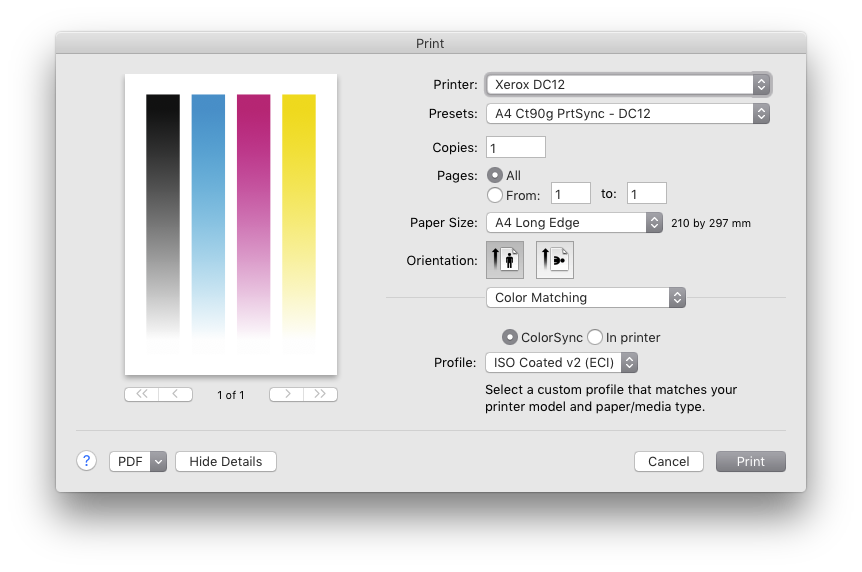
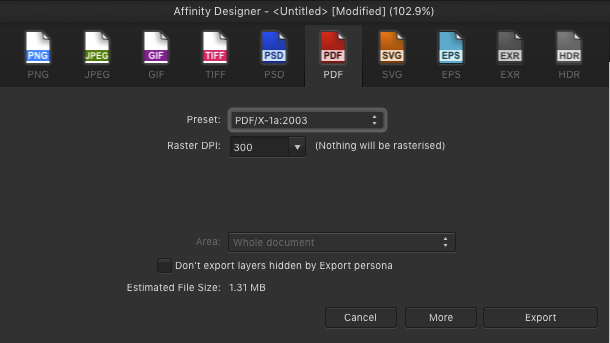
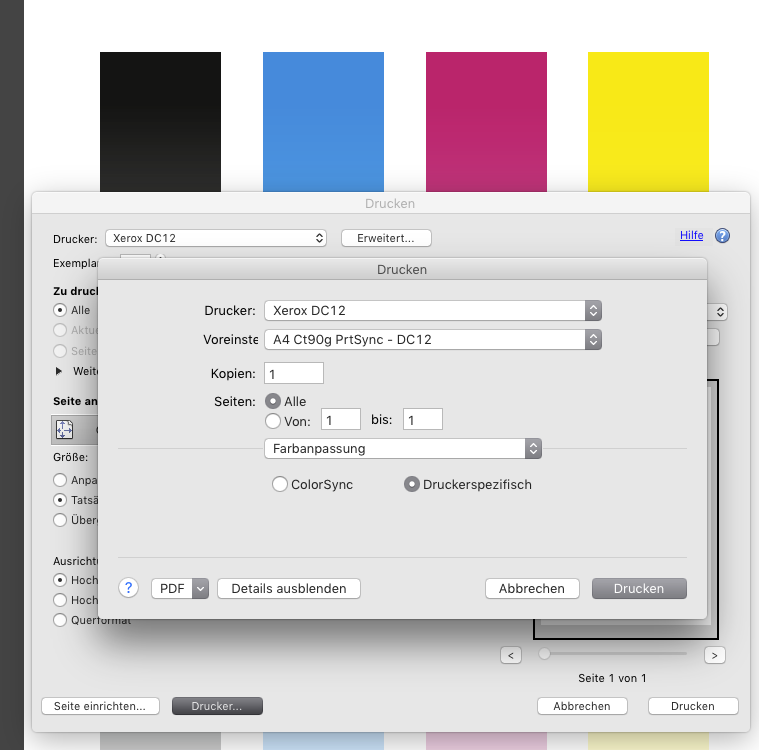
 Greyscale become multicoloured when printing from Affinity Designer. Obviously a conversion to/from color profiles happens inside Designer. How can I prevent this from happening? (This happens to all colours. It is just shown best with greyscale.) My printer expects data in the same colour profile as my AD files working profile. (ISO coated v2 (eci)) When exporting a PDF/X1a and printing with Adobe Acrobat everything is OK.
-
Any chance of incorporating the option to manage printing with icc profiles totally within the iPad app? E.g. when i use the print dialogue i am given the choice of printing as is and letting my printer do all color management, I would like to have the option to let the app control the colour output by having the option to apply an icc profile to my image as i print it. Similar to the process found in dare i say it.....photoshop Cheers in anticipation
-
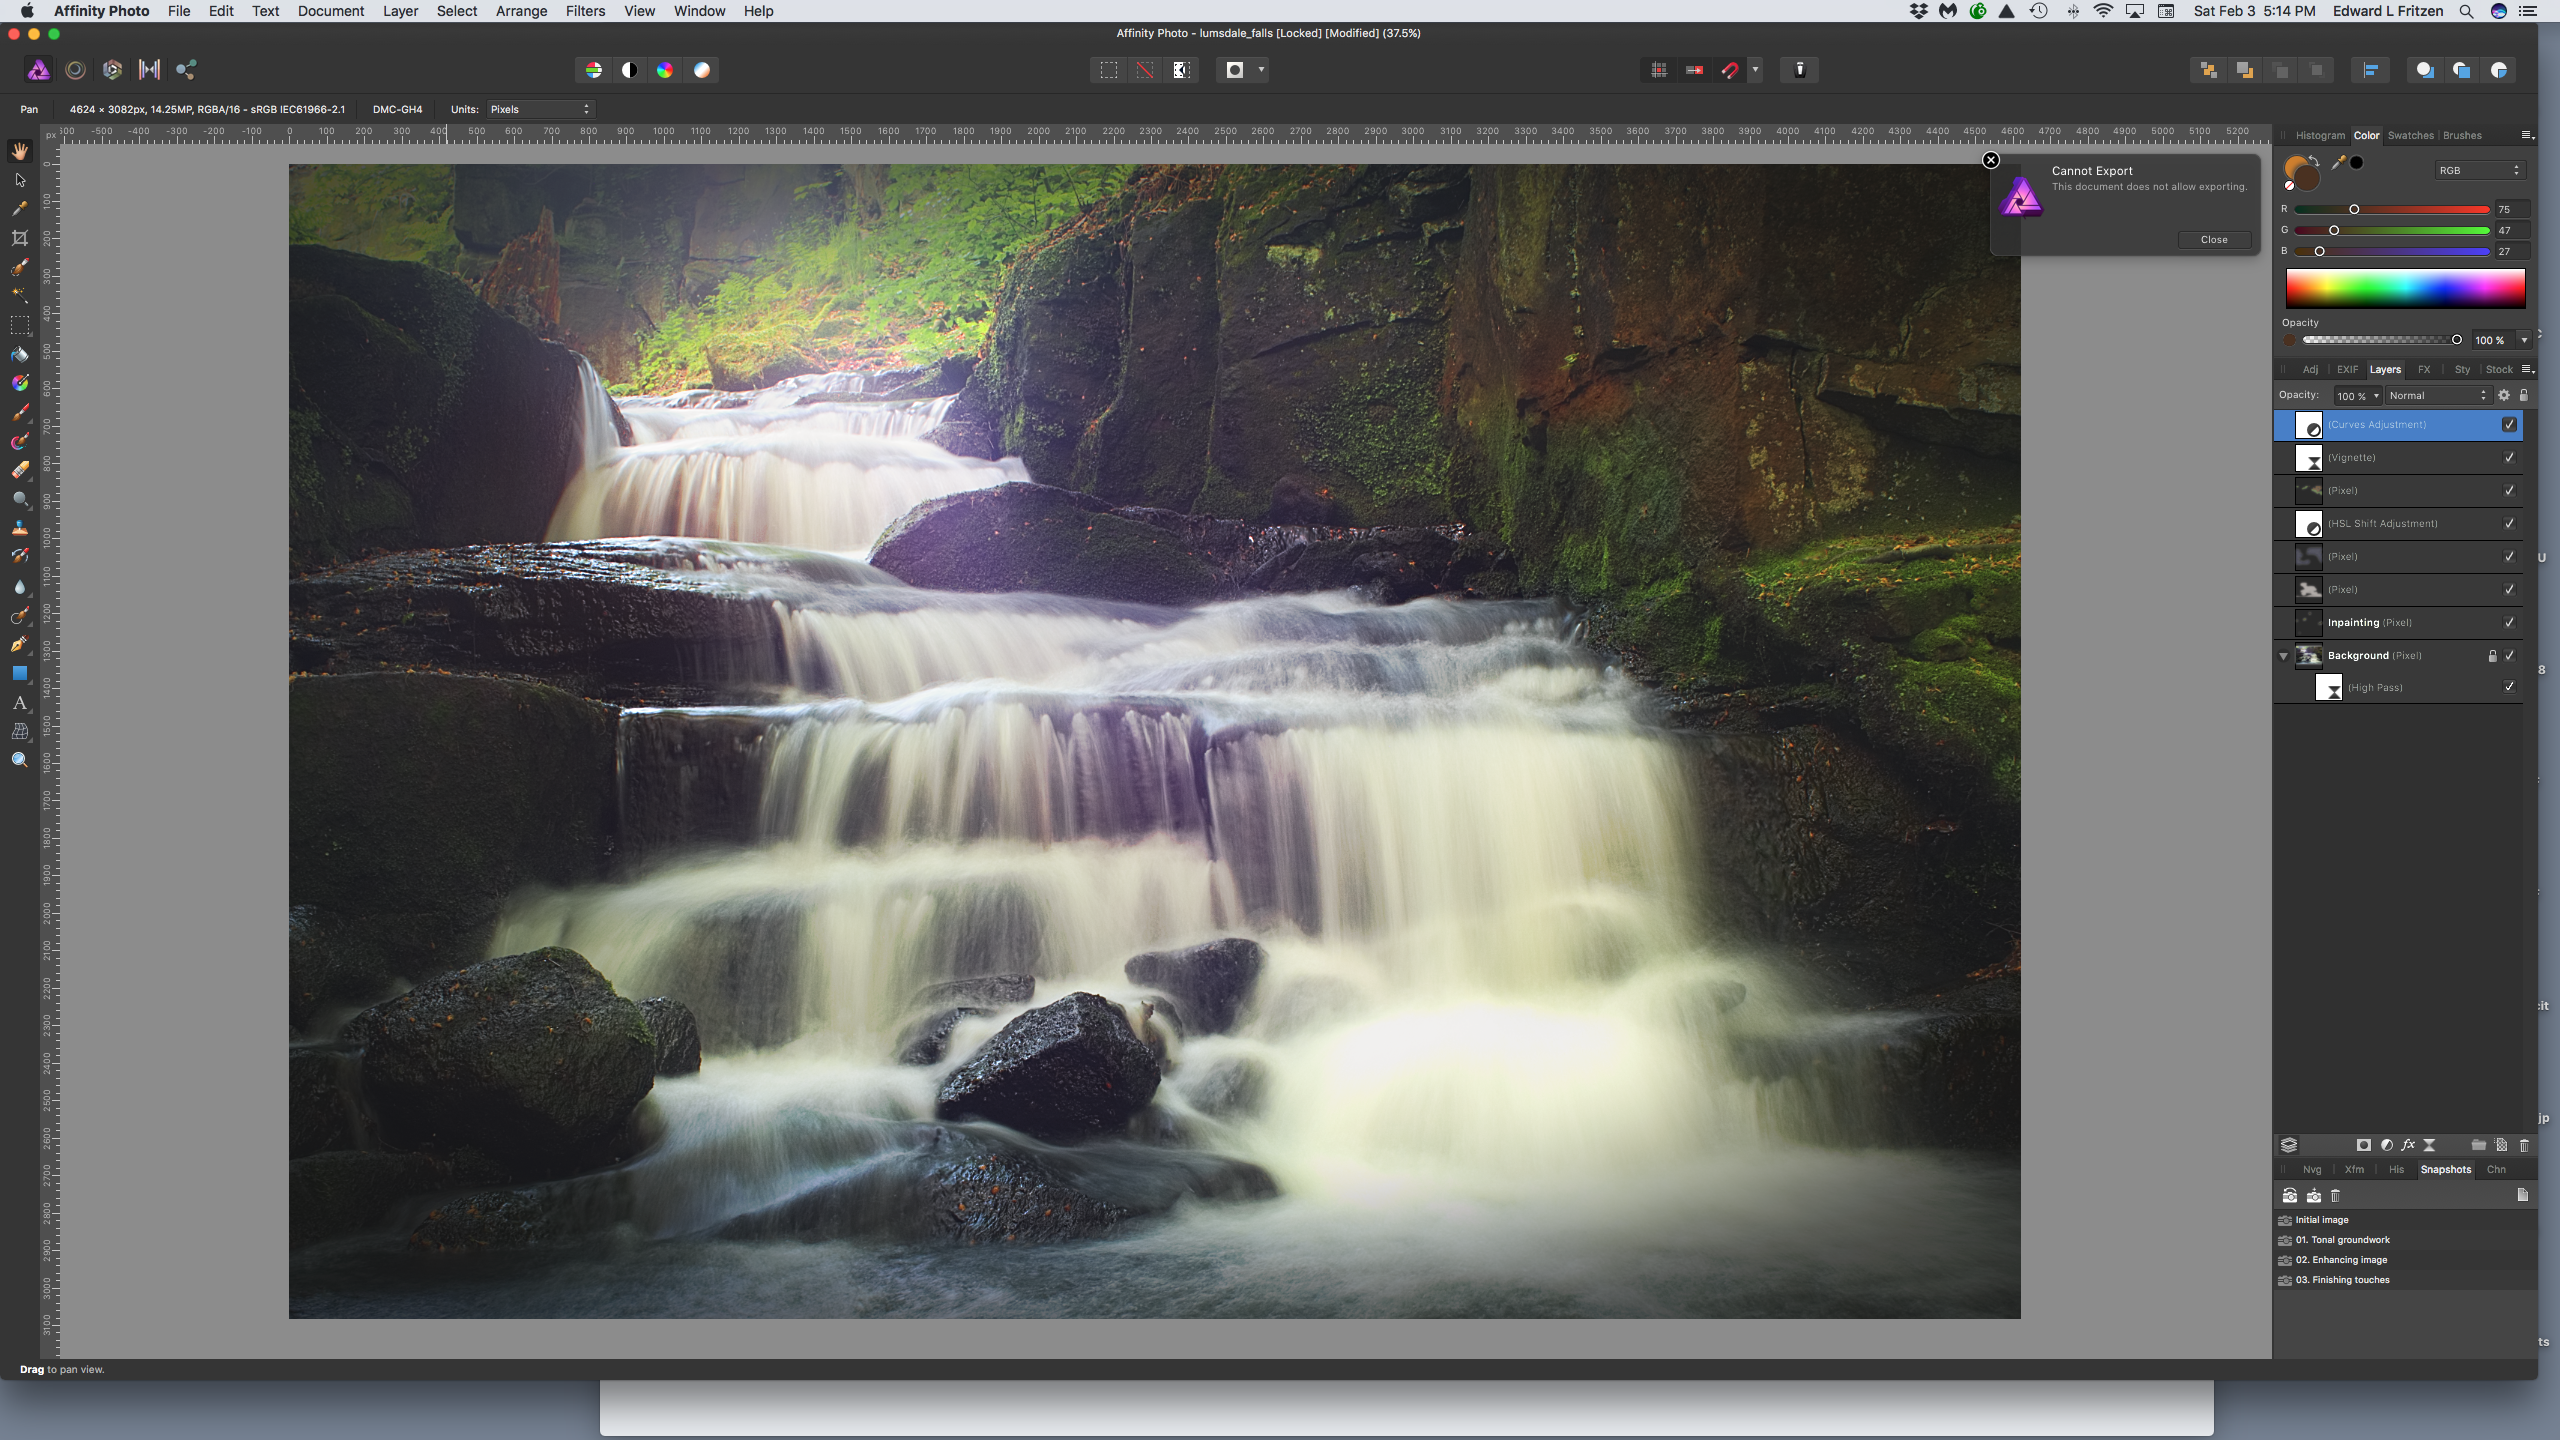
 I've been slowly working through the exercises in Affinity Photo Workbook and so far I think the book is very well done. In Chapter 3 on page 170 the process is described for exporting a photo for print as a TIFF file. When attempting to follow these steps, AP tells me the document does not allow exporting. I can't save a copy of this image either. Is this done to protect the copyright holder of this image in the workbook to prevent non-authorized use? I'm assuming these steps will work on one of my own images. Just curious.... Thanks, Ed
-
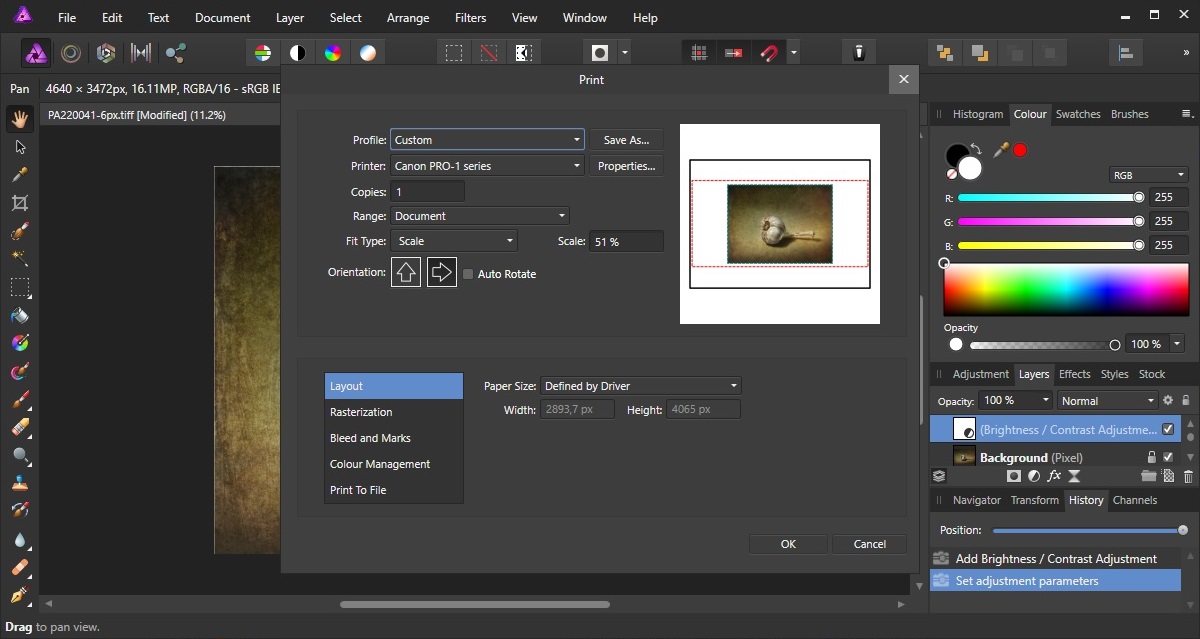
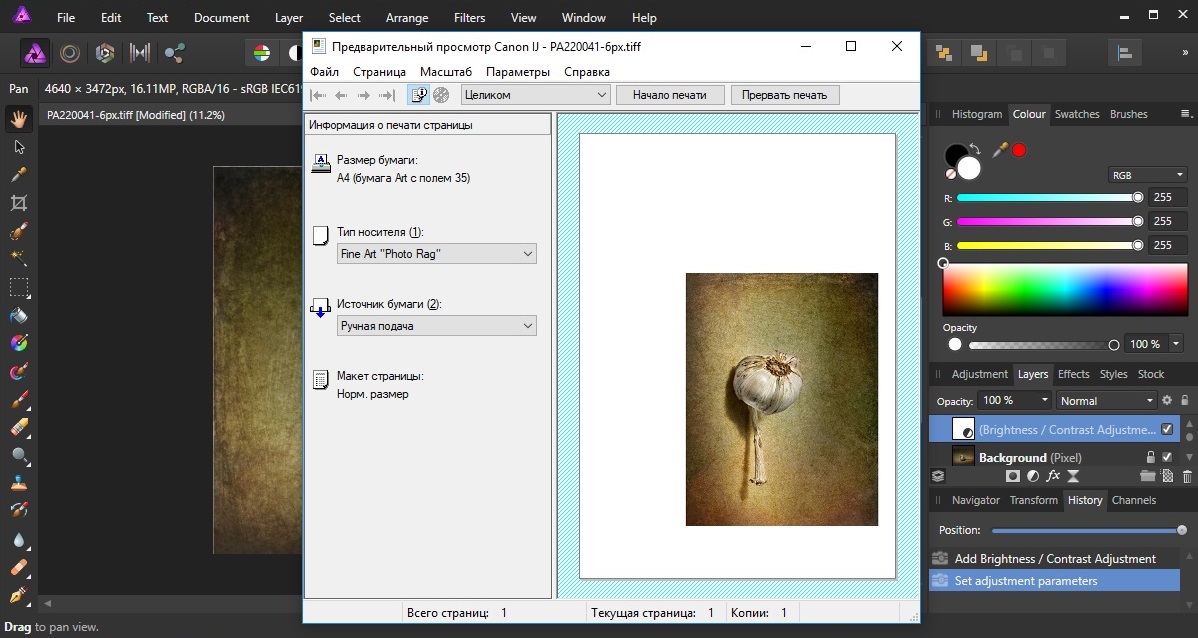
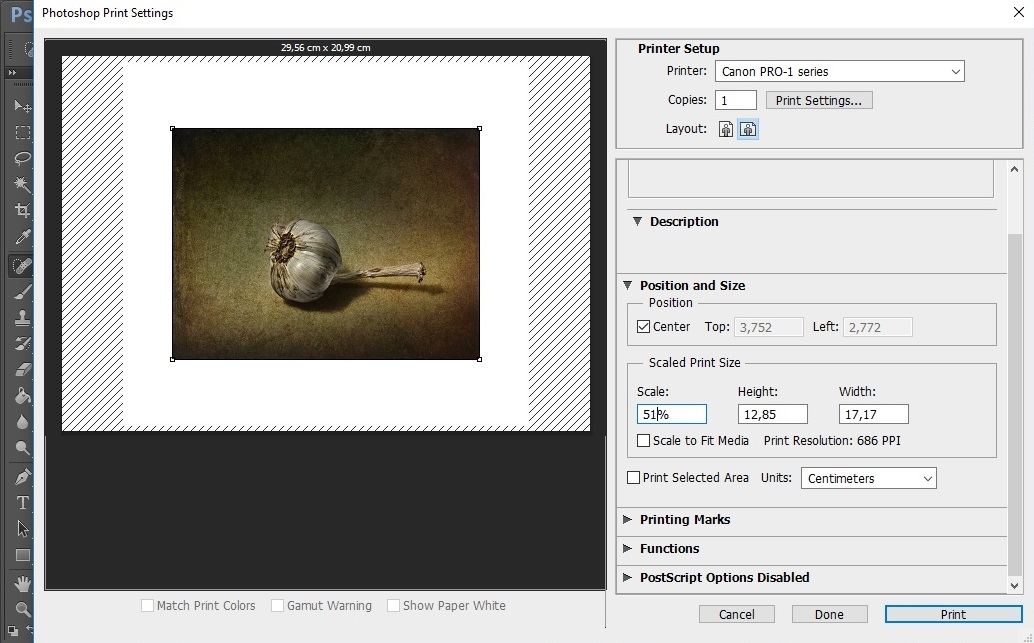
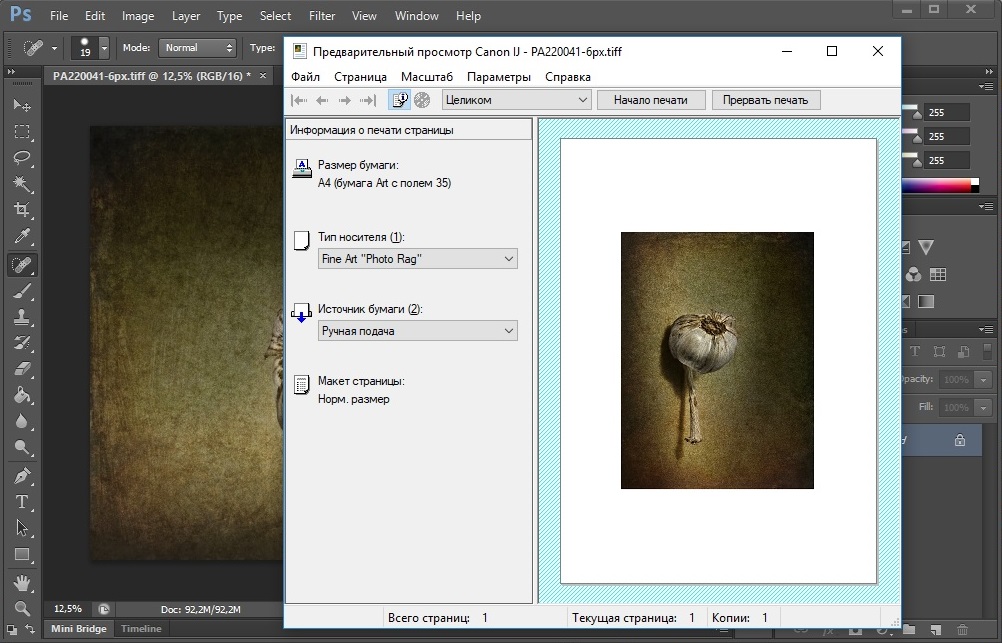
 This is in addition to my previous posts on the current impossibility to use of Affinity Photo print manager for accurate printing: Affinity Photo print manager should be updated How Affinity Photo meets Canon pro printers Today I tried to print an image from Affinity Photo, again, but calculating the scaling per cent with Calculator. This could remove, temporarily, the problem that Affinity photo print manager does not provide the physical size of printed image, but only the scaling per cent. OK. Let us print an image with, I say, 51% of scaling. You can see Affinity photo print manager below. The image is shown well aligned with respect to the page borders: But, once you start printing so that Affinity photo calls the printer driver (Canon Pixma Pro-1 in this case, but the same is observed on other Canon printers), you see... the image is turned to the page corner. And there is no way how to change the image location... That is, I guess, Affinity Photo print manager, when connecting with printers, does not do it correctly... In practice this means that you cannot align printed image on page when printing from Affinity Photo. To be honest, this does not allow printing something at all... I see this problem on the Canon professional printers (such as Pixma Pro-1 or Prograf). Compare how this works in Photoshop. When launching PS print manager we can set up both physical size and scaling per cent, on your choice and without boring calculations to match desired height or width of the image: And then, PS print managers calls printer drivers in correct way so that the image is well aligned to the page borders: CONCLUSION. It is the third week as I use Affinity Photo (trying to migrate to it from Photoshop). I got much editing work in Affinity Photo already. I like it much more than Photoshop, and believe your project has great future. But still unable to print something without problems... Photography exists not only in the fileds of the internet (which is a short flash in the world history). Prints survive in centuries as those made by Bruegel and Duerer five centuries ago. I therefore hope that Affinity photo print manager will have been improved in the next stable release, to meet professional photo-artists who are de-facto print makers as well.
-
 Hi Guys - Does anyone print their work directly using a Canon Pro printer and if so do you ever have problems? Every time I print directly from an art board it is always a fight on my end. Example, noise won’t print like what I see on my screen. Paper size error. Effects don’t print etc... I am using a Mac and Sierra (afraid) to upgrade to High Sierra because I had nightmares last time. My Canon drives are updated for Sierra as well. Any advise would be very helpful. Thanks!
 -
 Hi, Is there a way to make the text on path show in reverse? If I use the mirror/horizontal flip it just positions the text on the path differently. For example if you dray a circle and place the word 'Word' on the path. I wont it, and everything else in my design to print out back-to-front so it can be used as an iron-on transfer. Any help would be appreciated. Andy
 -
Hi, My wife has a craft hobby (obsession) and I regularly have to use AP and/or AD (ver 1.5 on MS Surface Pro 4) to edit or create small and medium bespoke items for her items. I use artboards to create small individual items - for example, a line of text that is curved or a series of small shapes. These are then printed off onto a special A4 transparent sticker to be cut out and applied to the created item. My question is: When I select a single small artboard to print, AD wants to print it in the center of the page, it is not economical or practical to print a single line of text - that is going to be cut out and stuck onto a birthday card for example - in the center of an A4 sheet. Is there a way to select my artboard for print, then move it or make it print at the top edge of the special A4 paper rather than the middle? At the moment I have to create a new A4 doc and copy and paste my selected item into the new docs top edge and print that. Not an ideal procedure. Any advice would be appreciated. Thanks Andy
-
 Is there a way to print the shortcuts? Or perhaps export them to open elsewhere and print? Many thanks!
 -
hi all, I am very new to affinity photo and photo editing, I am after some help on how to set my photo up for print, what setting I need to have it in ? I've tired to print a photo before but it came out rough looking and really dotty looking , and help would be great thanks
-
 hi im printing with a Canon pro 100 printer but cant access paper profiles from the print menu , is there a workaround or are paper profiles not available in affinity photo ?
 -
 I'm not looking to print borderless I (I understand this can't be done on a laser printer) however my layout from Affinity Designer is not printing to full scale on my HP CM1415fnw laser printer. It seems the HP has a border preset that causes my printouts of a trifold to come out about 97% of the actual size... and we all know how that will screw up a perfectly decent looking trifold!!! HP is not much help on this, and the manuals are not much good either. I printed from a pdf to a colour copier via thumb drive at a local Staples store here and it came out fine... but I'm trying to save our photo club the 88¢ per copy that would run by printing on my business laser. Blacks are better although the photos are coming out somewhat darker. Is there a setting that I haven't found yet in AD that I can use to bypass the limitations of the HP?
 -
 I need to print a variety of cards – greeting cards, for example, photo cards, postcards, etc. I'm really struggling to get decent results with Photoshop. There simply aren't enough printing options. Placement becomes guesswork. Printing from PDFs in Preview also isn't working well. I'm exploring different options. I'm considering buying Affinity Designer in hopes that it will make this job simpler – and not just for printing, but also fill in the areas where I need Illustrator but resort to PS. Sadly I let my Designer trial lapse before investigating this myself. Presuming that my trial can't be extended for a day or two, can users please share screenshots and other information on the type of layout and printing options I would get with Affinity? Is it a good option for me? Do you have other recommendations? I'm on a mac running latest OS. Many thanks!
 -
 I cannot find an answer to this in the documentation. I have been using Affinity Photo as a replacement for Photoshop and am pleased with the performance. I have a question about printing and whether I can print profile targets with no color management. Photoshop CS6 does not allow this (there is a 'null transform' work around) and Adobe suggests using the Adobe Color Print Utility (ACPU) for this purpose. Unfortunately with WindowsOS, patch sizes are reduced by 4% using ACPU. Adobe is aware of this issue but shows no signs of wanting to fix it. I would like to be able to use Affinity photo to print ArgyllCMS generated profile targets with no color management if possible so that target size is retained.
 -
 Hello first let me congratulate you for the amazing ipad app, just loving it...fantastic work...I am running the Beta I am running into an issue though with exporting my tiff files for printing. I export them as 16 bit tiffs in the adobe RGB space because there is no Prophoto option ( where is it?) and adobe RGB seems to be the next best choice ... correct? the export files opens perfect in AP desktop but wether I try to print the file from the IPAD or export in Prophoto from AP desktop they do not print properly but look like closups of very heavy noise artifacts.... I am printing from COLORBURST OVERDRIVE that reads the file and shows a normal preview. Never had a problem with COLORBURST and AP desktop files What do you reckon and suggest??. I think it could be interesting to put together a tutorial about preferences both for AP desktop and AP Ipad
 -
 I have an issue with color management printing from AD where the printed color is not what I would expect: The document is set to AdobeRGB, there are some red shapes (RGB 255;0;0) and a small image - printing to an HP CLJ M452. Color management is turned off in the printer driver. In the print dialog under color management, I´ve chosen "Color Handling: Performed by App" and my ICC profile for the paper type in question. The resulting print is shifted to orange instead of the pure red defined in the document. When I print the document by letting the printer driver manage color (and selecting AdobeRGB in the print driver), the result is as expected. I would have do some more tests but from what I see with this document, there seems to be something fishy about the color management handling in AD. The ICC profile is OK - I use it successfully in various other apps (Indesign, Lightroom, Photoshop). Any ideas?
 -
Photograph is just an image until it is printed. Yeah... Photographers needs to print their images to get them to be photographs, be them in the books, as prints in album or walls or table etc. We just need to get the images out from the digital devices to the physical world to really get the value and impact to them. So, many knows that printing is expensive, either by ordering prints or then doing prints by yourself. And all who does printing knows the basics of "soft proofing" but even that is just a trial and error method really. Adobe Lightroom (and few others) has a modern "print layout" feature where you can just select templates and place images in order and then just order print or press "print" and it comes out from the printer. But that is useful really only at the final results! The Affinity Photo (and incoming Affinity Digital Asset Management) would really help many photographers by offering a real "soft proofing" method. That is the feature from the darkroom era etc, where first we did a contact sheet so we could see easily negatives later on what we had. Then when we had chosen what we started to process, we needed to do a exposure test strip so we could bracket the correct exposure for the print before we start to work it. And then we did these on the smaller papers that were cheaper than using a final paper size. Like if we wanted to make a 20x30" print, we didn't do these evaluation tests for such size! We used all the scrap paper we had or size that could fit our negatives (usually single sheet of 8x10" paper for contact sheet). And here is the request: To offer to let us get this automated very easily to save money and time! Let us select a images we want to get printed Then let us to choose the final print size that will be the target like 30x20cm (this is crucial for sharpening, resolution, denoise evaluation) After that we select the test print size like 10x15cm. Now comes the easiness as well, we can select "strip" as well for the selected "test print", so the print is divided for a selected strips (like 1-5) and each strip can have a different settings (sharpening, contrast, saturation etc etc) or even files (copies of the same file of course)! This would allow easily anyone to import image to Affinity Photo, process it like they consider it to be a final one. And then export it to "soft proof" persona. And there user selects the final print size that is the target (like I want that 30x20cm print to be final) and then selects the test print size that is the paper size that is really going to be used to produce the test prints. And then we can choose a amount of strips for a test print and select each strip and make some special adjustment to each of them. And then print that/share that out so we can see what were the real results on print in final print size look! Example: Take image, adjust colors, contrast, sharpness. Then export it to "soft proof" persona and select target to be 20x30cm 300DPI print and test print a 10x15cm. Now the image gets overlay crop box that is size of 10x15cm related to the final 30x20cm 300DPI print (so 1/4 of print area) that we can move to position we want (we can have multiple of these!) and then we can select the amount of strips ie. 4. And then we can click each of the strips and edit each of the strip as individual by control values of the adjustments we did on the whole image (color adjustment, contrast and sharpness like we did above) but this is done just with +/- slider. It doesn't allow to apply a new effects but only ones we did and that matters in printing (like DPI value, colors, contrast, sharpening etc) and each strip gets easy way to set them up/down. So we get ie test print size of 10x15cm with 4 slides and each strip has +20 sharpening adjustment compared to next one. So strips are Original +20 Sharpening +40 Sharpening +60 Sharpening Or with other adjustment it could be like: Original 600 DPI 300 DPI 150 DPI Or with saturation: -10 saturation Original +10 saturation +20 saturation We get the 10x15cm test print files we can save (and get all the information overlaid even if wanted to strip corners so we can see later on what were the difference in settings). And now it is cheap to go and order or print these 10x15cm prints and get a "soft proofing" that way as contact/test sheet without going through lots of custom cropping, laying down the cropped parts as layers, adjusting each layer little differently and then getting them rescaled etc correctly for the image. And who says it would be limited to strips? Of course we could example select a 20x20cm test print with 5x5 grid with target of 30x20cm. And then we can use X and Y scales for a different settings. Like vertical lines for contrast and horizontal rows for a sharpness. Set the center (3x3 grid position) as default and then have sharpness and contrast to go from - values to + values at left to right. It could be hue, saturation etc. Then when we do a single 20x20cm print we can easily see the difference in settings and select the wanted one for final.
-
 I know there is a feature on adobe illustrator were it will package all your files together (vectors, fonts, backgrounds, etc) into one file so it is easier to give to your printer. Is there a similar feature in Affinity Designer that I am over looking?
 -
 I have found this question marked as dead, but is not dead for me (and anyone trying to use AD for press) Exporting single artboard with bleed works. But in tutorials of AD is suggested to create a design using multiple artboards, like the tri-fold leaflet. (the "Artboards: Exporting and Printing" tutorial, Bookcover tutorial) By tutorial, I should group them and the make a slice for the group and then export it as single page. But I am not be able to include a bleed at all, whatever I try. (and I was hoping for other benefits of this attitude as between artboards cropmarks to mark folding etc. :-/) Is there any workaround? Is there any way to export multiple artboards as a single page and keep the bleed? Or the autor of tutorial… maybe… never actually print anything :-) ? In that case I suggest to remake those tutorials or delete them as they may be quite missleading. Any suggestions would be very, vere, very much appreciated, thank you.