Search the Community
Showing results for tags 'Pixel'.
-
 Hi! Drawing using symmetry and mirroring works fine, there's a tiny bit of slow down sometimes, but nothing too serious. But drawing using only symmetry is a lot slower, to the point is almost unusable. I find it odd since I'd presume both functions would work the same. See the attached video for a visual sample of the issue. Happens on an iPad Pro 9.7" (2016) with the latest iPadOS (13.3.1) and latest Affinity Designer (1.7.3). Thanks! RPReplay_Final1580374739.mp4
 -
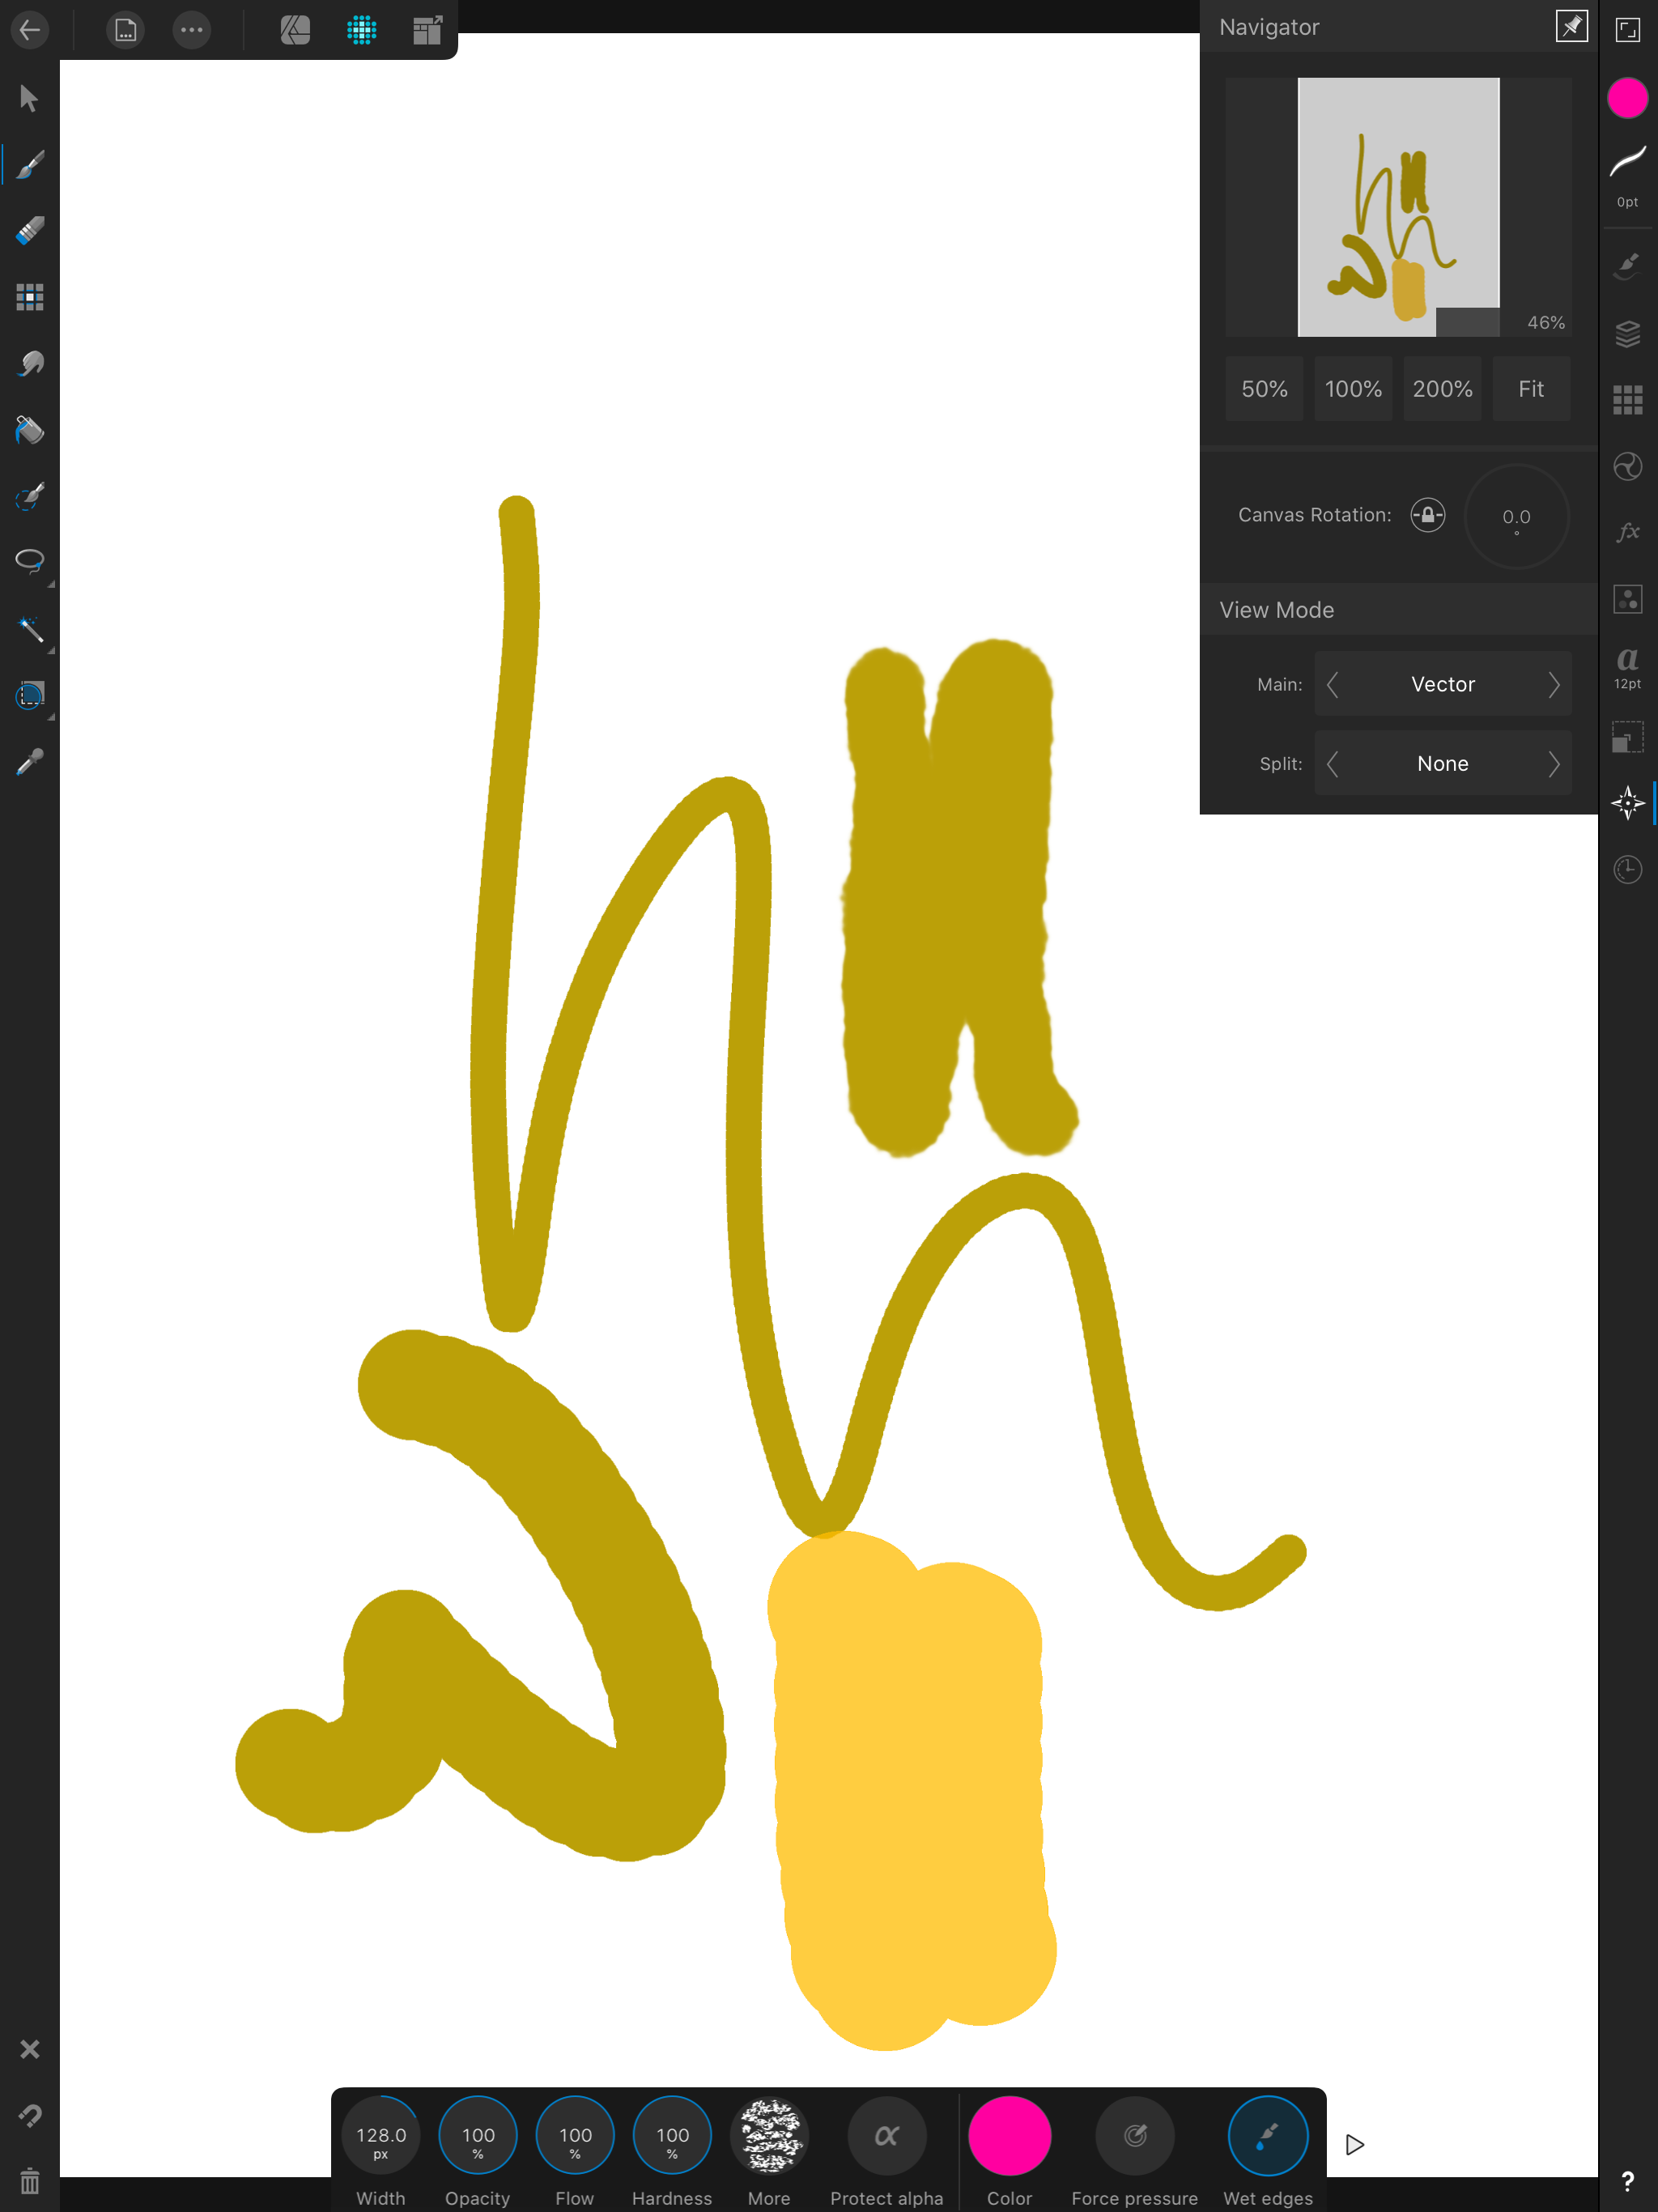
Every single brush in Pixel Persona is too pixelated, with jagged edges. I do not want to use the Vector Brush, as I like the feel and workflow of the Pixel mode. I’m hoping to replace Procreate with this app, but these jagged brushes are not awesome. I’ve attached screenshots of the document at 100% and at Fit. I’m using an iPad, with latest software update. Anyone else experienced this?

-
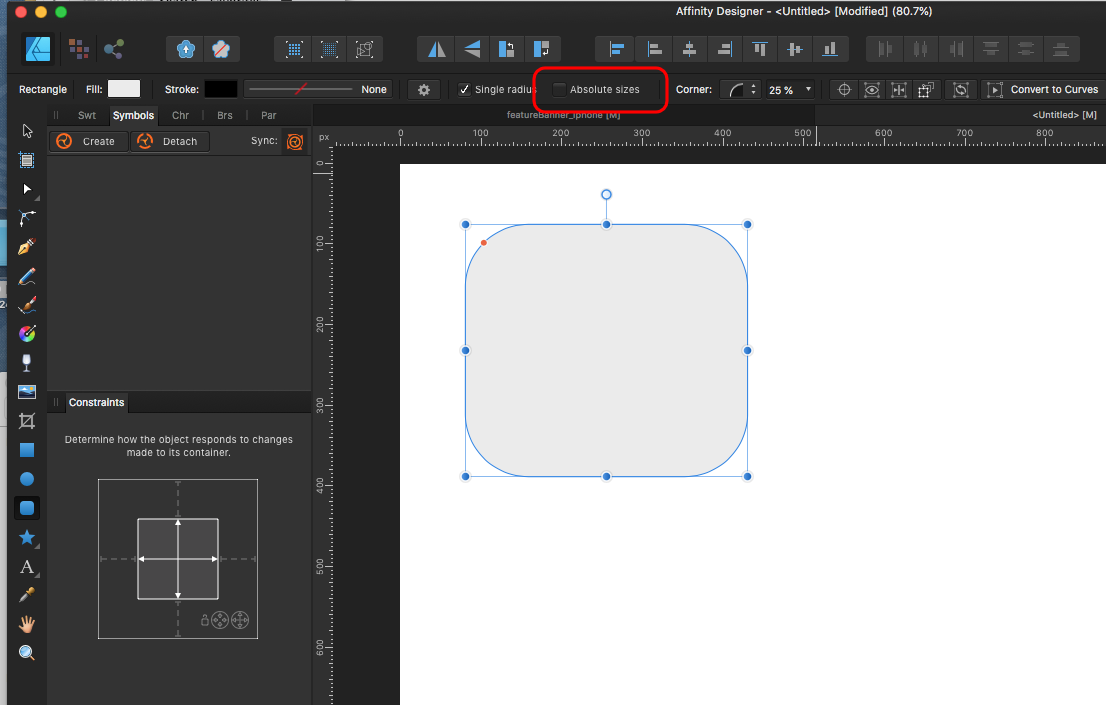
 Can I draw rounded rectangle on ipad and scale it with fixed corner radius? I cannot find even corner radius input box like desktop version. Please help me, thanks.
-
 https://www.dropbox.com/s/bj965vq3wh23vfn/paysafe.zip?dl=1 En este archivo, los textos "paysafe" y "recarga", aparecen pixelados al expotar a PDF (y son los únicos que salen pixelados ,ya que el resto estan vectorizados) pero en la edición del archivo en designer sale en vector . He probado a coger otra imagen de paysafe pero pasa exactamente lo mismo. A ver si alguien es capaz de resolver el problema. Gracias.
 -
I've just started the trial for Affinity Photo, having heard a lot of good things about it, and I've been loving it for the most part except for the fact that in several areas it's destroying my workflow and efficiency, so I wanted to ask if I'm doing things wrong being used to Photoshop and all that. I'm working and testing Affinity Photo on an 8MP pixel art image, and I've noticed that compared to the file import on Photoshop the result is quite blurry (see attachment). After some fiddling around I found out that on AP the problem comes from drag & dropping the image on the canvas: if I drag & drop the file it turns out like the chest in the right half; if I place the file it turns out like the one in the left half. Both are at their native resolution, and both are imported as Images. Opening the menu and selecting place for every single asset is quite lengthy and workflow destructive. Is there a way to emulate the placement while drag & dropping from the file manager? Shouldn't it work the same way? Am I doing something wrong or is it a bug? The 2nd most damning problem I have is with the clone tool: I'm working on a very structured file with hundreds of layers and subgroups, and one of the feature I used the most in Photoshop is the clone tool mode that allows selection from all layers, both above and below the currently active layer. Is this a feature that can be added in AP? Addendum 2: while working on it some more I noticed another pretty damning issue while working with pixel art. Applying a rotation to any object it starts getting blurry due to the diagonal approximation, but the ridiculous thing is that in 90° the image doesn't get back to crisp, only 180°. So, while in theory a turn left/right shouldn't involve any resampling, it actually does, which is quite problematic. (Solution to this seems to be View > Snapping Manager > Enable snapping and Force pixel alignment, though it still feels kind of wrong to interpolate on simple 90° turns?) Addendum 1: is there a way, while drag & dropping files into the canvas, to automatically place it in the current group/subgroup instead of automatically place it as the top layer? That's another thing that works while Place'ing, but doesn't while dragging files from Explorer (didn't test it on a Mac yet, I don't know if the behaviour also happens with Finder). Finally, not really related to pixel art, is a question related to PDFs. In Photoshop while importing from a PDF you have a thumbnail preview of the pages where you can select them and then import those pages only. I see that AP can do mostly the same but has no thumbnail available, so the user must know the page range beforehand. Is there a way to do it on the fly while visually scanning the document or do I have to stick to CS6 for that? I'm loving AP so far, with these couple exceptions: it runs butter smooth, is very efficient, tries to stay out of the way during creative work… everything I was looking for!
-
Hi! I've recently got access to an iPad Pro and I've been dabbling with Affinity Designer. Great stuff, but I've ran into limitations that break my colouring workflow. First let me explain how I do it on the desktop: Draw a vector shape Apply a global colour to this shape Create a pixel layer inside the shape Apply a Colour Overlay effect to the pixel layer Attribute a global colour to the above effect Draw on this layer, the pixel brush colour doesn't matter since the Overlay effect always overrides it Repeat steps 3. to 6. for every colour I want to draw inside the shape Move on to the next shape and start from 2. again This way if I want to change any colour after the fact, all I have to do is edit the global colours and all parts of the illustration respond accordingly, even the pixel layers. The iPad version of Affinity Designer does not have global colours, nor it does not support attributing swatches to layer effects... this fundamentally breaks the method of controlling colours described above... I've already requested both features on the appropriate forum, but until they get implemented I'd need an alternative method. My question is, what alternative methods of recolouring the artwork should I use? What do you use when you want to recolour the artwork after you're done? Thanks in advance!
-
 So I've started creating some pixel art with Affinity Designer for the Ipad. On screen it looks very clear but when i export it as PNG it comes out blurry. Is there any way around it?
-
 I'm trying to export a simple design that I made using Vector brushes to PNG format, but the design always end up being exported in pixels instead of vector, I tried searching for some answers online but I didn't find anything, I tried exporting it in other formats and while it did bring better results, it still lost some of its quality when exported, please help. Black Face.afdesign
-
 Hello everyone! I've been trying to edit some PSDs sent by the company designer and I just can't edit anything. Every layer is as "Pixel" - my first thought was that I hadn't the fonts packages, but after installing nothing changed If anyone can help me with this - I couldn't find any answers yet and I don't know if is something related to settings or anything more complex - the same image opens normally in other laptops.
-
 Hey, every time i export an .svg from AD to Figma, it always resizes to shrink the .svg image inside of one pixel. I'm new to AD and I'm only having this problem in AD. It's like it resizes itself in an export or something. Please check out this loom video of me going through all the steps. https://www.loom.com/share/90672ad2e6d94c6d9018f4b80aeb4c46 How can I export an .svg from AD that is 45x75px (or whatever) and it show up the same in Figma without me having to completely resize from a single pixel sized .svg?
 -
 Hello Team ! Just wanted to know at some stage Affinity Photo will support Lens Profile for devices like iPhones, Samsung Galaxy, Huawei, Pixel and Mi by Xiaomi ? IN fact, today there a lot of people are shooting with their mobile phone because it is what they own and like but those devices doesn't produce RAW file the same way big brand does but some will produce HEIC, JPEG and TIFF files. I know you focus on Pro and Expert but will it be possible for small creators to also be taken in consideration ? Blessings
 -
 Hey everyone, hope that you are well. I have a personal blog where I like to create pixel art. Still learning but yeah, I'm very comfortable with Affinity Designer for my normal vector work so I decided to give it a try for raster images. The thing is: the cursor is driving me nuts! Whenever I increase brush size (2px and up) the "preview" pixel that is going to be painted is displayed top left of the cursor. This video may help illustrate what I'm talking about https://screencast.com/t/k8yET7ijH Is this normal or the expected way for the tool to work? I'm using square brushes.
 -
Hello Team ! Hello Everyone ! Glad to make this suggestion for the good of Affinity and Designers or just Users who joined the move and those considering to join the move. My point is about not killing things that we already love but making them even better and i hope this won't become a troll. To my sight, the celebrissime Liquify Persona need to be reviewed and improved, boosted or upgraded (take it as you want). Actually, a persona is not just something we click at but it is an identity to a type of Designer/ Creative Person/People and it is time to make it reflect those of us who identify their style through that Persona. ___________________________________________ Having a Persona to only twirl, Freeze, push etc ... some couple of Pixel is good but ... there is more to it. I suggest the Liquify Persona to be upgraded and maybe renamed to fit with the real style it is supposed to reflect: Photo Manipulation or Photo Composition (here too call like you want). I suggest more tools to be put in there that will help make the Photo Composition/Manipulation happen from that precise place with dedicated tools and even it can be the opportunity to develop new tools that fit the Manipulation/Composition Style. i'm not asking for tool to be removed from the Pixel Persona, not at all but asking for the Pixel/Photo Persona to be less loaded from its first approach for sure a user could decide to customize his toolbox like we currently are allowed to do but if that user is a Photo Manipulator/Compositor then he should load everything he want (photos) using the Pixel/Photo Persona then switch to the dedicated Manipulation/Composition Persona and do his work from that place. The workflow could be like this: 1- Load an image (or many images) on the Pixel Persona then select the object we want to work with 2- click the Manipulation/Composition Persona then be presented with necessary tools for that precise job, from Selection brush, Flood Selection, to inPainting not forgetting all liquify tools but all those should now be in more advanced mode giving more flexibility and settings to fine tune the work. 3- Do the job and when done click on Apply to switch back to the Pixel/Photo Persona which is the central place and see the result. Then do the same again and again with all other layers who need to be transformed or manipulated 4- the upgrade should give the user the opportunity through a button (like the After/Before) to view full stack of layer in low opacity mode which can be increased or decreased (but the user should only be allowed to work on one layer at a time. 5- All Color Grading work can happen in the Develop Persona or in the Pixel/Photo Persona (here for those who need to control) 6- The Tone Mapping Persona wold be helpful for fine tuning the thing with rich presets, LUT or Manual stuffs. Well all this must be given the possibility to be non destructive, meaning i must be able to select a layer in my stack anytime, at any level of progress and switch back to the Manipulation Persona and redo this or fine tune more that etc... More focus in the Non Destructive aspect will actually increase the value of the software. I know the move you are taking with making Designer and Photo to be kind of sub or Persona for Publisher but still Photo should be improved on its own because Photo compositor/Manipulators won't buy Publisher just because it is not what they do but a more enriched Photo software ... Well Yes many would go for it no complex to what already exist. This topic is open to more adds that can help Devs to figure this out. Even if they don't implement it with 1.7 Beta cycle, it is something they may take serious and consider to fine tune and implement in coming version and we can help here. I'm only 1 Brain, yours are needed for more power, Step out of the Purist areas and come help build great with you original ideas. Hope i've posted in the right place and wish you all the best with improving Affinity. Blessings.
-
Hello Team Well i have couples of suggestions for what i call "The Persona Improvements". Well it is nothing as serious as the title is but more like me looking into things with different sight. 1- The Tone Mapping persona is lacking of a Global Reset button or function that allows the user to reset anything done there without leaving the Persona, i ask this because the Tone Mapping Persona have default behavior of applying the latest used Preset and apply it to a newly loaded picture, so having a Reset Global button will help us have a picture that is not directly changed and for which we can start at fresh either it be for manual adjustment or preset application. - Please Fix/Implement- 2- The Tone Mapping Persona to me should be far more than what it is actually and it the right place for us to process and handle very helpful and serious stuffs like LUT (and even more) but in a more advanced way than what we can do with the LUT Adjustment layer, there also we should be able to import/export LUT with ease of use. 3- The different categories we see in the persona would be pleasant if you could make it Fold/unFold. actually when i click say Main" or "Exposure" it stays unFolded and the only way to Fold it is to uncheck it thus disabling the related settings, So please make it Foldable/un Foldable but please keep the enable/disable for who may want (it is also necessary) 4- The curve category should offer more settings than the Adjustment of the same name (this should be the case for the develop persona too) i mean you should put everything like the Eye dropper for Highlight-Mid Tone and Shadow allowing us to do more and very accurate color grading and color balance. 5- I suggest changes and works done in the Tone Mapping Persona to reflect on the pixel persona as Adjustment Layers for he who may want that config but also it will make the thing more "Non Destructive style of work" also we should be able after applying our selection using the Tone Map Persona to return there and work from where we left things and not start at fresh again superposing this and that thus making our design or work "too much" ! 6- Possible to speed up the load of One Map persona ? i think if you disable the Auto apply selected tone it will be much faster and leaving us full control of whatwe want to do in there. That was my 6 points for a Better Affinity! Blessings.
-
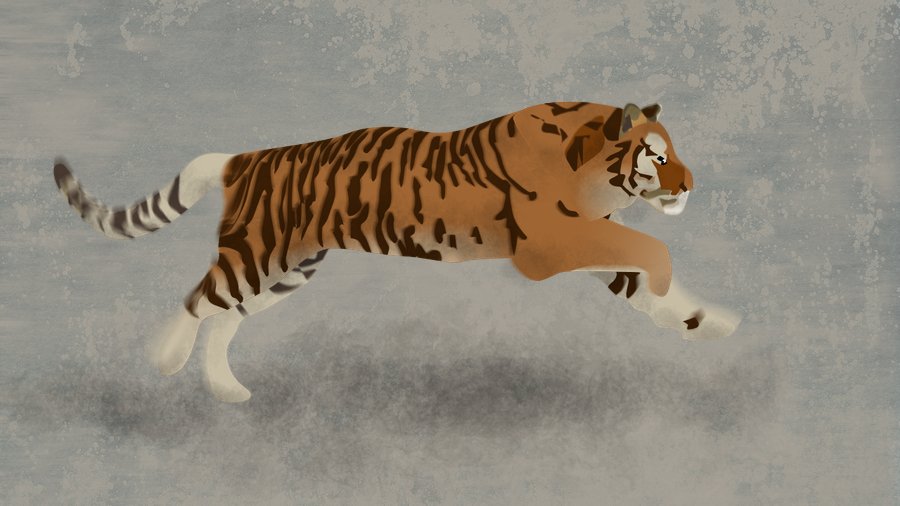
I'm working through the AD Workbook, and the first example seemed a little too easy for an old hand (or do I mean know-all?) like me, so I decided to try something a little more ambitious. So I did a tiger. It wasn't bad, but I thought I could do better ... so I did another one. Here it is ... This is reduced to about 70% of the original size. In the book, Ben The Illustrator says he often works from videos rather than still photos, so I looked out one or two videos on the internet. This image is made from two stills, as the real thing didn't look exciting enough! I made vector shapes on separate layers of: the body and nearer legs; the tail; the head; the further legs; and the stripes -- the stripes I clipped to their layers so i didn't have to fiddle about with the edges. I saved that as an AD file, then as an AP file, which I then edited with some motion and radial blur to give a sense of movement. As I went along, I duplicated some of the layers and rasterised them, so I could add some shading and clip them. Finally, I made up a background from a couple of texture images, and added a shadow underneath the animal.
-
It would be nice if you could add a filter to pixelate a vectorized drawing select drawing and then apply the filter or pixel effect, result when exporting to 64x64 the quality is perfect. Good would be better for artist in pixel
-
 Hi good day my intention is to export a 64x64 pixelated graphic, well if I export it directly, the quality is not what I expected. Is there any way to do this?
 -
 EDIT: Nevermind! I figured out what I was doing wrong. Thank you, though! I'm using Affinity Photo. This is the scenario: I have an 14 x 9 inch (landscape) jpg of an advertisement that I need to edit to fit an 8.5 x 11 inch (portrait) page. I need to cut and paste parts of the ad around in order to do this. I created an 8.5 x 11 inch document. Next, I placed the image onto the document. Naturally, some of the image falls off the document. As an image layer, I am unable to select part of the image, cut it and paste it onto a new layer. What happens is the entire image gets pasted onto the new layer. So, I converted the image layer into a pixel layer. Now, I am able to select a portion, cut and paste into a new layer, but the rest of the image (the part that fell off the document bounds) has disappeared. It has been clipped to the canvas. Unclipping the canvas is pointless because although it now shows the entire image, it defeats the purpose of creating an 8.5 x 11 document in the first place. What am I doing wrong? In Photoshop, I'm able to create a document of whatever size, place or drag in an image of any size, and manipulate the image as I need to and the parts that fall off the document bounds are still there.
-
- 1
-

-
- affinity photo
- photo
- (and 5 more)
-
Hello Everyone ! Would ask for more Non-Destructive capabilities to be added to Affinity Photo. There are great initiative taken with certain tools using a blank pixel layer but i believe more needs to be implemented and documented. i'm first thinking about : The Tone Mapping Persona: this is a great place for making our work better but it's only works in a destructive way (maybe i don't how to do it) but it would be great if a tone map can be added to a mask or a blank pixel layer then we can chose from there to map only a certain area/object etc of our photo/picture/ Development Persona: Great place to spend time working on better picture but also everything there is destructive, here i propose that one applied, our development to appears on sub or top layers similar to filter or mask or whatever dev's may find then from there we can mask this or that or simply make it possible continue where we left it in case we click the development persona again. Same thing should be applied to Liquify persona too. in fact, more Non-Destructive is okay and will be well received. if anyone knows how to do deep Non-Destructive works and/or know where to find tutos that talks about, please share ! Blessings !
-
- 1
-

-
- non destructive
- destructive
- (and 5 more)
-
Well ! i'm back with this other which i believe will help us all. Personally i like the way Serif made it cross-edit between all 3 piece of software but ... because there is always a but ! i Think the way it was and is managed is a bit counter productive or maybe not at its fullness. let me explain ! Here when you have a file opened on APub and want to do some work on it with ADesigner you can Edit with Designer then the whole project is transferred there leaving APub empty of everything but sometime we only want to edit a precise thing such as a smart shape etc... thus making the transfer of the whole project to ADesigner a kind of ... What if Serif could make it possible for us Click on the Object we want to edit and : 1- Right click on it then chose Edit with : Photo or Designer (depending of what we may want to achieve) 2- After selecting the desired object, we can also click the related persona (place where we want to edit) then have that precise thing migrated there for its edit 3- Should be the option we currently have, if we select nothing but click on one of the persona or chose to Edit with ... then whole project get migrated there for its further edit leaving APub Blank. The first 2 options should leave the core project opened in APub then only we should be able to edit the select object then click save to get its edit saved as an update withing the already opened and not closed project withing APub. The we can chose to edit only a part of the project without leaving the main tool we use and see the updates in real-time. Well, more geared peoples can add to this idea and help make this get better. Blessing !
- 3 replies
-
- 1
-
-
- edit
- cross edition
- (and 7 more)
-
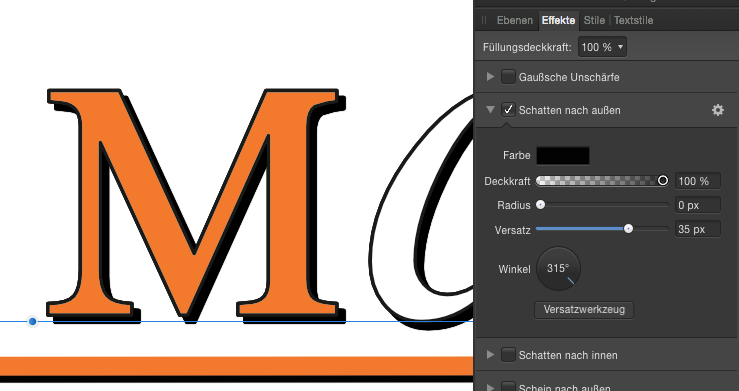
 Hello all, I designed a logo and used the outer shadow effect, Radius is set to 0 px. (see picture below) My expectation was, when exporting this to a PDF x4, that this shadow still is a vector element. When zooming in the PDF file in Adobe Acrobat, I can see that the effect was rasterized. In the PDF export preferenced, "Rasterize: Unsupported elements" is activated. Switching this option to "Rasterize: Nothing" will result in a PDF file without any shadow. Is there any way to keep effects as vector elements like in Adobe Illustrator? Thanks for your hints! I'm using Designer 1.6.1 on Mac OS X Regards, Holger
-
Okay ! here comes the proposition or question. I've noticed everything or all tone map we apply to a pixel layer (let's say i merged visible and decided to apply tone map to it) that operation is still destructive. I mean, tone mapping is very helpful but would be great if it become non-destructive. Okay maybe i'm missing a way to do that but i always : merged visible and applied tone mapping from that thus preserving the other layers ! if there is a way to tone map non-destructively please let me know if not yet then please Serif, make it happen. Blessings !
-
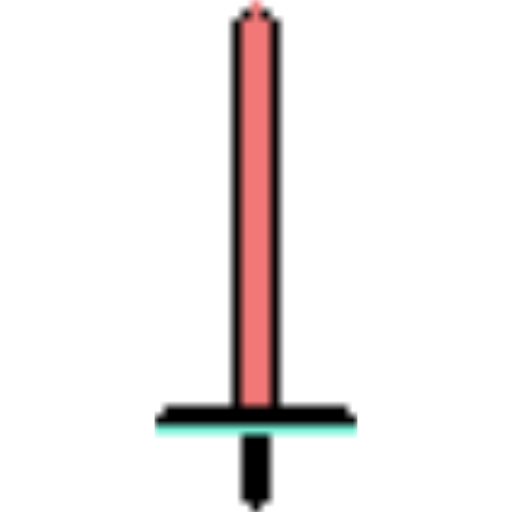
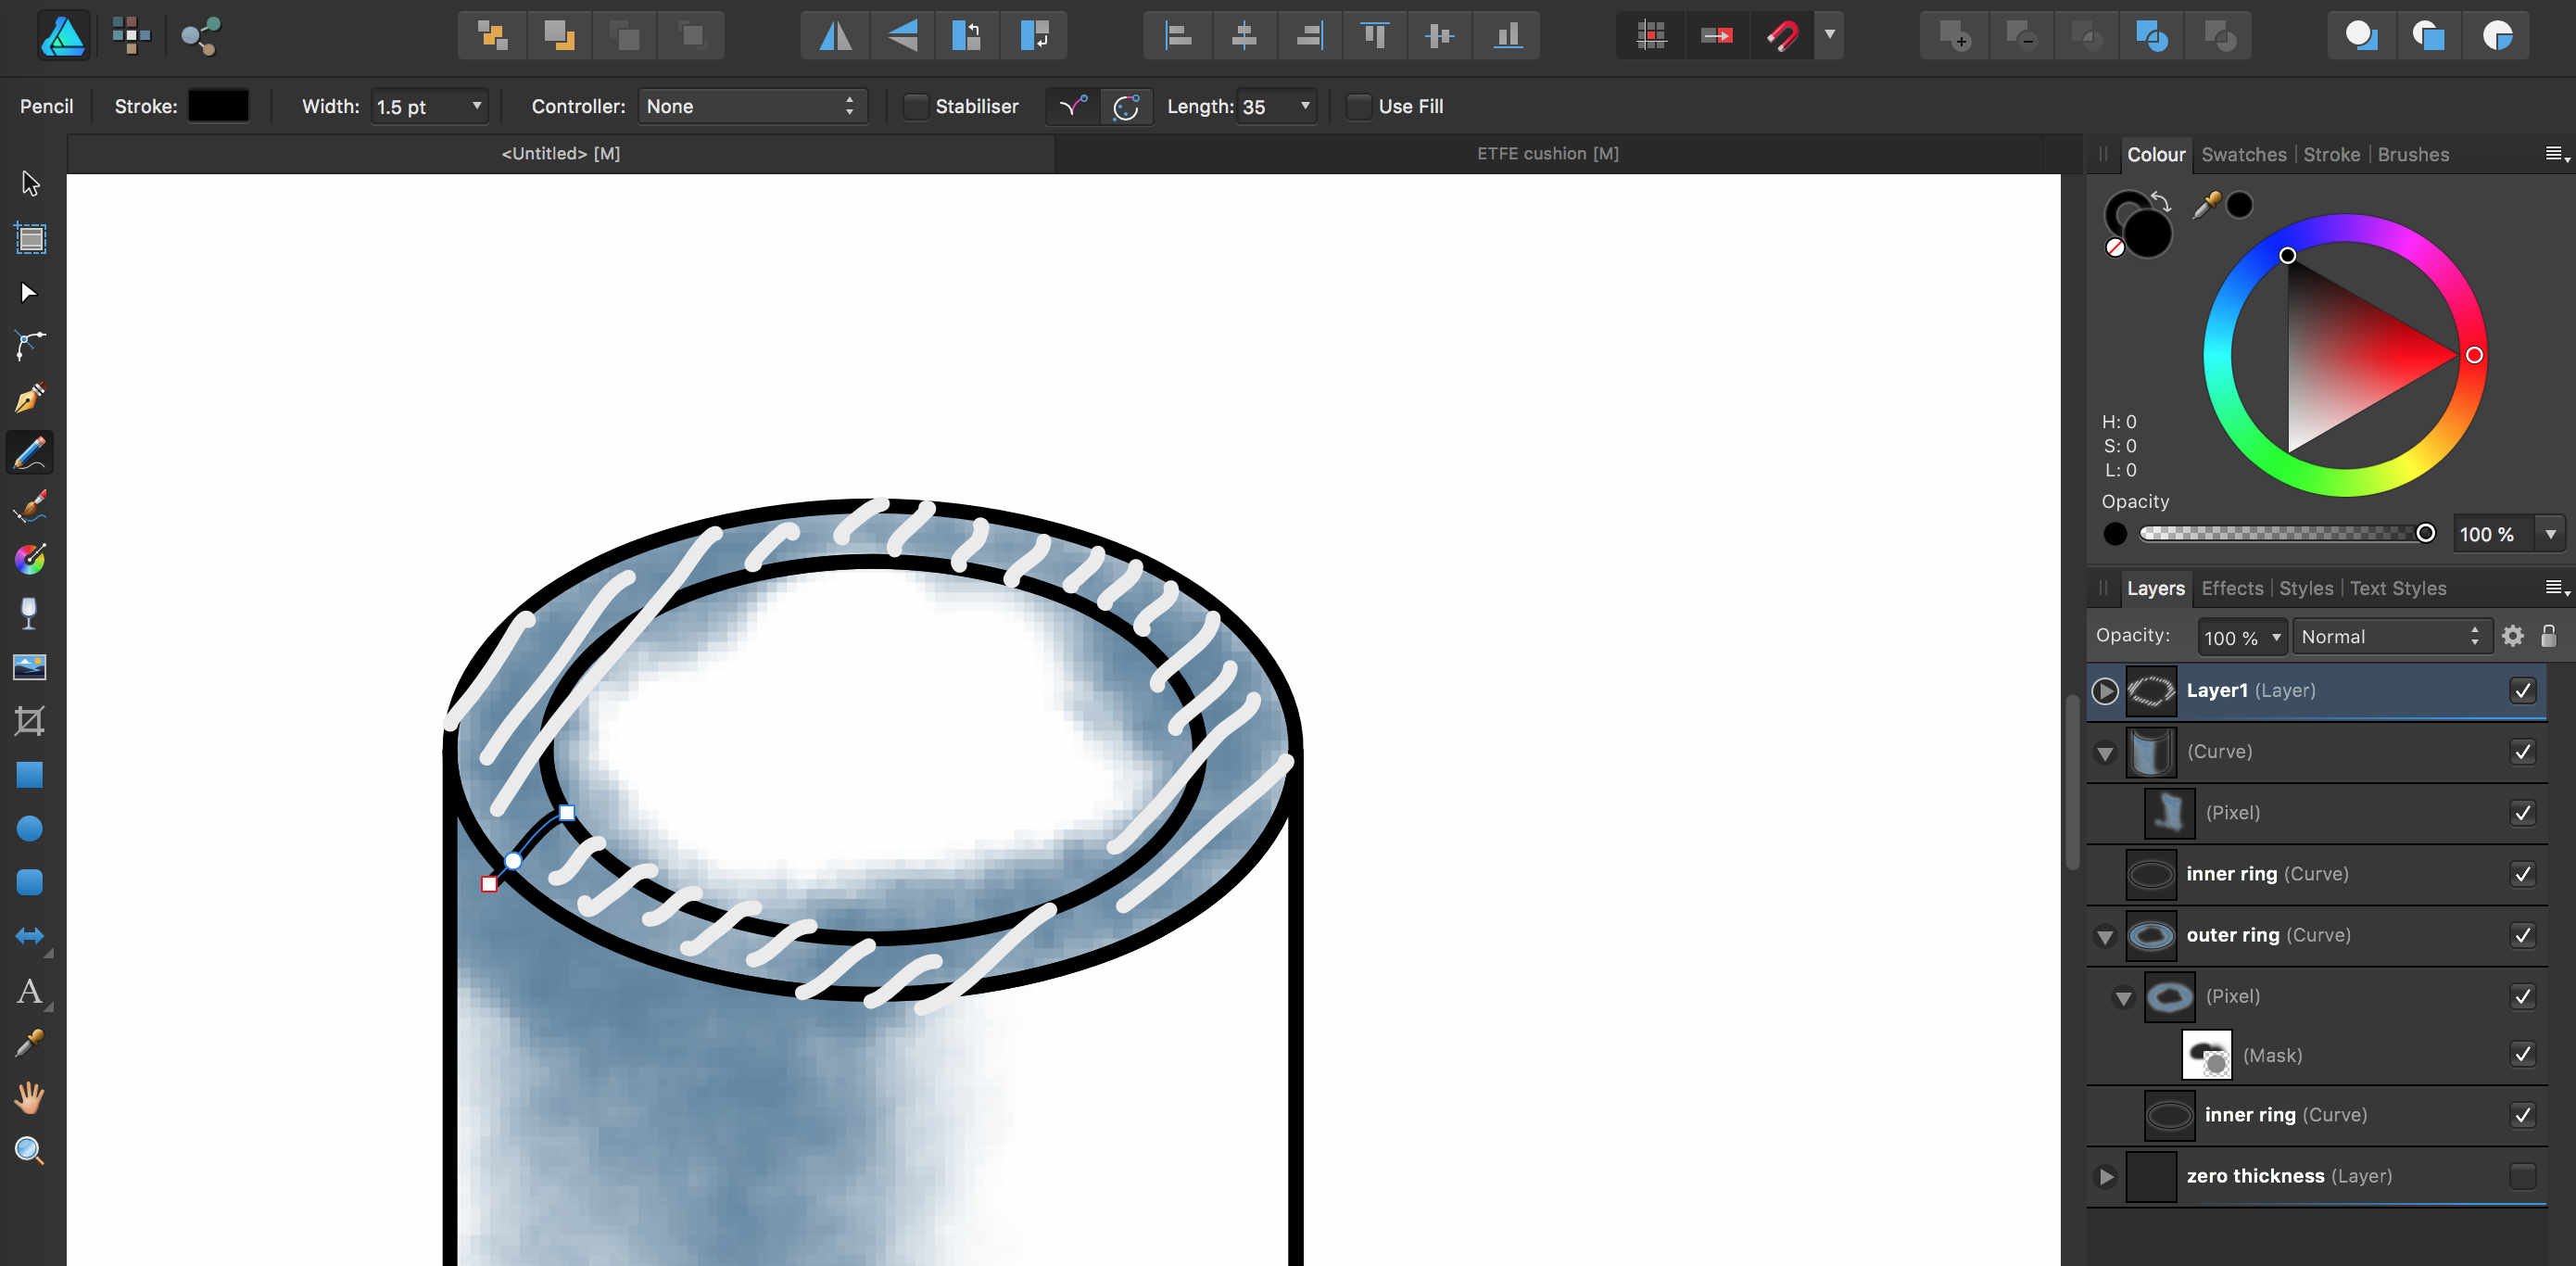
 Hi I'd like to know how to paint a vector shape as shown in the attached image, the hatched area? I know how to switch to pixelpersona to paint within a vector shape (circle, rectangle, triangle...), but failed to figure out how to paint a hollow circle ( a ring zone) ... In the attached image, I used the outer circle as mask to paint, however it will also paint into the inner smaller ring, yes, I can use eraser to carefully erase it off... but is there a way I can paint "freely" directly in this ring area? or is there a way to set up a mask for the eraser to ease the job? Thank you!
-
 Hello! So, my question is basically, "what's the big jump/difference between AP and AD?". I know this question has already been asked and the short answer is: "AP for pixel and photo editing and AD for vector-based graphics and illustration." Here's my point: I've been using Photoshop and Illustrator for a while but I'm transitioning to Affinity, 'cause it's lovely. I've been doing social media posts that mix images and graphics (text, shapes, graphic elements, etc) since before the transition, and it was clear to me the point where PS and AI intersected. I could not do "organic" strokes with the pen tool on Photoshop, neither could I edit text as curves. I couldn't work smoothly with gradients, merge shapes with complex operations—like pathfinder—and the list goes on. Photoshop was pretty limited in vector managing, and Illustrator couldn't do pixel work. Fast forward, I open Affinity Photo and it's like I don't need a vector software anymore. Everything I'd need to open Illustrator for is inside Affinity's pixel-based editor. As if it's not enough, AD can handle pixel manipulation—though I didn't use it enough to know its limits. I've tested both AP and AD during the free trial and, after expiration, bought Photo. I'm considering buying Designer now because their workflow together is pretty amazing, but do I really need it? What can Designer do that Photo can't? I feel like I can take the pen tool on Photo and create any shape I'd want, applying colors effortlessly. Can someone enlight me? Thanks!
 -
 Is it possible to merge pixel layers in designer?