Search the Community
Showing results for tags 'Pixel'.
-
Hello everyone , recently i started working on glitch art . A pixel sorter would make my work very easy because sadly you cannot really achieve the pixel sorting effect with the displacement map. It should roughly work like the "Wind" tool in photoshop where it slices and displaces the images in a vertical or horizontal plane To illustrate what I am talking about

-
 Well ! i'm back with this other which i believe will help us all. Personally i like the way Serif made it cross-edit between all 3 piece of software but ... because there is always a but ! i Think the way it was and is managed is a bit counter productive or maybe not at its fullness. let me explain ! Here when you have a file opened on APub and want to do some work on it with ADesigner you can Edit with Designer then the whole project is transferred there leaving APub empty of everything but sometime we only want to edit a precise thing such as a smart shape etc... thus making the transfer of the whole project to ADesigner a kind of ... What if Serif could make it possible for us Click on the Object we want to edit and : 1- Right click on it then chose Edit with : Photo or Designer (depending of what we may want to achieve) 2- After selecting the desired object, we can also click the related persona (place where we want to edit) then have that precise thing migrated there for its edit 3- Should be the option we currently have, if we select nothing but click on one of the persona or chose to Edit with ... then whole project get migrated there for its further edit leaving APub Blank. The first 2 options should leave the core project opened in APub then only we should be able to edit the select object then click save to get its edit saved as an update withing the already opened and not closed project withing APub. The we can chose to edit only a part of the project without leaving the main tool we use and see the updates in real-time. Well, more geared peoples can add to this idea and help make this get better. Blessing !
- 3 replies
-
- 1
-

-
- edit
- cross edition
- (and 7 more)
-
Hello Everyone ! Would ask for more Non-Destructive capabilities to be added to Affinity Photo. There are great initiative taken with certain tools using a blank pixel layer but i believe more needs to be implemented and documented. i'm first thinking about : The Tone Mapping Persona: this is a great place for making our work better but it's only works in a destructive way (maybe i don't how to do it) but it would be great if a tone map can be added to a mask or a blank pixel layer then we can chose from there to map only a certain area/object etc of our photo/picture/ Development Persona: Great place to spend time working on better picture but also everything there is destructive, here i propose that one applied, our development to appears on sub or top layers similar to filter or mask or whatever dev's may find then from there we can mask this or that or simply make it possible continue where we left it in case we click the development persona again. Same thing should be applied to Liquify persona too. in fact, more Non-Destructive is okay and will be well received. if anyone knows how to do deep Non-Destructive works and/or know where to find tutos that talks about, please share ! Blessings !
-
- 1
-
-
- non destructive
- destructive
- (and 5 more)
-
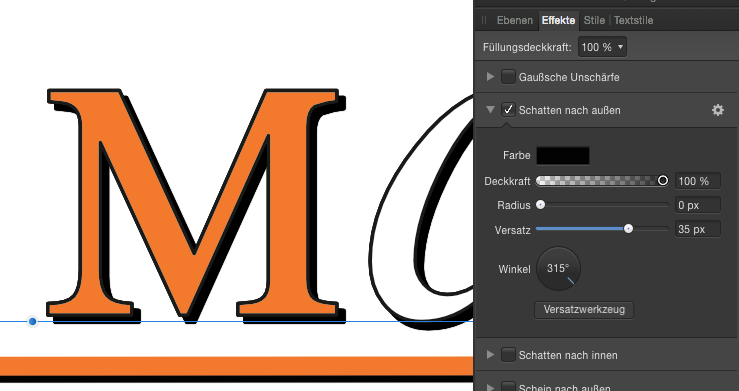
 Hello all, I designed a logo and used the outer shadow effect, Radius is set to 0 px. (see picture below) My expectation was, when exporting this to a PDF x4, that this shadow still is a vector element. When zooming in the PDF file in Adobe Acrobat, I can see that the effect was rasterized. In the PDF export preferenced, "Rasterize: Unsupported elements" is activated. Switching this option to "Rasterize: Nothing" will result in a PDF file without any shadow. Is there any way to keep effects as vector elements like in Adobe Illustrator? Thanks for your hints! I'm using Designer 1.6.1 on Mac OS X Regards, Holger
-
Okay ! here comes the proposition or question. I've noticed everything or all tone map we apply to a pixel layer (let's say i merged visible and decided to apply tone map to it) that operation is still destructive. I mean, tone mapping is very helpful but would be great if it become non-destructive. Okay maybe i'm missing a way to do that but i always : merged visible and applied tone mapping from that thus preserving the other layers ! if there is a way to tone map non-destructively please let me know if not yet then please Serif, make it happen. Blessings !
-
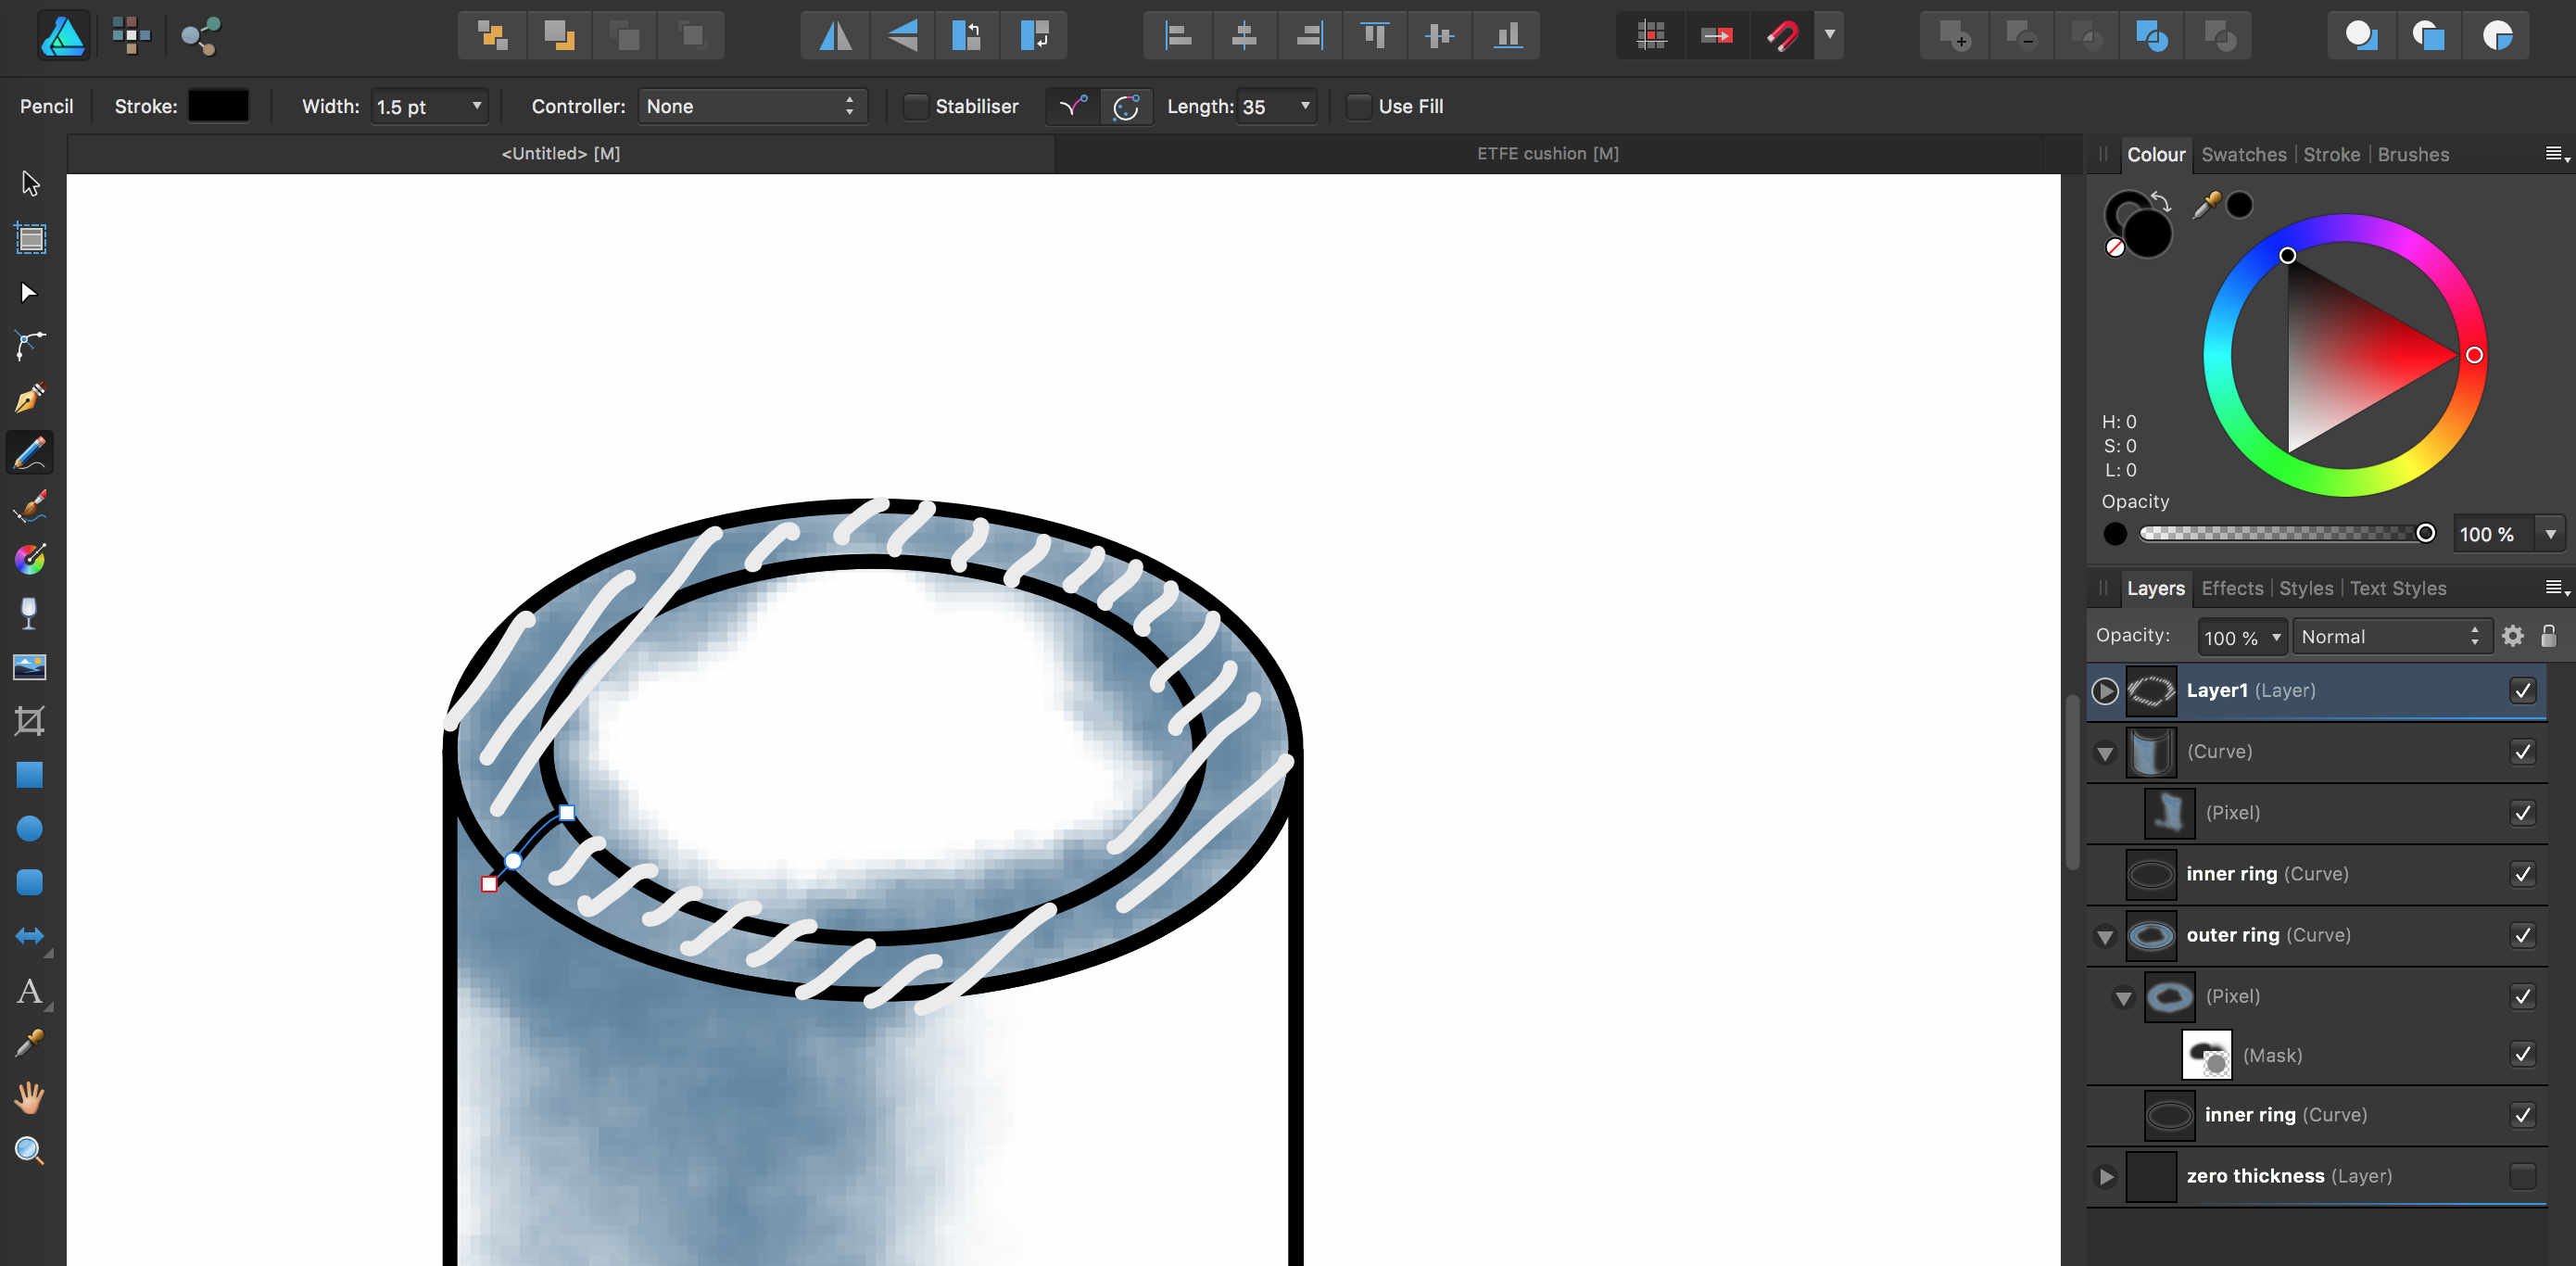
 Hi I'd like to know how to paint a vector shape as shown in the attached image, the hatched area? I know how to switch to pixelpersona to paint within a vector shape (circle, rectangle, triangle...), but failed to figure out how to paint a hollow circle ( a ring zone) ... In the attached image, I used the outer circle as mask to paint, however it will also paint into the inner smaller ring, yes, I can use eraser to carefully erase it off... but is there a way I can paint "freely" directly in this ring area? or is there a way to set up a mask for the eraser to ease the job? Thank you!
-
 Hello! So, my question is basically, "what's the big jump/difference between AP and AD?". I know this question has already been asked and the short answer is: "AP for pixel and photo editing and AD for vector-based graphics and illustration." Here's my point: I've been using Photoshop and Illustrator for a while but I'm transitioning to Affinity, 'cause it's lovely. I've been doing social media posts that mix images and graphics (text, shapes, graphic elements, etc) since before the transition, and it was clear to me the point where PS and AI intersected. I could not do "organic" strokes with the pen tool on Photoshop, neither could I edit text as curves. I couldn't work smoothly with gradients, merge shapes with complex operations—like pathfinder—and the list goes on. Photoshop was pretty limited in vector managing, and Illustrator couldn't do pixel work. Fast forward, I open Affinity Photo and it's like I don't need a vector software anymore. Everything I'd need to open Illustrator for is inside Affinity's pixel-based editor. As if it's not enough, AD can handle pixel manipulation—though I didn't use it enough to know its limits. I've tested both AP and AD during the free trial and, after expiration, bought Photo. I'm considering buying Designer now because their workflow together is pretty amazing, but do I really need it? What can Designer do that Photo can't? I feel like I can take the pen tool on Photo and create any shape I'd want, applying colors effortlessly. Can someone enlight me? Thanks!
 -
 Hello Everyone, I am new to Affinity Designer, i can say that Affinity Designer is a Very good Software so i was working on brush today and i found something un-usual In Pixel Persona the Brushes is not smooth when i draw anything. but in Draw Persona there isn't any problem like this. see the Image, the Brush i used on the Left is from Draw Persona & the Brush i Used to the Right is from Pixel Persona. can anyone tell me why is this happening. am i doing anything anything wrong or missing anything i am using affinity designer version 1.6.4 on Windows 10
-
 This is just a small tip/warning but it took me a while to figure out what was going on. Since Designer has the Pixel persona one has to be aware that there is the second type of selection - the pixel selection. The first type is obviously the object selection (selection box). If you are working with both types of selections (switching to Pixel persona and back) at one point you may forget to clear the pixel selection (deselect) or you may create the pixel selection accidentaly. And that might cause problems/confusion later on. This happened to me: While in Draw persona I selected a pixel object and noticed that the selection (bounding) box is completely off the object and has a different size: I thought that it had to be some kind of a bug. It took me a while to figure out that it is in fact a forgotten (or accidental) pixel selection. So ultimately Ctrl + d solved this issue. So if something is off with your object selection box or you get any sort of weird behavior alway try Ctrl + d. Maybe this is too obvious but you never know... Anyway I just wanted to share this.
-
 Hi, I have a problem with a brandnew hp es27 inch display. I use it as extended display connected to a macbook pro. If I am using the macbook pro with standard applications no problem. If I work with affinity photo problems coming up: - after developing an raw image, the image ist right after developing not sharp and with pixels. If I pull the open program to the mac - the same problem. If I disconnect the display and develope the picture again on the macbook - no problem. - Sometimes the picture contracts so you can see a part of the picture - the rest is canvas as you know it from an empty design template. - the menu bar on top is sometimes fixed sometimes not. When I connect my surface pro with the creative cloud applications, then I have no issue. Hope you can help me, I want to switch complete to affinity solutions - but with such a problem it will not work. Thanks a lot in advance!
 -
 I'm using the drag and drop interface to drop pixel art files (.bmp) from Windows Explorer to work with into a large master file, but when I paste (drop) them the layers depixelate and anti-aliasing appears. I can't tell whether the layers actual contents have been changed or if it is a UI effect but either way, I wish to turn this off. I performed a cursory search of the forums and the Internet but was unable to find anything for Affinity Photo. Here is approximately what's going on: If I copy and paste a range of pixels, the type of layer created is of type "Pixel", but when I drag and drop a file from an explorer window onto a canvas, it creates a layer of type "Image" instead. How do I make new layers made by drag/drop appear as pristine original pixels (like copy-paste) rather than a blurry anti-aliased version of themselves? I don't see a way to change this in the layer settings or in the Preferences window.
 -
 Tone mapping is not working on a single image pixel layer but is working on the background layer. Default panel on the left does not show any images can someone help
 -
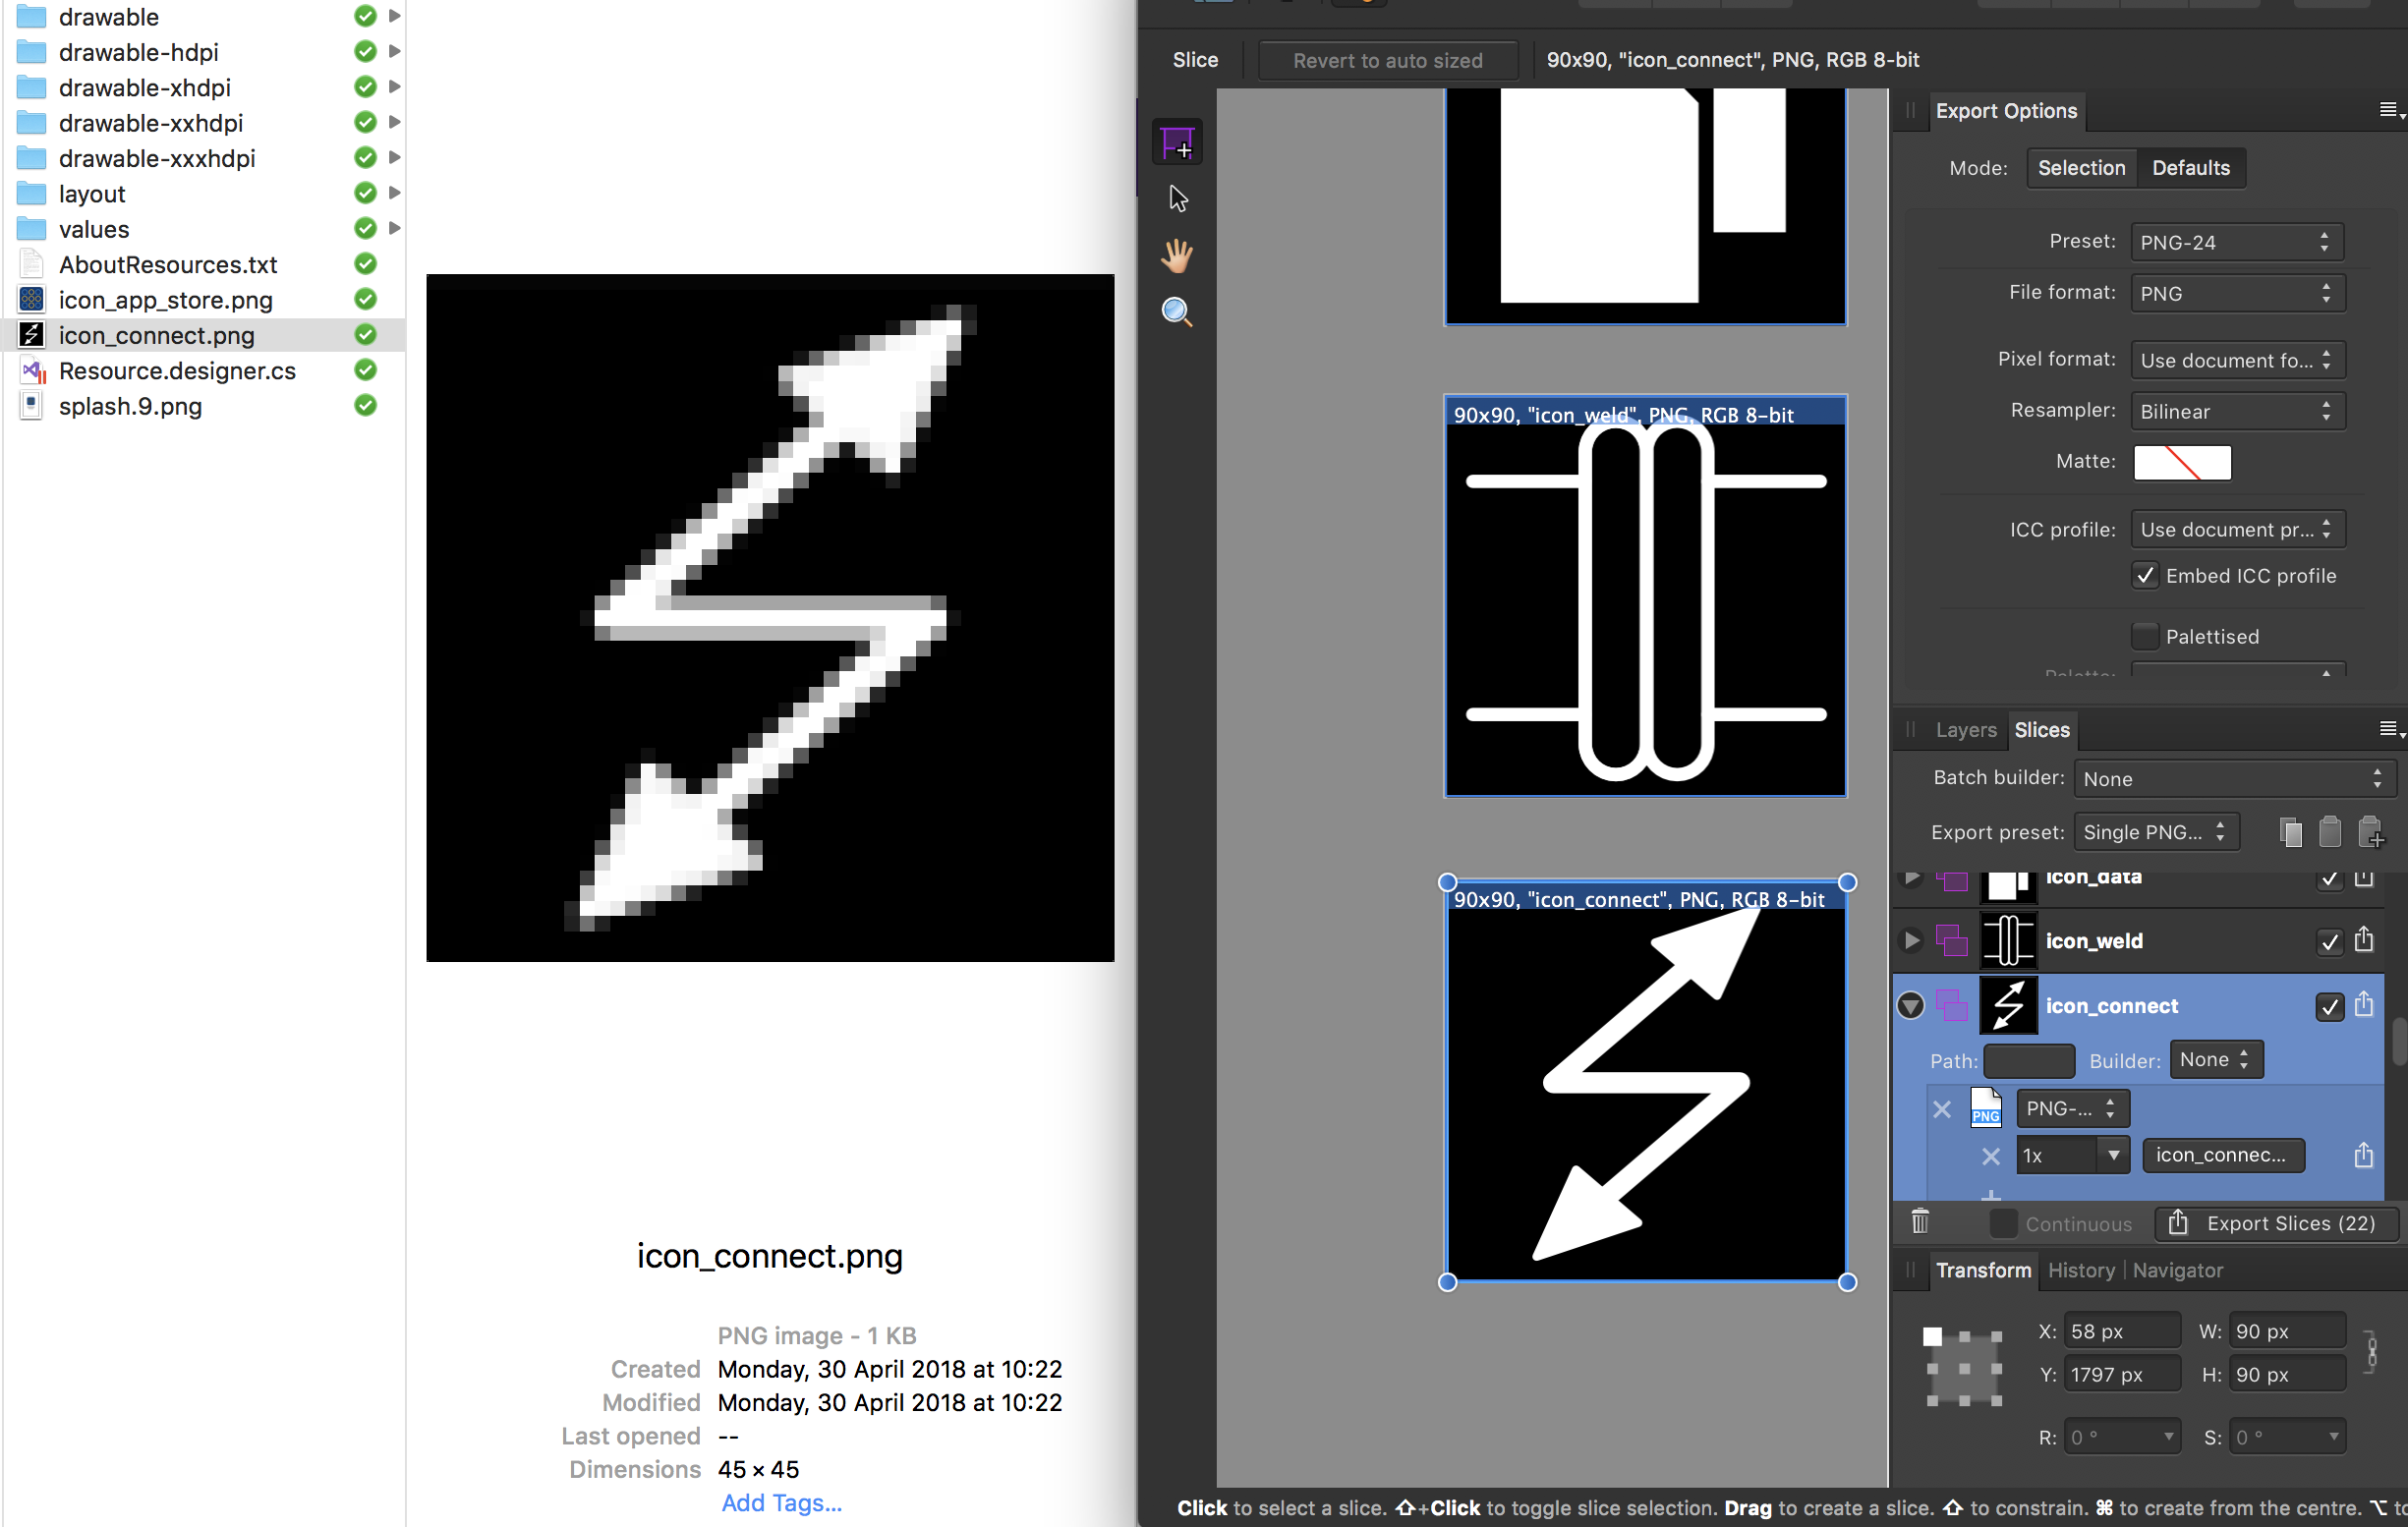
 Exporting sections results in incorrect pixel size. Please see image below where the document is set up in pixels, icon_connect is sized in the document (draw persona) to be 90 x 90 pixels. Export persona export slice also is set up to be 90 x 90 pixels, but the resulting file is 45 x 45 pixels after export. I can't find any scaling options in settings. How do I get the export to actually size the output correctly (I don't just want to use @2x because I actually want to output multiple sizes (e.g. x1, x2, x3, x4).
-
 Could we get some options to adjust zoom behaviour? Option to always (initially and/or consistently) display documents at the nearest rational zoom level (e.g. 1:3, 1:2, 1:1, 2:1, 3:1, ...) Option to always initially display documents at 1:1 (with option for "Small images only" and "All images") Option to always use nearest-neighbour scaling for rational zoom levels greater than 1 I would also prefer it if the zoom level could be made to never change unless the user requests it.
 -
The lion and the unicorn were fighting for the crown, The lion beat the unicorn all around the town. Some gave them white bread, and some gave them brown; Some gave them plum cake and drummed them out of town. I thought it would be much better if they made it up and went for a pint at The Crown. It's done in Designer, with a couple of brief excursions into Photo to blur the background and stop it competing with the important bits, and to reduce the brightness of the unicorn a little. The woodgrain and the badges on the beer pulls are bitmaps acquired online, but otherwise everything is my own.
-
 I recently lost the "colors" and "brushes" panel in the Pixel Persona setting on Affinity Designer. They don't appear in the Toggle UI anymore when I switch to Pixel Persona. My cursor accidentally got the tabs all mixed up and then they just disappeared. Do you know how I can get them back? Thanks.
 -
 Hey Im using Affinity Photo and I'm doing some pixel art. I'm using a brush that is 8x8 pixels. My grid spacing is 8x8 Pixels with no subdivisions. I was wondering if there is a way snap to grid but have the brush jump from grid square to grid square. So now I want the bursh just to snap to each indidvidual 8x8 grid space so every time i click its going to fill an 8X8 square within the bounderies of the grid. So my 8x8 brush always lines up with the grid. If i hold down shift and click on three points I want it to comes out like the image on the left. But right now I am getting the result on the right. I've played with the snapping setting but I can't quite figure it out. If anybody knows how to set this up please let me know. Thx
-
Hi! I would have a big problem. If you open a .RW2 Panasonic Raw file for Affinity Photo, it will not fix any Hot and Dead pixels. Lightroom is perfect for the picture. It also delivers perfectly to Photoshop Express, but Affinity Photo can see Hot Pixels in multiple places. Is there a setting here that I did not notice? Why does not it fix automatically? Do you have a solution? This should be a very basic thing. I use iPad Pro 2017 /12.9"/ Thank you (Sorry Google Translate)
-
 In Affinity Photo, i want to increase document size, without new calculation. I want the pixels to grow. IMG_20171230_175249_Freigestellt_2pixel2_hell_resize_usm.afphoto
 -
 First of all very nice job on the mobile app! There's still room for improvement, but it's by far the best iPad app in it's category. The features that I would like to see in the new version are: persistent tool selection - specifically, I do a lot of pixel art work, which means I use the pixel brush. However, every time I need to use the Selection persona, I come back to the brush tool being reset to it's default tool, the paint brush. This is quite annoying as I always have to tap 2 times just to go back to the brush I was using. If Affinity would remember I selected the pixel brush my workflow would be much improved switching personas and having personalized menus on 2-finger tap is cool, however, once I make a selection and go back to the drawing persona to move/resize/draw something I cannot access the Select menu without having to switch back to the Select persona. Most of the times I just need to deselect all, so having to tap 3 times is frustrating. I would like to have an option to deselect without switching personas. Maybe long press on the Select persona button in the toolbar gives me the Select menu without switching, maybe 2-finger tap includes some selection items as well even in the default drawing workspace. the fill color I feel should be the color that you're drawing with, not a different one. This is a standard in all drawing software and it's a logical implementation of real life painting - you use your brush to paint small areas, you dump the whole bucket of paint to fill in a large area. Having 2 active colors is nice, but the ability to switch between them and have a primary one which all tools use makes more sense than arbitrarily assigning different colors to different tools. Keep up the awesome job! Thanks! t
 -
 Hi guys, For instance I have an image, and above it I have a shape/curve. Even if the image layer is locked, if I click on the image on the stage/canvas, its margins still show as highlighted. Is there an option not to show that? Thank you
 -
 Hi peeps, On first glance you might think of this as a bit of a trolling, or a comedy title which you could apply to a Cartoon Network character project, but in reality I'm really looking for genuine opinion, experience and insight from those of you who have worked in such a manner. Whilst I can appreciate the flexibility inherent to having raster graphics be available within a vector project, it seems also to contradict the basic principle of electing to use vector - that of infinite scalability, particularly given that you can apply filter effects to vector elements and achieve much of what you might want whilst not being incumbered by the limitations of pixels. How do you feel about the practical application of this aspect of Affinity Designer and how might you have applied or perceived it as a workflow?
 -
 Hey, This might sound so imature but there are actually digners that redesign textures in minecraft. I regular use photoshop to create these designs but now i found this tool for only 60 bucks permanent and thaught if this is a good replacedment. I need to know which program i should rather use when im only designing with my mouse on rasters in pixels (16x16, 32x32, 64x64 ....). Siaro~
 -
 I'm designing a file for print and need to include bleed with my artwork. I am using a combination of vector and pixel elements, which includes pixel brushes. I have attached a screenshot of the close up of my artwork, and my brushwork is cropped by the constraints of the artwork trim area, whereas the vector elements are unaffected. Is there something I am missing? I have added bleed to the document but can't seem to paint on the bleed area. Is there a setting I need to turn on in order to do this?
-
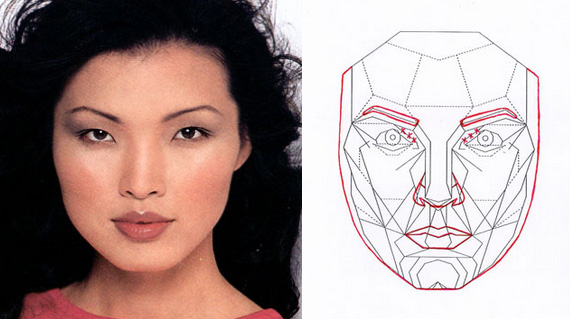
 Hi, I am working on a project that requires several photos (at least 80 of them) to have the same size and pixel count. The photos are faces of men and women from different races and background. I have set the Canvas and Document size to be the same, cropped them with the same width and length, and saved each of them under the same Pixel Size. However, because faces are different in sizes and shapes; some are larger and some are thinner or smaller, the results still vary tremendously. I would like to find out any way possible to measure or set the pixel sizes to be the same for ALL faces please. I have attached what I'm hoping to be an example of the faces just to give an idea. Again, shapes and sizes vary normal but I wanted to have a similar pixel size so that the area to be studied is still the same size if that makes sense. Thank you for your help!