Search the Community
Showing results for tags 'Pixel'.
-
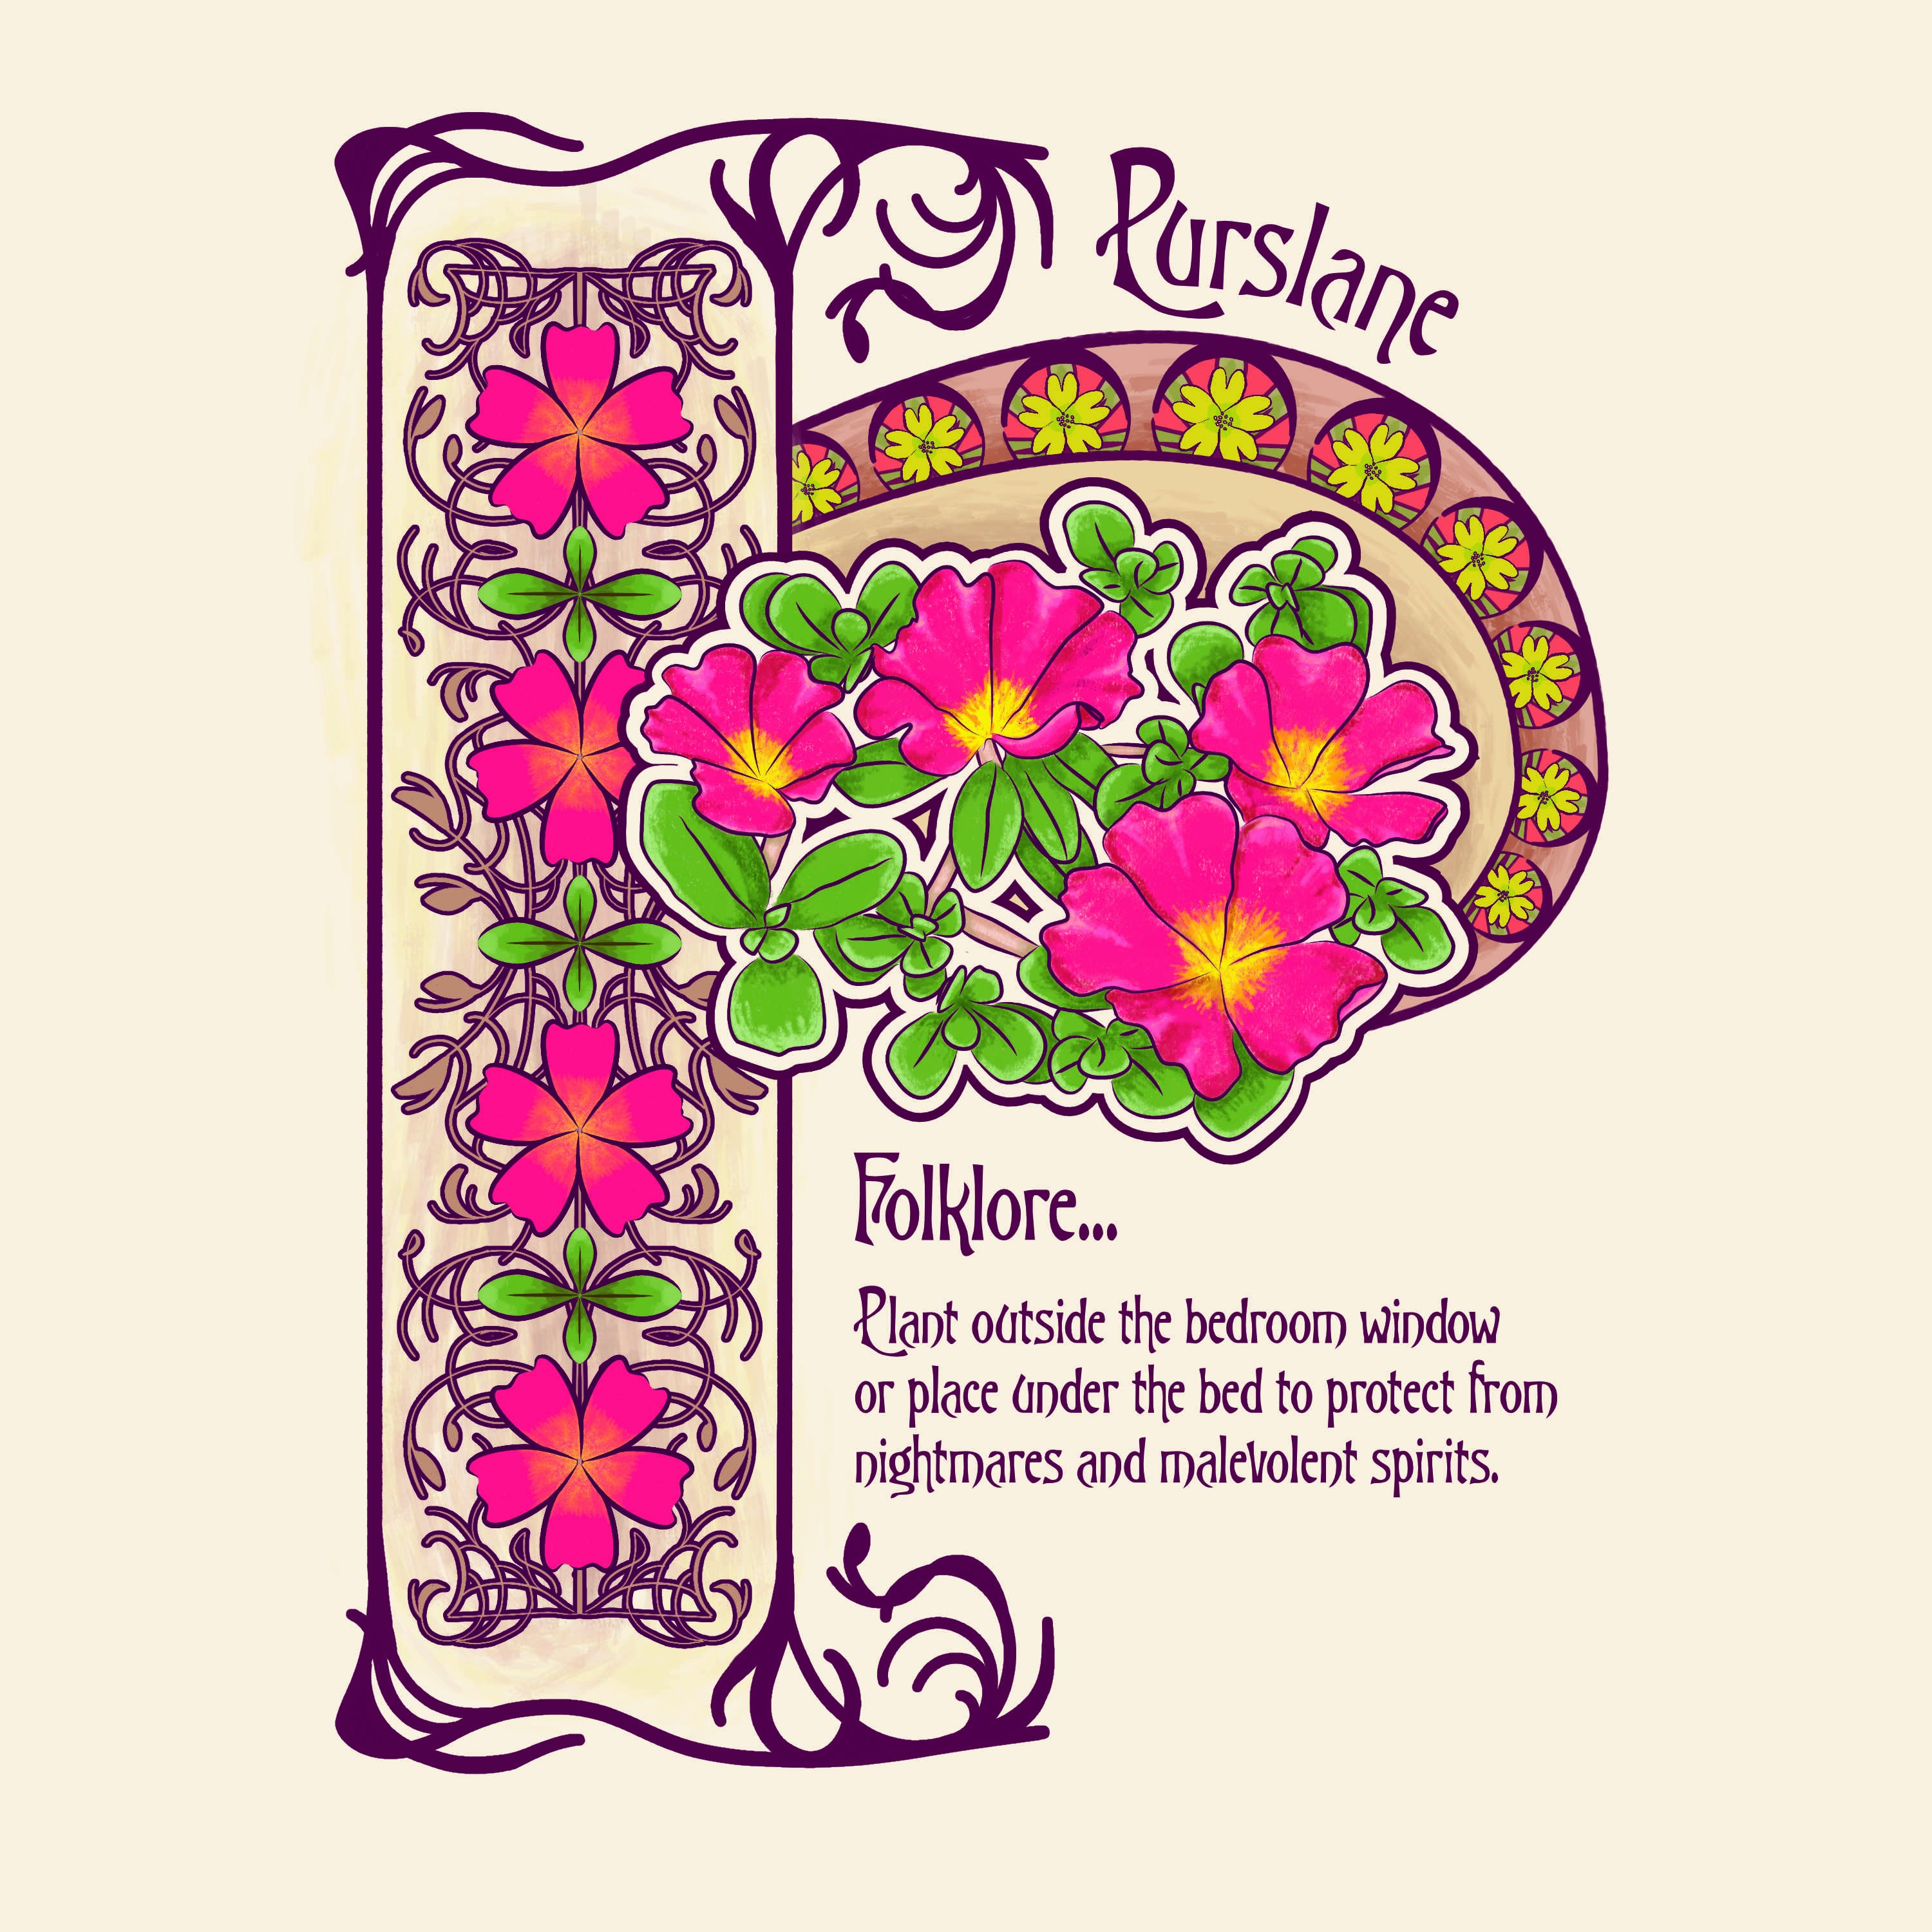
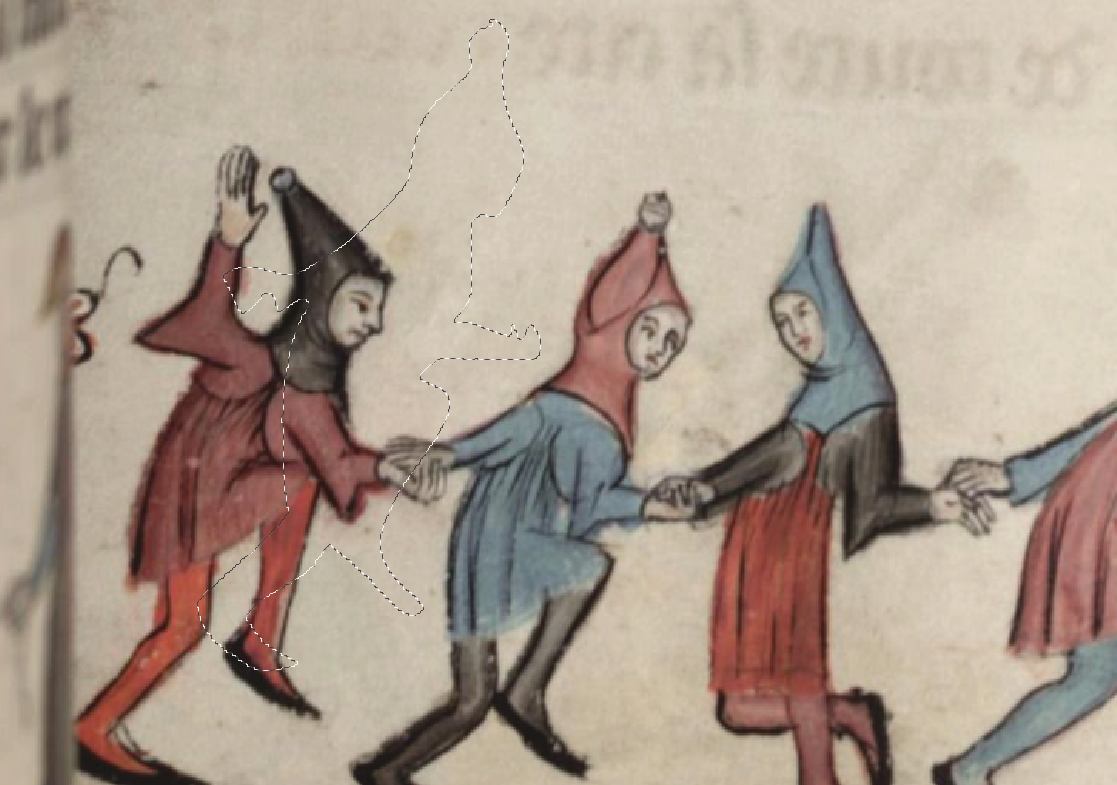
I made this for a french festival using mix of vector & pixels with few time to do it. (Using affinity suite since V1, I will never come back to Adobe suite. Evreything is quicker, easier and fits my needs perfectly : focusing on creativity and not struggling and wasting time to make things work as it should.)

-
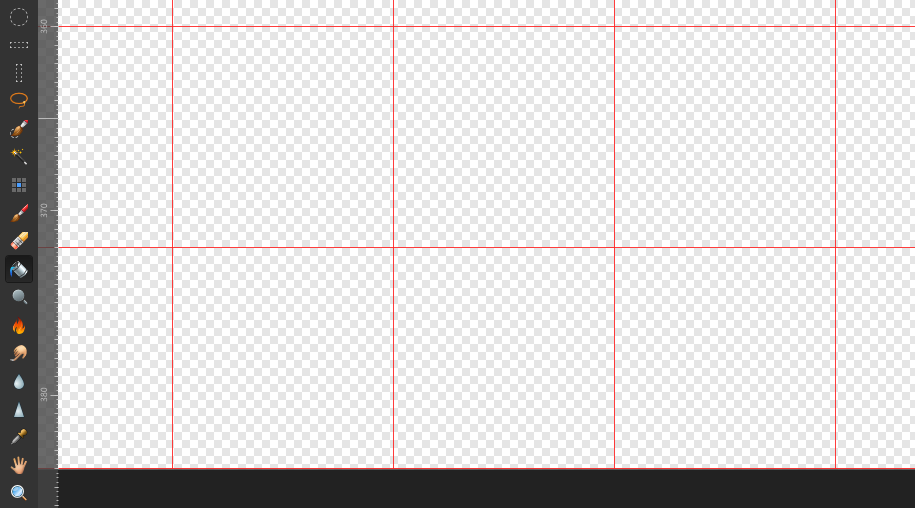
 Any idea how to use fill color in grid area without make rectangle shape in each grid?
-
 In Affinity Persona, on my Mac, I can hold Control while using the vector brush to force a straight line. In Pixel Persona (or in Photo), I can't do that. I can only hold the Shift key to force the line vertical or horizontal. It'd be a quality of life improvement if there were a similar straight-line-only modifier for Pixel persona. While I'm asking, it'd be nice to have that same option available in the Eraser Tool (as it is for the Shift modifier). I see that a similar operation can be done by clicking, then shift-clicking on the 2nd point to connect the two points with a straight line, but I'm really asking for similar functionality as the vector brush where I can drag the final point around and see where the line (or eraser mark) will go so I can fine tune the location.
 -
 Hey everyone, I'm in the middle of a project and I've hit a snag. I'm trying to remove the background from a person's image. For the smooth parts of the silhouette, like the general body and clothes, I'm using vector shapes, and for the more intricate details like strands of hair, I'm using pixel-based masks. (That's how I've always done it.) I thought I could use the compound mask option to combine these two masking techniques into one neat mask. However, that doesn't seem to be possible right now. I want the vector shape to stay vector at all costs for better editability. In the past, for projects like this, I've rasterized the vector shape as the last step, but I'd like to avoid that now. I thought the compound mask would be the perfect option for the task. Has anyone else come across this issue? (Sorry if I missed the thread; if there's one, feel free to point me in that direction.) Maybe this is something that the devs are already working on? I'd love to hear your thoughts or any solutions you might have! Cheers! Dennis *I've attached the masks as a file for testing purposes. Masks.afphoto
 -
 So I want to make pixel art and I see the pixel persona being used for that but I don't want it to be raster I'd like to export my pixel art as an SVG (with no raster) so I was wondering if that was possible with something made in pixel persona. If not is there some sort of pixel tool for the normal designer persona? All I saw there was the rectangle tool and that'd be a pain to use for pixel art.
 -
 A number of users have had the same problem I had with Pixel Persona when seeking to export multiple artboards at once. Each exported image was slightly out of line leaving a small gap on one or two sides of the image that had not been there previously. When zooming in within Pixel Persona, it became clear that the frame of each artboard/slice was slightly out of line with each artboard and could not be repositioned correctly since the frame jumps to the next pixel when it is moved within Pixel Persona. It's as if the artboard's frame had shifted to the nearest pixel. I came across a temporary solution: To align each artboard with one another so they are touching before converting the artboards to slices. However, this is not ideal for every project. Please ensure that the exact artboard area is converted into a slice irrespective of its position on the main document. Thanks! Asa.
- 2 replies
-
- 1
-

-
- pixel persona
- pixel
- (and 7 more)
-
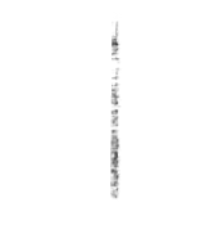
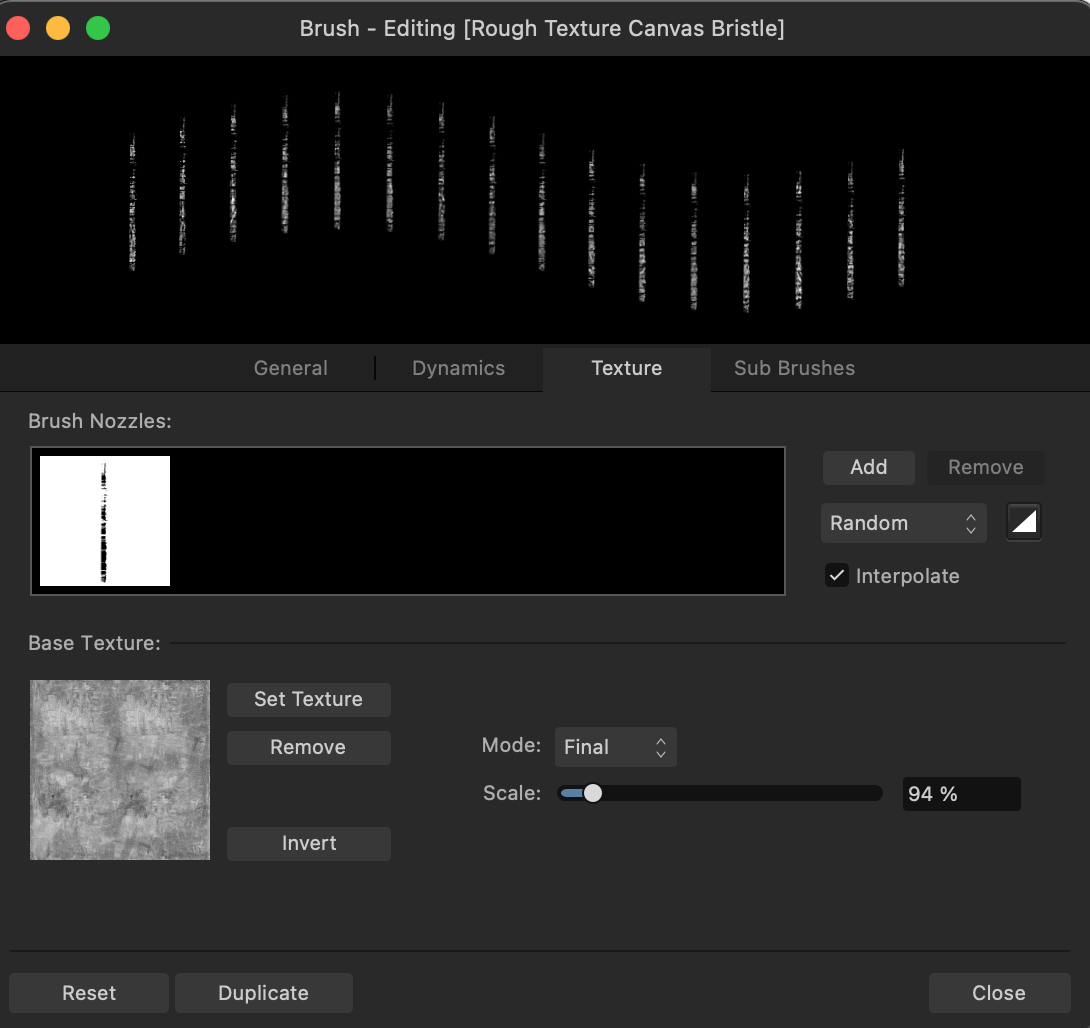
 Hi Community, I have this very basic question about imported pixel brushes to draw: I'm in Pixel Persona and I have correctly imported several sets of photoshop brushes (.abr) downloaded from web in order to find the "perfect" pencil to draw in my style. The import procedure is not a problem, but many of the pencil brushes have in the nozzle something like in the attached pictures, and when I start drawing the effect is useless because the shape does not translate into something "logic" let me say I guess I should manage the parameters but how ? How should I set them in the pixel brushes window in order to use this type of "vertical sticks" as a drawing tool ? Do you have any pointer to learn how to modify these imported brushes so that I can use them to draw as I would normally do with a pencil ? Or maybe these brushes are not compatible and I should throw them away ? I also have seen that most of the original brushes in AD2 (2.0.4) for Mac have a round shape instead of this vertical shape, so maybe I should create brushes my self which is at the end the option I am thinking. In this last case do you have any pointer to recreate more realistic pencils than those already present in AD2 which I don't like much ? Thanks for any suggestion ag
-
I wonder why the 2.0 version of Photo on iPad does not have a symmetry option for the pixel tool? I can not check the v2 dektop version yet, as I don't have a newer Mac. However on v1, I could have symmetry in the brush and the pixel tool, but in v2 on iPad, symmetry is only available for the brush? Is this a bug or is there reasoning behind this omission?
-
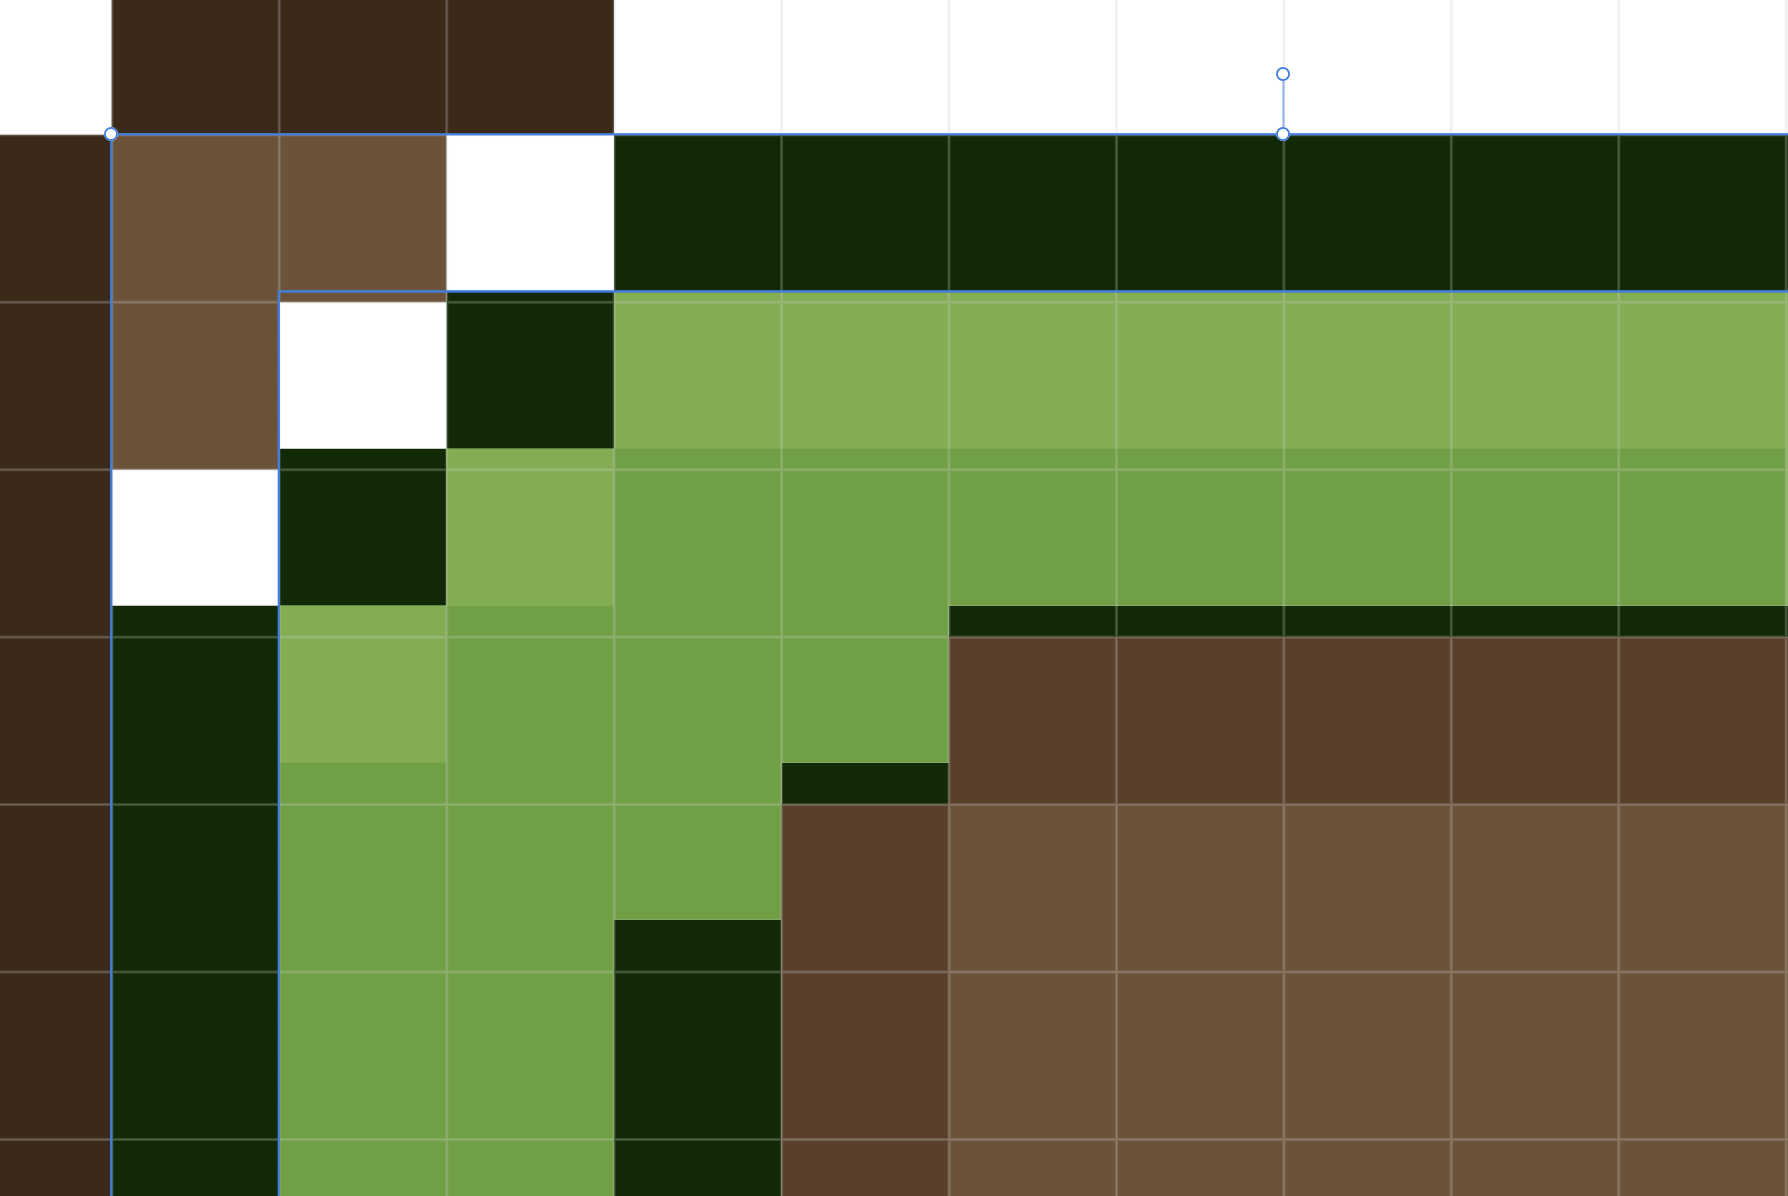
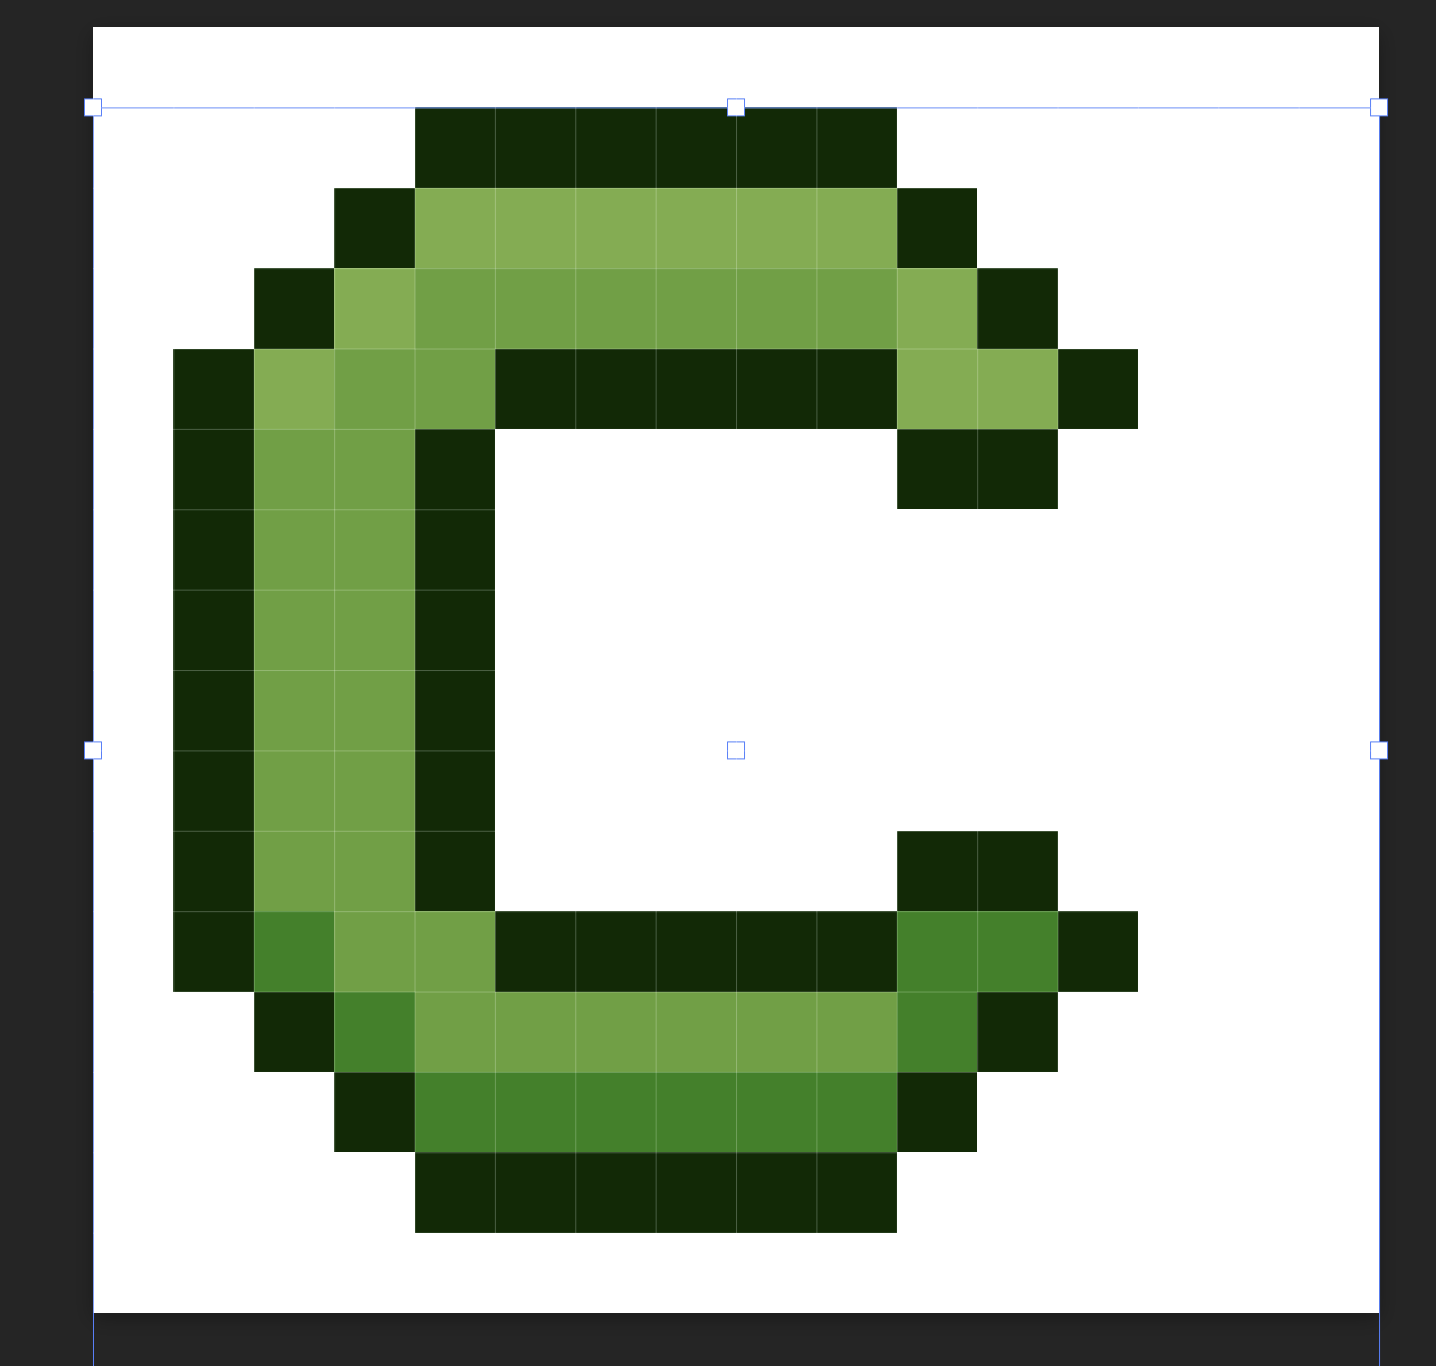
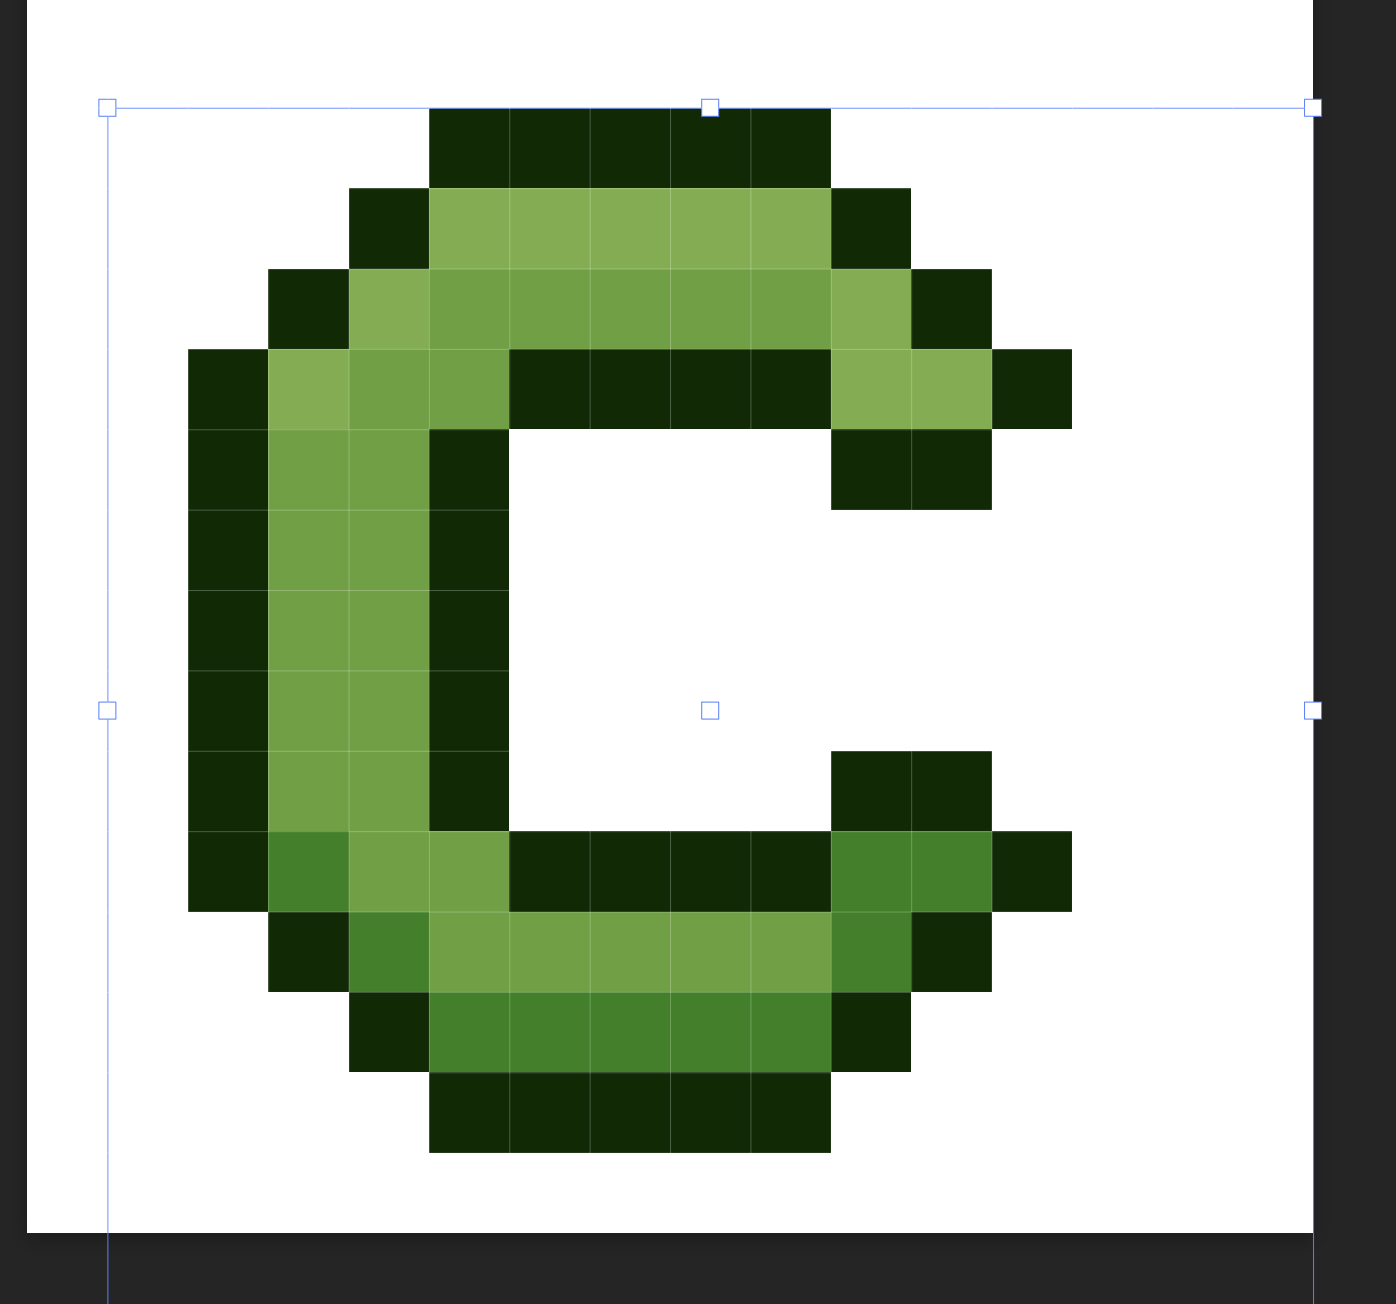
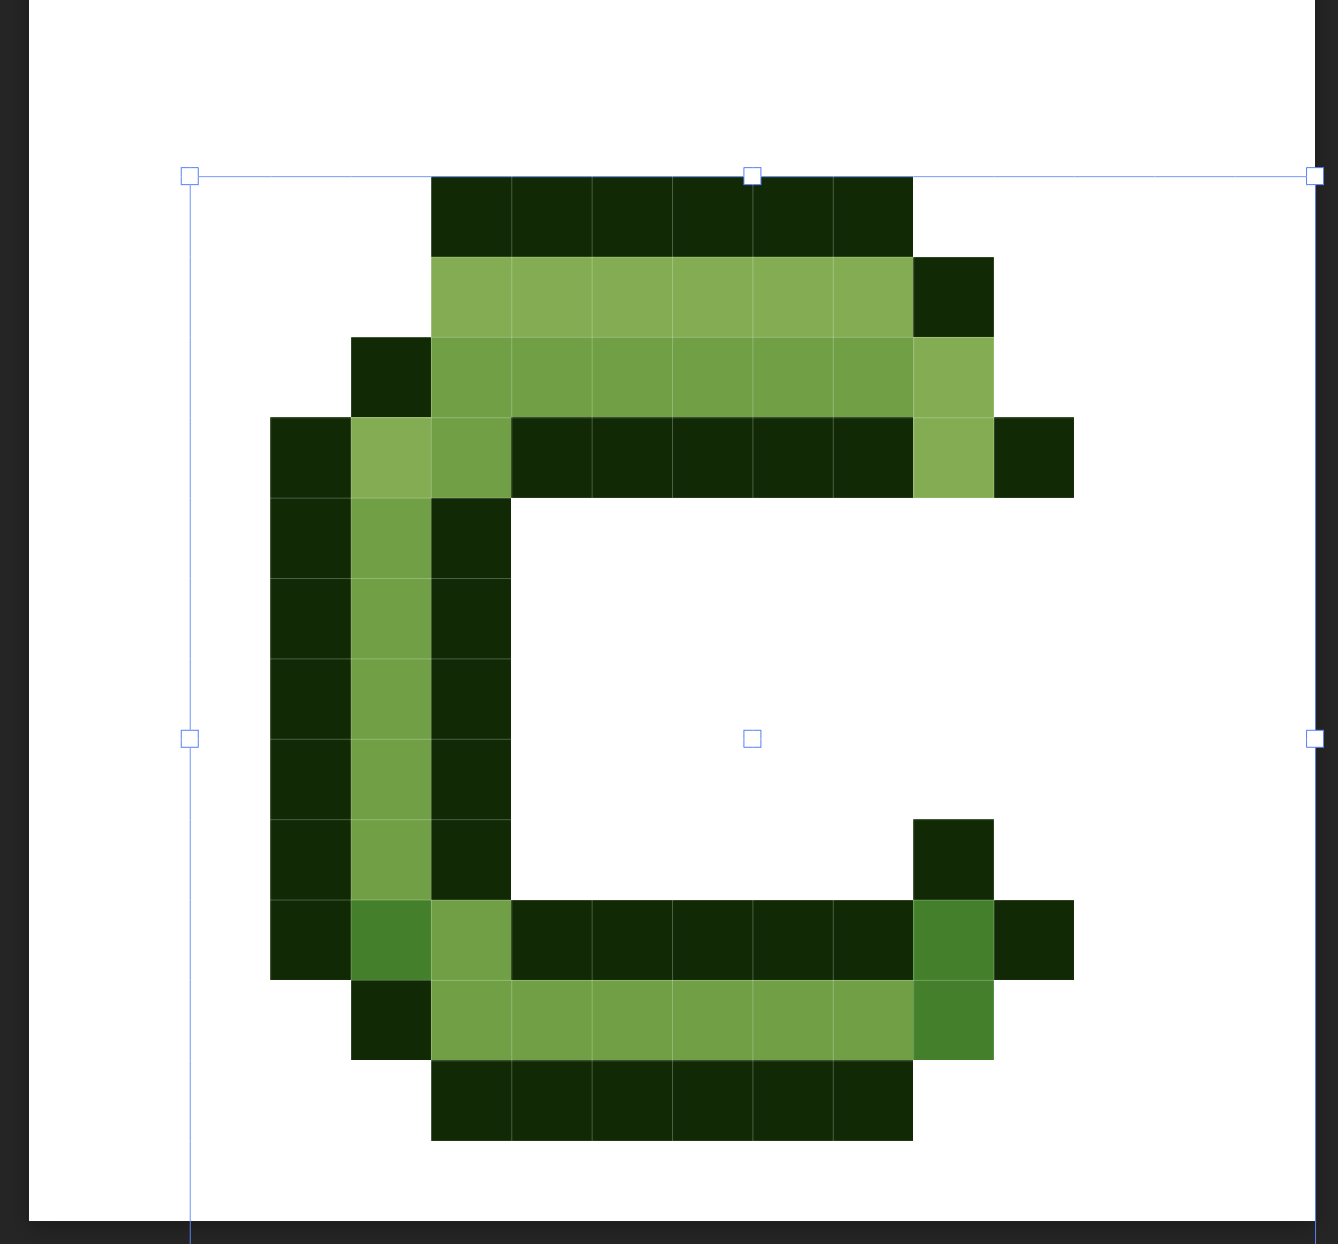
 Previously before using affinity I used a free software to create my pixel art. The software had this feature where when I scale an image it calculates and reshapes the pixels. It doesn't perfectly reshape but it does a pretty good job to retain the image. So attached, I have the letter C as an example. you will see that one is the original size and the other is scaled down. but scaling the image the software adjusts the pixels which helps me fill in the blanks. It's not perfect but it does a pretty good job. When I'm scaling my pixel art in affinity designer pixel persona, it does not adjust the pixels; rather, it just scales the image. Is there a way to get the same result as the free software i used to use? You will see in the attached image there is a picture that shows the image not respecting the pixel grid.
-
 The following issue, I'm not sure if it's MY mistake or a bug in Affinity Publisher: I have a logo consisting of an SVG vector file. I modified it as a vector in Affinity Designer. Now I embed this file in an Affinity Publisher document. (For testing purposes, I also created a link instead of embedding it) - when I look at the document in Publisher, I don't see any staircases or artifacts. In addition, I put a font under the logo. If I now export the whole thing with the PRINT-READY Pdf Preset, I get a PDF in which the font under the logo is razor sharp, but the logo itself looks very pixelated - like a bitmap! A mistake in the publisher? Or user error? Here are the files so you can take a look, along with the resulting PDFs.test_vector_pixel_verknuepft.afpub test_vector_pixel.afpub test_vector_pixel_verknuepft.pdf test_vector_pixel.pdf test_vector_pixel_verknuepft.afpub TEST_LOGO_black.afdesign
 -
 Please also add the possibility to create a new document (File > New) based on the clipboard size (in pixels). This is very useful to quickly annotate images or edit them from online sources. It basically removes the step to crop/ resize the image after pasting.
 -
 So I'm loving Affinity 2, it's so much faster and has features that were badly needed that already exist in my usual go-to, Inkscape. (What do you mean you can't live edit gradients?) Gradient editing still has a LONG way to go to be up to par with other vector editing software, but I'm glad to see improvements, and I look forward to more. See the distortion in "Tales" nearly halfway down the text? There's a white line along the left side of the image where Affinity 2 has nudged part of the workspace over by one pixel. This image was produced originally with version 1 of designer, and the issue began prior to the most recent version of designer 2, version 2.04. Since I can't load this into version 1, now, I edited an earlier version of this file and could not reproduce this bug.
-
Good afternoon, when drawing in Pixel mode, the mouse disappears in the program. That is, when I start drawing everything is fine, but after a while the mouse disappears in the program. And this error is solved only by restarting the program.
-
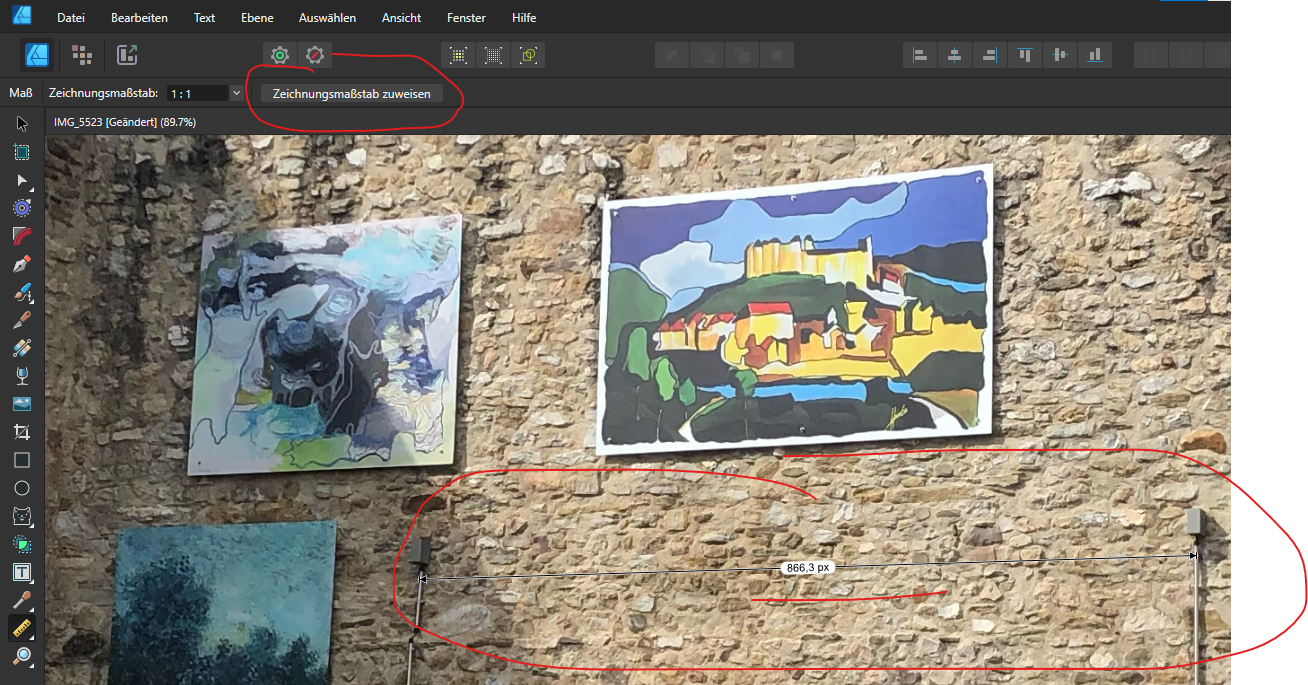
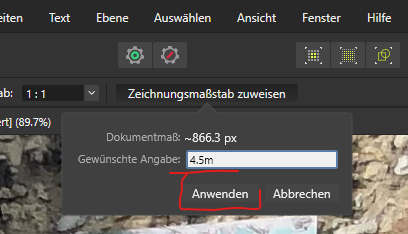
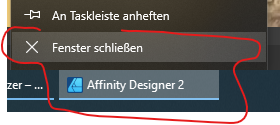
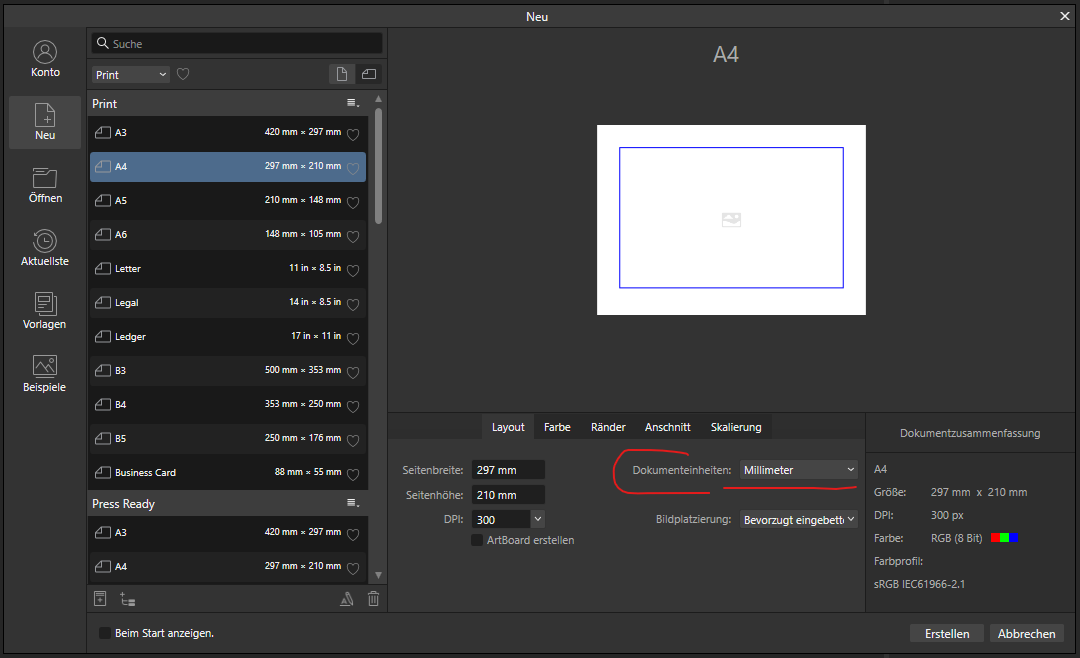
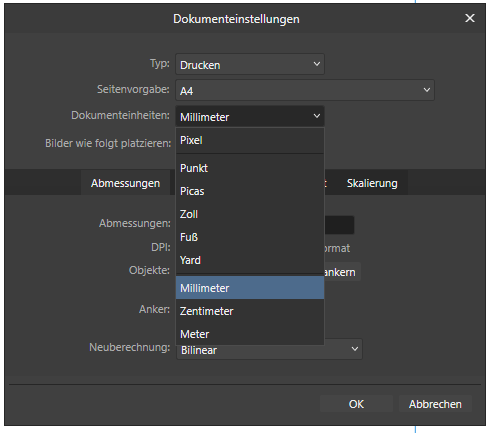
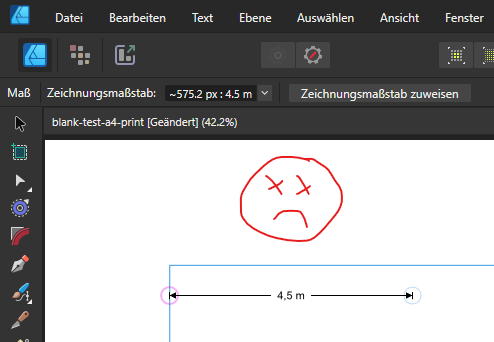
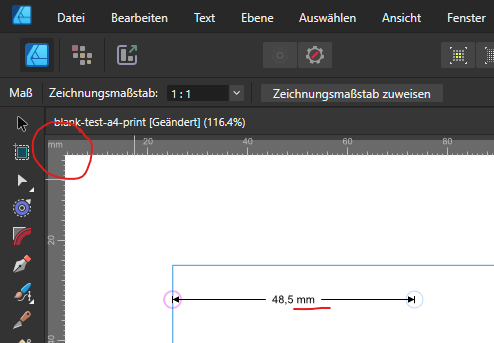
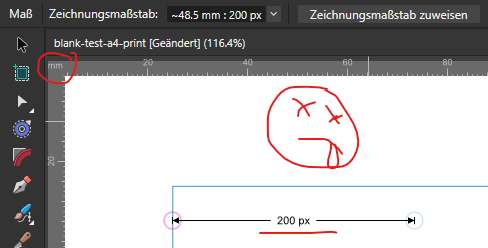
 Hi, this bug happens constantly with the following file and new blank documents. IMG_5523.afdesign 1) I open a JPG in Designer -> save as .afdesign 2) Use measurement tool and measure a distance A/B in pixels 3) Open "set scale" dialog -> enter "4.5m" and click "Anwenden" The dialog closes -> the widget now shows the computed distance in Meters -> Designer freezes The app does not recover. If i try to close the app via taskbar -> "Fenster schließen" i get the Save dialog but can't click any of the three buttons. The dialog is also freezed - can't click or move it. Have to force shutdown via the taskmanager: This error happens in 100% of all tests. Regardless of hardware acceleration on or off. EDIT I found this weird context 1) If i try this workflow with a fresh blank DIN A4 document (file -> new -> preset print, DIN A4 document unit Millimeter) there is no crash. Can use the tool after setting the scale to "4.5m" and continue work. Tool now shows distances in calculated scale and Meters. Document and Scale units are both metric blank-test-a4-print.afdesign 2) Now in the existing document I change the document unit settings from Millimeter to Pixel After that i do the above workflow again: measurement tool, measure A/B, set scale -> OK -> Designer freezes Have to force shutdown Designer via windows task manager. 3) The same crash appears even without changing the document units to pixel. It's enough to set the the scale units to Pixel when the document units differ (Millimeters): Conclusion: the whole scale units conversion (Pixel to Meters or vice versa) breaks the app.
-
 I can't pin down exactly what's triggering this. Maybe hardware acceleration related? The strokes stop rendering when reaching the previous bounds of the parent vector layer. Hiding and showing the layer resets it. 2022-06-24 00-52-31.mkv
 -
 Hello ! I would like to report a bug that occurs on some documents. And not all. I created a new one and couldn't reproduce the bug. But in the video you can see my problem. When I use the selection tool, at the end the selection is shifted. Not what I want. IDK how you can help me 'cause it happens sometime. I tried to restart the program and same problem in this document. I have latest AD version : 1.10.5 Mac os 12.6 Thanks !
-
I have years of experience in graphic design in the areas of marketing and advertising. Doing full illustrations like this isn't something I've done since art school, 20+ years ago. It is very satisfying.
-
This bug reproduces reliably on all Affinity products (Publisher/Designer/Photo) on Windows as well as Designer for iPad. Prior discussion: Demo: out.mp4 nested layer pixel bounds.afpub
-
In Photo there's an option to merge down or merge visible for pixel layers: In Designer, there isn't: So Please add the merge down and merge visible options for pixel layers in the Photo persona for Affinity Designer. So we can merge pixel layers without two step workarounds.
-
 Hi, Is there a way to work with Affinity Designer so that I never get decimals in the Transform panel? I'm getting mixed results with using "Force Pixel Alignment" and "Move by Whole Pixel" and due to snapping/aligning, I sometimes still end up getting : X: 900px | Y:62,5px Of course this makes sense, if you align something in the middle, and the heights don't match, you do the divide by 2, and get a ,5 decimal... but it makes me always having to check the transform panel to make sure I don't have "badly" positioned elements. The reason I want this is for better export. I found that export works best if things are aligned on full pixel value. Maybe you can change the logic of the "Force Pixel Alignment" and/or "Move by Whole Pixel" to actually reflect this and do rounding of values whenever decimals are present. The explanations above are a bit all over the place, hopefully you understand the goal. If I were to go deeper into implementation, I would say this would make sense for "Move by Whole Pixel" with the rounding of the X / Y values. If user holds ALT / OPTION key pressed, then maybe allow decimal values, as an exception. Width and Height with decimals are maybe not that big of a deal, because the export slice can be set to a whole number, but the reference point (X/Y) is pretty important.
 -
Hi everyone; Not sure if posting in the right folder, but I searched for someone having the same trouble and I didn't find this error: Whenever I try to make a pixel selection with the lace tool (or any other tool) in Photo, just as quick as I finish selecting, the selection made displaces a bit to the top left corner: It also happens whenever I try to select it and then press comm+⬆︎+I for making the invert selection. This is very unconfortable to work with because I lose all the precision and effort taken in selecting carefully, and I usually have to set it back by hand. I tried this both in Affinity Photo for Mac and Publisher with the Photo Persona, and still having the same trouble. Note that I also tried unselecting autosnapping, move by whole pixels and force pixel alignment but still doesn't work. Anyone know what possibly I'm doing wrong or badly set? Also, If i keep repeating the invert selection, the selection area keeps moving upwards in a progressive scale: Thank you all in advance for taking the effort in reading this lines (EDIT: i'm currently using the latest OS in Mac, Monterrey 12.2.1)
-
 I'm still new to Affinity so I'm sure this has been asked and answered but I'm not sure what to search. I drew a circle using a brush, which created the image on a pixel layer. I would now like to change the color of this circle. The only place or way I've found to do this is to do a color overlay, which doesn't really change the color of the item. Is there a better way to do this? And what should I be searching for in the help to find the answer? Thank you, Wills
-
 You might want to use a pixel layer as mask layer, but still be able to edit this layer and see the impact of your edits live. This is easily possible: Start with at least a background layer and a second pixel layer intended for masking add the live procedural text filter with this formula A=R, R=1, G=1, B=1 (or download preset "grey to alpha" below) Clip this live filter to the pixel layer to be used for masking Clip "pixel mask layer to be used for marking" to the background layer where you want to use it. The procedural text filter will become invisible in the layer stack, but still working. Modify the "pixel mask" layer with any pixel tool you like: brush, dodge and burn, sharpen, any adjustment or any filter At least give a "heart" or "thanks" to my post. Bonus material: If you have a mask you want to transform into a pixel layer, you can simply use the procedural text filter "alpha to gray" (see attached file). Video Tutorial: The recording did not capture the live procedural text filter. please use the settings from the picture below: Have fun alpha to gray.aftoolpresets grey to alpha.aftoolpresets
 -
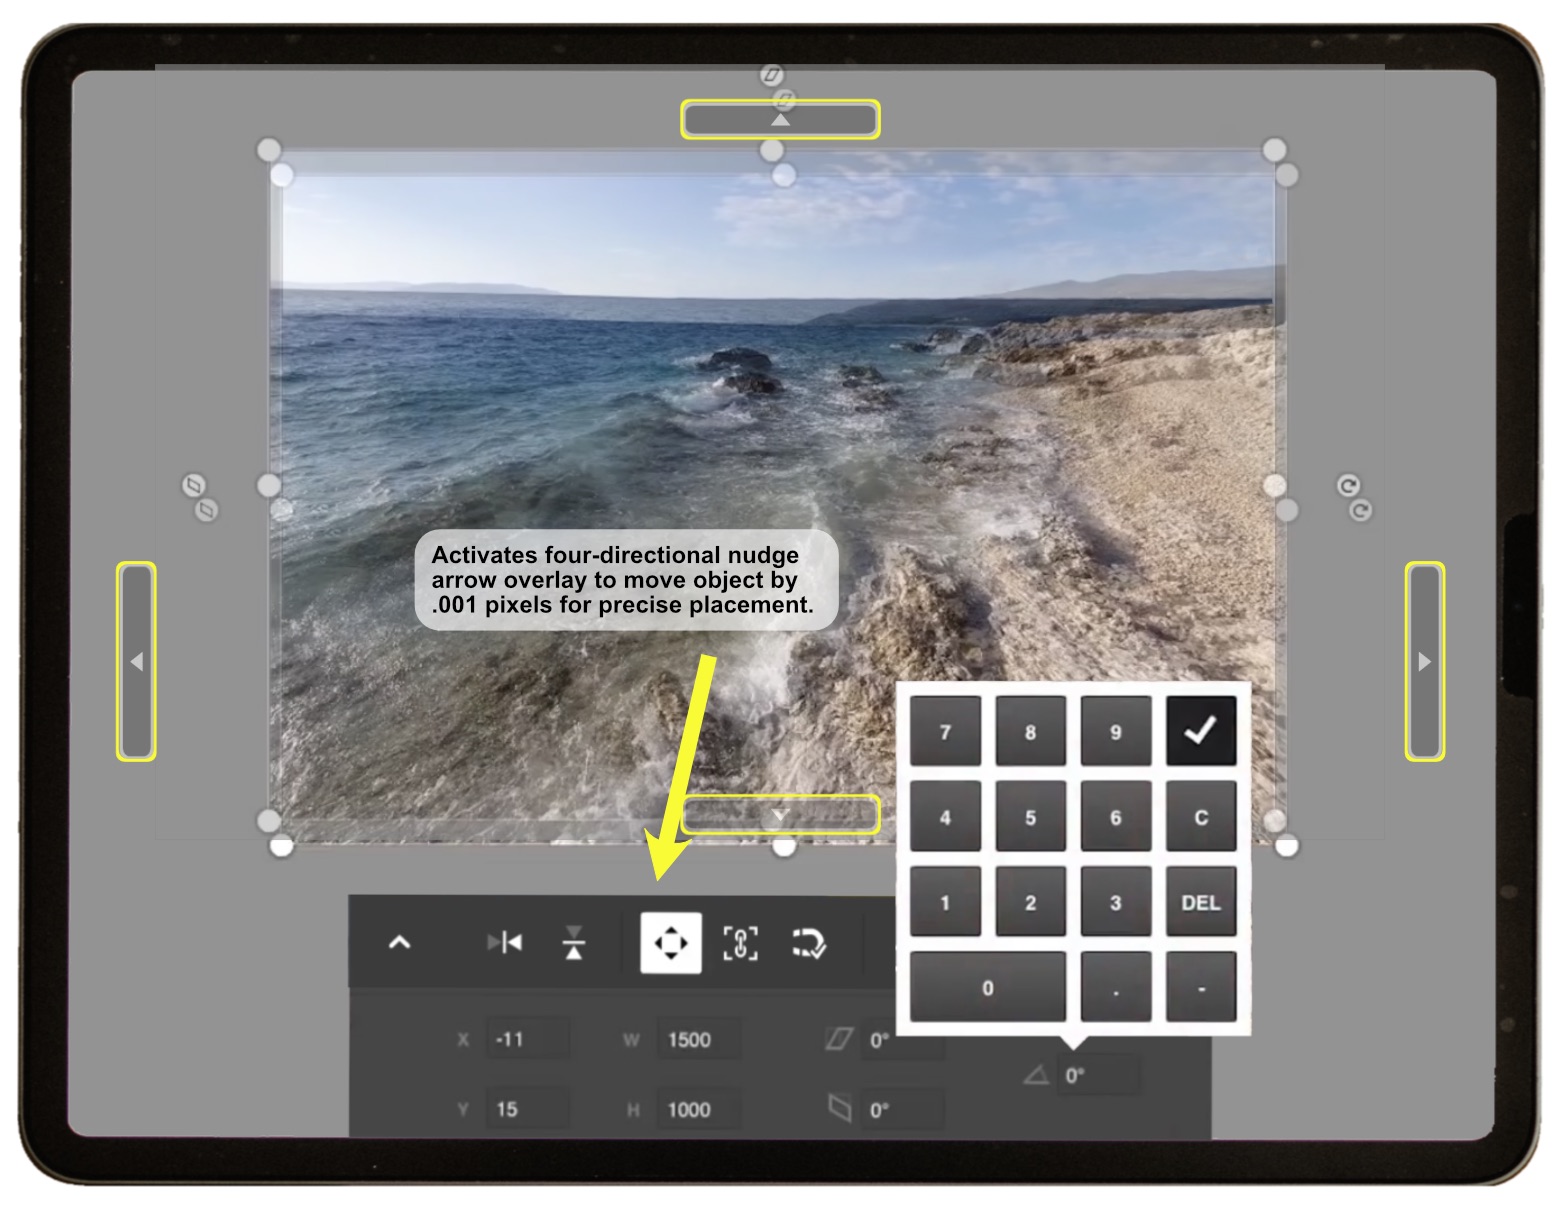
 Considering all of Serif's incredible attention to detail regarding the multitude of amazing features in both its desktop and mobile platform apps—with particular note to the amazing degree of feature control throughout the complexity within Affinity Designer for iPad —the one glaring gap in all of Affinity's applications ( soon to be six with Publisher for iPad ) has been in providing users with a tool to facilitate pixel-accurate positioning of objects on the canvas. The measurement readouts in the Transform Studio for iPad only display a 2 decimal point positions. Even though one can actually enter a 3- or 4 decimal digit figure and see a clear result, an object's EXACT positioning remains "in the dark" as far as the numerical display is currently able to show for those fields. Numerical positioning capability is certainly a boon in achieving the accurate positioning and movement of an object, but when faced with numerous objects that all require precise placement, continually entering numbers in a field can become exhausting and very time consuming. Adding a tool that allows for pixel-based X/Y MOVEMENT would be a HUGE improvement to all Affinity's apps—especially on the iPad. Adobe had a great one in their now-abandoned Photoshop PS Touch app—please see the screenshot below that illustrates the potential design and functionality for this badly-needed tool, and how Affinity could incorporate this feature into its Transform Studios. The screenshot illustrates two layers, one with lowered opacity for visual lineup, that have slightly different features on the horizon. I'm attempting to precisely align the pixels that are common to both and then mask a section out on the top layer to blend it into the layer below for integrating, compositing, and rasterzing them into a single photo. Selecting the circular four-arrowed tool would activate a temporary overlay of large arrow buttons, positioned at the outer corners of the screen, to allow for easily moving the selected layer or object ( the top layer in this example ) into it's pixel-matching position by rapidly tapping on them with a finger or Apple Pencil. This would eliminate the currently frustrating continuous back-and-forth trial-and result process for guessing what numerical entry will achieve that result to position it correctly...no more multitude of attempts using my finger or Apple Pencil to get it into the EXACT needed location. An added bonus would be including a two-finger action for temporarily bumping up the pixle increment using those directional buttons to allow moving an object with them in multiples of 10 pixels. Adding this critically essential would also offset having to redesign and widen Affinity's current iPad numerical fields to display a 4-decimal figure—though that would be a great improvement as well—and make accurate positioning so easy and convenient for both the Desktop and Mobile versions of ALL THREE Affinity applications: PHOTO, DESIGNER and PUBLISHER. And Affinity need not consider the importance for this tool based solely on "user consensus" as to what degree of need or popularity position this "please add this feature" occupies based on its number of requests. It's really a no-brainer, day-in day-out tool whose functionality almost certainly can and will be used and welcomed to speed up the completion of every project for every user throughout ALL of Affinity applications. This is particularly the case in Designer, where cartographers need to manage, handle and precisely position a plethora of objects within a single file.
-
Considering all of Serif's incredible attention to detail regarding the multitude of amazing features in both its desktop and mobile platform apps—with particular note to the amazing degree of feature control throughout the complexity within Affinity Designer for iPad —the one glaring gap in all of Affinity's applications ( soon to be six with Publisher for iPad ) has been in providing users with a tool to facilitate pixel-accurate positioning of objects on the canvas. The measurement readouts in the Transform Studio for iPad only display a 2 decimal point positions. Even though one can actually enter a 3- or 4 decimal digit figure and see a clear result, an object's EXACT positioning remains "in the dark" as far as the numerical display is currently able to show for those fields. Numerical positioning capability is certainly a boon in achieving the accurate positioning and movement of an object, but when faced with numerous objects that all require precise placement, continually entering numbers in a field can become exhausting and very time consuming. Adding a tool that allows for pixel-based X/Y MOVEMENT would be a HUGE improvement to all Affinity's apps—especially on the iPad. Adobe had a great one in their now-abandoned Photoshop PS Touch app—please see the screenshot below that illustrates the potential design and functionality for this badly-needed tool, and how Affinity could incorporate this feature into its Transform Studios. The screenshot illustrates two layers, one with lowered opacity for visual lineup, that have slightly different features on the horizon. I'm attempting to precisely align the pixels that are common to both and then mask a section out on the top layer to blend it into the layer below for integrating, compositing, and rasterzing them into a single photo. Selecting the circular four-arrowed tool would activate a temporary overlay of large arrow buttons, positioned at the outer corners of the screen, to allow for easily moving the selected layer or object ( the top layer in this example ) into it's pixel-matching position by rapidly tapping on them with a finger or Apple Pencil. This would eliminate the currently frustrating continuous back-and-forth trial-and result process for guessing what numerical entry will achieve that result to position it correctly...no more multitude of attempts using my finger or Apple Pencil to get it into the EXACT needed location. An added bonus would be including a two-finger action for temporarily bumping up the pixle increment using those directional buttons to allow moving an object with them in multiples of 10 pixels. Adding this critically essential would also offset having to redesign and widen Affinity's current iPad numerical fields to display a 4-decimal figure—though that would be a great improvement as well—and make accurate positioning so easy and convenient for both the Desktop and Mobile versions of ALL THREE Affinity applications: PHOTO, DESIGNER and PUBLISHER. And Affinity need not consider the importance for this tool based solely on "user consensus" as to what degree of need or popularity position this "please add this feature" occupies based on its number of requests. It's really a no-brainer, day-in day-out tool whose functionality almost certainly can and will be used and welcomed to speed up the completion of every project for every user throughout ALL of Affinity applications. This is particularly the case in Designer, where cartographers need to manage, handle and precisely position a plethora of objects within a single file.
-
- 1
-

-
- pixel
- pixel transformation
- (and 8 more)