Search the Community
Showing results for tags 'Photo'.
-
 A simple problem: I have a photo, and I want it cropped to become Facebook's cover photo (or a featured image on my blog, I have many presets). I have the exact pixel dimensions: 820x340 and want to crop it from a bigger image. But I want to actually draw the area I want cropped and scaled. In Photoshop it works like this: you select pixel dimensions you drag a rectangle on the image, it has a fixed aspect ratio, but can be any size double clicking then crops the image and scales it to the exact pixel dimensions. I can't figure it out in Affinity Photo. I can have a preset with exact pixel dimensions, but when I scale the area, the pixel dimensions change as well. I want the program to apply the pixel dimensions after I drew the area I'm interested in. Can it be done?
 -
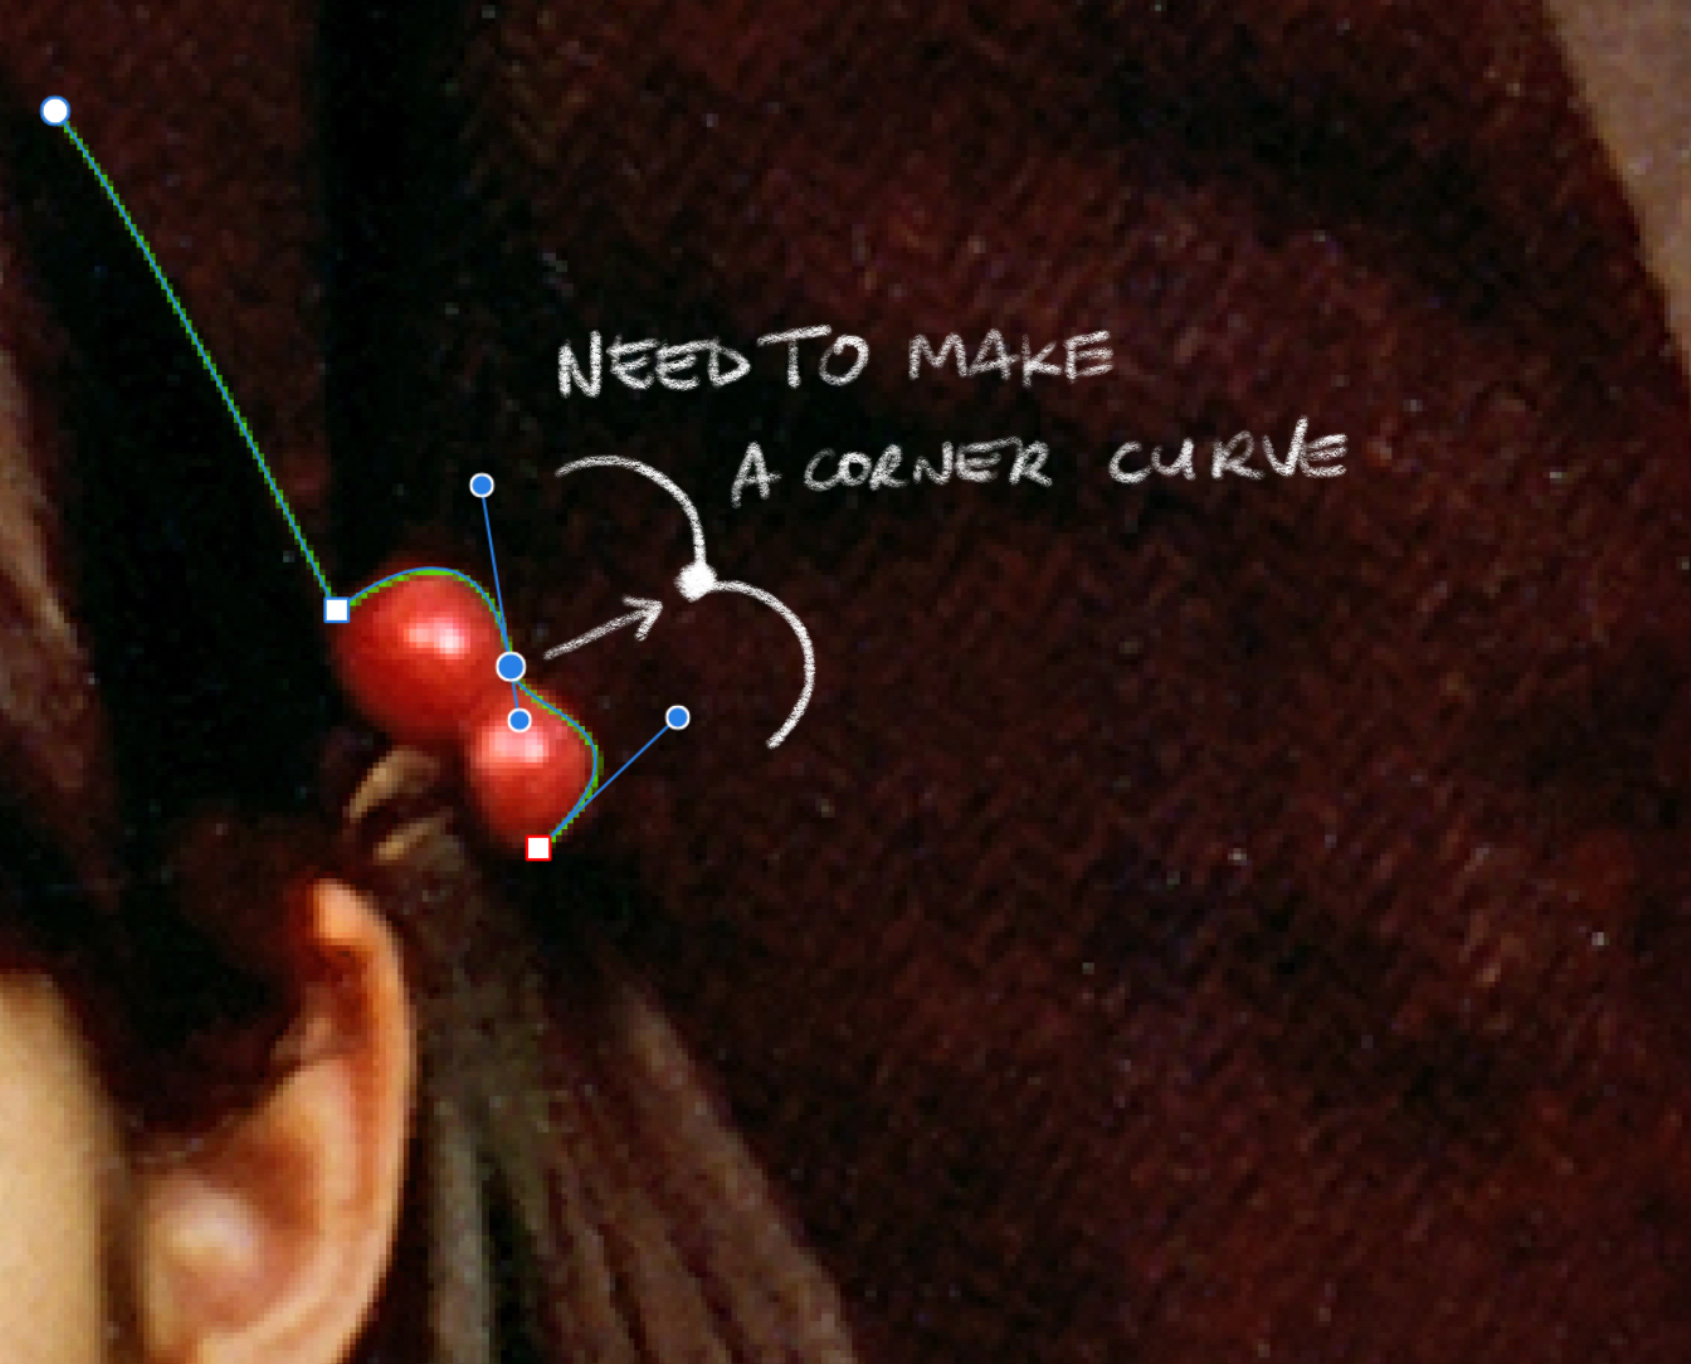
 Hi all, I'm working in Infinity Photo iOS on my iPad Pro and need to make a selection using the Pen tool. I can't figure out how to make a sharp anchor point to join two curved paths (please see attached). Normally in Photoshop, I'd hold down the alt/option key and click on the anchor to activate the "V" corner feature so I can adjust the two tangent handles independently, but I don't have this ability on the iPad. I tried the "Sharp" and "Smooth" bottoms in the Node mode, but they just toggle between straight-lined joints and curved lives without a corner. The path handling tool doesn't seem to be too intuitive, and I need to use the Pen tool to make precise selections. Any assistance would be greatly appreciated. Also, is there a feature like Photoshop's "Exclude Overlapping Shapes" or "Intersect Shape Areas"? I find that when I create a smaller shape within a large shape, the large shape disappears.
-
 I need to expand some strokes.
 -
Nice work BTW. I happily purchased Photo for macOS sometime last year, and recently iPad. Thrilled with both. Just a couple of annoyances. 1) It would be really nice if one had a preference option for Imperial vs Metric measurements and set one or the other as default. This could included a set of default preset sizes that match USA paper and print sizes. We use, 8.5x11 in standard paper size (there are several other standards as well). Not A4. For print we have 8x10 5x7 2x3 etc. all in inches. Yes, I can select inches when I create a new document. However, I have to select inches every time. I even have to change the selection back to inches, when I flip from Web presets to print. 2) Not so much of an annoyance but more OCD. On a system setup as US English, it maybe the word colour could be spelled without the 'u'. Like we do here in the Colonies. Thanks for a couple of great products and for reading. ~ Brian
-
 will you be supporting the new heif file format, if so will that be ipad and desktop, if so, when?
 -
 Hi, I have the Affinity Photo Trial Version, I am planning on buying the product but as I was testing it out I noticed that neither the text on the left bar nor the mesh warp tool on the left bar were there. Will these be there in the full verison. I do use Windows. Please let me know. Thanks!
-
 Hi, On a German keyboard, the default keys for changing brush size are not usable; keys '[' and ']' must be entered by pressing Alt+5 and Alt+6. Therefore, I redefined the keys to use '<' and '>' instead which works fine, but only for brushes. I cannot use them to resize the tool size in the liquify perspective nor for brush overlays in the HDR perspective. I think they should work everywhere where I want to increase and decrease a tool size while working. Furthermore in the preferences dialog, I think, the setting should not be placed under paint brush but in a more common (generic) category.
 -
 Hello there! I'm currently working on some brushes for a concept art project and I'm trying to create a 'sequenced' brush. Let me explain: I need a brush for drawing background trees, I've isolated like 4-6 trees to have some variation. I'm loading that images as brush nozzles, but they appear in random order (image below). It's something like: X X O X O X X X O X O X I NEED total control of this sequence, specially for more complex brushes I'm designing (6-8 nozzles). I mean, a straight sequence like this: X O X O X O X O X O X O Would be awesome to have the option for "Random" and "Linear (or something)" brush sequence. Would give MUCH MORE power to this multi-nozzle + texture brush engine :) Hope this makes sense.
 -
 I purchased the IOS version of Affinity photo for my iPad Pro. Does the Mac version do anything more or different, should I spring for both versions?
 -
 I have been thinking of getting a graphic tablet for a while and I don't want to get another software. So do I need Affinity Designer for drawing with a graphic tablet of Affinity photo will do? Which brands does Affinity support? (e. g. Wacom, Huion etc.)
 -
 New member here but I have been using the forums for information for a while, so than you to everybody who has unknowingly helped me so far! As you might have guessed though, I haven't found the answer to my latest question, which is: Is it possible to have Photo automatically crop remaining dead space to the original aspect ratio (or maybe a predefined one from your presets), or with a single click after using the straighten tool, or manual rotation? I usually take landscape, or architectural type shots so doing it manually occasionally is no problem, but I'm finding it can be a little tedious when doing batches of images that all need adjusting by a few degrees. If it isn't possible, is it something that could be implemented? I think it would be incredibly useful! I apologise if this has been asked before, i just couldn't find the answer. Thanks in advance, Carl
- 4 replies
-
- 1
-

-
- Crop
- Straighten
- (and 1 more)
-

Affinity Photo for iPad launched at Apple WWDC
Patrick Connor posted a topic in News and Information
Affinity Photo for iPad – the first fully-featured, truly professional photo editing tool to arrive on Apple’s tablet – is now on sale. We were proud to be able to launch it during the keynote at Apple’s WWDC in San Jose on 5 June – the highlight of Apple’s global product launch calendar. If you saw that, or if you use Affinity Photo already, you’ll understand why it’s the choice of thousands of professional photographers, retouchers and editors around the world. We think Affinity Photo for iPad redefines photo editing once again, by bringing almost all the features in the Mac version to your iPad, so you can take all that photo editing power with you wherever you go. The new version is tailored to harness the explosive power of the iPad’s hardware and touch capabilities, and is compatible with iPad Air 2, iPad 2017, iPad Pro 9.7-inch, iPad Pro 10.5-inch and iPad Pro 12.9-inch. Please note this is not the list of iPads that the App Store suggests it will work with, see this post for an explanation. We expect this to be the biggest launch we’ve ever had and even better, Affinity Photo for iPad is priced at an introductory discount of more than 30 per cent in the App Store – so for now, you pay £19.99 / $19.99USD / 21,99€. Watch the video: https://vimeo.com/220098594 See more: https://affinity.serif.com/photo/ipad Watch some tutorials: http://affin.co/ipadtuts Here's a clip of our MD presenting Affinity Photo for iPad which is 100 minutes in to this WWDC video- 140 replies
-
- 30
-
-
 Recently bought Affinity photo and been using it to edit RAW photos taken on my Nikon D3100. No problems when looking at photos in camera or in affinity. Just upgraded to a Nikon D750 and found that when i open the photos in Affinity they are much much darker and extremely washed out compared to when viewed in camera. Does any one know how to fix this difference that Affinity is showing??
 -
 Today I received a letter with a new version for the ipad and this possibility can not be - discount of -20% !!! I immediately bought :P, I'm glad and happy crazy with you! I will quietly rejoice in new works! Thanks to the developers for the mega product! I'm glad that there are companies that make super products at a good price! Creative success to you friends! +1 :wub:
 -
 When a user "Exports" an image, the default selected field should be the Size > Width field. Currently, the default selected field is the "Aspect Ratio Lock" (see screenshot). This is a very minor feature request, but changing the Aspect Ratio is much less common then changing the image size. Please make the default selected field: the size > width field. Thank you for your time, consideration, and the excellent photo editing software!
 -
 Congratulations – Photo for iPad seems like an incredibly capable tool that finally opens up iOS for more professional work. My iPad Air is not supported, so here are my initial impressions based only on the tutorial videos (which do work fine on iPad Air). These are what I think are the most pressing issues that, if fixed, would get this thing even closer to perfection ;) Putting something like "Deselect" into a contextual menu isn't that great – I think if each Persona had a few buttons next to the Persona selector for quick access to very frequently used operations, that would be much more fluid. This would also solve having the "Develop" command being only visible when you have the Hand tool active and having to dive into a menu for toggling clipping preview, which is something that is often used in a "switch it on, change something, switch it off to check how it looks, switch it on again" type workflow. Maybe it's just the videos, but I didn't see any way to use a brush to paint selections. It would be good to have a setting that switches the Adjustment and Filter studio panels to a simple list or icon view, or, alternatively, add buttons to the Layers panel that show popovers with filters a iPhone-style sliding categorized navigation list. The current design seems to require way too much scrolling and also has very colorful icons that distract from the document. If I just want to add something fast, the current design is not great. Also, a "previous filter" item at the top like on the desktop version might be a good idea. Levels does not have any histogram whatsoever – if the intended use is to just use the scopes panel, some kind of indicator where the selected black and white points fall inside the histogram/waveform is needed for precise control, as well as a way to make the histogram/scopes bigger than they currently are. Quick access to clipping highlights also (which would actually make more sense as a global option that's available in the other Personae as well, excluding Liquify). Output levels are missing as well. Double tap to fit to screen is nice, but quick pinch to fit like in Procreate seems more fluid to me (it might just be that my middle finger is somehow abnormally long, but two-finger taps are often recognized only after the second or third try for me) Straightening seems a bit fiddly – it would be nicer to be able to drag out a line and then have the end points movable even after you release the touch. Basically with an "Apply" button instead of committing right away. Right now, if you get it wrong or wonky, there seems to be no way to cancel and no way to get it really precise. Similar problem with the Inpainting and Mask Refinement brushes – an "apply on release" check box would make this more convenient. If disabled, it would allow you to paint multiple strokes and then press an "Apply" button. Same on the Desktop – I can't count the number of times I've used one of these brushes, hit the screen edge and had no way to scroll the document without the incomplete operation being applied, leaving no way but to undo and repaint a potentially complex selection. The curves UI in Develop (and possibly the regular Adjustment, it's not shown in the videos) seems to be too small for precise adjustments. A button that pops it out over the full screen like Procreate does by default would be very nice. Also, like with Levels, there needs to be a way to see where a point falls on the histogram/waveform, numeric coordinate inputs and a clipping warning for it to be really useful. It would be much more useful if dragging on the layers would adjust Opacity instead of doing multi-select. Selecting could be implemented either by having an additional column with checkmarks permanently shown to the left of the layer name, or by having a "Select" mode that makes that column appear after press of a button like in many other iOS list views to prevent accidental selection. That would also be more intuitive for new users. A "Hide Selection" option would be very useful to see what selection edges look like after an adjustment. Goes for Desktop as well. This is nitpicking, but the square buttons in the Layers panel don't match the round look on the other buttons, like "Return", "Document Menu" etc. The Inpainting Brush "Inpainting in progress" overlay seems like it would get really annoying if you have to do a lot of inpainting because it would make your screen flash after every brushstroke. It also makes it harder to compare before and after since you get to stare at that blurry wall instead of before/after images in direct sequence. A smaller progress indicator like the non-intrusive "Marked as Pick/Reject" feedback popups in Adobe Lightroom or a global progress bar next to the Persona selector would be a lot less distracting. A lot of the Develop UI is really colorful and could distract from the image. I already mentioned the Adjustments previews as another case of this. In Develop, for instance, the RGBCMY sliders could just have their knob colored instead of half the slider (background of the slider indicating the percentage could be gray instead of R/G/B/C/M/Y), or maybe the colored part could just be a thin line like on standard iOS sliders. It's not clear from the tutorial videos if this is there, but a "double-tap any numeric input, slider or option to reset to default" feature would be great. On the desktop as well. Or alternatively or additionally, a "default" button in the popup calculator would seem like a good idea to me. Develop seems to lack an option for numeric inputs. This is essential for precise corrections. It would be nice if the popup calculators could do basic maths, like those in Flame. So something like "current setting * 1.5" would be really easy to do. History seems to have no "Purge History" button that would save storage space on complex documents, especially ones with a lot of paint strokes. The only way to do this currently seems to be to do a "Save as". Also, having the initial document state in the history list would be useful. And an option to use the great split-screen compare mode with history steps would be nice (though admittedly not essential). The size of the application bundle is extremely large, more than a GB. Anything you could do to reduce this would be greatly appreciated since storage is usually extremely limited on Apple devices, there is no way to use memory cards, and the images being worked on potentially get rather large, especially considering that they are saved with history by default and that 41 megapixel raw files are within the norm these days. Hope this feedback is helpful, congratulations on the spectacular launch! :)
 -
 Now that Affinity Photo for iPad is out, and since Apple's iCloud, Photos, photo libraries, camera roll, etc., etc., confuse me a bit, (what's going where, and when?!?!) any chance that you might do a video on the interactions of AP for Mac and iPad and all those Apple functions? How can they be brought together into a nice workflow? If you've already posted such a tutorial, sorry. Thanks.
 -
 What happen with Affinity for IPad is still in development I hop so because I need a pro tool on iPad pro for vector and photo
 -
 Hi guys, So, basically the title says it all, AP jitters when zooming/enabling/disabling layers, basically at every click of the mouse AP decides to jitter around. I provided a performance setting and an example in the video below, any suggestion on how to solve it? https://www.youtube.com/watch?v=i6DofUr5zp0&feature=youtu.be Please turn on the resolution to 1080p, and no, the preview jitter is not youtube fault, is far more apparent on my screen when working with AP yeah I don't know hot to post a youtube link since it gets deleted so I just attached a .txt file with the link inside, no it's not spam, no it's not ads AP preview jitter bug.txt
 -
 Hi Affinity! First of all handy up for your good work, love the program so far. One question: When I try to export a Photo canvas (to be printed in a print office), that had been turned before by 90 degrees, the size of the main (automatic) slice seems to remember the old 'unturned' dimensions. Or do I get something wrong here? Cheers Juergen
 -
 I am facing a problem over batch on my MacBook Pro. The updated features are amazing , especially the macro and batch function, I use these two features a lot in my work. I record a Marco and save it into my category and then use batch job, it's great-I can give up Photoshop completely now. But there is a big problem, I don't know why the batch always processes my photos in landscape and portrait to the same shape, maybe the former or the latter. I just want to resize them but not to change the shape. Are you facing the same problem like me?
 -
 https://www.youtube.com/watch?v=8rkBADJIrTQ&t=0s great channel/ great explanation everything is doable in the current App Store Version of AP even offers image as download if you register post alternatives, better options for this workflow in AP (e.g. using clipping using curves instead of selecting+filling=masking) cheers //for more tips, KLICK << (especially clipping, curves, blend if)
 -
This would be quite useful, especially for tiling textures for example.
-
I am trying to simplify complex illustrations into their basic line forms...what is the best way to do that using Affinity?
-
 Hi, this seems pretty obvious, however I found no report of this issue so far. If a raw file is opened, the Develop and Cancel buttons in the develop persona are lacking any text (see attached image). Thanks and best regards, Henning