Search the Community
Showing results for tags 'Photo'.
-
 Hi All, I am an experienced LR user, with some GIMP experience migrating to AP, reason I say so, I am not a experienced PS user and an AP beginner, so I may miss some of the concepts, however I have observed the following issues, I can do a little help with in my understanding. First AP team great job and product! Keep up the good work, I really like working with AP and comments below are meant in a constructive way. 1) Personas, great concept, why is there no Panorama Persona and no Stack Persona? Both develop an image and end up in the Photo Persona, I tried both with RAW files and are unable to use the RAW Persona. I would AP expect to create a Panorama or Stack in RAW for development. 2) RAW and Photo Persona, after applying development in RAW and working in the Photo Persona, going back to RAW seems to leave me with the developed picture, my original development settings are visible in the picture, the sliders back to 0. So if I make adjustments I develop an developed RAW. 3) Some of the functions are available in different Persona's and menus were others are not, to give some examples: Photo Persona, perspective correction and distortion filters, great for easy access, I would expect these in the Liquify Persona. Organisation and grouping of adjustments, filters, live filters and functions, I can not see the logic of how they are grouped. I understand their operations on either pixel layers, adjustment layers, why 2 sets of filter (destructive and non destructive (live)). Not all Filers are Live Filter (or is this part of the road map and fase out destructive filters?) I fail to understand the order of the live filters in the menu, group picture optimisation and effects (artistic) they seem to be everywhere. What is the difference between the perspective correction on the tool menu and the perspective live filter. I guess the Layer Adjustments from the Layer menu are the same as from the dialogues on the right side (adjustment tab next to layer tab with the adjustment previews (Cool!) and the icon on the bottom of the dialogue (half B/W circle) the layer effects can only be found in 1 place, next to the adjustments Fx, not even on right click layer......) Last example, there are more.. why is Lighting in the filter menu.....? it is a destructive pixel layer tool and should be in the tool box. I think every user has his view and working and I would opt for a Personal Persona ;-) where one can configure not only the toolbar and the studio but also the top menu options. I understand that Affinity want to make everybody happy but I get the Martini commercial feeling : anytime anyplace anywhere. Cheers, Jeroen
 -
 Something is bothering me a lot about stroke widths. If you have to shapes with stroke width of 3 for example and create a compound object either with or without holding ALT to keep it live, the compound object will have what appears to be a random stroke width. This number is different in Designer and Photo, In the attached video you can see the issue. As an aside its also really annoying that you cannot change the width on multiple selections - really annoying. The only way I have found is to group them first. I would expect in the case of multiple objects having the same width, the compound object would inherit exactly the same stroke width. In the case of the multiple objects having different widths, I would accept the compound object inhering the largest of the widths. I just don't understand it changing to what appears to be a random number. StrokeWeightChange.mov
 -
Would be nice to be able to quickly make adjustments to objects (raster) that are currently in Designer with Photo. Cherry on top would be to have the object dynamically update as adjustments are made in Photo, so as to judge. ps. how about those ruler origins?
-
It seems like no one but Photoshop offers a crop-to-size tool that is resizable. By this, I mean this workflow: you need some photos at 400px by 900px at 72dpi you set the crop tool to this the crop tool jumps to this size you can now drag to reposition and resize the crop tool to control how much of the image gets cropped into 400x900 The #4 is the part. This allows me to not just choose a part of the photo that's already 400x900, but to improve composition I can enlarge the crop rectangle and the resulting image will have that area cropped and resized to what I have set.
-
 I use the eyedropper tool and sliders all the time to isolate and take red out of skin. Is there a way to do this in Affinity Photo? This would seriously be a deal breaker for me.I use the saturation and lightness sliders as well. I change the channel to red, use the eye dropper tool and click on the red I want to remove in the skin, I move the Hue slider to the left so I can see what area of the skin I am effecting, take the sliders below and push the right and middle sliders together until it isolates just the red in the skin, but doesn't effect the other area. I can then slide the hue towards yellow. Brush of the lips and I have the most perfect base of skin.
 -
 Hier eine kleine Bildschirmaufnahme wie man z.B. bei einem Logo (PNG Datei mit transparentem Hintergrund) einen Glitch/3D Split Effekt macht. Habe unnötige bzw. falsche Schritte nicht rausgeschnitten. Erklärungen gibt es nicht, die Bildschirmaufnahme ist aussagekräftig genug. Here is a short tutorial for a Glitch / 3D Split Effect for Affinity Photo. I show this with a PNG File with transparent Background. There are no explanations, you get the point by viewing. Further didn't i cut out unnecessary or false steps. Grüße, Best regards, Ben. https://youtu.be/0i9WOd2KzK0
-
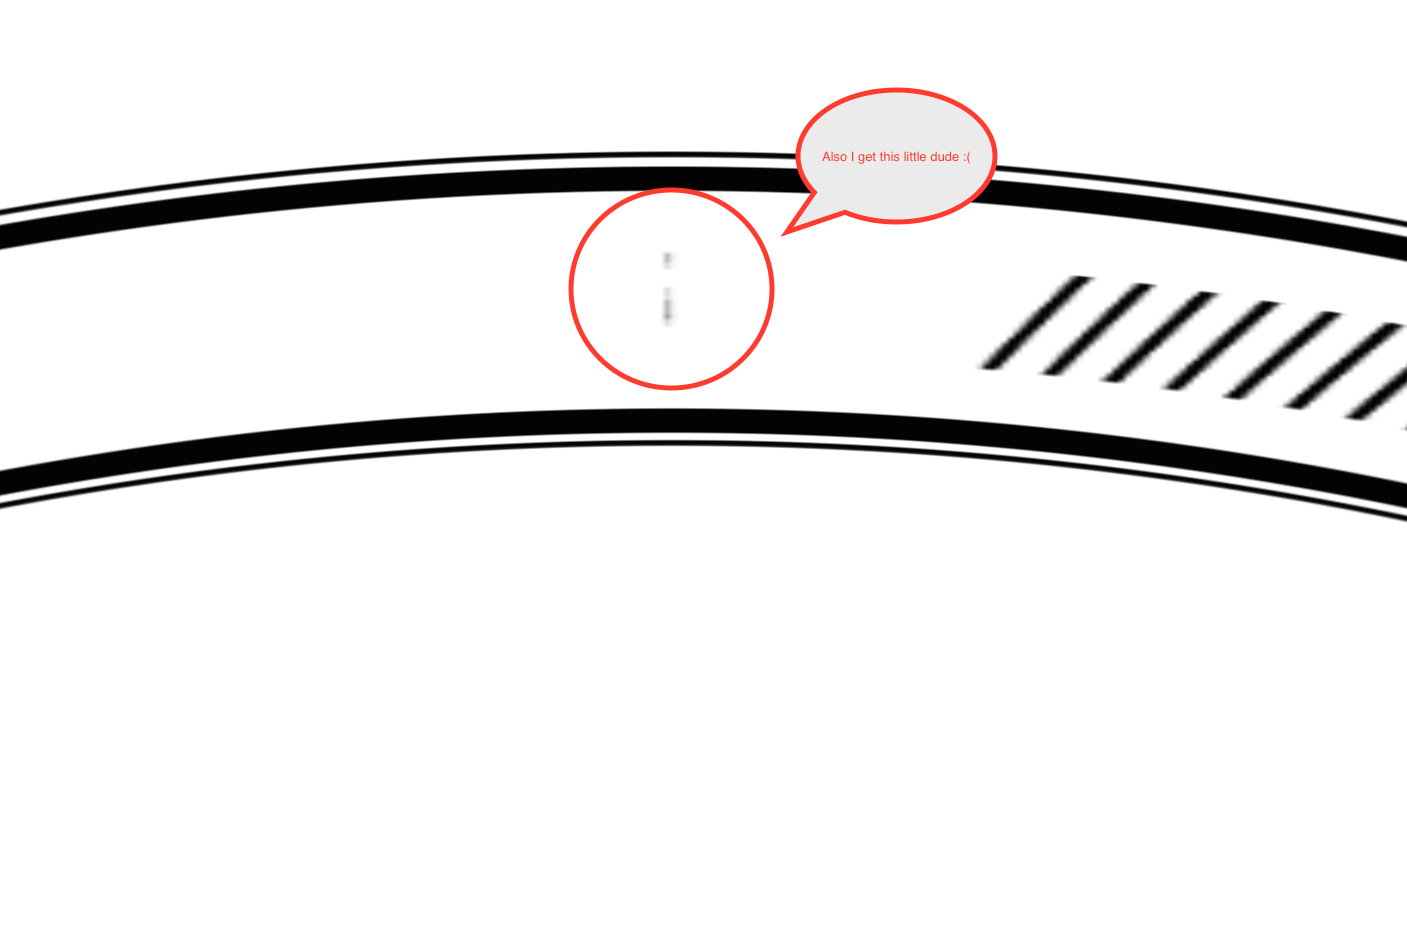
 Hi all, I'm coming from a couple years of using Photoshop, I had looked at other alternatives for awhile now and finally came across Affinity Photo/Designer about a month ago. Looking great so far. I'm impressed with how robust Photo & Designer in what feels like such a short period of being released publicly. One thing that is driving me batty though is how I can't seem to scale/transform/ or move selections on the fly. This is especially helpful when working with ellipses. As an example, attached at the bottom is a poison control logo. It should have taken me all of 5 seconds to get rid of the text in the thick black stroke, and create a replacement text to go in there. But I was not able to figure out how to create a ellipsis marquee that could move on the fly. I could make the marquee selection (click drag release), and then move it, but only after the fact, and this meant I couldn't get the right size ellipsis, nor where I wanted it since the ellipses starts wherever you click as a "corner" (no option to grow the selection from center AFAIK), and I'm not seeing an obvious way to resize the selection/marquee itself rather than pixels. This is something that I used heavily and made me a very happy camper on Photoshop. In Affinity Photo it took me several minutes to make a sloppy ellipses that encompassed the whole circle with text and all, use the free hand tool to select bits that the first ellipsis didn't get for the outer selection, and use the free hand tool again for subtracting the inner circle portion (which I should ideally be able to do with an ellipsis) I'm asking here first before making a feature request as I really am new to this software, and I have not watched all the tutorials yet, I need to get work done now, not later. I did a few searched and looked at other theads/posts about selections and did not see my specific question asked or mentioned.
-
Good afternoon, It's strange no one answers my question on this forum. Maybe someone sees my topic here and answers my simple question. I want to make a frame around my picture like this http://www.plantennamen.info/beekpunge-veronica-beccabunga In the passed I used Photoshop. I just resized my picture and made the canvas 5 px bigger. Because the Photoshop app of Apple was a big mistake I am thinking of buying this beautiful program. But only if I can make a simple frame. Regards, Maarten
-
 I am interested in switching our printshop to Affinity software in the next year, starting from the moment Affinity Publisher comes out. Why? Because it is great software, sometimes even better and faster than its Adobe counterparts. Is there a way to get into the beta program for Affinity Photo and Designer? I own Affinity Photo and Designer. And even more I want to get in the alpha or beta program for Publisher. In our Printshop we have a Apogee CTP-rip so I can render pdf's to see if some features produce print errors and so on. I am used to preflighting and checking pdf's for CTP-work. We also have a Xerox rip. If we switch to Affinity for our entire team, we need 10 copies of Photo, Designer and Publisher. I love trying good software, feature tryout and thinking about future features, and work in one other beta program for Tumult Hype (Web design). I also design websites and do video production so I can use output from Affinitys software for various purposes. Off course I do this for free. Sincerely, Korneel Bonte info@despin.be
 -
 How do one get a good results with Rectangular to polar - No matter what I do I keep getting very poor antialiasing.
-
 Hello, I am wondering if there is a way to quickly edit a raster layer that is in Affinity Designer in Affinity Photo. I use this feature in Illustrator all the time. I select an Illustrator Layer that is a raster and select it to edit in Adobe Photoshop. As I am updating/editing the image in Photoshop, I can watch it change/edit in Illustrator. I am sure this must be possible, just can not find the obvious way of doing this in Designer. Thank You!
 -
hi it wud be nice if we can get a browser in afinity photo so that its easy to see a file folder of images. otherwise need to switch between different programmes. when selecting a PSD file with layers the affinity photo software cannot create a thumb nail. the thumb nail only comes if the psd file is flattened. nice to have this fixed. add feather tool a pdf instruction manual so one can print it out and follow the guide. regards ashok
-
 Hi, Would it be possible to add another view to the scope or histogram palette in Affinity Photo to allow you to visualise in 3D the colour/pixel distribution of an image in a live 3D view. I think it's a really useful way of looking a the colour distribution in an image see http://opensource.graphics/visualizing-the-3d-point-cloud-of-rgb-colors/for an example. If possible there's one difference to the way it's displayed in the linked article that I'd like to see. To display a wireframe for both the colour profile area and a outer cube wireframe for the CIELAB colour space as well so that you can see how the pixel distribution relates to what colours are technically possible in the selected colour profile. Thanks. Matthew
 -
 Greetings, I was wondering if there is a way to emulate the VSCO presets in Affinity Photo? I have been looking at my VSCO presets in Lightroom and trying to mimic them in Photo, but can't seem to get it just right. I think most of it is because you can manipulate the camera profiles in Lightroom. Thank you for the help.
 -
Blender has a way to render SVG files from freestyle renders. The attached SVG opens OK in Illustrator but both Affinity Designer and Photo claim "The file appears to be corrupted." Its just a cube :) 0001.svg
-
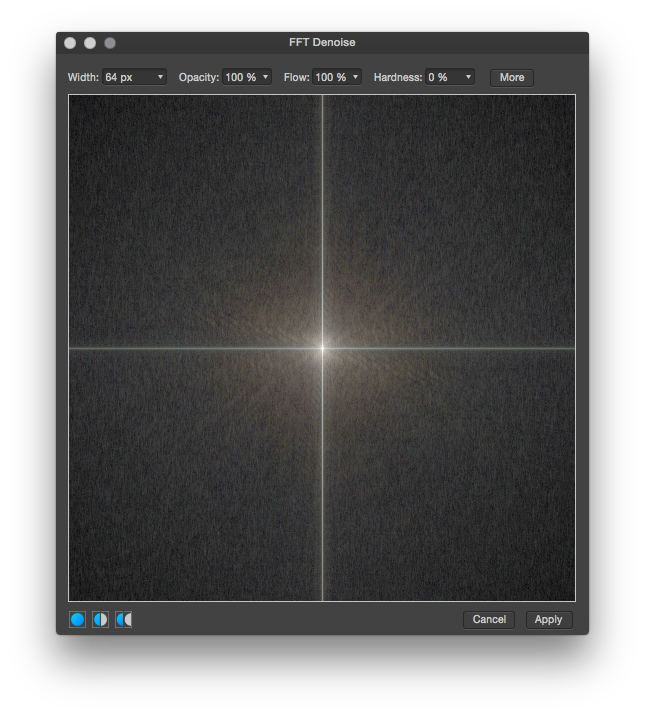
 Hi guys, since I got Photo I wonder how to use the FFT Denoise filter the way it’s supposed to be used. I never heard of it before and I can’t find a explanation for dummies or a tutorial for it. Someone – please enlighten me! :D Have a nice weekend Dennis
-
 Hey, so I'm not totally clear on how Affinity handles objects/layers. When I resize a bitmap layer, upscaling it, does it retain the same pixel data and is just enlarged? Within Photoshop, upscaling a bitmap object without first turning it into a Smart Object will inflate the image with more pixels. So are bitmap object in both Designer and Photo acting somewhat like PS Smart Objects..? Please explain! Thanks! JA
 -
Hey there, this is more of a very very tiny feature request. If you change the brush softness (and size) via the ⌃+⌘-keys and mouse drag I noticed if the cursor is near the bottom of the screen you're literally bound by the hardwares edge – the adjustment stops there and you have to repeat the step if you want the brush to be softer. Maybe virtually expand the range of the cursor so one can click and drag further, or something? I don’t know. :) I’m not sure how else to describe it, but I hope you get what I’m talking about. Cheers Dennis
-
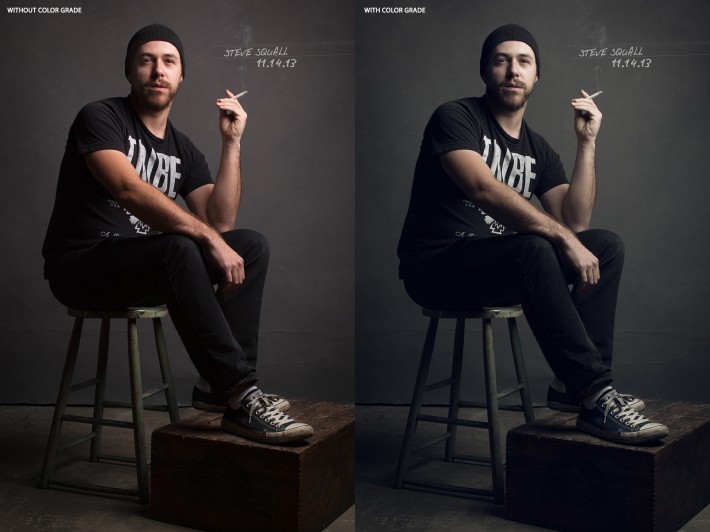
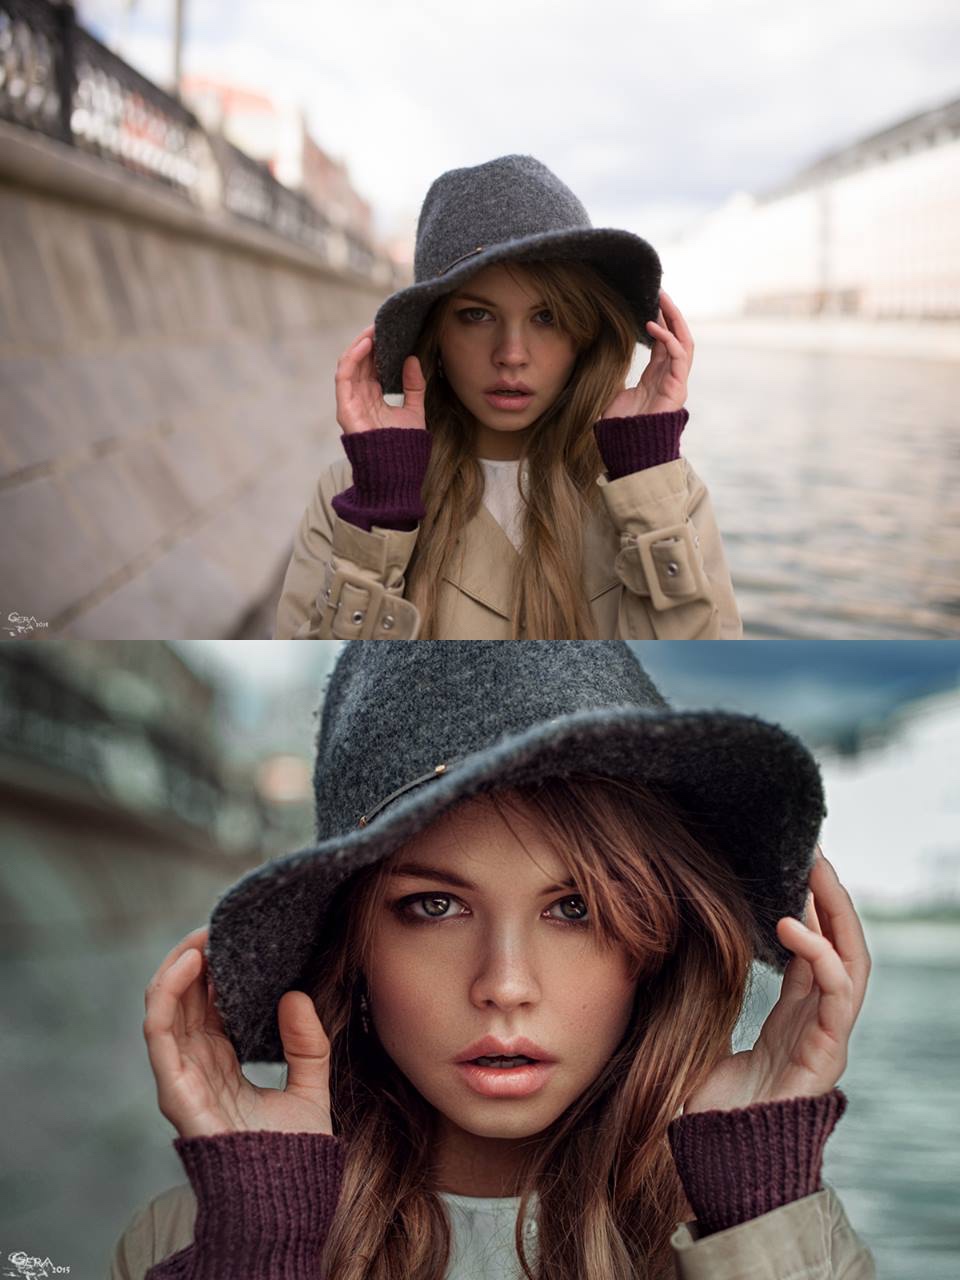
 Hi everyone! I'm learning photo processing with Affinity Photo, and actually I don't have much experience with photo processing at all. So I found official tutorials extremely useful! But I can't find much tutorials related to specific area - color toning techniques for portraits. I believe it's a kind of specific because often people and background objects are processed differently to achieve some artistic effects and get high quality works. Of course, there are many tutorials for LR and Photoshop, but it's twice harder to learn something new that way. I'd appreciate any links or hints on how to dive into this. Just a couple of toning samples I liked in attachments.
-
 Hello, I'm unable to launch neither Designer or Photo since the upgrade to El Capitan. They quit at launch. What must I do ?
 -
 Hi In Designer and Photo my pointer is not changing to the selected tool. e.g. If i select the Magnify tool my pointer does not change to a Magnify Glass. this is the same for all tools. Used the latest beta. 1.3.5.7 Regards Adrian
 -
I dowloaded and started to incorporate Affinity Photo into my workflow. I must say I am very impressed by this software and fully expect to use it instead of Photoshop (Adobe CC goodbye :-)). Having using the full version for a few days (but the beta before) I have found two things I use in photoshop missing (or I failed to find the function in AP). 1. Shake reduction filter. Does not do well on most images but in some cases it can be a savior. I would love this in AP. 2. Radial blur filter using the zoom method. This is a very useful filter when trying ti create (or improve) light rays (e.g. God rays from clouds) But so far this is the only thing I found missing (or haven't found) in AP. Now I only wish for an Affinity Lightroom replacement! :-) Thanks for a great software!!
-
 I would like to see some function for easily switching between before/after preview in the adjustments panels. Keyboard shortcut, toggle or maybe split view like in the filter panels.
 -
I'd like the ability to remove tools from the standard palette (in both Photo and Designer), especially subset items. There are so many tools that I don't use that I'd like to remove them, and I'd like the ability to pull commonly used subset items (like Rectangle, Ellipse, etc. from the Shapes tool) and place them on the "main" level. I'm hoping removing unused tools would also remove them from the keyboard shortcuts/toggles (in Photo, for example, "B" cycles between four different tools, two of which I don't use).
-
 I am trying to work with tiff files that are CMYK and fairly large. The "large" part isn't the problem - it's the fact that my files are improperly shown, just one part of it and never the whole image. I'm sure that there is nothing wrong with the file because they open just fine in photoshop right off the bat. Please help me out, I really need to get this done for a big project and would like to go Adobe-free as soon as humanly possible.