Search the Community
Showing results for tags 'Persona'.
-
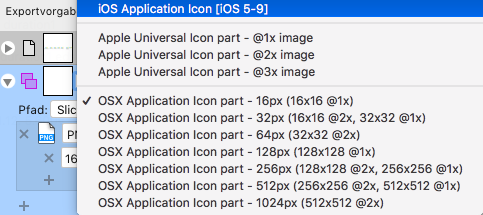
 Hello, is it possible in the Export Persona in Affinity Designer to create my own export specifications (in german: "Exportvorgaben")? Attached is a screenshot of the existing export specifications. Thanks in advance!
-
 Windows 10, Build 178. When I switch personas - doesn't seem to matter between which ones - the document zooms in a little. See attached GIF.
-
 I've been messing around with export persona and slices, and I'm trying to figure this out: I'm creating a heightmap for a game and I'm using a series of snapped squares to keep scale. What I'm trying to do is draw an image in a lay over all of these squares, then select a square and use it to create a slice that will export the corresponding part of the top layer. Unfortunately I keep on ending up with appropriately-sized blank squares or the entire image exported, or both. I'm not quite sure how the selection works; if someone could explain this to me it would be much appreciated.
 -
 Hello Everyone, I am new to Affinity Designer, i can say that Affinity Designer is a Very good Software so i was working on brush today and i found something un-usual In Pixel Persona the Brushes is not smooth when i draw anything. but in Draw Persona there isn't any problem like this. see the Image, the Brush i used on the Left is from Draw Persona & the Brush i Used to the Right is from Pixel Persona. can anyone tell me why is this happening. am i doing anything anything wrong or missing anything i am using affinity designer version 1.6.4 on Windows 10
-
 Ehy guys, yesterday I needed and probably will need in the future the ability to rotate RAW images in develop persona since Windows itself isn't able to do it. Rotating via the crop tool context toolbar is very difficult so it'd be nice to have the facility I've written above.
 -
 Exif data is totally cut of by Export Persona It is only properly exported/adapted from RAW by File/Export function. Generally: The Exif handling should be implemented much better. In comparison to Lr/Photoshop it is de facto inexistent. Of course there is the "All" view. But in there, I mess up with the countless xml tags, which are quite inconvenient to use - if you don't know the correct meaning by heart - what I do not and I have no intention to learn them. Guys, I want to use the program and not mess around with xml tags I have no clue of Appreciate any help, reply, whatever... Cheers mates, Roland PS: I was not sure, shall I post this under bugs or enhancement requests. Somehow it is like Schrödinger's cat: both
 -
Hello Affinity Team, switching a Persona sometimes takes a huge amount of time, especially switching to the Tone Map Persona (sometimes takes 15 minutes or longer). Canceling the operation would be very nice, since I could just continue working in the Develop Persona and not use Tone Map (at all or at that time). Kind regards Sebastian
-
 I recently lost the "colors" and "brushes" panel in the Pixel Persona setting on Affinity Designer. They don't appear in the Toggle UI anymore when I switch to Pixel Persona. My cursor accidentally got the tabs all mixed up and then they just disappeared. Do you know how I can get them back? Thanks.
 -
 Hello fellow affinity users, I was using Capture One as a RAW Developer and since I am using Affinity Photo as well I was wondering about the following: When using C1 it always used the raw data as you draw layers right on the raw output. My question is, does affinity use any of the advantages of having a raw file once it has been developed and you left the develop persona and edit in photo persona? Since I am usually not doing too much in the dev persona I might as well stop shooting raw and save tons of storage if there are no advantages beyond the developing persona. Also, what exactly happens when going from the photo persona back to the developing persona and you redevelop it? will you start from scratch? I hope my question aren't too dumb or answered anywhere else Thanks in advance!
 -
Photograph is just an image until it is printed. Yeah... Photographers needs to print their images to get them to be photographs, be them in the books, as prints in album or walls or table etc. We just need to get the images out from the digital devices to the physical world to really get the value and impact to them. So, many knows that printing is expensive, either by ordering prints or then doing prints by yourself. And all who does printing knows the basics of "soft proofing" but even that is just a trial and error method really. Adobe Lightroom (and few others) has a modern "print layout" feature where you can just select templates and place images in order and then just order print or press "print" and it comes out from the printer. But that is useful really only at the final results! The Affinity Photo (and incoming Affinity Digital Asset Management) would really help many photographers by offering a real "soft proofing" method. That is the feature from the darkroom era etc, where first we did a contact sheet so we could see easily negatives later on what we had. Then when we had chosen what we started to process, we needed to do a exposure test strip so we could bracket the correct exposure for the print before we start to work it. And then we did these on the smaller papers that were cheaper than using a final paper size. Like if we wanted to make a 20x30" print, we didn't do these evaluation tests for such size! We used all the scrap paper we had or size that could fit our negatives (usually single sheet of 8x10" paper for contact sheet). And here is the request: To offer to let us get this automated very easily to save money and time! Let us select a images we want to get printed Then let us to choose the final print size that will be the target like 30x20cm (this is crucial for sharpening, resolution, denoise evaluation) After that we select the test print size like 10x15cm. Now comes the easiness as well, we can select "strip" as well for the selected "test print", so the print is divided for a selected strips (like 1-5) and each strip can have a different settings (sharpening, contrast, saturation etc etc) or even files (copies of the same file of course)! This would allow easily anyone to import image to Affinity Photo, process it like they consider it to be a final one. And then export it to "soft proof" persona. And there user selects the final print size that is the target (like I want that 30x20cm print to be final) and then selects the test print size that is the paper size that is really going to be used to produce the test prints. And then we can choose a amount of strips for a test print and select each strip and make some special adjustment to each of them. And then print that/share that out so we can see what were the real results on print in final print size look! Example: Take image, adjust colors, contrast, sharpness. Then export it to "soft proof" persona and select target to be 20x30cm 300DPI print and test print a 10x15cm. Now the image gets overlay crop box that is size of 10x15cm related to the final 30x20cm 300DPI print (so 1/4 of print area) that we can move to position we want (we can have multiple of these!) and then we can select the amount of strips ie. 4. And then we can click each of the strips and edit each of the strip as individual by control values of the adjustments we did on the whole image (color adjustment, contrast and sharpness like we did above) but this is done just with +/- slider. It doesn't allow to apply a new effects but only ones we did and that matters in printing (like DPI value, colors, contrast, sharpening etc) and each strip gets easy way to set them up/down. So we get ie test print size of 10x15cm with 4 slides and each strip has +20 sharpening adjustment compared to next one. So strips are Original +20 Sharpening +40 Sharpening +60 Sharpening Or with other adjustment it could be like: Original 600 DPI 300 DPI 150 DPI Or with saturation: -10 saturation Original +10 saturation +20 saturation We get the 10x15cm test print files we can save (and get all the information overlaid even if wanted to strip corners so we can see later on what were the difference in settings). And now it is cheap to go and order or print these 10x15cm prints and get a "soft proofing" that way as contact/test sheet without going through lots of custom cropping, laying down the cropped parts as layers, adjusting each layer little differently and then getting them rescaled etc correctly for the image. And who says it would be limited to strips? Of course we could example select a 20x20cm test print with 5x5 grid with target of 30x20cm. And then we can use X and Y scales for a different settings. Like vertical lines for contrast and horizontal rows for a sharpness. Set the center (3x3 grid position) as default and then have sharpness and contrast to go from - values to + values at left to right. It could be hue, saturation etc. Then when we do a single 20x20cm print we can easily see the difference in settings and select the wanted one for final.
-
 Today I went through Affinity Designer scouring for pre-press tools, there were none. No separations, no channel view. Only the workaround to freeze all layers in Affinity Photo and export each CMYK+ channel separately. Bit of a surprise. But since there's nothing there, here's what I wished were there. That and a decent printing dialogue. For the print simulation, I used to recommend Substance Designer (setup) + Marmoset Toolbag (presentation) for a while now. Not anymore though because I always end up doing the work. -_- Scope: A new persona for all apps to address basic pre-press that are currently unaddressed. Views: Toggle between several views for dedicated control options on each task. Some views can be combined to get a better idea about the end result. Noted with [separate] when one stands alone. Overprint Check View Show realistic rendering of how the overprint will look based on selected profiles for ink, printer (optional, based on PPD) and paper. Tools: Range Selector: Like a mix of UPoint + drag and move, for fixing and optimising ink trapping (live dilate/erode on vector and bitmaps). Coverage meter: Show where the ink coverage exceeds or meets 100% with a heat map overlay. A range selector then can be used to lower the ink as: lower total, lower c/m/y/k/+. Buttons could be used to control that: e.g.: [c] [m] [y] [k] for working on magenta and yellow at the same time. Output Image: Render the simulation output of a whole document to an image (or PDF for multi-page) Font Trapper: Local overrides on font trappings that didn't turn out as planned in the style and colour settings. Print Simulation A simple simulation for base paper types and the ability to create custom ones (folder with absorption values, reflectance and a texture image for example) would be great to give clients a feel for it before someone has to spend money. Tools: Moveable light source: (useful for checking special inks, embossing/debossing, foil stamping and UV coats) Review light: Choose between a set of standard review lights (e.g. Just Normlicht LED proofstation) to judge the print under various lighting conditions and help avoid ambiguous colour situations (like that dress). Output Image: Render the simulation output of a whole document to an image (or PDF for multi-page) Separation View [separate] View all separations in a gallery view with an option to overlay them to check whether they can be optimised further or whether they work as planned (how is the yellow faring with the black? Did the overprints turn out as desired in the OC view? Are all special ink channels present correctly?) Tools: Drag overlay: Drag a sheet onto another to see their interaction in the printing context. Print separations: Print dialog allowing output of separations on a standard laser printer. This allows for a final manual check and also is of sufficient quality for a lot of silk screen printers out there. Export to PDF: Save all/active/selected artboards/pages in separations to a multipage PDF ready for lightjet ripping
 -
 When Serif showed off the Publisher video on Facebook today it showed three persona icons that were the icons for the three Affinity apps. Unfortunately they didn't click between these personas so it's hard to tell how they work. Can someone at Serif please explain what the personas are?
 -

Export/save from develop persona
InnerPeace posted a topic in Feedback for Affinity Photo V1 on iPad
I would like to be able to save an image directly from the develop/RAW persona without having to do a roundtrip through the photo persona. This would be especially great if the edits could be saved non-destructively. Some pictures don't need editing with the photo persona, this would definitely speed up my workflow for certain images. -
 Hi, I suggest that, when in the Develop persona, hitting Return be configured as meaning Develop. Same thing in the Liquify persona, Return should be made to mean Apply. It would save time and avoid a lot of superfluous mousing around. Thanks!
 -
Hi Guys, sorry in advance for my bad english I'm trying the trial version about Affinity Photo and that is what I found that doesn't work well: - Editing size and hardness of brush is really annoying: in PS I just need to right-click and fix how I want or Alt+right-click to edit in the fastest way the settings. Can you implement this in the next version? - Studio editing is pretty good but I can't group the tools, for example: if I want that all the tools selection are in a single group I can't do it, in PS I just need to drag them in a tool's icon tool to make them stay together. - The Blemish Removal tool works only with circles and I can't drag that... Under, in the info, there also written DRAG: bug or drag is just to select where Photo have to take the pixels to correct? IMHO Should be a brush... - During the selection work on PS if I press Shift I can add the next drag to my selection, if I use Alt I will delete. Can you implement also that please? - Develop Persona: There's somethings that doens't work good: I can't work simultaneously on more raws image (if I have a sequence I want to edit in the same way all the shots in syncro...) The raw edited can't be closed and worked later: I'll lose all my corrections. Can you fix that? Just like the .xmp files of ACR or in the metadata like LR I can't find the HSL panel that I use really much on PS or LR, can you implement please? Last thing: can you encourage people to create panels also for you? TK Panels and Beauty Retouch is a must for my workflow in landscape and portrait..! However Affinity Photo is a really, really, REALLY good: Smooth, fast, unexpensive, etc. If I think that you are just at 1.5 version... Wow. Keep up to good work! When you'll fix this problems I'll surely buy and incentivate my friends to buy the program. Thanks to have made a good competitor of Photoshop! =D
-
 When I attempt to leave the Develop Persona, I get a message about committing or cancelling the develop operation. When I do the same in the Tone Mapping Persona, I don't get a message (but nothing happens if the program is waiting for me to commit or cancel).
 -
Hi, would it be possible to add a way to save the job done in develop persona before the complete process is done and be able to start again from where we were at that point? I hope I'm clear :-) Best Regards Cyril
-
I'm sure you've given it thought but do you see changing the term "persona" or how AP/AD categorize these sections? Is this a "legal" get around? Only reason is that "Lightroom" for example has a similar thing in how they break up their workflow, but it's sort of laymen and it truly follows a workflow, oppose to Personas which feel random and honestly confusing. I would love to see this portion of the apps overhauled so it really becomes useful in a professional environment and follows a realistic workflow. Yes, it' different for everyone but at the end of the day, "1, 2, 3, 4 and 5" makes sense, not "3, 5, 1, 4 and 2". Love the product but just an observation that I hope will be addressed.
-
 I opened AD today and everything was where it always is. I switched over to Pixel Persona to work on some art and my Persona Toolbar vanished. I have to go into the AD dropdown menu to switch back to Draw Persona but the toolbar still does not appear. It's just a grey or black blank bar. I have restarted the program, updated it and even uninstalled it to reinstall it and the same thing keeps happening. Any help would be appreciated.
 -
 Can you please tell me how to commit changes I make in a persona before moving to another persona? I have looked everywhere and I can't find it. I keep getting a message asking me if I'm sure I want to leave a persona before committing to the changes but I can't see a way to commit. Thank you.
 -
Please it would be very very useful to have better snapping option in export persona and special the snapping should take in consideration the guides place in the photo persona. also it would be very useful to have a fonction that would allow to create slice base on layer, but also transform those created slice into slice that would take all layer from top to bottom in consideration. exemple if i create my slice from my background layer i would like this slice to be able to export all contend of above and under layer within that slice. let me know in case i missed those fonction in your existing version. Best Regards. F
-
 Hello Designers I'm a new user and I have one question for export multiple layers with export persona and slice. How to export with adjustment layers applied to other layers? Thanks Sorry for my English ;)
 -
 Some issues I've been facing on the Export persona in AD (1.5.3.6x public and beta): Slices don't always get the name of the artboard. If you rename the artboard the slice will keep the old name. If you're duplicating artboards this causes an issue where many slices have the same name and they'll be overwritten upon export I have a document with over 10 artboards (each one gets a slice). If I zoom out and select them on the Slices panel I can't tell which one is selected or not. Due to the naming issue above it's really hard to tell which of the artboards is selected since some have the same name and you can't see the selection border. The selection border gets hidden behind the slice blue border. There needs to be a way to completely hide (toggle show/hide) the slices markings In the Layers panel (back in Vector Persona) if you double-click a layer AD will zoom it in to fit the viewport. This would be very, very useful in export persona too, in the Slices panel. Double clicking a slice in the listing would zoom into that slice. Using the Slice tool sometimes selects an existing slice and sometimes it tries to create a new slice over an existing one. The behavior changes depending on zoom level and it's hard to replicate. The Slice Selection Tool selects objects within the artboard instead of the slice Selecting a artboard-slice by its name only works at greater zoom levels (100% or larger) There needs to be actions (buttons or kbd shortcuts) to select all/select none slices Selecting a slice highlights it on the Slices panel listing but does not scroll to it Thanks for reading :)
 -
This is a list of enhancements I would like to suggest for the Export persona in Designer: The selection border around selected slices should be visible at very small zoom levels. Currently it's very hard to tell which slice is selected on zoom levels below 50%. There needs to be a way to completely hide (toggle show/hide) the slices markings (the slice title and its border) Double-clicking a slice in the Slices panel listing would zoom into that slice. In the Layers panel (back in Draw Persona) if you double-click a layer AD will zoom it in to fit the viewport. This would be very, very useful in export persona too, in the Slices panel. The Slice Selection Tool selects objects within the artboard instead of the slice. It is far easier to select an object than to select a slice. Maybe the tool should select slices on click and objects on shift+click or something like that? Its name is misleading. There needs to be actions (buttons or keyboard shortcuts) to select all/select no slices or to check/uncheck the selected slices and invert the selection. In fact, it is confusing that selected slices are not exported, only checked ones are exported. Why not make exporting selection-based? Only selected slices would be exported, no need for checkboxes and confusing selection behavior. Selecting a slice highlights it on the Slices panel listing but does not scroll to it, this would be quite helpful Thanks!
-
 Hi, I have been using Affinity Designer and Affinity Photo for more than a year now, and so far, I haven't seen any layer or layers group that I couldn't paste in both Apps with all their functionalities intact, which is totally great! But the downside is that it forces me to create many redundant layers in 2 similar files. When I work on an image file in Affinity Photo for example, I sometimes need to save this same file as an Affinity Designer file to work on it with different tools in Designer. Then, if I edit the original image file in Affinity Photo, I have to replace manually the corresponding image layers in the Affinity Designer file by the updated ones. I suppose there are a few ways to get around this, but there is also a very simple solution: the afdesign and afphoto formats look basically like the same format, the only difference, as far as I know, being the application it opens the file into. So why not create an Affinity Designer button in Affinity Photo, and an Affinity Photo button in Affinity Designer, which would allow us to open the current file in the other Affinity App? Let's say I have created an image in Affinity Photo, and I need to add a compound shape for example. I would click the Affinity Designer button in the Affinity Photo App, which would open the file seamlessly in Affinity Designer, then I would create my compound shape, click the Affinity Photo button, edit it further in Photo, etc. The advantage of this method is that you are always working on the same file, instead of juggling between two similar files containing identical items that you would have to update manually. Depending on the programming of the Apps, you could even go one step further and replace the Photo Persona in Affinity Designer by a whole Affinity Photo persona when Affinity Photo is installed on the computer, and add an Affinity Designer Persona in Affinity Photo, when Designer is installed. Is it possible to implement such a functionality in the Affinity Apps?