Search the Community
Showing results for tags 'Masks'.
-
 I have a multi layer graphic on which I want to make a certain area shaped by a layer object appear in bw (i. e. saturation = 0). I was fiddling around with adaptations and masks (which behave different to AD1) but I didn't get it working. Is it possible at all? Thank You very much. 😊
 -
 The bounding boxes for masks (the area allowed to paint inside) doesn't always increase / decrease automatically. Masking an image outside of an artboard bugs it out somehow. Here's a file showcasing the issue. I don't know how to replicate it entirely, but the whole right side won't mask at all in this example: Mask Issues.afphoto Also, masks don't affect outside of the artboard and I think it's a strange behavior. Especially for cutting out objects. It's a lot of extra work for no reason. We shouldn't need to Rasterize > Trim and lose the photos quality as a workaround.
 -
 Hi, I have this issue quite a lot and now is the time to finally find a better workflow to do this; I have an image, masked with a rectangle that also defines the background color with it. But now I'd like to change the color of this mask object (the rectangle) because I'd like to change the background color. So far I unmask this first, change the color of the rectangle and mask it again (or change another way to do this background color anyway, but that's not the point now). But there must be a way to directly change the color of this 'mask-object' without unmasking it first, right? How to do this kind of stuff without unmasking? Hope this makes sense!
-
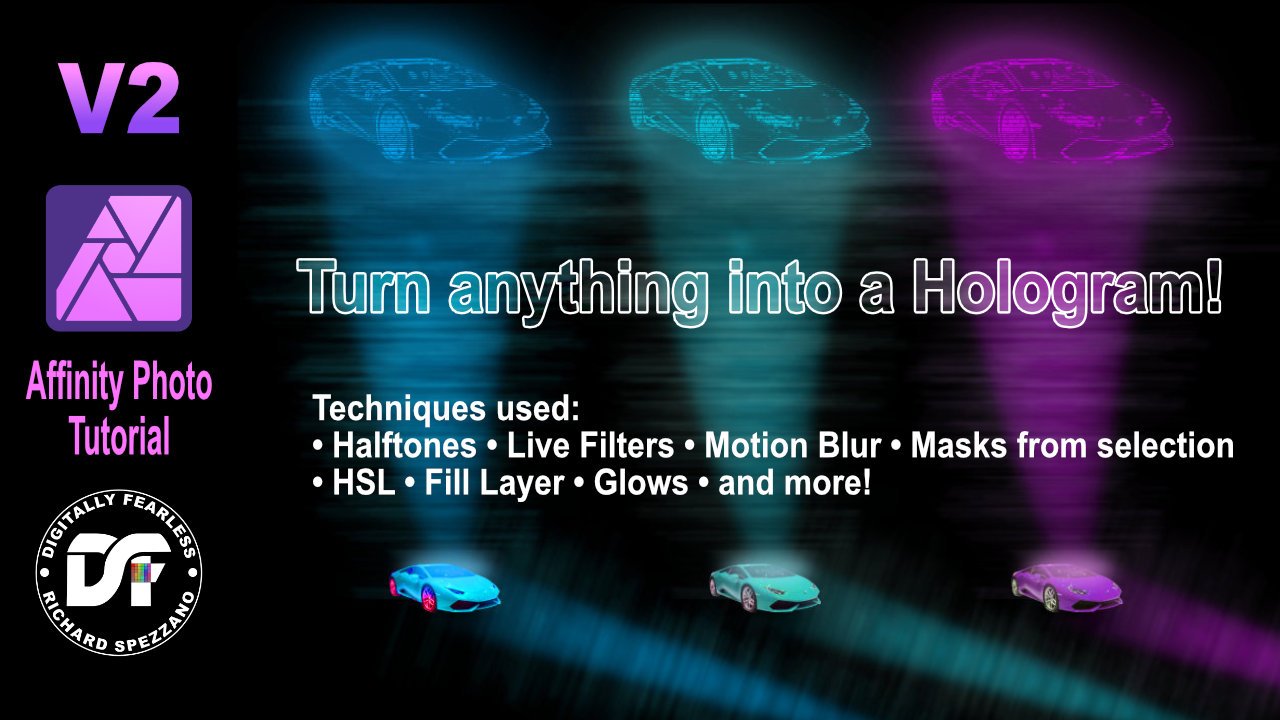
 In this Affinity Photo 2 tutorial for the desktop, I show one way to make holograms using live filters, halftones, different types of blurs, masks from selections,HSL filters, glow FX and more. I also did this tutorial for the iPad. Check out my YouTube channel for that version. https://youtu.be/ENdlHsLpGZY
-
 Whenever I create a mask I end up with parts of the area I wanted to mask showing. I then have to remove them with the paint brush. I have to blur backgrounds on photos so that the person is more prominent or to 'remove' people in the background. I usually use the selection brush tool along with the freehand selection tool to create a selection, then click 'refine' and, if needed, brush over the edges where the selection could be better - usually around the head and hair where the refine process works as expected. It's usually on hard edged shapes where the problem occurs - when the person is wearing a hat, or around their clothing. After selecting and clicking 'refine', I very rarely adjust any settings in the refine dialogue box, it's left as it appears. What I am left with is shown in the photo sample below. Can anyone help me with a solution to this issue to get it right first time without having to use the paint brush? FYI: MacOS 10.15.17 on a 27" iMac but this problem also happens on a MBP running the same OS.
-
 I am not able to finish a mask when in refine edges as the mask disappears and saves I have made are lost. When I close and reopen a lot of the masking touchups are not there and sometimes the mask reverts to the original version. What am I doing wrong??? Thanks Aidren
 -
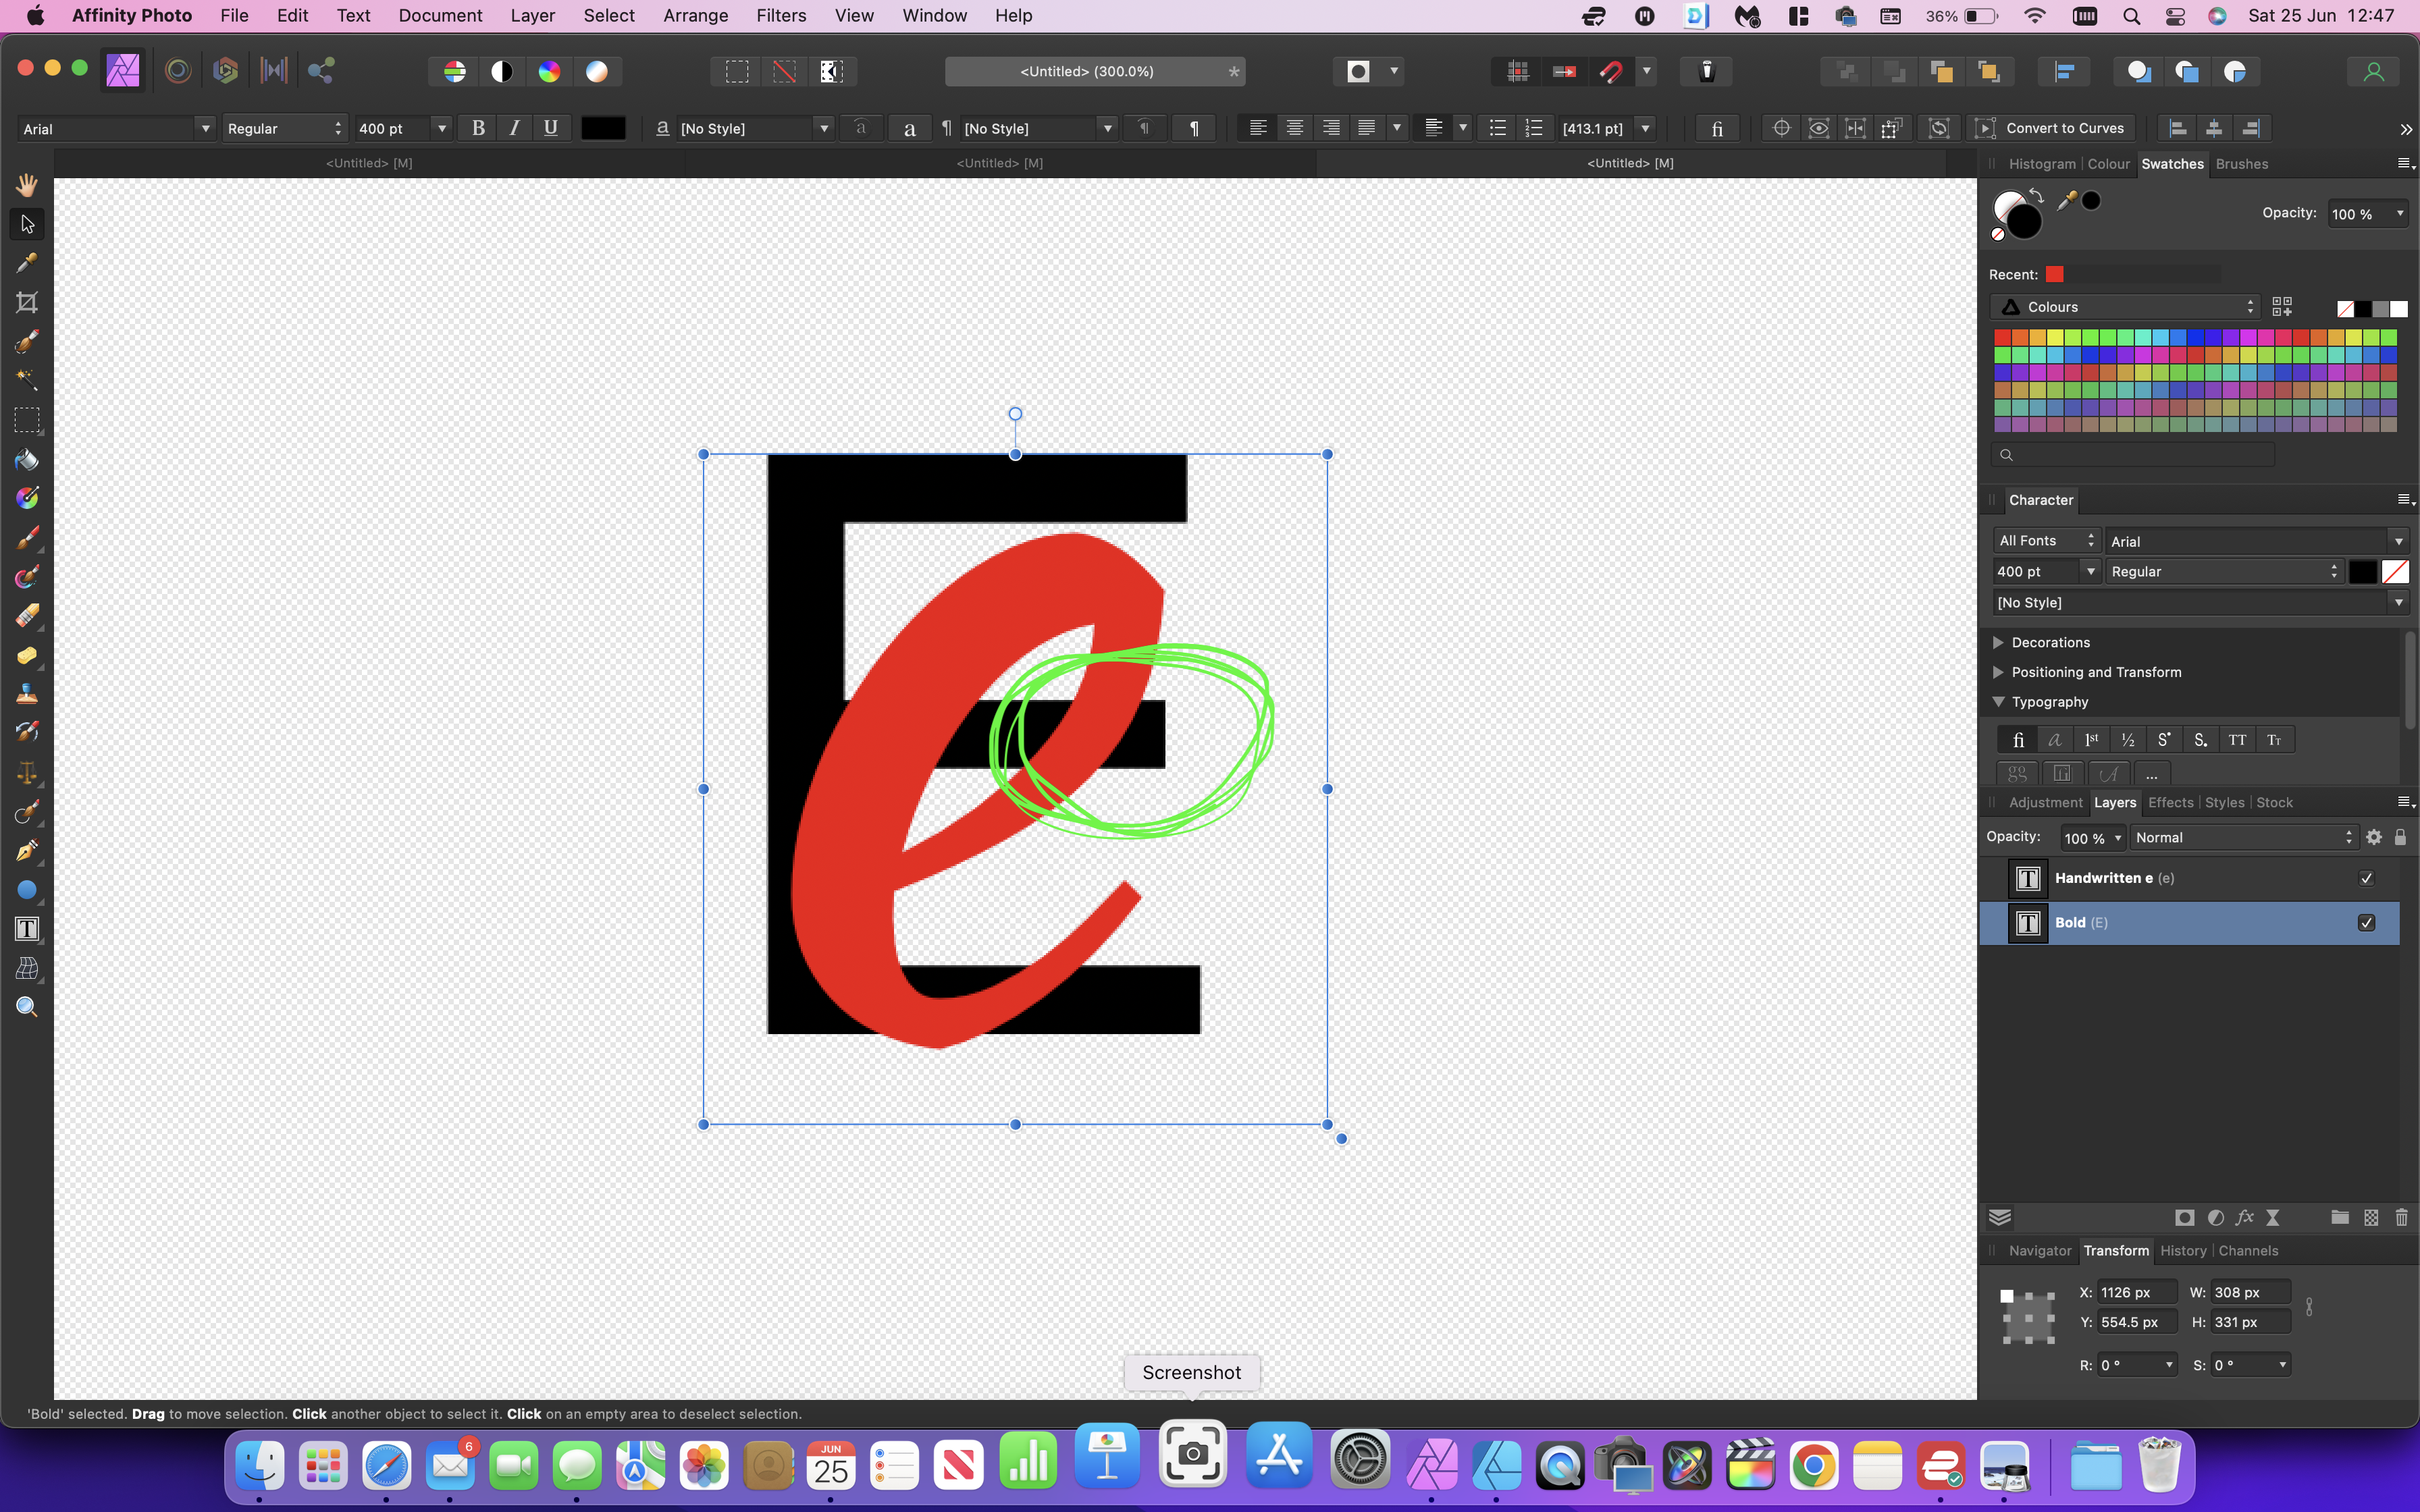
 So as the title suggests for the life of me cannot get my head around this, i am trying to use Mask to reveal only parts of another layer by using Mask and then the brush tool. I am sure it is relatively easy but I just cannot get it to work (i use procreate as well and can peform this quite easily) See screen grab so for example i want to reveal only the central part of the E as indicated by the circle in green (this is obviously not part of the main image, purely to highlight the area i am trying to reveal on top of the red handwriiten letter)
-
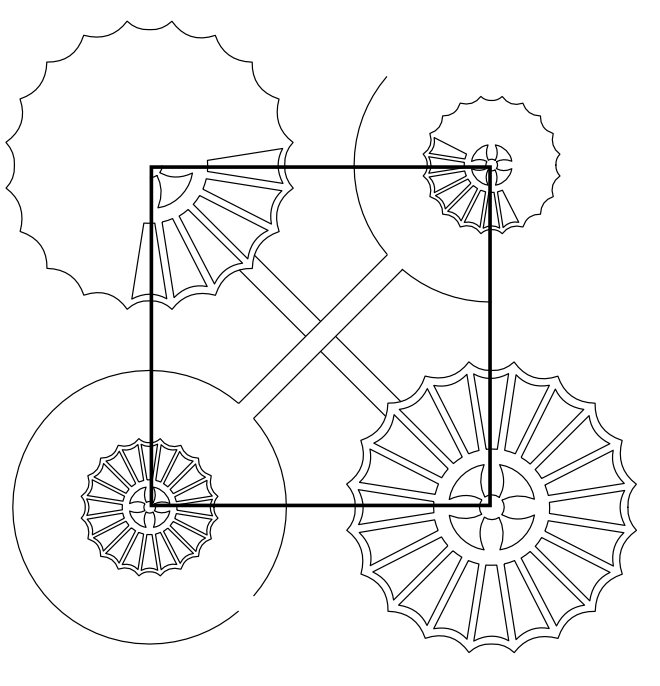
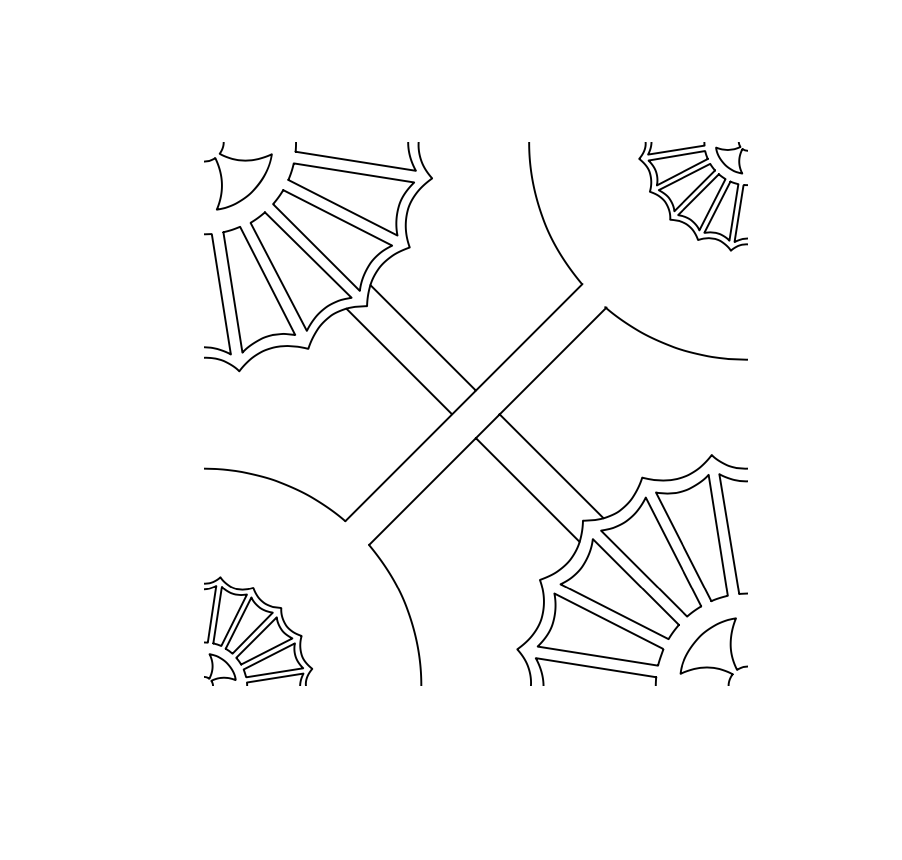
 hello! trying to make a pattern and want to delete everything that exists outside of a chosen section of a shape/mask. it's easy to do visually but then when exported the hidden lines remain part of the file. it's going into a laser cutter so i need to keep it as vectors (can't flatten) but also for everything outside of the shape to be gone gone gone! sorry if this is a really nooby question i just cant quite figure it out! so far i'm just having to go line by line cutting it at the right point, which is just rather time consuming. file attatched :) basically i have this: and need to turn it into this: pattern one.afdesign
-
iPad version Retro TV Pop-up Affinity Photo tutorial photo manipulation In this iPad photo manipulation in Affinity Photo, I create scanned lines and show a girl jumping out from a retro tv to real life. Halftones makes shapes and the pen tool are used. The link to the desktop version of this tutorial is in the description. https://youtu.be/j9qjXu0vqxQ
-
Retro TV Pop-up Affinity Photo tutorial photo manipulation. Desktop version. In this photo manipulation in Affinity Photo (desktop version), I create scanned lines and show a girl jumping out from a retro tv to real life. Halftones makes shapes and the pen tool are used. The link to the iPad version of this tutorial is in the description. https://youtu.be/EKR7IdFw6Os
-
 Hello, I'm watching a lot of tutorials on cropping right now. Especially hair. Unfortunately, none of them work for me. Are there any presets that need to be fixed beforehand in the preferences? So, selecting a person with brush (W) goes. Then refine the hair area and select further doesn't work, because all areas that were already selected before are partially undone. So if you click on apply, you have a smear at the "edge" ziwchen hair and background. Thanks
 -
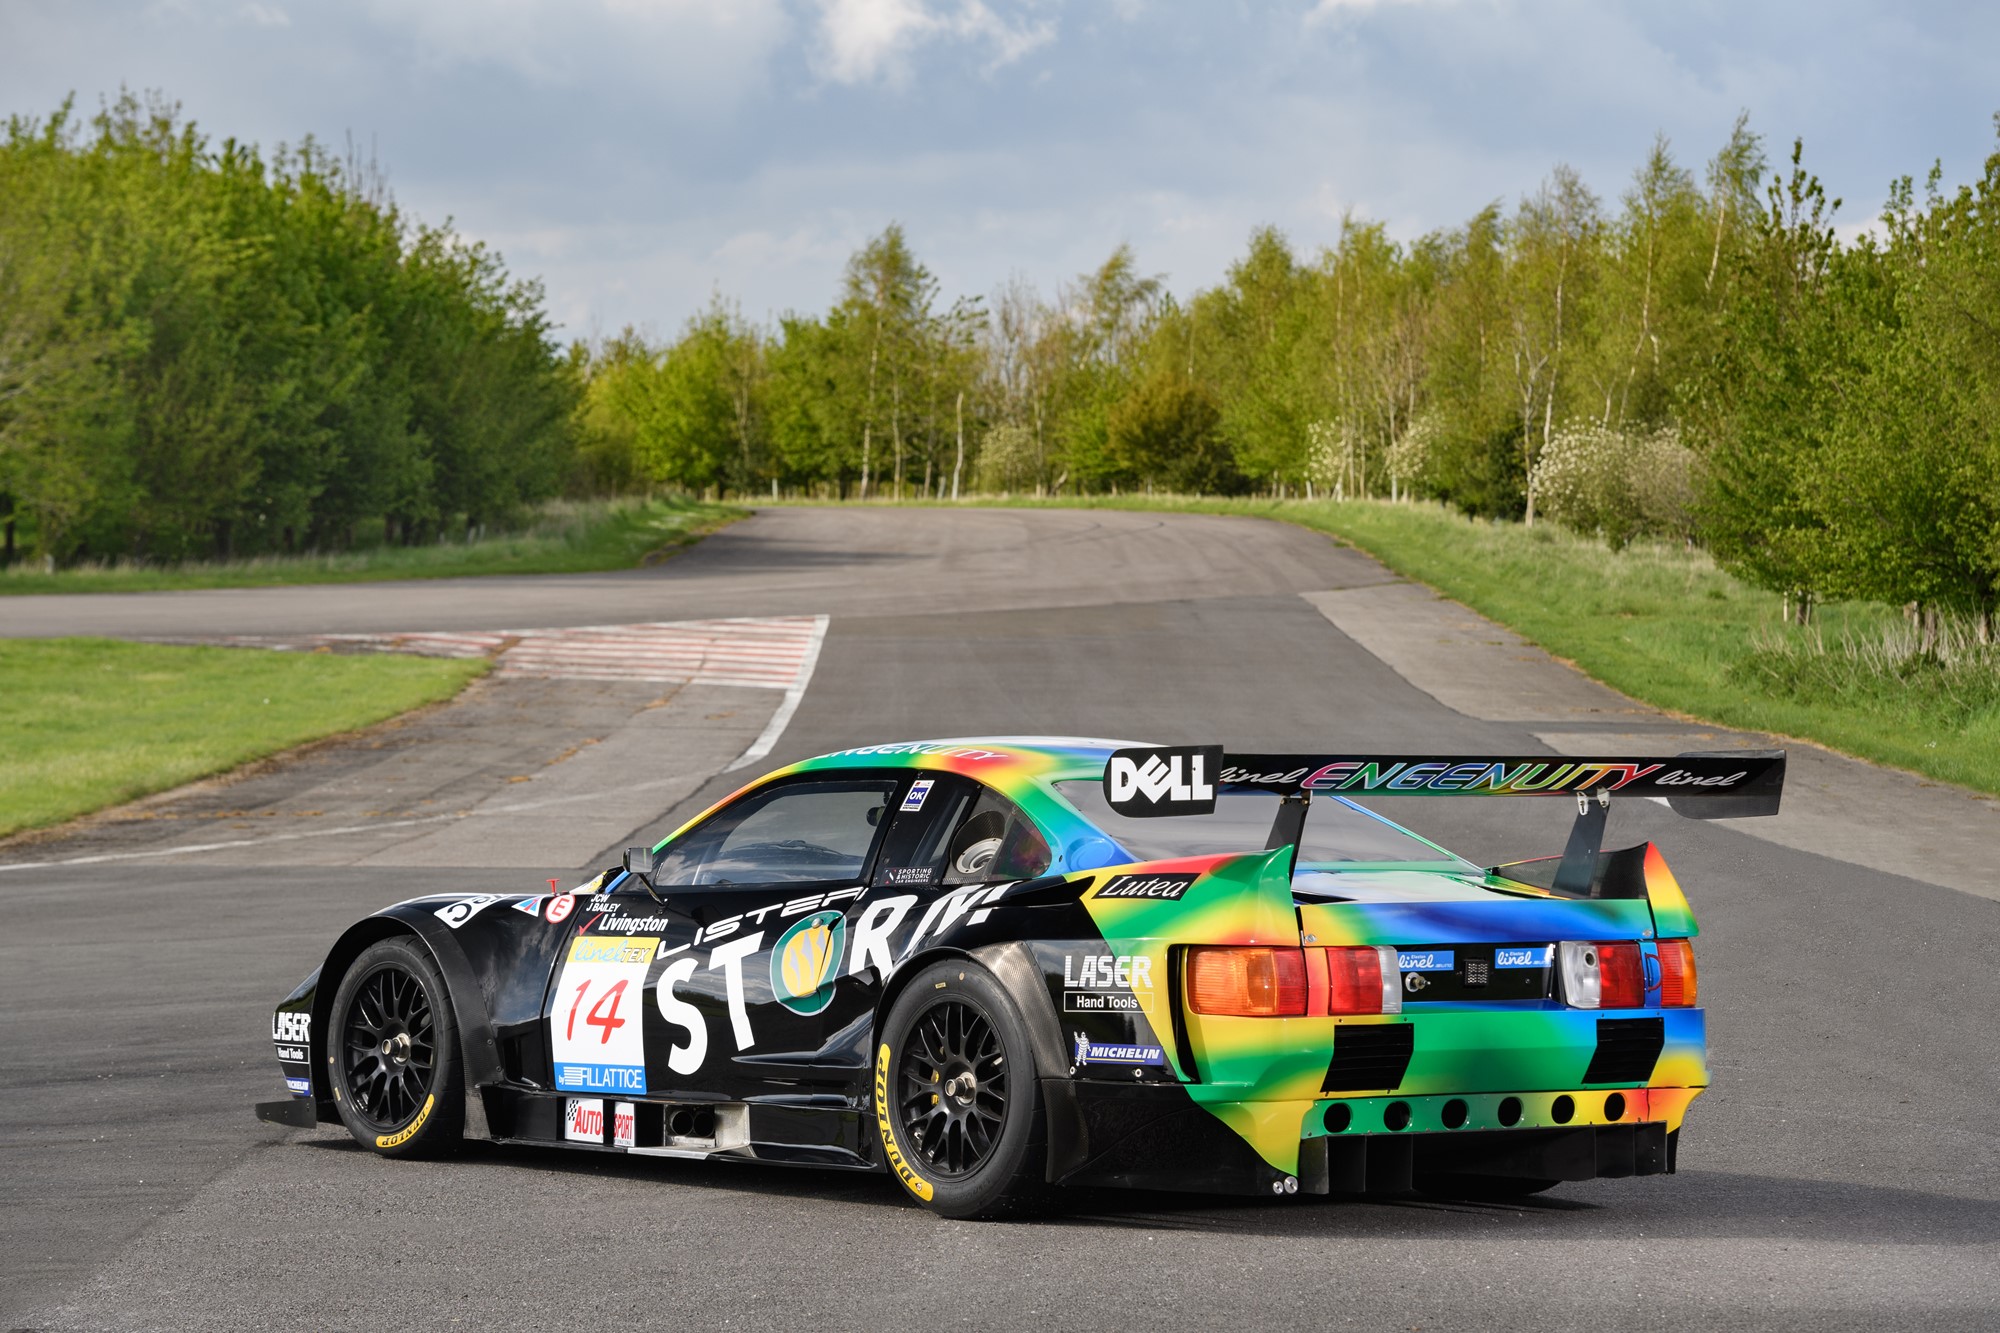
 Hi guys, Looking for advice on how to colour the back of this Lister Storm accurately. The work flow I have in my head at the moment is to create an overall outline of the car. Then a second shape using the pen to outline the coloured section and mask it inside the car and maybe fill this green as this is the bulk of the colour. To achieve the coloured 'splodges'(?) I'm considering doing rough shapes and then gaussian blur as opposed to using any gradients. Does this seem logical? If not does anyone have any tips. Many thanks!
-
 How can i use the undo brush non destructively ? Is it somehow possible with masks? What i want is a layer/masklayer i can blend in and out only with the changes of the undo brush.
 -
It's happening now, isn't it ... ?!
-
 Hello all, i am trying to add several vector shapes as masks to an image. I drag an rectangle onto the image thumbnail - this works: the image is cropped to the shape that was added. But when i add the second shape onto the same image, the both masks only reveal the image where they overlap. I am looking for a way to add the second mask independently from the first one, is that possible in designer?
 -
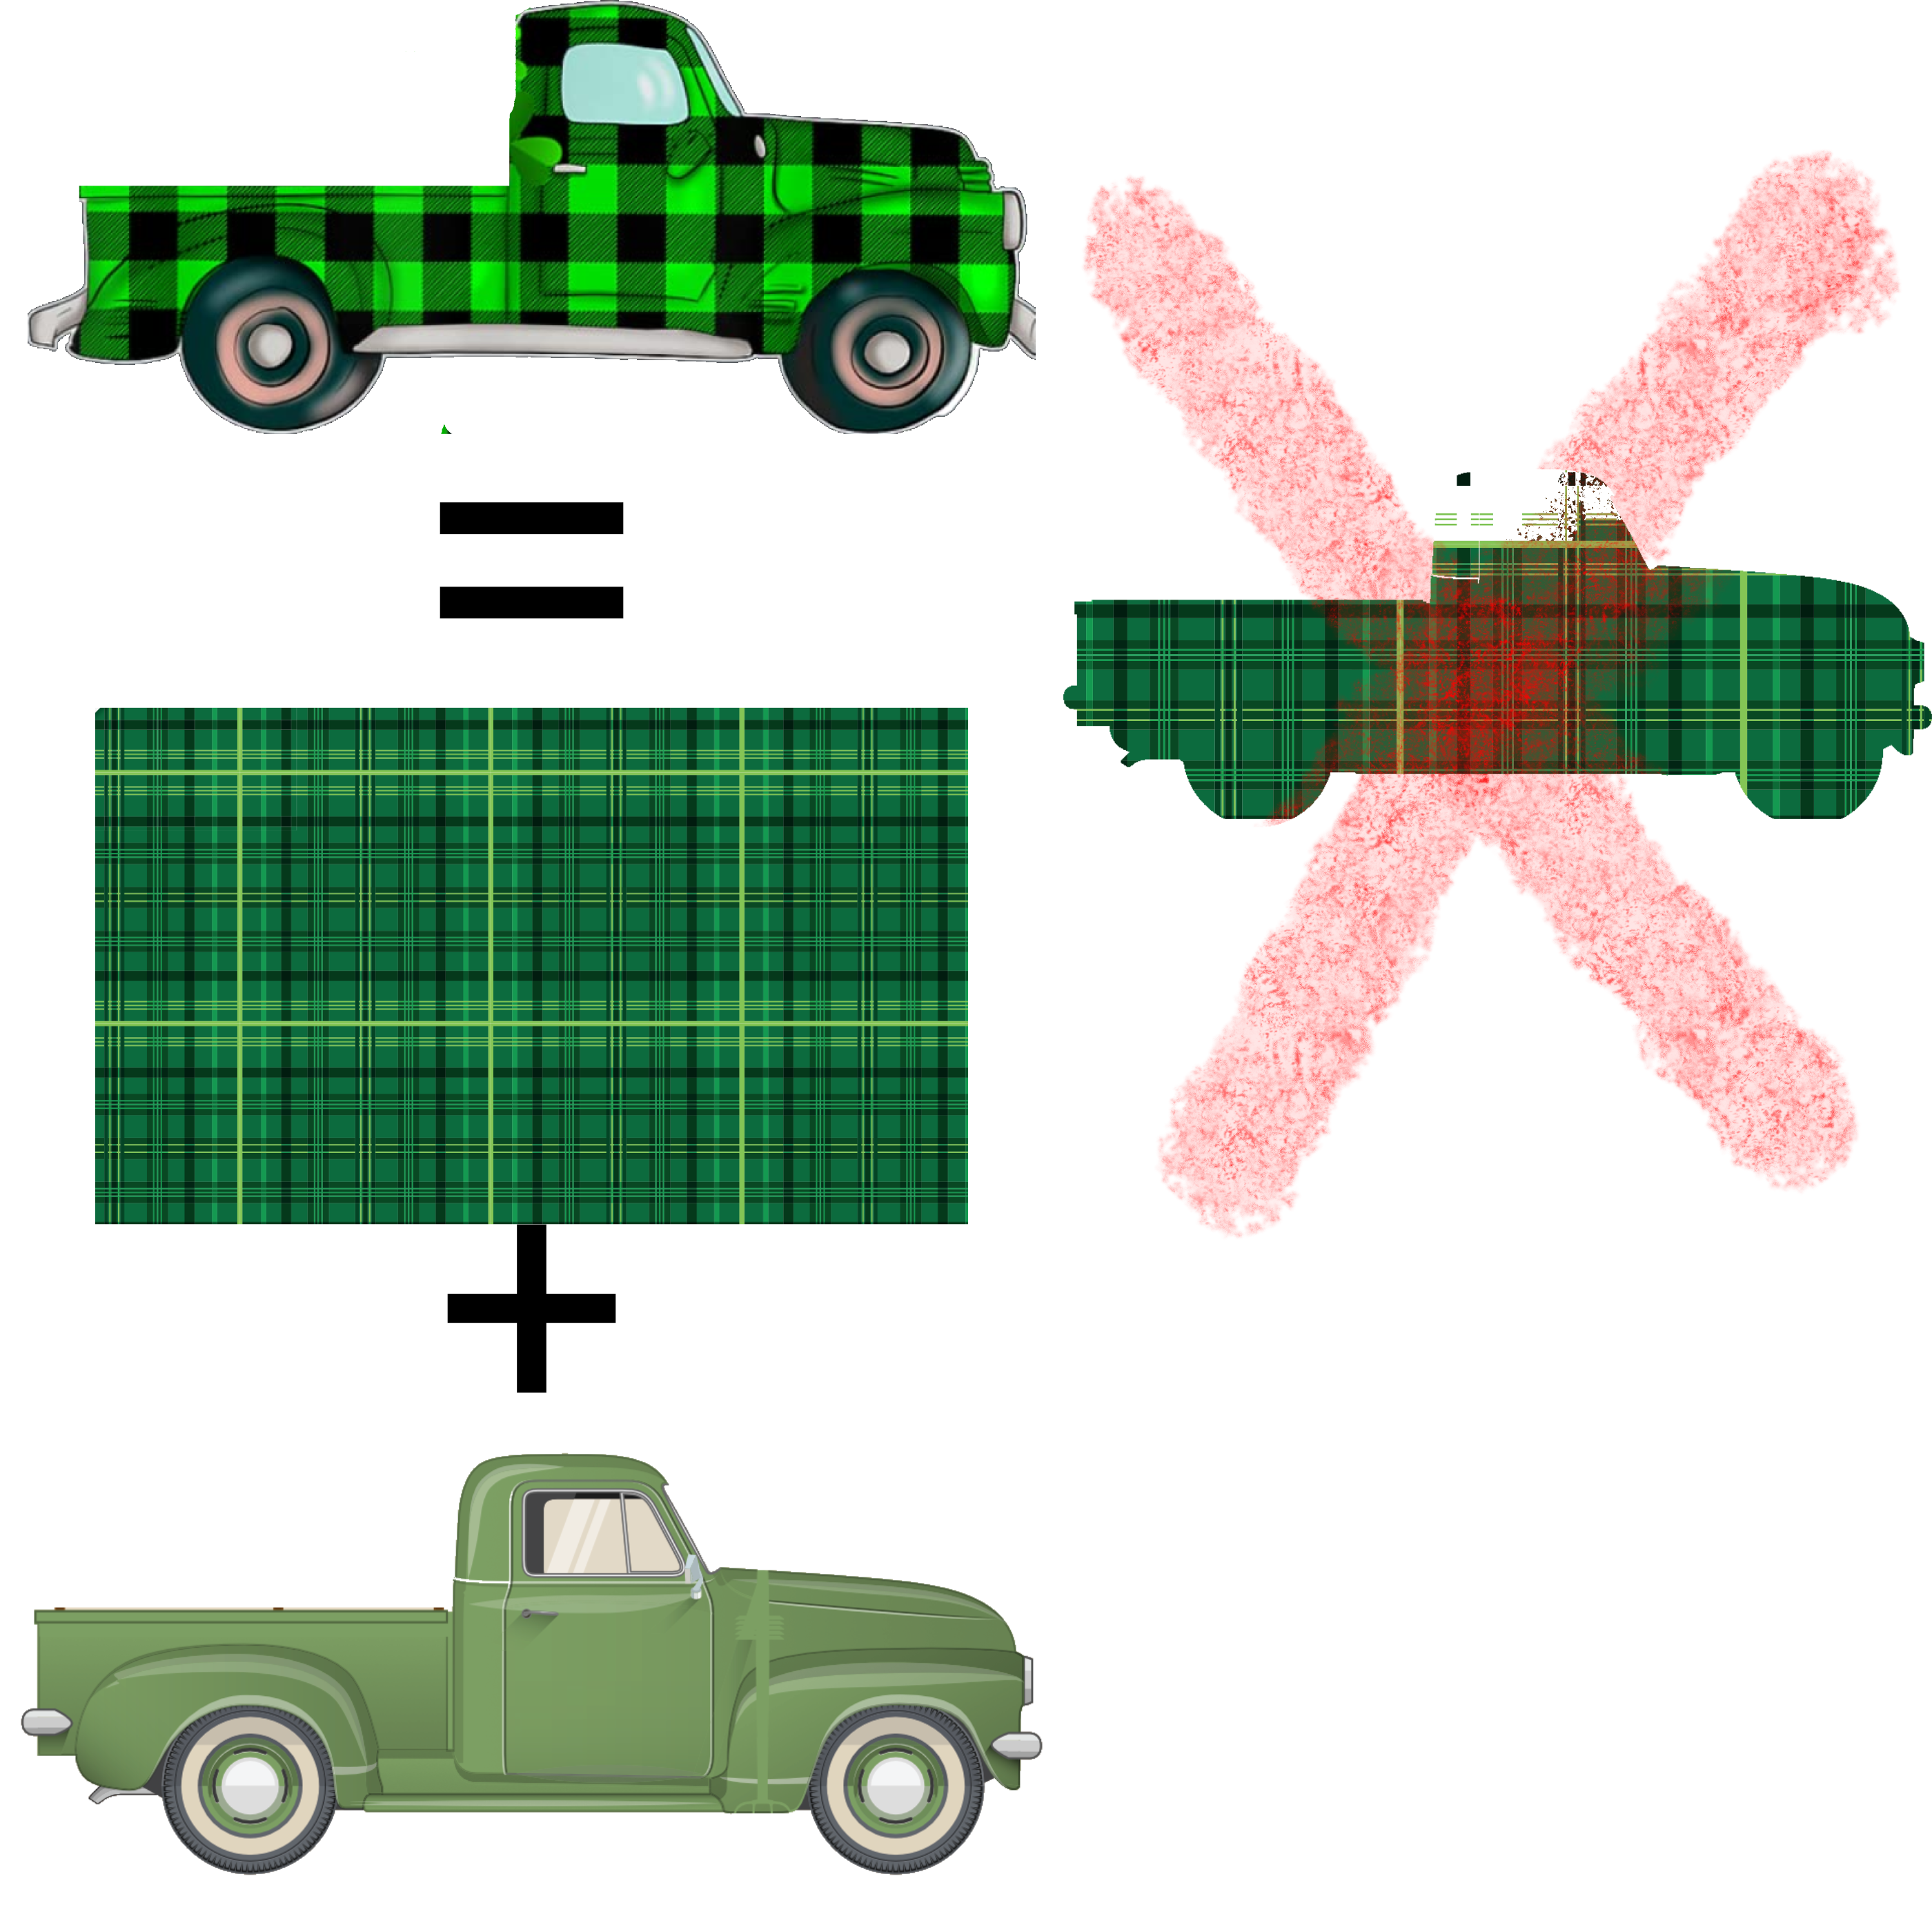
 Hi, Thank you for help in advance. I'm a beginner. i 'm looking to make this design (truck+pattern) without loosing truck details (hope you understand my english). do you know how to do? thank you
-
 Hi, I have a strange issue with layers and masks. After completing some editing I merged the layers into a new pixel layer. I then wanted to change the colour temperature so I added a new White Balance layer however this only applied the change to part of the image. The same thing happens with all layers meaning that I can't edit the main body of the image. It would appear that the that the White Balance Adjustment that I made to part of the image is now "stuck" in the merged image. To illustrate this I've taken a screen shot with an exposure adjustment maxxed out and the only part of the image affected is the bright bar above the middle of the cheetah's head. Any ideas about what I've done wrong and/or how to resolve the issue? If you think that this is a bug I can upload the .afphoto file but it's about 250MB.
-
Hi there, this may be less of a bug but a hardware problem but I want to mention it anyway. With Affinity Photo 1.9, exporting an image seems to be incredibly slow with liquify masks applied. The two devices I have and I have tried with are: iMac mid2011 21" quad 2,5GHz i5 16GB RAM with High Sierra 10.13.6 (yes, its incredibly old and I am working on replacing it. But its still my main device for now and it runs incredibly smooth with everything). MacBook Pro start2015 13" dual2,9GHz i5 8GB RAM with Catalina 10.15.7 (not really a workhorse but my little pal in the field). Exporting images without liquify masks is still fast as ever but as soon the smallest change with a liquify mask is applied the CPU runs on max for two or three minutes to export the image. Does someone else has experienced the same? Since its a very new feature I do somewhat hope that there is a more efficient way to implement that feature without requiring unusual more hardware specs.
-
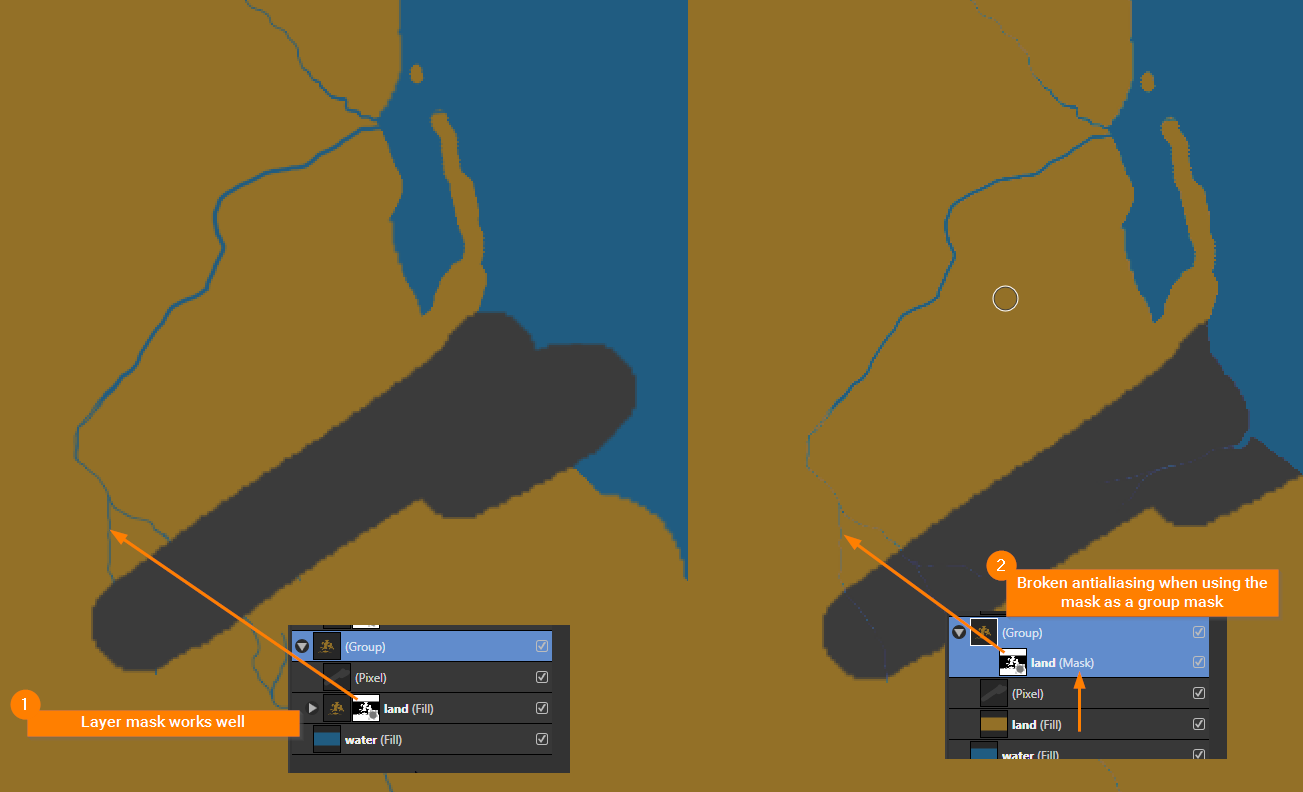
 Issue: The antialiasing of a painted group mask is broken. See my example screenshot below. Bug description: When using the a painted mask in a layer all works fine. Moving the same mask into a group results in destroyed stroke edges (broken antialiasing). Is this a bug or do I something wrong? Screenshot:
-
 Hi there, i tried to use a live stack to merge several images in a HDR style. Images are exposure bracketed. I do not understand how alpha channels work in combination with live stacking: If i apply a mask to one of the pictures, the mask is effective to filter out unwanted parts. But if i try to adjust the alpha channel of the mask, e.g. with help of a levels adjustment, this does not show any effect. Is this inteded behavior, or a bug?
 -
 I started off writing this as a question because I couldn't work it out, but a few times I accidentally got it to work although I couldn't work out how I had done it. (Affinity Designer Desktop v1.8.5, Windows 10). After much fiddling around I have worked out how to make it repeatable. (Admins: please feel free to move this to a better place in the forum if there is one). This is useful if you use a tablet and want to draw vector brush strokes in a mask in pressure mode, see the effect as you draw them and be able to edit them afterwards. Here is the explanation - there are three important steps which are not obvious but omitting them will leave you without editable vectors in the mask: Select the layer or group you want to add the mask to. I'll call this layer A. Click the Layer Mask button to add a pixel mask (even though we are in Designer Persona). This serves no actual purpose except that if it doesn't exist, this method doesn't work. Draw a vector brush or pen stroke (this creates its own layer above layer A). Create a group with this single curve (or more if you want to); the point is, it must be a group. Lets call this M (for mask) Make sure the group is open (i.e. click the triangle so that it points down and you can see the vector curve(s) in the group). Drag the Group M into the mask position of layer A. The vectors in group M are now a mask and the curves are individually visible and editable. A black 100% density stoke reveals anything below Layer A. Select the vector brush (or pen or pencil) tool and click on a curve in group M (select a curve in the group, not the group itself) in the layers window. No points in that vector curve should be selected because this will just extend that curve, unless that is what you want to do. Draw a new vector curve and it will be added to the curves in group M; i.e new brush strokes add vector masks in real-time. You can delete the pixel mask layer created in step 2. I have tried to record a video of the process (the context menu for the layers window doesn't show up in the recording but the actions were creating a group and later, deleting some of the vectors). Affinity Designer 2020-12-02 11-43-09.mp4 Note: if you don't create the pixel mask (step 2), group the brush stroke (step 4) or have the mask group open (step 5) when you drag it to the mask position (in step 6), you get the vector curves as a mask but you can't edit the individual curves or add any others. You can only do that if you drag the mask back out so that they become an editable group again and then re-drag to the mask position.
 -
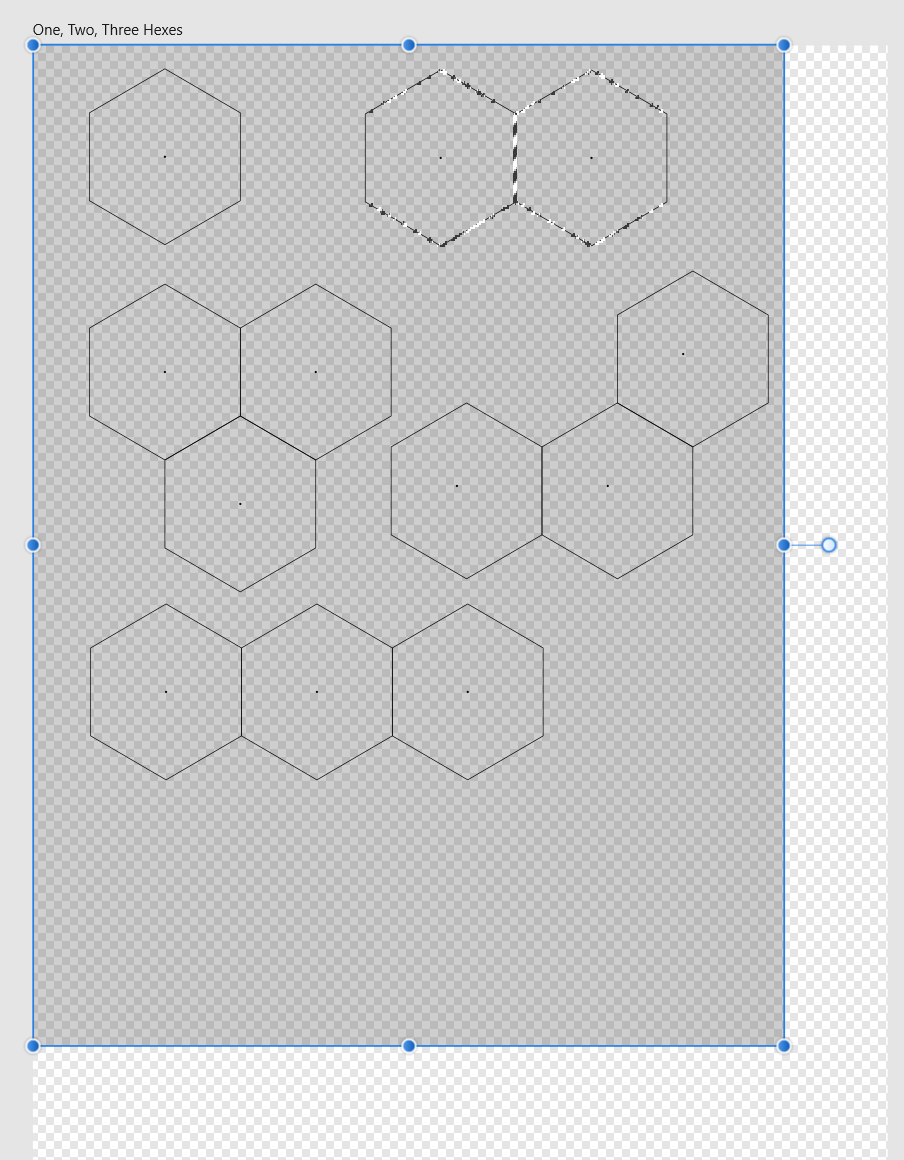
 Despite thinking I had a pretty good handle on selections and masks, I find myself unable to figure out what I am sure is the simplest way to do something.... In the picture below, I have a bunch of shapes (as Groups, consisting of Curves), and an image which I want to drag across all the shapes and appear only within the hexes. Essentially, turn all the individual hex groups into a mask that reveals the image layer, while the rest of the board remains transparent. I can select an individual group and choose Selection from Layer, and I guess I could save that selection, and the one by one add each group to a new saved selection until I have a selection consisting of all the groups, and then turn it into a layer mask, but seems like there is probably a simpler technique.
-
 How do you limited the selection tools to a pre-selected area? Literally 100% of the time, if I have a pixel selection and then use selection tools, it's because I only want to select colors in that area. I do this a lot, but at times am forced to go into photoshop to make a mask there, because I can't figure out how to do it in Affinity Photo.
 -
 Hi, can I let the alpha channel of the fill color of 2 paths (each on an own layer) be operated with by a selected mask operation such as subtract? How? Thanks, u&i
 -
 See screencapture I'm working on a landscape with a badly under exposed foreground. Supplied as a jpeg... ( oh-yes, they don't have a raw one ) I've got an adjustment layer (levels) and have created its mask on the adjustment layer itself (as in: I've not manually added a mask). I'm attempting to refine the mask that's on the adjustment layer. (Menu: Layers > Refine Mask) The Refine Selection dialogue box does not appear to show the current state of the levels adjustment, it shows the original as though there is no adjustment applied. Yes, it's an utterly awful photo, but "needs must, please-please help" pleaded the client. I know I could have done something acceptable in Photoshop by now (done, dusted)... but I'm trying to move to and master Affinity Photo.