Search the Community
Showing results for tags 'Mask'.
-
 Hi! Could someone confirmed the following in V2 ? Path tools create "curve" layer (???) and only one path can be stored inside any attempt to use the path (selection or mask) destroys it Masking a layer void any layer above it is not possible to draw on a mask or fill it Thanks PS: Feeling I will never be able to give up PhotoShop CS6 Regards
 -
 Add a new Compound Mask layer to any image/pixel layer. Create a couple or more shapes (circle, or rectangle, or star, or whatever). Place them inside the Compound Mask layer. The image/pixel only shows in the intersection of all the shapes. Now, right click the Compound Mask layer and choose Edit Mask. Affinity Photo 2 crashes!!! Also, shouldn't we have the Add/Subtract/Intersect/XOR options for a shape mask, and not only for bitmap masks?
 -
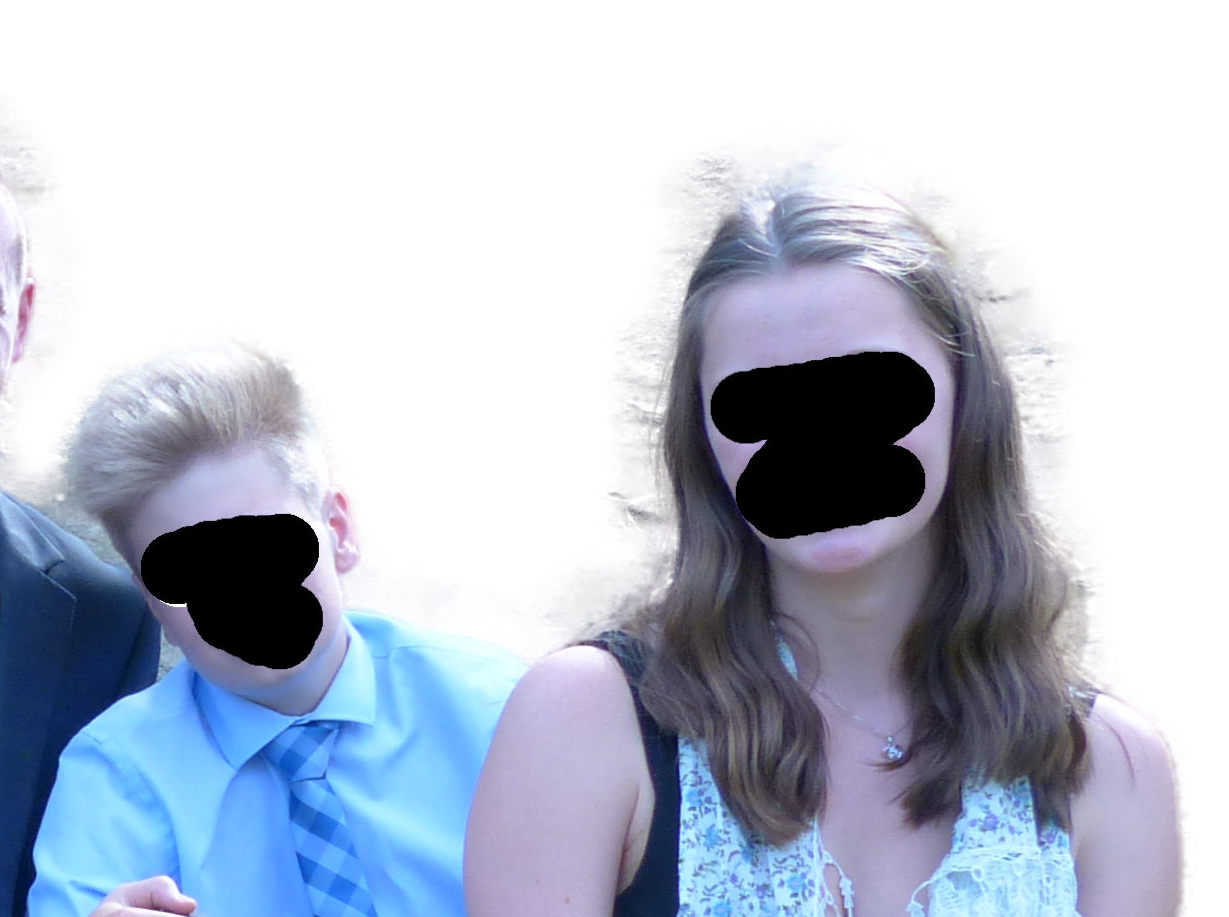
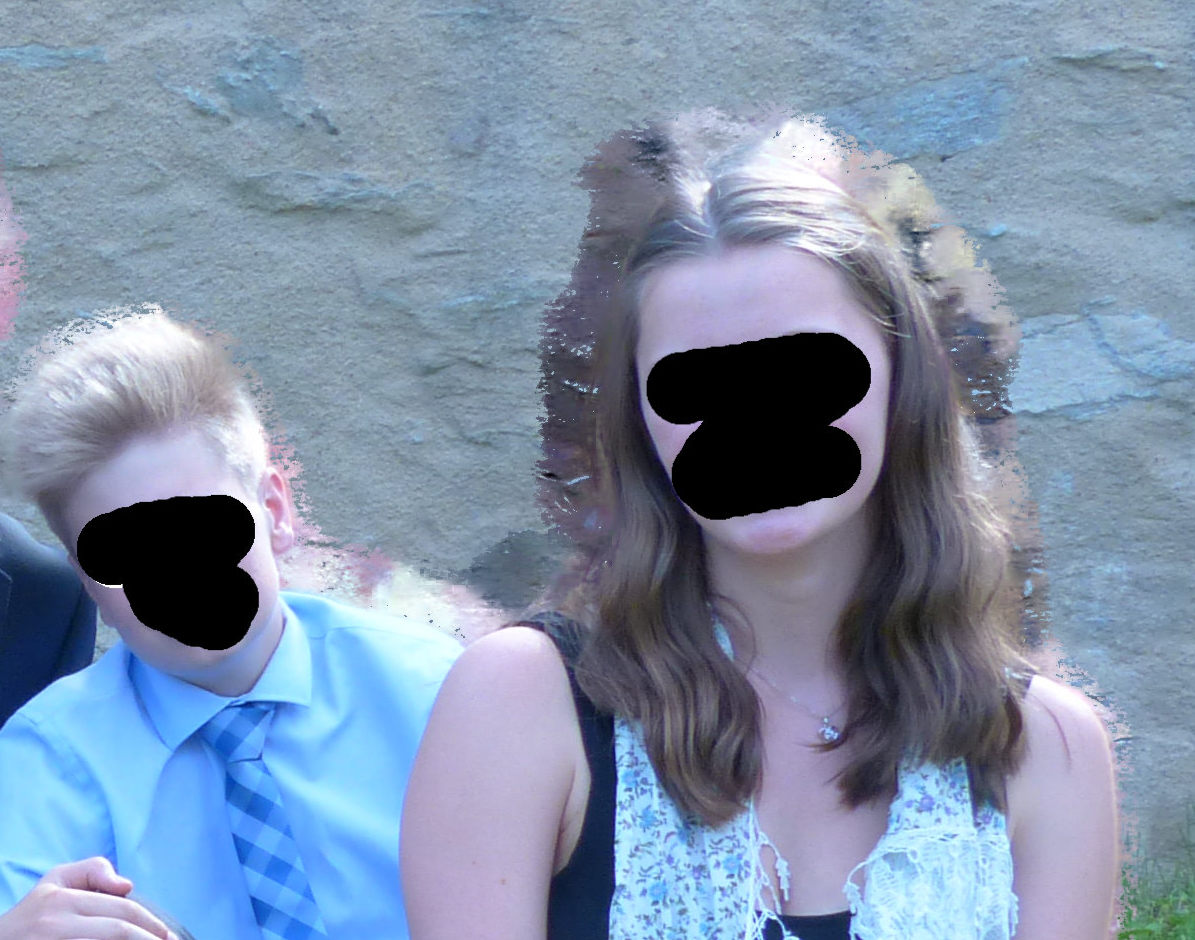
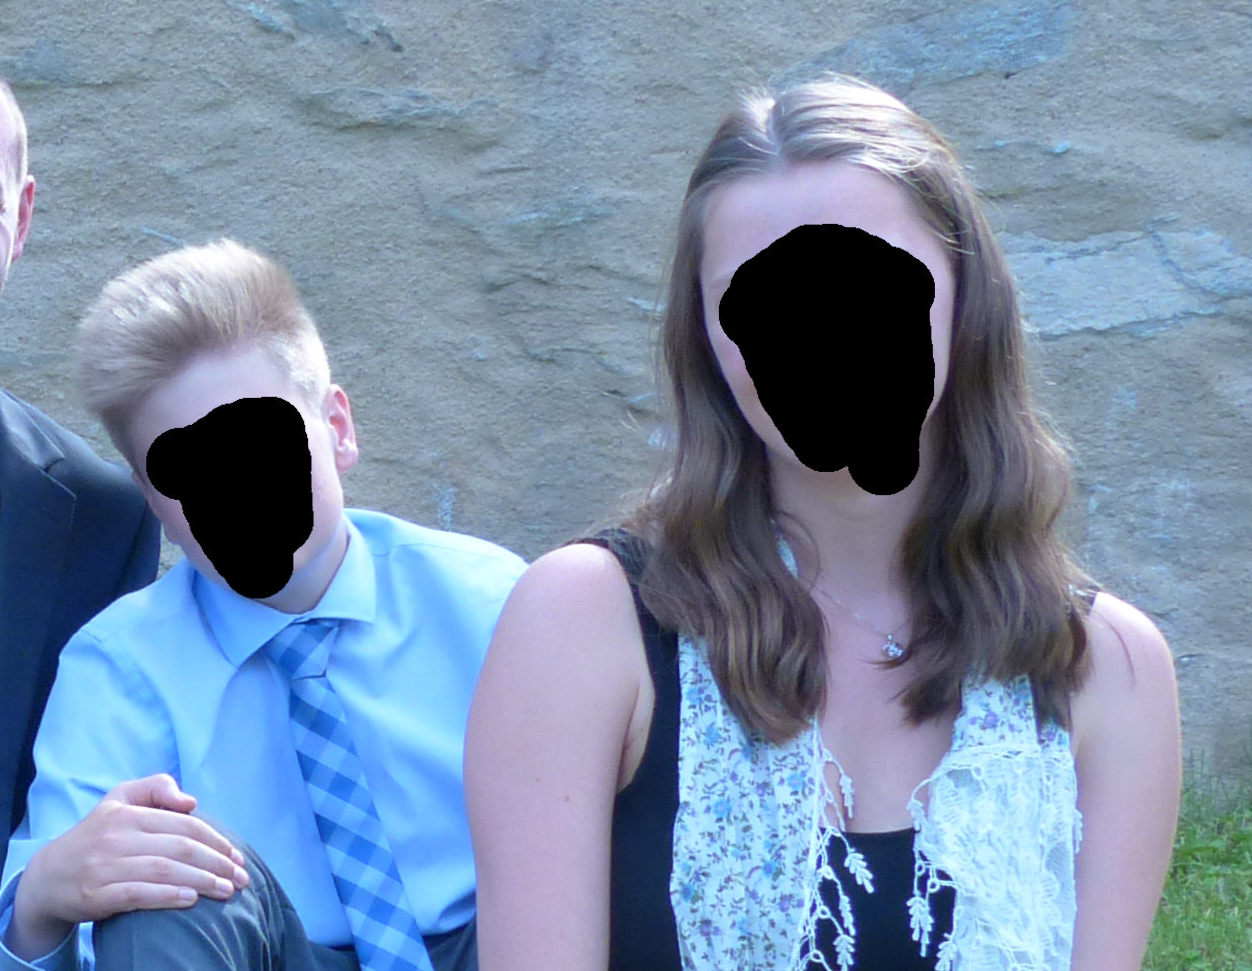
 Whenever I create a mask I end up with parts of the area I wanted to mask showing. I then have to remove them with the paint brush. I have to blur backgrounds on photos so that the person is more prominent or to 'remove' people in the background. I usually use the selection brush tool along with the freehand selection tool to create a selection, then click 'refine' and, if needed, brush over the edges where the selection could be better - usually around the head and hair where the refine process works as expected. It's usually on hard edged shapes where the problem occurs - when the person is wearing a hat, or around their clothing. After selecting and clicking 'refine', I very rarely adjust any settings in the refine dialogue box, it's left as it appears. What I am left with is shown in the photo sample below. Can anyone help me with a solution to this issue to get it right first time without having to use the paint brush? FYI: MacOS 10.15.17 on a 27" iMac but this problem also happens on a MBP running the same OS.
-
A group has a mask is exported as the original size even if I select "Selection Only." (Exporting with the Export command.) A clipping mask instead of a layer mask or exporting from Export Persona works though... masked-group-export-bug.afdesign
-
 Hi, I want to make an object (green square) with a transparent hole inside of it. How do you do this? I can't seem to find the option for this So basically a square, with a circle inside of it, but you cannot see the fill of the circle as well as the fill of the square. So a square with a hole inside. In my attachment the circle is black, however I want it gone. Black hole that should be transparent.afdesign If I try to make the circle a mask of the layer, I get a round circle...? How do I inverse this? Removing the circle not the green square? Masked square that gives a round green circle.afdesign
 -
 Hi there, I'm using Affinity Publisher Suite, with all three Affinity programs working together (Publisher, Designer and Photo) I've used the Pen tool to make a selection and have gone to the Affinity Photo component, but I am unable to turn it into a Selection. All the internet advice shows there are two little buttons in the Context Toolbar saying "Mask" and "Selection", but I do not have these buttons. I am also unable to activate them by customising the Context Toolbar - they are not given as options. Are there tools missing from Affinity Photo when you use it via the Suite? If so, how would I get my pen tool selection to convert to a Selection? (I have tried command-clicking on the relevant layer, but this just transforms the pen nodes into a thin line, but does not allow me to "select" it either.) Thanks for any help.
-
Hi, Wondering if I can assign a keyboard shortcut on "Mask to Below" in the layer menu. Or can I assign shortcuts for the items in the layer menu? Thanks! CY
-
 Any ideas why this is? I can't work it out. Affinity_Help.mov
 -
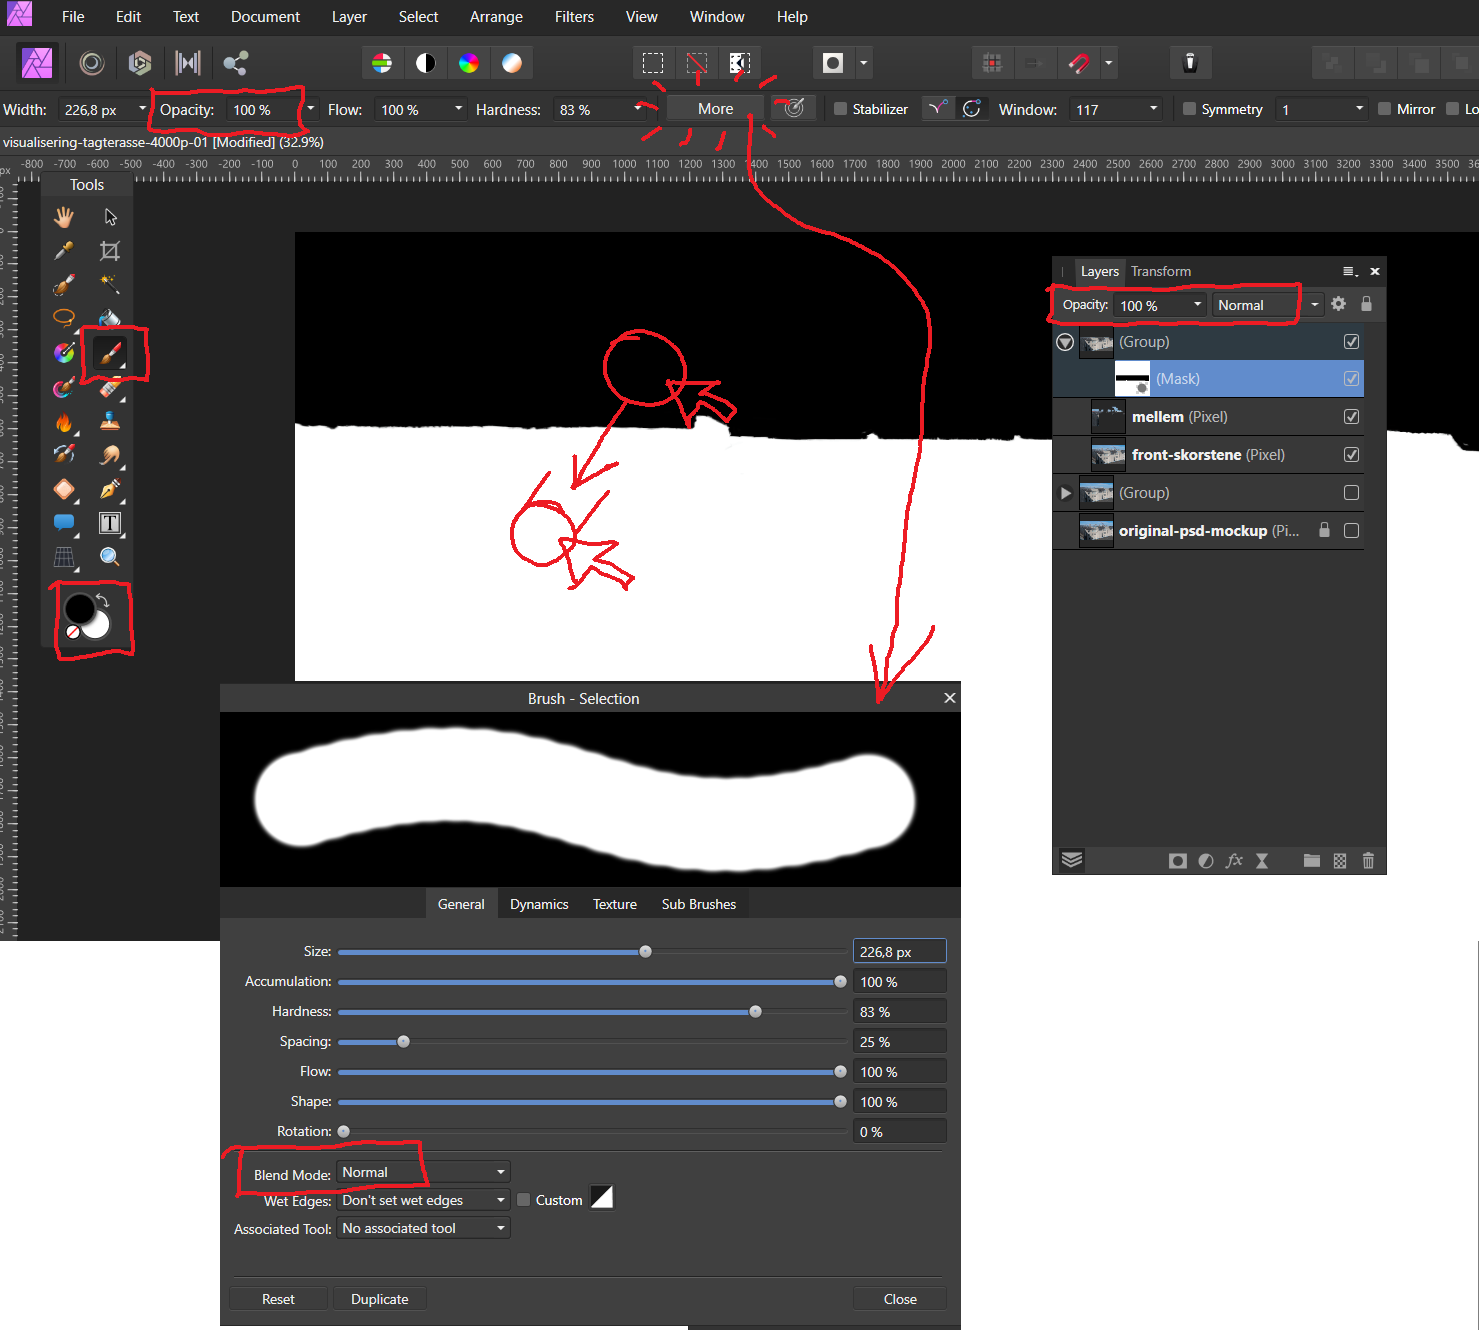
 Ok, I give up. Searched a solution but no success: I cannot make the mask layer receive my brushstrokes. Tried several suggestions (opacity, blendmodes, color, etc.). Do you notice any faults in my attached screen grabs? Any Help is appreciated with grattitude! Affinity Photo 2022-05-12 09-56-16.mp4.mp4
-
 Having an issue with mask layers when exporting to PDF from Affinity Publisher. When viewing the PDF in Mac's Preview, you see a layer that lightens the background in an area for a Distress Effect that's supposed to be masked to the shape of the Blue Object in the picture below. I have the Blue Object grouped with a Distress Effect which is set to Erase. If I rasterize the layer I don't have this issue but sometimes I don't have the option to rasterize it depending on where I use the assets. Is this an Affinity Issue or and Export Issue? Or maybe just an incompatibility issue with Preview. I can't replicate it in Adobe Acrobat PDF Viewer or Chrome. Affinity 1.10.5 Mac 10.13.6 Preview 10.0 (944.5) Screenshots of what it looks like in PDF, export settings, and in Publisher itself.
-
 Hi, new to Affinity Designer, I'm working in a graphics template and need to copy a mark and image to another group within same document, however, it seems to be linked to original mark and image and if I change image it updates image in both place in document. How do I unlink the masked image from source mask image so I can change working image? To give more detail: After copy mask/image to new group and drag it to target location on view, I go back to naviagtion layer of target object and double click on image, it opens into embedded window, I place new image and remove old and close embedded window and return to document window and see that image updated in both locations. as below. I have tried this in Designer and Publisher with same results, so I know it is linked but I can't see how to unlink them so they act independently.
-
 Hello, I'm trying to mask curve shape to hide part of it but I don't know why it's not hiding the selected part entirely. Here is sample file where I added black brush and select with fill primary black color, as You can see there is still slightly visible part of shape. What I'm doing wrong? Greetings. sample.afphoto
-
 Looking to find the "create selection from luminance" (alt-ctrl click on layer thumbnail) on the iPad version of Photo. Any clues ?
 -
 I suppose you already have a plan to improve this compatibility but I post this just in case. Raster layer mask of fill layer(solid color layer) created in Photoshop become transparency instead of a mask in Affinity. Masks should be preserved as a mask if possible like on pixel layers.
- 3 replies
-
- 1
-

-
- fill layer
- mask
- (and 2 more)
-
 Easy use of the turbulence tool. In this easy Affinity Photo tutorial, I use the turbulence tool to create a perm or Afro hairstyle. This Photo Manipulation is number 44 in my Powerful tools of Affinity series and is shown in desktop and iPad. https://youtu.be/mjngeQCl1cg #turbulence #liquify #livefilter #mask #photomanipulation #madeinaffinity #affinityphoto #affinityserif #tutorial #photomanipulation #graphicdesign #affinity #digitallyfearless #affinityguides
-
Hello, I need to create a mask image but with a border colored, also the image need to be dynamic so my client can change it but keep the mask.. But when I try to put it with the program I use for web development, it's not working. I know that I am making something wrong with the design part. This is the final result I am trying to achieve with elementor : this is the form of the mask : but when I export it in svg or png I get this : or that if I put a pixel mask : please someone have any idea ? :)
-
 Hi there, I do have a problem with masking. Samples see attached: What is the problem? I have a pic. (original.jpg) and I've done a selection with the selection brush. After this is I did "refine edges" to fine tune the selection. After this I safed it as a new layer with mask. The result was ok (see: with mask.jpg). BUT Once I disable the mask or I edit the mask I get horrible artefacts (see: mask disabled.jpg)... What is the problem? What is my thinking mistake? Thanks for your input and help.... Best Thomas
-
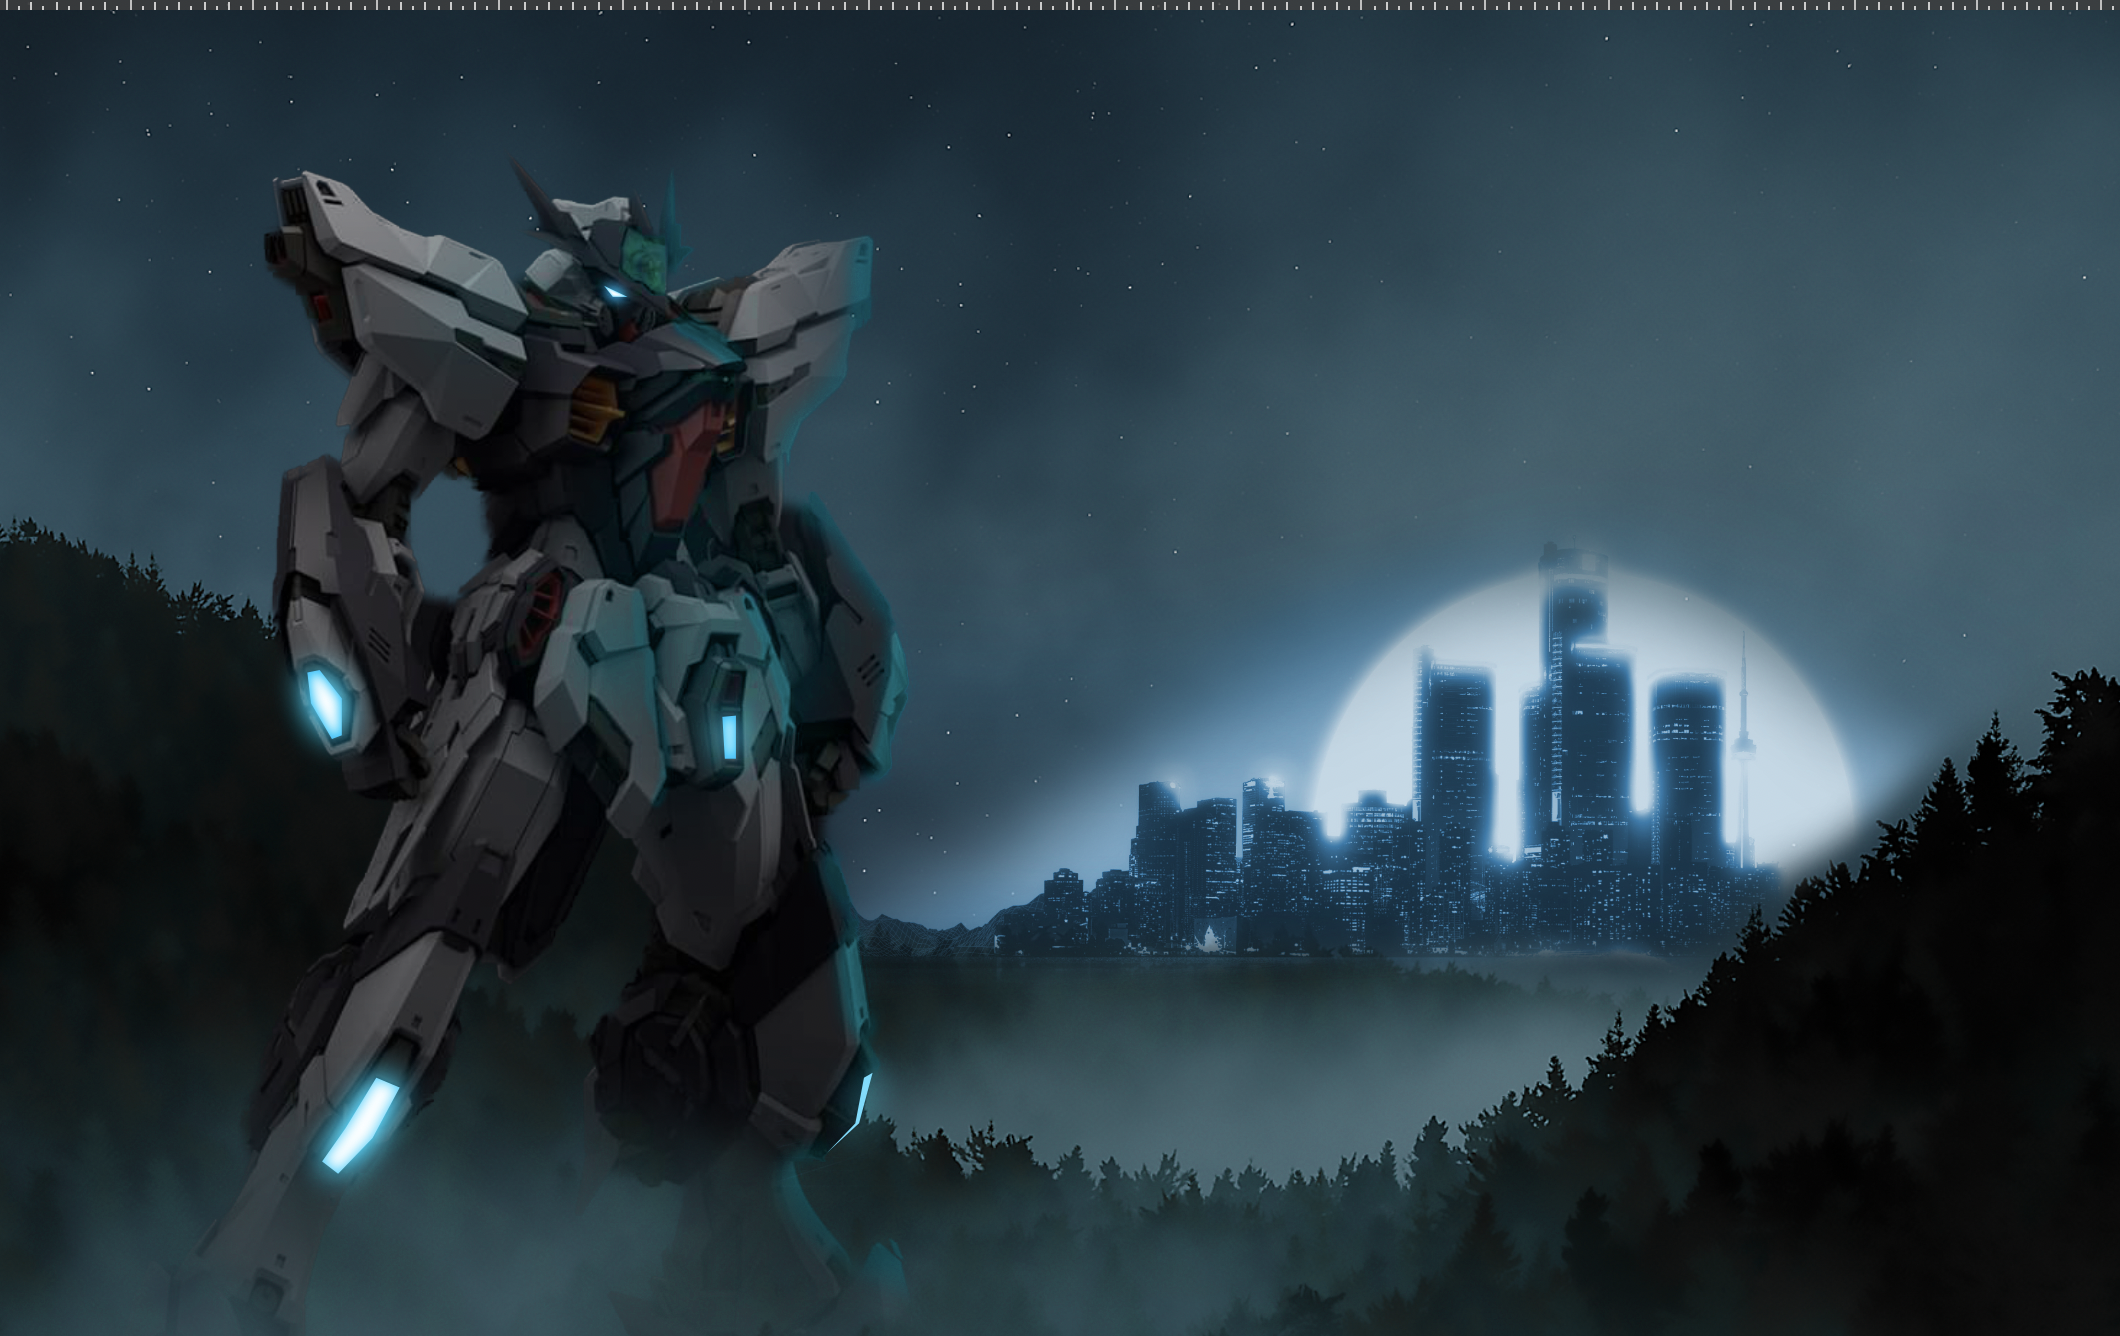
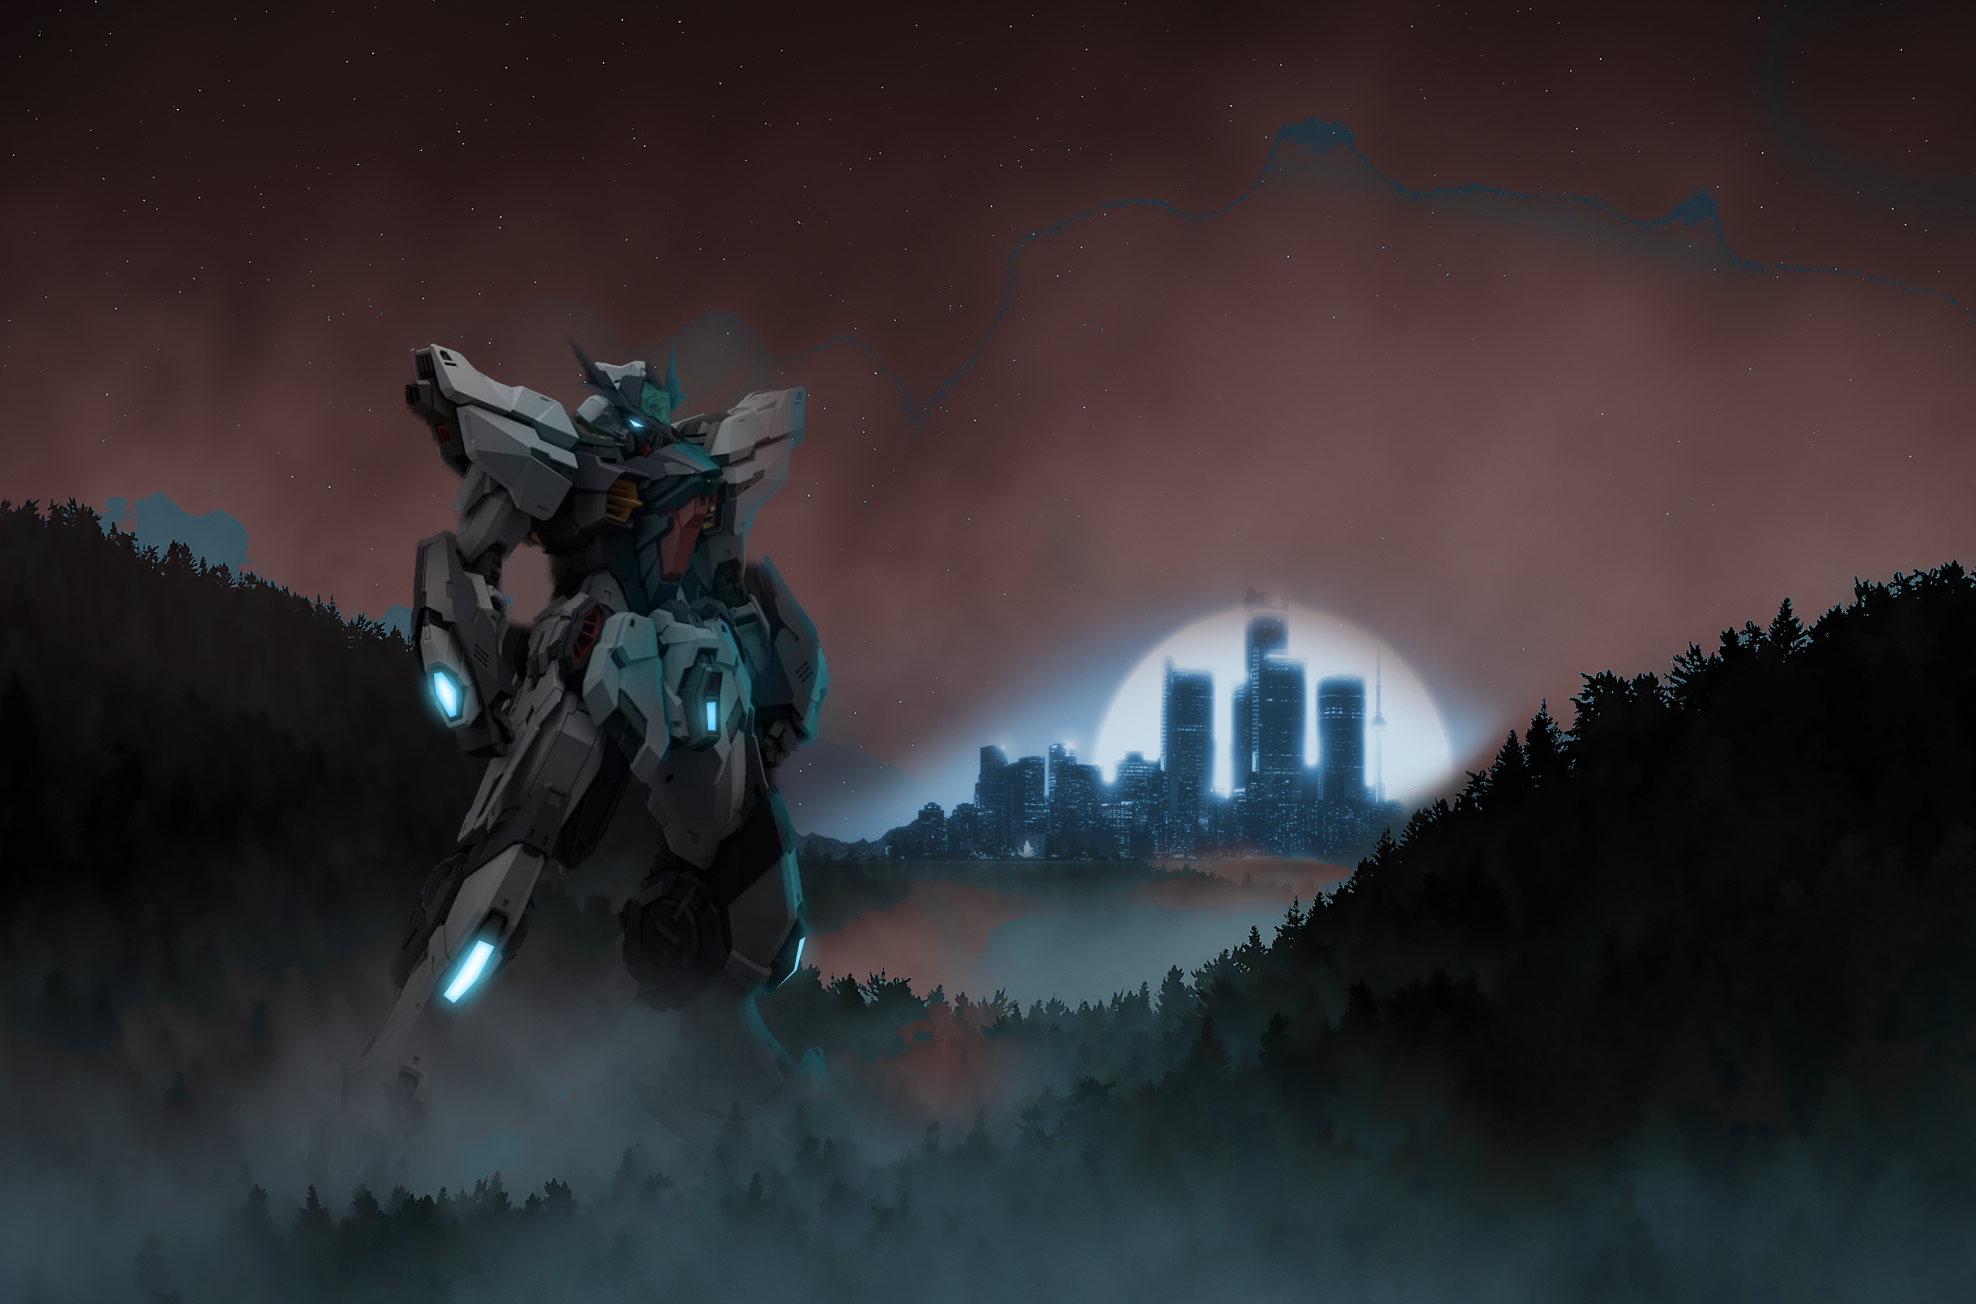
 Hi! After 3 years I finally decided to open up Affinity Photo and start to practice (I mainly use Designer and Publisher). There are a couple of road bumps that I cant seem to find the answer too. I am familiar with the brush tool and the basics such as keeping the colours black and white when you are blending to remove or add. My issues come when I am trying to add artificial light or highlights using the brush tool. In the example below, I have a Mech in a forest with the city in the back. I was able to blend them in, but I am having troubles adding the highlights from the city onto the edges of the mech and trees. It allows me to paint with any colour but they seem to be very dark. I have no control over the vibrance of the highlight or the contrast. I only have control over colour and opacity. Could it because whatever i am paining on a mech that already has adjustment? I usually add highlights at the end in Photoshop! Q1: If I wanted to add a very thin or thick glow / highlight on the mech from the city, how would I do that? Q2: Recolouring seems to have this obvious separation where the blends happened. How to fix? (blue shows through red) Q3: When I am changing the exposure, shadows or light on the mech it selects the entire project even though I specifically click the single masked mech. I then have to copy the adjustment and paste to group only the mech. Is there a fast way of only selecting mech and not the forest? Hope someone has an answer! Also, great community and great software. I've been more than satisfied for the last 3 years and I rarely have to come on here to look for solutions. :)
-
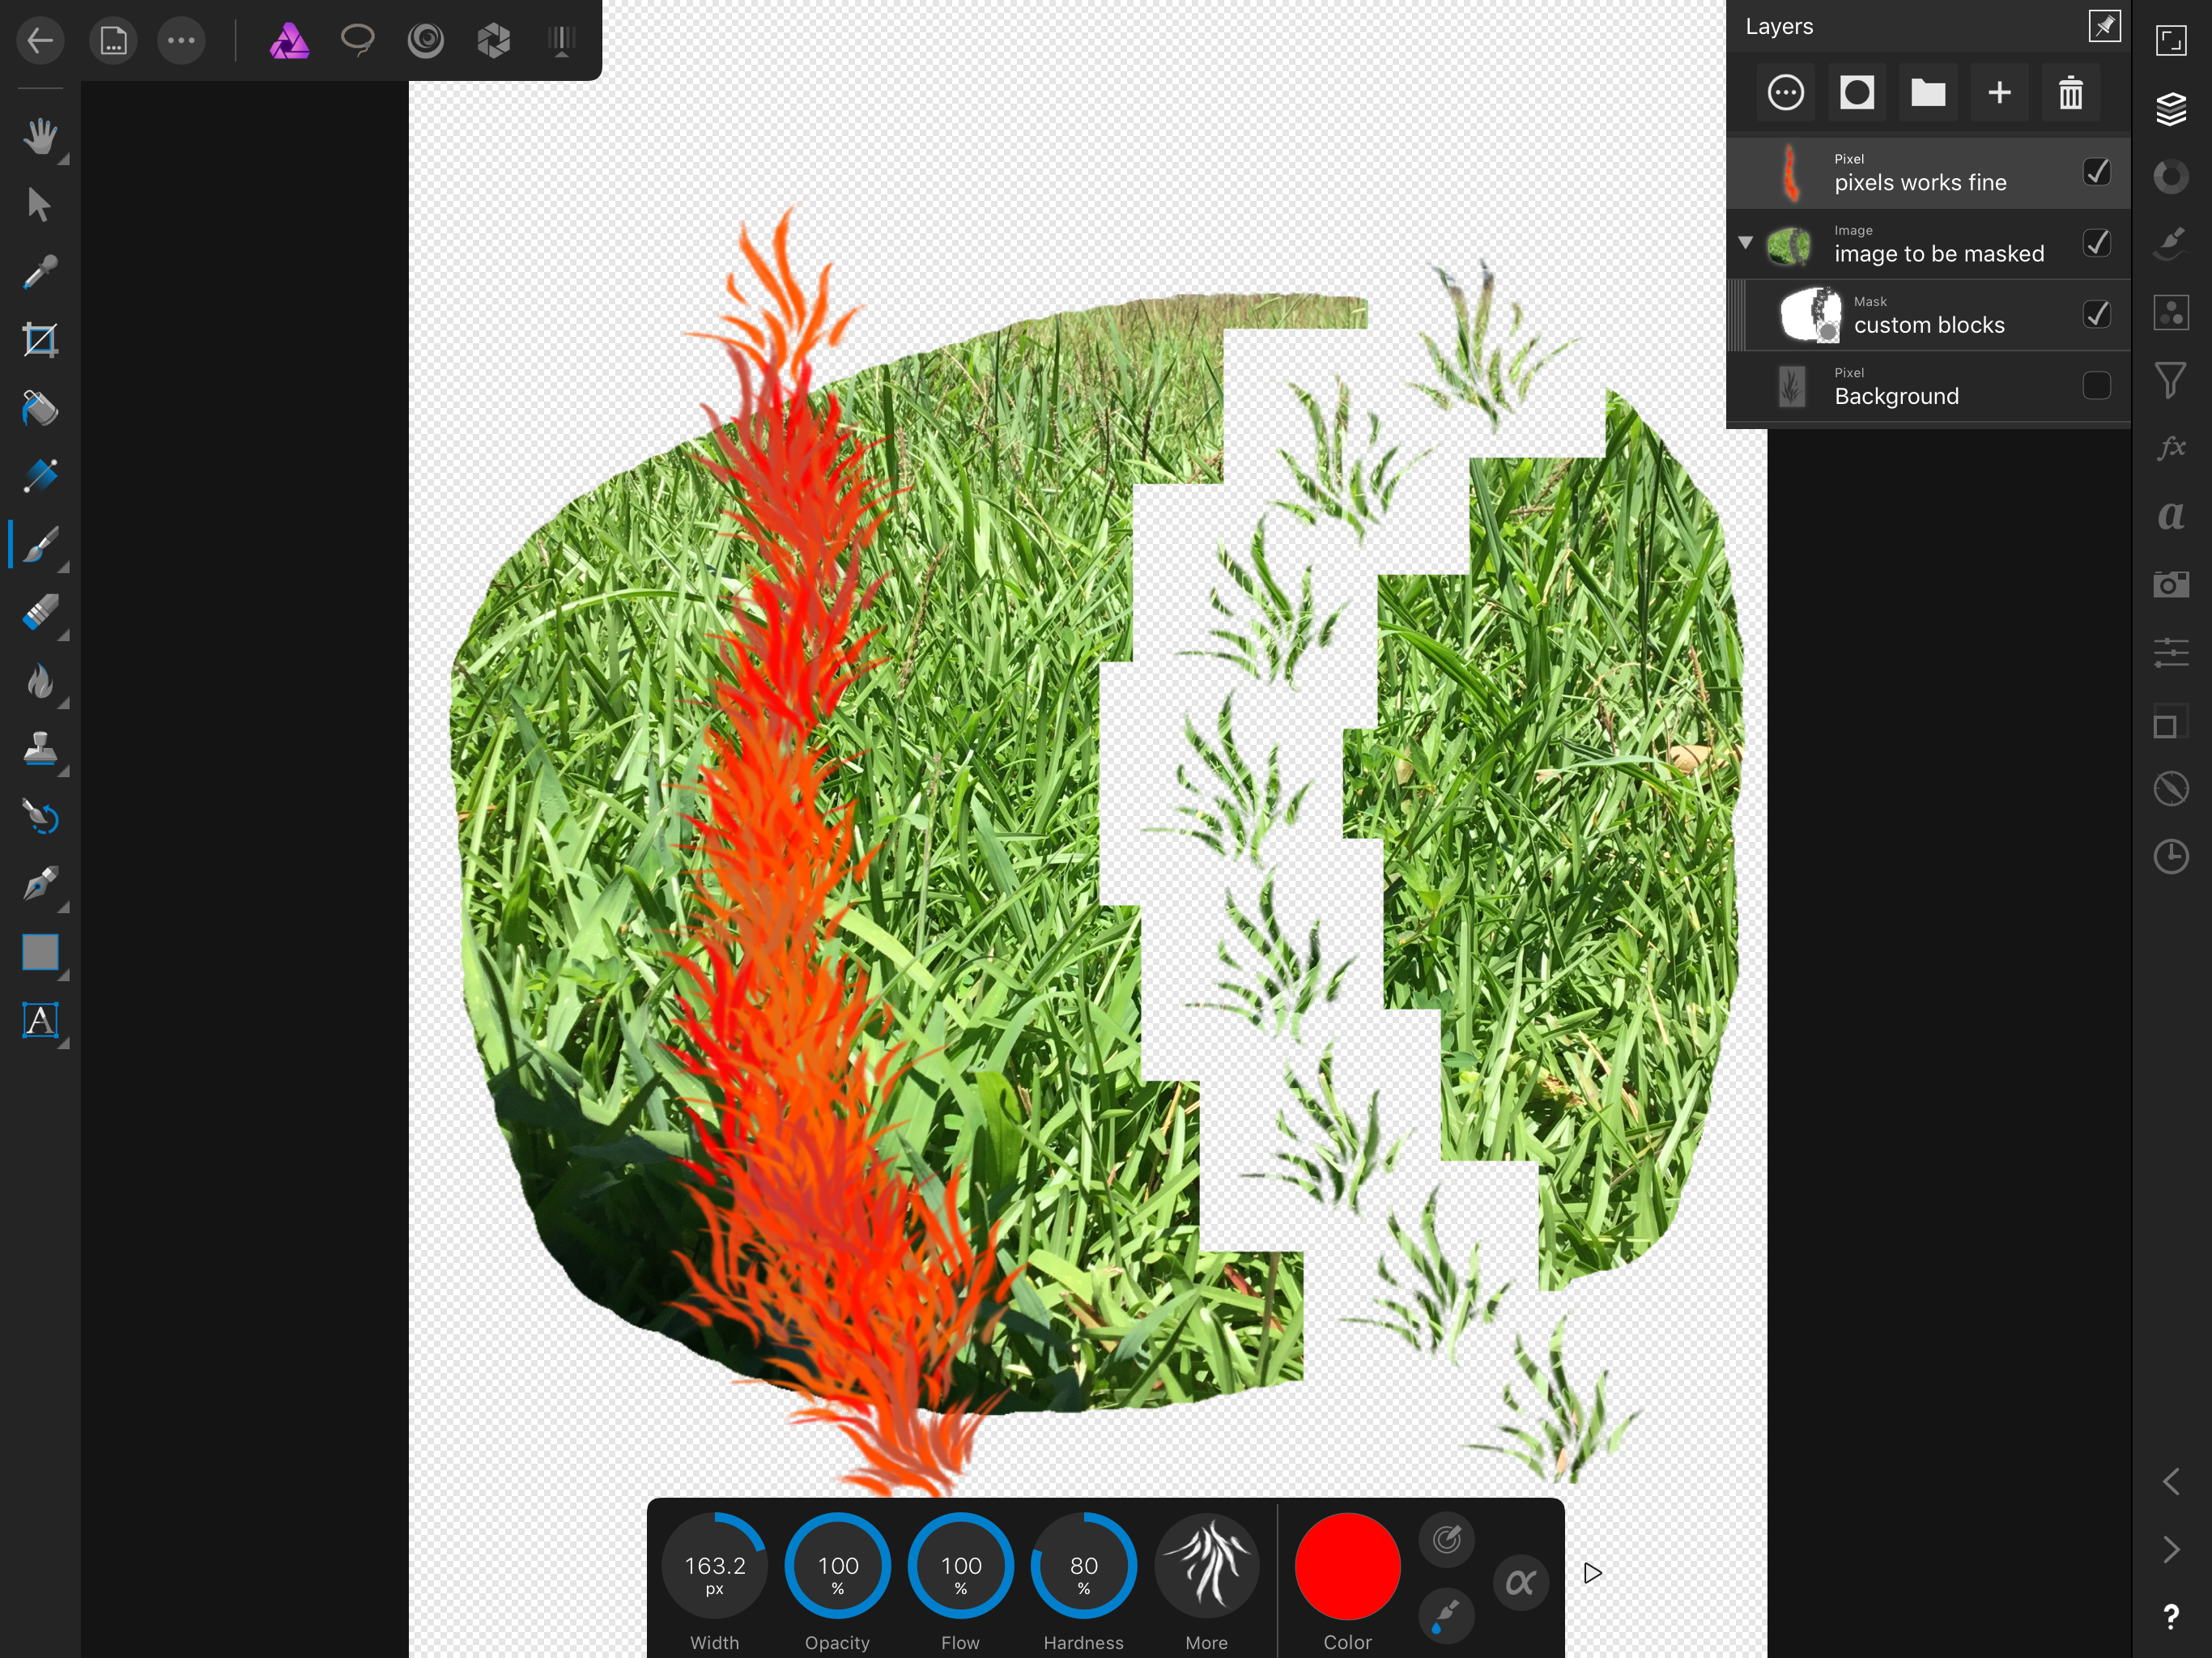
 How can I place an black/white image as a mask onto a group. Masking is some confusing compared to what I'm used to doing in Photoshop. In this case i drug the black and white pixel layer ontop of the group thumbnail and it appears to apply it as a mask but doesn't do anything? The workflow appears very unpredictable at times like this where I spend 30 minutes trying to figure out something so trivial. I'm going to guess the solution is not as straight forward as this.... In this sample I should be seeing a red background however I'm still seeing the black background that's part of the original image which should be masked out. Any help please?
-
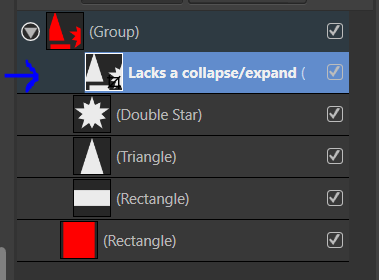
 When a group/layer with children is used as a mask, it doesn't have a button to expand/collapse, so I have to right click on it, scroll, and press "Expand Selection" Bug.afdesign
-
Masks can't snap to their parent, the masked layer. In the attached file, in the layer "Problem Here" there is an ellipse as mask; it's not possible to snap this ellipse to the rectangle it's masking. Snapping Problem.afdesign
-
 I don't have time to search entire forums or the interwebs to see if someone else has ever suggested this feedback before. So I offer my apologies if my suggestions have already been covered. 1) Please can you provide a feedback function WITHIN the application it self. It's incredibly frustrating to have to use out dated methods of signing up to god-awful web-forums which just leads to nonconstructive replies of un-thought out opinions and arguments. It also allows you to correctly link feedback (and abuse) to the software license of the user and even categorise the feedback so you can easily see which areas are causing most concern to the user base. 2) Please can you fix the mouse icon when painting in masks in the develop mode. The standard OS mouse icon does not feel accurate to paint with. Also a nice to improve if possible: Painting often feels sluggish to see the red tint forming. If there is a way to make this feel more responsive without upgrading an existing 32GB RAM I7 processor machine, that would be lovely please. 3) Cropping in Develop mode is missing an "ok" or "finished" button. It's frustrating to be sitting back with my tablet, controlling everything then having reach over to the keyboard which I moved to one side, just to hit <enter>. I don't want to map the enter key to my tablet device as it's never used for anything else! if you simply put a button in the UI it will mean I can just move the mouse there and click! perhaps I've missed a trick that does what I want, but then that would mean it's not obvious and intuitive to the user. 4) Please update the flash function for uploading files on this forum. Who runs flash in 2017? Browsers auto block flash from running by default because it's nasty. 5) More of a question then a suggestion, but is there a way to rename the overlays in the Overlays tab in Develop mode? I have 3 gradient overlays, all with the same name! that's very confusing to simple minds like myself. 6) Although I generally hope you spend more time fine tuning what you have already developed, instead of just rushing out new features, it would be nice if there was an in-application function for browsing image files, with a nice big preview of the image and EXIF data, which you can then double click to open it in the develop mode. I don't think anyone wants all this "importing" and cataloguing rubbish which is very slow. But browsing files within Affinity with a UI that suits photographers that windows/macOS don't offer, would be a great win. Thanks for your time.
 -
 Hi all, Sorry if this has already been covered somewhere, but I was not able to find anything. Basically I have a layer with a mask applied to it. I want to transform the layer using the perspective tool, and I want that transformation to apply to the mask as well. I can scale/rotate the layer, and the mask follows, but for the perspective tool this does not seem to work. Can this be done?
 -
 When using my self-created brushes on mask layers, each intensity brush image dab (or whatever the proper technical term is) is surrounded by a square shape. The attached image is an example of my problem. This does not occur with any of the default intensity (I assume) brushes that came with the application, only custom/downloaded brushes. I followed the instructions for custom brush creation found in the help files. Then I followed all of the recommendations I discovered here in the forums and on YouTube: square image, PNG file type, 300dpi, both black on white and transparent backgrounds. Each attempt resulted in block-surrounded image dabs. Affinity Photo has shown iPad Pro users the way forward, as well as the way around the Company of the Big Red "A". Hopefully we have returned the favor via the App Store. It's time to help us further by updating the documentation and tutorial videos concerning the creation and use of custom brushes. Thanks!
-
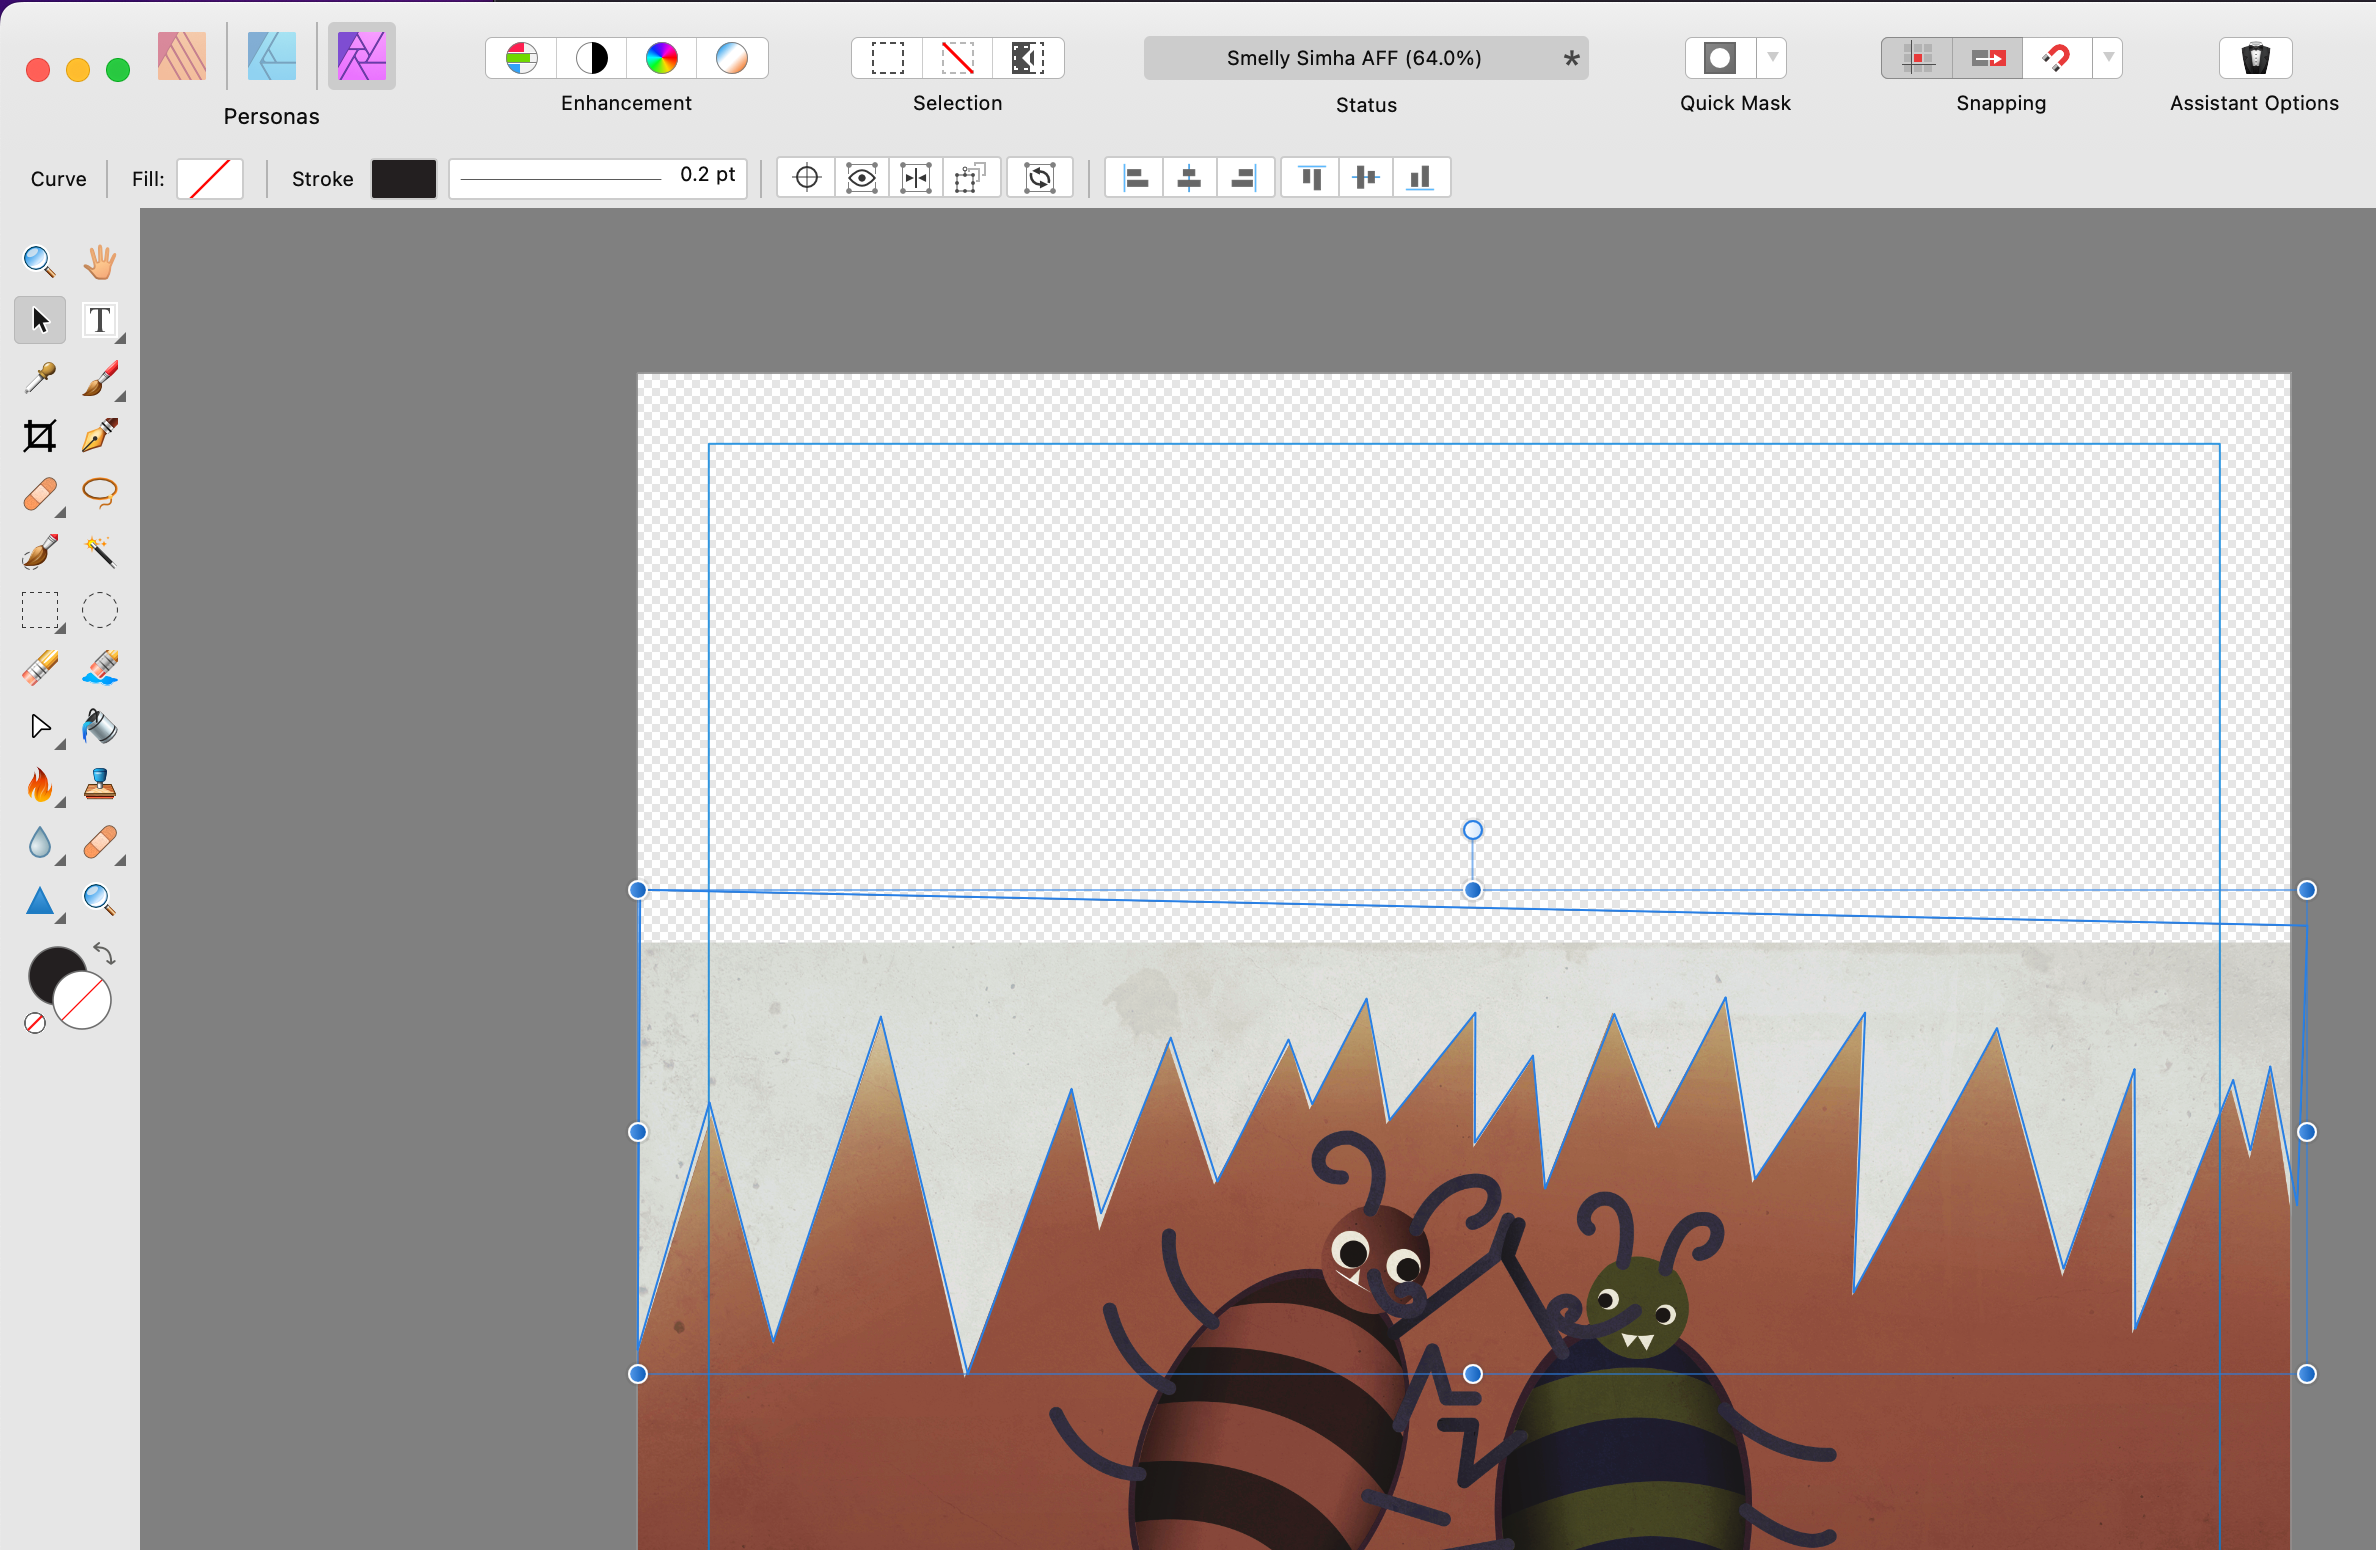
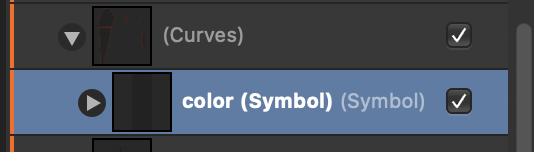
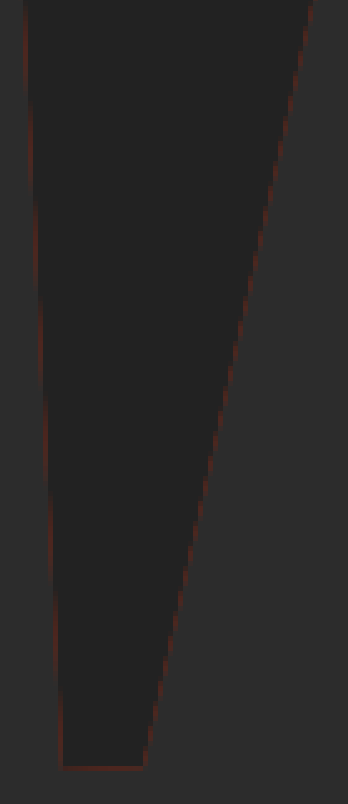
Masked shape is not completely overflow main object. Using square as masked object produces 1px outline from mask background. 1) create mask with red background 2) use a square with darker color square as a symbol masked by object above (Curve) 2) observe outline of 1px, this is background from mask (Curves), better is visible on dark canvas But it should be filled up by one color.