Search the Community
Showing results for tags 'Mask'.
-
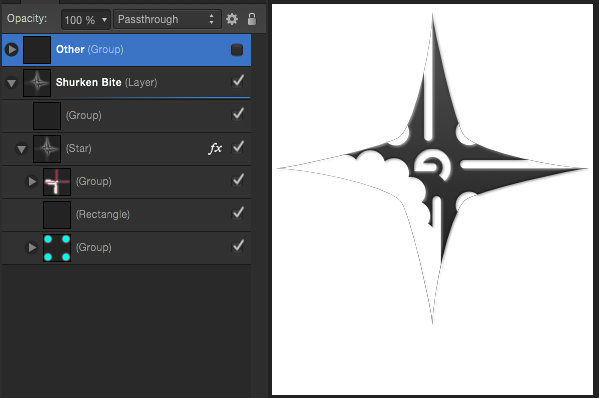
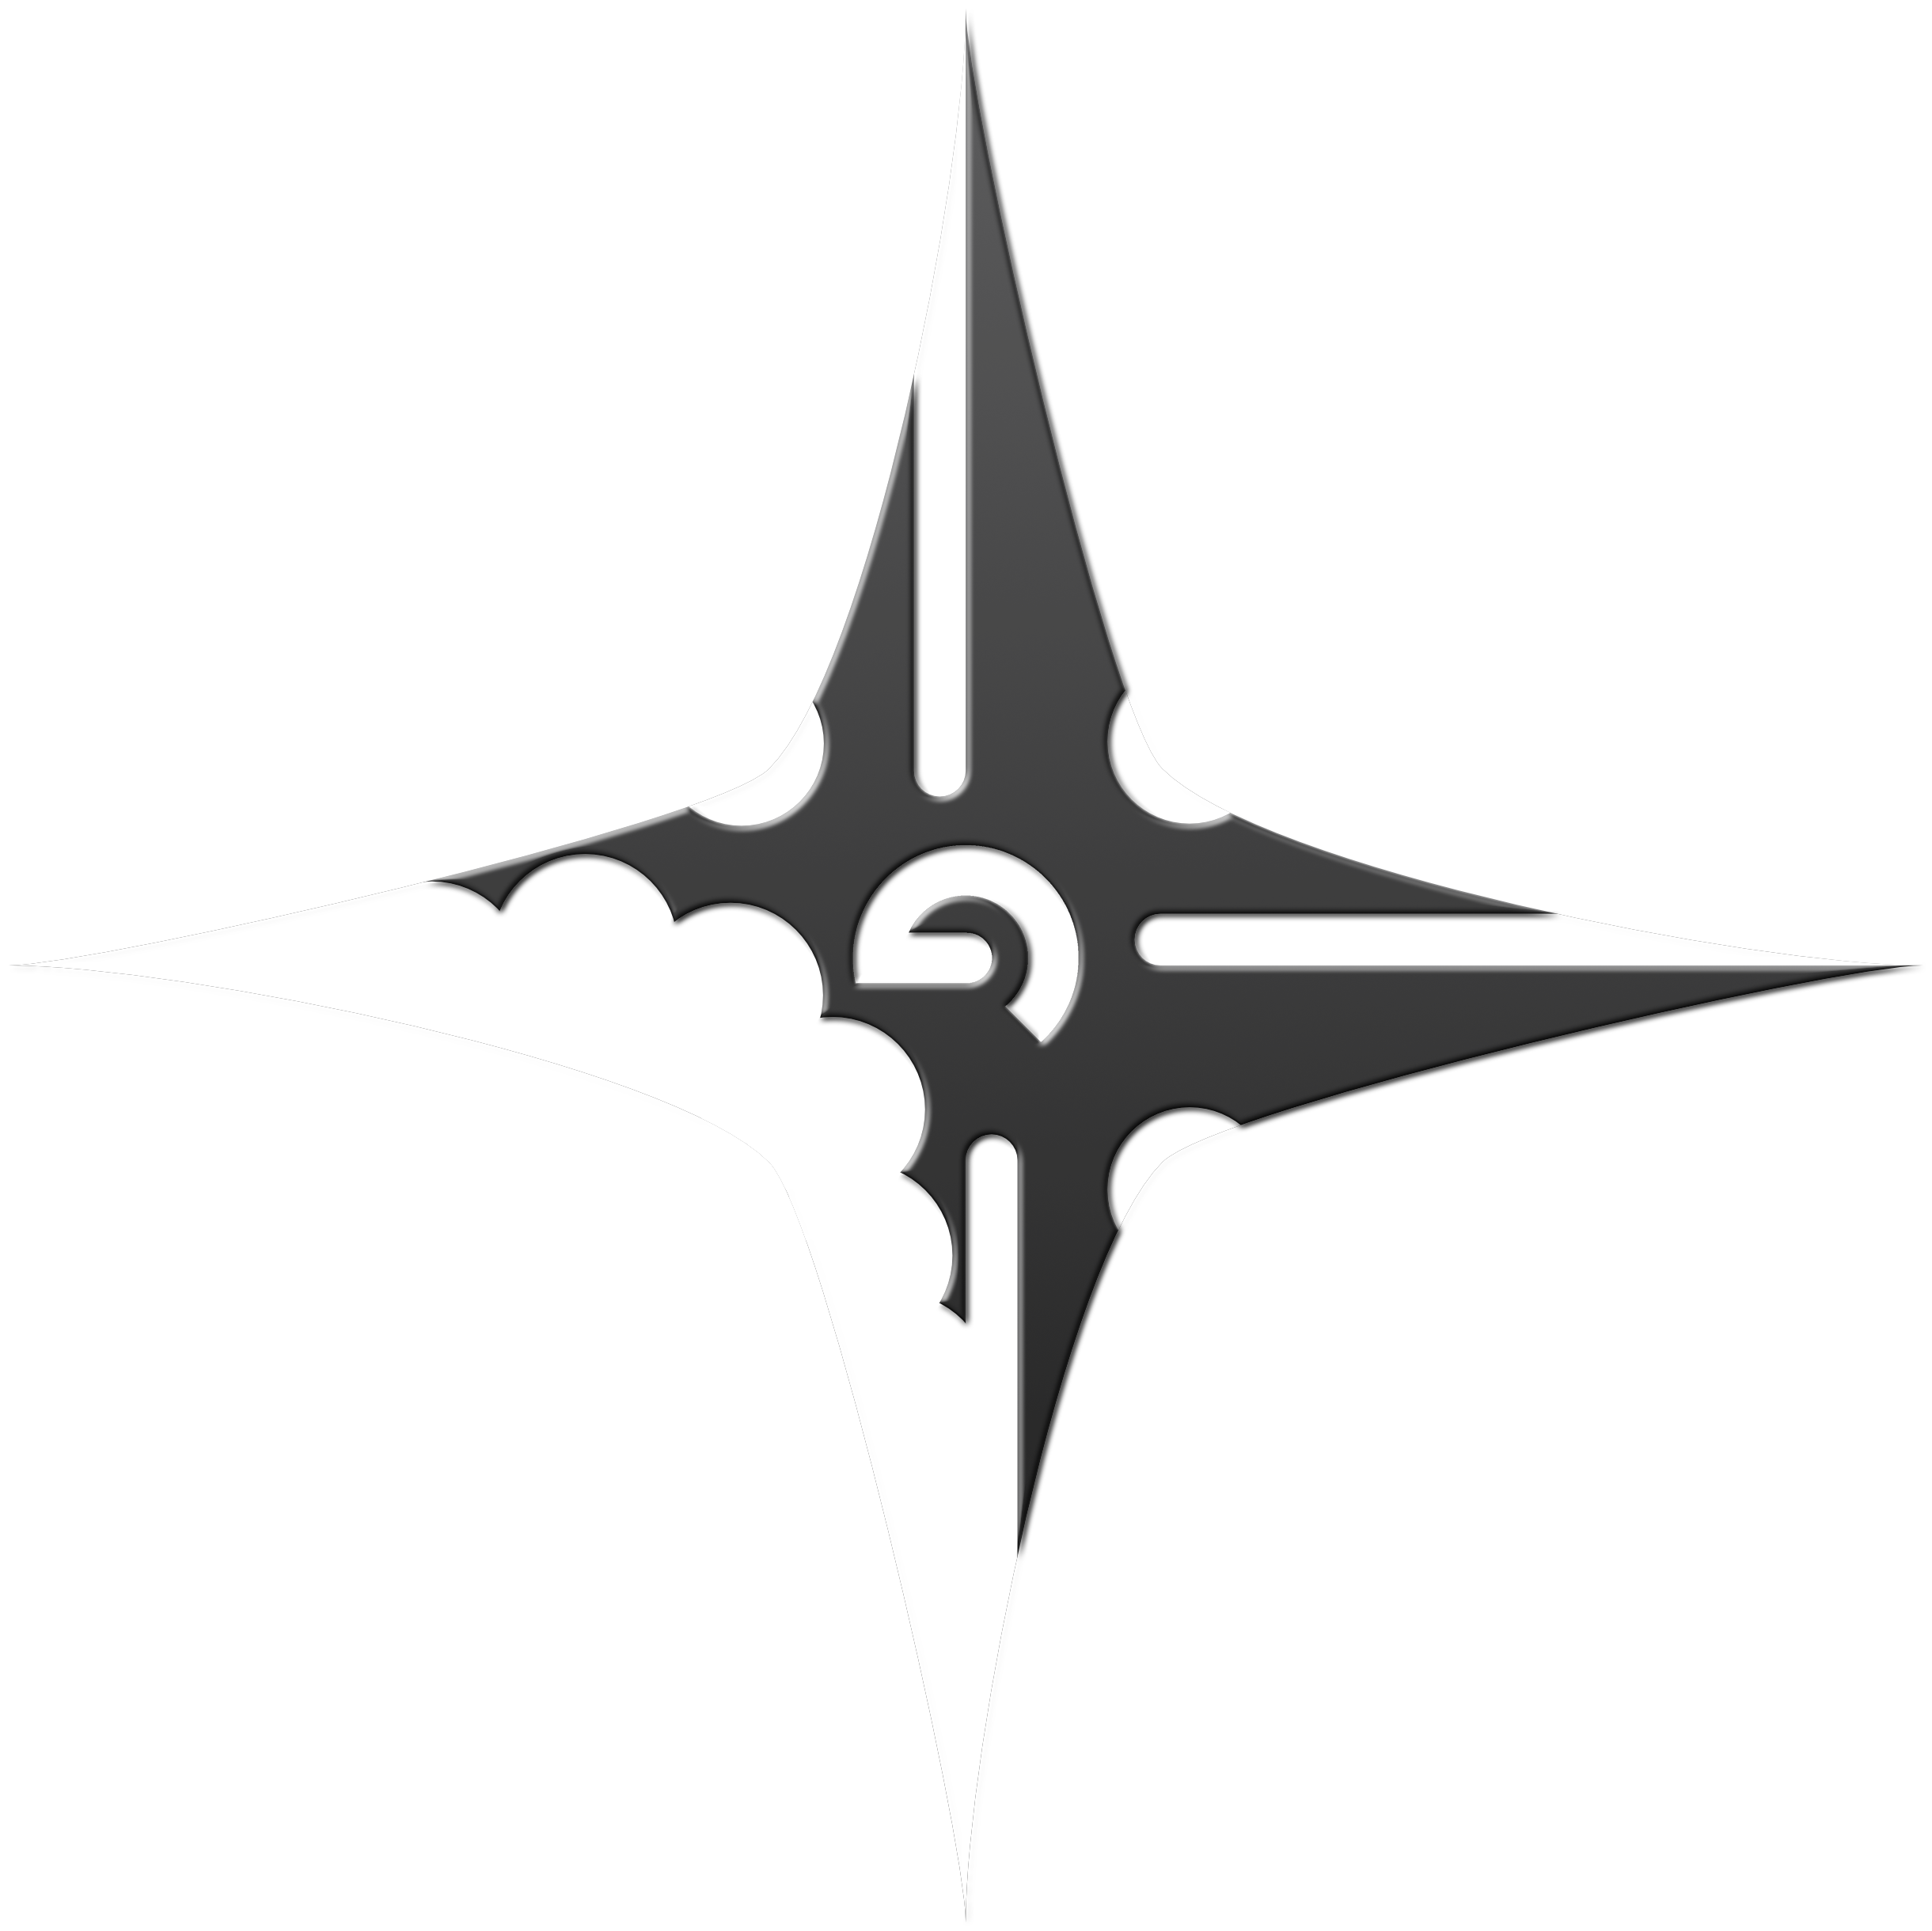
 Hey all! I am having a problem with a shuriken I designed. I made a star and omitted sections by masking with other shapes. The only problem is that the whole outline is rendered with the image when I try to export. How can I be rid of those lines so that only the shuriken is rendered, not the whole star in outline form?
-
 Trying to figure out how to select the area inside a curve (I can fill the curve if need be), then add that selection to a layer mask or an existing selection. Looks like in past versions this was done with a "Selection" button in the pen tool context toolbar, but I don't see that in my version. Thanks
 -
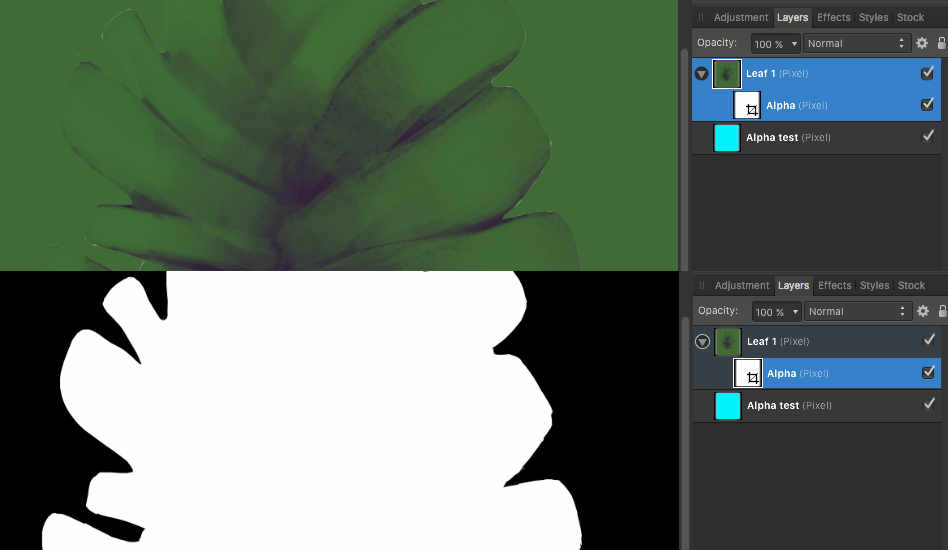
 I have the simple task of taking an image, and its alpha (a separate image) and combining them to use in a document. I can not for the life of me figure out how to paste into a mask layer, or how to convert a pasted layer into a mask for another layer. In photoshop this is posible by adding a raster mask to a layer, and then selecting the mask channel and pasting into it. I have tried the "mask to below" option but it no actual masking happens. It places my alpha as a child of the layer I want masked, but its preview is empty and no masking happens. If I then select "edit mask" it shows me the alpha just like it should. I have attached a screen shot as an example, you can see that none of the cyan layer is showing. Top half is normal, bottom half is "edit mask". I really want Photo to replace photoshop for me. Unfortunately all these channels and alpha things I need for creating textures for 3D are missing or work in weird ways. Also all tutorials online have to do with image manipulation so finding out how to do things is almost imposible. I'm hoping that here on the forms you all can help me out, thanks for your time. - Jeff
-
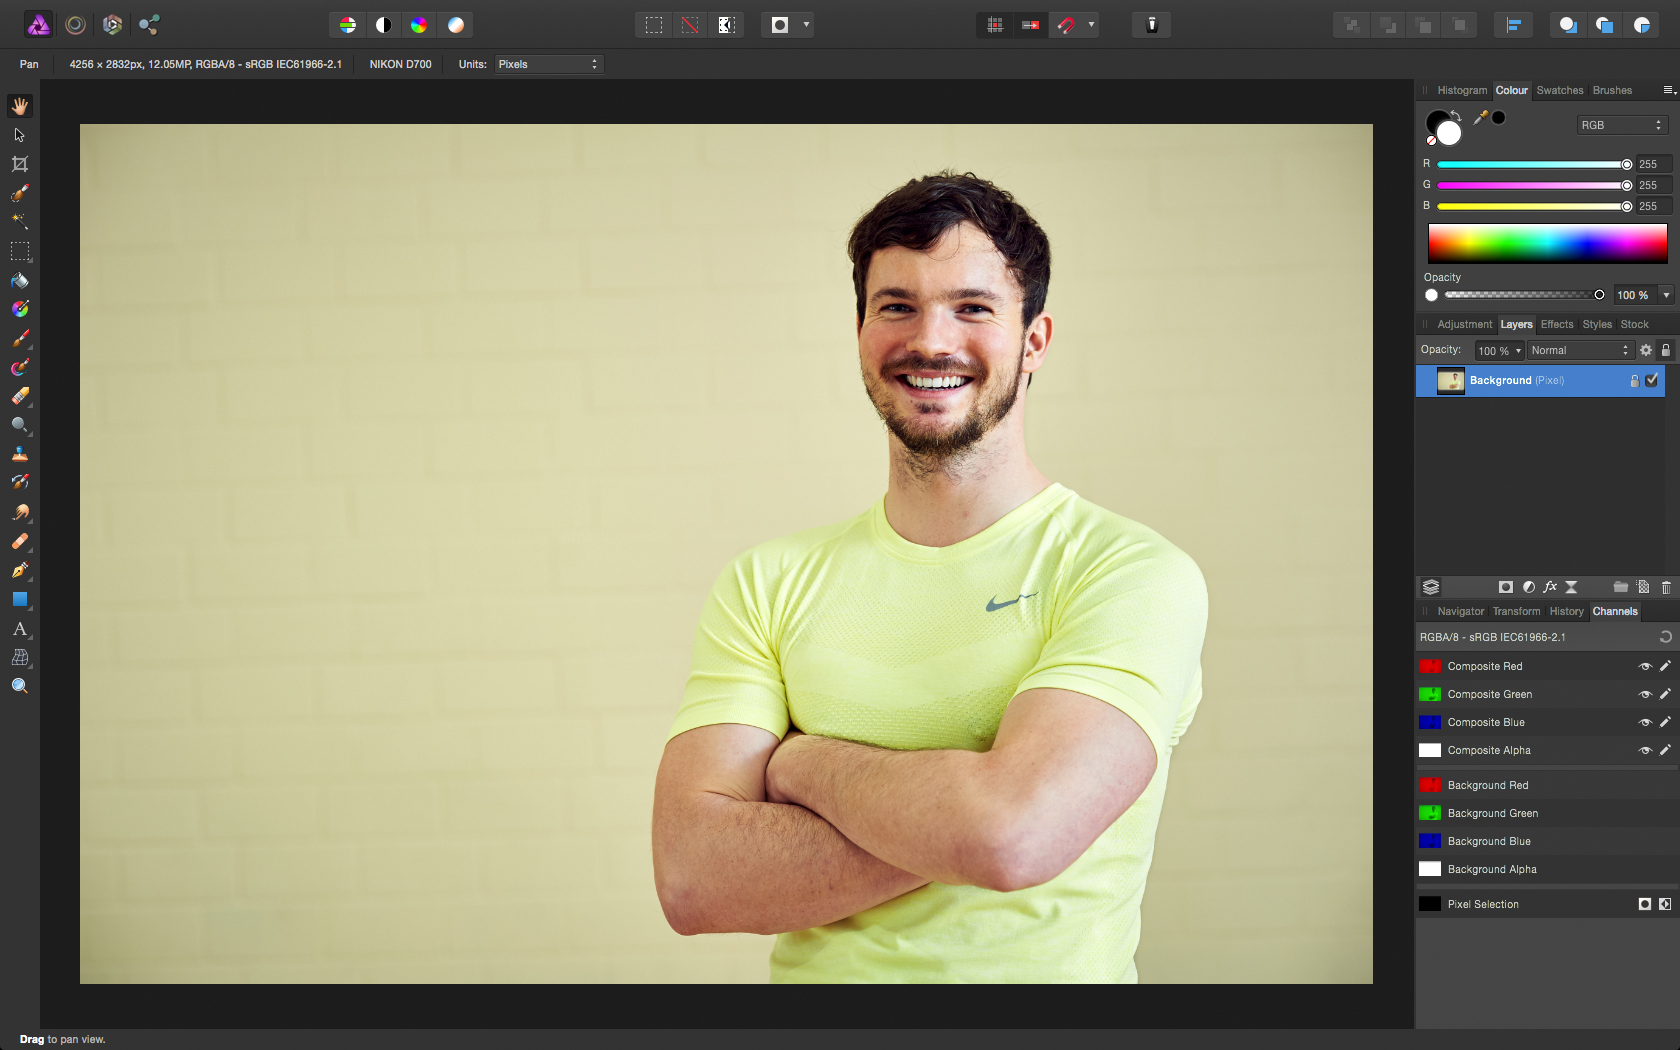
 Hi everyone! I was wondering if there was a way to remove certain colors from my pictures? However, unlike other posts, the color is a block of color that I need removed, but are rather hues that I need erased. I've attached the image as an example, where the clownfish's midsection has a greenish hue, making him look sickly! I've tried Channel Mixers, Selective Colors, and Dodge/Sponge but none of them look good. I also can't select just the part that's green using the Free Select Tools because whenever I apply an effect to it, the boundary between the selected and non-selected portions all look really weird. Any suggestions?
-
 Hello, I need some help regarding blend modes. So, I applied gold foil to an invitation design using "lighten" because that produced the most desirable results. However, it applies the effect to all the layers underneath. Is there a way to restrict where the blend mode is applied? I tried using a different method like "paste inside" and it did not produce desirable results. I only want the outlines gold, not the inside of the shapes/texts. I attached an example of what I'm working on. You can see that I've applied the gold to the outlines using the Lighten mode. Is there a better way? I am a newbie to graphic design and really need help. Any suggestions or tutorials would be appreciated! Thanks!
 -
Hi all, I am no working on AP for a couple of weeks: my compliments to the team. Also my compliments to all who are answering the multiple questions on this forum with patience. This my first question and I hope it make sense. I have the following question: is it possible to use one mask for multiple (adjustment/live filter) layers. If it is possible then all the layers effects would be affected directly when I make a change to that mask. I know one solution: make a copy of the background layer en nest the mask and the layers under the copy (when working with one picture) or use "merge visible" (if the situation is already more complex). These methods are not the best because if you edit the original you will have to recopy the background and move the layers and the mask again under the new copy and delete the old. The reason I'm asking this is the following: i have got multiple pictures/projects where a want to use the same effects on only a selection of the picture but not always the same selection. A copy/paste of the layers with a empty mask to the top of the original layer(s) and direct masking with the brush would be very convenient. I have also looked at exporting and importing LUT, but the disadvantage is that you can not adjust the layers anymore. Thanx in advance Smittie
-
 i stumbled upon this tutorial, that describes how to make complex selections in photoshop: https://www.youtube.com/watch?v=zQ2ONalr2yE the teacher explains how to remove the background of an image, when the subject has a complex shape (in the example, the subject is a model with curly hair). he uses the blue channel to get a high contrast image and create a mask selecting the shadows. then, he inverts the selection to isolate the white background and applies the mask to the image. until now, everything can be done in AP. however, at about 7:41, the teacher does something i am not able to reproduce: in order to get rid of the thin background left around the curls here and there, he creates a new layer, changes its blend mode to darken, and sets it as a clipping mask for the image layer (and its mask). then, he shows that cloning from the hair to those background areas, they are filled with the hair colour and texture, and the clipping mask prevents painting where it's not needed. well, is it possible to create such a clipping mask in AP? i know how to use objects as clipping masks, but it's a different context. i could not find a way to go on. any help will be really appreciated.
 -
Another tutorial. Enjoy.. :) Changing eye color using shape tool as a mask.. https://youtu.be/g2DvaGwBdEY
-
 Sharpening with an edge mask 1. This is a portrait after RAW conversion with standard sharpening applied to eliminate anti-aliasing from the sensor. The image is sharp, but not tack sharp. I will improve on this by using a sharpen filter in Affinity Photo. The problem is, that the effect is applied globally to the entire photo. Smooth gradients, like the skin will be affected also and in most cases this is not desireable. Therefore, I will show you a way to create an edge mask, which allows to only sharpen the edges and leave the gradient portions of an image intact.
-
 Hello, supports Affinity Photo the "Selected Areas" option? Example: http://adobe.ly/1Ob3PLz (Photoshop Help | Create a temporary quick mask -> Selected Areas) Thanks! :) Carsten
 -
 In this tutorial we look at a family portrait and how to swap out the face of one of the kids who doesn't look to happy. Enjoy... How to swap out a face Allan
 -
 Hi, I've just started using Affinity. I've create an FX layer with Gaussian Blur, and then created a mask on this layer so I can selectively control the effect. I'm finding both the pencil and erase tools are painting on the mask. My reading of the manual online suggests the erase tool should clear the mask. I've opened up the make layer so I can see it using the alt key. There I can see both tools paint on the mask. Is this expected behaviour - should I do something else to clear the mask after painting on it? Am I doing something wrong? thanks
 -
 Good Evening, i tried to achieve a certain pattern on top of my picture. Something like this: http://xpertpoin8.com Unfortunately I couldn't find any tutorial explaining it (or I just didn't know exactly what to search for)! Any explanation or tutorial is highly appreciated! Kind regards jounas
 -
I am voicing my request again for editable spare channels to create custom masking as seen here. Presently I can do it and I've actually gotten it down. But it would be so much easier if we could have editable channels. Instead of 4-6 steps it could be done in 1!!! Please Please consider!
-
 Hi, Just starting out evaluating the AP trial against my current editor (PS CS6). Very impressed so far; hugely impressed with your work. I primarily use Curves and Levels adjustment masks in my work. Using a Levels adjustment mask in PS CS6 and adjusting the Black and White levels, I can see a full-image clipping indication mask if I hold down ALT while adjusting. This is a really helpful tool. Is there an equivalent for this in AP? I tried holding down ALT while adjusting black/white sliders but there was no effect. I also tried the other modifier keys (Shift, Cmd etc), but also no effect. I'm using AP Trial v1.3.5 on a late 2012 Mac Mini running OS X 10.10.5. Many thanks, Matt
 -
 Hey guys, is there any possibility to create a mask for embedded object or vector layer? Every time I try to paint into that mask it creates a new pixel layer. I don't wanna rasterize that layer. Thank you for your time!
 -
 Hello! Is there anyway to "unlink" a Layer Mask so you can move the clipped content independent of the mask?
 -
 Hi, Slightly confused here. Making masks based on hair selections - created 'new layer with mask' and the like, tried a few variations. Free mask, to 'restore' the layer back to the unmasked version, but... The now unmasked layer has completely destroyed and messy edges around where the mask use to be? I'm guessing that this is as designed, and something that AF does in order to smooth the pixels where the masking occurs? Could anyone confirm this, and is there an easy way to get the original lay back, without the modified edges? Thanks! Wayne
 -
 Hello, I want to mask an image with a gradient. If I do this the image look's like that.. (Attachment #1) It's destory the colors or so.. But if I rasterise the image (with mask) then it look's normal. (Attachment #2) Why? Thanks in advance!
-
 It is very often that I want to use a shape mask to hide elements sticking out from the edges of the designated area. However alot of the time I also would like to add a border around this shaped area but as its a mask there doesnt seem to be anyway to do this.
 -
 I'm a bit confounded on what should be a pretty basic function. I can't figure out how to modify / transform a layer but not affect the mask. For example, I'm using a mask to crop a section of a photo. I like where the mask is but the position of the photo needs to be adjusted. How to I move / resizes the image but maintain the position / size of the mask? Thanks!
 -
 I am a novice. I have been using the File, Place tool to place fairy wing overlay document png type (invisible background layer) files over background images, and then using the erase brush tool to clean up (erase the overlay) from the face and chest area. Its worked beautifully for days, but today it does not work for me, and I can't figure out why its changed? I did notice the assistant started coming on, with notes about rasterising the layer, but I selected to undo the action, and the assistant is disabled. I thought this would stop my issue. I think I want to be able to erase from a vector layer freely.... So, my process has been to open my picture, place my png overlay, and erase any "interference" over the subject's face... in PS I learned only briefly to use the paint brush tool to paint the overly in black over the overlay to "reveal" the area underneath, but that technique is not working either.... Thanks, OnTheWander
 -
Not sure if requested... but I would like to see a Lock and Unlock feature for Layer Masks to the layer. Similar to PS where unlocked masks allows you to move object/img within the mask. Thank you Serif Gods :wub:
-
There are times when I might like one part of a selection to be more opaque than another, and being able to select this area and increase or decrease the opacity by changing its color in the layer mask is really useful. Supporting the black/white layer masks where editing the colors changes the opacity would be greatly appreciated. Or maybe I'm missing the trick. Been searching tutorials for several days (on and off as I have time) and haven't found it. Maybe the answer just lies in a more advanced tutorial for using your mask techniques (for ex-photoshop'ers!). Great app, and please keep up the good work. I don't mind paying for updates as you develop this because I do hope that I can one day throw one of your competitors subscription-based services in the trash. Thank you!
-
 Changing a blend mode from normal to overlay does not work when painting on a mask. Does anyone know how to do this?