Search the Community
Showing results for tags 'Macro'.
-
I love the way some sliders are working, this method allows better and fine controls. But the slider in Live Gaussian Blur is almost at middle when is set at 10px When this control is exposed in a Macro we loose that level of fine control. I wold propose to make it either way but to be the same way in both places because is confusing if you use macros a lot.

-
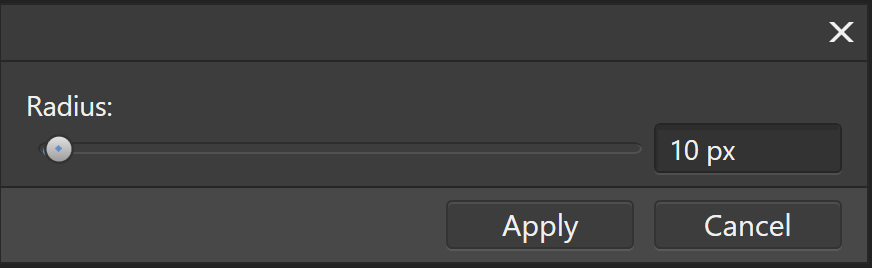
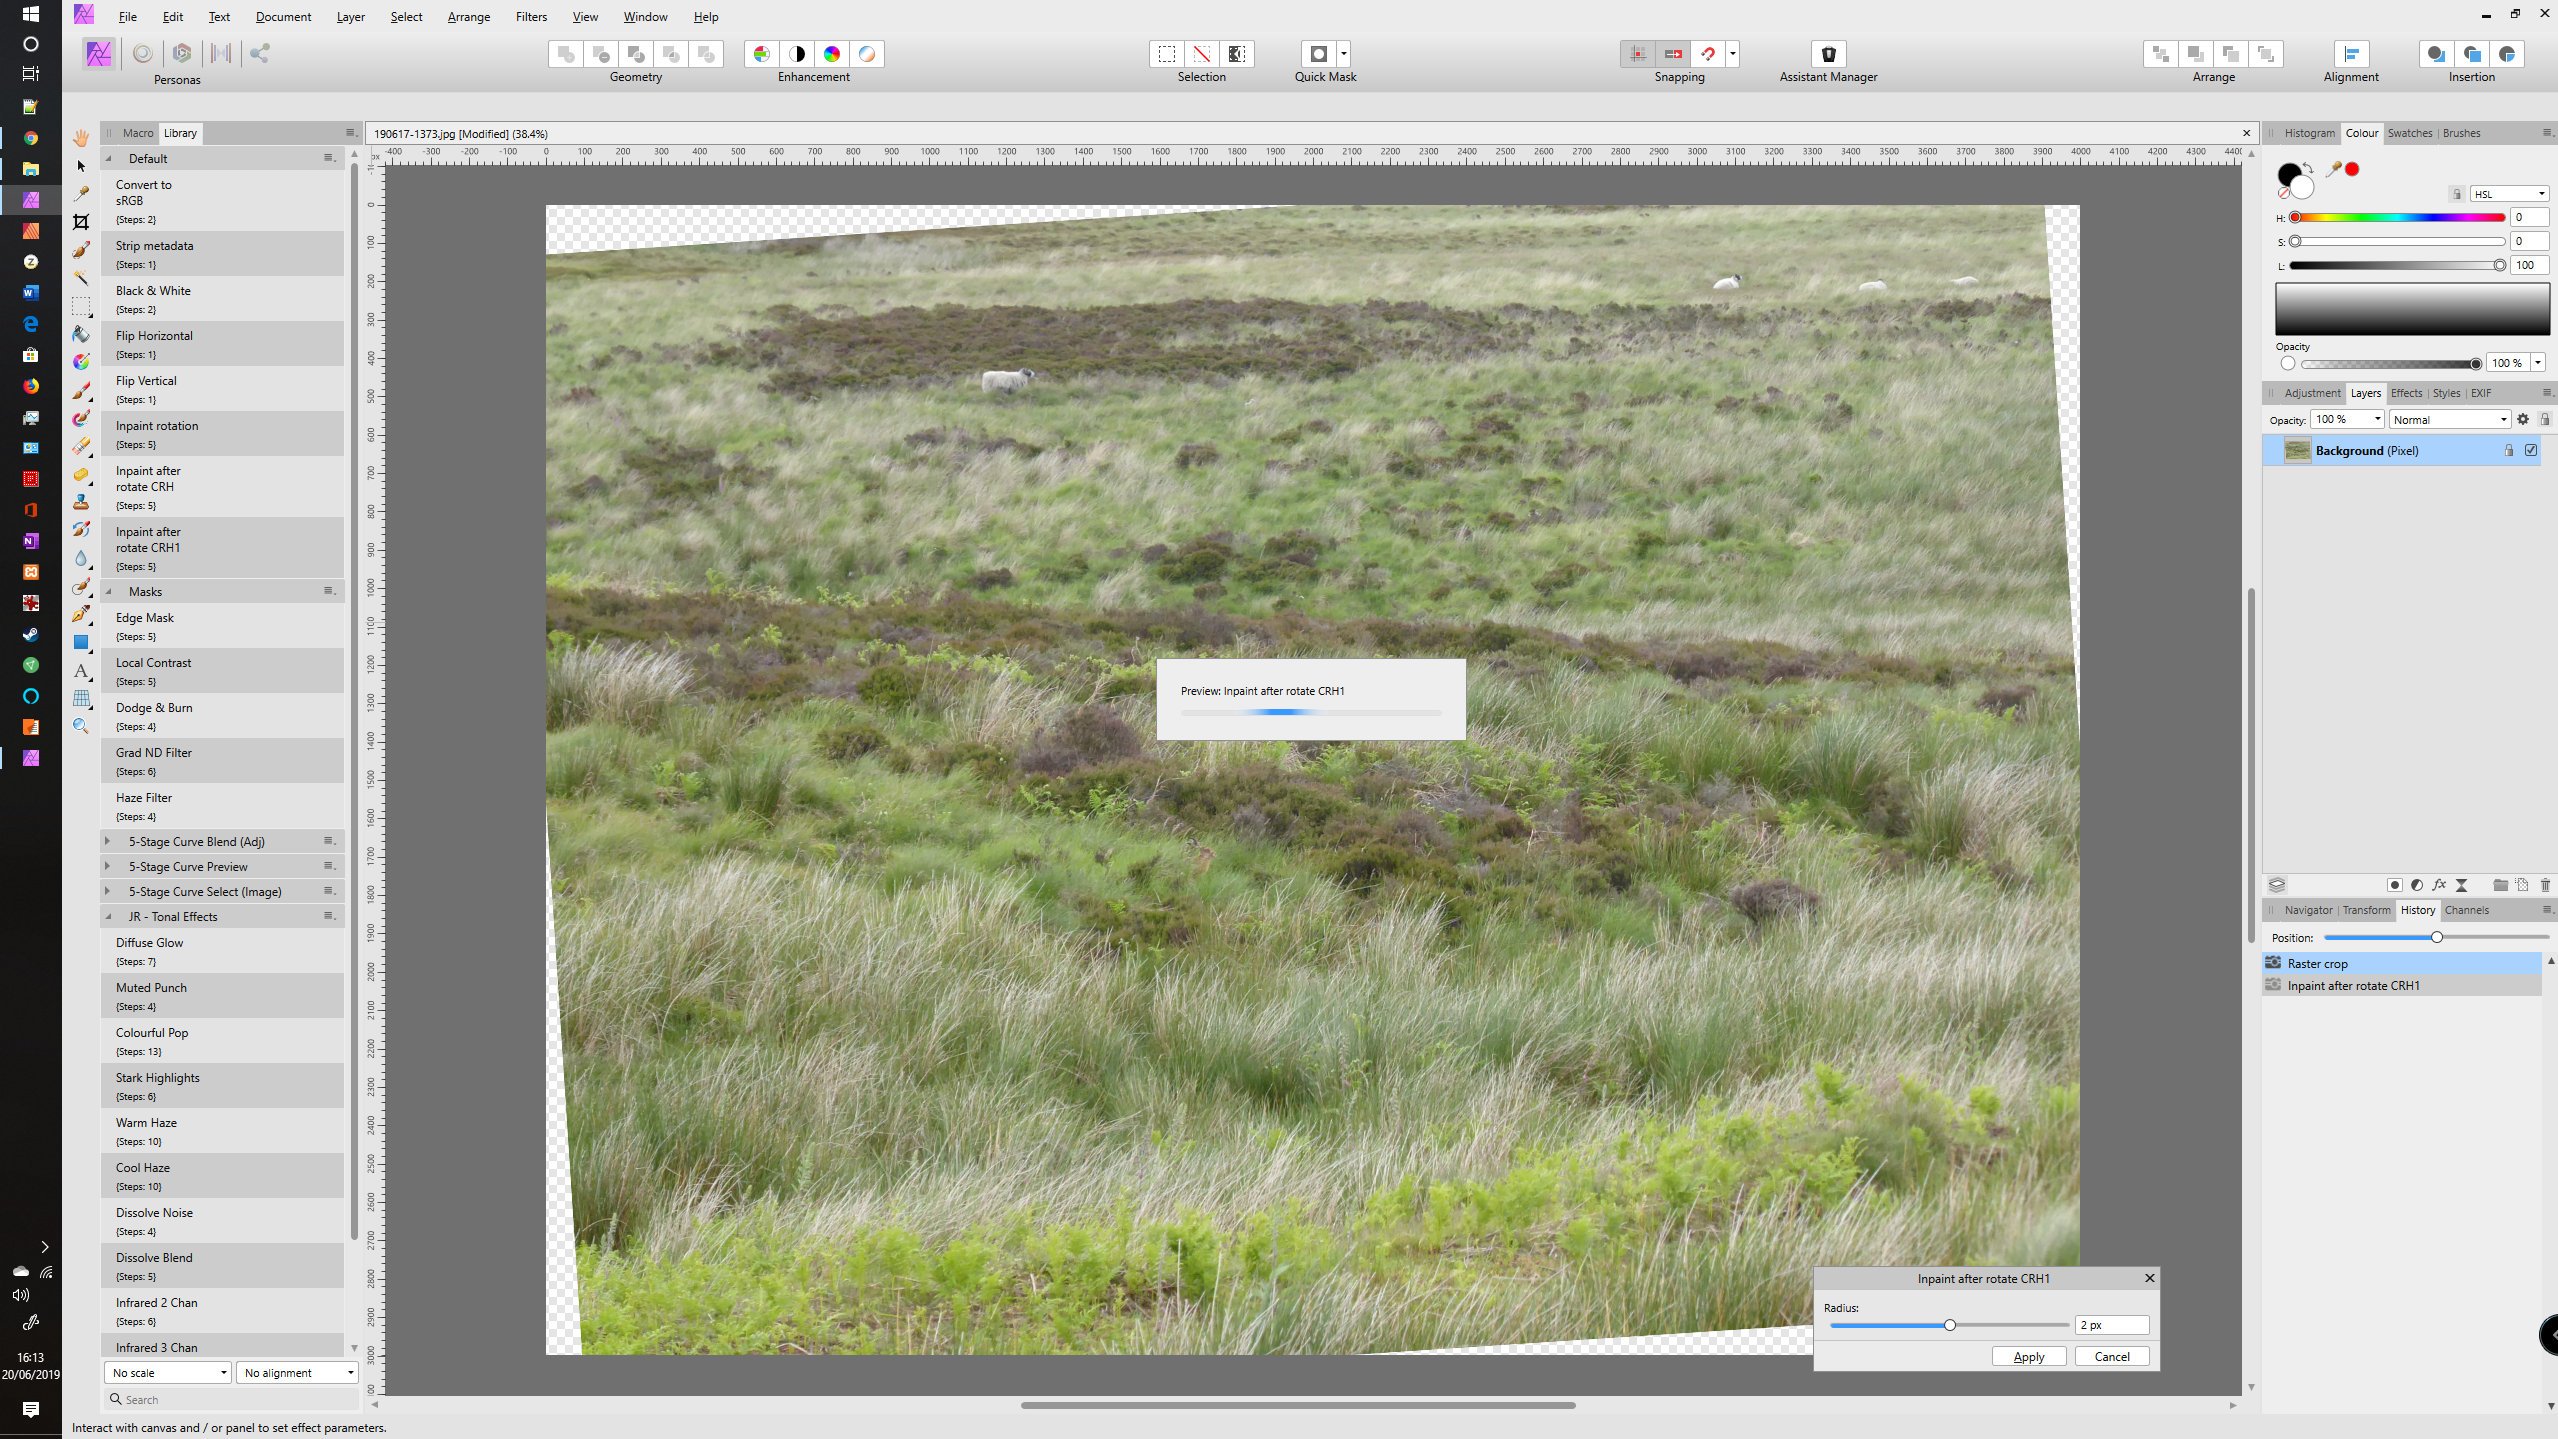
 Affinity Photo v1.7.1.404 (Windows) After viewing the macro tutorial video I generated the macro following the steps then clicked the settings icon to activate user interaction on how much to grow the selections before triggering the inpainting process. When I run the macro it displays a box with the text Preview: Inpaint after Rotate CRH1, as well as the Grow/Shrink radius settings dialogue box. However, after a couple of seconds the macro continues without waiting for the user input (that is, I haven't clicked the Apply button) & completes the operation with the settings dialogue still visible. If I then click the Cancel button the macro actions are undone, or if I click the Apply button it seems to run the macro a second time, although nothing changes. In the tutorial video a Preview box is not seen, so I do not understand why it appears when I run the macro. Also, I was expecting the macro to wait until I click the Apply button. Is the macro behaving as expected, & if so, how do I get it to let me change the grow/shrink radius value interactively when running it? I attach a screenshot showing the two boxes as described above, & the .afmacro file of the exported macro. crh1.afmacro
-
Not too long ago, in a land not very far away, I came across the concept of focus merges to dramatically increase depth-of-field of photos, especially macro ones. This was one of the reasons I bought Affinity Photo, as having learned the technique I had a requirement for affordable software the could do a good job of a focus merge. The focus merges I have done thus far have typically been hand-held and of fairly large 'macro' subjects such as mushrooms and flowers. Generally, these consist of 10-30 shots that Affinity Photo churns through and merges in very short order. Due to the hand-holding, there are often a few ghosting artefacts around some edges, but nothing that a bit of AffinityPhotoShopping can't sort out. Yesterday, I came across an unfortunately-demised beetle which seemed to be a perfect opportunity to try a more technical, tripod based, photo merge. One of the reasons for this post is to showcase the ability of Affinity Photo which coped with a quite staggering amount of data (the other reason is a desire to share what I think is a quite stonking photo!). To achieve the focus merge, I took 270 20-megapixel raw photos, totalling 7.8 GB of data. These I then processed into 16 bit/channel PNGs using RawTherapee which came to 24.7 GB. I then fed them into Affinity Photo's Focus Merge and let it churn away. It took just over 1.5 hours to complete the merge, and I'm very pleased with the results: In case anyone is interested in the hardware involved, here's the list: Camera: Panasonic DC-G9 Lens: Olympus 60mm f/2.8 Macro Images shot at: 0.5 sec, f/3.5, ISO 200 CPU: AMD Ryzen 1500X RAM: 16 GB DDR4 2666 GPU: nVidia Geforce GTX 970 I largely seemed to be CPU-bound during the various processing stages. Memory usage from RawTherapee and Affinity Photo pottered around the 2-3 GB mark; RawTherapee thrashed all 4 cores / 8 threads in the Raw -> PNG conversion (but still took ages; I left it going over night, so I don't know quite how long...) , whilst Affinity Photo used 1 core / 2 threads for the stack. A lower core count / faster GHz processor would therefore seem to be an advantage during the stacking process in Affinity Photo, whilst RawTherapee clearly liked all the cores it could get it's sticky little paws on. I included my GPU in the list as Affinity Photo does seem to use it a bit: 5-8% GPU activity shows up in Task Manager during Focus Merges; I've no idea if it makes a difference though. In conclusion, I'm very impressed with the ability of Affinity Photo to deal with huge amounts of data without choking. A few more threads might be nice though
- 9 replies
-
- 8
-

-
- beetle
- focus merge
- (and 1 more)
-
 Hi folks. First post from me, a long-time Photoshop/Lightroom user making the transition. I've had AP for a couple of weeks and been leaning a lot. It's an impressive product. I'm hoping the community can help me with information about how to perform a seemingly simple task. I have looked for answers here and elsewhere to no avail. Here we go: I give clients screen-res images at a standard height or width. I have Lightroom set up with 2 different export presets. Landscape orientation images are always exported at 1920 px across. Portrait orientation images are always exported at 1080 px high. Regardless of what aspect ration I choose to crop, LR is able to calculate the required variable dimension opposite the fixed dimension. How can I do similar in AP? I tried to set up a macro, however I can't define just one aspect in pixels and leave the other aspect value blank. I frequently crop at different aspect ratios based on how the image "feels". This means that I'd have to create a different macro for each aspect ratio in AP. Hopefully somebody can tell me how to do this. Thanks, Frank
 -
 I've got a bunch of files exported from Affinity Publisher that have all come out at the wrong DPI (all exported images are 96 DPI despite the documents being 72 DPI). As I can't seem to find a solution to that, and I've already exported a bunch of assets, I'm attempting to fix these images via a macro and a batch process. Unfortunately, it doesn't seem like that's going to be viable either. The only way I've found to change the document DPI is through the resize document method, but this is unsuitable for use in a macro. When you run the "resize document" as a macro, it attempts to replicate the exact settings of the recording. This means instead of adjusting the DPI, and resizing the document in relation to that DPI change, it sets the DPI and scales the document to match the original documents size was at the time of recording. Is this intended behaviour? Could there be another way of approaching this?
 -
This is an updated version of the Polar Quadrant macro I have posted earlier. Consider a rectangular image that you would like to bend into an arc: The macro has two parameters. The first (a or Sector Width) controls the fraction of a circle that the altered image will occupy. The default value of 1 produces an arc of one eighth of a circle. Reducing this to 0.5 gives one quarter of a circle. This image this parameter set to 0.5: The second parameter (b or Height below Top) controls the position of the centre of the circle. Setting this to 1 places the centre at the bottom edge of the image. Reducing the value places the centre above the bottom, thereby reducing the radius. The following image has this parameter set to 0.75 (and the first to 0.5): A few notes: The parts of the final image outside the sector are transparent. The parts within the sector retain the original background colour. The macro works with the latest 1.7 Beta (333). I have tried to set both the default parameters to 1. However, in the 1.6 version, it insists on setting the default of the second parameter to zero which gives you a blank output! You will need to increase this second parameter. It seems to perform properly in the 1.7 beta. The image layer is rasterized at the start of the macro. If you apply a small value of the Height below Top parameter (below 0.5), You will get a partial (or even full) mirror image in the bottom part of the screen. I have left this, since some users might want to utilise it. Otherwise you can crop the image. The macro comprises a rasterization followed by Filter > Distort > Equations with the following lines for x and y: x=w*atan((x-w/2)/(h*b-y))/(180/pi/a)+w/2 y=h*b-sqrt((x-w/2)^2+(h*b-y)^2) Here are the macro and macro library (containing the one macro). Arcs and Arches.afmacros Polar Sector.afmacro John
-
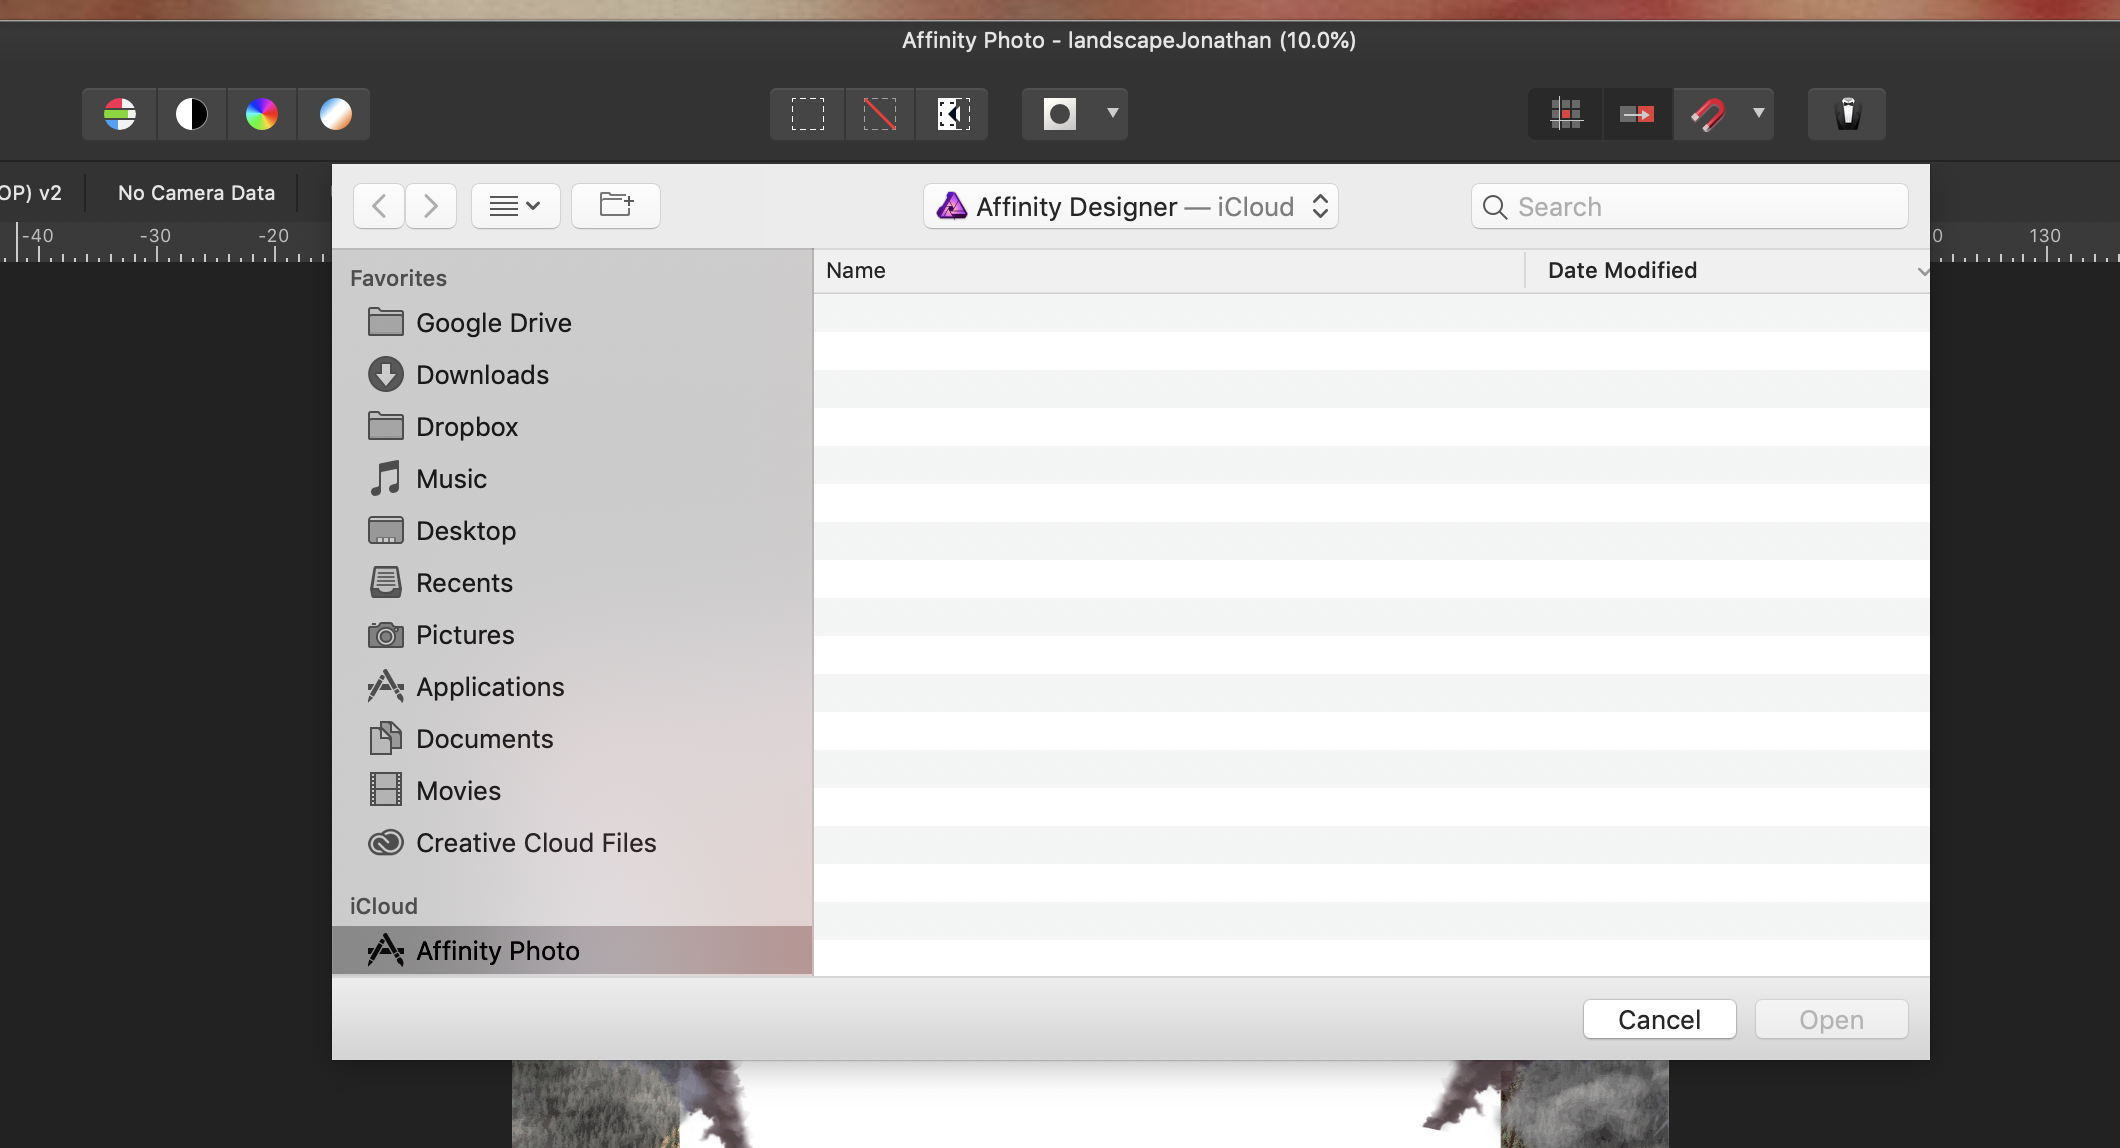
 So, I try to import a macro in my program and this window appears but I don't even know where this file is located or if it even exists? I would like to copy them in this file so they could be linked anywhere on my mac or my iPad in a near future. To specify, I think it requires to copy my macros into this unknown file to be able to import them at all.
-
 I wrote a macro to convert an image using a Cartesian to Polar conversion. It worked well in 1.6 and I describe it here. I have just tried it in the 1.7 beta and it no longer works. The output is a series of concentric colours, as if just the central axis has been rotated. I have tried running the original macro and also re-creating the macro with the same Equations. John
 -
 Hi, my macros all suddenly disappeared while I was working on some pictures. I have reinstalled the latest 1.6.5 version, but doesn't even load the standard macros - check pic attached. I use Windows 10. Any suggestions? Thanks
-
 Is there a way to insert/create a copyright/watermark in Affinity Photo please?
 -
I have created several new macros. However, when I wish to enter them into a new category I get an error as follows: Click on the hamburger menu at the top of the Library Panel. Select Create New Category. This creates a new category called Macros. Click on the Hamburger menu for this new category.Select Rename. I now get an error message saying "You already have a macro category named 'Macros'.Please choose another name." (Note the lack of space between Macros and Please.) I now click on Close and I am now able to choose another name. Needless to say, I do not already have a category called 'Macros'. John
-
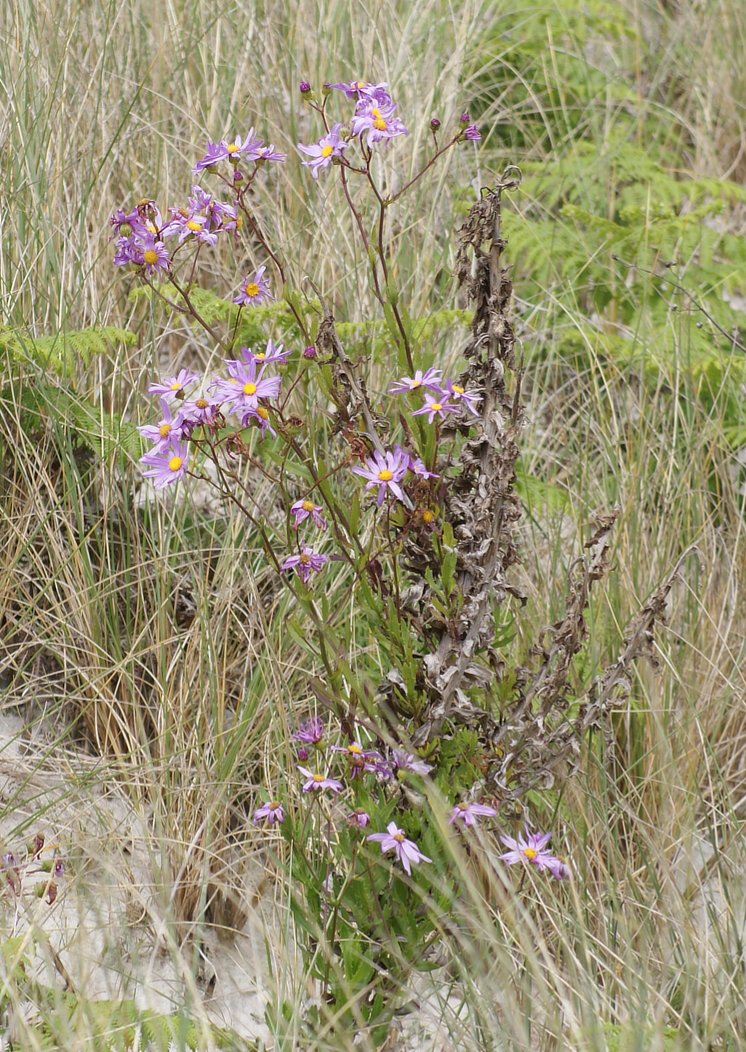
I was prompted to create this macro by a recent posting asking about haziness as result of the output of an aircraft engine. My initial efforts were also trying to emulate the effects of hammered glass. Here is a macro that creates a general fuzziness effect which could possibly be used in the contexts mentioned above. Fuzziness is a category containing just one macro: General Fuzziness. Fuzziness.afmacros General Fuzziness.afmacro There are three parameters: Wavelength controls the number of cells across the image. Noisiness controls the amount of random noise applied to the cell sizes. Amplitude controls the overall intensity of the effect. Here is an example as applied to an image of a Sea Aster flower: . With the parameters at half strength: and with the parameters at full strength. I would envisage that you would use this effect on just part of an image. John
-
 Good morning folks I,ve been trying to make a watermark macro to use on my photos without much success.I have made a macro and added it to the library but when I try to add it to a photo nothing happens.I would be grateful if someone could let me know the correct procedure.Many thanks
 -
 Hi AP folk, I have had AP since it's release but am just now starting to phase out my use of PS CS5 and replace it with AP as my main photo software. One of the functions I am having difficulty with though is placing a signature on my photos in a batch process using a macro. I have a macro that downsizes, then runs a high pass sharpening filter and I then want to add a signature in the bottom right of the photo. I read in a forum somewhere that AP doesn't allow a text layer to be added in a macro ( I have had the error message when trying to do it it) so I created a brush that is my signature. The brush works when I use it recording the macro but when I run the macro on a batch of photos it doesn't place the signature on the photo. What have I done wrong ? Is it possible to put a signature/text on photos as part of a macro to batch process ? Regards Ian Colley
 -
I have afmacros but I coludn't import them. The Photo is needed afmacro. I renamed them to .afmacro from .afmacros but no work.
-
Hello guys. I left this feature request in the image-line forums, for the music production software FL Studio, so, I would love to have the following feature in Affinity as well. It's the ability to program commands or extensions like programs like Microsoft Office, Adobe Flash/Animate, Microsoft VS Code, etc. It would be really useful to be able to create commands to automatize tasks, in either Python, C# or Javascript language. (I'd said mostly C#, but Python would be good because of its simple syntax). This will benefit greatly the Affinity/Serif developers, because they would only need to focus on fixing bugs mostly, and us community programmers could contribute by creating these commands and extensions so, the amount of features request should decrease. For example, one crucial extension would be we type a text in a input textfield/dialog, and it splits that text by the spaces and create {n} amount of textfields with the split words. Also, search layers by layer description/name/title or by another search query like hidden, locked, blend mode, or layer containing {x} FX, or search all layers of type textfield, or search all pixel layers, etc. There are so many tools we need to automatize task that us programmers could easily implement. Can someone from Affinity confirm if there is any plan of including this feature, or at least, if they would at least consider implementing it in like version 2.x? Thank you!
-
 We are often working with many various photos in a specific way. Often performed operation, after the whole process of photo editing is adding border. Let's say, that border have to be 40px at each direction for 800px image. I have created a macro with using FX Outline option - maybe there are better ways to do it? Change Document properties - uncheck the Transparent background in the Document menu. Enable the Outline FX effect. Set radius to some pixel value... and this it's strange, because it must be 39px to get proper width of 880px for bordered image from 800px image. 40px is resulting in 882px image. Why is that? Set FX Outline colour to white. Clip Canvas. Is there an option to change a default colour of the document background, or it must be white? White is good for us for now, but it's good to know Next question is a little different, but also is close to our specific workflow with these photos. Is there a way to clip a photo as described below? We have a product photo with the white(or other), solid background. We choose some option to crop the image to content with ignoring pixels of the the background. Result is: Cropped solid background to the pixels of the product - It detects solid colour around the different pixels of the product accumulated at the middle of the document. For example, we have such option in Gimp: Image > Crop to Content.
 -
 I know this feature has been requested before (macros/actions), but it's not quite there yet for my needs. With the 1.5 update, Affinity Photo does have a basic macro recording function now, but it still does not eliminate the need for Photoshop from my workflow until I can assign custom keyboard shortcuts to the macros for rapid playback! I've been very impressed with Affinity Photo so far, and I really want to see it become a "Photoshop Killer"! I work in entertainment press photography, and we typically edit around 100-200 photos a night from an average movie premiere/event, or up to 1000 photos from a major awards show. We work at a rapid pace and on very tight deadlines, so speed is critical. My typical workflow in Photoshop ... - I need to be able to eyeball every single photo in a set and make rapid corrections with a series of keyboard shortcuts. Batch processing might work for some jobs, but looking at every single photo to make adjustments quickly is also frequently needed. - I usually open 200 photos in Photoshop at a time (Photoshop's limit) in a cascading stack, then do corrections to levels, sharpness, and maybe slight color correction if needed. - Save/close the file as JPEG 8, 300dpi at 3000x2000 px (Saved while closing the file with COMMAND-W on Mac) - Repeat until I'm done with all 200, and then work on an addition 200 files if needed - Then caption all the photos with the name of the person/people using Photo Mechanic What I would love to see in Affinity Photo is the same rapid editing ability that Photoshop has. For example, I would love to be able to assign a keyboard shortcut to macros/actions that do something like the following: CTRL-SHIFT-F1 - Auto Brightness/Contrast CTRL-SHIFT-F2 - Brighten 10% CTRL-SHIFT-F3 - Brighten 20% CTRL-SHIFT-F4 - Auto Color Temp CTRL-SHIFT-F5 - De-Orange CTRL-SHIFT-F6 - De-Blue CTRL-SHIFT-F7 - Auto Sharpen CTRL-SHIFT-F8 - Sharpen 10% CTRL-SHIFT-F9 - Sharpen 20% CTRL-ALT-L - Last Used Level Adjustment CTRL-ALT-C - Last Used Color Correction CTRL-ALT-U - Last Used Sharpness Adjustment I think you get the idea :-) Another feature I would love to see is IPTC data creation/editing (or even basic awareness, passthrough). It's not an absolute must for me, since I use Photo Mechanic, which does an amazing job. However, I would not like to have a situation pop up where maybe I need to go back and do a quick edit to a file that has already been captioned in Photo Mechanic, but Affinity Photo doesn't save the existing IPTC data that's already in the file (ie. strips that info out). That would be "no bueno"! Thanks for listening!
 -
I have recently been developing a macro to create ripples in a reflective water surface. Here is an example using the screes besides Wastwater in the English Lake District. The original was a scanned very old slide (with the accompanying loss of quality), but I thought it lent itself to this treatment. I flipped the image of the scree and applied the ripples macro to it before merging the two. John
-
I have updated my Ripples macro originally posted under Tutorials. I am now posting under Resources, since it is really delivering a sort-of-finished product rather than a 'How to'. The new version has three parameters: a controls vertical spacing of the ripples. Reducing the a parameter increases the ripple frequency (reduces the wavelength). b controls the horizontal variation of ripple amplitude across the width of the image. Small values of b make the ripples change a lot across the image. For large values (~=1) the changes cycle two or three times across the image. c affects ripple complexity. This is very much a suck-it-and-see parameter. A value of one adds no complexity, a vale of 1 does. Here is an original image (Tewkesbury Mill inverted): And with the macro applid with a-1, b=0.5 and c-0.5: I have to admit that the results I have had with this macro are varied. Sometimes it is very impressive, but for other images it is definitely not! Here is the macro as a single file and as a library: Ripples.afmacro Ripples.afmacros I have been looking at the Distortions macro in the Macro Pack with mixed results. I have got it to perform, but not consistently. It appears to have no visible effect on the Tewkesbury Mill image. John
-
 Hi I know there have been topics on batch processing but I keep hitting a problem, I'm wanting to resize and watermark my photos to send to clients, but when recording the macro it says it can not record the save instruction in the macro. is there a workaround for this, as it basically means you can not do any batch processing even though the option is there.
-
Hi, Is there a way to have border in macro which will be +100px to current image size ? How to define that ? Regards, Greg
-
 How can one group multiple layers in a Macro? I can record a Group operation, but what is the envisioned usage of that if I am unable to have more than one layer selected before it. Also doesn't seem possible to record moving a layer into a group.
 -
 Hey, i was creating basic dodge and burn macro for myself but started thinking that is there way to set shortcut key for macros? Would be awesome.